
Chapter 6. Administrative AAA on IOS
This chapter covers the following subjects:
• Introduction to Administrative Sessions, Authentication, and Privilege Levels
• Enabling AAA on IOS
• Method Lists
• Authentication of Administrative Sessions
• Troubleshooting Authentication
• Authorization of Administrative Sessions
• Command Authorization
• Troubleshooting Authorization
• Accounting of Administrative Sessions and Commands
Previous chapters provided you with the opportunity to become familiar with ACS 4.2 and 5.1, depending on what you are using in your workplace. This chapter begins discussing how to use AAA to accomplish various administrative tasks on Cisco IOS devices. This chapter explores the way a router is accessible for management and how those points of management are handled by default. You will then look at local users and how to authenticate them, followed by a lab scenario of creating and using a privilege level. After the local lab scenario, this chapter moves into a discussion of external AAA and various configurations of authentications to the AAA Server, as well as Authorization and Accounting. You will also learn valuable troubleshooting techniques in this chapter.
Local Database
Cisco IOS provides four methods for administrative access—console, vty, auxiliary, and HTTP. Administrative access is granted based on Username and/or Password. By default, the console port is usually unprotected to allow initial configuration. Access to vty port is not allowed until a password, called the line password, is manually configured using the following commands:
Router(config)#line vty 0 4
Router(config-line)#password password
You can create a database of users in the router, called the local database, and use it to authenticate administrative sessions instead of using just a password. To add a user to the local database, use the following command in the global configuration mode:
username user password password
After creating the database, you will need to configure the router to use the local database for authentication instead of the line password. To do this, use the following commands:
line {console | vty | aux} line_number [line_number_end]
login authentication local
Note
As soon as this command is entered, the authentication prompt on login will change from Password to Username. If a local database does not exist, you will not be able to log in to the device.
Similar to the console, vty, and auxiliary lines, the built-in HTTP server can be configured to use the local database for authentication using the following command:
ip http authentication local
Privilege Levels
All the users in the local database that you just created have an equal level of access. It is usually desired to have different levels of access for users depending on their job role, experience, and so on. Such authorization can also be configured on the device without an AAA server.
For this, IOS provides 16 levels of access, called privilege levels. The number of commands available to a user depends on the privilege level. Higher privilege levels provide more commands.
By default, the following three levels are defined on the device:
• privilege level 0: Includes the disable, enable, exit, help, and logout commands. You cannot really access this level because after login, the first level accessible is level 1. Hence, the commands defined in this level are available to all users and do not affect the configuration of the device.
• privilege level 1: Normal level on Telnet; includes all user-level commands at the router> prompt. This level is also known as User-EXEC mode. Commands at this level do not affect the configuration of the device.
• privilege level 15: Includes all enable-level commands at the router# prompt. At this level, all commands are available and any configuration can be viewed or changed. This level is also known as Privileged-EXEC mode.
When you log in to a device using Telnet or Console, you arrive at level 1 after authentication. To get to level 15, you have to use the enable command and enter the configured enable secret. The enable secret is configured using the following command in the global configuration mode:
enable secret password
As you already know, all commands that can change configuration of the device are available at level 15. Access to this level is not something that you will want to give to everyone. To provide differential access, you will need to reduce the privilege level of a command from 15 to one of the custom levels (2 to 14). For example, if you want user1 to be able to use the clock command, you will need to reduce the privilege level of the command. After that, user1 can access the custom level and use the clock command. The user will not have access to any other level 15 commands.
To enter the custom privilege level, the users will need an enable secret for that level. Enable secret for a custom level can be configured using the following command:
enable secret level level password
To enter the custom privilege level, users have to use the following command at level 1:
enable level
To reduce the privilege level of a command and make it available at a lower privilege level, use the following global configuration command:
privilege mode [all] level level command
Table 6-1 explains the command syntax.
Table 6-1. Syntax Description: Privilege Command

Example 6-1 shows the configuration required to create a custom level 2 where the users have access to level 15 commands show running-config, configure, hostname, and clock.
Example 6-1. Custom Level Configuration

Note
When the privilege level of show running-config command is reduced, users at the custom level will not be able to see the entire configuration. Users will see only the configuration related to the commands they can execute.
Lab Scenario #1: Local Authentication and Privilege Levels
XYZ Inc. is installing a new router in a small network. It has basic access restriction in place using vty and console line passwords. The company wants to use a local database now. It also wants to configure level 5 on IOS, such that users at this level can shut down interfaces and change interface duplex and speed. Your task is to configure the router to support that requirement. In addition, user1 and user2 with a password of abcd should exist in the local database. The enable secret for level 5 should be limited.
Lab Setup
This lab scenario requires any device running Cisco IOS. IP connectivity is not necessary because verification can be done using the console port.
Lab Solution
Step 1. Add users in the local database:
Router(config)#username user1 password abcd
Router(config)#username user2 password abcd
Step 2. Create an enable secret for level 5:
Router(config)#enable secret level 5 limited
Step 3. Change privilege level for the required commands:

Lab Verification
To verify the solution, login to the device and enter level 5. You should have default, duplex, exit, help, no, shutdown, and speed commands available in the interface configuration mode. You can verify this using the ? command at the mode.
Using AAA
In the previous sections you learned how to use the local database and privilege levels on IOS to secure access to the device. When you have a large number of network devices, it is difficult to manage access information. Imagine adding a new user on 100 devices! For such situations, you can make use of the AAA framework on IOS and authenticate and authorize users using TACACS+ or RADIUS.
Note
IOS supports both TACACS+ and RADIUS for administrative AAA but using TACACS+ is highly recommended due to support of command authorization.
By default, the AAA model is disabled on IOS. To enable AAA, enter the following command in global configuration mode of a Cisco router:
Router(config)#aaa new-model
Note
As soon as AAA model is enabled, it will overwrite every other authentication method configured on the lines and default to authentication using local database. We cannot stress enough the importance of having a local user configured before enabling AAA. Failure to do so can lead to unwanted password recovery procedure in certain situations.
You can disable AAA functionality with a single command. To disable AAA, use the following command in global configuration mode:
Router(config)#no aaa new-model
Note
When the AAA model is disabled, all AAA configurations remain in the memory and are applied back when the AAA model is re-enabled. This can cause problems if the device is off network or AAA servers are unreachable. We recommend removing all AAA configurations before disabling the AAA model.
Before you can configure authentication using AAA, you need to add the IP address, shared secret key, and optionally the port of the AAA server to be used. To add the server details, use the following command:
radius-server host {hostname | ip-address} [key secret-key] [auth-port number] [acct-port number]
or
tacacs-server host {hostname | ip-address} [key secret-key] [port number]
Note
If you use a hostname, ensure that the device is able to resolve it. Port configuration is optional and you should configure it only if your AAA server is not listening on default ports.
You can add multiple RADIUS or TACACS+ servers. Each new server is added below the previous one. The device will query each server starting from the top until it gets a response.
All the servers added in this fashion form a group called group RADIUS or group TACACS+ depending on the protocol. In effect, group RADIUS contains all the RADIUS servers added in the device and group TACACS+ contains all TACACS+ servers added in the device. Under normal circumstances, these default groups are used for all AAA purposes. In situations where you want to use some servers for a particular type of AAA and some for other types, you will need to create custom server groups and assign the servers to them. To create a custom server group and assign the servers, use the following commands:
Router(config)#aaa group server {radius | tacacs+} group-name
Router(config-sg-radius)#server {hostname | ip-address}
Note
You can assign servers to custom groups only after adding them in the device to the default groups. After the servers have been assigned to the custom server group, they will belong to the custom as well as the default group. They can be used by calling the custom or the default group. An exception to this rule can be made using the server-private command inside the group; however, this will not be discussed here to avoid complication.
From this point, you use a method list to configure what method in which to use AAA. A method list is a list that defines the point of authentication, authorization, or accounting and the method to be used. The section that follows discusses method lists in detail.
Configuring Authentication on IOS Using AAA
After enabling AAA and adding AAA servers, it is finally time to configure authentication. As mentioned earlier, method lists are used to define the method to be used for a point of authentication (also called service). There are many points of authentication, authorization and accounting or services in an IOS device such as login, PPP, enable, and dot1x. Different services are discussed throughout this book.
The syntax for a method list created on a Cisco router is shown here in a generic form:
aaa authentication service {default | list-name} method1 [method2] [method3] ... [methodn]
As you already know, service is the point of authentication, authorization, or accounting that this method applies to. This section looks at authentication of administrative sessions on the console, vty, and aux lines. For this, use the login service.
The second option (list-name) to determine is the name of the list. If default is used, this list applies to all variations of the service. For this case, the default list will apply to the console, vty, aux lines, and HTTP sessions. If default is not used, the list will need to be applied to each variation of service manually. For example, two method lists are created for the login service. One is the default list and another is named MYAUTH. The default list gets applied to console, vty, and aux lines as soon as it is created. The MYAUTH list does nothing unless it is manually applied to one of the lines. At this stage, if MYAUTH list is applied to the console, it will override the default list for the console only. The remaining lines will continue to use the default list.
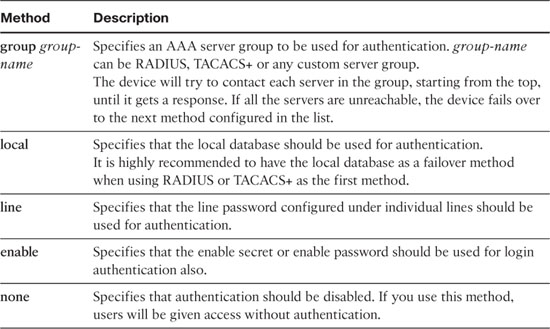
Finally, you must select the method of authentication. The method can be one of the AAA server groups (group RADIUS, group TACACS+, or a custom server group) or any of the local options available for the particular service. If multiple methods are configured, the first option will act as the primary option and the subsequent methods will act as failover options in the order they are specified. Table 6-2 shows the different methods available for the login service.
Table 6-2. Methods Available for Authentication of Login Service
Example 6-2 shows some method lists for the login service.
Example 6-2. Authentication Method Lists for Login Service

Note
The device will use failover methods only when it fails to get a response from the current method. If an authentication failure is received, the device will not failover. The only exception to this rule occurs when the local database is the first option. In such cases, if the username does not exist in the local database, the next configured method is used.
You can apply a named method list to console, vty, or aux line using the following command:
Router(config-line)#login authentication list-name
A named method list can be applied to HTTP sessions using the following command:
Router(config)#ip http authentication aaa login-authentication list-name
Before moving to the next section, take some time to understand the complete configuration given in Example 6-3. This example shows the configuration required to authenticate Telnet and aux lines using TACACS+ with that local database as failover while authentication is disabled on the console.
Example 6-3. Authentication Configuration

Configuring ACS 4.2 and 5.1 for Authentication
Now that you have configured the device for authentication using TACACS+ or RADIUS, it is time to configure ACS to accept the requests from the device and authenticate users. Configuring ACS for authentication of login services requires the following steps:
Step 1. Add the device as an AAA client in ACS.
Step 2. Create a user.
Step 3. (ACS 5.1 only) Create an access service for the authentication request.
You already know how to add an AAA client, create a user, and access services from the coverage in Chapter 3, “Getting Familiar with ACS 4.2,” and Chapter 4, “Getting Familiar with ACS 5.1,” depending on your ACS version. In case you have forgotten, or have skipped the previous chapters, refer to these chapters.
Verifying and Troubleshooting Authentication
During the initial configuration of AAA, the most common reason for failure is a communication problem between the device and the AAA server. A quick way to verify authentication is to use the following command on the device:
test aaa group group-name username password {legacy | new-code}
Note
The legacy and new-code options refer to the TACACS+ code path to use. Newer IOS versions do not have the legacy option. I personally prefer the legacy option because it provides better debugs then the new-code options.
If the user is successfully authenticated, the communication between the device and the AAA server is working properly. If not, check the following:
• The hostname or IP address of the AAA server is correctly added in the device. If you are using hostname, make sure it can be resolved by the device.
• Verify IP communication between the device and the AAA server using ping.
• Ensure that the device can reach the AAA server on TACACS+ or RADIUS ports. A firewall or access list might be blocking these ports.
• Ensure that the shared secret key is same on the device and the server. With TACACS+, the secret key mismatch will be obvious in the AAA server logs; however, with RADIUS, the AAA server will report an authentication failure due to a user password mismatch.
• For ACS 5.1, ensure that an access service is properly configured to authenticate the request.
When troubleshooting authentication, the following debugs are most useful:
debug aaa authentication
debug {tacacs | radius}
The debugs will help pinpoint the problem area. Example 6-4 shows the debug seen when authentication fails due to key mismatch and Example 6-5 shows the debugs seen when the AAA server is unreachable.
Example 6-4. debug aaa authentication and debug tacacs+: Key Mismatch

Example 6-5. debug aaa authentication and debug tacacs+: Server Unreachable

If the device is able to reach the AAA server, the logs on the server will be more useful than debugs to troubleshoot the problem. Chapter 3 and 4 cover the ACS logs in more detail.
Authorization of Administrative Sessions
The previous section taught you how to authenticate administrative sessions using TACACS+ and RADIUS. With such configuration, all users have equal access to the device. As discussed earlier, the level of access should be regulated depending on job role, experience, and so on. For this, you can configure the device to authorize administrative sessions. Authorization will not only determine whether a user has administrative access to the device, it will also determine the level of access a user has. Using Attribute-Value pairs, you can customize the level of access every user has.
Configuring authorization on IOS also involves creating method lists. The authorization method lists are similar to authentication method lists and the generic syntax for them is as follows:
aaa authorization service {default | list-name} method1 [method2] [method3] ... [methodn]
To authorize administrative sessions, you have to use the exec service. A default method list will apply to all administrative services whereas a named method list would need to be applied to console, vty, aux, or HTTP sessions manually.
Note
Authorization does not get applied to console unless the aaa authorization console command is present in the configuration. By default, the command is not present in the configuration.
Table 6-3 shows the different methods available for exec authorization.
Table 6-3. Methods Available for EXEC Authorization

Example 6-6 shows some method lists for EXEC authorization.
Example 6-6. Method Lists for EXEC Authorization

You can apply a named method list to a console, vty, or aux line using the following command:
Router(config-line)#authorization exec list-name
A named method list can be applied to HTTP sessions using the following command:
Router(config)#ip http authentication aaa exec-authorization list-name
Before moving to the next section, consider the configuration given in Example 6-7. This example builds on Example 6-3 and adds EXEC authorization for all administrative sessions except those on the console.
Example 6-7. EXEC Authorization Configuration

Note
If you are wondering why there is no named method list applied on the console for EXEC authorization, recall that authorization does not get applied to the console until the aaa authorization console command is present in the configuration.
Configuring ACS 4.2 and 5.1 for EXEC Authorization
After configuring the device to authorize administrative sessions, you now need to configure ACS to accept these requests, authorize the service, and optionally send additional attributes to customize the access levels.
As mentioned earlier, you can use TACACS+ and RADIUS for authentication, authorization, and accounting of administrative sessions; however, using TACACS+ is highly recommended due to better support for these sessions—especially the ability for command authorization. Hence we will cover only TACACS+ configuration in this section.
When EXEC authorization has been enabled, the device will send a TACACS+ authorization request to the AAA server immediately after authentication to check whether the user is allowed to start an administrative session. So, the user or group profile in ACS 4.2 and the access service in ACS 5.1 should have the Shell (EXEC) service enabled.
To enable the service in ACS 4.2, follow these steps:
Step 1. If you want to enable the service at the user level, ensure that Per-user TACACS+/RADIUS Attributes is enabled in Interface Configuration > Advanced Options.
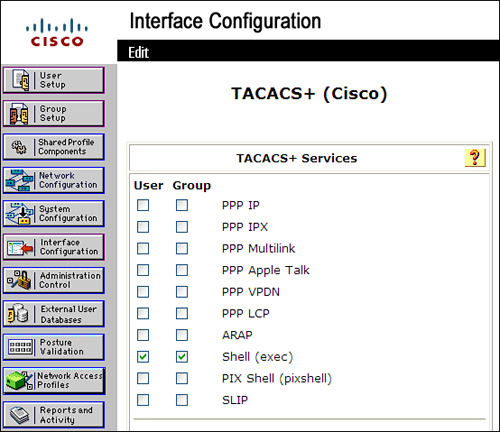
Step 2. Select Interface Configuration > TACACS+ (Cisco IOS) and enable Shell (exec) for User and/or Group, as shown in Figure 6-1.
Figure 6-1. Enabling Shell (EXEC) Service in ACS 4.2
Step 3. If you want to enable the service for the group, select the group in the Group Setup page and click Edit Settings. If you want to enable the service for the user, type the username in User Setup page and click Add/Edit.
Step 4. Scroll down to TACACS+ Settings.
Step 5. Select Shell (Exec), as shown in Figure 6-2.
Figure 6-2. Permitting Shell (EXEC) in an ACS 4.2 Group

Step 6. Select Submit from User Setup page or Submit + Restart from Group Setup page.
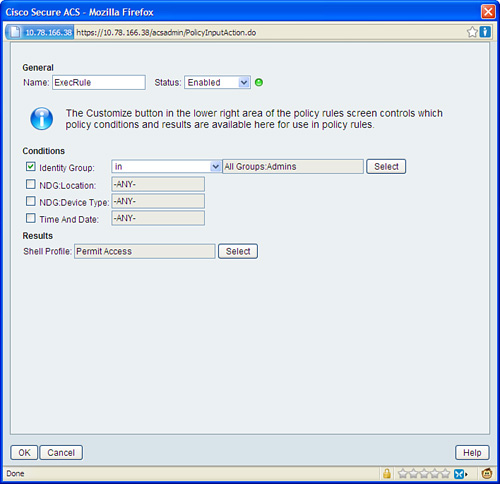
ACS 5.1 has a default access service called Default Device Admin that allows local users to authenticate. It also has a default authorization policy that allows EXEC authorization for all users. Recommend practice dictates changing the default policy and applying the Deny Access shell profile, which you can perform from the Access Policies > Default Device Admin > Authorization page. After changing the default authorization policy, create a new policy as per the following steps:
Step 1. Select Access Policies > Default Device Admin > Authorization and click Create.
This will bring up the policy creation page.
Step 2. Enter a name.
Step 3. Select Identity Group of the users. You also can select any condition that identifies the request.
Step 4. In the Results section, click Select next to Shell Profiles and select Permit Access shell profile from the list.
Figure 6-3 shows the policy creation page after completing the preceding steps.
Figure 6-3. Creating an Authorization Policy for EXEC Authorization
Step 6. Click OK.
This will bring you back to the Authorization Policy page.
Step 7. Click Save Changes.
Note
If you do not want to use the Default Device Admin access service, you can create a new Access Service and configure the Service Selection Rules accordingly. The preceding steps can be repeated for creating an authorization policy inside the new Access Service. For steps to create a new Access Service and changing the Service Selection Rule, see Chapter 4.
Now you know how to configure ACS so that the EXEC authorization is successful. You can also configure ACS to push additional attributes to the device. The following list discusses some of the attributes that you can use to customize the administrative session on a per user or group level:
• Default Privilege Level: Defines the default privilege level of the user. Upon successful authentication and authorization, the user will land in this privilege level instead of level 1. This is a very useful attribute to ensure that users get the correct privilege level on login and do not have to use the enable command. Certain administrative HTTP sessions to the device require this attribute to be set to 15. To configure this attribute, select the Privilege Level option under TACACS+ Settings in the group or user profile in ACS 4.2. In ACS 5.1, the Default Privilege Level attribute is available under the Common Tasks tab when creating or editing a shell profile.
• Auto Command: You can use the Auto Command attribute to send a command from the ACS to the device, which will be executed as soon as authorization is complete. The user will see the output of the command and the session will be closed. In effect, the user does not get an interactive shell. This is a useful feature if you want the user to see a menu or just certain information such as running configuration, version, interface status, and so on. Ensure that you are assigning a default privilege level of 15 if you want to execute a level 15 command such as show running-config. This option is also available under TACACS+ Setting in the group or user profile page in ACS 4.2 and under the Common Tasks tab when creating or editing a shell profile in ACS 5.1.
• Timeout: You can use this attribute to define the absolute timeout of the administrative session for a user in minutes. This option is also available under TACACS+ Setting in the group or user profile page in ACS 4.2 and under the Common Tasks tab when creating or editing a shell profile in ACS 5.1.
• Idle Timeout: You can use this attribute to define the idle timeout value for an administrative session in minutes. This option is also available under TACACS+ Setting in the group or user profile page in ACS 4.2 and under the Common Tasks tab when creating or editing a shell profile in ACS 5.1.
Verifying and Troubleshooting EXEC Authorization
If authentication using TACACS+ is working, authorization usually works well also. Most problems with authorization are due to the absence of required attributes or incorrect attributes or values. If authorization fails, check the following:
• User or group in ACS 4.2 and access service in ACS 5.1 has Shell (EXEC) privilege.
• Attribute values are correctly configured.
The following debugs are useful in troubleshooting authorization:
• debug aaa authorization
• debug tacacs
• debug tacacs packet
Example 6-8 shows debugs from a successful authorization session. You can see the privilege level, timeout, and idle timeout attributes sent from the ACS server.
Example 6-8. EXEC Authorization Debugs

Command Authorization
Earlier in the chapter you learned about using privilege levels in IOS to limit the commands available to a user during an administrative session. Configuring and maintaining privilege levels on hundreds of IOS devices is not an easy task. To make this easier to manage, IOS allows using TACACS+ to control which commands a user can execute on the device. After command authorization is enabled, the device will send each command to the TACACS+ server for authorization. If authorization is successful, the command will be executed. If the authorization fails, the user will see a failure message and the command will not be executed.
To do this, you will need to configure command authorization on the IOS device and apply shell command authorization sets on the user or group profile in ACS.
Before configuring command authorization, you should have authentication working on the device with TACACS+.
Configuring command authorization also requires creating method lists, the generic syntax for which is as follows:
aaa authentication commands level {default | list-name} method1 [method2] [method3] ... [methodn]
The command authorization method list is similar to the EXEC authorization method list with the exception of the level option. The level option indicates the privilege level on which command authorization has to be applied. You can apply command authorization on any level from 0 to 15 using a separate method list for each level.
Note
The level option in the method list indicates the level of the commands on which authorization has to be enabled. It does not indicate the level of the user. What it means is that if a user at privilege level 15 executes a privilege level 1 command, command authorization will be applied only if it has been enabled for level 1 commands.
Command authorization on level 15 does not affect the global configuration mode and its submodes unless the following command is present in the configuration:
aaa authorization config-commands
If a named method list is used, you will need to apply the list individually to console, vty, aux, or HTTP sessions. Recall that authorization does not apply to console unless the aaa authorization console command is present in the configuration. For a list of methods available for command authorization, refer to Table 6-3.
You can apply a named method list to console, vty, or aux line using the following command:
Router(config-line)#authorization commands level list-name
You can apply a named method list to HTTP sessions using the following command:
Router(config)#ip http authentication aaa command-authorization level list-name
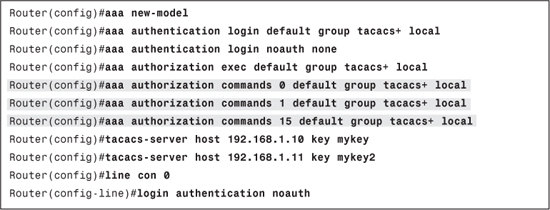
Before moving to the next section, consider the configuration given in Example 6-9. This example builds on Example 6-7 and adds command authorization for level 0, 1, and 15 on all administrative sessions except those on the console.
Example 6-9. Command Authorization Configuration
Configuring ACS 4.2 and 5.1 for Command Authorization
As you already know, when command authorization is enabled, the device sends each command and its arguments to the TACACS+ server for authorization. The user or group profile in ACS 4.2 and the authorization policy in 5.1 should have a command authorization set applied to it. A command authorization set is a list of commands and their arguments that are permitted or denied for the user or group it is applied to.
To create a command authorization set in ACS 4.2, perform the following steps:
Step 1. Select Shared Profile Components.
Step 2. Select Shell Command Authorization Sets.
Step 3. Select the Add button.
Step 4. Enter a name for your shell command authorization set.
Step 5. Enter a description for your shell command authorization set.
Step 6. You have two options in the form of radio buttons for unmatched commands.
The option to select a permit action versus a deny action here is determined based on the amount of commands you want to allow a user to have access to. For example, if you want a user with this command level to have access to all except a few commands, it makes sense to select Permit and create a list of denied commands. On the other hand, if you want to permit only a few commands, it makes sense to select Deny and create a list of commands permitted.
For this example, select Deny.
Step 7. The large box on the left is populated as you enter commands in the small text box below it. In the small text box, enter the word show for this example.
Step 8. Select the Add Command button.
After performing step 8, you can see the show command placed in the large box on the left side of the configuration page.
Step 9. Select the command with your mouse. This highlights the command in blue.
Step 10. If you place a check mark next to the words Permit Unmatched Arguments, any argument not listed in the box below the check mark will be permitted. If the box below the check mark is empty, all arguments are permitted. For our example, do not place a check mark there.
Step 11. To create a list of arguments that are permitted or denied with the selected command (show in our case), use the following format:
{permit | deny} argument
You can add entries for as many arguments as you want. Remember that the arguments are case sensitive.
For this example, enter permit running-config.
At this point, your command authorization set reads like this: Any command that does NOT match “show running-config” will be denied. Users to whom this set is applied will not be able to execute any commands apart from show running-config. To include any other commands, simply follow steps 7 through 11.
Figure 6-4 shows a command set created to allow some commands and deny the rest.
Figure 6-4. Command Authorization Set in ACS 4.2

To create a Command Authorization Set in ACS 5.1, follow these steps:
Step 1. Select Policy Elements > Authorization and Permissions > Device Administration > Command Sets.
Step 2. Click Create.
Step 3. Enter a name for your shell command authorization set.
Step 4. Enter a description for your shell command authorization set.
Step 5. You have an option to select the check box next to Permit any command that is not in the table below.
The option between allowing versus not allowing commands not listed in the table is determined based on the number of commands you want to allow a user to have access to. For example, if you want a user with this command level to have access to all except a few commands, it makes sense to place a check mark here and create a list of denied commands. On the other hand, if you want to permit only a few commands, it makes sense to not place a check mark here and create a list of commands permitted.
For this example, do not place a checkmark here.
Step 6. Below the table, you have three fields: Grant, Command and Arguments. Select Permit or Deny in the drop-box below the Grant field depending on whether you want to allow or deny the command. For this example, select Permit.
Step 7. In the text box under the Command field, enter the command you want to permit or deny. For this example, enter show.
Step 8. In the text box below the Argument field, you can enter an argument of the command entered in the previous step. If any argument is entered, the permit or deny action will only apply to the entered argument of the command. If no argument is entered, the permit or deny action will apply to all arguments of the command. Remember that the arguments are case sensitive.
For this example, enter running-config.
Step 9. Click Add button above the Grant field.
The show command and its argument that you entered are now listed in the table.
At this point, your command authorization set reads like this: Any command that does NOT match show running-config will be denied. Users to whom this set is applied will not be able to execute any commands apart from show running-config. To include any other commands or arguments of previously entered commands, simply follow steps 6 through 9. Figure 6-5 shows a command set created to allow some commands and deny the rest.
Figure 6-5. Command Set in ACS 5.1

Step 10. Click Submit.
You can apply the command authorization sets created in the preceding list using the following methods:
• (ACS 4.2 only) In user or group edit page, select Assign a Shell Command Authorization Set for any network device and select your command set from the drop-down list. Click Submit from the User edit page or Submit + Restart from the group edit page.
• (ACS 5.1 only) Ensure that Command Sets is selected as a result in the Authorization Policy page of your access service and select your command set in the correct authorization policy. In case you are not sure about results and authorization policies, refer to Chapter 4.
Before moving on to the next section, you should know that ACS applies pattern matching to the arguments. That is, the argument permit and matches any argument that contains the string any. Thus, for example, permit any would allow not only the argument any but also the arguments company and anywhere. To limit the extent of pattern matching, you can add the following expressions:
• Dollar Sign ($): Expresses that the argument must end with what has gone before. Thus permit any$ would match any or company, but not anywhere.
• Caret (^): Expresses that the argument must begin with what follows. Thus permit ^any would match any or anywhere, but not company.
You can combine these expressions to specify absolute matching. In the example given, you would use permit ^any$ to ensure that only any was permitted, and not company or anywhere.
Verifying and Troubleshooting Command Authorization
If authentication using TACACS+ is working, command authorization usually works well also. Most problems with authorization are due to incorrect configuration. Check the following if command authorization is not working as desired:
• User or group in ACS 4.2 and access service in ACS 5.1 has the correct command set applied.
• The device is configured to authorize commands of the correct levels. Remember that the level of the command is important for deciding the levels for which command authorization should be enabled.
• Commands in the set should match the case and format used by the device in the authorization request. If you are unsure of how the command is sent by the device, look at the debugs or failure logs on ACS. Sometimes devices will omit special characters such as slash (/).
• Command authorization often causes problems with HTTP sessions such as the ones opened by SDM. This is because SDM issues a series of commands when it starts up and they are not present in the command set. Look at ACS failure logs to see the commands that need to be permitted for SDM to work properly.
The following debugs are useful in troubleshooting authorization:
• debug aaa authorization
• debug tacacs
• debug tacacs packet
Example 6-10 shows debugs from a successful command authorization request. You can see that the authorization request from the device contains the command and argument entered by the user.
Example 6-10. Debug Output for Command Authorization

Accounting of Administrative Sessions
Restricting access to a network device alone is not enough for complete security of the device. Restrictions should be followed by regular monitoring. IOS provides the accounting feature to help monitor administrative sessions and commands entered in the session.
Similar to authentication and authorization, accounting also requires creating method lists. The syntax for accounting of EXEC sessions is as follows:
aaa accounting exec {default | list-name} {stop-only | start-stop} group
{ tacacs+ | radius} [group {tacacs+ | radius}] ...
The syntax for command accounting is as follows:
aaa accounting commands level {default | list-name} {stop-only | start-stop} group
{ tacacs+ | radius} [group {tacacs+ | radius}] ...
In the preceding commands, a default list will apply to all administrative sessions whereas a named list will need to be applied to individual lines manually. Another important consideration when enabling accounting is whether you need accounting records only when the session stops only or also when the session starts. This is denoted by the stop-only and start-stop keywords in the syntax.
Accounting can use only a server group as a method. You can use multiple server groups as failover.
Example 6-11 builds on Example 6-9 and adds EXEC and command accounting.
Example 6-11. Accounting Configuration
You can apply named lists for EXEC and command accounting to the lines using the following commands:
Router(config-line)#accounting exec list-name
Router(config-line)#accounting commands level list-name
Configuring ACS for Accounting
There is no configuration required on ACS to accept accounting if the device is added as an AAA client.
You can see the EXEC accounting logs in ACS 4.2 under Reports and Activity > TACACS+ Accounting and command accounting logs under Reports and Activity > TACACS+ Administration.
In ACS 5.1, you can see both the EXEC and command accountings logs under AAA Protocol > TACACS+ Accounting.
Note
If authentication is working, accounting will work. The only exception to this is when you are using RADIUS and the device cannot reach ACS at the configured accounting port. In such situations, ensure that the accounting port is properly configured and is not blocked by a firewall or ACL. You can use debug accounting and debug radius to troubleshoot accounting.
Lab Scenario #2: Authentication, Authorization, and Accounting of Administrative Sessions Using TACACS+
XYZ Inc. has purchased Cisco ACS and it wants to use TACACS+ to authenticate connecting to its router using Telnet. In addition to that, the company wants to ensure that users belonging to the Admins group land in privilege level 15 directly after login and are able to execute all commands except shutdown. It also wants all sessions and commands to be logged in ACS using TACACS+.
You task is to configure the device and ACS to meet all these requirements and ensure that console and aux lines are not affected.
The IP address of the router is 192.168.1.1 and the IP address of ACS is 192.168.1.10.
Lab Setup
You require a simple setup connecting an IOS device to your ACS. The router should have IP connectivity to ACS.
Before starting the lab, add the device in ACS as an AAA client. If you are using ACS 4.2, rename a group to Admins. If you are using ACS 5.1, create an identity group named Admins. You can use the Default Device Admin access service for this lab. You also need to create an authorization policy in the access service that matches the Admins identity group.
Lab Solution
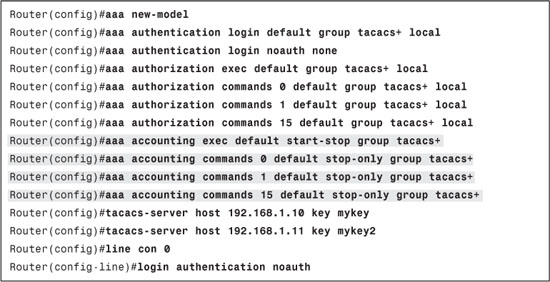
Step 1. Configure the device for authentication, authorization, and accounting:

Step 2. Create a command set in ACS that denies the command shutdown with all arguments and permits all other commands.
Step 3. (ACS 4.2 only) Apply the command set to ACS 4.2 group called Admins and select Shell (exec) and Privilege Level under TACACS+ Settings and enter 15 in the text box next to it. Click Submit + Restart
Step 4. (ACS 5.1 only) Create a shell profile and set Default Privilege Level to 15. Apply this shell profile and the command set to the authorization policy created at the start of the lab.
Lab Verification
To verify the solution, create a user in the Admins group and initiate a Telnet session to the device. Authenticate using the user from the Admins group. You will notice that the session starts in level 15 and the user is able to execute any command except the shutdown command in the interface configuration mode.
Lab Scenario #3: Authentication and Authorization of HTTP Sessions
XYZ Inc. wants to manage its routers using Cisco Security Device Manager (SDM). The company wants SDM sessions to be authenticated from ACS using TACACS+. Users in the Admin group should be able to access SDM without any problems.
Your task is to configure the device and ACS to fulfill the preceding requirement.
The IP address of the router is 192.168.1.1 and the IP address of ACS is 192.168.1.10. Ensure that console, vty, and aux are still authenticated using line passwords.
Lab Setup
You require a simple setup connecting an IOS device to your ACS. The router should have IP connectivity to ACS. SDM is not really required for this lab.
Before starting the lab, add the device in ACS as an AAA client. If you are using ACS 4.2, rename a group to Admins. If you are using ACS 5.1, create an identity group named Admins. You can use the Default Device Admin access service for this lab. You also need to create an authorization policy in the access service that matches the Admins identity group.
Lab Solution
Step 1. Configure the device for authentication and authorization:

Step 2. (ACS 4.2 only) Edit the Admins group and select Shell (exec) under TACACS+ Settings. Also select Privilege Level and enter 15 in the text box next to it. Click Submit + Restart.
Step 3. (ACS 5.1 only) Create a shell profile and set Default Privilege Level to 15. Apply this shell profile in the authorization policy created at the start of the lab.
Lab Verification
To verify the solution, launch a web browser and connect to the router at 192.168.1.1. HTTP authentication and authorization should be successful and you should see SDM loading. If you do not have SDM, you will see the default web interface of the device.
Summary
This chapter is the most crucial one in understanding AAA implementation on Cisco devices. The following will be used throughout this book and it is important that you understand them well and are comfortable with all variations:
Method lists
• ACS 4.1 configuration including group/user setup and command sets
• ACS 5.2 configuration including access services, shell profiles, and command sets
This chapter also covered troubleshooting steps for AAA on IOS, which will be used throughout the book.