
Chapter 10. Cut-Through Proxy AAA on PIX/ASA
This chapter covers the following subjects:
• Overview of Cut-Through Proxy AAA
• Configuring PIX/ASA for Cut-Through Proxy AAA
• Downloadable Access Lists
• Configuring ACS 4.2 to Support Cut-Through Proxy Authentication and Authorization
• Configuring ACS 5.1 to Support Cut-Through Proxy Authentication and Authorization
Traditionally, access control lists (ACLs) have been used to restrict access to network resources. Although effective, ACLs are static in nature. ACLs cannot be used in environments where the source and/or destination address of the traffic is not known or is not static. For example, consider a network where an IP address is assigned dynamically using Dynamic Host Configuration Protocol (DHCP) and access to the Internet is not required for everyone. Because the source address of the traffic is not static, ACLs cannot be used to restrict access here.
For such requirements, PIX and ASA provide the cut-through proxy AAA feature. Using this feature, you can make authentication and authorization mandatory for certain types of sessions. Even if the interface ACL allows the session, ASA/PIX will intercept it for authentication. Access is granted based on the user profile.
Note
This chapter uses ASA to refer to the security appliance. All concepts and commands discussed here also apply to PIX version 7.0 and later unless mentioned otherwise.
Cut-Through Proxy Authentication
Note
Throughout this section it is assumed that authorization and accounting is not configured unless mentioned otherwise. Authorization and accounting are covered later in this chapter.
Figure 10-1 shows the steps involved in cut-through proxy authentication. The ASA device shown is configured to enforce authentication on all outbound HTTP sessions. When an unauthenticated user from the inside network initiates an HTTP session to a web server on the outside network, ASA intercepts the connection and sends a challenge to the user.
Figure 10-1. Cut-Through Proxy Authentication

When the user replies with his/her credentials, ASA sends the credentials to an AAA server for verification. If the AAA server responds with an Access Accept or PASS message, ASA allows the original session to go through normally. At this point, the session continues between the end user and the web server directly.
You should remember the following rules before configuring cut-through proxy authentication:
• You can configure ASA to enforce authentication on multiple types of sessions; however, the user needs to authenticate only once. This means that the first authentication by the user will be valid for all types of sessions that require authentication.
• When the user authenticates, ASA starts a timer called User Authentication or a uauth timer. When this timer expires, the user will need to authenticate again. This timer is discussed in detail later in the chapter.
• ASA supports direct authentication with FTP (TCP port 21), Telnet (TCP port 23), HTTP (TCP port 80), and HTTPS (TCP port 443). A user must first authenticate with one of these services before the security appliance allows other traffic requiring authentication.
• For Telnet and FTP, the security appliance generates an authentication prompt. For HTTP, the security appliance uses basic HTTP authentication and provides an authentication prompt. For HTTPS, the security appliance generates a custom login screen.
ASA provides means to authenticate users using Virtual Telnet and HTTP sessions in case you do not want to enforce authentication on the supported protocols. This means if you want to authenticate any other type of traffic, say RDP (TCP port 3389), users will need to initiate a Virtual Telnet or HTTP session to the ASA and authenticate first. When authenticated, they can initiate the other type of sessions. Virtual HTTP and Virtual Telnet sessions are discussed in detailed later in the chapter.
You can use RADIUS or TACACS+ for cut-through proxy authentication. There is no difference as far as choice of protocol is concerned for authentication, but there are differences when authorization is required.
You already know the commands for adding an AAA server on ASA from Chapter 7, “Administrative AAA on ASA/PIX,” which are repeated here for your reference:
aaa-server server_tag protocol {radius | tacacs+}
aaa-server server_tag [(nameif)] host ip_address
key shared_key
There are two ways of configuring cut-through proxy authentication. The legacy command is as follows:
aaa authentication include service interface_name inside_ip inside_mask
[outside_ip outside_mask] {server_tag | LOCAL}
Table 10-1 explains the command options.
Table 10-1. aaa authentication include Command Options


For example, assuming that the AAA group is radius_servers in Figure 10-1, Example 10-1 shows the command to enforce authentication for an outbound HTTP connection:
Example 10-1. Enforcing Authentication for an Outbound HTTP Connection
![]()
Another command you should know about is the aaa authentication exclude command. This command will exclude specified IP addresses from authentication. The syntax for the exclude command is as follows:
aaa authentication exclude service interface_name inside_ip inside_mask [outside_ip outside_mask] {server_tag | LOCAL}
The options for the exclude commands are same as the include command and have the same meaning.
Example 10-2 shows the command required to exclude a host from the authentication configured in Example 10-1.
Example 10-2. Excluding a Host from Authentication
ASA(config)#aaa authentication exclude http inside 192.168.1.1 255.255.255.255 radius_servers
The new and Cisco-recommended command for configuring cut-through proxy authentication is the aaa authentication match command. This command uses an access list to define traffic that needs to be included in or excluded from authentication. The syntax of the command is as follows:
aaa authentication match acl_name interface_name {server_tag | LOCAL}
You will notice that this command is simpler than the aaa authentication include command. The acl_name parameter defines the ACL to be used for authentication. The interface_name parameter defines the interface on which the traffic is being received and the server_tag parameter defines the AAA server group to be used for this authentication. The LOCAL parameter tells the ASA to use the local database for authentication.
You must use an extended access list to configure this method of cut-through proxy authentication. Permit statements in the access list define which traffic needs to be authenticated. Deny statements define which traffic needs to be excluded from authentication.
Example 10-3 shows the commands required to combine Example 10-1 and Example 10-2 in the aaa authentication match command.
Example 10-3. Configuring Cut-Through Proxy Authentication with the aaa authentication match Command

Note
You cannot use both the new and the legacy commands together. You must use either aaa authentication match (the new and Cisco-recommended method) or aaa authentication include (the legacy method) on an ASA/PIX device. In addition, the legacy method is much slower than the new method.
Virtual Telnet, Virtual HTTP, and HTTP Redirection
As mentioned earlier, ASA supports direct authentication with HTTP, HTTPS, FTP, and Telnet protocols only. If authentication is required for any other protocol, the user must authenticate using the supported protocols first. If you do not want to enforce authentication for any of the supported protocols, you can use the Virtual Telnet, Virtual HTTP, or HTTP Redirection features in ASA.
Consider the network shown in Figure 10-2. In the sample network, authentication is required for all outbound Remote Desktop Protocol (RDP) (TCP/3389) traffic, but no other traffic requires authentication. Because RDP traffic cannot be authenticated directly, you will need to use one of the features described in the sections that follow.
Figure 10-2. Need for Virtual Telnet, Virtual HTTP, or HTTP Redirection
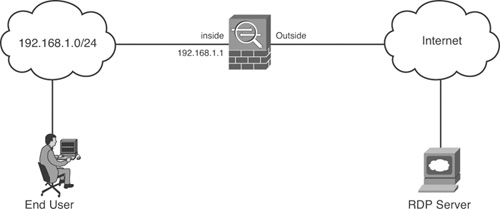
Each of the three methods of authenticating unsupported protocols—Virtual Telnet, Virtual HTTP and HTTP Redirection—have their own advantages and disadvantages. Your network, the technical level of the end users, security considerations, and other related considerations determine which method is best for you.
Virtual Telnet
The Virtual Telnet feature enables you to configure an IP address to which users can Telnet to authenticate. When an unauthenticated user Telnets to this IP address, the user is challenged for a username and password, and then authenticated by the AAA server or the local database. When authenticated, the user sees the message “Authentication Successful” and is disconnected. The user can now access other services that require authentication.
The Virtual Telnet IP address should be an unused IP address from the network and routable to the ASA. Ideally it should be in the same subnet as the interface where the traffic in received. ASA will respond to ARP requests for this IP address.
To better understand Virtual Telnet, consider the example of the network shown previously in Figure 10-2. To authenticate RDP sessions, the administrator would need commands similar to the following:
access-list rdp permit tcp 192.168.1.0 255.255.255.0 any eq 3389
aaa authentication match rdp inside radgroup
When an unauthenticated end user initiates an outbound RDP session, ASA will drop it. Because RDP cannot be authenticated directly, Virtual Telnet can be used to authenticate the user. The IP address to be used in this case would need to be in the 192.168.1.0/24 subnet. For this example, 192.168.1.2 can be used for Virtual Telnet. After Virtual Telnet is configured, the end user will need to Telnet to 192.168.1.2 and provide a username and password. If authentication is successful, the user will see a message to that effect and will be disconnected. The user can now initiate the outbound RDP session.
While configuring Virtual Telnet, you should remember the following:
• The aaa authentication include or aaa authentication match command should include Telnet traffic to the virtual IP address. In the previous example, access-list rdp permit tcp 192.168.1.0 255.255.255.0 host 192.168.1.2 eq 23 command would need to be added.
• For inbound users (from lower security to higher security), the ACL applied to the source interface should allow Telnet traffic to the Virtual Telnet address. For outbound users, there is an explicit permit statement for traffic; however, if you apply an access list to an inside interface, be sure to allow access to the Virtual Telnet address.
• For inbound users, you must add a static command for the Virtual Telnet IP address, even if NAT is not required (using the no nat-control command). An identity NAT command is typically used. The static statement is not required for outbound users.
• A user will stay authenticated until the uauth timer expires. The user can reconnect to the Virtual Telnet IP address to log out. uauth is discused later in the chapter.
To configure Virtual Telnet, use the following command in the global configuration mode:
virtual telnet virtual_telnet_ip_address
For the example in this section, the command to configure Virtual Telnet is virtual telnet 192.168.1.2.
Virtual HTTP
Virtual HTTP is similar to Virtual Telnet. In this case, the end user uses HTTP to authenticate instead of Telnet. The IP address, ACL, and static statement considerations discussed in the Virtual Telnet section also apply to Virtual HTTP.
ASA uses basic HTTP authentication for Virtual HTTP. It redirects all HTTP connections that require AAA authentication to the HTTP server on the security appliance, where the user is prompted for a username and password. After the user is authenticated, ASA redirects the HTTP connection back to the original server, but it does not include the username and password.
To configure Virtual HTTP, use the following command in the global configuration mode:
virtual http virtual_http_ip_address
In the network shown previously in Figure 10-2, if Virtual HTTP is used for authentication outbound RDP sessions, the commands shown in Example 10-4 will be required:
Example 10-4. Virtual HTTP Configuration

HTTP Redirection
Redirection is an improvement over the Virtual HTTP method in that it provides an improved user experience when authenticating. The users can connect to the ASA’s interface IP address directly using HTTP or HTTPS and will get an authentication page similar to the one shown in Figure 10-3. Optionally, HTTP traffic that requires authentication can also be redirected to this authentication page.
Figure 10-3. Authentication Page for Redirection

As you can see from Figure 10-3, this page provides some information—unlike a simple authentication prompt on a browser. In addition to that, you can use the interface address of the ASA instead of having to use a different address.
You can configure HTTP Redirection using the following command in the global configuration mode:
aaa authentication listener http[s] interface_name [port portnum] [redirect]
Table 10-2 explains the command options.
Table 10-2. HTTP Redirection Command Options

Note
Redirection, or listener as it is sometimes called, can sometimes be unavailable to users who are directly authenticating to ASA. It is better to ask the users to connect to http://asa-ip-address/netaccess/constatus.html.
Another benefit of HTTP Redirection is that the users can explicitly log out by connecting to the ASA’s IP address. They will see a page similar to the one shown in Figure 10-4. This page also shows users the login duration. It is useful in cases where the usage is billed to the user or access durations are restricted.
Figure 10-4. Redirection Logout Page

Although HTTP Redirection has some benefits over Virtual HTTP, you cannot use HTTP Redirection if the destination web server of the original HTTP traffic also requires authentication. This is because HTTP Redirection sends the username and password that you used to authenticate with the ASA to the HTTP server; you are not prompted separately for the HTTP server username and password. Assuming the username and password are not the same for the AAA and HTTP servers, the HTTP authentication fails.
Virtual HTTP, on the other hand, enables you to authenticate separately to ASA and the destination server.
uauth Timer
When a cut-through proxy authentication is successful, ASA stores the authentication and authorization information in its cache. The cache entry contains IP address, authorization information, and cache timers. The entry is created on the first authentication and is valid for any kind of traffic. This means that if more than one kind of traffic needs authentication, the first authentication will be sufficient for all of them as long as the cache entry exists.
The uauth timer determines how long ASA will maintain the cache entry. When the uauth timer expires, the entry is removed, and the user will need to authenticate again. The uauth timer can be absolute or inactivity based. This means that the uauth timer can be made to expire after a fixed period or if there is no activity for a defined period. Example 10-5 shows a uauth cache with default timers.
Example 10-5. Uauth Cache

By default, the uauth timer expires in 5 minutes, irrespective of activity status. You can change the uauth timer default using the following global configuration command:
timeout uauth hh:mm:ss [absolute | inactivity]
To configure absolute and inactivity timers together, use the command twice. You must ensure that the uauth duration is shorter than the xlate duration. The xlate duration defines the idle time after which an address translation slot is freed. ASA will not accept a timer which is longer than the xlate timer.
You can disable caching by using a uauth timer of 0. The timer can be set to a maximum of 1193:0:0.
Configuring ACS for Cut-Through Proxy Authentication
Configuring ACS 4.2 and 5.1 for cut-through proxy authentication requires the steps you followed for configuring administrative authentication of ASA. Refer to Chapter 7 to recall the steps you used. A summary of required steps is as follows:
Step 1. Add ASA as an AAA client with the correct shared key and protocol.
Step 2. Add a user.
Step 3. For ease of learning, ensure that you use a new group so that previous configuration does not cause problems.
Verifying and Troubleshooting Cut-Through Proxy Authentication
The most common problems with cut-through proxy authentication relate to the communication between the ASA and AAA server as discussed in Chapter 7. For the most part, when communication between the ASA device and the AAA server is working, cut-through proxy authentication works like a charm. Few problems that arise with cut-through proxy authentication itself are related to the authentication configuration on ASA. You should verify that the following are true:
• The aaa authentication match or aaa authentication include commands are correct. Check the ACL used for the match command. Ensure that the Virtual Telnet or Virtual HTTP session is added in the authentication command.
• Ensure that the Virtual Telnet, Virtual HTTP, or HTTP Redirection address is accessible by users. This includes verifying the routing, NAT configuration, and interface access lists.
• Ensure that the authentication commands are using the correct server group.
The show uauth command is very important when verifying and troubleshooting cut-through proxy authentication as demonstrated in Example 10-6. Two important things you should notice in the command are the Most Seen Authenticated Users number and the cache entries themselves. If the cache entry is empty or the most seen number is 0, your users are not being prompted for authentication or are not able to get to the virtual addresses.
Example 10-6. show uauth Command Output

If authentication is working well and users are complaining about repeatedly needing to authenticate, you might need to adjust the uauth timers.
Note
When the uauth cache is disabled by setting the uauth timeout to 0, HTTPS authentication might not work. If a browser initiates multiple TCP connections to load a web page after HTTPS authentication, the first connection is let through, but the subsequent connections trigger authentication. As a result, users are continuously presented with an authentication page, even if the correct username and password are entered each time. To work around this, the uauth timeout must be enabled and set to at least 1.
Before moving to authorization of cut-through traffic, complete Lab Scenario #12 so that the authentication concepts are clear. Remember that if cut-through proxy authentication is not working, authorization will not work.
Lab Scenario #12: Authenticating Cut-Through Traffic on ASA
XYZ Inc. is hosting an application server inside its internal network. The employees and partners need to initiate an FTP connection and connect to TCP port 8764 from the Internet to the server. The company wants the users to authenticate to its AAA server before they can access the services on the server. Users connect to the 200.10.30.4 address, which is translated into the inside host address. They have a free IP address, 200.10.30.5, which can be used for Virtual Telnet. Your task is to configure the ASA device to authenticate FTP and Virtual Telnet connections to the AAA server at 10.1.10.2 in the inside network.
Lab Setup
This Lab Scenario requires one ASA device and at least a Layer 2 switch. Figure 10-5 shows the setup required for the scenario. Apart from the solution that follows, you will need to configure an access list on the Outside interface on ASA to permit the required traffic.
Figure 10-5. Lab Setup for Scenario #12

Lab Solution
Note
For ACS configuration required for this lab, see Lab #5.
Step 1. Create a server group and add the AAA server:

Step 2. Create an access list for the traffic that needs to be authenticated:

Step 3. Configure ASA to authenticate the traffic on the outside interface:
ASA(config)#aaa authentication match authlist outside myservers
Step 4. Configure Virtual Telnet:
ASA(config)#virtual telnet 200.10.30.5
Lab Verification
To verify the solution, you will need to Telnet to 200.10.30.5 from a host in the outside network and enter the AAA credentials. Example 10-7 shows sample output from the Telnet session.
Example 10-7. Virtual Telnet Session Output for Lab Scenario #12

After a successful authentication, you can use the show uauth command to see the cache entry as shown in Example 10-8.
Example 10-8. show uauth Output for Lab Scenario #12

Cut-Through Proxy Authorization
ASA supports authorization of cut-through traffic using both TACACS+ and RADIUS. Authorizing cut-through traffic enables you to control which group of users can access which service. For example, consider a network where you want all users to authenticate before any traffic is allowed to the Internet. You also want to restrict which group of users can access which service on the Internet. This is where authorization comes into the picture.
Remember that the choice of protocol does not matter when authenticating cut-through traffic but it does matter when authorizing the traffic. This is because RADIUS and TACACS+ have different ways of authorizing cut-through traffic. Remember that TACACS+ can initiate multiple authorization requests to the AAA server independent of the authentication request. RADIUS, on the other hand, authorizes along with the authentication process. Hence it cannot initiate multiple authorization requests. So, a RADIUS server must return all authorization information in the Access-Accept packet.
Owing to the way each protocol works, ACS has to be configured as follows:
TACACS+: Every time there is traffic which needs to be authorized, ASA sends a service authorization request to the AAA server. This request is similar to the request sent for command authorization of administrative sessions. On ACS, you need to apply command authorization sets to the user or group or policy as the case may be.
RADIUS: For authorization using RADIUS, you need to configure downloadable ACLs on ACS and apply them to the user or group or policy as necessary. These access lists are downloaded from ACS to the ASA and applied on the interface for the user. By default, the interface access list will override any conflicting access control entry.
Note
TACACS+ is more resource intensive because it initiates a request every time there is a traffic that needs to be authorized.
As with authentication, ASA supports a legacy include command and the new match command for authorization of cut-through traffic using TACACS+. The commands are similar to the authentication commands:
![]()
For a definition of the command options of the include command, see Table 10-1.
Configuring ACS 4.2 and 5.1 for Cut-Through Proxy Authorization Using TACACS+
As mentioned earlier, the authorization request for cut-through traffic is similar to the authorization request for command authorization. In the case of command authorization, if the ASA device needs to authorize the configure terminal command, it sends the following request:
service=shell
cmd=configure terminal
In the case of cut-through traffic, if the ASA device needs to authorize a Telnet session to destination 172.16.26.1, it sends the following request:
service=shell
cmd=telnet 172.16.26.1
Here, telnet is the command and the destination IP address is the argument. The command authorization set applied to the user should permit the command and the argument.
Note
When ASA needs to authorize well-known protocols such as Telnet, HTTP, and so on, it sends the name of the protocol. If it has to authorize any other protocol, the request is sent as cmd=protocol/port destination address.
Note
Chapter 6, “Administrative AAA on IOS,” covers creating and applying command authorization sets in greater detail.
To configure ACS to allow authorization of cut-through traffic, you will need to create a command authorization set and apply it to the user or its group. This time the command sets will contain the protocol name as the command and the destination addresses as arguments. Figure 10-6 shows a command authorization set that permits a Telnet connection to 172.16.26.1 and denies it for 172.16.26.2 in ACS 4.2. Figure 10-7 shows the same command set in ACS 5.1.
Figure 10-6. Command Authorization Set in ACS 4.2 for Cut-Through Traffic

Figure 10-7. Command Set in ACS 5.1 for Cut-Through Traffic

Remember that ACS looks for a minimum match in arguments. This means that permit 172.16.26.1 will permit destination addresses that contain 172.16.26.1, such as 172.16.26.10. If you want to restrict the match to only the given address, use the dollar sign ($) at the end.
You can also allow all destination addresses for a protocol by leaving the Arguments box blank and selecting the Permit Unmatched Args check box in ACS 4.2. You can leave the Arguments box blank in ACS 5.1 to permit all destination addresses.
Apart from the command authorization sets, you will need to give the user Shell (EXEC) privilege in ACS 4.2. You might recall that this privilege can be given in User or Group Setup in ACS 4.2. In ACS 5.1, you do not need to be given this privilege.
Configuring ACS 4.2 for Cut-Through Proxy Authorization Using RADIUS
As mentioned earlier, RADIUS requires authorization attributes to be sent along with the Access-Accept packet. Hence, you will need to configure downloadable access lists (DACLs) on ACS and apply them to the user or its group.
DACLs are standard IP access lists configured in ACS. These access lists use the same syntax as the normal IP ACLs on the device. When a user authenticates, these ACLs are sent as attribute-value pairs in the Access-Accept packet.
Note
The process by which DACLs are sent to the device has been simplified here for better understanding. In reality, two RADIUS Access-Request packets are involved in the process.
When the device receives the AV pairs containing the downloaded ACL, it stores the ACL in its memory and associates it with the uauth cache. The traffic from the authenticated user has to be permitted by the downloaded ACL or the interface ACL before it is allowed to go through.
Before creating DACLs, ensure that User-Level Downloadable ACLs and/or Group-Level Downloadable ACLs options are selected in the Interface Configuration > Advanced Options section.
To create a DACL, follow these steps:
Step 1. Select Shared Profile Components > Downloadable IP ACLs.
Step 2. Click Add.
The Downloadable IP ACLs page appears. Each downloadable IP ACL can contain multiple sets of access control entries. All the entries in all the sets configured will be sent to the device.
Step 3. Enter a name. For this example, use CutThrough.
Step 4. (Optional) Enter a description.
Step 5. Click Add.
The Downloadable IP ACL Content page appears as shown in Figure 10-8. You can create your set of entries in this page.
Figure 10-8. Creating Downloadable ACL in ACS 4.2

Step 6. Enter a name for the set. For this example, use CT1.
Step 7. Enter an ACL definition. Remember that you have to use the access list format supported by the device. On ASA, the simplified command to create an ACL is as follows:
access-list id {deny | permit} {any | host ip_address | ip_address
subnet_mask}
or
access-list id {deny | permit} protocol src_ip mask [operator port]
dest_ip mask [operator port]
On ACS, each entry in the set starts with the permit or deny keyword. The rest of the syntax remains the same. For this example, the ACL should permit Telnet traffic to 172.16.26.1. Figure 10-8 shows the configuration required for this example.
Step 8. Click Submit.
The set you created is added to the Downloadable ACL. At this stage, you can create more sets, although this option is not pursued for the purposes of this example.
Step 9. Click Submit.
The downloadable ACL is saved.
After the downloadable ACL is created, you have to apply it to a user or the group of the user with the following steps:
Step 1. Select User Setup or Group Setup from the main ACS menu.
Step 2. Enter a username or select a group.
Step 3. Scroll to the Downloadable ACLs section.
Step 4. Select Assign IP ACL.
Step 5. Select the downloadable ACL from the drop-down box. For this example, select CutThrough.
Step 6. Click Submit in User Setup or Submit+Apply in Group Setup.
Configuring ACS 5.1 for Cut-Through Proxy Authorization Using RADIUS
Note
If you have skipped the previous section, “Configuring ACS 4.2 for Cut-Through Authorization Using RADIUS,” you should read it once to understand how authorization works when RADIUS is used.
As with ACS 4.2, you will need to configure downloadable ACLs in ACS 5.1 for cut-through proxy authorization to work with RADIUS. To create downloadable ACLs in ACS 5.1, follow these steps:
Step 1. Select Policy Elements > Authorization and Permissions > Named Permission Objects > Downloadable ACLs.
The Downloadable ACLs page appears with a list of existing ACLs.
Step 2. Click Create.
The Create Downloadable ACLs page appears as shown in Figure 10-9.
Figure 10-9. Creating Downloadable ACLs in ACS 5.1

Step 3. Enter a name. For this example, use CutThrough.
Step 4. (Optional) Enter a description.
Step 5. Enter an ACL definition. Remember that you have to use the access list format supported by the device. On ASA, you can use one of the following simplified commands to create an ACL:

On ACS, each entry in the set starts with the permit or deny keyword. The rest of the syntax remains the same. For this example, the ACL should permit Telnet traffic to 172.16.26.1. Figure 10-9 shows the configuration required for this example.
Step 6. Click Submit.
The ACLs is saved and is now listed in the Downloadable ACLs page.
Because RADIUS-based authorization policies allow only authorization profiles as results, you will need to create bind the DACL to an authorization profile.
Authorization profiles are discussed in detail in Chapter 4, “Getting Familiar with ACS 5.1.” To create an authorization profile and bind the DACLs to it, follow these steps:
Step 1. Select Policy Elements > Authorization and Permissions > Network Access > Authorization Profiles.
The Authorization Profiles page appears with a list of existing profiles.
Step 2. Click Create.
The Create Authorization Profile page appears.
Step 3. Enter a name. For this example, use DACL.
Step 4. Click the Common Tasks tab.
The page changes to one showing common tasks as shown in Figure 10-10.
Figure 10-10. Creating an Authorization Profile with Downloadable ACL

Step 5. Select Static from the Downloadable ACL Name drop-down list.
Step 6. Select a Downloadable ACL from the Value drop-down list. For this example, select CutThrough as shown in Figure 10-10.
Step 7. Click Submit.
The authorization profile is saved and listed in the Authorization Profiles page.
This authorization profile can now be added in an authorization policy that you create for cut-through proxy authentication.
Note
Chapter 4, “Getting Familiar with ACS 5.1,” discusses access services and different policies in detail.
Verifying and Troubleshooting Cut-Through Proxy Authorization
After authorization is successful, ASA will store the authorization information in the uauth cache for later use. Example 10-9 shows the uauth cache after authorization is successful using TACACS+. Notice the authorization information in the cache that shows the destination address and port this user is allowed.
Example 10-9. uauth Cache After Authorization

You should note that in the case of TACACS+, the uauth cache will show only destination address and protocol information for traffic that has already been authorized. The cache entry is by no means a list of all the addresses and protocols which the user is authorized to access. Assuming that the cache entry shows the complete Command Set can be misleading during troubleshooting.
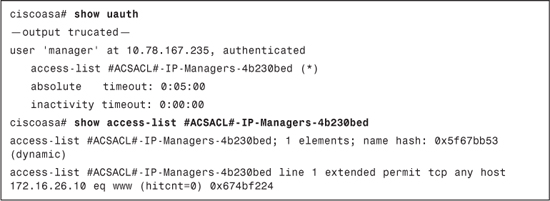
When RADIUS is used to authorize cut-through traffic, the uauth cache will contain the name of the DACL. You can use the show access-list command to view the contents of the ACL. Example 10-10 shows the uauth cache and the ACL. Notice the contents of the ACL. They match with the ACL created on ACS.
Example 10-10. uauth Cache and ACL Entry After Authorization Using RADIUS

In case of cut-through proxy authorization, most complaints are related to users not able to access services they are authorized to access or being able to access services for which they are not authorized. To troubleshoot cut-through proxy authorization, you should verify the following:
• ASA and ACS Version: Cisco changed the way DACLs are sent from ACS. This change was made in ACS version 4.0. PIX versions earlier than 7.0 use the old way of downloading the ACLs. Ensure that you are using compatible versions of ASA and ACS.
• Interface ACL: In most cases, DACLs override the interface ACL. Ensure that all services that a user is permitted to use are allowed by the DACL.
• Implicit Deny: DACLs have an implicit deny at the end just like normal ACLs on ASA. If you want to deny few services and permit the rest, you should add an explicit entry at the end of the ACL to permit all IP traffic.
• Request Format: When using TACACS+, ASA sends protocol names in the request for well-known protocols. For other protocols, it sends Protocol and Port number in the request. If authorization fails, check the Failed Attempts logs in ACS 4.2 or TACACS+ Authorization logs in ACS 5.1 to see the request format sent by the ASA.
• ACL Syntax: Verify that the ACL sent from ACS is created on ASA. If the syntax of the ACL is incorrect on ACS, ASA will not create it locally. One common mistake is to use wildcard masks in ACL instead of network mask. Wildcard masks are valid on IOS-based devices, but not ASA.
• Unmatched Arguments: If you want to permit all destination addresses for a protocol, ensure that Unmatched Args check box is selected for that protocol in the command authorization set in ACS 4.2.
Cut-Through Proxy Accounting
ASA supports accounting for cut-through proxy traffic using both RADIUS and TACACS+. You can configure ASA to send accounting information to a RADIUS or TACACS+ server about any TCP or UDP traffic that passes through the security appliance.
If that traffic is authenticated, the AAA server can maintain accounting information by username. If the traffic is not authenticated, the AAA server can maintain accounting information by IP address.
Accounting information includes session start and stop time, username, service used, duration of each session, destination IP address, and user’s IP address and source port.
As with authentication and authorization, ASA provides two commands to configure accounting: the legacy include command and the new match command. The commands are similar to the authentication and authorization commands:
aaa accounting include service interface_name inside_ip inside_mask [outside_ip
outside_mask] server_tag
aaa accounting match acl_name interface_name server_tag
For definition of the command options of the include command, see Table 10-1.
Note
It is not a good practice to use cut-through proxy accounting for high traffic protocols such as HTTP, SMTP, POP3 or even all IP traffic because ACS will get overwhelmed and will exhaust its resources. If you need to configure accounting for high traffic protocols, you should restrict it to specific source or destination addresses.
As you already know from previous chapters, accounting does not require any configuration on ACS. You must ensure that TACACS+ accounting logs or RADIUS accounting logs are enabled on ACS and that the device is present in ACS as a client with the correct shared key and protocol.
Note
At presstime, neither ACS 4.2 nor ACS 5.1 can display certain accounting information from ASA correctly when RADIUS is used. This is due to the fact that most information such as user’s IP address is sent as cisco-av-pair in the RADIUS packet. Hence such information is visible in the accounting record as cisco-av-pair values instead.
Lab Scenario #13: Cut-Through Proxy Authentication, Authorization, and Accounting
ABC Inc. has a web server and an FTP server in its DMZ network. These servers contain sensitive data. Not all of the company’s employees need access to these servers. The employees who need access are divided into three groups: Researchers, Managers, and Administrators. Researchers need access to the FTP server for FTP protocol. Managers need access to the web server for HTTP protocol, and Administrators need access to both the servers for FTP and HTTP protocols, respectively.
ABC Inc. has a CiscoSecure ACS in its internal network. It wants the ASA to authenticate and authorize all access to the servers in DMZ. In addition to that, ASA should send accounting information for HTTP and FTP traffic going to these servers.
The company has added the ASA as a RADIUS client on ACS (shared secret is seckey) and have created the groups. Your task is to configure the ASA and ACS for authentication, authorization, and accounting of the traffic.
Lab Setup
The Lab Scenario requires an ASA device, at least one Layer 2 switch, ACS, and at least one host. Figure 10-11 shows the setup required.
Figure 10-11. Lab setup for Scenario #13

Before proceeding with this lab, add the ASA as a client in ACS. If you are using ACS 4.2, rename three groups as Researchers, Managers, and Admins. If you are using ACS 5.1, create three identity groups. You can use the default RADIUS Access Service or create a new one. Identity policy can be left as default (Internal Users). This lab will focus on configuration of ASA and downloadable ACLs.
Lab Solution
The steps that follow outline the solution for this lab for both ACS version 4.2 and 5.1:
Step 1. Create a server group and add the AAA server:

Step 2. Create an access list for the traffic that needs to be authenticated, authorized, and accounted for:

Step 3. Configure ASA to authenticate and account for traffic on the inside interface:
ASA(config)#aaa authentication match authlist inside myservers
ASA(config)#aaa accounting match authlist inside myservers
Step 4. Create three downloadable ACLs on ACS:
Downloadable ACLs on ACS 4.2 can be created at the Shared Profile Components > Downloadable IP ACLs page.
Downloadable ACLs on ACS 5.1 can be created at the Policy Elements > Authorization and Permissions > Named Permission Objects > Downloadable ACLs page.
The first ACL, named Researchers, will have the following ACE:
permit tcp any host 172.16.26.11 eq 21
The second ACL, named Managers, will have the following ACE:
permit tcp any host 172.16.26.10 eq 80
The third ACL, named Administrators, will have the following ACEs:
permit tcp any host 172.16.26.11 eq 21
permit tcp any host 172.16.26.10 eq 80
Step 5. (For ACS 5.1 only) Create three authorization profiles (Policy Elements > Authorization and Permissions > Network Access > Authorization Profiles). Name the profiles Researchers, Managers, and Administrators, respectively. In each profile, set Downloadable ACL Name to static. From the drop-down box, select the DACL that matches the name of the profile.
Step 6. Apply the DACL.
In ACS 4.2, go to Group Setup of each group that you renamed before the lab and apply the respective Downloadable ACL. For example, go to the Group Setup page of the Researchers group, scroll to the Downloadable ACLs section, select the Assign IP ACL check box, and then select the DACL that matches the group name.
In ACS 5.1, create three authorization policy rules in the Access Service of your choice. Select identity groups you created before the lab as a condition and match the authorization profile in the results section. For example, select the Researchers identity group as a condition and the Researchers authorization profile as a result.
Lab Verification
To verify the solution, create a user in each group on ACS and initiate an FTP session to 172.16.26.11 or an HTTP session to 172.16.26.10. You will be prompted for authentication.
After authentication, the uauth cache will look similar to the output shown in Example 10-11, 10-12, and 10-13, depending on the group of the user. The examples also show the content of the downloaded ACL.
Example 10-11. uauth Cache and DACL for the Researchers Group

Example 10-12. uauth Cache and DACL for the Managers Group
Example 10-13. uauth Cache and DACL for the Administrators Group

You should also try to establish an FTP session to 172.16.26.11 after authenticating as a user from the Managers Group. ASA should not allow the session to go through.
Summary
Cut-through proxy AAA is an often neglected part of identity management solutions. Effective use of this feature can strengthen your network security by providing dynamic access policies on a user by user basis.
Before you implement cut-through proxy AAA, it is important to remember the difference in configuration based on the protocol being used. TACACS+ will add more load on ACS because multiple authorization requests will be sent. It is also important to remember where you will need to use Virtual Telnet, Virtual HTTP, or HTTP Redirection.
This chapter also introduced downloadable ACLs, which will be used in authorization of other services discussed in later chapters. You should remember how DACLs are configured and that their syntax depends on the AAA client.