This chapter will discuss ways to use and save files, documents, and images to the CMS. We will cover not only the implementation of these features, but will also give you a firm background to help you understand how these features work, as well as other suggestions on implementing them.
This chapter will cover the following topics:
Images and files on the Web
Using the FileUpload control
Creating a database table for the images and files
Creating an image gallery and all classes associated with it
Creating a document repository and all classes associated with it
RSS feeds
Images are a key aspect for nearly any web site. They are the pieces that can let you be expressive and give your web site users a great experience, but that's not all they are good for. Images, and documents for that matter, can be provided to your users as usable content. In order to take advantage of all these pieces, you really need to understand how they work and why they act the way they do. If you've worked with HTML before, you have almost certainly used the <img /> tag. That tag is universally understood and processed by browsers. This control uses an src= attribute to tell the browser where the file is located. However, there is more to it than just a pointer—it can also be used more intricately. For starters, the src attribute can not only be a "relative path" ( /folder/image.jpg) and a "fully qualified URL" (http://www.foo.com/folder/image.jpg), but it can actually be a dynamically generated image (I'll cover that in more detail later). The key to take away from this is that the <img /> tag is the root of imaging when it comes to the Web. Every web programming language has some sort of custom image control, but if you look at what is rendered out to the user's browser, it is almost always an <img /> tag, simply because this is what the browser "knows" how to use. In reality, if you know the path directly to the image, you can put the image path into your browser most of the times, and point right to the image and display it. There are some limitations with the <img /> tag, which you need to keep in mind when using the control. The biggest, or at least the most common hindrance, is the type(s) of images that are usable. Different browsers will accept and interpret some different image types, but in general, you will see that nearly every browser will accept *.jpg, *.gif and *.png image types, along with many also accepting *.bmp and *.tif. Now, there is also one other special case—the *.ico. However, that will be covered at another point.
When building a CMS, one of the most important features you can have on your site is the ability to allow users to upload and view documents, images, files, and so on. For getting these files on to the web server—where they need to be for everyone to access them—you really have two basic choices. The first is a manual way where the file is delivered to someone (through email or disc) and then that person directly copies the files on to the server. The second way is to allow the users to upload these files directly to the server from their own computer. For reasons that are pretty obvious, you will usually opt for the second choice. For doing these direct uploads, one of the most common ways is to use the <asp:FileUpload />. The heart/core of this control is really nothing new, and has been around for quite a while. If you look at the control and what the rendered HTML is for this control, you will see that it's an <input type="file" /> tag. This has been around for many versions of the HTML standards and is accepted by nearly every browser out there today. With that in mind, Microsoft took this fairly basic control, and extended it to allow you to do more with it, or at least more with the resulting file.
Before we get into too much detail of what you can do with the <asp:FileUpload /> control, let's talk about what, and how, it does what it does. To put it simply, it allows you to browse to a file on your computer, select it, and then transfer it to the server. It breaks the files down into their binary components and starts sending them to the server where they are being waited for. All of the contents of the file are sent to the server and stored in memory (RAM) on the server until all the pieces are there, then recombined and saved on the server. This entire process is subject to a number of influencing factors, which you need to take into account while using this powerful control.
The first is you need a steady connection to the server throughout the uploading process. While you may think this sounds like no big deal, it wasn't always, and still isn't the case in many areas. The Internet can be thought of as a large ocean of data with waves rolling in and out. Your connection speed and even the actual connectivity can go up and down, sometimes drastically. When you are looking at web pages, it's not typically as noticeable because you aren't maintaining a constant connection to the site, but rather you are connecting, getting your data, and then disconnecting. If the connection fluctuates, you don't often notice because you aren't actually requesting any data at that moment, but when it comes to uploading a file, you need a steady connection. The speed can vary. But if the actual connection between you and the server is momentarily lost, for whatever reason, you will probably have to re-do the upload, as the pieces are no longer going anywhere and you've probably lost a few along the way.
The second factor you need to keep in mind, and this partially ties to the first, is the file size. The larger the file, the longer it will take to get all the pieces to the server. That leaves more opportunity and time for a connection to falter. This also means, if you remember that the entire file needs to be loaded into the server's memory before it's saved, that this can be resource intensive on the server. Trying to upload a large file can take a lot of memory away from the other things that the server may need to do. It's for this reason that ASP.NET has the ability to limit the file size when transferring a file. Within the web.config file, there is sometimes a setting called the HttpRuntime that explicitly sets the value, but there is also an inherited default value of approximately 4MB. This tells the site to not allow transfers larger than 4MB. This value is actually a default value that's inherited. Besides being just a site setting, which is defined in the web.config, it can also be set at a server level and enforced on all sites on that server. These values are typically stored in the machine.config. They work the exact same way, just on a larger scale. I'd suggest reading up on the different config files available to you, but for now, we will be working with just the web.config. However, you do need to keep in mind that your settings may be overridden by settings in another config file elsewhere. For now, we will use this 4MB file limit.
The third and last thing I want to mention in regards to how the <asp:FileUpload /> control and it's use can be impacted is the security aspect of it. As this control is one of the few things that can have access to the user's computer, the security around it is vital. There is very little that you can do to adjust the way it interacts with the client's computer. The control has limited interactive capabilities from the developer's perspective just to help ensure the users' security—where the user selects the file from, what file type, and even the file sizes cannot be easily limited within the context of the control. This is all purposely excluded from the abilities of the control to ensure someone isn't extracting a file from the user's computer without their express consent.
Now that we've covered some of the background on the control, let's dig into how to use it. For our CMS, we know we are going to need the ability to upload documents and images, and make them available to a site user. So, let's look at our options on how we can do this. Firstly we need to make a decision on how we want to store these items within our site. For this, we have two common options.
The first is simply to stick them into a folder on the server when the user uploads them. This is a great approach and can work very smoothly, but there are a couple of distinct limitations. The first is that every item would need to have a unique name, otherwise files would be overwritten when a new one with the same name is added. This approach can also cause limitations within the security of these items. If you want to allow access to certain users to access only certain items, you could find yourself with some real difficulties. The last potential limitation that I wanted to mention was that of "versioning". By that I mean you have no way of maintaining multiple copies of the same file, at least not easily, as each new version would simply overwrite the previous. Although this approach of directly saving the files on the server does have some advantages. The most important advantage is that the items can be directly accessed through your links within the site. This can really increase performance of the site in that there is no processing that needs to be done when you want to access the files.
The other common option we have when it comes to saving the files on the server is that of using a database to store the binary data for the file, and then recombine it and provide it back to the user when they request it. This method was considered a far less preferred method, as it affected the performance of database servers. However, with current computing capabilities of database servers, I've found there to be little, if any, performance impact with this method. First, let's look at the potential negative aspects of this approach, the biggest of which is that we must do additional work to get the file back out of the database when you want to use it. The positive aspects of this method are much more numerous though, and due to these, it has become a very well accepted method for storing your files. The "pros" of this method are really all the same as the negatives from the previous method of directly storing your files—ability to reuse the same filename, ability to easily secure individual files, and a way to easily store multiple versions of the same file for future reference if needed. With all these factors taken into account, let's go with the database-stored files method for our CMS.
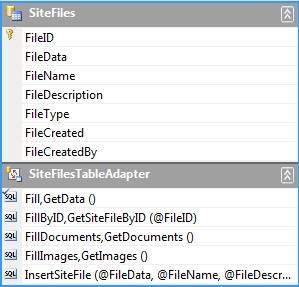
We'll need to start off by modifying our database to allow us to store the documents. We will need a new table, and since we can use this to contain both our images and documents, or really just about any file, let's call our table SiteFiles. Now we need to decide what columns our new table will need. We'll have to have an ID column for referencing the items, we'll need a column to store the actual binary data for the file, and technically that's all we'd need, but for ease of use we'll add a few more columns. We'll start with a column to hold the file's name, so we can present it to the user more easily. We will also want to add a column to hold a simple description of the file that the user can enter when they upload the file, again to make it clearer when presenting the file back to users. We should also add columns to track which user uploaded the file and when it was uploaded, as well as a column for us to tell what type of file it is that we are storing. If we want, we could extend the table and add columns to track things such as version numbers and an approval indicator, but for our CMS, we'll stick with a less complicated approach. Taking into account the columns mentioned, our new table should look like this in our SL manager:

Note
FileID in our new table is an Identity column with the autonumbering turned on. This means it will automatically generate a new identifier every time a record is inserted into the table, saving us all the hassle and time of doing it ourselves.
Now that we've created the database table, we will need to write the code to access the documents. We'll need to start by creating a new dataset, like we did earlier. Open your project, expand your app_code folder, and then right-click on your DAL folder. Select Add New Item from the menu. You should get a selection screen like this:

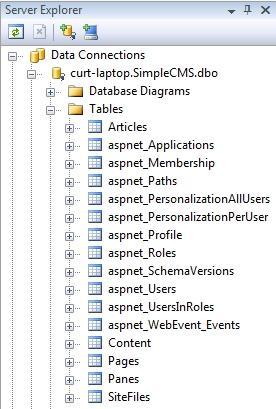
From this, select DataSet and give it a name of SiteFilesDS.xsd so that we can quickly find it again when we need it. You now have an empty dataset. Let's open the project's Solution Explorer and navigate to our database. Expand the Tables folder and you should get a listing similar to this:
Drag the SiteFiles table from the list onto our new dataset and you should see this:

As you can see, the system will automatically create the GetData() method for us, and if all we ever wanted to do was retrieve a list of all the files, this would be sufficient. But for obvious reasons, we'll need a few more methods to get us going. First off we will need a way to get the data into the table, so let's right-click on the SiteFilesTableAdapter and you should get a pop up menu. Choose Add Query from the list and you will get a screen like this:
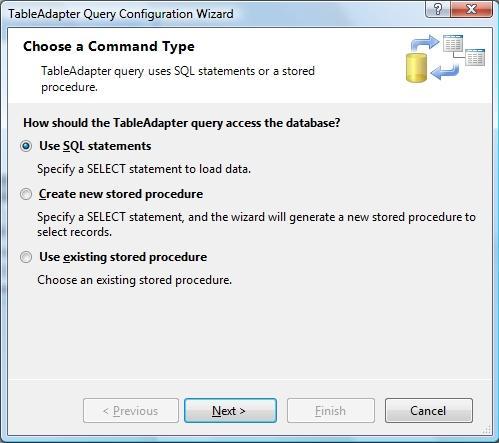
We will be using an SQL Statement, so choose that option. You will then go to another selection screen that looks like this:

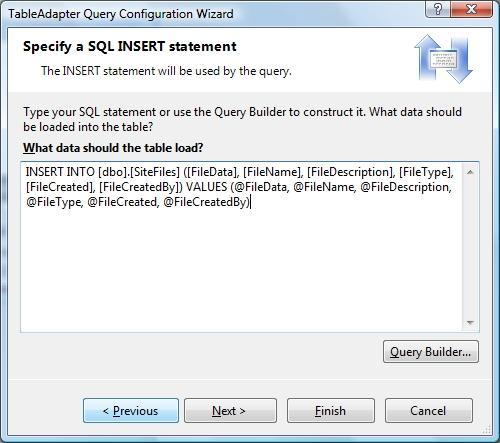
As we will be wanting to insert a record into our table with the method, go ahead and choose the INSERT option, and click Next. The query it automatically builds is typically sufficient for the process and, in this case, it's exactly what we need. Yours should look like this:
Click the Next button and let's name our method InsertSiteFile. Once again by giving it a friendly, easy to remember name, we will be able to quickly find it when we need it. From here you can click either Next or Finish, and you should see that our dataset now looks like this:

The other methods that we will need right away will be one where we can retrieve an item from the table by an ID, one where we can retrieve a list of all the images, and one where we can retrieve a list of all the documents. We'll worry about those last two in a little bit. The existing GetData() method gets us the entire list, but we will also be able to retrieve a single record. Let's right-click on the SiteFilesTableAdapter and select Add Query just like before. Again we will choose the Use SQL option. But on the next screen, rather than selecting the INSERT option, we will choose the SELECT (the one which returns a row). We will be presented with an SQL statement that looks like this:

We will want to modify this statement to include the ID as parameter, like this:

Click Next and let's give some friendlier names to our methods, something like this:

We should be ready to start working with our database table now. We'll come back and add some more functionality to this dataset at a later time in this chapter, but for now we should be able to insert records, retrieve lists, and retrieve a single item. Our next step will be to create our Business Logic Layer (BLL) that corresponds with the DAL we just created. Our BLL, just like the one we created earlier for the Articles, will need a number of methods to call out to our DAL layer. Here is an example of these methods as they could be written:
Imports SiteFilesDSTableAdapters
<System.ComponentModel.DataObject()> _
Public Class SiteFilesBLL
Private _SiteFilesTableAdapter As SiteFilesTableAdapter = Nothing
Protected ReadOnly Property Adapter() As SiteFilesTableAdapter
Get
If _SiteFilesTableAdapter Is Nothing Then
_SiteFilesTableAdapter = New SiteFilesTableAdapter()
End If
Return _SiteFilesTableAdapter
End Get
End Property
' Get All Site Files Function
<System.ComponentModel.DataObjectMethodAttribute(System.ComponentModel.DataObjectMethodType.Select, True)> _
Public Function GetFiles() As SiteFilesDS.SiteFilesDataTable
Return Adapter.GetData()
End Function
' Update File Function
<System.ComponentModel.DataObjectMethodAttribute(System.ComponentModel.DataObjectMethodType.Update, True)> _
Public Function UpdateSiteFile(ByVal FileID As Integer, ByVal FileData As Byte(), ByVal FileName As String, ByVal FileDescription As String, ByVal FileType As Integer, ByVal FileCreated As DateTime, ByVal FileCreatedBy As String) As Boolean
Dim SiteFiles As SiteFilesDS.SiteFilesDataTable = Adapter.GetSiteFileByID(FileID)
If SiteFiles.Count = 0 Then
' If no matching record is found, return false
Return False
End If
Dim SiteFilesRow As SiteFilesDS.SiteFilesRow = SiteFiles(0)
SiteFilesRow.FileCreated = FileCreated
SiteFilesRow.FileCreatedBy = FileCreatedBy
SiteFilesRow.FileData = FileData
SiteFilesRow.FileDescription = FileDescription
SiteFilesRow.FileName = FileName
SiteFilesRow.FileType = FileType
' Update the Article record
Dim rowsAffected As Integer = Adapter.Update(SiteFilesRow)
' Return true if precisely one row was updated, otherwise false
Return rowsAffected = 1
End Function
' Delete File Function
<System.ComponentModel.DataObjectMethodAttribute(System.ComponentModel.DataObjectMethodType.Delete, True)> _
Public Function DeleteSiteFile(ByVal FileID As Integer) As Boolean
Dim rowsAffected As Integer = Adapter.Delete(FileID)
' Return true if precisely one row was deleted, otherwise false
Return rowsAffected = 1
End Function
End Class
Now that we have our DAL and BLL, we need the frontend pieces for the user to put the files in and retrieve them. In our CMS, we can break these down into two basic areas—Image galleries and document repositories.
An Image gallery can be thought of as a digital version of your home photo album. It's simply a listing of images that the user can browse through. In most galleries, you are displayed a listing of the images, often with a smaller version or thumbnail image as a representation, and then you have the ability to click on it and are presented with a larger image for easier viewing. This basic concept has been around since the early days of the Internet when people realized that they could easily allow a vast number of people to view their photos, images, or whatever. Galleries have come a long way since then, but the basic premise is still the same. For our CMS, we'll keep our gallery fairly simple, but we'll also point out the areas where you could further enhance it, should the need arise.
First thing we'll need to do is create a page to display our gallery. From the Solution Explorer, right-click on the Website and select Add New Item. You should get a selection screen like this:

Choose Web Form from the list of options and name it Gallery.aspx. Be sure to check both options—Place code in separate file and Select master page. Then click Add. You should now get another selection screen asking you to choose the Master Page you want to use.

Browse to the SimpleCMS.master file that we created earlier and click OK. We now have a page to use for our gallery, but now we need to add some controls to our page, in order to allow us to actually display the list of images. We could do this any number of ways—from tables, grids, repeaters, or even just simple lists, all of which would work for our needs. However, if we want to make things easy on ourselves (and who doesn't want to), I'd suggest we stick with one of the great grids that are provided to us. From the Toolbox, select Gridview and drag it onto your page into the ContentPlaceHolder1 section that should be highlighted. You should end up with a page that looks like this:

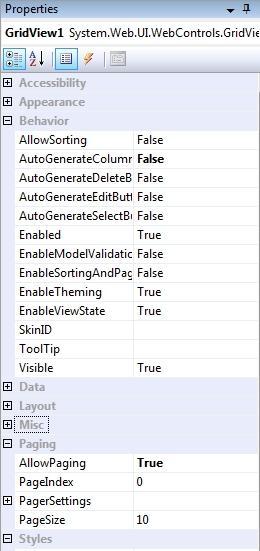
We now need to set up a few properties on our new Gridview so that it will work for us. First off, let's change the ID of the Gridview to something friendlier—"GalleryView". While we are in the Properties view, let's go ahead and set a few other items:
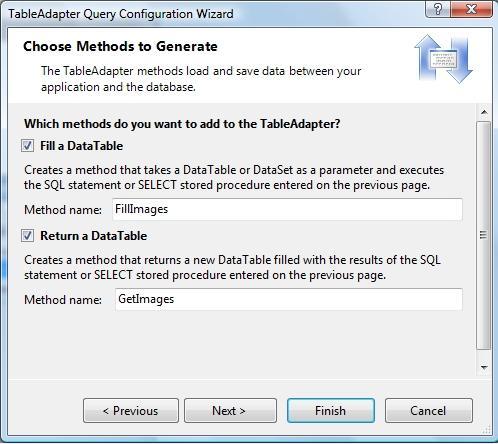
Now we need to set up the connection to our data. Earlier we created our SiteFilesDS with only a couple of simple methods. We'll need to add one to retrieve a list of images from the database. So, let's open up the SiteFilesDS and, like earlier, right-click on the SiteFilesTableAdapter and select Add Query. Again we will use the SELECT option and SELECT which returns rows. We will then be given the SQL statement that it prefilled for us, but we will add a little to it. Change the SQL so that it looks like this:

We will want to name the methods something friendlier again, so let's name them FillImages and GetImages.
Click Next and then Finish. We should now have a dataset that looks like this:

We'll now need to add this new method to our BLL:
' Get Images Function
<System.ComponentModel.DataObjectMethodAttribute( _
System.ComponentModel.DataObjectMethodType.Select, True)> _
Public Function GetImages() As SiteFilesDS.SiteFilesDataTable
Return Adapter.GetImages()
End Function
Okay, now that we have our methods in place, let's go back to our Gallery page. Open the Tasks menu for the Gridview we added earlier, and select Choose Data Source and then New Data Source from the menu options. You will get a selection screen like this:

Select the Object option available and click OK. You will get another selection screen that looks like this:

Choose the SiteFilesBLL option from the menu and click Next. As we will be retrieving a list from the database, we'll stay on the SELECT tab and then select the GetImages() method from the selection list. Click Finish and you should see some updates to your grid:

Ideally we could run the site now, but we're still missing one key component—a way to add images to the site. For this we'll want to create another new page. Just like before, let's right-click on the Website in the Solution Explorer and select Add Item. Choose Web Form from the options and name it AddImage.aspx, again selecting the Place code in separate file and Select master page options, as shown in the following screenshot:

We'll choose the SimpleCMS.master once again and click OK. We've now got our new page. Let's go ahead and add a label and text box for us to enter the description for the file we want to add. We'll also want to add a FileUpload control like we discussed earlier in this chapter. When you are done, your page should look similar to this:

And your HTML view should look similar to this:
<%@ Page Language="VB" MasterPageFile="~/SimpleCMS.master" AutoEventWireup="false"
CodeFile="AddImage.aspx.vb" Inherits="AddImage" title="Untitled Page" %>
<asp:Content ID="Content1" ContentPlaceHolderID="head" Runat="Server">
</asp:Content>
<asp:Content ID="Content2" ContentPlaceHolderID="ContentPlaceHolder1" Runat="Server">
File Description <asp:TextBox ID="txtFileDescription" runat="server"></asp:TextBox><br />
File <asp:FileUpload ID="fuSiteFile" runat="server" /><br />
<asp:Button ID="btnSubmit" runat="server" Text="Submit" />
</asp:Content>
You can always come back at a later point and arrange the controls into a style that fits your own design decisions, but for now, we'll just keep it simple. Notice that we also added a button for the user to click to submit their data. Now that we have the controls on the page, we need to make them do some actual work. Go into the code view for the page we just created. When you first enter it, you should see something similar to this:
Partial Class AddImage
Inherits System.Web.UI.Page
End Class
Let's go ahead and choose the btnSubmit from the class selection drop-down and then choose the Click event from the method drop-down. When you do that you should see the Click event for the button generated, looking similar to this:
Partial Class AddImage
Inherits System.Web.UI.Page
Protected Sub btnSubmit_Click(ByVal sender As Object, _
ByVal e As System.EventArgs) Handles btnSubmit.Click
End Sub
End Class
Now, we will want to create an instance of our BLL that we created earlier, and pass in all the values for the file to let the method do its thing and save our file to the database. The code for that could look similar to this:
Protected Sub btnSubmit_Click(ByVal sender As Object, _
ByVal e As System.EventArgs) Handles btnSubmit.Click
Dim bll As New SiteFilesBLL
If bll.AddSiteFile(fuSiteFile.FileBytes, _
fuSiteFile.FileName, _
txtFileDescription.Text, _
1, _
Now, _
Page.User.Identity.Name) Then
' All worked as expected
Response.Redirect("~/Gallery.aspx")
Else
' The upload failed.
End If
End Sub
You can see that I've added an IF/THEN check around the AddSiteFile() call to allow us to trap errors. I've also filled in all the values for the method. You may notice a couple of items in that list that may cause you to ask "why", so I'll discuss the purpose of each of the values briefly. The first value is the actual digital representation of the file, or the "bytes". The FileUpload control makes these available directly to us. The second parameter is the FileName, again coming directly from a property of the FileUpload control. The third parameter is the FileDescription, as entered in the text box by the user. The fifth value is a static integer of 1. In this case, we will use the 1 to represent images in our database. Remember that the database table will contain both images and documents. The sixth parameter is the "Created" date/time stamp. For this, you can use the Now() method that's prebuilt with .NET. The last parameter is the "Created By", or username, for the user who uploaded the file. That should complete our construction of this page, but wait. How would you get to the page? In order to access the page, we have to go back to the menu we created in Chapter 6 and add it. Open up the web.sitemap, and alter the items to include not only the AddImage.aspx, but we will also add the Gallery.aspx as well. When you are done, it should look similar to this:
<?xml version="1.0" encoding="utf-8" ?>
<siteMap xmlns="http://schemas.microsoft.com/AspNet/SiteMap-File-1.0" >
<siteMapNode url="" title="">
<siteMapNode url="~/Default.aspx" title="Home" description="Home" />
<siteMapNode url="~/AddImage.aspx" title="Add Image" description="Add Image" />
<siteMapNode url="~/Gallery.aspx" title="Gallery" description="Gallery" />
</siteMapNode>
</siteMap>
Let's go ahead and run our site now. Be sure to log in first (we'll come back to that shortly). From the menu, choose the Gallery page. As we haven't entered anything to this point, you should see a blank page like this:

From the menu, choose the Add Image item. You should see a page like this:

Go ahead and use the control to browse out and select an image from your computer. I'd suggest you select a JPEG file, just for ease of use. Fill in a description and click Submit. If all goes as expected, the file will be uploaded to the database. Of course, as we didn't tell the page to do anything after a successful save, it's difficult to know. Let's go back into the code for the Submit button Click, and change the result of the IF/THEN statement to have the page redirect to the Gallery page after an upload. It should look like this:
Partial Class AddImage
Inherits System.Web.UI.Page
Protected Sub btnSubmit_Click(ByVal sender As Object, _
ByVal e As System.EventArgs) Handles btnSubmit.Click
Dim bll As New SiteFilesBLL
If bll.AddSiteFile(fuSiteFile.FileBytes, _
fuSiteFile.FileName, _
txtFileDescription.Text, _
1, _
Now, _
Page.User.Identity.Name) Then
' All worked as expected
Response.Redirect("~/Gallery.aspx")
Else
' The upload failed.
image galleryimage gallerypage, browsingEnd If
End Sub
End Class
From the page menu, select the Gallery link and you should see a page similar to this:

As you can see, all the details on the file we uploaded are visible here, but the actual image itself isn't. That's because the image is stored in its raw form in the database, and hence the system will not automatically generate a column for this. We will need to manually do this. This is where things can get a little tricky. We will need to write a way to extract the raw data from the database and "recombine" it into a usable image. To accomplish this, we can create what's called a Stream to take the data out and allow us to work with it. Let's start by adding another Web Form to our page, same as we've done a number of times. However, this time let's make sure not to check the box that says Select Master Page. Call this new page StreamFile.aspx. You should get a new blank page that looks similar to this:
<%@ Page Language="VB" AutoEventWireup="false"
CodeFile="StreamFile.aspx.vb" Inherits="StreamFile" %>
<!DOCTYPE html
PUBLIC "-//W3C//DTD XHTML 1.0 Transitional//EN"
"http://www.w3.org/TR/xhtml1/DTD/xhtml1-transitional.dtd">
<html xmlns="http://www.w3.org/1999/xhtml">
<head runat="server">
<title>Untitled Page</title>
</head>
<body>
<form id="form1" runat="server">
<div>
</div>
</form>
</body>
</html>
Change the HTML view of the page to look like this:
<%@ Page Language="VB" AutoEventWireup="false"
CodeFile="StreamFile.aspx.vb" Inherits="StreamFile" %>
<%@ OutputCache Duration="60" VaryByParam="id" %>
<!DOCTYPE html
PUBLIC "-//W3C//DTD XHTML 1.0 Transitional//EN"
"http://www.w3.org/TR/xhtml1/DTD/xhtml1-transitional.dtd">
<html xmlns="http://www.w3.org/1999/xhtml">
<head id="Head1" runat="server">
<title></title>
</head>
<body></body>
</html>
We are simply eliminating all the unnecessary pieces of the page. We now need to go into the code view of the page. When we start, it will look like this:
Partial Class StreamFile
Inherits System.Web.UI.Page
End Class
We'll need to add a Page_Load event to the code, and then we'll need to do some coding to retrieve the raw data from the database and stream it back out to the client. Here is a sample of one simple way of retrieving this stream, but there are other ways too:
Imports SiteFilesBLL
Partial Class StreamFile
Inherits System.Web.UI.Page
Protected Sub Page_Load(ByVal sender As Object, _
ByVal e As System.EventArgs) Handles Me.Load
If Not Request.QueryString("id") Is Nothing AndAlso _
Not Request.QueryString("type") Is Nothing Then
Dim ID As Integer = CInt(Request.QueryString("id"))
Dim FileType As Integer = CInt(Request.QueryString("type"))
If FileType = 1 Then ' These are our Images
Dim _SiteFile As New SiteFilesDS.SiteFilesDataTable
Dim _SiteFilesBLL As New SiteFilesBLL
_SiteFile = _SiteFilesBLL.GetDataByFileID(ID)
Dim b() As Byte = _SiteFile(0).FileData
Response.BinaryWrite(b)
End If
End If
End Sub
End Class XE "image gallery:Page_Load event, adding to code"
Now that we have the page to return our image from the database, let's go back to the grid we put on our Gallery page. The code for it should look similar to this:
<%@ Page Language="VB" MasterPageFile="~/SimpleCMS.master" AutoEventWireup="false"
CodeFile="Gallery.aspx.vb" Inherits="Gallery" title="Untitled Page" %>
<asp:Content ID="Content1" ContentPlaceHolderID="head" Runat="Server">
</asp:Content>
<asp:Content ID="Content2" ContentPlaceHolderID="ContentPlaceHolder1" Runat="Server">
<asp:GridView ID="GridView1" runat="server" AllowPaging="True"
AutoGenerateColumns="False" DataKeyNames="FileID"
DataSourceID="ObjectDataSource1">
<Columns>
<asp:BoundField DataField="FileID" HeaderText="FileID" InsertVisible="False"
ReadOnly="True" SortExpression="FileID" />
<asp:BoundField DataField="FileName" HeaderText="FileName"
SortExpression="FileName" />
<asp:BoundField DataField="FileDescription" HeaderText="FileDescription"
SortExpression="FileDescription" />
<asp:BoundField DataField="FileType" HeaderText="FileType"
SortExpression="FileType" />
<asp:BoundField DataField="FileCreated" HeaderText="FileCreated"
SortExpression="FileCreated" />
<asp:BoundField DataField="FileCreatedBy" HeaderText="FileCreatedBy"
SortExpression="FileCreatedBy" />
</Columns>
</asp:GridView>
Let's go ahead and add another column to the beginning of the grid to display our image. We'll add an Image column. Let's now set its properties using the following code:
<asp:GridView ID="GridView1" runat="server" AllowPaging="True"
AutoGenerateColumns="False" DataKeyNames="FileID"
DataSourceID="ObjectDataSource1">
<Columns>
<asp:ImageField DataImageUrlField="FileID"
DataImageUrlFormatString="~/StreamFile.aspx?type=1&id={0}"
ReadOnly="true" InsertVisible="false" ControlStyle-Width="50" />
<asp:BoundField DataField="FileID" HeaderText="FileID" InsertVisible="False"
ReadOnly="True" SortExpression="FileID" />
<asp:BoundField DataField="FileName" HeaderText="FileName"
SortExpression="FileName" />
<asp:BoundField DataField="FileDescription" HeaderText="FileDescription"
SortExpression="FileDescription" />
<asp:BoundField DataField="FileType" HeaderText="FileType"
SortExpression="FileType" />
<asp:BoundField DataField="FileCreated" HeaderText="FileCreated"
SortExpression="FileCreated" />
<asp:BoundField DataField="FileCreatedBy" HeaderText="FileCreatedBy"
SortExpression="FileCreatedBy" />
</Columns>
</asp:GridView>
Go ahead, run the site again, and go to the Gallery page. You should see the grid again, but this time with a small "thumbnail" of the image you selected. As many of the images we could be entering into our system may be large, and we wouldn't want the grid to become too cumbersome, we have set our grid to always keep the images to 50px in width. Now, we will want to allow the users the ability to see the full size image, so let's go back to the grid and add one more column. This time we'll add a Hyperlink column to the grid. Go ahead and add one so that it looks similar to this:
asp:GridView ID="GridView1" runat="server" AllowPaging="True"
AutoGenerateColumns="False" DataKeyNames="FileID"
DataSourceID="ObjectDataSource1">
<Columns>
<asp:HyperLinkField DataNavigateUrlFields="FileID"
DataNavigateUrlFormatString="~/StreamFile.aspx?type=1&id={0}"
InsertVisible="false" Text="View" Target="_blank" />
<asp:ImageField DataImageUrlField="FileID"
DataImageUrlFormatString="~/StreamFile.aspx?type=1&id={0}"
ReadOnly="true" InsertVisible="false" ControlStyle-Width="50" />
<asp:BoundField DataField="FileID" HeaderText="FileID" InsertVisible="False"
ReadOnly="True" SortExpression="FileID" />
<asp:BoundField DataField="FileName" HeaderText="FileName"
SortExpression="FileName" />
<asp:BoundField DataField="FileDescription" HeaderText="FileDescription"
SortExpression="FileDescription" />
<asp:BoundField DataField="FileType" HeaderText="FileType"
SortExpression="FileType" />
<asp:BoundField DataField="FileCreated" HeaderText="FileCreated"
SortExpression="FileCreated" />
<asp:BoundField DataField="FileCreatedBy" HeaderText="FileCreatedBy"
image galleryimage galleryHyperlink column , addingSortExpression="FileCreatedBy" />
</Columns>
</asp:GridView>
Run the site again, and navigate to the Gallery page. This time you will see the View column. Click on it, and you should get another window that opens with just your image displayed.
We've now got a gallery added to our CMS site, as well as a way to add new images to it. Go ahead, add a few more, and you should see that when you add more than ten images, you will automatically have page numbers on the bottom of your grid for easier use. The Gallery and the Add Image pages are not the best looking ones out there, but they are fully functional. We will leave most of the "prettying up" to you so that you can incorporate the look and feel of your choice with your site.
The one last thing I want to mention in regards to Image and Photo Galleries is that there are a great deal of plug-ins out there on the Internet, many of which are free. I suggest that before you spend too much time enhancing your gallery, you spend a little time with your favorite search engine. You may find some great ones already built for you that you could easily plug into this site and use.
Document repositories work basically the same way as the image galleries. With this in mind, we will be able to utilize the work we've already done and simply enhance it to fill another need. Just like with the gallery work we did earlier, let's start down at the DAL level. Let's create another method on the SiteFilesTableAdapter in the SiteFilesDS. Right-click on the SiteFilesTableAdapter and select Add Query. Select the Use SQL statements option and then SELECT which returns rows. We'll want to modify the query that is generated to limit it to only our documents. Remember that images and documents are stored in the same location, so we need to filter out all the unwanted items. Modify the query so that it looks like this:

On the next page, let's name our methods FillDocuments and GetDocuments, as shown in the following screenshot:

Click Next and then Finish, and we should have our new method to retrieve our documents for displaying later. Now we need to go to the BLL and give us a way to call the new method we wrote. We'll want to add a new method to the SiteFilesBLL class we created earlier to retrieve the documents from the DAL. Yours should look similar to this:
Now we're ready to create a page to add a document to the list, and then we'll want to add a page to view a list of all the documents. For adding a document, our page will be nearly identical to the Add Image page we created already. Add a new Web Form to the site, calling it AddDocument.aspx, and making sure to select the SimpleCMS.master as your Master Page. Open the new page you created in the HTML view and add the same series of controls you added for the Add Image page. It should look like this:
<%@ Page Language="VB" MasterPageFile="~/SimpleCMS.master" AutoEventWireup="false"
CodeFile="AddDocument.aspx.vb" Inherits="AddDocument" title="Untitled Page" %>
<asp:Content ID="Content1" ContentPlaceHolderID="head" Runat="Server">
</asp:Content>
<asp:Content ID="Content2" ContentPlaceHolderID="ContentPlaceHolder1" Runat="Server">
File Description <asp:TextBox ID="txtFileDescription" runat="server"></asp:TextBox><br />
File <asp:FileUpload ID="fuSiteFile" runat="server" /><br />
<asp:Button ID="btnSubmit" runat="server" Text="Submit" />
</asp:Content>
Switch to the Code view for the page and add a Page_Load event. From there, we will need to instantiate the BLL class and add a call to the AddSiteFile() method just like before. However, this time notice that we change the FileType parameter from 1 to 2, in order to indicate that it's a document and not an image. Yours should look similar to this:
Partial Class AddDocument
Inherits System.Web.UI.Page
Protected Sub btnSubmit_Click(ByVal sender As Object, _
ByVal e As System.EventArgs) Handles btnSubmit.Click
Dim bll As New SiteFilesBLL
If bll.AddSiteFile(fuSiteFile.FileBytes, _
fuSiteFile.FileName, _
txtFileDescription.Text, _
2, _
Now, _
Page.User.Identity.Name) Then
' All worked as expected
Response.Redirect("~/Documents.aspx")
Else
' The upload failed.
End If
End Sub
End Class
Notice that we also changed the successful code path to redirect to a different page, Documents.aspx. This will be the next page we create. Let's go ahead and add another Web Form just like before, calling it Documents.aspx and using the same SimpleCMS.master that we've been using. Rather than just use another grid to show how you could display the list of documents, we'll look at another control you could use. For this listing, we'll use the Repeater control. Go ahead and drag a Repeater control from the Toolbox onto your form inside the Content2 control. It should look like this:

Open the Tasks menu from the control and select Datasource | New Datasource. Choose the Object option and click the OK button. You'll then get a selection screen just like we got with the gallery. Choose the SiteFilesBLL and click Next. On the next screen, we need to define the Data Method we want to use. Select the GetDocuments() method from the drop-down list and click Finish. We've now told our Repeater to go to the database and get all the documents in it, but we haven't yet told it how to present the results to us. With the grid, it did a bunch of guesswork for us and laid out all the columns from the database in a nice grid fashion. However, the Repeater starts out empty, and we need to do the layout work ourselves. Open the HTML view for the Documents.aspx page and it should look similar to this:
<asp:Content ID="Content1" ContentPlaceHolderID="head" Runat="Server">
</asp:Content>
<asp:Content ID="Content2" ContentPlaceHolderID="ContentPlaceHolder1" Runat="Server">
<br />
<asp:Repeater ID="Repeater1" runat="server" DataSourceID="ObjectDataSource1"> </asp:Repeater>
<asp:ObjectDataSource ID="ObjectDataSource1" runat="server"
DeleteMethod="DeleteSiteFile" InsertMethod="AddSiteFile"
OldValuesParameterFormatString="original_{0}" SelectMethod="GetDocuments"
TypeName="SiteFilesBLL" UpdateMethod="UpdateSiteFile"> <DeleteParameters>
<asp:Parameter Name="FileID" Type="Int32" />
</DeleteParameters>
<UpdateParameters>
<asp:Parameter Name="FileID" Type="Int32" />
<asp:Parameter Name="FileData" Type="Object" />
<asp:Parameter Name="FileName" Type="String" />
<asp:Parameter Name="FileDescription" Type="String" />
<asp:Parameter Name="FileType" Type="Int32" />
<asp:Parameter Name="FileCreated" Type="DateTime" />
<asp:Parameter Name="FileCreatedBy" Type="Str ing" />
</UpdateParameters>
<InsertParameters>
<asp:Parameter Name="FileData" Type="Object" />
<asp:Parameter Name="FileName" Type="String" />
<asp:Parameter Name="FileDescription" Type="String" />
<asp:Parameter Name="FileType" Type="Int32" />
<asp:Parameter Name="FileCreated" Type="DateTime" />
<asp:Parameter Name="FileCreatedBy" Type="String" />
</InsertParameters>
</asp:ObjectDataSource> </asp:Content>
Let's go ahead and add some HTML formatting for us to display our documents in. For this, we'll use a simple table tag. Let's add a header row to the table, with all the columns we would want to display from the documents list. When you are done, it should look similar to this:
<asp:Repeater ID="Repeater1" runat="server" DataSourceID="ObjectDataSource1">
<HeaderTemplate>
<table border="1" style="width:600px">
<tr>
<th>Document</th>
<th>Created</th>
<th>User</th>
</tr>
</HeaderTemplate> <FooterTemplate>
</table>
</FooterTemplate>
</asp:Repeater>
Notice that we put all this in the HeaderTemplate and FooterTemplate controls within the Repeater. The HeaderTemplate is only displayed once, which is what we want. Now we need to add an ItemTemplate to display the individual items from the list that we receive from the database. The ItemTemplate is repeated for every single item in the list that comes back. Go ahead and add your ItemTemplate, and fill in its contents so that it looks similar to this:
<asp:Repeater ID="Repeater1" runat="server" DataSourceID="ObjectDataSource1">
<HeaderTemplate>
<table border="1" style="width:600px">
<tr>
<th>Document</th>
<th>Created</th>
<th>User</th>
</tr>
</HeaderTemplate>
<ItemTemplate>
<tr>
<td><%#Container.DataItem("FileName")%></td>
<td><%#Container.DataItem("FileCreated")%></td>
<td><%#Container.DataItem("FileCreatedBy")%></td>
</tr>
</ItemTemplate>
<FooterTemplate>
</table>
</FooterTemplate>
</asp:Repeater>
We've now created the two pages we needed, but we still need to add them to our menu that we created earlier. Add them to your web.sitemap. Yours should look similar to this:
<?xml version="1.0" encoding="utf-8" ?>
<siteMap xmlns="http://schemas.microsoft.com/AspNet/SiteMap-File-1.0" >
<siteMapNode url="" title="">
<siteMapNode url="~/Default.aspx" title="Home" description="Home" />
<siteMapNode url="~/AddImage.aspx" title="Add Image" description="Add Image" />
<siteMapNode url="~/Gallery.aspx" title="Gallery" description="Gallery" />
<siteMapNode url="~/AddDocument.aspx" title="Add Document" description="Add Document" />
<siteMapNode url="~/Documents.aspx" title="Documents" description="Documents" />
</siteMapNode>
</siteMap>
Go ahead and run the site now. Don't forget that until you actually go and add some documents to the site through the AddDocuments.aspx page, you won't get any results in your Documents.aspx list. Make sure to add a couple and then your resulting Documents.aspx should look similar to this:
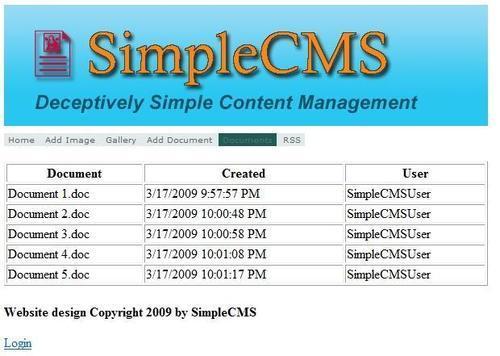
We can now see all the documents listed out, but we don't have the ability to actually open one of them. To accomplish this, let's go back to the HTML view for the repeater we put on our Documents.aspx page. Let's adjust the first column so that the name of the document is a link to actually open the document. For this we'll need to wrap it in an <A HREF> tag and call our StreamFiles.aspx page. Yes, that's right; we can reuse that same page for streaming out documents, as well as our images. Change the code for the first column so that it looks similar to this:
<asp:Repeater ID="Repeater1" runat="server" DataSourceID="ObjectDataSource1">
<HeaderTemplate>
<table border="1" style="width:600px">
<tr>
<th>Document</th>
<th>Created</th>
<th>User</th>
</tr>
</HeaderTemplate>
<ItemTemplate>
<tr>
<td><a href="StreamFile.aspx?id=<%#Container.DataItem("FileID") %>&type=2"
target="_blank"><%#Container.DataItem("FileName")%></a></td>
<td><%#Container.DataItem("FileCreated")%></td>
<td><%#Container.DataItem("FileCreatedBy")%></td>
</tr>
</ItemTemplate>
<FooterTemplate>
</table>
</FooterTemplate>
</asp:Repeater>
We'll also need to go to the StreamFile.aspx code and add the functionality to retrieve the document from the database and present it to the user. For that we'll want to add another IF check to the existing method. Add the following code so that yours looks similar to this:
Protected Sub Page_Load(ByVal sender As Object, _
ByVal e As System.EventArgs) Handles Me.Load
If Not Request.QueryString("id") Is Nothing AndAlso _
Not Request.QueryString("type") Is Nothing Then
Dim ID As Integer = CInt(Request.QueryString("id"))
Dim FileType As Integer = CInt(Request.QueryString("type"))
If FileType = 1 Then ' These are our Images
Dim _SiteFile As New SiteFilesDS.SiteFilesDataTable
Dim _SiteFilesBLL As New SiteFilesBLL
_SiteFile = _SiteFilesBLL.GetDataByFileID(ID)
Dim b() As Byte = _SiteFile(0).FileData
Response.BinaryWrite(b)
ElseIf FileType = 2 Then ' These are our Documents
Dim _SiteFile As New SiteFilesDS.SiteFilesDataTable
Dim _SiteFilesBLL As New SiteFilesBLL
_SiteFile = _SiteFilesBLL.GetDataByFileID(ID)
Dim b() As Byte = _SiteFile(0).FileData
Response.Clear()
Response.AddHeader("Content-Disposition", _
"attachment; filename=" & _SiteFile(0).FileName)
Response.AddHeader("Content-Length", b.Length.ToString())
Response.ContentType = "application/octet-stream"
Response.BinaryWrite(b)
Response.Flush()
Response.End()
End If
End If
End Sub
You will notice the code handles this in a slightly different fashion from the original, but it just shows you one more alternative when storing your files within the database and streaming them out for use.
These days, users want to be able to know what's going on with sites they visit, especially when it may routinely have new content such as articles, news, blog posts, and so on. For this continuous updating, many users have turned to the world of RSS. Before we go into too much depth on adding the functionality to our site, let's talk a little more about what RSS is and how it works. RSS typically stands for Really Simple Syndication and its purpose is just what its name indicates. It's a way for you to syndicate (distribute) your site in a standardized, simple format. An RSS feed is really nothing more than a properly formatted XML file, following a set of guidelines. We won't go into detail on the specifications for a proper RSS, but a quick search online with your favorite search engine should produce a plethora of information on the subject. For our purposes, we will stick with simply implementing the process and generating the XML output.
Now for the XML output for the Articles within our site, we have two basic options. We could create a physical XML file on the server and append a new entry to it each time a new article is added to the system. However, I've found that this method can be quite cumbersome and can create a great deal of headaches. Most of the problems around this can be related to the way the server has to open and close the file, the permissions on the file to do the work, possible caching issues with the file, and lastly the possibility of corruption of the file. For these reasons, I often opt for a second option, that is, generating the file "on the fly" in a very similar way to how we are retrieving images and documents within our CMS.
First thing we will need to do if we want to generate our file dynamically is to create a page to generate the output. Go ahead and add a new Web Form to your site and call it RSS.aspx. However, this time make sure to uncheck Select master page, just like we did for the other streaming page. Your newly-generated file should look like this:
<%@ Page Language="VB" AutoEventWireup="false"
CodeFile="RSS.aspx.vb" Inherits="RSS" %>
<!DOCTYPE html PUBLIC "-//W3C//DTD XHTML 1.0 Transitional//EN"
"http://www.w3.org/TR/xhtml1/DTD/xhtml1-transitional.dtd">
<html xmlns="http://www.w3.org/1999/xhtml">
<head runat="server">
<title>Untitled Page</title>
</head>
<body>
<form id="form1" runat="server">
<div>
</div>
</form>
</body>
</html>
We'll now want to trim out all the unnecessary HTML. Your page should now look like this:
<%@ Page Language="VB" AutoEventWireup="false"
CodeFile="RSS.aspx.vb" Inherits="RSS" %>
<%@ OutputCache Duration="300" VaryByParam="none" %>
<!DOCTYPE html PUBLIC "-//W3C//DTD XHTML 1.0 Transitional//EN"
"http://www.w3.org/TR/xhtml1/DTD/xhtml1-transitional.dtd">
<html xmlns="http://www.w3.org/1999/xhtml">
<head id="Head1" runat="server"><title></title></head>
<body></body>
</html>
Now, we'll need to open the code view of our newly-created page. Go ahead and add a Page_Load() event. Your code should now look similar to this:
Partial Class Rss
Inherits System.Web.UI.Page
Protected Sub Page_Load(ByVal sender As Object, _
ByVal e as System.EventArgs) Handles Me.Load
End Sub
End Class
From here the code can look intimidating, but all we are really doing is building our XML file one tag at a time. I'll try to break it down as we go. In order for us to be able to use XML and its built-in methods provided by the .NET Framework, we will have to first add an Imports statement to the top, as follows:
Imports System.Xml
Partial Class RSS
Inherits System.Web.UI.Page
Next, we'll start off our code within the Page_Load method with some house cleaning. We'll want to add the Response.Clear line to clear any pre-existing output that the system may have already generated. Next, we'll add a new Response declaration to tell the user's browser what the file type is. Your code should look similar to this:
Protected Sub Page_Load(ByVal sender As Object, ByVal e As System.EventArgs) Handles Me.Load
Response.Clear()
Response.ContentType = "text/xml"
Now, we'll need to instantiate the new XML output that we want to generate. To do this, we'll create our XmlTextWriter object, and will also create the starting tags, like this:
Dim objX As New XmlTextWriter(Response.OutputStream, Encoding.UTF8)
objX.WriteStartDocument()
The next three lines of code we need are simply XML tags (better known as Elements) and some corresponding attributes necessary for RSS readers to properly parse the data. Your next three lines should look like this:
objX.WriteStartElement("rss")
objX.WriteAttributeString("version", "2.0")
objX.WriteStartElement("channel")
The next five lines in the XML output are "top level" items. This means they are in the file once and help to define what your RSS feed is all about. This is information like your site name, site/feed URL, site description, and copyright information. The code for this will look like this:
objX.WriteElementString("title", "Simple CMS")
objX.WriteElementString("link", "http://www.YourSiteName.com/rss.aspx")
objX.WriteElementString("description", "Articles from SimpleCMS.")
objX.WriteElementString("copyright", "(c) 2009, yoursite.com. All rights reserved.")
objX.WriteElementString("ttl", "5")
That takes care of all the setup for the parent elements of the XML file. Now what we need to do is actually get all the latest Articles from our system into the feed. For this we will first need to instantiate the BLL layer for our Articles and call the method to retrieve the latest Articles. That would be a call like the following:
Dim _articlesBLL As New ArticlesBLL
For Each _article As ArticlesDataSet.ArticlesRow In _articlesBLL.GetAllCurrentPublishedArticles Next
Now that we have the collection of Articles we want to output in our feed, we just need to create the appropriate elements for each Article. The next eight lines of code create the element for the Article and fill in the child Elements with the values from the Article that was retrieved from the database. These items are the title, description (contents), link to the Article, date published/created, author, and the categorization. The code to populate this will look like this:
Dim _articlesBLL As New ArticlesBLL
For Each _article As ArticlesDataSet.ArticlesRow In _articlesBLL.GetAllCurrentPublishedArticles
objX.WriteStartElement("item")
objX.WriteElementString("title", _article.ArticleTitle)
objX.WriteElementString("description", _article.ArticleBody)
objX.WriteElementString("link", "http://www.yoursite.com/articles.aspx?id=" & _article.ArticleID.ToString)
objX.WriteElementString("pubDate", CDate(_article.ArticleCreatedDate).ToString("R"))
objX.WriteElementString("author", _article.ArticleCreatedBy)
objX.WriteElementString("category", "Articles")
objX.WriteEndElement()
Next
All we have left to do now is close out all the XML Elements we've created. Go ahead and add these five lines to close the elements and close out the output for the user's browser. The code for that will look like this:
objX.WriteEndElement()
objX.WriteEndElement()
objX.WriteEndDocument()
objX.Flush()
objX.Close()
Response.End()
That's it! Our CMS site's Articles are now available to the world through their favorite RSS reader. The only thing now is to provide a link on our menu so that the users can find our RSS Feed. Open the web.sitemap we created for our site and add the RSS link to it like this:
<?xml version="1.0" encoding="utf-8" ?>
<siteMap xmlns="http://schemas.microsoft.com/AspNet/SiteMap-File-1.0" >
<siteMapNode url="" title="">
<siteMapNode url="~/Default.aspx" title="Home" description="Home" />
<siteMapNode url="~/AddImage.aspx" title="Add Image" description="Add Image" />
<siteMapNode url="~/Gallery.aspx" title="Gallery" description="Gallery" />
<siteMapNode url="~/AddDocument.aspx" title="Add Document" description="Add Document" />
<siteMapNode url="~/Documents.aspx" title="Documents" description="Documents" />
<siteMapNode url="~/RSS.aspx" title="RSS" description="RSS" />
</siteMapNode>
</siteMap>
Go ahead and run the site now and click the RSS menu item. Depending on your browser, you may get an output that looks similar to this (IE7 version).

In this chapter, we covered a great deal about dynamically providing content to your users. We've explored streaming files and images from the database, as well as generating RSS feeds "on the fly". However, this is just a small sample of the different ways this can all be done. I highly recommend you spend some time with other research materials, and execute some different options within the code, in order to see what other things you can do. Once you master the concepts of creating the content dynamically, nearly anything is possible.