
In this section, we will revisit the new features and enhancements in WCF 4.5. The new and enhanced features in WCF 4.5 include the following:
- Simplified configuration: WCF 4.5 provides support for a much simpler configuration. It provides default endpoints, binding, and behavior.
- Standard endpoints: WCF 4.5 provides support for preconfigured standard endpoints. The standard endpoints available in WCF 4.5 include dynamicEndPoint, discoveryEndpoint, udpDiscoveryEndpoint, announcementEndpoint, udpAnnouncementEndpoint, mexEndPoint, webHttpEndpoint, webScriptEndpoint, and workflowControlEndpoint.
- Discovery: WCF 4.5 provides the ability to resolve service endpoints dynamically, based on some predefined criteria.
- Simplified IIS Hosting: WCF 4.5 provides support for simplified hosting services in the IIS with easy-to-use configuration.
- Better support for REST: WCF 4.5 provides enhanced support for the design and development of REST-based services.
- Routing service: WCF 4.5 provides support for routing. You can host a routing service in much the same way you host a WCF service. Routing service provides versioning, protocol bridging, transaction and error-handling support.
- Workflow services: WCF 4.5 provides support for integrating WCF services and WF services. You can now implement declarative services seamlessly. You also have a much improved infrastructure for hosting workflow services in IIS.
The WCF Framework was first introduced in 2006 as part of .NET Framework 3.0. It is a framework that comprises a number of technologies to provide a platform for designing applications that are based on SOA, which can have the capability to intercommunicate.
The new enhancements in WCF in .NET Framework 3.5 include the following:
- Support for Ajax-enabled WCF services
- Improved support for WCS standards
- A new WCF designer
- New WCF tools (WcfSvcHost and WcfTestClient)
- Support for REST-based WCF services
- Support for WCF and WF interactivity
Another great new feature in WCF 3.5 is the introduction of the UserNamePasswordValidator class. You can use this class to design and implement your own custom validators for validating a user's credentials.
The UserNamePasswordValidator class in the System.IdentityModel.Selectors namespace can be used to validate user credentials in WCF 3.5. You can create your own custom validator simply by extending the UserNamePasswordValidator class and then overriding the Validate method, as shown in the following code:
using System;
using System.IdentityModel.Selectors;
using System.IdentityModel.Tokens;
using System.ServiceModel;
namespace Packt
{
    public class PacktValidator : UserNamePasswordValidator
    {
        public override void Validate(String userName, String password)
        {
            if (!userName.Equals("joydip")) || !password.Equals("joydip1@3"))
            {
                throw new SecurityTokenException("User Name and/or Password incorrect...!");
            }
        }
    }
}
You can then configure the validator you just created in the configuration file, as shown here:
<?xml version="1.0" encoding="utf-8" ?>
<configuration>
  <system.web>
    <compilation debug="true" />
  </system.web>
  <system.serviceModel>
    <services>
      <bindings>
        <wsHttpBinding>
          <binding name="PacktAuthentication">
            <security mode="Transport">
              <transport clientCredentialType="Basic" />
            </security>
          </binding>
        </wsHttpBinding>
      </bindings>

      <behaviors>
        <serviceBehaviors>
          <behavior name="PacktValidator.ServiceBehavior">
            <serviceCredentials>
              <userNameAuthenticationuserNamePasswordValidationMode="Custom"customUserNamePasswordValidatorType="Packt.PacktValidator, Packt"/>
            </serviceCredentials>
          </behavior>
        </serviceBehaviors>
      </behaviors>
    </system.serviceModel>
</configuration>
The new enhancements in WCF 4.5 include the following:
- Simplified configuration
- Standard endpoints
- Discovery
- Simplified IIS Hosting
- REST improvements
- Workflow services
- Routing services
- An automatic Help page
WCF 4.5 starts up with the default configuration model. Configuration in WCF 4.5 is much simplified compared to its earlier counterparts. In WCF 3.x, you needed to specify the endpoints, behavior, and so on, for the service host. With WCF 4.5, default endpoints, binding information, and behavior are provided by default. In essence, WCF 4.5 eliminates the need for any WCF configuration when you are implementing a particular WCF service.
There are a few standard endpoints and default binding/behavior configurations that are created by default for any WCF service in WCF 4.5. This makes it easy to get started with WCF, because the tedious configuration details of WCF 3.x are no longer required.
Consider the following WCF service:
using System;
using System.ServiceModel;
namespace PacktService
{
    [ServiceContract]
    public interface ITestService
    {
        [OperationContract]
        String DisplayMessage();
    }

    public class TestService : ITestService
    {
        public String DisplayMessage()
        {
            return "Hello World!";
        }
    }
}
In WCF 4.5, you can use ServiceHost to host the WCF service without the need for any configuration information whatsoever. The following is all the code you need to host your WCF service and display the address, binding, and contract information:
using System.ServiceModel;
using System;
using System.ServiceModel.Description;
namespace PacktClient
{
    class Program
    {
        static void Main(string[] args)
        {
            ServiceHost serviceHost = new ServiceHost
                 (typeof(PacktService.TestService));
                 serviceHost.AddServiceEndpoint
                 (typeof(PacktService.TestService),
                 new BasicHttpBinding(),
                 "http://localhost:1607/
                 TestService.svc");
            serviceHost.Open();
            foreach (ServiceEndpoint serviceEndpoint
                in serviceHost.Description.Endpoints)
              Console.WriteLine("Address: {0}, Binding: {1},
                Contract: {2}", serviceEndpoint.Address,
                serviceEndpoint.Binding.Name,
                serviceEndpoint.Contract.Name);
            Console.ReadLine();
            serviceHost.Close();
        }
    }
}
The following is an example of all the configuration information you need to specify and consume your service in WCF 4.5:
<?xml version="1.0" encoding="utf-8" ?>
<configuration>
 <system.serviceModel>
    <behaviors>
      <serviceBehaviors>
        <behavior>
          <serviceMetadata httpGetEnabled ="true"/>
        </behavior>
      </serviceBehaviors>
    </behaviors>
 </system.serviceModel>
</configuration>
Note that the binding used by default is BasicHttpBinding. If you want to choose a more secure binding (such as WSHttpBinding), you can change the binding information, as shown in the following code snippet:
<?xml version="1.0" encoding="utf-8" ?>
<configuration>
 <system.serviceModel>
    <behaviors>
      <serviceBehaviors>
        <behavior>
          <serviceMetadata httpGetEnabled ="true"/>
        </behavior>
      </serviceBehaviors>
    </behaviors>
    <protocolMapping>
      <add binding="wsHttpBinding" scheme ="http"/>
    </protocolMapping>
 </system.serviceModel>
</configuration>
Standard endpoints are preconfigured endpoints in WCF Framework 4.5. You can always reuse them, but they don't generally change. The following table lists the standard endpoints in WCF 4.5 and their purposes.
You can use any of the endpoints shown in the previous example by referencing them in the <configuration> element using the endpoint name. The following is an example:
<configuration>
  <system.serviceModel>
    <services>
      <service name="PacktService">
        <endpoint kind="basicHttpBinding" contract="IMyService"/>
        <endpoint kind="mexEndpoint" address="mex" />
      </service>
    </services>
  </system.serviceModel>
</configuration>There are two modes of operation:
- Ad-hoc mode: In this mode, there is no centralized server, and all service announcements and client requests are sent in a multicast manner.
- Managed mode: In this mode, you have a centralized server. Such a server is known as a discovery proxy, where the services are published centrally, and the clients who need to consume such published services connect to this mode to retrieve the necessary information.
You can just add the standard udpDiscoveryEndpoint endpoint and also enable the <serviceDiscovery> behavior to enable service discovery in the Ad-hoc mode. The following is an example:
<configuration>
    <system.serviceModel>
      <services>
        <service name="TestService">
          <endpoint binding="wsHttpBinding" contract="ITestService" />
          <!-- add a standard UDP discovery endpoint-->
          <endpoint name="udpDiscovery" kind="udpDiscoveryEndpoint"/>
        </service>
      </services>
      <behaviors>
        <serviceBehaviors>
        <behavior name="TestService.MyServiceBehavior">
          <!-- To avoid disclosing metadata information, set the value below to false and remove the metadata endpoint above before deployment -->
          <serviceMetadata httpGetEnabled="true"/>
          <!-- To receive exception details in faults for debugging purposes, set the value below to true.Set to false before deployment to avoid disclosing exception information -->
          <serviceDebug includeExceptionDetailInFaults="false"/>
         <serviceDiscovery />
         </behavior>
      </serviceBehaviors>
      </behaviors>
    </system.serviceModel>
</configuration>
In the preceding code snippet, note how a new EndPoint has been added to discover the service. The ServiceDiscovery behavior has also been added. You can use the DiscoveryClient class to discover your service and invoke one of its methods.
You must create an instance of the DiscoveryClient class and pass UdpDiscoveryEndPoint to the constructor of this class as a parameter to discover the service. Once the endpoint has been discovered, its address can be used to invoke the service. The following code snippet illustrates this:
using System;
using System.ServiceModel;
using System.ServiceModel.Discovery;
namespace PacktConsoleApplication
{
    class Program
    {
        static void Main(string[] args)
        {
            DiscoveryClient discoverclient = new DiscoveryClient(new UdpDiscoveryEndpoint());
            FindResponse findResponse = discoverclient.Find(new FindCriteria(typeof(ITestService)));
            EndpointAddress endpointAddress = findResponse.Endpoints[0].Address;
            MyServiceClient serviceClient = new MyServiceClient(new WSHttpBinding(), endpointAddress);
            Console.WriteLine(serviceClient.DisplayMessage());
        }
    }
}
WCF 4.5 also enables you to configure services to announce their endpoints as soon as they are started. You can configure your service to announce endpoints at start time with the following code:
<configuration>
  <system.serviceModel>
    <services>
      <service name="TestService">
        <endpoint binding="wsHttpBinding" contract="ITestService"/>
        <endpoint kind="udpDiscoveryEndpoint"/>
      </service>
    </services>
    <behaviors>
      <serviceBehaviors>
        <behavior>
          <serviceDiscovery>
            <announcementEndpoints>
              <endpoint kind="udpAnnouncementEndpoint"/>
            </announcementEndpoints>
          </serviceDiscovery>
        </behavior>
      </serviceBehaviors>
    </behaviors>
  </system.serviceModel>
</configuration>Hosting of WCF 4.5 applications on IIS has now become easy. The following is an example of a simple WCF service:
<!-- PacktService.svc -->
<%@ ServiceHost Language="C#" Debug="true" Service=" PacktService
    CodeBehind="~/App_Code/PacktService.cs" %>
[ServiceContract]
public class PacktService
{
    [OperationContract]
    public string GetMessage()
    {
        return "This is a test service.";
    }
}
You can then enable service metadata for the service in the application's web.config configuration file as shown in the following code snippet:
<system.serviceModel>
  <behaviors>
    <serviceBehaviors>
      <behavior>
        <serviceMetadata httpGetEnabled="true"/>
      </behavior>
    </serviceBehaviors>
  </behaviors>
</system.serviceModel>
You can also define virtual service activation endpoints for your WCF 4.5 services in your application's web.config configuration file. In doing so, you can activate your WCF service without the need of any .svc files. Here is the configuration you need to specify in your application's web.config configuration file to activate your service without the need of a .svc file:
<configuration>
  <system.serviceModel>
    <serviceHostingEnvironment>
      <serviceActivations>
        <add relativeAddress="PacktService.svc" service="PacktService"/>
      </serviceActivations>
    </serviceHostingEnvironment>
  </system.serviceModel>
</configuration>WCF 4.5 comes with improved support for REST-based features. You now have support for an automatic Help page that describes the REST-based services available for service consumers or clients. This feature is turned on by default, though you can manually configure the same, as shown in the following code listing:
<configuration>
  <system.serviceModel>
    <serviceHostingEnvironment aspNetCompatibilityEnabled="true" />
    <behaviors>
      <endpointBehaviors>
        <behavior name="PacktTestHelpBehavior">
          <webHttp helpEnabled="true" />
        </behavior>
      </endpointBehaviors>
    </behaviors>
    <services>
      <service name="PacktSampleWCFService">
        <endpoint behaviorConfiguration="PacktTestHelpBehavior"binding="webHttpBinding" contract="PacktSampleWCFService" />
      </service>
    </services>
  </system.serviceModel>
</configuration>
WCF 4.5 also comes with support for HTTP caching using the AspNetCacheProfile attribute. Note that the AspNetCacheProfile support actually uses the standard ASP.NET output caching mechanism to provide you with caching features in your WCF service.
To use this attribute, you should add a reference to the System.ServiceModel.Web.Caching namespace. You can apply this attribute in a WebGet operation and specify the cache duration of your choice. The following code snippet can be used in your service contract method to make use of this feature:
using System.ServiceModel.Web.Caching;
[OperationContract]
[WebGet]
[AspNetCacheProfile("PacktCache")]
String GetProductName();
Accordingly, you should set the cache profile in your application's web.config file as shown in the following code:
<caching>
 <outputCacheSettings>
    <outputCacheProfiles>
      <add name="PacktCache" duration="60" varyByParam="format"/>
    </outputCacheProfiles>
 </outputCacheSettings>
</caching>
Routing is a feature in WCF 4.5 that is used to determine how a message should be forwarded, and when a request from the client appears. Filters determine how the routing service redirects the requests that come in from the client to a particular WCF service. These filters are mapped with the corresponding WCF service endpoints using a routing table. The following are the available filter types:
- Action
- Address
- AddressPrefix
- And
- Custom
- Endpoint
- MatchAll
- XPath
The Routing service in WCF 4.5 provides support for the following features:
- Message routing
- Versioning
- Error handling
- Transaction handling
- Protocol bridging
In WCF 4.5, you have the RoutingService class that you can use to implement generic WCF routing mechanisms in your application. The following is how the RoutingService class looks:
[ServiceBehavior(AddressFilterMode = AddressFilterMode.Any,InstanceContextMode = InstanceContextMode.PerSession,UseSynchronizationContext = false, ValidateMustUnderstand = false)]
public sealed class RoutingService : ISimplexDatagramRouter, ISimplexSessionRouter,
    IRequestReplyRouter, IDuplexSessionRouter
{
     //Some code
}
Hosting RoutingService is as simple as hosting a WCF service. You must simply create an instance of ServiceHost, and then specify RoutingService for the service type. The following is an example:
public static void Main()
{
    ServiceHost serviceHost = new ServiceHost(typeof(RoutingService));
    try
    {
        serviceHost.Open();
        Console.WriteLine("Routing Service started...");
        Console.WriteLine("Press <ENTER> to stop the Routing Service.");
        Console.ReadLine();
        serviceHost.Close();
    }
    catch (CommunicationException ce)
    {
        Console.WriteLine(ce.Message);
        serviceHost.Abort();
    }
}
The routing section consists of two sections, filters and filterTables. All the filters that are created for the routing are located in the filters section. For each filter, we have to specify the name and type. Here, the filterData is EndpointName. There are different kinds of filter types available:
- EndpointName
- XPath
- Action
- And
- Custom
Once RoutingService has been started by making a call to the Open() method on the ServiceHost instance, it can route messages as needed. The following is an example of a typical configuration you would use to specify the routing information for your routing service:
<?xml version="1.0" encoding="utf-8" ?>
<configuration>
 <system.serviceModel>
    <services>
       <service name="System.ServiceModel.Routing.RoutingService" behaviorConfiguration="TestBehavior">
        <host>
          <baseAddresses>
            <add baseAddress="http://localhost:1809/TestService"/>
          </baseAddresses>
        </host>
        <endpoint
                  address=""
                  binding="wsHttpBinding" name="TestRoutingEndpoint" contract="System.ServiceModel.Routing.IRequestReplyRouter"/>
      </service>
    </services>
    <behaviors>
      <serviceBehaviors>
        <behavior name="TestBehavior">
          <serviceMetadata httpGetEnabled="True"/>
          <serviceDebug includeExceptionDetailInFaults="True"/>
          <routing routingTableName="ServiceRouterTable"/>
          <!--The Router Table Contains Entries for services-->
        </behavior>
      </serviceBehaviors>
    </behaviors>

    <!--Define Services Here-->
    <client>
      <endpoint
      name="PacktService" binding="wsHttpBinding"
      address="http://localhost:2709/Services/PacktService.svc"
      contract="*">
      </endpoint>
    </client>
    <!--Routing Defination-->
    <routing>
      <!--Filter For Detecting Messages Headers to redirect-->
      <filters>
        <filter name="TestFilter" filterType="MatchAll"/>
      </filters>
      <!--Define Routing Table, This will Map the service with Filter-->
      <routingTables>
        <table name="ServiceRouterTable">
          <entries>
            <add filterName="TestFilter" endpointName="PacktService"/>
          </entries>
        </table>
      </routingTables>
    </routing>
 </system.serviceModel>
</configuration>
Note that the routing service shown in the previous code snippet is hosted at http://localhost:1809/TestService. It uses wsHttpBinding.
You can also configure RoutingService with message filters. To do this, you need to enable RoutingBehavior on RoutingService and then specify configuration information, similar to what is shown in the following code snippet:
<configuration>
  <system.serviceModel>
    <behaviors>
      <serviceBehaviors>
        <behavior name="PacktServiceRoutingBehavior">
          <serviceMetadata httpGetEnabled="True"/>
          <routing filterTableName="myFilterTable" />
        </behavior>
      </serviceBehaviors>
    </behaviors>
</system.serviceModel>
</configuration>
The WebHttpBehavior class in WCF 4.5 comes with support for an automatic Help page. This class contains a property named HelpEnabled that you can turn on or off as needed. Here is how you configure this automatic help feature:
<configuration>
  <system.serviceModel>
    <serviceHostingEnvironment aspNetCompatibilityEnabled="true" />
    <behaviors>
      <endpointBehaviors>
        <behavior name="PacktHelpBehavior">
          <webHttp helpEnabled="true" />
        </behavior>
      </endpointBehaviors>
    </behaviors>
    <services>
      <service name="PacktTestService">
        <endpoint behaviorConfiguration="HelpBehavior"
                  binding="webHttpBinding"
                  contract="PacktTestService" />
      </service>
    </services>
  </system.serviceModel>
</configuration>
In the next section, we will explore bindings in WCF, and why they are useful.
A binding is used to specify the transport channel (HTTP, TCP, pipes, Message Queuing) and the protocols (Security, Reliability, Transaction flows). A binding comprises of binding elements. These binding elements denote how an endpoint communicates with service consumers. WCF provides support for nine built-in bindings. In WCF, the three major sections in WCF configuration scheme are serviceModel, bindings, and services, shown as follows:
<configuration>
    <system.serviceModel>
        <bindings>
        </bindings>
        <services>
        </services>
        <behaviors>
        </behaviors>
    </system.serviceModel>
</configuration>
Here's how you specify binding information in the configuration file:
<service name="Demo">
  <endpoint
      address="/Test/"
      contract="ITest "
      binding="basicHttpBinding" />
  </endpoint>
</service>
The address attribute specifies the URI (absolute or relative path) that other endpoints would use to communicate with the service. The contract attribute denotes the contract that this endpoint is exposing, and the binding attribute is used to select a predefined or custom binding to use with the endpoint. In this section, we will explore bindings in WCF.
BasicHttpBinding exposes WCF services as legacy ASMX web services, and supports both HTTP and secure HTTP. It supports both Text as well as MTOM encoding methods. However, this type of binding doesn't support WS-* standards, such as WS-Addressing, WS-Security, and WS-ReliableMessaging shown as follows:
<bindings>
  <basicHttpBinding>
    <binding name="Demo">
      <security mode="Transport">
        <transport clientCredentialType="None"/>
      </security>
    </binding>
  </basicHttpBinding>
</bindings>
WsHttpBinding encrypts a SOAP message by default, and supports both HTTP and HTTPS. It supports both Text as well as MTOM encoding methods. It also supports WS-* standards, such as WS-Addressing, WS-Security, and WS-ReliableMessaging. This type of binding uses message security by default. You can specify an HTTPS endpoint to provide authentication, integrity, and confidentiality shown as follows:
<binding name="Demo">
  <security mode="TransportWithMessageCredential">
    <transport clientCredentialType="None"/>
    <message clientCredentialType="IssuedToken"/>
  </security>
</binding>
netTcpBinding provides support for transactions and security. It is based on the TCP protocol, and uses binary as the encoding method. It is the most optimized and fastest binding among all the binding types supported by WCF. It uses transport security by default. Note that IIS 6.0 cannot host netTcpBinding applications.
<client>
  <endpoint name="Demo" address="net.tcp://localhost:8523/SecurityService"
    binding="netTcpBinding" contract="ISecurityService" >
    <identity>
      <servicePrincipalName value="SecurityService/Joydip-PC" />
    </identity>
  </endpoint>
</client>This binding supports transaction, uses transport security, and is optimized for creating WCF clients and services that interoperate with non-WCF MSMQ endpoints. The MsmqIntegrationBinding class in the System.ServiceModel namespace maps MSMQ messages to WCF messages. MsmqIntegrationBinding provides out of the box binding for communication with MSMQ.
netMsmqBinding uses MSMQ as the transport channel, and is used in a cross machine environment with secure and reliable queued communication. Note that WCF provides support for two bindings to communicate with MSMQ; that is, MsmqIntegrationBinding and netMsmqBinding. Although the former can be used in heterogeneous architectures where WCF is exchanging information with other MSMQ clients and services, the latter is used in homogenous architectures, that is, in architectures where the services and clients are both WCF based.
This is typically used for cross-process communication, it uses transport security for message transfer and authentication, supports message encryption and signing, and uses named pipes for message delivery. This binding provides secure and reliable named pipe-based communication between WCF services and WCF clients on the same system. The following code snippet illustrates how a typical service configuration would look when using netNamedPipeBinding:
<services>
<service name="DemoService" behaviorConfiguration="DemoServiceBehavior">
        <host>
          <baseAddresses>
            <add baseAddress="net.pipe://localhost/DemoService"/>
          </baseAddresses>
        </host>
    <endpoint address="" binding="netNamedPipeBinding" contract="IDemoService"></endpoint>
</service>
</services>
And here is how the netNamedPipeBinding client configuration would look like:
<client>
<endpoint address="net.pipe://localhost/DemoService.svc" binding="netNamedPipeBinding" contract="IDemoService"></endpoint>
</client>This is used to provide secure binding for peer-to-peer network applications. You can use WCF netPeerTCPBinding to develop a peer-to-peer networking applications that make use of a TCP-level peer-to-peer mesh infrastructure. To use this type of binding, you should have Peer Name Resolution Protocol (PNRP) installed on your machine. If it is not available, you can install it manually using Add or Remove Programs in the Control Panel. You should also ensure that PNRP and its dependent services are running in your system. The following code snippet illustrates how you can configure netPeerTcpBinding:
<endpoint
address="net.p2p://localhost/TestWCFService/"
binding="netPeerTcpBinding"
bindingConfiguration="netp2pBinding"
contract="ITestWCFService">
<bindings>
      <netPeerTcpBinding>
        <binding name="netP2P" >
          <resolver mode="Pnrp" />
          <security mode="None" />
        </binding>
</netPeerTcpBinding>
</bindings>
WsDualHttpBinding provides all the features of WsHttpBinding. Added to this, it provides support for Duplex Message Exchange Pattern. In this pattern, a service can communicate with the client using callbacks. The following code snippet illustrates how you can connect to a WCF service that uses WsDualHttpBinding:
Uri serviceAddress = new Uri("http://localhost/DemoService");
WSDualHttpBinding wsd = new WSDualHttpBinding();
EndpointAddress endpointAddress = new EndpointAddress(serviceAddress, EndpointIdentity.CreateDnsIdentity("localhost"));
client  = new DemoServiceClient (new InstanceContext(this), wsd, endpointAddress);
The following is the configuration you would specify at the client:
<system.serviceModel>
    <bindings>
        <wsDualHttpBinding>
            <binding name="WSDualHttpBinding_IDemoService" closeTimeout="00:01:00"
                openTimeout="00:01:00" receiveTimeout="00:10:00" sendTimeout="00:00:05"
                bypassProxyOnLocal="false" transactionFlow="false" hostNameComparisonMode="StrongWildcard"
                maxBufferPoolSize="524288" maxReceivedMessageSize="65536"
                messageEncoding="Text" textEncoding="utf-8" useDefaultWebProxy="true">
                <readerQuotas maxDepth="32" maxStringContentLength="8192" maxArrayLength="16384"
                maxBytesPerRead="4096" maxNameTableCharCount="16384" />
                <reliableSession ordered="true" inactivityTimeout="00:10:00" />
                <security mode="Message">
                    <message clientCredentialType="Windows" negotiateServiceCredential="true"
                        algorithmSuite="Default" />
                </security>
            </binding>
        </wsDualHttpBinding>
    </bindings>
    <client>
        <endpoint address="http://localhost/DemoService/"
            binding="wsDualHttpBinding" bindingConfiguration="WSDualHttpBinding_IDemoService"contract="IDemoService" name="WSDualHttpBinding_IDemoService">
            <identity>
                <dns value="localhost" />
            </identity>
        </endpoint>
    </client>
</system.serviceModel>
WsFederationHttpBinding is a type of WS Binding that provides support for federated security. Note that a federated service is one that requires the service consumers to be authenticated using a security token issued by a security token service. The WSFederationHttpBinding class and the wsFederationHttpBinding element in configuration facilitates exposing a federated service. Note that WSFederationHttpBinding supports message-level security, and you need not select a client credential type when using WSFederationHttpBinding, because the client credential type is always an issued token by default. You can know more on WSFederationHttpBinding at http://msdn.microsoft.com/en-IN/library/aa347982.aspx.
You can also have multiple bindings for the same WCF service. The following configuration shows how you can configure a service that uses multiple bindings:
<service name="DemoService, Version=2.0.0.0, Culture=neutral, PublicKeyToken=null">
    <endpoint
        address="http://Joydip-PC:8080/Demo1"
        contract="IDemo, Version=2.0.0.0, Culture=neutral, PublicKeyToken=null"
        binding="basicHttpBinding"
        bindingConfiguration="shortTimeout"
    </endpoint>
    <endpoint
        address="http://Joydip-PC:8080/Demo2"
        contract="IDemo, Version=2.0.0.0, Culture=neutral, PublicKeyToken=null"
        binding="basicHttpBinding"
        bindingConfiguration="Secure"
     </endpoint>
</service>
<bindings>
    <basicHttpBinding
        name="shortTimeout"
        timeout="00:00:00:01"
     />
     <basicHttpBinding
        name="Secure" />
        <Security mode="Transport" />
</bindings>
You can also achieve the same behavior using the protocolMapping section in your configuration file, as follows:
<protocolMapping>
    <add scheme="http" binding="basicHttpBinding" bindingConfiguration="shortTimeout" />
    <add scheme="https" binding="basicHttpBinding" bindingConfiguration="Secure" />
</protocolMapping>
<bindings>
    <basicHttpBinding
        name="shortTimeout"
        timeout="00:00:00:01"
     />
     <basicHttpBinding
        name="Secure" />
        <Security mode="Transport" />
</bindings>
The following code snippet shows the endPoints to which a service is listening:
ServiceHost host = new ServiceHost(typeof(DemoService), new Uri("http://localhost:9090/DemoService"));
            host.Open();
Console.WriteLine("Service started...press any key to terminate");
            ServiceEndpointCollection endpoints = host.Description.Endpoints;
            foreach (ServiceEndpoint endpoint in endpoints)
            {
                Console.WriteLine("The service host is listening at {0}", endpoint.Address);
            }
            Console.WriteLine("Press any key to terminate the service.");
            Console.ReadLine();
You can also define custom binding by deriving your custom binding class from the System.ServiceModel.Channels.Binding class. The following table lists the various bindings in WCF, their transport mode, supported message encoding type, security mode, and their transaction support:
|
Binding Class |
Transport |
Message Encoding |
Security Mode |
Reliable Messaging |
Transaction Flow |
|---|---|---|---|---|---|
|
BasicHttpBinding |
HTTP |
Text |
None |
Not Supported |
Not Supported |
|
WSHttpBinding |
HTTP |
Text |
Message |
Disabled |
WS-AtomicTransactions |
|
WSDualHttpBinding |
HTTP |
Text |
Message |
Enabled |
WS-AtomicTransactions |
|
WSFederationHttpBinding |
HTTP |
Text |
Message |
Disabled |
WS-AtomicTransactions |
|
NetTcpBinding |
TCP |
Binary |
Transport |
Disabled |
OleTransactions |
|
NetPeerTcpBinding |
P2P |
Binary |
Transport |
Not Supported |
Not Supported |
|
NetNamedPipesBinding |
Named Pipes |
Binary |
Transport |
Not Supported |
OleTransactions |
|
NetMsmqBinding |
MSMQ |
Binary |
Message |
Not Supported |
Not Supported |
|
MsmqIntegrationBinding |
MSMQ |
Not Supported |
Transport |
Not Supported |
Not Supported |
The following table lists the types of bindings in WCF and their supported modes:
|
Binding Type |
Transport mode |
Message mode |
|---|---|---|
|
BasicHttpBinding |
Yes |
Yes |
|
WSHttpBinding |
Yes |
Yes |
|
WSDualHttpBinding |
No |
Yes |
|
NetTcpBinding |
Yes |
Yes |
|
NetNamedPipeBinding |
Yes |
No |
|
NetMsmqBinding |
Yes |
Yes |
|
MsmqIntegrationBinding |
Yes |
No |
|
wsFederationHttpBinding |
No |
Yes |
In essence, binding is an attribute of an endpoint, and you can use it to configure transport protocol, encoding and security specifications of a service. Now, which is the binding I should use and when? Here's the rule of thumb:
- WsHttpBinding: You can use this type of binding if you need to expose your service over the Internet
- basicHttpBinding: You should select this type of binding if you need to expose your WCF service to legacy clients, such as an ASMX Web service
- NetTcpBinding: You can go for this type of binding if you need to support WCF clients within an intranet
- netNamedPipeBinding: This type of binding is a good choice if you need to support WCF clients on the same machine
- netMsmqBinding: You can select this type of binding if you need to support disconnected queued calls
- wsDualHttpBinding: You can select this type of binding if you would like to provide support for bidirectional communication between the service and the client
In this section we will discuss how we can secure our WCF services. To secure your WCF service and ensure confidentiality of the data transmitted over the wire, you can bank on the concepts of authentication, authorization, and message or transport security. Although authentication denotes identification of the user's (trying to access the service) credentials, authorization denotes the resources to which an authenticated user can have access. To maintain the integrity of messages, you can digitally sign and encrypt your messages before they are transmitted over the wire.
Transport-level security provides a point-to-point security between two endpoints, and uses transport protocols, such as TCP, HTTP, and MSMQ. Note that the user credentials passed in this mode of security are protocol dependent. The following figure shows the functioning of transport-level security:

To enable transport security, use the security attribute in the service's configuration file, as shown in the following code snippet:
<bindings>
<wsHttpBinding>
<binding name="TransportSecurity">
<security mode="Transport">
<transport clientCredentialType="None"/>
</security>
</binding>
</wsHttpBinding>
</bindings>
Message-level security is independent of the security protocol, and here the user credentials are encrypted before they are transmitted over the wire, along with the message. Although transport security works faster than message security, the latter is much more flexible. The following figure shows the functioning of message-level security:

The following code snippet illustrates how you can implement message-level security using user credentials:
<wsHttpBinding>
<binding name = "wsHttp">
<security mode = "Message">
<message clientCredentialType = "UserName"/>
</security>
</binding>
</wsHttpBinding>
And here is how you can implement the message-level security using certificates:
<bindings>
<wsHttpBinding>
<binding name="wsHttpEndpointBinding">
<security>
<message clientCredentialType="Certificate" />
</security>
</binding>
</wsHttpBinding>
</bindings>
We have had enough of discussion on WCF (this was needed anyway, because we will be using WCF throughout this book). In the section that follows, we will implement a RESTful service using WCF. We will also create a database that we will be using throughout this book.
In this section we will explore how to create REST-based services using WCF. To implement RESTful Web Service, you'll first need to create a WCF service, and then make the service RESTful using the appropriate attributes.
Note that you need to use WebHttpBinding in order to enable the RESTful behavior.
The simplest representation of a WCF RESTful service will look like the following:
[AspNetCompatibilityRequirements(RequirementsMode=AspNetCompatibilityRequirementsMode.Required)]
    public class Service : IService
    {
        public Employee[] GetEmployees()
        {
            return new Employee[]
             {
                  new Employee() {EmpId=1,FirstName="Joydip",LastName="Kanjilal"},
                  new Employee() {EmpId=2,FirstName="Sabita",LastName="Kanjilal"}
             };
        }
    }
ServiceContract will look like the following:
[ServiceContract]
    public interface IService
    {
        [OperationContract]
        [WebGet(UriTemplate="/Employees",ResponseFormat=WebMessageFormat.Xml )]
        Employee[] GetEmployees();
    }
And here is DataContract for you:
[DataContract]
    public class Employee
    {
        [DataMember]
        public int EmpId { get; set; }
        [DataMember]
        public string FirstName { get; set; }
        [DataMember]
        public string LastName { get; set; }
}In this section, we will create a database to use throughout this book. The name of this database is Packt_Security, and it contains the following tables:
UserUserAuthenticationUserAuthenticationTypeUserLoginHistory
I've kept the database design as simple as possible. The database design of our Packt_Security database looks similar to the following:

The Database Design
The following is the complete script for the Security database:
CREATE TABLE [dbo].[UserMaster](
    [UserName] [nvarchar](max) NOT NULL,
    [UserID] [int] IDENTITY(1,1) NOT NULL,
    [UserEmail] [nvarchar](max) NULL,
    [Password] [nvarchar](max) NOT NULL,
    [LastLoginDate] [datetime] NULL,
    [IsOnline] [bit] NULL,
    [IsAdmin] [bit] NULL,
    [IsActive] [bit] NULL,
    [DateCreated] [datetime] NULL,
 CONSTRAINT [pk_UserMaster] PRIMARY KEY CLUSTERED
(
    [UserID] ASC
)WITH (PAD_INDEX = OFF, STATISTICS_NORECOMPUTE = OFF, IGNORE_DUP_KEY = OFF, ALLOW_ROW_LOCKS = ON, ALLOW_PAGE_LOCKS = ON) ON [PRIMARY]
) ON [PRIMARY] TEXTIMAGE_ON [PRIMARY]
CREATE TABLE [dbo].[UserLoginHistory](
    [UserLoginID] [int] IDENTITY(1,1) NOT NULL,
    [UserID] [int] NOT NULL,
    [LoginDateTime] [datetime] NOT NULL,
 CONSTRAINT [PK_UserLoginHistory] PRIMARY KEY CLUSTERED
(
    [UserLoginID] ASC
)WITH (PAD_INDEX = OFF, STATISTICS_NORECOMPUTE = OFF, IGNORE_DUP_KEY = OFF, ALLOW_ROW_LOCKS = ON, ALLOW_PAGE_LOCKS = ON) ON [PRIMARY]
) ON [PRIMARY]
CREATE TABLE [dbo].[UserAuthentication](
    [UserAuthenticationID] [int] IDENTITY(1,1) NOT NULL,
    [UserAuthenticationTypeID] [int] NOT NULL,
    [UserID] [int] NOT NULL,
    [Password] [varchar](50) NOT NULL,
    [SecurityQuestion] [varchar](50) NOT NULL,
    [SecurityAnswer] [varchar](50) NOT NULL,
 CONSTRAINT [PK_UserAuthentication] PRIMARY KEY CLUSTERED
(
    [UserAuthenticationID] ASC
)WITH (PAD_INDEX = OFF, STATISTICS_NORECOMPUTE = OFF, IGNORE_DUP_KEY = OFF, ALLOW_ROW_LOCKS = ON, ALLOW_PAGE_LOCKS = ON) ON [PRIMARY]
) ON [PRIMARY]
CREATE TABLE [dbo].[UserAuthenticationType](
    [UserAuthenticationTypeID] [int] IDENTITY(1,1) NOT NULL,
    [UserAuthenticationTypeName] [varchar](50) NOT NULL,
 CONSTRAINT [PK_UserAuthenticationType] PRIMARY KEY CLUSTERED
(
    [UserAuthenticationTypeID] ASC
)WITH (PAD_INDEX = OFF, STATISTICS_NORECOMPUTE = OFF, IGNORE_DUP_KEY = OFF, ALLOW_ROW_LOCKS = ON, ALLOW_PAGE_LOCKS = ON) ON [PRIMARY]
) ON [PRIMARY]
We will now implement a WCF service named SecurityService, which will make use of the UserMaster table in the Packt database.
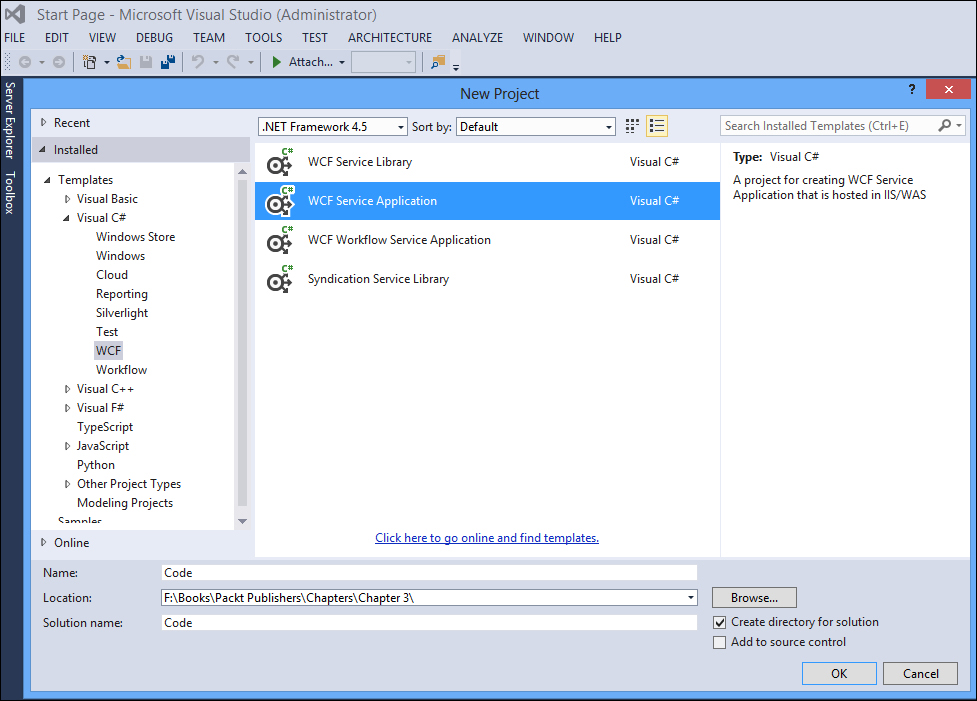
To create WCF Service, follow these simple steps:
- Open Visual Studio 2013 IDE.
- Go to File | New | Project.
- Select WCF Service Application from the list of the project templates displayed.
- Specify a name for WCF Service Application.
- Click on OK to save.
Please refer to the following screenshot:
Creating the Service
A WCF service is comprises the following:
- A Service class
- A Service contract
- Hosting environment
- One or more endpoints
A service class in WCF is the one that implements a service contract. A service contract is typically an interface, and is decorated using the [ServiceContract] attribute. The hosting environment denotes the environment in which a WCF service executes. A WCF service can be hosted in IIS, or can be a self-hosted service. Clients connect to a WCF service using the exposed endpoints. In a WCF service, you would have one or more methods that are marked using the [OperationContract] attribute.
When you create a new WCF Service Application project, you would see a service contract and a service class created by default. Note that the service contract is marked using the [ServiceContract] attribute, shown as follows:
using System.Runtime.Serialization;
using System.ServiceModel;
namespace Packt.Services
{
    [ServiceContract]
    public interface IService1
    {
        [OperationContract]
        string GetData(int value);
        [OperationContract]
        CompositeType GetDataUsingDataContract(CompositeType composite);
    }
    [DataContract]
    public class CompositeType
    {
        bool boolValue = true;
        string stringValue = "Hello ";
        [DataMember]
        public bool BoolValue
        {
            get { return boolValue; }
            set { boolValue = value; }
        }
        [DataMember]
        public string StringValue
        {
            get { return stringValue; }
            set { stringValue = value; }
        }
    }
}
The service class implements the service contract defined earlier as follows:
using System;
namespace Packt.Services
{
    public class Service1 : IService1
    {
        public string GetData(int value)
        {
            return string.Format("You entered: {0}", value);
        }
        public CompositeType GetDataUsingDataContract(CompositeType composite)
        {
            if (composite == null)
            {
                throw new ArgumentNullException("composite");
            }
            if (composite.BoolValue)
            {
                composite.StringValue += "Suffix";
            }
            return composite;
        }
    }
}
A service contract is an interface that is marked with the [ServiceContract] attribute, and contains one or more methods that are exposed using the [OperationContract] attribute. The next step is to create your service contract and service class. A service contract can also have one or more Data Contracts. A Data Contract is a class that holds data and is marked with the [DataContract] attribute.