

WHEN YOU PLAY in the Minecraft world, even with the programming interface, it is a virtual world. The only way you can interact with the game is by using your keyboard and mouse to direct the controls that the engineers designed.
But there's another way to interact with Minecraft—by breaking out of the barriers imposed by the sandbox game and linking it to the physical world. Here you quickly discover that the lines between what is virtual and what is real become blurred, and your gaming experience becomes even more creative and exciting.
In this adventure you find out how to link Minecraft to a small electronic computer called the BBC micro:bit. First you will test that everything works by sensing button presses from your BBC micro:bit and then you create a program that displays an icon of a house on your BBC micro:bit display when you walk into your house. You use the display as a countdown and use a real banana as an input device to trigger a countdown to an explosion (so you'll never have any difficulty clearing space for your building adventures in Minecraft again). Finally you build a ball-rolling game where you tilt your BBC micro:bit to collect objects and avoid holes on a virtual game table. Your friends will marvel at your new magic tricks and ask you to create game controllers with a BBC micro:bit for them too!
What You Need for This Adventure
Here is a list of everything you need to build the projects described in this adventure:
- A BBC micro:bit
- A USB cable for your BBC micro:bit
- Two or more crocodile clip leads
- A banana (optional; an orange works too!)
- Our starter kit from the companion website, or a copy of the ‘bitio' package
If you don't have a spare banana to hand, don't worry – you can make the projects in this adventure work by just touching the pins on the BBC micro:bit (but using a banana is much more fun!)
What Is a BBC micro:bit?
The BBC micro:bit is a small codeable computer, designed by the BBC and more than 29 industry partners and released in 2015. A free BBC micro:bit was given to every year 7 school child (11 to 12 year olds) in the UK in 2016 as part of a digital literacy project called Make It Digital, which aims to inspire the next generation of engineers, designers and technologists.
In this adventure, you use your BBC micro:bit with some pre-written software that turns the BBC micro:bit into a simple games controller, and you use that controller as both an input and an output device for your Minecraft games. However, the BBC micro:bit is a fully programmable computer that can be programmed in many languages, including MicroPython.
Understanding Inputs and Outputs
Any computer system has a range of inputs and outputs, which are used with the on-board processor to build exciting and useful devices. The BBC micro:bit might be a small, hand-held computer half the size of a credit card, but it has many features. Figure 8-1 shows the layout of your BBC micro:bit.

FIGURE 8-1 The BBC micro:bit front (left) and back (right)
The following are the inputs and outputs that are built into your BBC micro:bit and that you will use in this adventure:
- Buttons A and B: These two buttons on the front allow you to trigger actions by pressing the buttons. With the right amount of extra program code, you can also measure how long a button is pressed for.
- Display: The display is a 5x5 light emitting diode (LED) matrix. An LED is a component that lights up (in this case, red) when current flows through it. The LEDs on the BBC micro:bit can be individually programmed to create icons, animations and even scrolling text. The intensity of these LEDs can also be changed individually to one of 10 different brightness levels.
- Rings 0, 1 and 2: These gold rings can be used to connect to crocodile clip leads and allow connection to external circuits. You can also touch the pins with your finger and your BBC micro:bit senses that you have touched them. The rings can be used for a variety of input and output purposes.
- 3V and GND: These two gold rings can be used to provide a small amount of power to external circuits that you build. The GND (ground) is also used as a return path for the touch-sensing circuit.
- Battery connector: The white battery connector on the back of the BBC micro:bit allows you to power it from a battery pack, such as one that holds two AAA batteries.
- USB connector: The USB connector is mainly used to transfer new program code to your BBC micro:bit (overwriting any previous program code that you stored on it). You can also use the USB connector to provide a small amount of power to the BBC micro:bit and to send and receive data to another computer while your program is running.
- Accelerometer: An accelerometer measures acceleration forces and can be used by the BBC micro:bit to sense various forms of movement, including shaking and tilting. It is the same sort of device that is used inside smartphones to sense which way up the screen is facing. You use the accelerometer later in this adventure to sense tilting that will move a ball inside your Minecraft world.
Using Your BBC micro:bit as a Game Controller
In this adventure, you load a program onto your BBC micro:bit so that you can use it as a game controller with Minecraft. The BBC micro:bit is used as an input and output device that both controls and reacts to the Minecraft games that you code.
Setting Up Your Computer to Connect to Your BBC micro:bit
Before you can use your BBC micro:bit as a game controller for your Minecraft games, there is a little bit of setup to do.
Plugging In Your BBC micro:bit
Plug your BBC micro:bit into the USB lead, and plug the other end of the USB lead into your computer in a spare USB port. After a few seconds, you should see a MICROBIT drive appear in the Explorer (PC), File Manager (Raspberry Pi) or in the Finder (Apple Mac). See Figure 8-2 for an example of what you should see.

FIGURE 8-2 The MICROBIT drive appears in the Explorer/File Manager/Finder
If you are using Microsoft Windows, you may see a message pop up in the bottom right of your computer screen saying that the mbed serial driver could not be installed. Don't worry, your BBC micro:bit is working fine, but there is an extra step you need to follow. Go to support.microbit.org and search for ‘windows serial driver', then follow the instructions on that page to install the mbed windows serial driver for your Windows PC.
Loading the Game Controller Code onto Your BBC micro:bit
The final step of the setup is to load some code that helps the BBC micro:bit work as a game controller. I have written a package called bitio (pronounced bitty-o) that turns your BBC micro:bit into an input/output device for your Minecraft Python games. The package has two parts to it: some code that is loaded onto the BBC micro:bit and some code that you run on your main computer. All of this code is provided in the starter kit that you downloaded as part of Adventure 1.
All of this code is provided in the starter kit that you downloaded as part of Adventure 1; you should have a file called bitio.hex inside your MyAdventures folder. Drag and drop this file onto the MICROBIT drive to load the program into your BBC micro:bit's memory. The yellow system LED on the back flashes for a few seconds. When the LED has finished flashing, you should see the bitio logo (Io) on the display to let you know that the program has loaded correctly. Don't worry if your computer ‘ejects' the MICROBIT drive at the end; this is normal and is just a result of your BBC micro:bit resetting and then starting the program that you just downloaded to it.
Your BBC micro:bit is now ready to receive commands from your Python code that you write on your main computer. Figure 8-3 shows what the display on your BBC micro:bit looks like.

FIGURE 8-3 The bitio logo shows on your BBC micro:bit.
Hello BBC micro:bit
In Adventure 1 you wrote ‘Hello Minecraft World' as a way to test that everything was working. In this adventure you're going to create a Hello program to test that your BBC micro:bit game controller is working. Fortunately I have done a lot of the hard work for you, and all you need is a single-line program. Do the following:
- Start a new program by choosing File ⇒ New File and save it as
hellomb.py. Make sure you save it in yourMyAdventuresfolder; otherwise your program won't be able to find the necessary microbit module. - Import the microbit module:
import microbit
That's it. That's all there is to it! The microbit Python module that I have provided in the starter kit does all of the hard work of detecting and connecting to your BBC micro:bit for you.
Now run hellomb.py and follow the onscreen instructions to locate your BBC micro:bit. Your program automatically remembers your BBC micro:bit for the next time you use it. You should see a screen similar to Figure 8-4:

FIGURE 8-4 Scanning for a BBC micro:bit serial port
Sensing Button Presses
Now that you know your BBC micro:bit is communicating correctly with Python on your computer, you are going to sense an input by reading a button press from the BBC micro:bit and making something happen on your computer as a result. Use these steps:
- Start a new program by choosing File ⇒ New File and save it as
button.py. - Import the necessary modules:
import time
import microbit - Display a friendly message to the user in the Python console window:
print("press button A to test") - Create a game loop that loops round forever; this is so that you can press the button at any time and your program still detects it:
while True: - Using an
ifstatement, check to see if your BBC micro:bit A button has been pressed. If it has, display a message on the Python console:if microbit.button_a.was_pressed():
print("Button A pressed")
time.sleep(0.5)
Run the program button.py. You should see press button A to test on the Python shell window. Now press the A button on your BBC micro:bit, and you should see Button A pressed as shown in Figure 8-5.
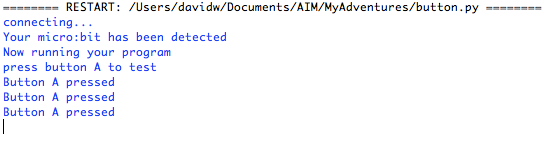
FIGURE 8-5 The Python shell shows a message when you press the A button.
Using Your BBC micro:bit Display
Before you connect your BBC micro:bit with Minecraft, you should check that you can also output something to the BBC micro:bit. You do this by modifying the button.py program to write to the display when you press a button.
Modify your button.py to look like this (the new lines have been added in bold):
  if microbit.button_a.was_pressed():
    print("Button A pressed")
    microbit.display.show("A")
    time.sleep(0.5)
    microbit.display.clear()
Run the program again, and make sure that when you press the A button, the letter A is displayed on the display of your BBC micro:bit.
The Magic Doormat Revisited
Now you have proved that you can use your BBC micro:bit as an input device and an output device, it's time to use Python to link the BBC micro:bit into your Minecraft game world. To do this you're going to revisit the magic doormat program from Adventure 2 and add a bit of a twist to it. This time, you're going to display a house icon on the BBC micro:bit display whenever you're standing on your doormat. This is the first example of linking your Minecraft world to the physical world.
Developing the Magic Doormat Program
- Start a new program by choosing File ⇒ New File and naming it
house.py. - Import the necessary modules, which includes both the microbit module and the minecraft modules. (This is the first time that you use both together.) Also create a connection to the Minecraft game:
import microbit
import mcpi.minecraft as minecraft
import mcpi.block as block
import time
mc = minecraft.Minecraft.create() - Set some constants that will be the coordinates of your welcome home mat. You need to decide where you want the mat to appear in your world and choose these constants accordingly. On the Raspberry Pi you can see your coordinates in the top left of the Minecraft window. On the PC or Mac you can press F3 to find out the coordinates of your player.
HOME_X = 0
HOME_Y = 0
HOME_Z = 0 - Below these constants, create a block out of wool at the mat home location. This is your doormat—just like the doormat you created in Adventure 2:
mc.setBlock(HOME_X, HOME_Y, HOME_Z, block.WOOL.id, 15) - Write a game loop that looks like the code shown here. Take special care with the indentation. This code repeatedly reads the player position and geo-fences it to see if you are on the doormat. If you are, an image of a house is displayed on your BBC micro:bit. If you're not standing on your doormat,
?is shown on the display:while True:
time.sleep(1)
pos = mc.player.getTilePos()
if pos.x == HOME_X and pos.z == HOME_Z:
microbit.display.show(microbit.Image.HOUSE)
else:
microbit.display.show("?")
Run your program and make sure that when you stand on your doormat, a picture of a house is displayed on your BBC micro:bit screen. When you are not standing on the doormat, the screen should display ?.
This is fantastic! You now have all the ingredients you need to break out of the virtual world of the Minecraft sandbox and link the game to real-world objects. You can sense inputs and control outputs, so you are limited only by your imagination and willingness to experiment!
Designing Your Own Icon for the Display
The BBC micro:bit has a number of built-in images. You can find a list of them by creating and running a short program that lists all of their names:
- Create a new program by choosing File ⇒ New File and save it as
imagelist.py. - Import the microbit module so that you can communicate with your BBC micro:bit:
import microbit - Print the value of the
STD_IMAGE_NAMESmodule variable. This variable is a list that has the names of all the supported image names that are loaded onto your BBC micro:bit:print(microbit.Image.STD_IMAGE_NAMES)
Run your program, and you should see a big list of image names appear, as shown in Figure 8-6.

FIGURE 8-6 The list of standard images that are loaded onto your BBC micro:bit
Images for the BBC micro:bit are stored as a 5x5 grid of digits. Each digit can be between 0 and 9, and represents the brightness. Figure 8-7 shows an example grid with a design for an image of a house, and below it you see the line of code to create that image.

FIGURE 8-7 A grid design for a house icon
Here is the line of code you need to create a house for the BBC micro:bit display:
MYHOUSE = microbit.Image("00900:09090:90009:99999:09990")
Note how each row is made up of five digits, with a : character separating them. So in the MYHOUSE example, there are five rows of data, each with five columns. The 0 means the LED is off, and the 9 means the LED is at full brightness. Numbers 0 through 9 create different intensities, and you can set the intensity of each pixel of the display independently of the others.
Now that you know how to design a custom image, you can build a program that displays that image on your BBC micro:bit display:
- Add this line of code towards the top of your
house.pyprogram but after theimportline:MYHOUSE = microbit.Image("00900:09090:90009:99999:09990") - Change the code so that it looks like the following (the changed line is marked in bold):
  if pos.x == HOME_X and pos.z == HOME_Z:
    microbit.display.show(MYHOUSE)
  else:
    microbit.display.show("?")
Run your program again and stand on your doormat to make sure that your custom house image is displayed.
Making a Detonator
In this project, you build a detonator using a banana as an input device. You touch the banana to start a countdown on the BBC micro:bit display to give your player time to run away from the blast, and then a huge crater appears at the point where your player was standing when you touched the banana. This program is a handy addition to your toolbox as a quick way to clear some space as you move around your Minecraft world and build things. This project introduces you to another type of input called a touch input, which senses when one of the pins on the BBC micro:bit (or something connected to that pin) is touched. You'll put your BBC micro:bit display to good use too!
Attaching a Banana to Your BBC micro:bit
To add a bit of extra fun to this project, you use a banana as an input device rather than using the buttons of the BBC micro:bit. Touch inputs on the BBC micro:bit sense when you complete a circuit between one of the pins (P0, P1 or P2) and the GND pin. If you don't have a banana, you can get the same effect by touching P0 with your left finger and thumb and GND with your right finger and thumb.
Using two crocodile clip leads, clip the first lead into the hole of P0, and connect the other end to part of the skin of the banana. Use the second crocodile clip lead to connect to the GND pin of the BBC micro:bit. Figure 8-8 shows this circuit.

Photo courtesy of Gemma May Latham
FIGURE 8-8 A banana connected to the BBC micro:bit
Sensing Touch Inputs
Now that you have wired up your banana, the next step is to write a Python program that senses when you touch the banana. Later you extend this to make something happen inside Minecraft.
- Create a new program by choosing File ⇒ New File and save it as
banana.py. - Import the necessary modules:
import microbit
import time - Create a custom image of a banana:
BANANA = microbit.Image("00090:00090:00990:09900:99000") - Create a game loop with a short delay. This delay is so that the display doesn't flicker too much if you are not very accurate in touching the banana:
while True:
time.sleep(0.25) - Use
is_touched()to sense whether the P0 pin is touched. If it is touched, display your custom banana image; if it is not touched, display a?:if microbit.pin0.is_touched():
microbit.display.show(BANANA)
else:
microbit.display.show('?')
Run your code and make sure that when you touch your banana, your custom banana image is displayed on your BBC micro:bit display.
Writing the Detonator Program
Now that you have your banana input working, this next program builds on these ideas but links them up to your Minecraft game world. When you touch the banana, you see the display of your BBC micro:bit count from five down to zero and then blow a massive crater in the Minecraft world!
- Start a new program by choosing File ⇒ New File and save it as
detonator.py. - Import the necessary modules:
import microbit
import mcpi.minecraft as minecraft
import mcpi.block as block
import time - Create a new custom banana image for the display:
BANANA = microbit.Image("00090:00090:00990:09900:99000") - Connect to the Minecraft game:
mc = minecraft.Minecraft.create() - Write a function that drops a block of TNT to mark where the bomb will go off, counts down to zero, then blows a big crater where the TNT block was. The following code builds the TNT block slightly to the side of the player so it doesn't land on top of him! Note that the crater is 20 blocks in size (10 to the left and 10 to the right of your player) and this size is set by the calculations done in
setBlocks()here:def bomb(x, y, z):
mc.setBlock(x+1, y, z+1, block.TNT.id)
for t in range(6):
microbit.display.show(str(5-t))
time.sleep(1)
mc.postToChat("BANG!")
mc.setBlocks(x-10, y-5, z-10, x+10, y+10, z+10,block.AIR.id) - Write the main game loop so that it waits for a banana touch and then sets off a bomb:
while True:
  time.sleep(0.1)
  if microbit.pin0.is_touched():
    microbit.display.show(BANANA)
    pos = mc.player.getTilePos()
    bomb(pos.x, pos.y, pos.z)
  else:
    microbit.display.show("?")
Save your program and run it. Remember that you must also hold the GND connection to complete the circuit.
Run to somewhere in the Minecraft world and touch the banana, and then run for your life! Figure 8-9 shows the aftermath of the explosion—a massive crater.

FIGURE 8-9 A crater blown into the Minecraft World
Writing a Ball-Rolling Game
In the final project of this adventure you put together all the things from this and previous adventures to build a complete mini-game. This mini-game consists of a table in the Minecraft world with treasure dotted around it at random locations. You use your BBC micro:bit with its accelerometer to sense tilt movements so that the ball will roll around the table and collect treasure. The display on your BBC micro:bit tells you how many more items there are to collect. Figure 8-10 shows you the game mid-play.
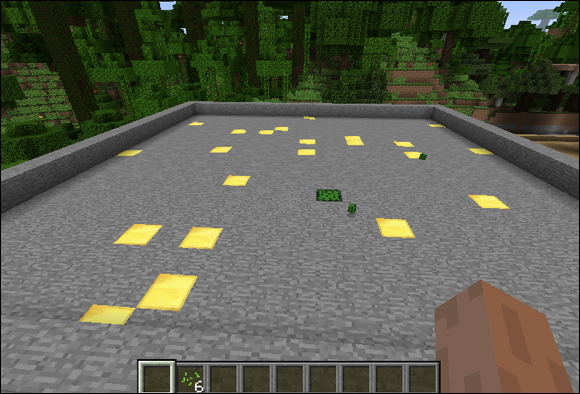
FIGURE 8-10 Playing the ball-rolling game
This is a game of great skill, because once you have collected an item of treasure there will be a hole in the table that you have to avoid, and you'll get a time penalty if you fall into a hole. The objective of the game is to complete it in the fastest time possible.
Building the Structure of the Program
This is quite a large program, so the best approach is to write the code in small steps, testing each step as you go. That way you don't have to write and test the whole program in one go, but you can come back to it every so often and add more to it. Just like a real software engineer, you're building a large program as a series of small parts. The first thing to do is to get the basic structure of the program written and tested. You can then add new parts to this program gradually as you add and test new features. Use these steps for the first part:
- Start a new program by choosing File ⇒ New File and save it as
ballgame.py. - Import the necessary modules. You also use the random module so that the treasure is placed at random coordinates, which makes the game more challenging to play:
import microbit
import mcpi.minecraft as minecraft
import mcpi.block as block
import time
import random - Add a comment. In a later step you replace this with some constant numbers that configure the game:
# CONSTANTS - Connect to the Minecraft game, and post a message saying that the BBC micro:bit has joined the game:
mc = minecraft.Minecraft.create()
mc.postToChat("BBC micro:bit joined the game") - Add a comment. In a later step you replace this with some variables that maintain the state of the running game:
# VARIABLES
remaining = 1 - Create skeleton functions for all the major parts of the program. You fill each of these gradually as you work through the later steps of this adventure:
def build_table(x, y, z):
  print("build table")

def place_treasure():
  print("place treasure")

def move_ball():
  print("move ball")

def move_ball_to(x, y, z):
  print("move ball")

def new_speed(speed, tilt):
  return 0

def check_tilt():
  print("check tilt")

def is_on_table(x, z):
  return True

def check_below():
  print("check below")

def wait_for_start():
  print("wait for start")

def build_game():
print("build game") - Write the
play_game()function. This function contains the main game loop, as well as some Python code to time how long the game takes to play. Remember that this is a time-trial game, so the player must be told at the end how long it took them, so they can challenge their friends to beat their time! See the ‘Digging into the Code' section later to learn about how you can measure time in Python.def play_game():
start_time = time.time()
while remaining > 0:
time.sleep(0.1)
check_tilt()
move_ball()
check_below()
end_time = time.time()
mc.postToChat("game time=" + str(int(end_time-start_time))) - Create an infinite loop that keeps playing the game over and over again:
while True:
  wait_for_start()
  build_game()
  play_game()
Save the program and run it to see whether you have made any typing errors. When the program runs—if there are no errors—it should loop round and round telling you what it is doing. If you have any errors in your program, look back carefully, fix them and run it again until all the errors are corrected. Figure 8-11 shows what the output of this program looks like on the Python shell.

FIGURE 8-11 The output generated by running the skeleton program
Adding a Button and a Countdown
At the moment, your skeleton program doesn't do much, but it is a really good start. It's now time to add some inputs and outputs to make things a bit more interactive. You use a button press to start the game, and before the game starts a countdown displays on your BBC micro:bit to give your player time to prepare and get excited about playing the game.
- Modify the existing
wait_for_start()function in yourballgame.pyprogram so that it looks like the following code. Thetime.sleep()function is required inside thewhileloop because the rules of the Python language state that all conditionals must have at least one statement in them. Thewhileloop spins round and round doing nothing until you press the B button on your BBC micro:bit.def wait_for_start():
mc.postToChat("press B to start")
microbit.display.show("?")
while not microbit.button_b.was_pressed():
time.sleep(0.1)
for t in range(6):
microbit.display.show(str(5-t))
time.sleep(0.5)
Save your program and run it again. It should now ask you to press B to start. When you press the B button, you should see a countdown from 5 to 0 on the display of your BBC micro:bit. Because the rest of the game is not written yet, the program loops round and waits for another button press, but this is enough testing to make sure that you can start your game properly.
Building the Game
Any good game most likely needs some constants that set the parameters of the game, and some variables that manage the state of the game while it is being played. Python programmers use a convention where any name that is in uppercase is used to show that the item is a constant and you should not really change it while the program is running. It is normal to put all the program constants at the top of the program where another programmer could change them easily to change how your game works, without requiring the other programmer to read the rest of the Python code.
First you add some constants and variables and build the table that the ball will roll around:
- Find the
# CONSTANTSsection inballgame.pyand replace it with the items shown here. Later you might want to change these values to make the game different and more interesting to play. The table has a certain width and depth; there are always a fixed number of treasure blocks created and the block types of various blocks are set here so that you can easily change them later:TABLE_WIDTH = 20
TABLE_DEPTH = 20
TREASURE_COUNT = 25
TABLE = block.STONE.id
BALL = block.CACTUS.id
TREASURE = block.GOLD_BLOCK.id - Find the
# VARIABLESsection inballgame.pyand replace it with the items shown here. These are global variables, so we initialise most of them toNonejust so that the variables are created and can be used later in the program.Nonejust means that no value is stored in the variable, but the variable is still defined correctly. The ball has zero speed, and there are currently no remaining items of treasure to collect. All of these variables now completely define everything that your game needs to know while the game is being played.table_x = None
table_y = None
table_z = None
ball_x = None
ball_y = None
ball_z = None
speed_x = 0
speed_z = 0
remaining = 1 - Next build the game table so that you can see some visible progress inside the Minecraft world when you next run the program. The table is built as a rectangular layer of blocks, but because you might be standing near a mountain or a tree when you run the game, a
GAPof 10 blocks around the table is created so that you can see the table regardless of where you build it. Replace thebuild_table()function in your skeletonballgame.pywith the following code:def build_table(x, y, z):
global table_x, table_y, table_z
GAP = 10
mc.setBlocks(x-GAP, y, z-GAP, x+TABLE_WIDTH+GAP,
y+GAP, z+TABLE_DEPTH+GAP, block.AIR.id)
mc.setBlocks(x-1, y, z-1,
x+TABLE_WIDTH+1, y+1,
z+TABLE_DEPTH+1, TABLE)
mc.setBlocks(x, y+1, z,
x+TABLE_WIDTH, y+1, z+TABLE_DEPTH,
block.AIR.id)
table_x = x
table_y = y
table_z = z - Change the
build_game()function so it looks like this:def build_game():
pos = mc.player.getTilePos()
build_table(pos.x, pos.y-2, pos.z)
Save and run your program. After you have fixed any typing errors, you should see a table appear on the screen, and your player should be standing on the table. Move around a bit and explore the table to make sure it is the right size and to confirm there is a gap of air all around it to make it easy to see. Figure 8-12 shows an example of what my world looked like when I ran this program.

FIGURE 8-12 The table is now built inside the Minecraft world.
Sensing Tilt Movements with Your BBC micro:bit
Now that you have a table, the next step is to use your BBC micro:bit to sense tilt. It is this movement that rolls the ball up, down, left and right on the table. Your BBC micro:bit has a special device on it called an accelerometer, which can be used to sense which way you are tilting the device.
An accelerometer senses forces due to gravity, so as you tilt your BBC micro:bit left and right, an x reading value changes between about –1024 and +1024 to indicate how far the device has tilted. When you tilt forwards and backwards, a y reading changes between about –1024 and +1024.
Now add in tilt-sensing features to your game:
- Update the function called
new_speed()that works out by how much the speed of the rolling ball adjusts for a given amount of tilt. The speed of the ball is designed to be ‘laggy' to make the game more interesting to play. Because you can tilt your BBC micro:bit in both the x and y axes, it's better to write a function that does all this maths once and then use it for each of the two axes. (Read about how this maths works in the ‘Digging into the Code' section later.) Change the existingnew_speed()function to look like this:def new_speed(speed, tilt):
if abs(tilt) < 300:
tilt = 0
tilt = tilt / 300
if tilt < speed:
speed = speed - 1
elif tilt > speed:
speed = speed + 1
return speed - Each time around the main game loop, your game reads the x and y accelerometer values and adjusts the
speed_xandspeed_zvariables. Don't be confused by the use of x,y and x,z in that sentence though. Remember that the accelerometer labels the axes differently to the Minecraft game, and here you use the Minecraft labelling convention for the speeds. Change thecheck_tilt()function so it looks like this:def check_tilt():
global speed_x, speed_z
speed_x = new_speed(speed_x, microbit.accelerometer. ↩
get_x())
speed_z = new_speed(speed_z, microbit.accelerometer. ↩
get_y())
print(speed_x, speed_z)
Save and run your program. Tilt your BBC micro:bit left and right, forwards and backwards, and make sure that you see numbers scrolling on the Python shell that change as you tilt your device. Figure 8-13 shows what my screen looked like when I tested this program.

FIGURE 8-13 The accelerometer x and y values scrolling up the Python shell screen
Moving the Ball When You Tilt Your BBC micro:bit
Now that you can sense tilt of your BBC micro:bit and adjust the speed_x and speed_z variables, it's time to use this new magic power to actually move the ball on the table!
- You need to make sure that the ball does not fall off of the table, so write a function called
is_on_table()that works out where the ball is. This is just geo-fencing, like the code that you wrote in earlier adventures. Replace theis_on_table()function with the following Python code:def is_on_table(x, z):
if x < table_x or x > table_x + TABLE_WIDTH:
return False
if z < table_z or z > table_z + TABLE_DEPTH:
return False
return True - Update the function
move_ball_to()that places the ball at a specific location. There are already three global variables that you set up in the variables section earlier—ball_x,ball_yandball_z—and when the game first starts these are set toNone. Theifstatement checks to see whether the ball block has been previously built. If it has the program clears the block toAIRfor its old position, before then changing the ball global variables to the new position and building aBALLblock. Change themove_ball_to()function to look like this:def move_ball_to(x, y, z):
global ball_x, ball_y, ball_z
if ball_x is not None:
mc.setBlock(ball_x, ball_y, ball_z, block.AIR.id)
ball_x = x
ball_y = y
ball_z = z
mc.setBlock(ball_x, ball_y, ball_z, BALL) - The
move_ball()function is called each time round the game loop, so this has to work out which way the ball is moving and move it. The ball moves based on thespeed_xandspeed_zvariables calculated earlier. If the ball has not moved (for example, because the speed is zero) it is not redrawn. This is a game programmer's trick, where you update the screen only if something has changed, which prevents unnecessary flickering due to repeated screen redrawing. Then, as long as the ball would not fall off of the table, it is moved. So, change themove_ball()function to look like this:def move_ball():
new_x = ball_x - speed_x
new_z = ball_z - speed_z
if ball_x != new_x or ball_z != new_z:
if is_on_table(new_x, new_z):
move_ball_to(new_x, ball_y, new_z) - Finally, the ball has to be placed on the table somewhere, and the game is more exciting if you make that random. Add the line that is in bold to the
build_game()function:def build_game():
pos = mc.player.getTilePos()
build_table(pos.x, pos.y-2, pos.z)
move_ball_to(table_x + random.randint(0, TABLE_WIDTH),
table_y+1,
table_z + random.randint(0, TABLE_DEPTH))
Save and run your program. Remember that if you have any typing errors, try to fix those first. You can always look up the final program listing on the companion website if you want to see the whole program in one listing.
Now you should be able to almost play the game! Tilt your BBC micro:bit left and right and forwards and backwards, and the ball rolls around the table! If it reaches the edge of the table it doesn't fall off. Figure 8-14 shows what my screen looked like at this point in the game.

FIGURE 8-14 Rolling a ball around the table
Collecting Items from the Table
Rolling a ball around a table is quite fun, but so far there is nothing in the game that makes it addictive and competitive—two essential ingredients that can lead to a great game. In this next step, you write some Python that places treasure at random locations and also add a feature that collects the treasure when the ball rolls over it.
- First develop the
place_treasure()function. This function has to build treasure blocks at random locations all over the table. Fortunately the random module provides a way to create random numbers, and those random numbers can be generated in a range that is compatible with the size of the game table. The blocks are created in the table, so that later when blocks are collected it leaves a hole behind for the ball to fall down. Modify theplace_treasure()function so it looks like this:def place_treasure():
y = table_y
for i in range(TREASURE_COUNT):
x = random.randint(0, TABLE_WIDTH) + table_x
z = random.randint(0, TABLE_DEPTH) + table_z
mc.setBlock(x, y, z, TREASURE) - Now develop the
check_below()function, which monitors the block type that is directly below the ball (at y–1). If it is aTREASUREblock, the block is collected. If it is anAIRblock, the ball falls down the hole and then pops out and lands at a random location near the hole. Collecting the treasure is easy; all you have to do is set theTREASUREblock toAIR, and it disappears. Change thecheck_below()function so it looks like this:def check_below():
global remaining
block_below = mc.getBlock(ball_x, ball_y-1, ball_z)
if block_below == TREASURE:
mc.setBlock(ball_x, ball_y-1, ball_z, block.AIR.id)
remaining = remaining - 1
microbit.display.show(remaining)
elif block_below == block.AIR.id:
move_ball_to(ball_x, ball_y-1, ball_z)
time.sleep(0.5)
move_ball_to(table_x + random.randint(0, TABLE_WIDTH),
table_y+1,
table_z + random.randint(0, TABLE_DEPTH))
Save your program and run it again.
Did it work? Well, not quite! A common programming error is to write a new function that does something, but then forget to modify the rest of your program so that it actually calls that function, which is the problem you have here!
Finishing the Game Play
There is one other small modification to make so that the treasure is placed correctly:
Add the lines in bold to the build_game() function to finish it off:
def build_game():
    global speed_x, speed_z, remaining

    pos = mc.player.getTilePos()
    build_table(pos.x, pos.y-2, pos.z)
    move_ball_to(table_x + random.randint(0, TABLE_WIDTH),
                 table_y+1,
                 table_z + random.randint(0, TABLE_DEPTH))
    place_treasure()
    mc.player.setTilePos(table_x + TABLE_WIDTH/2, table_y+1, table_z)
    remaining = TREASURE_COUNT
    speed_x = 0
    speed_z = 0
Save your program and run it again. This time your build_game() function calls the place_treasure() function, so you should now have treasure randomly dotted all over the table. Also the check_below() function should already be called from within play_game(), so every time round the game loop it checks for treasure and holes. Figure 8-15 shows what my game table looked like when I ran the program at this point.

FIGURE 8-15 The table with treasure on it
Adding a Time Penalty for Falling into a Hole
There is a small time penalty for falling down a hole, but it is only a fraction of a second. A good way to add an exciting penalty to a game is to make the user do something different, which means your player has to coordinate multiple movements correctly (tilting left and right, tilting forwards and backwards, and pressing a button) and that makes the game harder but more exciting to play.
Add the lines marked in bold to the check_below() function, so that when the ball falls down a hole, the user has to press the B button to bounce the ball out of the hole again.
  elif block_below == block.AIR.id:
    move_ball_to(ball_x, ball_y-1, ball_z)
    while not microbit.button_b.was_pressed():
      time.sleep(0.1)
Save your program and run it again to try out the new time penalty feature. It should be slightly harder to play now, but a bit more interesting as a result, because you have to coordinate your hands to tilt your BBC micro:bit and also press the button when you fall down a hole. As you collect more treasure, there are more holes, so the game gets harder. Figure 8-16 shows what my game table looked like after I collected some treasure and fell down a hole.

FIGURE 8-16 The table with treasure and holes in it, and the ball stuck in a hole
Further Adventures with Your BBC micro:bit Game Controller
In this adventure you have linked the Minecraft world to the physical world and expanded your horizons into the fascinating world of physical computing by sensing and controlling things in the real world. You have used this new knowledge to sense buttons, display icons on the BBC micro:bit display, sense when a banana is touched and also sense when you tilt your BBC micro:bit. But most importantly, you have escaped the confines of the Minecraft sandbox world. With this newfound knowledge you can make your own amazing game controllers and display devices!
- The BBC micro:bit display has 25 LEDs on it, called pixels. One of the children in my computer club had a fantastic idea of building a Minecraft game with an adventure map. You could use your BBC micro:bit as a kind of electronic navigator, turning on and off different LEDs to indicate treasure nearby, and scrolling the screen as you move around in the game. This way, your BBC micro:bit display could help you locate hidden treasure and other challenges within your game.
- The BBC micro:bit accelerometer measures acceleration forces, which means that instead of tilting it, if you shake it in any direction, the value that comes back will be much higher—that is, larger than 1024—in the x, y or z directions. Build a game in Minecraft where you sense shaking the BBC micro:bit in different directions to create
AIRblocks in that direction, and use the tilt to move your player. This allows you to really go mining inside Minecraft to dig and navigate your own maze of underground tunnels! (Hint: Because it is dark underground, you could make a shake to the left clear some space to the left and also place a torch nearby, so you can see where you are heading.)
Quick Reference Table | |
Command |
Description |
import microbit microbit.display.show( microbit.Image.HOUSE) |
Display standard images |
import microbit microbit.display.show('?') |
Display single letters or symbols |
import microbit microbit.display.scroll(str(2367)) |
Display numbers |
import microbit while True: if microbit.button_a.was_pressed(): print('pressed button A') |
Sense button presses |
import microbit import time while True: x = microbit.accelerometer.get_x() if abs(x) > 300: print('tilted sideways') time.sleep(1) |
Sense tilt |
import microbit BANANA = microbit.Image( "00090:00090:00990:09900:99000") microbit.display.show(BANANA) |
Display custom images |
import microbit microbit.display.scroll('hello') |
Display messages |
import microbit # int uses custom font microbit.display.show(22) |
Display two-digit numbers |
import microbit import time while True: if microbit.pin0.is_touched(): print('pin 0 touched') time.sleep(1) |
Sense touch |

Achievement Unlocked: You have escaped the confines of the Minecraft virtual world into the real world! You're a pioneer in the fascinating new industry of Minecraft physical computing. The boundaries of your gaming experiences are now limitless!