

Throughout each chapter, we cover the major features that make Aperture the cornerstone of our digital workflows. Yet what really sets Aperture apart is its attention to the small details that help make your workflow more efficient, whether that's working with multiple computers and multiple libraries or running a tethered shooting session. This chapter covers many of the smaller but important workflow-improving features in Aperture 3.
Understanding Badge Meanings
Managing Photo Previews
Working with Multiple Libraries
Controlling Tethered Shooting
Customizing Keyboard Shortcuts
Using Aperture with Automator
Vaults and Backup
Using Aperture's Database Repair Tools
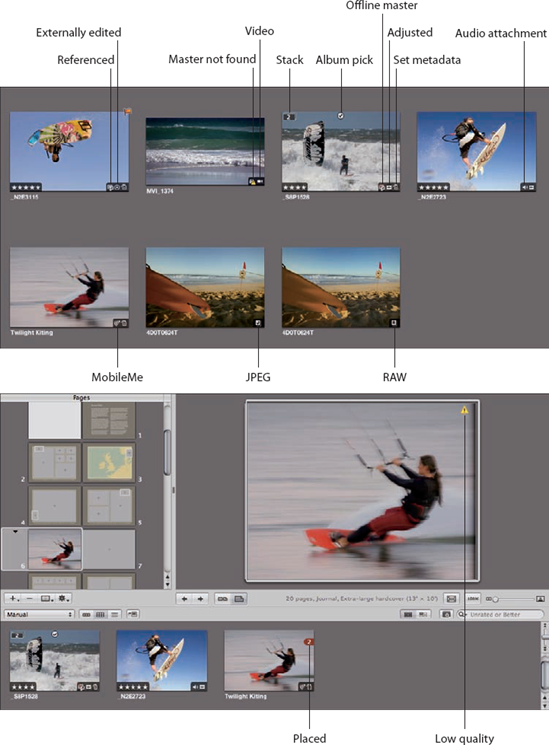
Throughout this book, we've mentioned some of the various badge overlays that Aperture displays to indicate an image's status, ranging from whether the image has an adjustment to whether it has an audio attachment. Chapter 3 explains how to configure your metadata overlays to see badges if you currently don't see them in Browser or Viewer. However, there are some uncommon badges in Aperture that we haven't covered yet. Table 10.1 provides a quick reference list to those badges so that you don't have to dig through each chapter to figure out what each badge means, and Figure 10.1 helps you identify them.
Table 10.1. Aperture Image Badge Descriptions
Badge | Description |
|---|---|
Referenced | This image has a referenced master. |
Offline master | This image's master is on a drive that's not currently connected, and the master is offline. |
Master not found | This image's master can't be found. |
RAW/JPEG | This image has both a RAW and JPEG master (simultaneously shot), and Aperture displays the first badge when the RAW file is the master and the second when the JPEG is the master. |
Video | This image is a movie file. |
Stack | This is a stack of images, and the badge displays how many images are in the stack. |
Set metadata | This image has user-set metadata. |
Adjusted | This image has one or more adjustments applied. |
Externally edited | This image has been externally edited and has its own master file. |
Audio attachment | This image has an audio attachment. |
Placed | How many times this image has been placed into a book, Web gallery/journal, or light table. |
Album pick | Out of the stack of images, this image is the album pick and the top of the stack. Note that an album pick is not necessarily the stack pick displayed at the project's root, and different albums can have different album picks. |
Low quality | This image is a low enough resolution that it might not look good when printed in a book or used in a Web gallery. |
MobileMe | This image was downloaded from a MobileMe gallery. |
One of Aperture's great features is the ability to make multiple adjustments and versions of your images without actually modifying your files on disk. Unfortunately, sometimes you want to quickly access your modified images, such as to sync to your iPhone, to set as your desktop background, or to include in an iDVD project, without having to export versions of your images. Aperture can automatically create JPEG previews of your images, with all your adjustments, that you can use whenever you see the media browser, such as in iWork, or even drag right from Aperture and drop onto another application.
However, it's important to pay close attention to how you set your preview preferences so that you don't slow down Aperture or waste tons of disk space on unneeded previews. If you're automatically generating previews, Aperture updates your preview every time you make a change to an image, which can slow Aperture down.
Note
We keep our Aperture libraries on external drives but sync our photos to our iPhones. To avoid photos suddenly disappearing if we sync when our drives aren't plugged in, we use iPhoto's Aperture importer (which uses Aperture previews) to create albums in iPhoto with our Aperture-managed images that we then sync to our iPhones. Because our iPhoto libraries are empty (aside from these Aperture images) and live on our main hard drives, they're always available when we sync our devices.
We recommend setting your preview preferences as soon as possible so that you get Aperture creating previews the way you want right away. Start by opening the Previews preferences pane (Aperture
New projects automatically generate previews. If selected, Aperture starts creating preview JPEGs for your images as soon as you start importing images into a project. We recommend deselecting this so that Aperture doesn't waste time creating previews for images that you throw away. After all, how often do you keep and use every image you import? However you'll need to remember to have Aperture create previews for some of your images as part of your workflow.
Use embedded JPEG from camera when possible. We recommend selecting this option so that rather than having to open your RAW file and generate a preview (which takes processing time), Aperture uses the camera-created JPEG that some cameras automatically create when you take the photo.
Share previews with iLife and iWork. Use this pop-up menu to choose when Aperture updates its data file that contains information about your previews. Because we leave Aperture running most of the time, we leave this set to Always. Leaving it set to Always (rather than When quitting Aperture or Never) also makes it so we never wonder why other iApps aren't seeing our latest previews.
Photo Preview. This pop-up menu controls the dimensions for your previews. We leave these set to monitor resolution so that full-screen slide shows look good using previews rather than the original files. Preview JPEGs are easier for computers to open and process instead of the full RAW files.
Photo Preview quality. Use this slider to adjust the JPEG compression setting in your previews. A higher quality means less compression. We find a value around 8 to be a good balance between quality and disk size.

Note
To turn off automatic preview generation for an existing project, select the project in the Library Inspector and deselect Maintain Previews for Project from the Library Inspector Action pop-up menu.
You're probably asking yourself how and when we create previews for our images, since we turn off automatic preview generation. Our workflow is to only create previews for images once we've done an initial ratings and adjustment pass. Typically we filter a project to show the images we rated as 3-star and higher and then create previews for those files.
To create previews, select the images in Browser, Control+click them, and choose Update Preview. Aperture will show its progress in the Activity window.
If an image already has a preview, Update Preview won't regenerate the preview. If Aperture thinks your preview is up to date but you're not seeing your latest adjustments, select the image, Option+Control+click it, and select Generate Preview.
To delete an image's preview, select the image, Control+click it, and choose Delete Preview.
When you use the media browser in the iApps to browse your Aperture library, you might have noticed that you don't see the full contents of your stacks. Aperture only displays the stack pick. Aperture does respect the album pick (if it's different than the main stack pick) and displays the album pick in that album in the media browser. If you want to see the full contents of the stack, then make a new Smart Album with the image and select the Ignore stack groupings option.
Note
Once you create a preview for an image, you can drag it from Aperture and drop it onto another program. If you drag an image that isn't a stack pick, Aperture correctly drags that image's preview rather than the stack pick.
At some point, you will end up with a second library. You might create one to separate your work and personal images, or perhaps you'll create one library for each year's worth of wedding shoots that you archive and remove from your main drive at the end of the year. Or perhaps you have more than one computer, such as a laptop and desktop, and you have a library on each computer. Whatever the reason, it's good to know how to use multiple libraries with Aperture.
In previous versions of Aperture, it was a little clunky to work with multiple libraries and to move images among them. Fortunately, Aperture 3 has simplified this whole process.
The most basic task when using multiple libraries is to switch to a different or even completely new library. Start by choosing File
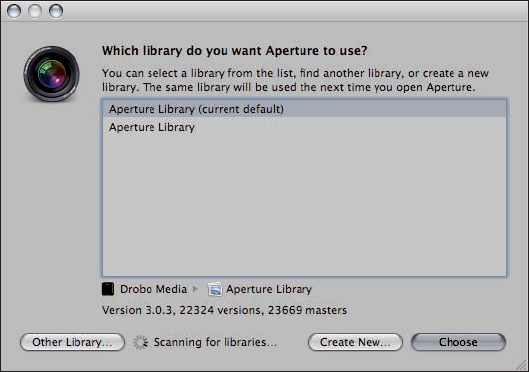
Figure 10.3. The Switch to Library dialog lets you pick an existing or new library to load into Aperture.
If you see the desired library in the list, select it and click Choose. Note that when you select the library, Aperture displays information about the library's location, version, and contents.
If you don't see your desired library, click Other Library and browse for your library. Select it and click the Select button to switch to that library.
To create a new, empty library, click Create New, select where you want the library to live, give your library a name, and click Create. Aperture automatically opens this new library.
Note
To set which library Aperture uses while opening Aperture, hold down the Option key and then open Aperture. Aperture shows you a dialog nearly identical to Figure 10.3. Select the library you want to use and click Choose to continue opening Aperture.
At some point, you will need to move images from one library to another. The simplest way to do so is to export your masters from the first library and to import them into the second. While this works well if you haven't made any adjustments or set any custom metadata (if you export an XMP file with your master, Aperture exports some of your metadata with the image), it's not adequate for most users' needs.
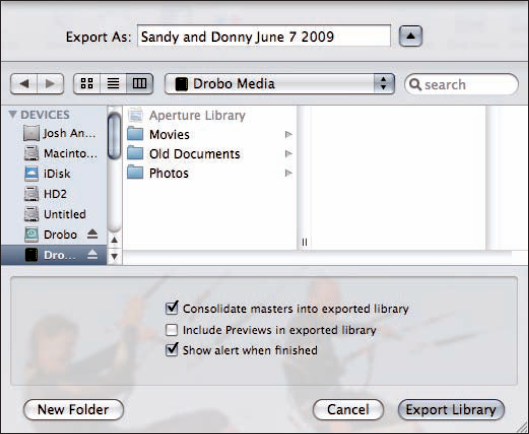
Fortunately, Aperture provides a better way to export images from one library to another. Specifically, it lets you export an album, project, or folder as a library, which contains all your adjustments and metadata that you can then import into the second library. Follow these steps to export your new library:
Select the album, project, or folder in the Library Inspector.
Choose File

Select where you want this new library to live. If you have referenced masters that you want to keep referenced, make sure the Consolidate masters into exported library option isn't selected. However, if you want to make sure your new library has its own copy of all your master images, select this option. We recommend always selecting this option if you're transferring your library to another computer. If you don't want Aperture to have to rebuild previews for your images in the new library, select Include Previews in exported library. Note that this will make your exported library larger, sometimes significantly so.
Click Export Library to start exporting. Use the Activity (Window
Note
A faster way to export albums, projects, and folders is to select them in the Library Inspector and then drag and drop them into the Finder. While Aperture exports them, the new library will have _exporting appended to its name. Aperture removes that extension once it's finished exporting.
After you export your library, the next step is importing it into another Aperture library. To import a library, choose File

Figure 10.5. Aperture prompts to see if you want to add copies of or merge the images in the library you're importing.
When merging libraries, sometimes there will be a conflict. For example, if you exported a project from your desktop to your laptop, made similar changes in both places, and then tried to merge the library from your laptop with the one on your desktop, you will create a conflict because a file has been changed in both libraries. If Aperture finds a conflict, it prompts you with the dialog shown in Figure 10.6 about how you want to resolve the conflict.
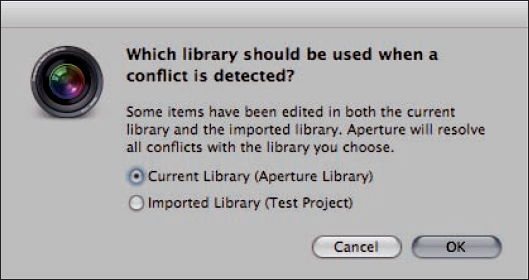
Figure 10.6. Aperture lets you pick which library's data it should use to resolve any merge conflicts.
You resolve a conflict by picking which library is accurate. Unfortunately it doesn't provide any information about what the conflict is, and it will apply your pick to all conflicts it finds. If you have merge conflicts, to be safe, we recommend clicking Cancel, reimporting this library, and clicking Add instead of Merge so that Aperture imports its contents as a copy into your library, rather than possibly replacing existing, good data.
Note
If you drag and drop a library onto Aperture from the Finder, Aperture prompts you if you want to add or merge this library into the open library.
Note
The Projects View also lets you merge libraries into specific projects. To do so, select the project in the Projects View, Control+click and choose Import
A very common reason to work with multiple libraries is that you have multiple computers. While you will need to establish a workflow that best fits your setup, here are our recommendations based on our setup. Specifically, we have laptops with limited storage that we take into the field and use on site and desktops with large hard drives in our offices.
Create a new library for each shoot on your laptop. If you have just one Aperture library on your laptop containing multiple shoots, then you need to export a subsection of it to import into the master library on your desktop. If instead you create a new library for each shoot, when you're done you can import it as is to your desktop. Furthermore, if you like to keep a library with shots from multiple recent shoots on your laptop, you can add the single-shoot library into your existing laptop library and then delete the separate one-shoot library.
Use managed files on the laptop. When you're tired or working quickly, as often happens in the field, it's easy to lose track of what folders you're putting your images into, how you're renaming your files, and all the other settings. We try to keep Aperture's settings on our laptops as idiot-proof as possible, and managed files give us one less thing to worry about.
Connect your laptop to your desktop. Use either FireWire target disk mode or networking, or connect your laptop directly to your desktop's external hard drive with your master Aperture library. We prefer using Target disk mode because it's significantly faster than copying large files over a network (especially our wireless ones) and because we don't have to change our external hard drive's connections to hook them up to our laptops.
Note
To enter Target disk mode, connect two Macs with a FireWire cable, then reboot one of them while holding down T on that computer until you see the screen fill with the FireWire icon. That computer appears listed as an external hard drive for your other computer. You can then move or copy files between them.
If needed, open your laptop's library from your desktop and export the library to a temporary location.
Switch to your main Aperture library and import the library. At this point, do any bulk file management, such as switching managed files to referenced files, and if you exported a temporary library, it's now safe to delete it.
Alternatively, use a portable external hard drive in the field as a backup and copy the library onto it daily. Then connect the external drive to your desktop computer at your home/office and import the library from there.
A useful feature for studio photographers is the ability to shoot tethered. This means that your camera is hooked up to your computer, and as you press the Shutter Release button, Aperture automatically downloads each image and adds it to a project. Then, you can quickly check the image's overall exposure or zoom in to check your focus. Clients also like tethered shooting, as they can quickly see what you're shooting on a large display and provide feedback as to what, if any, changes they want.
To start a tethering session, choose File

Figure 10.7. The Tether Settings dialog lets you control the import options for your tethering session.
This dialog lets you pick whether your images will be managed or referenced, how they'll be named, what metadata preset is applied, whether they're backed up, and what adjustment preset Aperture applies as it imports your images. We recommend selecting the Show HUD check box in the bottom left, as the tethering HUD has useful status information. Click Start Session once you enter your settings.
Running a tethering session is quite straightforward. Press the Shutter Release button on your camera, and Aperture downloads your image and adds it to the selected project. When you're ready to stop the session, choose File
We recommend using the Tether HUD (see Figure 10.8, which is also accessible by choosing File
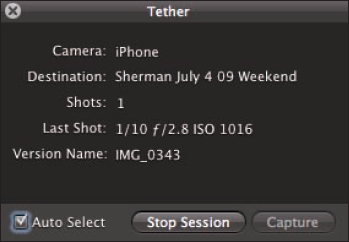
Figure 10.8. The Tether HUD provides useful status information about your camera and the last image shot during a tethering session.
Note
Make sure to check Apple's Web site to see whether your camera is compatible with Aperture's tethering system. Currently, because of their proprietary nature, some Canon cameras do not work with it. If your camera is listed as compatible but you have a busy message on your camera when connected, make sure your camera's communication method is set correctly (typically to PC Connect and not Print/PTP).
One of Aperture's most underrated features is its ability to customize the keyboard shortcuts for nearly every command, including commands that don't have keyboard shortcuts. Furthermore, Aperture lets you save those command sets and to export them from one machine to another.
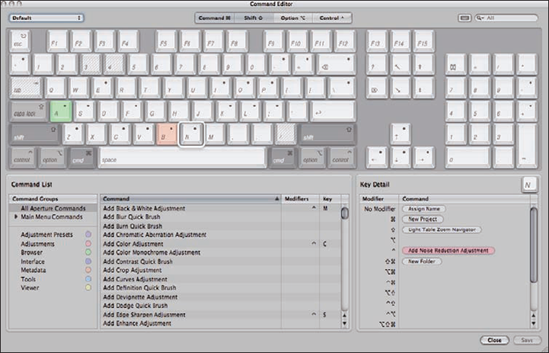
Open the Command Editor (see Figure 10.9) by choosing Aperture
The simplest way to set a keyboard shortcut is as follows:
Sort through the Command List until you find the command whose shortcut you want to change.
Select the command.
Press the shortcut, including the

Click Save to save your changes and to close the Command Editor.
There are other ways to use this editor, though. If you click a key in the keyboard display, Aperture updates the Key Detail area to show all the different commands associated with this key and different modifiers. For example, the N key is bound to the Light Table Zoom Navigator, New Project, Add Noise Reduction, and New Folder, depending on the modifier key. To change which modifiers a given key uses (for example, perhaps you want
Clicking the Keyboard button at the top right shows you what keys have shortcuts attached to them for the selected command group (in the Command List area), and Aperture updates the display as you select the different modifiers at the top. You can also drag commands onto the keyboard display or drag them from the keyboard to add and remove commands interactively. Note that as you drag commands over the keyboard display, Aperture updates the contents of the Key Detail area to reflect the selected key.
To create a new command set, follow these steps:
Open the Command Editor.
Select the set you want to copy or the Default set from the pop-up menu in the top left.
Choose Duplicate.
Give your command set a name and click OK.
To switch command sets without opening the Command Editor, choose your desired set from the Aperture
Automator is a workflow tool that ships with Mac OS X. It lets you easily assemble workflow actions by dragging and dropping different pieces. For example, you could create a workflow to get the images you have selected in Aperture, export versions of them at a certain size, and load them into Keynote, one image per slide.
We're going to walk through a simple example, exporting images, applying a quartz composition filter, and reimporting them into Aperture. If you've ever used Photo Booth and played with the funky filters, those are all quartz composition filters, and the filters range from simple ones like black and white or sepia tone to funky ones like color pencil and thermal camera. These filters aren't available directly in Aperture, but this workflow makes it easy to apply them anyway. Follow these steps:
Open Automator. It's in your Applications folder and looks like Figure 10.10 when running.
Go into the Photos group, select Get Selected Items, and drag it onto the area at the right. Automator now looks like Figure 10.11.
Drag the Export Versions action onto the right, after the Get Selected Images task. Set your export options as desired.
Drag Apply Quartz Composer Filter onto the right. Select what filter you want to apply, such as Color Pencil, and set any additional task options for that filter. Automator prompts you to add a copy files step because this action modifies your images. Choose Don't Add, as a fresh copy of your images was already exported in the previous action to modify.
Drag Import Photos after Apply Quartz Composer. Click Options and select the Show this action when the workflow runs check box so that Automator prompts you each time you run this action for where and how Aperture should import your images. Alternatively, if you always want to import your images the same way to the same project, type your settings and leave Show this action when the workflow runs deselected. Your completed workflow will look like Figure 10.12.
Select a few images in Aperture.
Click the Run button in the top-right corner of Automator. When it finishes running, look at your newly imported images with the quartz composition filter applied.

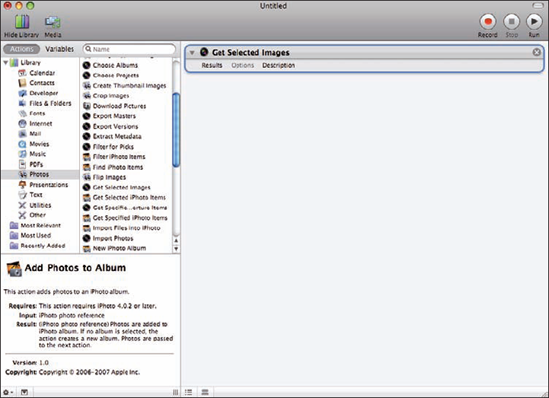

Figure 10.12. A completed Automator workflow to apply a quartz composition filter to a group of images.
Warning
Sometimes Automator actions have similar names. Make sure the icon for the action matches the icon for the program you want to use (for example, Aperture and not iPhoto) or read the action description in the bottom left that appears once you select the action.
When your workflow is working, save your Automator action. Automator provides a number of different formats, including workflow, application, and plug-in. Use workflow when you want to open the Automator workflow into Automator and make changes. Use application to create a stand-alone file that you can double-click to run without opening Automator. Use plug-in to create a plug-in for a specific application, such as Finder. For example, if you made a workflow with an Import Photos action, you could save it as a Finder plug-in named Import to Aperture so that you could Control+click any Finder item and choose Automator
Note
If your camera doesn't work with Aperture's tethered shooting, you can set up an Automator folder action so that any file placed in the folder is imported into Aperture. Then use your camera's software, such as Canon's EOS Utility, to control the tethering session, setting it to save each image into that special folder.
Your digital files are your film negatives, and to a working photographer, they're also your income. Protecting these files is crucial! The first step to protecting your files is to figure out a backup strategy, starting with where you store your photo library.
One of the most common causes of lost data is hard drive failure. Unfortunately, drives don't last forever, and if your library's only on one drive, it's quite possible that you'll lose all your images at some point. Rather than storing our libraries on a single drive, we use redundant arrays of independent disk (RAID) storage devices for our primary photo library. RAID systems let you automatically store your data to multiple hard drives at once, but the combined drives appear as one drive to your computer.
Note
When setting up a RAID system, we recommend buying drives from different manufacturers if possible, so that if a manufacturer has a bad run of drives, your drives don't all fail together.
Currently, we use Drobos from Data Robotics (see Figure 10.13), which are special cases with fast interfaces (including FireWire 800 and eSATA) that automatically reconfigure their RAID settings as you add or remove drives. Literally, you just add new drives or swap out old drives as you need more storage, and the Drobo automatically reconfigures itself to provide efficient, protected data storage. With the original Drobo, one drive can fail but your data will still be safe, and with newer systems like the Drobo S, more drives can fail but your data will still be safe (assuming you're using all the drive bays).
While keeping your images on a RAID array helps prevent image loss due to hard drive failure, it won't protect you if there's a fire or some other natural disaster. The simplest way to protect yourself in this case is to keep a second copy of your data at an off-site location. For example, perhaps you buy a second Drobo that you keep in your house rather than your studio. Every so often, take your spare drive to your computer and sync your data either using vaults as we describe shortly or by using a program like RSyncX that updates your backup drive with any changes that you make on your main drive.
RAID arrays aren't a viable option while shooting in the field because they're too large to be easily portable. When we shoot in the field, we use a two-tiered backup system. The first is that we use field storage devices (specifically Sanho HyperDrive COLORSPACE UDMAs) to back up our memory cards when we download them to our computers. Then we have small, portable hard drives on which we keep an Aperture vault or export the albums and projects as libraries, so that as we organize our images on our computers, all our changes are synced to our backup drive. Furthermore, should our computer die, Sanho sells an accessory for the HyperDrive so that you can back up to the HyperDrive and an external hard drive at the same time. We feel that this setup gives us the best balance between portability, flexibility, and reliability.
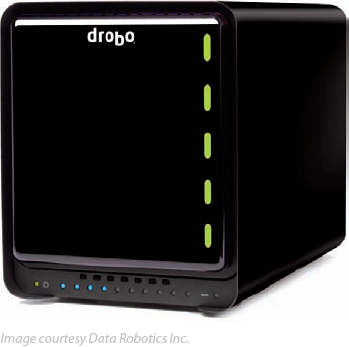
Figure 10.13. Drobo products, from Data Robotics, provide an easy and low-cost way to set up a RAID system for your photo library.
A vault is a special backup of your photo library that Aperture incrementally updates when you update the vault. Specifically, each time you update your vault, Aperture's smart enough to only copy over any changes you've made, rather than making a full copy of your library each time. You can create multiple vaults, such as one that you update daily, and another on a hard drive that you keep off-site that you update weekly.
Warning
Aperture does not back up referenced files within a vault, only managed files. If you use referenced files in your workflow, see the section on Alternate backup strategies for how to back up your images.
Choose Window
Creating a new vault is simple. Follow these steps:
Connect your external drive for the vault.
Open the Vault pane.
Choose Add Vault from the Vault Action pop-up menu or choose File
Choose where you want your vault to live and give it a name.
Click Add, and Aperture creates an empty vault. Update it right away to create the initial backup.
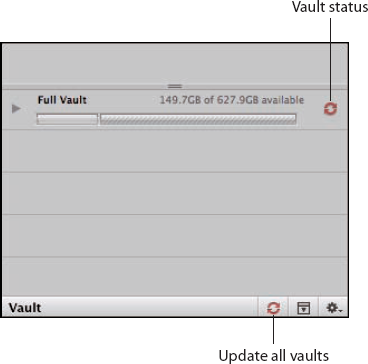
The Vault Status button, located to the right of each vault's entry in the Vault pane, indicates how up to date the vault is. A black icon means the vault is up to date, a yellow icon means that the vault contains all the master files from your library but not all your adjustments, and a red icon means that there are masters in your library that haven't been backed up.
To update a specific vault, either click the Vault Status button or select the vault and choose Update Vault from the Vault Action pop-up menu.
To update all your vaults, click the Update All Vaults button or choose File
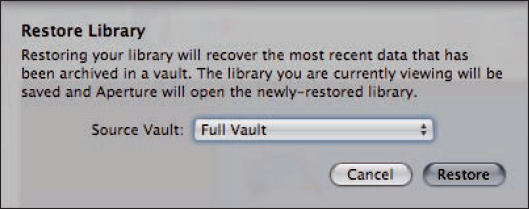
Restoring your library from a vault is straightforward. While hopefully you'll never have to restore a library due to a drive failure, if you purchase a new computer, you can use these easy steps to restore a vault into a fresh Aperture installation rather than manually copying your library over.
Connect the hard drive with your vault to your computer. Wait for it to appear in Finder.
Open Aperture.
Choose File
Choose your vault from the Source Vault pop-up menu. If it's not listed, choose Select Source Vault and navigate to your vault.
Click Restore. When prompted to confirm, click Restore again.
Note
If you use a vault to back up your library, we highly recommend storing it on an external hard drive so that if your primary drive fails, you don't lose your vault, too.
While vaults are quite convenient, they don't back up referenced images and therefore aren't the ideal backup solution for every photographer. Fortunately, there are plenty of other backup tools out there.
The simplest backup tool, Time Machine, comes standard with every Mac that has OS X 10.5 or later installed. Time Machine is sort of like a vault, but it operates on your entire hard drive and not just your Aperture library. It's like a vault in that it's an incremental backup — it only backs up files that have changed since the last backup. But it goes far beyond an Aperture vault, too. It keeps hourly backups for the past day, daily backups for the past month, and weekly backups until its area of the hard drive is full. Should you need to restore a file, Time Machine's interface lets you go back in time to find and restore the files you want.
To use Time Machine, choose System Preferences
Note
Because hard drives can always fail, we recommend either using a RAID system like a Drobo for your Time Machine backups or having two different external hard drives that you use for backup. Should you use a Drobo, the Drobo FS supports Time Machine natively. Otherwise, you'll need to set up a sparse disk image on your Drobo for your backup. Look online for help on how to do this.

An alternative to using hard drives to back up your data is to use another type of physical storage such as a DVD. or a tape drive. Tape drives, while once popular backup solutions, aren't common on the desktop now, and we don't recommend them for the typical user.
Using DVDs is sort of a middle ground. While it seems like a great idea (hey, my data's being laser-etched into a disc — isn't that better than a hard drive?), DVDs can also go bad, and sometimes they don't even last a year. At the very least, make sure to use archival gold DVDs, which last longer, and look for DVD-R and not DVD-RW discs. The DVD-RWs, or rewritable variety, don't last as long as the write-once type. DVDs are also convenient for keeping a copy of your data off-site, as they take far less space than a hard drive.
Unfortunately, because DVDs typically only hold about 4GB (a bit more if you use a dual-layer disc), you'll probably need a lot of discs to back up your images. If you choose to use DVDs to back up your work, we recommend that you use referenced files. That way, you can point third-party programs that automatically distribute large chunks of data among a number of DVDs at your image folders. Plus, you can periodically also burn your Aperture library to a disc to back up your project structure and metadata.
A different alternative is to use an online backup service. There are a number of services that photographers would be interested in, but they primarily fall into two camps. The first camp is a photography-oriented backup service, designed to both archive your photos and to provide gallery and sales features, and the second camp is a general-purpose backup solution, designed to back up your entire hard drive.
Some of the photography services include PhotoShelter (www.photoshelter.com), SmugMug (www.smugmug.com), and Swiss Picture Bank (www.swisspicturebank.com). PhotoShelter and SmugMug (as of this writing) charge either a monthly or yearly fee, and they have different rates depending on what features you need, ranging from basic gallery services to terabytes of storage with online sales and custom Web site templates. Josh currently uses PhotoShelter to drive his Web site. He uses its Aperture export plug-in to upload his master files to a RAW folder within his PhotoShelter archive, and he uploads JPEG versions of his images, with all his adjustments burned in, to another folder that he then posts publicly.
Swiss Picture Bank is a newer service, but what's special about it is that your data has a lifetime guarantee through the Foundation for Data Permanence so that if Swiss Picture Bank goes out of business, your data is always safe and accessible. Furthermore, rather than paying an annual fee, you pay once for however much storage you need and have that for life.
Unfortunately with these services, you have to manually select what images you want to upload to the sites and upload them yourself. But that's a small price to pay to be able to access your images anywhere and for some of the other features these sites provide.
The more general services, like Mozy (www.mozy.com) and Carbonite (www.carbonite.com) provide programs that monitor the data on your computer and upload any new or changed files whenever you make a change. These services cost less (each is roughly $60 per year for unlimited backup, compared to the $60 per month you might pay PhotoShelter for storage), but they don't provide any gallery or photo sales features.
Should you choose to use an online backup service, remember that the initial backup can take a significant amount of time depending on how much data you have to back up and your network connection, possibly even weeks. Furthermore, we recommend not relying on an online service as your only backup solution, as restoring your data can also take a significant amount of time.
At its core, Aperture uses a database to contain and organize information about your images, ranging from where the files are on disk to where each thumbnail is stored to what faces are tagged in each image. Unfortunately, once in a while, it's possible for something bad to happen, such as the power going out while Aperture is using its database, which causes the database to become corrupt.
Aperture 3 includes a first aid tool that you should use as the first problem-solving step when you encounter problems with Aperture. It can fix everything from images showing the wrong thumbnails to Aperture not being able to open the library file and can be faster than restoring your library from a backup.
To access the Library First Aid tools, follow these steps:
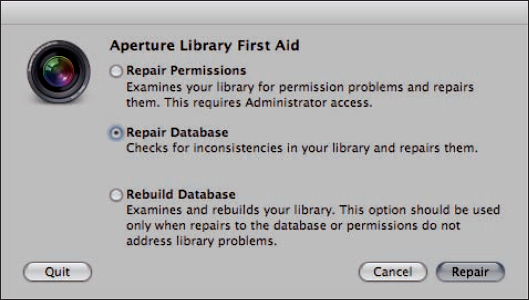
Within the Library First Aid dialog, there are three repair options:
Repair Permissions. Select this option if Aperture can't open or display either the library or some of the images within the library. Note that this option requires an administrator password for your computer. Also note that if Aperture can't open your images because they're referenced and have missing masters, this option will not reconnect your images for you.
Repair Database. If Aperture is displaying the wrong metadata for various images (or not displaying any metadata) or having trouble with something other than accessing your image files, select this option.
Rebuild Database. This option uses the different data files within your Aperture library to rebuild the library's database. Use this option as a last resort if Repair Database fails, as it can be quite slow.
If you still have problems with your library after using the Library First Aid tool, we recommend simply restoring your library from your most recent backup.
Note
Because of how Aperture stores some of its internal files, your library can become fragmented across your hard drive. If you notice Aperture's performance slowly degrading over time, try using a defragmentation program on the drive that you use to store your Aperture library.