
Chapter 5: Holding a Class Responsible
In This Chapter
![]() Letting the class protect itself through access control
Letting the class protect itself through access control
![]() Introducing the property, a specialized kind of method
Introducing the property, a specialized kind of method
![]() Allowing an object to initialize itself via the constructor
Allowing an object to initialize itself via the constructor
![]() Defining multiple constructors for the same class
Defining multiple constructors for the same class
![]() Constructing static or class members
Constructing static or class members
A class must be held responsible for its actions. Just as a microwave oven shouldn’t burst into flames if you press the wrong key, a class shouldn’t allow itself to roll over and die when presented with incorrect data.
To be held responsible for its actions, a class must ensure that its initial state is correct and then control its subsequent state so that it remains valid. C# provides both these capabilities.
Restricting Access to Class Members
Simple classes define all their members as public. Consider a BankAccount program that maintains a balance data member to retain the balance in each account. Making that data member public puts everyone on the honor system.
I don’t know about your bank, but my bank isn’t nearly so forthcoming as to leave a pile of money and a register for me to mark down every time I add money to or take money away from the pile. After all, I may forget to mark my withdrawals in the register.
Controlling access avoids little mistakes, such as forgetting to mark a withdrawal here or there, and manages to avoid some truly big mistakes with withdrawals.
 I know exactly what you procedural types out there are thinking: “Just make a rule that other classes can’t access the
 balance data member directly, and that’s that.” That approach may work in theory, but in practice it never does. People start out with good intentions (like my intentions to work out every day), but those good intentions get crushed under the weight of schedule pressures to get the product out the door. Speaking of weight. . . .
A public example of public BankAccount
The following BankAccount class example declares all its methods public but declares its data members, including _accountNumber and _balance, to be private. Note that I’ve left it in an incorrect state to make a point. The following code chunk doesn’t compile correctly yet:

// BankAccount -- Create a bank account using a double variable
// to store the account balance (keep the balance in a private
// variable to hide its implementation from the outside world).
// Note: Until you correct it, this program fails to compile
// because Main() refers to a private member of class BankAccount.
using System;
namespace BankAccount
{
public class Program
{
public static void Main(string[] args)
{
Console.WriteLine(“This program doesn’t compile in its present state.”);
// Open a bank account.
Console.WriteLine(“Create a bank account object”);
BankAccount ba = new BankAccount();
ba.InitBankAccount();
// Accessing the balance via the Deposit() method is okay --
// Deposit() has access to all the data members.
ba.Deposit(10);
// Accessing the data member directly is a compile-time error.
Console.WriteLine(“Just in case you get this far the following is “
+ “supposed to generate a compile error”);
ba._balance += 10;
// Wait for user to acknowledge the results.
Console.WriteLine(“Press Enter to terminate...”);
Console.Read();
}
}
// BankAccount -- Define a class that represents a simple account.
public class BankAccount
{
private static int _nextAccountNumber = 1000;
private int _accountNumber;
// Maintain the balance as a double variable.
private double _balance;
// Init -- Initialize a bank account with the next
// account id and a balance of 0.
public void InitBankAccount()
{
_accountNumber = ++_nextAccountNumber;
_balance = 0.0;
}
// GetBalance -- Return the current balance.
public double GetBalance()
{
return _balance;
}
// AccountNumber
public int GetAccountNumber()
{
return _accountNumber;
}
public void SetAccountNumber(int accountNumber)
{
this._accountNumber = accountNumber;
}
// Deposit -- Any positive deposit is allowed.
public void Deposit(double amount)
{
if (amount > 0.0)
{
_balance += amount;
}
}
// Withdraw -- You can withdraw any amount up to the
// balance; return the amount withdrawn.
public double Withdraw(double withdrawal)
{
if (_balance <= withdrawal)
{
withdrawal = _balance;
}
_balance -= withdrawal;
return withdrawal;
}
// GetString -- Return the account data as a string.
public string GetString()
{
string s = String.Format(“#{0} = {1:C}”,
GetAccountNumber(), GetBalance());
return s;
}
}
}
 In this code example,
 _balance -= withdrawal is the same as _balance = _balance - withdrawal. (C# programmers tend to use the shortest notation available.)
Marking a member public makes that member available to any other code within your program.
The BankAccount class provides an InitBankAccount() method to initialize the members of the class, a Deposit() method to handle deposits, and a Withdraw() method to perform withdrawals. The Deposit() and Withdraw() methods even provide some rudimentary rules, such as “You can’t deposit a negative number” and “You can’t withdraw more than you have in your account” (both good rules for a bank, as I’m sure you’ll agree). However, everyone’s on the honor system as long as _balance is accessible to external methods. (In this context, external means “external to the class but within the same program.”) The honor system can be a problem on big programs written by teams of programmers. It can even be a problem for you (and me), given general human fallibility.
Well-written code with rules that the compiler can enforce saves everyone from the occasional bullet to the big toe.
Before you get too excited, however, notice that the program doesn’t build. Attempts to do so generate this error message:
‘BankAccount.BankAccount._balance’ is inaccessible due to its protection level.
I don’t know why it doesn’t just come out and say, “Hey, this is private, so keep your mitts off.” The statement ba._balance += 10; is illegal because _balance isn’t accessible to Main(), a method outside the BankAccount class. Replacing this line with ba.Deposit(10) solves the problem. The BankAccount.Deposit() method is public and therefore accessible to Main() and other parts of your program.
Not declaring a class member’s access type explicitly is the same as declaring it private.
The default access type is private. However, you should include the private keyword to remove any doubt. Good programmers make their intentions explicit, which is another way to reduce errors.
Jumping ahead — other levels of security
Understanding this section depends on your having some knowledge of inheritance (see Chapter 6 in this minibook) and namespaces (Chapter 10 in this minibook). You can skip this section for now if you want, but just know that it’s here when you need it.
C# provides these levels of security:
![]() A
A public member is accessible to any class in the program.
![]() A
A private member is accessible only from the current class.
![]() A
A protected member is accessible from the current class and any of its subclasses.
![]() An
An internal member is accessible from any class within the same program module or assembly.
 A C# “module,” or assembly, is a separately compiled piece of code, either an executable program in an
 .EXE file or a supporting library module in a .DLL file. A single namespace can extend across multiple assemblies. (Chapter 10 in this minibook explains C# assemblies and namespaces and discusses access levels other than public and private.)
![]() An
An internal protected member is accessible from the current class and any subclass, and from classes within the same module.
Keeping a member hidden by declaring it private offers the maximum amount of security. However, in many cases, you don’t need that level of security. After all, the members of a subclass already depend on the members of the base class, so protected offers a comfortable level of security.
Why You Should Worry about Access Control
Declaring the internal members of a class public is a bad idea for at least these reasons:
![]() With all data members
With all data members public, you can’t easily determine when and how data members are being modified. Why bother building safety checks into the Deposit() and Withdraw() methods? In fact, why even bother with these methods? Any method of any class can modify these elements at any time. If other methods can access these data members, they almost certainly will.
Your BankAccount program may execute for an hour or so before you notice that one of the accounts has a negative balance. The Withdraw() method would have ensured that this situation didn’t happen, so obviously another method accessed the balance without going through Withdraw(). Figuring out which method is responsible and under which conditions is a difficult problem.
![]() Exposing all data members of the class makes the interface too complicated. As a programmer using the
Exposing all data members of the class makes the interface too complicated. As a programmer using the BankAccount class, you don’t want to know about the internal workings of the class. You just need to know that you can deposit and withdraw funds. It’s like a candy machine that has 50 buttons versus one with just a few buttons — the ones you need.
![]() Exposing internal elements leads to a distribution of the class rules. For example, my
Exposing internal elements leads to a distribution of the class rules. For example, my BankAccount class doesn’t allow the balance to be negative under any circumstances. That required business rule should be isolated within the Withdraw() method. Otherwise, you have to add this check everywhere the balance is updated.
Sometimes, a bank decides to change the rules so that “valued customers” are allowed to carry slightly negative balances for a short period, to avoid unintended overdrafts. Then you have to search through the program to update every section of code that accesses the balance, to ensure that the safety checks are changed.
 Make your classes and methods no more accessible than necessary. I give you this advice not so much to cause paranoia about snoopy hackers as to suggest a prudent step that helps reduce errors as you code. Use
 private, if possible, and then escalate to protected, internal, internal protected, or public as necessary.
Accessor methods
If you look more carefully at the BankAccount class, you see a few other methods. One, GetString(), returns a string version of the account fit for presentation to any Console.WriteLine() for display. However, displaying the contents of a BankAccount object may be difficult if its contents are inaccessible. The class should have the right to decide how it is displayed.
In addition, you see two “getter” methods, GetBalance() and GetAccountNumber(), and one “setter” method, SetAccountNumber(). You may wonder why I would bother to declare a data member such as _balance private but provide a public GetBalance() method to return its value. I have two reasons:
![]()
GetBalance() doesn’t provide a way to modify _balance — it merely returns its value. The balance is read-only. To use the analogy of an actual bank, you can look at your balance any time you want; you just can’t withdraw money from your account without using the bank’s withdrawal mechanism.
![]()
GetBalance() hides the internal format of the class from external methods. GetBalance() may perform an extensive calculation by reading receipts, adding account charges, and accounting for any other amounts your bank may want to subtract from your balance. External methods don’t know and don’t care. Of course, you care which fees are being charged — you just can’t do anything about them, short of changing banks.
Finally, GetBalance() provides a mechanism for making internal changes to the class without the need to change the users of BankAccount. If the Federal Deposit Insurance Corporation (FDIC) mandates that your bank store deposits differently, the mandate shouldn’t change the way you access your account.
Access control to the rescue — an example
The following DoubleBankAccount program demonstrates a potential flaw in the BankAccount program. The entire program is on my website; however, the following listing shows just Main() — the only portion of the program that differs from the earlier BankAccount program:
// DoubleBankAccount -- Create a bank account using a double variable
// to store the account balance (keep the balance in a private
// variable to hide its implementation from the outside world).
using System;
namespace DoubleBankAccount
{
public class Program
{
public static void Main(string[] args)
{
// Open a bank account.
Console.WriteLine(“Create a bank account object”);
BankAccount ba = new BankAccount();
ba.InitBankAccount();
// Make a deposit.
double deposit = 123.454;
Console.WriteLine(“Depositing {0:C}”, deposit);
ba.Deposit(deposit);
// Account balance
Console.WriteLine(“Account = {0}”, ba.GetString());
// Here’s the problem.
double fractionalAddition = 0.002;
Console.WriteLine(“Adding {0:C}”, fractionalAddition);
ba.Deposit(fractionalAddition);
// Resulting balance
Console.WriteLine(“Resulting account = {0}”, ba.GetString());
// Wait for user to acknowledge the results.
Console.WriteLine(“Press Enter to terminate...”);
Console.Read();
}
}
}
The Main() method creates a bank account and then deposits $123.454, an amount that contains a fractional number of cents. Main() then deposits a small fraction of a cent to the balance and displays the resulting balance.
The output from this program appears this way:
Create a bank account object
Depositing $123.45
Account = #1001 = $123.45
Adding $0.00
Resulting account = #1001 = $123.46
Press Enter to terminate...
Users start to complain: “I just can’t reconcile my checkbook with my bank statement.” Personally, I’m happy if I can get to the nearest $100, but some people insist that their accounts match to the penny. Apparently, the program has a bug.
The problem, of course, is that $123.454 shows up as $123.45. To avoid the problem, the bank decides to round deposits and withdrawals to the nearest cent. Deposit $123.454 and the bank takes that extra 0.4 cent. On the other side, the bank gives up enough 0.4 amounts that everything balances out in the long run. Well, in theory, it does.
The easiest way to solve the rounding problem is by converting the bank accounts to decimal and using the Decimal.Round() method, as shown in this DecimalBankAccount program:
// DecimalBankAccount -- Create a bank account using a decimal
// variable to store the account balance.
using System;
namespace DecimalBankAccount
{
public class Program
{
public static void Main(string[] args)
{
// Open a bank account.
Console.WriteLine(“Create a bank account object”);
BankAccount ba = new BankAccount();
ba.InitBankAccount();
// Make a deposit.
double deposit = 123.454;
Console.WriteLine(“Depositing {0:C}”, deposit);
ba.Deposit(deposit);
// Account balance
Console.WriteLine(“Account = {0}”, ba.GetString());
// Now add in a very small amount.
double fractionalAddition = 0.002;
Console.WriteLine(“Adding {0:C}”, fractionalAddition);
ba.Deposit(fractionalAddition);
// Resulting balance.
Console.WriteLine(“Resulting account = {0}”, ba.GetString());
// Wait for user to acknowledge the results.
Console.WriteLine(“Press Enter to terminate...”);
Console.Read();
}
}
// BankAccount -- Define a class that represents a simple account.
public class BankAccount
{
private static int _nextAccountNumber = 1000;
private int _accountNumber;
// Maintain the balance as a single decimal variable.
private decimal _balance;
// Init -- Initialize a bank account with the next
// account id and a balance of 0.
public void InitBankAccount()
{
_accountNumber = ++_nextAccountNumber;
_balance = 0;
}
// GetBalance -- Return the current balance.
public double GetBalance()
{
return (double)_balance;
}
// AccountNumber
public int GetAccountNumber()
{
return _accountNumber;
}
public void SetAccountNumber(int accountNumber)
{
this._accountNumber = accountNumber;
}
// Deposit -- Any positive deposit is allowed.
public void Deposit(double amount)
{
if (amount > 0.0)
{
// Round off the double to the nearest cent before depositing.
decimal temp = (decimal)amount;
temp = Decimal.Round(temp, 2);
_balance += temp;
}
}
// Withdraw -- You can withdraw any amount up to the
// balance; return the amount withdrawn.
public double Withdraw(double withdrawal)
{
// Convert to decimal and work with the decimal version.
decimal decWithdrawal = (decimal)withdrawal;
if (_balance <= decWithdrawal)
{
decWithdrawal = _balance;
}
_balance -= decWithdrawal;
return (double)decWithdrawal; // Return a double.
}
// GetString -- Return the account data as a string.
public string GetString()
{
string s = String.Format(“#{0} = {1:C}”,
GetAccountNumber(), GetBalance());
return s;
}
}
}
I’ve converted all internal representations to decimal values, a type better adapted to handling bank account balances than double in any case. The Deposit() method now uses the Decimal.Round() method to round the deposit amount to the nearest cent before making the deposit. The output from the program is now as expected:
Create a bank account object
Depositing $123.45
Account = #1001 = $123.45
Adding $0.00
Resulting account = #1001 = $123.45
Press Enter to terminate...
So what?
You could argue that I should have written the BankAccount program using decimal input arguments to begin with, and I probably would agree. But the point is that I didn’t. Other applications were written using double as the form of storage. A problem arose. The BankAccount class was able to fix the problem internally and make no changes to the application software. (Notice that the class’s public interface didn’t change: Balance() and Withdraw() still return doubles, and Deposit() and Withdraw() still take a double parameter.)
I repeat: Applications using class BankAccount didn’t have to change.
In this case, the only calling method potentially affected was Main(), but the effects could have extended to dozens of methods that accessed bank accounts, and those methods could have been spread over hundreds of assemblies. None of those methods would have to change, because the fix was within the confines of the BankAccount class, whose public interface (its public methods) didn’t outwardly change. This solution wouldn’t have been possible if the internal members of the class had been exposed to external methods.
Internal changes to a class still require some retesting of other code, even though you didn’t have to modify that code.
Defining Class Properties
The GetX() and SetX() methods demonstrated in the BankAccount programs in the previous section are access methods, or simply accessors. Although they signify good programming habits in theory, access methods can become clumsy in practice. For example, the following code line is necessary to increment _accountNumber by 1:
SetAccountNumber(GetAccountNumber() + 1);
C# defines a construct known as a property, which makes using access methods much easier than making them methods. The following code snippet defines a read-write property, AccountNumber (it’s both a getter and a setter):
public int AccountNumber // No parentheses here.
{
get{ return _accountNumber; } // The “read” part. Curly braces and semicolon.
set{ _accountNumber = value; } // The “write” part. ‘value’ is a keyword.
}
The get section is called whenever the property is read, and the set section is invoked on the write. The following Balance property is read-only because only the get section is defined (using a less compact notation):
public double Balance
{
get
{
return (double)_balance;
}
}
In use, these properties appear as follows:
BankAccount ba = new BankAccount();
// Set the account number property.
ba.AccountNumber = 1001;
// Get both properties.
Console.WriteLine(“#{0} = {1:C}”, ba.AccountNumber, ba.Balance);
The properties AccountNumber and Balance look much like public data members, in both appearance and use. However, properties enable the class to protect internal members (Balance is a read-only property) and hide their implementation (the underlying _balance data member is private). Notice that Balance performs a conversion — it could have performed any number of calculations. Properties aren’t necessarily one-liners.
By convention, the name of a property begins with a capital letter. Note that properties don’t have parentheses: It’s Balance, not Balance().
Properties aren’t necessarily inefficient. The C# compiler can optimize a simple accessor to the point that it generates no more machine code than accessing the data member directly. This concept is important, not only to an application program but also to C# itself. The C# library uses properties throughout, and you should, too.
Use properties to access class data members, even from methods in the same class.
Static properties
A static (class) data member may be exposed through a static property, as shown in this simplistic example (note its compact layout):
public class BankAccount
{
private static int _nextAccountNumber = 1000;
public static int NextAccountNumber { get { return _nextAccountNumber; } }
// . . .
}
The NextAccountNumber property is accessed through the class as follows because it isn’t an instance property (it’s declared static):
// Read the account number property.
int value = BankAccount.NextAccountNumber;
(In this example, value is outside the context of a property, so it isn’t a reserved word.)
Properties with side effects
A get operation can perform extra work other than simply retrieving the associated property, as shown here:
public static int AccountNumber
{
// Retrieve the property and set it up for the
// next retrieval by incrementing it.
get{ return ++_nextAccountNumber; }
}
This property increments the static account number member before returning the result. This action probably isn’t a good idea, however, because the user of the property receives no clue that anything is happening other than the actual reading of the property. The incrementation is a side effect.
Like the accessor methods that they mimic, properties shouldn’t change the state of the class other than, say, setting a data member’s value. Both properties and methods generally should avoid side effects because they can lead to subtle bugs. Change a class as directly and explicitly as possible.
Letting the compiler write properties for you
Most properties described in the previous section are utterly routine, and writing them is tedious (though simple):
private string _name; // An underlying data member for the property
public string Name { get { return _name; } set { _name = value; } }
Because you write this same boilerplate code repeatedly, since C# 3.0, the compiler now does it for you. All you have to write for the previous property (including the private data member) is this line:
public string Name { get; set; }
This line is sort of equivalent to
private string <somename>; // What’s <somename>? Don’t know or care.
public string Name { get { return <somename>; } set { <somename> = value; } }
The compiler creates a mysterious data member that shall be nameless along with the accessor boilerplate code. The AccessorPropertyShortcuts example on csharp102.info illustrates this usage. This style encourages using the property even inside other members of its containing class because the property name is all you know. For that reason, you must have both get and set when you write the shortcut property. You can initialize such properties using the property syntax:
public int AnInt { get; set; } // Compiler provides a private variable.
. . .
AnInt = 2; // Initialize compiler-written instance variable via property.
Accessors with access levels
Accessor properties don’t necessarily have to be declared public. You can declare them at any appropriate level, even private, if the accessor is used only inside its class. (The upcoming example marks the Name property internal.)
You can even adjust the access levels of the get and set portions of an accessor individually. Suppose that you don’t want to expose the set accessor outside your class — it’s for internal use only. You can write the property like this:
internal string Name { get; private set; }
The AccessorPropertyShortcuts example at csharp102.info illustrates this usage.
Getting Your Objects Off to a Good Start — Constructors
Controlling class access is only half the problem: An object needs a good start in life if it is to grow. A class can supply an initialization method that the application calls to get things started, but the application could forget to call the method. The class starts out with garbage, and the situation gets no better after that. If you want to hold the class accountable, you have to ensure that it has a chance to start out correctly.
C# solves that problem by calling the initialization method for you — for example:
MyObject mo = new MyObject();
In other words, this statement not only grabs an object from a special memory area, but it also initializes that object’s members.
Keep the terms class and object separate in your mind. Cat is a class. My cat Striper is an object of class Cat.
The C#-Provided Constructor
C# keeps track of whether a variable has been initialized and doesn’t allow you to use an uninitialized variable. For example, the following code chunk generates a compile-time error:
public static void Main(string[] args)
{
int n;
double d;
double calculatedValue = n + d;
}
C# tracks the fact that the local variables n and d haven’t been assigned a value and doesn’t allow them to be used in the expression. Compiling this tiny program generates these compiler errors:
Use of unassigned local variable ‘n’
Use of unassigned local variable ‘d’
By comparison, C# provides a default constructor that initializes the data members of an object to
![]() 0 for numbers
0 for numbers
![]()
false for Booleans
![]()
null for object references
Consider the following simple program example:
using System;
namespace Test
{
public class Program
{
public static void Main(string[] args)
{
// First create an object.
MyObject localObject = new MyObject();
Console.WriteLine(“localObject.n is {0}”, localObject.n);
if (localObject.nextObject == null)
{
Console.WriteLine(“localObject.nextObject is null”);
}
// Wait for user to acknowledge the results.
Console.WriteLine(“Press Enter to terminate...”);
Console.Read();
}
}
public class MyObject
{
internal int n;
internal MyObject nextObject;
}
}
This program defines a class MyObject, which contains both a simple data member n of type int and a reference to an object, nextObject (both declared internal). The Main() method creates a MyObject and then displays the initial contents of n and nextObject.
The output from executing the program appears this way:
localObject.n is 0
localObject.nextObject is null
Press Enter to terminate...
When the object is created, C# executes a small piece of code that the compiler provides to initialize the object and its members. Left to their own devices, the data members localObject.n and nextObject would contain random, garbage values.
The code that initializes values when they’re created is the default constructor. It “constructs” the class, in the sense of initializing its members. Thus C# ensures that an object starts life in a known state: all zeros. This concept affects only data members of the class, not local variables in a method.
Replacing the Default Constructor
Although the compiler automatically initializes all instance variables to zeroes, for many classes (probably most classes), all zeroes isn’t a valid state. Consider the following BankAccount class from earlier in this chapter:
public class BankAccount
{
private int _accountNumber;
private double _balance;
// . . .other members
}
Although an initial balance of 0 is probably okay, an account number of 0 definitely isn’t the hallmark of a valid bank account.
At this point in the chapter, the BankAccount class includes the InitBankAccount() method to initialize the object. However, this approach puts too much responsibility on the application software using the class. If the application fails to invoke the InitBankAccount() method, the bank account methods may not work, through no fault of their own.
A class shouldn’t rely on external methods such as InitBankAccount() to start the object in a valid state.
To work around this problem, you can have your class provide its own explicit class constructor that C# calls automatically when the object is created. The constructor could have been named Init(), Start(), or Create(), but C# requires the constructor to carry the name of the class. Thus a constructor for the BankAccount class appears this way:
public void Main(string[] args)
{
BankAccount ba = new BankAccount(); // This invokes the constructor.
}
public class BankAccount
{
// Bank accounts start at 1000 and increase sequentially.
private static int _nextAccountNumber = 1000;
// Maintain the account number and balance for each object.
private int _accountNumber;
private double _balance;
// BankAccount constructor -- Here it is -- ta-da!
public BankAccount() // Parentheses, possible arguments, no return type
{
_accountNumber = ++_nextAccountNumber;
_balance = 0.0;
}
// . . . other members . . .
}
The contents of the BankAccount constructor are the same as those of the original Init...() method. However, the way you declare and use the constructor differs:
![]() The constructor always carries the same name as the class.
The constructor always carries the same name as the class.
![]() The constructor can take parameters (or not).
The constructor can take parameters (or not).
![]() The constructor never has a return type, not even
The constructor never has a return type, not even void.
![]()
Main() doesn’t need to invoke any extra method to initialize the object when it’s created; no Init() is necessary.
If you provide your own constructor, C# no longer supplies a default constructor. Your constructor replaces the default and becomes the only way to create an instance of your class.
Constructing something
Try out a constructor thingie. Consider the following program, DemonstrateCustomConstructor:
// DemonstrateCustomConstructor -- Demonstrate how you can replace the
// C# default constructor with your own, custom constructor.
// Creates a class with a constructor and then steps through a few scenarios.
using System;
namespace DemonstrateCustomConstructor
{
// MyObject -- Create a class with a noisy custom constructor
// and an internal data object.
public class MyObject
{
// This data member is a property of the class (it’s static).
private static MyOtherObject _staticObj = new MyOtherObject();
// This data member is a property of each instance.
private MyOtherObject _dynamicObj;
// Constructor (a real chatterbox)
public MyObject()
{
Console.WriteLine(“MyObject constructor starting”);
Console.WriteLine(“(Static data member constructed before “ +
“this constructor)”);
Console.WriteLine(“Now create nonstatic data member dynamically:”);
_dynamicObj = new MyOtherObject();
Console.WriteLine(“MyObject constructor ending”);
}
}
// MyOtherObject -- This class also has a noisy constructor but
// no internal members.
public class MyOtherObject
{
public MyOtherObject()
{
Console.WriteLine(“MyOtherObject constructing”);
}
}
public class Program
{
public static void Main(string[] args)
{
Console.WriteLine(“Main() starting”);
Console.WriteLine(“Creating a local MyObject in Main():”);
MyObject localObject = new MyObject();
// Wait for user to acknowledge the results.
Console.WriteLine(“Press Enter to terminate...”);
Console.Read();
}
}
}
Executing this program generates the following output:
Main() starting
Creating a local MyObject in Main():
MyOtherObject constructing
MyObject constructor starting
(Static data member constructed before this constructor)
Now create nonstatic data member dynamically:
MyOtherObject constructing
MyObject constructor ending
Press Enter to terminate...
The following steps reconstruct what just happened:
1. The program starts, and Main() outputs the initial message and announces that it’s about to create a local MyObject.
2. Main() creates a localObject of type MyObject.
3. MyObject contains a static member _staticObj of class MyOtherObject.
All static data members are initialized before the first MyObject() constructor runs. In this case, C# populates _staticObj with a newly created MyOtherObject before passing control to the MyObject constructor. This step accounts for the third line of output.
4. The constructor for MyObject is given control. It outputs the initial message, MyObject constructor starting, and then notes that the static member was already constructed before the MyObject() constructor began:
(Static data member constructed before this constructor)
5. After announcing its intention with Now create nonstatic data member dynamically, the MyObject constructor creates an object of class MyOtherObject using the new operator, generating the second MyOtherObject constructing message as the MyOtherObject constructor is called.
6. Control returns to the MyObject constructor, which returns to Main().
Job well done!
Executing the constructor from the debugger
Executing the same program from the debugger is illuminating:
1. Rebuild the program: Choose the command Build⇒Build DemonstrateCustomConstructor.
You might also have to set the project as the startup project by right-clicking the DemonstrateCustomConstructor project and selecting Set As Startup Project.
2. Before you start executing the program from the debugger, set a breakpoint at the Console.WriteLine() call in the MyOtherObject constructor.
To set a breakpoint, click in the gray trough on the left side of the editor window, next to the line at which you want to stop.
Figure 5-1 shows my display with the breakpoint set: The dark ball is in the trough.
3. Rather than choose Debug⇒Start Debugging, choose Debug⇒Step Into (or press F11).
Your menus, toolbars, and windows should change a bit, and then a bright yellow highlight appears on the opening curly brace in Main().
4. Press F11 three more times and lightly rest the mouse pointer on the localObject variable (without clicking).
You’re about to call the MyObject constructor. Your display should now look like the one shown in Figure 5-2. You can see that localObject is currently null under the cursor. The Locals window shows the same thing. (If Locals isn’t visible, choose Debug⇒Windows⇒Locals to display it.)

Figure 5-1: The high-lighting in the My-Other-Object constructor indicates the presence of a breakpoint.
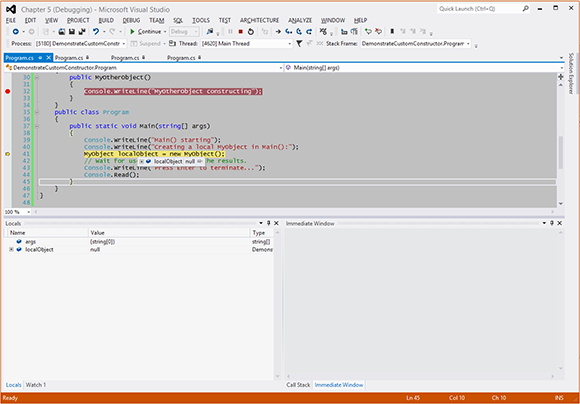
Figure 5-2: Just before you jump into Constructor Land, the Visual Studio debugger display looks like this.
5. Press F11 one more time.
The program executes to the breakpoint in MyOtherObject, as shown by the yellow bar shown in Figure 5-3. How did you reach this point? The last call in Main() invoked the constructor for MyObject. But before that constructor begins to execute, C# initializes the static data member in class MyObject. That data member is of type MyOtherObject, so initializing it means invoking its constructor — which lands you at the breakpoint. (Without the breakpoint, you wouldn’t see the debugger stop there, although the constructor would indeed execute, as you could confirm by checking to ensure that the constructor’s message shows up in the console window.)
6. Press F11 twice more, and you’re stopped at the static data member, _staticObj, as shown in Figure 5-4.
It was that object’s constructor you just stepped out of.
7. Continue pressing F11 as you walk through the program.
The first time you press F11, you stop at the beginning of the MyObject constructor, at last. Note that you step into the MyOtherObject constructor a second time when the MyObject constructor creates the other MyObject data member, _dynamicObj (the nonstatic one).
Remember to continue through the Console.Read() statement back in Main(). After viewing the console window, you can press Enter to close it.

Figure 5-3: Control passes to the MyOther-Object constructor beforeheading into the My-Object construc-tor.

Figure 5-4: Having stepped through the My-Other-Object constructor, you’re back where the construc-tor was invoked.
Book IV gives you a thorough tour of the debugger.
Initializing an object directly with an initializer
Besides letting you initialize data members in a constructor, C# enables you to initialize data members directly by using initializers.
Thus I could have written the BankAccount class as follows:
public class BankAccount
{
// Bank accounts start at 1000 and increase sequentially.
private static int _nextAccountNumber = 1000;
// Maintain the account number and balance for each object.
private int _accountNumber = ++_nextAccountNumber;
private double _balance = 0.0;
// . . . other members . . .
}
Here’s the initializer business. Both _accountNumber and _balance are assigned a value as part of their declaration, which has the same effect as a constructor but without having to do the work in it.
Be clear about exactly what’s happening. You may think that this statement sets _balance to 0.0 right now. However, _balance exists only as a part of an object. Thus the assignment isn’t executed until a BankAccount object is created. In fact, this assignment is executed every time an object is created.
Note that the static data member _nextAccountNumber is initialized the first time the BankAccount class is accessed — as your tour in the debugger showed, that’s the first time you access any method or property of the object owning the static data member, including the constructor.
After the static member is initialized, it isn’t reinitialized every time you construct a BankAccount instance. That’s different from the nonstatic members.
Initializers are executed in the order of their appearance in the class declaration. If C# encounters both initializers and a constructor, the initializers are executed before the body of the constructor.
Seeing that construction stuff with initializers
In the DemonstrateCustomConstructor program, move the call new MyOtherObject() from the MyObject constructor to the declaration itself, as follows (see the bold text), modify the second WriteLine() statement as shown, and then rerun the program:
public class MyObject
{
// This member is a property of the class (it’s static).
private static MyOtherObject _staticObj = new MyOtherObject();
// This member is a property of each instance.
private MyOtherObject _dynamicObj = new MyOtherObject(); // <- Here.
public MyObject()
{
Console.WriteLine(“MyObject constructor starting”);
Console.WriteLine(
“Both data members initialized before this constructor)”);
// _dynamicObj construction was here, now moved up.
Console.WriteLine(“MyObject constructor ending”);
}
}
Compare the following output from this modified program with the output from its predecessor, DemonstrateCustomConstructor:
Main() starting
Creating a local MyObject in Main():
MyOtherObject constructing
MyOtherObject constructing
MyObject constructor starting
(Both data members initialized before this constructor)
MyObject constructor ending
Press Enter to terminate...
You can find the entire program (after these changes) on the website, under the illustrious name of DemonstrateConstructorWithInitializer.
Initializing an object without a constructor
Suppose that you have a little class to represent a Student:
public class Student
{
public string Name { get; set; }
public string Address { get; set; }
public double GradePointAverage { get; set; }
}
A Student object has three public properties, Name, Address, and GradePointAverage, which specify the student’s basic information.
Normally, when you create a new Student object, you have to initialize its Name, Address, and GradePointAverage properties like this:
Student randal = new Student();
randal.Name = “Randal Sphar”;
randal.Address = “123 Elm Street, Truth or Consequences, NM 00000”;
randal.GradePointAverage = 3.51;
(Yes, Virginia, there is a Truth or Consequences, New Mexico. My nephew Randal was born there.)
If Student had a constructor, you could do something like this:
Student randal = new Student
(“Randal Sphar”, “123 Elm Street, Truth or Consequences, NM, 00000”, 3.51);
Sadly, however, Student lacks a constructor, other than the default one that C# supplies automatically — which takes no parameters.
In C# 3.0 and later, you can simplify that initialization with something that looks suspiciously like a constructor — well, sort of:
Student randal = new Student
{ Name = “Randal Sphar”,
Address = “123 Elm Street, Truth or Consequences, NM 00000”,
GradePointAverage = 3.51
};
The last two examples are different in this respect: The first one, using a constructor, shows parentheses containing two strings and one double value separated by commas, and the second one, using the new object-initializer syntax, has instead curly braces containing three assignments separated by commas. The syntax works something like this:
new LatitudeLongitude
{ assignment to Latitude, assignment to Longitude };
The new object-initializer syntax lets you assign to any accessible set properties of the LatitudeLongitude object in a code block (the curly braces). The block is designed to initialize the object. Note that you can set only accessible properties this way, not private ones, and you can’t call any of the object’s methods or do any other work in the initializer.
The new syntax is much more concise: one statement versus three. And, it simplifies the creation of initialized objects that don’t let you do so through a constructor. (I broke the Student example into multiple lines only to fit it on the page — and that was only because the name Truth or Consequences is long. If you lived there, it would seem even longer.)
The new object-initializer syntax doesn’t gain you much of anything besides convenience, but convenience when you’re coding is high on any programmer’s list. So is brevity. Besides, the feature becomes essential when you read about anonymous classes.
Use the new object-initializer syntax to your heart’s content. I use it frequently myself throughout the rest of this book.
Look up the term object initializer in Help to find the lawyer-y language stuff concerning which kinds of properties it works with.
The ObjectInitializers program example on the website demonstrates object initializers.