
Chapter 2: Accessing Data
In This Chapter
![]() Understanding the
Understanding the System.Data namespace
![]() Connecting to a data source
Connecting to a data source
![]() Exploring the Entity Framework
Exploring the Entity Framework
![]() Working with data from databases
Working with data from databases
Not to predispose you to the contents of this chapter, but you’ll probably find that data access is the most important part of your use of the .NET Framework. You’ll likely use the various features of the System.Data namespace more than any other namespace.
Unquestionably, one of the most common uses of Visual Studio is the creation of business applications. Business applications are about data. This is the black and white of development with Visual Studio. While understanding a little of everything is important, complete understanding of the System.Data namespace is essential when you’re building business applications.
Until the .NET Framework became popular in the 2003 timeframe, most business applications built using Microsoft products used FoxPro or Visual Basic. C# has unquestionably replaced those languages as the business programmer’s language of choice over the past several years.
You can look at the data tools in C# in three ways:
![]() Database connectivity: Getting information out of and into a database is a primary part of the
Database connectivity: Getting information out of and into a database is a primary part of the System.Data namespace.
![]() Holding data in containers within your programs: The
Holding data in containers within your programs: The DataSet, DataView, and DataTable containers are useful mechanisms for accomplishing the holding of data. If you’re a Visual Basic 6 or ASP programmer, you may remember Recordsets, which have been replaced by the new constructs.
 The Language Integrated Query enables you to get the data out of the data containers using Structured Language Queries (SQL) rather than complicated object-oriented language (OOL).
![]() Integration with data controls: The
Integration with data controls: The System.Web and System.Windows namespaces function to integrate with the data controls. Data control integration uses database connectivity and data containers extensively. This makes data controls a great target for your reading in this chapter.
Getting to Know System.Data
Data in .NET is different from data in any other Microsoft platform. Microsoft has and continues to change the way data is manipulated in the .NET Framework. ADO.NET, whose implementation is contained in the new data library System.Data, provides yet another new way to think about data from a development perspective:
![]() Disconnected: After you get data from a data source, your program is no longer connected to that data source. You have a copy of the data. This cures one problem and causes another:
Disconnected: After you get data from a data source, your program is no longer connected to that data source. You have a copy of the data. This cures one problem and causes another:
• You no longer have a row-locking problem. Because you have a copy of the data, you don’t have to constrain the database from making changes.
• You have the last in wins problem. If two instances of a program get the same data, and they both update it, the last one back to the database overwrites the changes made by the first program.
![]() XML driven: The data copy that’s collected from the data source is XML under the hood. It might be moved around in a custom format when Microsoft deems it necessary for performance, but it is just XML either way, making movement between platforms or applications or databases much easier.
XML driven: The data copy that’s collected from the data source is XML under the hood. It might be moved around in a custom format when Microsoft deems it necessary for performance, but it is just XML either way, making movement between platforms or applications or databases much easier.
![]() Database-generic containers: The containers don’t depend on the type of database at all — they can be used to store data from anywhere.
Database-generic containers: The containers don’t depend on the type of database at all — they can be used to store data from anywhere.
![]() Database-specific adapters: Connections to the database are specific to the database platform, so if you want to connect to a specific database, you need the components that work with that database.
Database-specific adapters: Connections to the database are specific to the database platform, so if you want to connect to a specific database, you need the components that work with that database.
The process for getting data has changed a little, too. You used to have a connection and a command, which returned a Recordset. Now, you have an adapter, which uses a connection and a command to fill a DataSet container. What has changed is the way the user interface helps you get the job done.
System.Data has the classes to help you connect to a lot of different databases and other types of data. These classes are broken up into the namespaces in Table 2-1.

Though there is a lot to the System.Data namespace and related tools, I focus on the way Visual Studio implements these tools. In previous versions of the development software of all makes and models, the visual tools just made things harder because of the black box problem.
 The black box problem is that of having a development environment do some things for you over which you have no control. Sometimes it’s nice to have things done for you, but when the development environment doesn’t build them exactly how you need them, code is generated that isn’t useful.
Fortunately, that isn’t the case anymore. Visual Studio now generates completely open and sensible C# code when you use the visual data tools. I think you’ll be pleased with the results.
How the Data Classes Fit into the Framework
The data classes are all about information storage. In Book I, I talk about collections, which are for storage of information while an application is running. Hashtables are another example of storing information. Collections hold lists of objects, and hashtables hold name and value pairs.
The data containers hold data in larger amounts and help you manipulate that data. Here are the data containers:
![]()
DataSet: Kind of the granddaddy of them all, the DataSet container is an in-memory representation of an entire database.
![]()
DataTable: A single table of data stored in memory, the DataTable container is the closest thing you can find to a Recordset, if you’re a VB 6 programmer and are looking. DataSet containers are made up of DataTable containers.
![]()
DataRow: Unsurprisingly, a row in a DataTable container.
![]()
DataView: A copy of a DataTable that you can use to sort and filter data for viewing purposes.
![]()
DataReader: A read-only, forward-only stream of data used for one-time processes, such as filling up list boxes. Usually called a fire hose.
Getting to Your Data
Everything in the System.Data namespace revolves around getting data from a database such as Microsoft SQL Server and filling these data containers. You can get to this data manually. Generally speaking, the process goes something like this:
1. You create an adapter.
2. You tell the adapter how to get information from the database (the connection).
3. The adapter connects to the database.
4. You tell the adapter which information to get from the database (the command).
5. The adapter fills the DataSet container with data.
6. The connection between the adapter and the database is closed.
7. You now have a disconnected copy of the data in your program.
Not to put too fine a point on it, but you shouldn’t have to go through that process at all. Visual Studio does a lot of the data management for you if you let it, and I recommend that you do.
Using the System.Data Namespace
The System.Data namespace is another namespace that gets mixed up between the code world and the visual tools world. Though it is more of a relationship between the form controls and the Data namespace, it often seems like the data lives right inside the controls, especially when you’re dealing with Windows Forms.
In the following sections, you deal primarily with the visual tools, which are as much a part of the C# experience as the code. First, I go over connecting to data sources, and then I show you how to write a quick application using one of those connections. Finally, I go over a little of the code side.
To make all this work, you need to have some kind of schema set up in your database. It can be a local project of your own creation or a sample schema. The next section tells you how.
Setting up a sample database schema
To get started, direct your browser to http://msftdbprodsamples.codeplex.com/releases/view/55330. If this URL doesn’t work, search the web for SQL Server 2012 samples and find the nearest CodePlex link. It should get you there.
This page offers a whole bunch of sample listings — sample applications and sample schemas, as well as reporting databases and OLTP bits and a bunch of other stuff. The sample applications are full-blown applications that show complete end-to-end implementation of data-driven software built using .NET. Some are in C#, some are in Visual Basic. The sample schemas are databases only and are designed for database administrators to practice getting experience in handling the system.
Any of the sample schemas will work. If you want exactly the same one as I use in the examples here, choose the AdventureWorks2012 Data File. Other options may be a better fit for the work you’re doing.
To install, download the MDF file and put it somewhere that makes sense to you. You’ll eventually reference it in your project, so a local location like C:Databases might be good.
If you’re familiar with SQL Server, you can add a database to your local install and point to it there. In case you aren’t a DBA, it is also possible to point a data provider directly to a file. That’s the angle I take for the rest of this chapter.
Connecting to a data source
There is more to connecting to a database than establishing a simple connection to Microsoft Access these days. Visual Basic developers have to connect to mainframes, text files, unusual databases, web services, and other programs. All these disparate systems get integrated into windows and web screens, with update, add, and delete functionality to boot.
A lot of the data features are different in the Express editions. These samples were done in Visual Studio 2012 Professional. If you’re using one of the various Express editions, your mileage may vary.
Getting to these data sources is mostly dependent on the Adapter classes of the individualized database namespaces. Oracle has its own, as does SQL Server. Databases that are ODBC (Open Database Connectivity) compliant (such as Microsoft Access) have their own Adapter classes; the newer OLEDB (Object Linking and Embedding Database) protocol has one, too.
Fortunately, a wizard handles most of this. The Data Source Configuration Wizard is accessible from the Data Sources panel, where you spend much of your time when working with data. To get started with the Data Source Configuration Wizard, follow these steps:
1. Start a new Windows Forms Application project by clicking the New Project icon in the Start page; select a C# Windows Forms Application and give it an appropriate name.
For this example, I named the Windows Application project Accessing Data.
2. To open the Data Sources panel, choose Data⇒Show Data Sources or press Shift+Alt+D.
It should tell you that you have no data sources, as shown in Figure 2-1.
3. Click the Add New Data Source link in the Data Sources panel.
It’s the small icon with a plus next to it.
This brings up the Data Source Configuration Wizard. The wizard has a variety of data source types that you can choose from. The most interesting of these is the Object source, which gives you access to an object in an assembly to bind your controls to.
4. Click the Object source type and then click Next to see the available options, shown in Figure 2-2; then click the Previous button to go back to the preceding screen.

Figure 2-1: The Data Sources panel.

Figure 2-2: Using an object for a data source.
You can pick a web service to connect to a function on another computer. I cover web service creation and consumption in Book V, but this functionality sets you up to have a data source along with the web service reference. It’s cool. An example of the blank screen is shown in Figure 2-3.

Figure 2-3: Using a web service for a data source.
When you finish looking around, click the Cancel button to return.
5. Click the Database data source type to be taken to the Choose a Database Model screen.
For this example, I just used an Entity Data Model. The next part of the wizard is the Entity Data Model Wizard, as shown in Figure 2-4.You want to select Generate from Database.
6. If you have an existing data connection, it appears in the drop-down list; otherwise, you need to click the New Connection button to bring up the Add Connection dialog box, shown in Figure 2-5.
For this example, I click the New Connection button and select Microsoft SQL Server Database File.
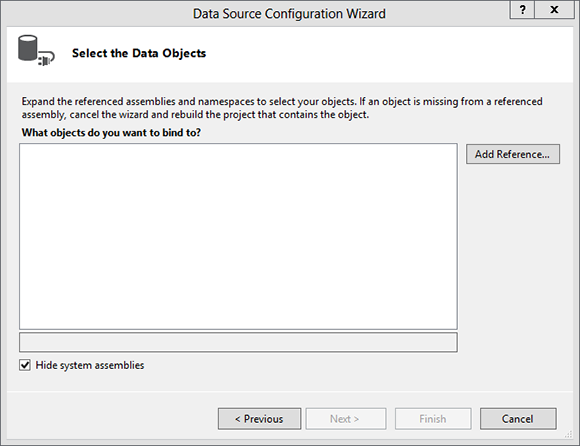
Figure 2-4: Choosing your data connection.
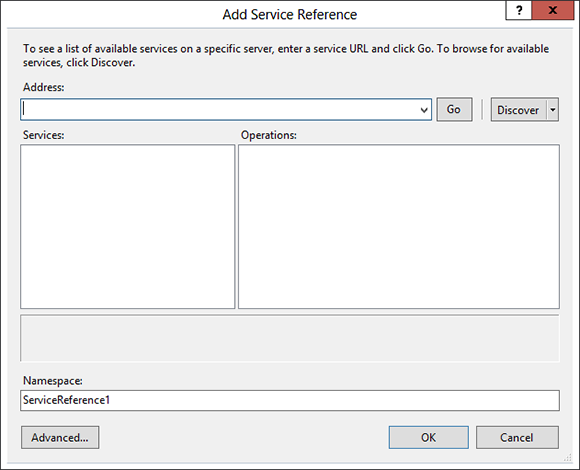
Figure 2-5: The Add Connection dialog box.
The Add Connection dialog box assumes that you’re going to connect to a SQL server. If that isn’t the case, click the Change button to select a different database from the Change Data Source dialog box, as shown in Figure 2-6. For this example, I chose Microsoft SQL Server Database File and clicked OK.
Depending on what edition of SQL Server you have installed, you may see extra steps. You may be asked by Visual Studio to upgrade the database file, which is totally fine. If you’re in a large-scale enterprise environment, check with your database administrator as to the best way to connect to your database system.
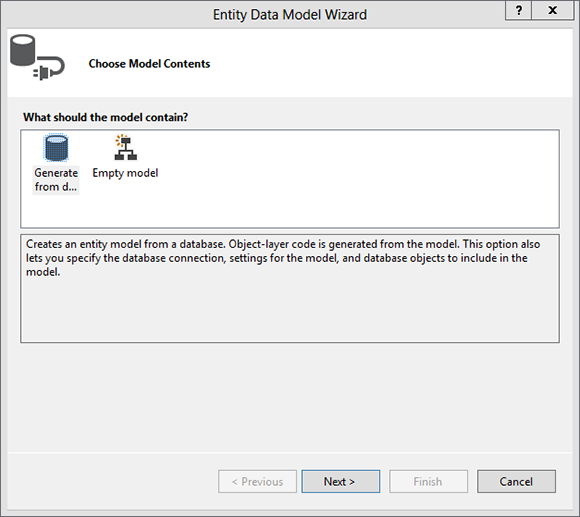
Figure 2-6: The Change Data Source dialog box.
If you do use a database file, Visual Studio will copy pertinent files to your project. If you’re working through this book in an isolated project, that’s fine. If you’re on a development effort with others, check to make sure that it’s appropriate to your life cycle methodology.
7. Click the Next button to save the connection string to the application configuration file.
8. Accept the defaults by clicking Next.
You see the Choose Your Database Objects and Settings screen. You can choose the tables, views, or stored procedures that you want to use.
9. Under Tables, select Product and ProductCategory (under the Production heading, as shown in Figure 2-7), and click Finish.
You’re done! If you look at the designer, you can see that an Entity Data Model was added to your project with the two tables on the design surface, as shown in Figure 2-8.

Figure 2-7: Selecting data objects.

Figure 2-8: New data connections appear in the Data Sources panel to the left.
By following the preceding steps, you create two significant entities in Visual Studio:
![]() You create a connection to the database, shown in the Server Explorer. You find that it sticks around — it’s specific to this installation of Visual Studio.
You create a connection to the database, shown in the Server Explorer. You find that it sticks around — it’s specific to this installation of Visual Studio.
![]() You also create a Entity Data Model, which is specific to this project and won’t be there if you start another project.
You also create a Entity Data Model, which is specific to this project and won’t be there if you start another project.
Both of them are important, and they provide different functionality. In this chapter, I focus on the project-specific data source displayed in the Entity Data Model.
Working with the visual tools
The Rapid Application Development (RAD) data tools for C# are a massive improvement over what Microsoft previously provided. The RAD data tools in Visual Studio are usable and do what you need, and they write decent code for you.
You need to know that I would never show this kind of black magic if it weren’t a best practice. In the past, tools that did something you couldn’t see often did their job poorly. Using the tools, in the long run, made your program worse. The new tools, though, are a good way to build software. People may tell you that I am wrong, but it really isn’t bad. Try it!
If you select the Data Sources panel (View⇒Other Windows⇒Data Sources) and click a table in the panel, a drop-down arrow appears, as shown in Figure 2-9. Click it, and you see something interesting: A drop-down list appears, and you can then choose how that table is integrated into Windows Forms.
Change the Product table to Details View. It’s used to create a detail type form — one that easily enables users to view and change data. Then drag the table to the form, and Details View is created for you, as shown in Figure 2-10.
A whole lot of things happened when you dropped the table on your form:
![]() The fields and the field names were added.
The fields and the field names were added.
![]() The fields are in the most appropriate format.
The fields are in the most appropriate format.
![]() The field name is a label.
The field name is a label.
![]() Visual Studio automatically adds a space where the case changes.
Visual Studio automatically adds a space where the case changes.

Figure 2-9: Table Options drop-down list.

Figure 2-10: Creating a Parts Detail data form.
 Note that each field gets a SmartTag that enables you to specify a query for the values in the text box. You can also preset the control that’s used by changing the values in the Data Sources panel (refer to Figure 2-10).
Also, a VCR Bar (technically called the BindingNavigator) is added to the top of the page. When you run the application, you can use the VCR Bar to cycle among the records in the table.
Finally, four completely code-based objects are added in the Component Tray at the bottom of the page: the DataSet, the BindingSource, the DataAdapter, and the BindingNavigator objects.
Click the Play button, and you can see the VCR Bar work. You can walk through the items in the database with no problems, as shown in Figure 2-11. It’s just like working in Access or FoxPro, but with enterprise quality!
Writing data code
In most enterprise development environments, however, you won’t be using the visual tools to build data access software. Generally, an infrastructure is already in place.
The reason for this is that often, enterprise software has specific requirements, and the easiest way to manage those specifications is with unique and customized code. In short, some organizations don’t want things done the way Microsoft does them.

Figure 2-11: Running the example.
Output of the visual tools
The reason that the visual tools often aren’t used in enterprise environments is that the code the tools put out is rather sophisticated. If you switch to Code View and right-click an instance of an object (such as the PartsTableAdapter object) and select Go to Definition, you see the code behind the designer.
Figure 2-12 shows what you see when you first get in there. The box marking the region near the top of the code window is marked as Windows Form Designer generated code, and you can’t help but notice that the line number before that section is in the twenties and the number after that is in the four hundreds. That’s a lot of generated code.

Figure 2-12: Generated code. Huh?
Nothing is wrong with this code, but it is purposely generic to support anything that anyone might want to do with it. Enterprise customers often want to make sure that everything is done the same way. For this reason, they often define a specific data code format and expect their software developers to use that, rather than the visual tools.
Basic data code
The code of the sample project is simple:
using System;
using System.Collections.Generic;
using System.ComponentModel;
using System.Data;
using System.Drawing;
using System.Linq;
using System.Text;
using System.Windows.Forms;
namespace Accessing_Data
{
public partial class Form1 : Form
{
public Form1()
{
InitializeComponent();
}
private void partsBindingNavigatorSaveItem_Click(object sender, EventArgs e)
{
this.Validate();
this.partsBindingSource.EndEdit();
this.tableAdapterManager.UpdateAll(this.assets_MaintenanceDataSet);
}
private void Form1_Load(object sender, EventArgs e)
{
// TODO: This line of code loads data into the ‘assets_MaintenanceDataSet.Part_Faults’ table. You can move, or remove it, as needed.
this.part_FaultsTableAdapter.Fill(this.assets_MaintenanceDataSet.Part_Faults);
// TODO: This line of code loads data into the ‘assets_MaintenanceDataSet.Parts’ table. You can move, or remove it, as needed.
this.partsTableAdapter.Fill(this.assets_MaintenanceDataSet.Parts);
}
}
}
While this is fairly straightforward, it obviously isn’t everything that you need. The rest of the code is in the file that generates the visual form itself, supporting the visual components.
The time may come when you want to connect to a database without using visual tools. I discuss the steps in the earlier section “How the Data Classes Fit into the Framework,” and here I show the code to go with it:
1. SqlConnection mainConnection = new SqlConnection();
2. mainConnection.ConnectionString = “server=(local);database=Assets_Maintenance;Trusted_Connection=True”
3. SqlDataAdapter partsAdapter = new SqlDataAdapter(“SELECT * FROM Parts”, mainConnection)
4. DataSet partsDataSet = new DataSet();
5. mainConnection.Open();
6. partsAdapter.Fill(partsDataSet);
7. mainConnection.Close();
This becomes useful especially when you want to build a web service or a class library — though it should be noted that you can still use the visual tools in those project types.
Let’s talk about this a line at a time. Line 1 sets up a new data connection, and line 2 populates it with the connection string. You can get this from your Database Administrator (DBA) or from the properties panel for the data connection.
Line 3 has a SQL Query in it. In Chapter 1 of this minibook, I talk about how this is a bad deal, and you should use Stored Procedures. A Stored Procedure is a database artifact that allows you to use a parameterized query from ADO.NET, rather than dynamically generated SQL Strings.Don’t use inline SQL for production systems. I could have just as easily put a stored procedure name in there.
Line 4 builds a new dataset. This is where the schema of the returned data is held and what I would use to navigate the data.
Lines 5, 6, and 7 perform the magic: Open the connection, contact the database, fill the dataset using the adapter, and then close the database. It’s all straightforward in this simple example. More complex examples make for more complex code.
After running this code, you would have the Products table in a DataSet container, just as you did in the visual tools in the earlier section, “How the Data Classes Fit into the Framework.” To access the information, you set the value of a text box to the value of a cell in the DataSet container, like this:
TextBox1.Text = myDataSet.Tables[0].Rows[0][“name”]
To change to the next record, you need to write code that changes the Rows[0] to Rows[1] in the next example. As you can see, it would be a fair amount of code.
That’s why few people use the basic data code to get the databases. Either you use the visual tools, or you use an Object Relationship Model of some sort, like Entity Framework.
Using the Entity Framework
I don’t want to get into much programming philosophy here, but object models (which I discuss in much of this book) and databases just don’t go together. They’re two different ways of thinking of the same information.
The problem mostly lies in inheritance, which I discuss in Book II. If you have a class called ScheduledEvent, which has certain properties, and a bunch of classes that inherit from it, like Courses, Conferences, and Parties, there just isn’t a good way to show this in a relational type of database.
If you make a big table for ScheduledEvents with all possible types of properties and just make a Type property so that you can tell the Courses from the Parties, you have a lot of empty table cells. If you make a table for just the properties that are in ScheduledEvents and then separate tables for Courses and Parties, you make the database remarkably complex.
To address this problem, Microsoft created the Entity Framework. It’s the latest edition of a product that Microsoft and everyone else has tried to create since the popularity of relational databases and object-oriented programming made object role modelers necessary.
Object Role Modelers try to take the whole shootin’ match and turn it on its head. The goal is to design the database first (which I recommend anyway) and then make an object model to work with it automatically. Then, keep it up to date.
The Entity Framework does an acceptable job at that process. It generates a context for you that you can use to communicate with your data in a way that looks more like an object model than it does a database.
Generating the entity model
To get started, you need the model itself. Just follow these steps to generate the entity model:
1. Create a new project.
I used a Windows Forms project again, called EntityFramework.
2. Right-click the project and click Add New in the context menu; Select ADO.NET Entity Data Model and name it PartsDatabase.
3. Choose Generate from Database Option in the Choose Model Contents window.
4. Select the Assets_Database.mdf from the Connection drop-down list.
If it isn’t there, see the earlier section “Connecting to a data source.”
5. If you get a message asking whether you’d like to copy the database into the project, select No.
Copying the database is usually a bad practice, especially if you’re on a shared project. If you’re building a standalone project and are working alone, it is an acceptable solution.
6. Select the Asset_Parts, Assets, Part_Faults, and Parts tables, just for fun (see Figure 2-13) and keep the default name.

Figure 2-13: Select a few tables.
The next thing you see is the designer canvas for the Class Designer. A sample diagram is shown in Figure 2-14. It’s just a class diagram, like the ones in Book III, Chapter 2 .

Figure 2-14: Looks like a class model, walks like a database.
Notice something missing? The Asset_Parts table is gone; it’s been abstracted into the model for you because the table was there only to link the Assets and Parts tables in a many-to-many relationship. Slick, isn’t it?
Writing code for the entity model
After you have an interesting addition to your coding environment and the database is meshed nicely into the C# object model, you can code with the objects provided in this new entity model. To start, follow these steps:
1. Go back to the window designer and double-click the window to go to Code View.
2. In the window.load event handler, type Part part = new Part();.
3. In the next line, type part. and check out the IntelliSense.
It contains all columns in the Parts table as properties to the class.
What you now have is a context to work against. No complex Linq queries — they’re all done under the covers. No inline SQL. No stored procedures. You can do it all with a scoped object.