
Chapter 4. Control Statements, Part 2

Objectives
In this chapter, you’ll:
■ Use the for and do…while iteration statements.
■ Perform multiple selection using the switch selection statement.
■ Use C++17’s [[fallthrough]] attribute in switch statements.
■ Use C++17’s selection statements with initializers.
■ Use the break and continue statements to alter the flow of control.
■ Use the logical operators to form compound conditions in control statements.
■ Understand the representational errors associated with using floating-point data to hold monetary values.
■ Use C++20’s [[likely]] and [[unlikely]] attributes to help the compiler optimize selection statements by knowing which paths of execution are likely or unlikely to execute.
■ Continue our objects-natural approach with a case study that uses an open source ZIP compression/decompression library to create and read ZIP files.
■ Use more C++20 text-formatting capabilities.
Outline
4.2 Essentials of Counter-Controlled Iteration
4.4 Examples Using the for Statement
4.5 Application: Summing Even Integers
4.6 Application: Compound-Interest Calculations
4.7 do…while Iteration Statement
4.8 switch Multiple-Selection Statement
4.9 C++17: Selection Statements with Initializers
4.10 break and continue Statements
4.11.1 Logical AND (&&) Operator
4.11.2 Logical OR (||) Operator
4.11.3 Short-Circuit Evaluation
4.11.4 Logical Negation (!) Operator
4.11.5 Logical Operators Example
4.12 Confusing the Equality (==) and Assignment (=) Operators
4.13 C++20 Feature Mock-Up: [[likely]] and [[unlikely]] Attributes
4.14 Objects Natural Case Study: Using the miniz-cpp Library to Write and Read ZIP files
4.1 Introduction
17 20 This chapter introduces all but one of the remaining control statements—the for, do…while, switch, break and continue statements. We explore the essentials of counter-controlled iteration. We use compound-interest calculations to begin investigating the issues of processing monetary amounts. First, we discuss the representational errors associated with floating-point types. We use a switch statement to count the number of A, B, C, D and F grade equivalents in a set of numeric grades. We show C++17’s enhancements that allow you to initialize one or more variables of the same type in the headers of if and switch statements. We discuss the logical operators, which enable you to combine simple conditions to form compound conditions. We show C++20’s attributes [[likely]] and [[unlikely]], which can help the compiler optimize selection statements by knowing which paths of execution are likely or unlikely to execute. In our objects-natural case study, we continue using objects of pre-existing classes with the miniz-cpp open-source library for creating and reading compressed ZIP archive files. Finally, we introduce more of C++20’s powerful and expressive text-formatting features.
“Rough-Cut” E-Book for O’Reilly Online Learning Subscribers
You are viewing an early-access “rough cut” of C++20 for Programmers. We prepared this content carefully, but it has not yet been reviewed or copy edited and is subject to change. As we complete each chapter, we’ll post it here. Please send any corrections, comments, questions and suggestions for improvement to [email protected] and I’ll respond promptly. Check here frequently for updates.
“Sneak Peek” Videos for O’Reilly Online Learning Subscribers
As an O’Reilly Online Learning subscriber, you also have access to the “sneak peek” of our new C++20 Fundamentals LiveLessons videos at:
https://learning.oreilly.com/videos/c-20-fundamentals-parts/9780136875185
Co-author Paul Deitel immediately records each video lesson as we complete each rough-cut e-book chapter. Lessons go live on O’Reilly Online Learning a few days later. Again, check here frequently for updates.
4.2 Essentials of Counter-Controlled Iteration
This section uses the while iteration statement introduced in Chapter 3 to formalize the elements of counter-controlled iteration:
1. a control variable (or loop counter)
2. the control variable’s initial value
3. the control variable’s increment that’s applied during each iteration of the loop
4. the loop-continuation condition that determines if looping should continue.
Consider the application of Fig. 4.1, which uses a loop to display the numbers from 1 through 10.
 1  // fig04_01.cpp
 2  // Counter-controlled iteration with the while iteration statement.
 3  #include <iostream>
 4  using namespace std;
 5
 6  int main() {
 7     int counter{1}; // declare and initialize control variable
 8
 9     while (counter <= 10) { // loop-continuation condition
10        cout << counter << " ";
11        ++counter; // increment control variable
12     }
13
14     cout << endl;
15   }
1 2 3 4 5 6 7 8 9 10
Fig. 4.1 Counter-controlled iteration with the while iteration statement.
In Fig. 4.1, lines 7, 9 and 11 define the elements of counter-controlled iteration. Line 7 declares the control variable (counter) as an int, reserves space for it in memory and sets its initial value to 1. Declarations that require initialization are executable statements. In C++, it’s more precise to call a variable declaration that also reserves memory a definition. Because definitions are declarations, too, we’ll generally use the term “declaration” except when the distinction is important.
Line 10 displays counter’s value once per iteration of the loop. Line 11 increments the control variable by 1 for each iteration of the loop. The while’s loop-continuation condition (line 9) tests whether the value of the control variable is less than or equal to 10 (the final value for which the condition is true). The program performs the while’s body even when the control variable is 10. The loop terminates when the control variable exceeds 10.
Floating-point values are approximate, so controlling counting loops with floating-point variables can result in imprecise counter values and inaccurate tests for termination. For that reason, always control counting loops with integer values.
4.3 for Iteration Statement
C++ also provides the for iteration statement, which specifies the counter-controlled-iteration details in a single line of code. Figure 4.2 reimplements the application of Fig. 4.1 using a for statement.
 1  // fig04_02.cpp
 2  // Counter-controlled iteration with the for iteration statement.
 3  #include <iostream>
 4  using namespace std;
 5
 6  int main() {
 7     // for statement header includes initialization,
 8     // loop-continuation condition and increment
 9     for (int counter{1}; counter <= 10; ++counter) {
10        cout << counter << " ";
11     }
12
13     cout << endl;
14   }
1 2 3 4 5 6 7 8 9 10
Fig. 4.2 Counter-controlled iteration with the for iteration statement.
When the for statement (lines 9–11) begins executing, the control variable counter is declared and initialized to 1. Next, the program checks the loop-continuation condition, counter <= 10, which is between the two required semicolons. Because counter’s initial value is 1, the condition is true. So, the body statement (line 10) displays counter’s value (1). After executing the loop’s body, the program increments counter in the expression ++counter, which appears to the right of the second semicolon. Then the program performs the loop-continuation test again to determine whether to proceed with the loop’s next iteration. At this point, counter’s value is 2, so the condition is still true, so the program executes the body statement again. This process continues until the loop has displayed the numbers 1–10 and counter’s value becomes 11. At this point, the loop-continuation test fails, iteration terminates, and the program continues executing at the first statement after the for (line 13).
A Closer Look at the for Statement’s Header
The following diagram takes a closer look at the for statement in Fig. 4.2:
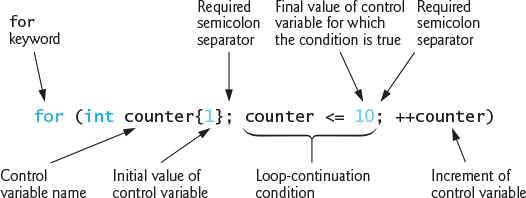
The first line—including the keyword for and everything in the parentheses after for (line 9 in Fig. 4.2)—is sometimes called the for statement header. The for header “does it all”—it specifies each item needed for counter-controlled iteration with a control variable.
General Format of a for Statement
The general format of the for statement is
for (initialization; loopContinuationCondition; increment) {
statement}
where
• the initialization expression names the loop’s control variable and provides its initial value,
• the loopContinuationCondition determines whether the loop should continue executing and
• the increment modifies the control variable’s value so that the loop-continuation condition eventually becomes false.
The two semicolons in the for header are required. If the loop-continuation condition is initially false, the program does not execute the for statement’s body. Instead, execution proceeds with the statement following the for.
Scope of a for Statement’s Control Variable
If the initialization expression in the for header declares the control variable, it can be used only in that for statement—not beyond it. This restricted use is known as the variable’s scope, which defines where it can be used in a program. For example, a variable’s scope is from its declaration point to the right brace that closes the block. We discuss scope in detail in Chapter 5.
Expressions in a for Statement’s Header Are Optional
All three expressions in a for header are optional. If you omit the loopContinuationCondition, the condition is always true, thus creating an infinite loop. You might omit the initialization expression if the program initializes the control variable before the loop. You might omit the increment expression if the program calculates the increment in the loop’s body or if no increment is needed.
The increment expression in a for acts like a standalone statement at the end of the for’s body. Therefore, the increment expressions
counter = counter + 1
counter += 1
++counter
counter++
are equivalent in a for statement. Many programmers prefer counter++ because it’s concise and because a for loop evaluates its increment expression after its body executes, so the postfix increment form seems more natural. In this case, the increment expression does not appear in a larger expression, so preincrementing and postincrementing have the same effect. We prefer preincrement. In Chapter 14’s operator overloading discussion, you’ll see that preincrement can have a performance advantage.
Using a for Statement’s Control Variable in the Statement’s Body
Programs frequently display the control-variable value or use it in calculations in the loop body, but this use is not required. The control variable is commonly used to control iteration without being mentioned in the body of the for.
Although the value of the control variable can be changed in a for loop’s body, avoid doing so, because this practice can lead to subtle errors. If a program must modify the control variable’s value in the loop’s body, use while rather than for.
UML Activity Diagram of the for Statement
Below is the UML activity diagram of the for statement in Fig. 4.2:

The diagram makes it clear that initialization occurs only once—before testing the loop-continuation condition the first time. Incrementing occurs each time through the loop after the body statement executes.
4.4 Examples Using the for Statement
The following examples show techniques for varying the control variable in a for statement. In each case, we write only the appropriate for header. Note the change in the relational operator for the loops that decrement the control variable.
a) Vary the control variable from 1 to 100 in increments of 1.
for (int i{1}; i <= 100; ++i)
b) Vary the control variable from 100 down to 1 in decrements of 1.
for (int i{100}; i >= 1; --i)
c) Vary the control variable from 7 to 77 in increments of 7.
for (int i{7}; i <= 77; i += 7)
d) Vary the control variable from 20 down to 2 in decrements of 2.
for (int i{20}; i >= 2; i -= 2)
e) Vary the control variable over the values 2, 5, 8, 11, 14, 17, 20.
for (int i{2}; i <= 20; i += 3)
f) Vary the control variable over the values 99, 88, 77, 66, 55, 44, 33, 22, 11, 0.
for (int i{99}; i >= 0; i -= 11)
Do not use equality operators (!= or ==) in a loop-continuation condition if the loop’s control variable increments or decrements by more than 1. For example, in the for statement header
for (int counter{1}; counter != 10; counter += 2)
counter != 10 never becomes false (resulting in an infinite loop) because counter increments by 2 after each iteration, producing only the odd values (3, 5, 7, 9, 11, …).
4.5 Application: Summing Even Integers
The application in Fig. 4.3 uses a for statement to sum the even integers from 2 to 20 and store the result in int variable total. Each iteration of the loop (lines 10–12) adds control variable number’s value to variable total.
 1  // fig04_03.cpp
 2  // Summing integers with the for statement.
 3  #include <iostream>
 4  using namespace std;
 5
 6  int main() {
 7     int total{0};
 8
 9     // total even integers from 2 through 20
10     for (int number{2}; number <= 20; number += 2) {
11        total += number;
12     }
13
14     cout << "Sum is " << total << endl;
15   }
Sum is 110
Fig. 4.3 Summing integers with the for statement.
A for statement’s initialization and increment expressions can be comma-separated lists containing multiple initialization expressions or multiple increment expressions. Although this is discouraged, you could merge the for statement’s body (line 11) into the increment portion of the for header by using a comma operator as in
total += number, number += 2
The comma between the expressions total += number and number += 2 is the comma operator, which guarantees that a list of expressions evaluates from left to right. The comma operator has the lowest precedence of all C++ operators. The value and type of a comma-separated list of expressions is the value and type of the rightmost expression. For example, assuming x is an int and y is a double, the value of the comma-separated list of expressions
x = 5, y = 6.4;
is 6.4 and the type is double.
The comma operator is often used in for statements that require multiple initialization expressions or multiple increment expressions.
4.6 Application: Compound-Interest Calculations
Let’s compute compound interest with a for statement. Consider the following problem:
A person invests $1,000 in a savings account yielding 5% interest. Assuming all interest is left on deposit, calculate and print the amount of money in the account at the end of each year for 10 years. Use the following formula to determine the amounts:
a = p (1 + r)n
where
p is the original amount invested (i.e., the principal)
r is the annual interest rate (e.g., use 0.05 for 5%)
n is the number of years
a is the amount on deposit at the end of the nth year.
w (Fig. 4.4) involves a loop that performs the indicated calculation for each of the 10 years the money remains on deposit. We use double values here for the monetary calculations. Then we discuss the problems with using floating-point types to represent monetary amounts. In Chapter 10, we’ll develop a new Dollar-Amount class that uses large integers to precisely represent monetary amounts. As you’ll see, the class performs monetary calculations using only integer arithmetic.
 1  // fig04_04.cpp
 2  // Compound-interest calculations with for.
 3  #include <iostream>
 4  #include <iomanip>
 5  #include <cmath> // for pow function
 6  using namespace std;
 7
 8  int main() {
 9     // set floating-point number format
10     cout << fixed << setprecision(2);
11
12     double principal{1000.00}; // initial amount before interest
13     double rate{0.05}; // interest rate
14
15     cout << "Initial principal: " << principal << endl;
16     cout << "    Interest rate: " << rate << endl;
17
18     // display headers
19     cout << "
Year" << setw(20) << "Amount on deposit" << endl;
20
21     // calculate amount on deposit for each of ten years
22     for (int year{1}; year <= 10; ++year) {
23        // calculate amount on deposit at the end of the specified year
24        double amount = principal * pow(1.0 + rate, year);
25
26        // display the year and the amount
27        cout << setw(4) << year << setw(20) << amount << endl;
28     }
29   }
Initial principal: 1000.00
    Interest rate: 0.05

Year   Amount on deposit
  1             1050.00
  2             1102.50
  3             1157.63
  4             1215.51
  5             1276.28
  6             1340.10
  7             1407.10
  8             1477.46
  9             1551.33
 10             1628.89
Fig. 4.4 Compound-interest calculations with for.
Lines 12–13 declare double variables principal and rate, and initialize principal to 1000.00 and rate to 0.05. C++ treats floating-point literals like 1000.00 and 0.05 as type double. Similarly, C++ treats whole-number literals like 7 and -22 as type int.1 Lines 15–16 display the initial principal and the interest rate.
1. Section 3.12 showed that C++’s integer types cannot represent all integer values. Choose the correct type for the range of values you need to represent. You may designate that an integer literal has type long or long long by appending L or LL, respectively, to the literal value.
Formatting with Field Widths and Justification
Line 10 before the loop and line 27 in the loop combine to print the year and amount values. We specify the formatting with the parameterized stream manipulators setprecision and setw and the nonparameterized stream manipulator fixed. The stream manipulator setw(4) specifies that the next value output should appear in a field width of 4— i.e., cout << prints the value with at least four character positions. If the value to be output is fewer than four character positions, the value is right-aligned in the field by default. If the value to be output is more than four character positions, C++ extends the field width to the right to accommodate the entire value. To left-align values, output nonparameterized stream manipulator left (found in header <iostream>). You can restore right-alignment by outputting nonparameterized stream manipulator right.
The other formatting in the output statements displays variable amount as a fixed-point value with a decimal point (fixed in line 10) right-aligned in a field of 20 character positions (setw(20) in line 27) and two digits of precision to the right of the decimal point (setprecision(2) in line 10). We applied the stream manipulators fixed and setprecision to the output stream cout before the for loop because these format settings remain in effect until they’re changed—such settings are called sticky settings, and they do not need to be applied during each iteration of the loop. However, the field width specified with setw applies only to the next value output. Chapter 15 discusses cin’s and cout’s formatting capabilities in detail. We continue discussing C++20’s powerful new text-formatting capabilities in Section 4.15.
Performing the Interest Calculations with Standard Library Function pow
The for statement (lines 22–28) iterates 10 times, varying the int control variable year from 1 to 10 in increments of 1. Variable year represents n in the problem statement.
C++ does not include an exponentiation operator, so we use the standard library function pow (line 24) from the header <cmath> (line 5). The call pow(x, y) calculates the value of x raised to the yth power. The function receives two double arguments and returns a double value. Line 24 performs the calculation a = p(1 + r)n, where a is amount, p is principal, r is rate and n is year.
![]() PERF The body of the
PERF The body of the for statement contains the calculation 1.0 + rate as pow’s first argument. This calculation produces the same result each time through the loop, so repeating it in every iteration of the loop is wasteful. In loops, avoid calculations for which the result never changes. Instead, place such calculations before the loop. To improve program performance, many of today’s optimizing compilers place such calculations before loops in the compiled code.
Floating-Point Number Precision and Memory Requirements
Variables of type float represent single-precision floating-point numbers. Most of today’s systems store these in four bytes of memory with approximately seven significant digits. Variables of type double represent double-precision floating-point numbers. Most of today’s systems store these in eight bytes of memory with approximately 15 significant digits—approximately double the precision of float variables. Most programmers represent floating-point numbers with type double. C++ treats floating-point numbers like 3.14159 in a program’s source code as double values by default. Such values in the source code are known as floating-point literals.
Though most systems store floats in four bytes and doubles in eight bytes, the C++ standard indicates that type double provides at least as much precision as float. There is also type long double, which provides at least as much precision as double. For a complete list of C++ fundamental types and their typical ranges, see
https://en.cppreference.com/w/cpp/language/types
Floating-Point Numbers Are Approximations
In conventional arithmetic, floating-point numbers often arise as a result of division— when we divide 10 by 3, the result is 3.3333333…, with the sequence of 3s repeating infinitely. The computer allocates only a fixed amount of space to hold such a value, so the stored floating-point value can be only an approximation. As you can see, double suffers from what is referred to as representational error. Assuming that floating-point numbers are represented exactly (e.g., using them in comparisons for equality) can lead to incorrect results.
Floating-point numbers have numerous applications, especially for measured values. For example, when we speak of a “normal” body temperature of 98.6 degrees Fahrenheit, we do not need to be precise to a large number of digits. When we read the temperature on a thermometer as 98.6, it actually might be 98.5999473210643. Calling this number 98.6 is fine for most applications involving body temperatures. Generally, type double is preferred over type float, because double variables can represent floating-point numbers more precisely. We use double throughout the book.
A Warning about Displaying Rounded Values
We declared variables amount, principal and rate to be of type double in this example. We’re dealing with fractional parts of dollars and thus need a type that allows decimal points in its values. Unfortunately, floating-point numbers can cause trouble. Here’s a simple explanation of what can go wrong when using floating-point numbers to represent dollar amounts that are displayed with two digits to the right of the decimal point. Two calculated dollar amounts stored in the machine could be 14.234 (rounded to 14.23 for display purposes) and 18.673 (rounded to 18.67 for display purposes). When these amounts are added, they produce the internal sum 32.907, which would typically be rounded to 32.91 for display purposes. Thus, your output could appear as
  14.23
+ 18.67
  32.91
but a person adding the individual numbers as displayed would expect the sum to be 32.90. You’ve been warned!
Even Common Dollar Amounts Can Have Representational Error in Floating Point
Even simple dollar amounts, such as those you might see on a grocery or restaurant bill, can have representational errors when they’re stored as doubles. To see this, we created a simple program with the declaration
double d = 123.02;
then displayed variable d’s value with many digits of precision to the right of the decimal point. The resulting output showed 123.02 as 123.0199999…, which is another example of a representational error. Though some dollar amounts can be represented precisely as double, many cannot. This is a common problem in many programming languages. Later in the book, we create and use classes that handle monetary amounts precisely.
4.7 do…while Iteration Statement
The do…while iteration statement is similar to the while statement. In a while statement, the program tests the loop-continuation condition at the beginning of the loop, before executing the loop’s body. If the condition is false, the body never executes. The do…while statement tests the loop-continuation condition after executing the loop’s body; therefore, the body always executes at least once. When a do…while statement terminates, execution continues with the next statement in sequence. Figure 4.5 uses a do…while to output the numbers 1–10.
 1  // fig04_05.cpp
 2  // do...while iteration statement.
 3  #include <iostream>
 4  using namespace std;
 5
 6  int main() {
 7     int counter{1};
 8
 9     do {
10        cout << counter << " ";
11        ++counter;
12     } while (counter <= 10); // end do...while
13
14     cout << endl;
15   }
1 2 3 4 5 6 7 8 9 10
Fig. 4.5 do…while iteration statement.
Line 7 declares and initializes control variable counter. Upon entering the do…while statement, line 10 outputs counter’s value and line 11 increments counter. Then the program evaluates the loop-continuation test at the bottom of the loop (line 12). If the condition is true, the loop continues at the first body statement (line 10). If the condition is false, the loop terminates, and the program continues at the next statement after the loop.
UML Activity Diagram for the do…while Iteration Statement
The UML activity diagram for the do…while statement in Fig. 4.5 makes it clear that the loop-continuation condition is not evaluated until after the loop performs the action state at least once:

4.8 switch Multiple-Selection Statement
C++ provides the switch multiple-selection statement to choose among many different actions based on the possible values of a variable or expression. Each action is associated with the value of an integral constant expression (i.e., any combination of character and integer constants that evaluates to a constant integer value).
Using a switch Statement to Count A, B, C, D and F Grades
Figure 4.6 calculates the class average of a set of numeric grades entered by the user. The switch statement determines each grade’s letter equivalent (A, B, C, D or F) and increments the appropriate grade counter. The program also displays a summary of the number of students who received each grade.
 1  // fig04_06.cpp
 2  // Using a switch statement to count letter grades.
 3  #include <iostream>
 4  #include <iomanip>
 5  using namespace std;
 6
 7  int main() {
 8     int total{0}; // sum of grades
 9     int gradeCounter{0}; // number of grades entered
10     int aCount{0}; // count of A grades
11     int bCount{0}; // count of B grades
12     int cCount{0}; // count of C grades
13     int dCount{0}; // count of D grades
14     int fCount{0}; // count of F grades
15
16     cout << "Enter the integer grades in the range 0-100.
"
17        << "Type the end-of-file indicator to terminate input:
"
18        << "   On UNIX/Linux/macOS type <Ctrl> d then press Enter
"
19        << "   On Windows type <Ctrl> z then press Enter
";
20
21     int grade;
22
23     // loop until user enters the end-of-file indicator
24     while (cin >> grade) {
25        total += grade; // add grade to total
26        ++gradeCounter; // increment number of grades
27
28        // increment appropriate letter-grade counter
29        switch (grade / 10) {
30           case 9: // grade was between 90
31           case 10: // and 100, inclusive
32              ++aCount;
33              break; // exits switch
34
35           case 8: // grade was between 80 and 89
36              ++bCount;
37              break; // exits switch
38
39           case 7: // grade was between 70 and 79
40              ++cCount;
41              break; // exits switch
42
43           case 6: // grade was between 60 and 69
44              ++dCount;
45              break; // exits switch
46
47           default: // grade was less than 60
48              ++fCount;
49              break; // optional; exits switch anyway
50        } // end switch
51     } // end while
52
53     // set floating-point number format
54     cout << fixed << setprecision(2);
55
56     // display grade report
57     cout << "
Grade Report:
";
58
59     // if user entered at least one grade...
60     if (gradeCounter != 0) {
61        // calculate average of all grades entered
62        double average = static_cast<double>(total) / gradeCounter;
63
64        // output summary of results
65        cout << "Total of the " << gradeCounter << " grades entered is "
66           << total << "
Class average is " << average
67           << "
Number of students who received each grade:"
68           << "
A: " << aCount << "
B: " << bCount << "
C: " << cCount
69           << "
D: " << dCount << "
F: " << fCount << endl;
70     }
71     else { // no grades were entered, so output appropriate message
72        cout << "No grades were entered" << endl;
73     }
74   }
Enter the integer grades in the range 0-100.
Type the end-of-file indicator to terminate input:
   On UNIX/Linux/macOS type <Ctrl> d then press Enter
   On Windows type <Ctrl> z then press Enter
99
92
45
57
63
71
76
85
90
100
^Z

Grade Report:
Total of the 10 grades entered is 778
Class average is 77.80

Number of students who received each grade:
A: 4
B: 1
C: 2
D: 1
F: 2
Fig. 4.6 Using a switch statement to count letter grades.
The main function (Fig. 4.6) declares local variables total (line 8) and gradeCounter (line 9) to keep track of the sum of the grades entered by the user and the number of grades entered, respectively. Lines 10–14 declare and initialize to 0 counter variables for each grade category. The main function has two key parts. Lines 24–51 input an arbitrary number of integer grades using sentinel-controlled iteration, update variables total and gradeCounter, and increment an appropriate letter-grade counter for each grade entered. Lines 54–73 output a report containing the total of all grades entered, the average grade and the number of students who received each letter grade.
Reading Grades from the User
Lines 16–19 prompt the user to enter integer grades or type the end-of-file indicator to terminate the input. The end-of-file indicator is a system-dependent keystroke combination used to indicate that there’s no more data to input. In Chapter 9, File Processing, you’ll see how the end-of-file indicator is used when a program reads its input from a file.
The keystroke combinations for entering end-of-file are system dependent. On UNIX/Linux/macOS systems, type the sequence
<Ctrl> d
on a line by itself. This notation means to press both the Ctrl key and the d key simultaneously. On Windows systems, type
<Ctrl> z
On some systems, you must press Enter after typing the end-of-file key sequence. Also, Windows typically displays the characters ^Z on the screen when you type the end-of-file indicator, as shown in the output of Fig. 4.6.
The while statement (lines 24–51) obtains the user input. Line 24
while (cin >> grade) {
performs the input in the while statement’s condition. In this case, the loop-continuation condition evaluates to true if cin successfully reads an int value. If the user enters the endof-file indicator, the condition evaluates to false.
If the condition evaluates to true, line 25 adds grade to total and line 26 increments gradeCounter. These variables are used to compute the average of the grades. Next, lines 29–50 use a switch statement to increment the appropriate letter-grade counter based on the numeric grade entered.
Processing the Grades
The switch statement (lines 29–50) determines which counter to increment. We assume that the user enters a valid grade in the range 0–100. A grade in the range 90–100 represents A, 80–89 represents B, 70–79 represents C, 60–69 represents D and 0–59 represents F. The switch statement’s block contains a sequence of case labels and an optional default case, which can appear anywhere in the switch, but normally appears last. These are used in this example to determine which counter to increment based on the grade.
11 When the flow of control reaches the switch, the program evaluates the controlling expression in the parentheses (grade / 10) following keyword switch. The program compares this expression’s value with each case label. The expression must have a signed or unsigned integral type—bool, char, char16_t, char32_t, wchar_t, int, long or long long. The expression can also use the C++11 signed or unsigned integral types, such as int64_t and uint64_t—see the <cstdint> header for a complete list of these type names.
The controlling expression in line 29 performs integer division, which truncates the fractional part of the result. When we divide a value from 0 to 100 by 10, the result is always a value from 0 to 10. We use several of these values in our case labels. If the user enters the integer 85, the controlling expression evaluates to 8. The switch compares 8 with each case label. If a match occurs (case 8: at line 35), that case’s statements execute. For 8, line 36 increments bCount, because a grade in the 80s is a B. The break statement (line 37) exists the switch. In this program, we reach the end of the while loop, so control returns to the loop-continuation condition in line 24 to determine whether the loop should continue executing.
The cases in our switch explicitly test for the values 10, 9, 8, 7 and 6. Note the cases at lines 30–31 that test for the values 9 and 10 (both of which represent the grade A). Listing cases consecutively in this manner with no statements between them enables the cases to perform the same set of statements—when the controlling expression evaluates to 9 or 10, the statements in lines 32–33 execute. The switch statement does not provide a mechanism for testing ranges of values, so every value you need to test must be listed in a separate case label. Each case can have multiple statements. The switch statement differs from other control statements in that it does not require braces around multiple statements in a case.
case without a break Statement
Without break statements, each time a match occurs in the switch, the statements for that case and subsequent cases execute until a break statement or the end of the switch is encountered. This is often referred to as “falling through” to the statements in subsequent cases.2
2. This feature is perfect for writing a concise program that displays the iterative song “The Twelve Days of Christmas.” As an exercise, you might write the program, then use one of the many free, open-source text-to-speech programs to speak the song. You might also tie your program to a free, open-source MIDI (“Musical Instrument Digital Interface”) program to create a singing version of your program accompanied by music.
C++17: [[fallthrough]] Attribute
17 Forgetting a break statement when one is needed is a logic error. To call your attention to this possible problem, many compilers issuing a warning when a case does not contain a break statement. For instances in which “falling through” is the desired behavior, C++17 introduced the [[fallthrough]] attribute. This enables you to tell the compiler when “falling through” is correct so that warning will not be generated.
In Fig. 4.6, for case 9: (line 30), we want the switch to fall through (without a compiler warning) and execute the statements for case 10:—this allows both cases to execute the same statements. We can indicate the desired behavior by writing line 30 as:
case 9: [[fallthrough]];
The default Case
If no match occurs between the controlling expression’s value and any of the case labels, the default case (lines 47–49) executes. We use the default case in this example to process all controlling-expression values that are less than 6—that is, all failing grades. If no match occurs and the switch does not contain a default case, program control simply continues with the first statement after the switch. In a switch, it’s good practice to test for all possible values of the controlling expression.
Displaying the Grade Report
Lines 54–73 output a report based on the grades entered. Line 60 determines whether the user entered at least one grade—this helps us avoid dividing by zero, which for integer division causes the program to fail and for floating-point division produces the value nan—for “not a number”. If so, line 62 calculates the average of the grades. Lines 65–69 then output the total of all the grades, the class average and the number of students who received each letter grade. If no grades were entered, line 72 outputs an appropriate message. The output in Fig. 4.6 shows a sample grade report based on 10 grades.
switch Statement UML Activity Diagram
The following is the UML activity diagram for the general switch statement:

Most switch statements use a break in each case to terminate the switch statement after processing the case. The diagram emphasizes this by including break statements and showing that the break at the end of a case causes control to exit the switch statement immediately.
The break statement is not required for the switch’s last case (or the optional default case, when it appears last), because execution continues with the next statement after the switch. Provide a default case in every switch statement to focus you on processing exceptional conditions.
Notes on cases
Each case in a switch statement must contain a constant integral expression—that is, any combination of integer constants that evaluates to a constant integer value. An integer constant is simply an integer value. You also can use enum constants (introduced in Section 5.8) and character constants—specific characters in single quotes, such as 'A', '7' or '$', which represent the integer values of characters. (Appendix B shows the integer values of the characters in the ASCII character set, which is a subset of the Unicode® character set.)
The expression in each case also can be a constant variable—a variable containing a value that does not change for the entire program. Such a variable is declared with keyword const (discussed in Chapter 5).
In Chapter 13, Object-Oriented Programming: Polymorphism, we present a more elegant way to implement switch logic. We use a technique called polymorphism to create programs that are often clearer, easier to maintain and easier to extend than programs using switch logic.
17 4.9 C++17: Selection Statements with Initializers
Earlier, we introduced the for iteration statement. In the for header’s initialization section, we declared and initialized a control variable, which limited that variable’s scope to the for statement. C++17’s selection statements with initializers enable you to include variable initializers before the condition in an if or if…else statement and before the controlling expression of a switch statement. As with the for statement, these variables are known only in the statements where they’re declared. Figure 4.7 shows if…else statements with initializers. We’ll use both if…else and switch statements with initializers in Fig. 5.5, which implements a popular casino dice game.
 1  // fig04_07.cpp
 2  // C++17 if statements with initializers.
 3  #include <iostream>
 4  using namespace std;
 5
 6  int main() {
 7     if (int value{7}; value == 7) {
 8        cout << "value is " << value << endl;
 9     }
10     else {
11        cout << "value is not 7; it is " << value << endl;
12     }
13
14     if (int value{13}; value == 9) {
15        cout << "value is " << value << endl;
16     }
17     else {
18        cout << "value is not 9; it is " << value << endl;
19     }
20   }
value is 7
value is not 9; it is 13
Fig. 4.7 C++17 if statements with initializers.
Syntax of Selection Statements with Initializers
For an if or if…else statement, you place the initializer first in the condition’s parentheses. For a switch statement, you place the initializer first in the controlling expression’s parentheses. The initializer must end with a semicolon (;), as in lines 7 and 14. The initializer can declare multiple variables of the same type in a comma-separated list.
Scope of Variables Declared in the Initializer
Any variable declared in the initializer of an if, if…else or switch statement may be used throughout the remainder of the statement. In lines 7–12, we use the variable value to determine which branch of the if…else statement to execute, then use value in the output statements of both branches. When the if…else statement terminates, value no longer exists, so we can use that identifier again in the second if…else statement to declare a new variable known only in that statement.
To prove that value is not accessible outside the if…else statements, we provided a second version of this program (fig04_07_with_error.cpp) that attempts to access variable value after (and thus outside the scope of) the second if…else statement. This produces the following compilation errors in our three compilers:
• Visual Studio: 'value': undeclared identifier
• Xcode: error: use of undeclared identifier 'value'
• GNU g++: error: 'value' was not declared in this scope
4.10 break and continue Statements
In addition to selection and iteration statements, C++ provides statements break and continue to alter the flow of control. The preceding section showed how break could be used to terminate a switch statement’s execution. This section discusses how to use break in iteration statements.
break Statement
The break statement, when executed in a while, for, do…while or switch, causes immediate exit from that statement—execution continues with the first statement after the control statement. Common uses of break include escaping early from a loop or exiting a switch (as in Fig. 4.6). Figure 4.8 demonstrates a break statement exiting a for early.
1  // fig04_08.cpp
2  // break statement exiting a for statement.
3  #include <iostream>
4  using namespace std;
5
6  int main() {
7     int count; // control variable also used after loop
8
9     for (count = 1; count <= 10; ++count) { // loop 10 times
10       if (count == 5) {
11          break; // terminates for loop if count is 5
12       }
13
14       cout << count << " ";
15    }
16
17    cout << "
Broke out of loop at count = " << count << endl;
18  }
1 2 3 4
Broke out of loop at count = 5
Fig. 4.8 break statement exiting a for statement.
When the if statement nested at lines 10–12 in the for statement (lines 9–15) detects that count is 5, the break statement at line 11 executes. This terminates the for statement, and the program proceeds to line 17 (immediately after the for statement), which displays a message indicating the value of the control variable when the loop terminated. The loop fully executes its body only four times instead of 10.
continue Statement
The continue statement, when executed in a while, for or do…while, skips the remaining statements in the loop body and proceeds with the next iteration of the loop. In while and do…while statements, the program evaluates the loop-continuation test immediately after the continue statement executes. In a for statement, the increment expression executes, then the program evaluates the loop-continuation test.
 1  // fig04_09.cpp
 2  // continue statement terminating an iteration of a for statement.
 3  #include <iostream>
 4  using namespace std;
 5
 6  int main() {
 7     for (int count{1}; count <= 10; ++count) { // loop 10 times
 8        if (count == 5) {
 9           continue; // skip remaining code in loop body if count is 5
10        }
11
12        cout << count << " ";
13     }
14
15     cout << "
Used continue to skip printing 5" << endl;
16   }
1 2 3 4 6 7 8 9 10
Used continue to skip printing 5
Fig. 4.9 continue statement terminating an iteration of a for statement.
Figure 4.9 uses continue (line 9) to skip the statement at line 12 when the nested if determines that count’s value is 5. When the continue statement executes, program control continues with the increment of the control variable in the for statement (line 7).
Some programmers feel that break and continue violate structured programming. Since the same effects are achievable with structured-programming techniques, these programmers do not use break or continue.
![]() PERF There’s a tension between achieving quality software engineering and achieving the best-performing software. Sometimes one of these goals is achieved at the expense of the other. For all but the most performance-intensive situations, you should first make your code simple and correct, then make it fast and small—but only if necessary.
PERF There’s a tension between achieving quality software engineering and achieving the best-performing software. Sometimes one of these goals is achieved at the expense of the other. For all but the most performance-intensive situations, you should first make your code simple and correct, then make it fast and small—but only if necessary.
4.11 Logical Operators
The if, if…else, while, do…while and for statements each require a condition to determine how to continue a program’s flow of control. So far, we’ve studied only simple conditions, such as count <= 10, number != sentinelValue and total > 1000. Simple conditions are expressed in terms of the relational operators >, <, >= and <= and the equality operators == and !=, and each expression tests only one condition. To test multiple conditions in the process of making a decision, we performed these tests in separate statements or in nested if or if…else statements. Sometimes control statements require more complex conditions to determine a program’s flow of control.
C++’s logical operators enable you to combine simple conditions. The logical operators are && (logical AND), || (logical OR) and ! (logical negation).
4.11.1 Logical AND (&&) Operator
Suppose we wish to ensure at some point in a program that two conditions are both true before we choose a certain path of execution. In this case, we can use the && (logical AND) operator, as follows:
if (gender == FEMALE && age >= 65) {
   ++seniorFemales;
}
This if statement contains two simple conditions. The condition gender == FEMALE com-pares variable gender to the constant FEMALE to determine whether a person is female. The condition age >= 65 might be evaluated to determine whether a person is a senior citizen. The if statement considers the combined condition
gender == FEMALE && age >= 65
which is true if and only if both simple conditions are true. In this case, the if statement’s body increments seniorFemales by 1. If either or both of the simple conditions are false, the program skips the increment. Some programmers find that the preceding combined condition is more readable when redundant parentheses are added, as in
(gender == FEMALE) && (age >= 65)
The following table summarizes the && operator, showing all four possible combinations of the bool values false and true values for expression1 and expression2:

Such tables are called truth tables. C++ evaluates to zero (false) or nonzero (true) all expressions that include relational operators, equality operators or logical operators.
4.11.2 Logical OR (||) Operator
Now suppose we wish to ensure that either or both of two conditions are true before we choose a certain path of execution. In this case, we use the || (logical OR) operator, as in the following program segment:
if ((semesterAverage >= 90) || (finalExam >= 90)) {
   cout << "Student grade is A
";
}
This statement also contains two simple conditions. The condition semesterAverage >= 90 determines whether the student deserves an A in the course for a solid performance throughout the semester. The condition finalExam >= 90 determines whether the student deserves an A in the course for an outstanding performance on the final exam. The if statement then considers the combined condition
(semesterAverage >= 90) || (finalExam >= 90)
and awards the student an A if either or both of the simple conditions are true. The only time the message "Student grade is A" is not printed is when both of the simple conditions are false. The following is the truth table for the operator logical OR (||):

Operator && has higher precedence than operator ||. Both operators group left-to-right.
4.11.3 Short-Circuit Evaluation
The parts of an expression containing && or || operators are evaluated only until it’s known whether the condition is true or false. Thus, evaluation of the expression
(gender == FEMALE) && (age >= 65)
stops immediately if gender is not equal to FEMALE (i.e., the entire expression is false) and continues if gender is equal to FEMALE (i.e., the entire expression could still be true if the condition age >= 65 is true). This feature of logical AND and logical OR expressions is called short-circuit evaluation.
In expressions using operator &&, a condition—we’ll call this the dependent condition—may require another condition to be true for the evaluation of the dependent condition to be meaningful. In this case, the dependent condition should be placed after the && operator to prevent errors. Consider the expression (i != 0) && (10 / i == 2). The dependent condition (10 / i == 2) must appear after the && operator to prevent the possibility of division by zero.
4.11.4 Logical Negation (!) Operator
The ! (logical negation, also called logical NOT or logical complement) operator “reverses” the meaning of a condition. Unlike the logical operators && and ||, which are binary operators that combine two conditions, the logical negation operator is a unary operator that has only one condition as an operand. To execute code only when a condition is false, place the logical negation operator before the original condition, as in the program segment
if (!(grade == sentinelValue)) {
   cout << "The next grade is " << grade << "
";
}
which executes the body statement only if grade is not equal to sentinelValue. The parentheses around the condition grade == sentinelValue are needed because the logical negation operator has higher precedence than the equality operator.
In most cases, you can avoid using logical negation by expressing the condition differently with an appropriate relational or equality operator. For example, the previous statement may also be written as follows:
if (grade != sentinelValue) {
   cout << "The next grade is " << grade << "
";
}
This flexibility can help you express a condition more conveniently. The following is the truth table for the logical negation operator:

4.11.5 Example: Using the Logical Operators to Produce Their Truth Tables
Figure 4.10 uses logical operators to produce the truth tables discussed in this section. The output shows each expression that’s evaluated and its bool result. By default, bool values true and false are displayed by cout and the stream insertion operator as 1 and 0, respectively. The sticky stream manipulator boolalpha (line 8) specifies that each bool expression’s value should be displayed as the word “true” or the word “false.” Lines 8–12, 15–19 and 22–24 produce the truth tables for &&, || and !, respectively.
 1  // fig04_10.cpp
 2  // Logical operators.
 3  #include <iostream>
 4  using namespace std;
 5
 6  int main() {
 7     // create truth table for && (logical AND) operator
 8     cout << boolalpha << "Logical AND (&&)"
 9        << "
false && false: " << (false && false)
10        << "
false && true: " << (false && true)
11        << "
true && false: " << (true && false)
12        << "
true && true: " << (true && true) << "

";
13
14     // create truth table for || (logical OR) operator
15     cout << "Logical OR (||)"
16        << "
false || false: " << (false || false)
17        << "
false || true: " << (false || true)
18        << "
true || false: " << (true || false)
19        << "
true || true: " << (true || true) << "

";
20
21     // create truth table for ! (logical negation) operator
22     cout << "Logical negation (!)"
23        << "
!false: " << (!false)
24        << "
!true: " << (!true) << endl;
25   }
Logical AND (&&)
false && false: false
false && true: false
true && false: false
true && true: true

Logical OR (||)
false || false: false
false || true: true
true || false: true
true || true: true

Logical negation (!)
!false: true
!true: false
Fig. 4.10 Logical operators.
Precedence and Grouping of the Operators Presented So Far
The following table shows the precedence and grouping of the C++ operators introduced so far—from top to bottom in decreasing order of precedence:

4.12 Confusing the Equality (==) and Assignment (=) Operators
There’s one error that C++ programmers, no matter how experienced, tend to make so frequently that we feel it requires a separate section. That error is accidentally swapping the operators == (equality) and = (assignment). What makes this so damaging is that it ordinarily does not cause syntax errors. Statements with these errors tend to compile correctly and run to completion, often generating incorrect results through runtime logic errors. Some compilers issue a warning when = is used in a context where == is expected.
Two aspects of C++ contribute to these problems. One is that any expression that produces a value can be used in the decision portion of any control statement. If the expression’s value is zero, it’s treated as false. If the value is nonzero, it’s treated as true. The second is that assignments produce a value—namely, the value assigned to the variable on the left side of the assignment operator. For example, suppose we intend to write
if (payCode == 4) { // good
   cout << "You get a bonus!" << endl;
}
but we accidentally write
if (payCode = 4) { // bad
   cout << "You get a bonus!" << endl;
}
The first if statement properly awards a bonus to the person whose payCode is equal to 4. The second one—which contains the error—evaluates the assignment expression in the if condition to the constant 4. Any nonzero value is true, so this condition always evaluates as true and the person always receives a bonus regardless of the pay code! Even worse, the pay code has been modified when it was only supposed to be examined!
lvalues and rvalues
You can prevent the preceding problem with a simple trick. First, it’s helpful to know what’s allowed to the left of an assignment operator. Variable names are said to be lvalues (for “left values”) because they can be used on an assignment operator’s left side. Literals are said to be rvalues (for “right values”) because they can be used on only an assignment operator’s right side. Lvalues also can be used as rvalues on the right side of an assignment, but not vice versa.
Programmers normally write conditions such as x == 7 with the variable name (an lvalue) on the left and the literal (an rvalue) on the right. Placing the literal on the left, as in 7== x (which is syntactically correct), enables the compiler to issue an error if you accidentally replace the == operator with =. The compiler treats this as a compilation error because you can’t change a literal’s value.
Using == in Place of =
There’s another equally unpleasant situation. Suppose you want to assign a value to a variable with a simple statement like
x = 1;
but instead write
x == 1;
Here, too, this is not a syntax error. Rather, the compiler simply evaluates the expression. If x is equal to 1, the condition is true, and the expression evaluates to a nonzero (true) value. If x is not equal to 1, the condition is false and the expression evaluates to 0. Regardless of the expression’s value, there’s no assignment operator, so the value is lost. The value of x remains unaltered, probably causing an execution-time logic error. Using operator == for assignment and using operator = for equality are logic errors. Use your text editor to search for all occurrences of = in your program and check that you have the correct assignment. relational or equality operator in each place.
20 4.13 C++20 Feature Mock-Up: [[likely]] and [[unlikely]] Attributes
![]() PERF Today’s compilers use sophisticated optimization techniques3 to tune your code’s performance. C++20 introduces the attributes
PERF Today’s compilers use sophisticated optimization techniques3 to tune your code’s performance. C++20 introduces the attributes [[likely]] and [[unlikely]] that enable you to provide additional hints to help compilers optimize if, if…else and switch statement code for better performance.4 These attributes indicate paths of execution that are likely or unlikely to be taken. Many of today’s compilers already provide mechanisms like this, so [[likely]] and [[unlikely]] standardize these features across compilers.5
3. “Optimizing Compiler.” Wikipedia. Wikimedia Foundation, April 7, 2020. https://en.wikipedia.org/wiki/Optimizing_compiler#Specific_techniques.
4. Note to reviewers: At the time of this writing, these attributes were not implemented by our preferred compilers. We searched for insights as to why and how you’d use this feature to produce better optimized code. Even though the standard is about to be accepted in May, there is little information at this point other than the proposal document “Attributes for Likely and Unlikely Statements (Revision 2)” (https://wg21.link/p0479r2). Section 3, Motivation and Scope, suggests who should use these features and what they should be used for.
5. Sutter, Herb. “Trip Report: Winter ISO C Standards Meeting (Jacksonville).” Sutter's Mill, April 3, 2018. https://herbsutter.com/2018/04/. Herb Sutter is the Convener of the ISO C++ committee and a Software Architect at Microsoft.
To use these attributes, place [[likely]] or [[unlikely]] before the body of an if or else, as in
if (condition) [[likely]] {
   // statements
}
else {
   // statements
}
or before a case label in a switch, as in
switch (controllingExpression) {
   case 7:
      // statements
      break;
   [[likely]] case 11:
      // statements
      break;
   default:
      // statements
      break;
}
![]() PERF There are subtle issues when using these attributes. Using too many
PERF There are subtle issues when using these attributes. Using too many [[likely]] and [[unlikely]] attributes in your code could actually reduce performance.6 The document that proposed adding these to the language says for each, “This attribute is intended for specialized optimizations which are implementation specific. General usage of this attribute is discouraged.”7 For a discussion of other subtleties, see the proposal document at:
https://wg21.link/p0479r2
6. Section 9.12.6, “Working Draft, Standard for Programming Language C.” ISO/IEC, April 3, 2020. https://github.com/cplusplus/draft/releases/download/n4861/n4861.pdf.
7. “Attributes for Likely and Unlikely Statements (Revision 2).” https://wg21.link/p0479r2. Section VIII, Technical Specifications.
If you’re working on systems with strict performance requirements you may want to investigate these attributes further.
4.14 Objects Natural Case Study: Using the miniz-cpp Library to Write and Read ZIP files8
8. This example does not compile in GNU C++.
![]() PERF Data compression reduces the size of data—typically to save memory, to save secondary storage space or to transmit data over the Internet faster by reducing the number of bytes. Lossless data-compression algorithms compress data in a manner that does not lose information—the data can be uncompressed and restored to its original form. Lossy data-compression algorithms permanently discard information. Such algorithms are often used to compress audio and video. For example, when you watch streaming video online, the video is often compressed using a lossy algorithm to minimize the total bytes transferred over the Internet. Though some of the video data is discarded, a lossy algorithm compresses the data in a manner such that most people do not notice the removed information as they watch the video. The video quality is still “pretty good.”
PERF Data compression reduces the size of data—typically to save memory, to save secondary storage space or to transmit data over the Internet faster by reducing the number of bytes. Lossless data-compression algorithms compress data in a manner that does not lose information—the data can be uncompressed and restored to its original form. Lossy data-compression algorithms permanently discard information. Such algorithms are often used to compress audio and video. For example, when you watch streaming video online, the video is often compressed using a lossy algorithm to minimize the total bytes transferred over the Internet. Though some of the video data is discarded, a lossy algorithm compresses the data in a manner such that most people do not notice the removed information as they watch the video. The video quality is still “pretty good.”
ZIP Files
You’ve probably used ZIP files—if not, you almost certainly will. The ZIP file format9 is a lossless compression10 format that has been in use for over 30 years. Lossless compression algorithms use various techniques for compressing data—such as
• replacing duplicate patterns, such as text strings in a document or pixels in an image, with references to a single copy, and
• replacing a group of image pixels that have the same color with one pixel of that color and a count.
9. “Zip (File Format).” Wikipedia. Wikimedia Foundation, April 23, 2020. https://en.wikipedia.org/wiki/Zip_(file_format).
10. “Data Compression.” Wikipedia. Wikimedia Foundation, April 16, 2020. https://en.wikipedia.org/wiki/Data_compression#Lossless.
ZIP is used to compress files and directories into a single file, known as an archive file. ZIP files are often used to distribute software faster over the Internet. Today’s operating systems typically have built-in support for creating ZIP files and extracting their contents.
Open-Source miniz-cpp Library
Many open-source libraries support programmatic manipulation of ZIP archive files and other popular archive-file formats, such as TAR, RAR and 7-Zip.11 Figure 4.11 continues our objects natural presentation by using objects of the open-source miniz-cpp12,13 library’s class zip_file to create and read ZIP files. The miniz-cpp library is a “header-only library”—it’s defined in header file zip_file.hpp that you can simply include in your project (line 5). We provide the library in the examples folder’s libraries/minizcpp subfolder. Header files are discussed in depth in Chapter 10.
11. “List of Archive Formats.” Wikipedia. Wikimedia Foundation, March 19, 2020. https://en.wikipedia.org/wiki/List_of_archive_formats.
12. https://github.com/tfussell/miniz-cpp.
13. The miniz-cpp library provides nearly identical capabilities to the Python standard library’s zipfile module (https://docs.python.org/3/library/zipfile.html), so the miniz-cpp GitHub repository refers you to that documentation page for the list of features.
 1   // fig04_11.cpp
 2  // Using the miniz-cpp header-only library to write and read a ZIP file.
 3  #include <iostream>
 4  #include <string>
 5  #include "zip_file.hpp"
 6  using namespace std;
 7
Fig. 4.11 Using the miniz-cpp header-only library to write and read a ZIP file.
Inputting a Line of Text from the User with getline
The getline function call reads all the characters you type until you press Enter:
 8 int main() {
 9    cout << "Enter a ZIP file name: ";
10    string zipFileName;
11    getline(cin, zipFileName); // inputs a line of text
12
Enter a ZIP file name: c:usersuseraccountDocuments est.zip
Here we use getline to read from the user a the location and name of a file, and store it in the string variable zipFileName. Like class string, getline requires the <string> header and belongs to namespace std.
Creating Sample Content to Write into Individual Files in the ZIP File
The following statement creates a lengthy string named content consisting of sentences from this chapter’s introduction:
13    // strings literals separated only by whitespace are combined
14    // into a single string by the compiler
15    string content{
16       "This chapter introduces all but one of the remaining control "
17       "statements--the for, do...while, switch, break and continue "
18       "statements. We explore the essentials of counter-controlled "
19       "iteration. We use compound-interest calculations to begin "
20       "investigating the issues of processing monetary amounts. First, "
21       "we discuss the representational errors associated with "
22       "floating-point types. We use a switch statement to count the "
23       "number of A, B, C, D and F grade equivalents in a set of "
24       "numeric grades. We show C++17's enhancements that allow you to "
25       "initialize one or more variables of the same type in the "
26       "headers of if and switch statements."};
27
We’ll use the miniz-cpp library to write this string as a text file that will be compressed into a ZIP file. Each string literal in the preceding statement is separated from the next only by whitespace. The C++ compiler automatically assembles such string literals into a single string literal, which we use to initialize the string variable content. The following statement outputs the length of content (632 bytes).
28    cout << "
content.length(): " << content.length();
29
content.length(): 632
Creating a zip_file Object
The miniz-cpp library’s zip_file class—located in the library’s miniz_cpp namespace— is used to create a ZIP file. The statement
30    miniz_cpp::zip_file output; // create zip_file object
31
creates the zip_file object output, which will perform the ZIP operations to create the archive file.
Creating a File in the zip_file Object and Saving That Object to Disk
Line 33 calls output’s writestr member function, which creates one file ("intro.txt") in the ZIP archive containing the text in content. Line 34 calls output’s save member function to store the output object’s contents in the file specified by zipFileName:
32     // write content into a text file in output
33     output.writestr("intro.txt", content); // create file in ZIP
34     output.save(zipFileName); // save output to zipFileName
35
Fig. 4.11 Using the miniz-cpp header-only library to write and read a ZIP file.
ZIP Appear to Contain Random Symbols
ZIP is a binary format, so if you open the compressed file in a text editor, you’ll see mostly gibberish. Below is what the file looks like in the Windows Notepad text editor:

Reading the Contents of the ZIP File
You can locate the ZIP file on your system and extract (decompress) its contents to confirm that the ZIP file was written correctly. The miniz-cpp library also supports reading and processing a ZIP file’s contents programmatically. The following statement creates a zip_file object named input and initializes it with the name of a ZIP file:
36    miniz_cpp::zip_file input{zipFileName}; // load zipFileName
37
This reads the corresponding ZIP archive’s contents. We can then use the zip_file object’s member functions to interact with the archived files.
Displaying the Name and Contents of the ZIP File
The following statements call input’s get_filename and printdir member functions to display the ZIP’s file name and a directory listing of the ZIP file’s contents, respectively.
38    // display input's file name and directory listing
39    cout << "

ZIP file's name: " << input.get_filename()
40       << "

ZIP file's directory listing:
";
41    input.printdir();
42
ZIP file's name: c:usersuseraccountDocuments	est.zip

ZIP file's directory listing:
  Length      Date    Time    Name
---------  ---------- -----   ----
      632  04/23/2020 16:48   intro.txt
---------                     -------
      632                     1 file
The output shows that the ZIP archive contains the file intro.txt and that the file’s length is 632, which matches that of the string content we wrote to the file earlier.
Getting and Displaying Information About a Specific File in the ZIP Archive
Line 44 declares and initializes the zip_info object info:
43    // display info about the compressed intro.txt file
44    miniz_cpp::zip_info info{input.getinfo("intro.txt")};
45
Calling input’s getinfo member function returns a zip_info object (from namespace miniz_cpp) for the specified filen in the archive. The object info contains information about the archive’s intro.txt file, including the file’s name (info.filename), its uncom-pressed size (info.file_size) and its compressed size (info.compress_size):
46    cout << "
File name: " << info.filename
47       << "
Original size: " << info.file_size
48       << "
Compressed size: " << info.compress_size;
49
File name: intro.txt
Original size: 632
Compressed size: 360
Note that intro.txt’s compressed size is only 360 bytes—43% smaller than the original file. Compression amounts vary considerably, based on the type of content being compressed.
Extracting "intro.txt" and Displaying Its Original Contents
You can extract a compressed file from the ZIP archive to restore the original. Here we use the input object’s read member function, passing the zip_info object (info) as an argument. This returns as a string the contents of the file represented by the object info:
50    // original file contents
51    string extractedContent{input.read(info)};
52
We output extractedContent to show that it matches the original string content that we “zipped up”. This was indeed a lossless compression:
53    cout << "

Original contents of intro.txt:
" <<
54       extractedContent << endl;
55  }
Original contents of intro.txt:
This chapter introduces all but one of the remaining control statements--the
for, do...while, switch, break and continue statements. We explore the
essentials of counter-controlled iteration. We use compound-interest
calculations to begin investigating the issues of processing monetary
amounts. First, we discuss the representational errors associated with
floating-point types. We use a switch statement to count the number of A, B,
C, D and F grade equivalents in a set of numeric grades. We show C++17's
enhancements that allow you to initialize one or more variables of the same
type in the headers of if and switch statements.
20 4.15 C++20 Feature Mock-Up: Text Formatting with Field Widths and Precisions
In Section 3.13, we introduced C++20’s format function (in header <format>), which provides powerful new text formatting capabilities. Figure 4.12 shows how format strings can concisely specify what each value’s format should be.14 We reimplement the formatting introduced in Fig. 4.4’s compound interest problem. Figure 4.12 produces the same output as Fig. 4.4, so we’ll focus exclusively on the format strings in lines 13, 14, 17 and 22.
14. Some of our C++20 Feature Mock-Up sections present code that does not compile or run. Once the compilers implement those features, we’ll retest the code, update our digital products and post updates for our print products at https://deitel.com/c-plus-plus-20-for-programmers. The code in this example runs, but uses the {fmt} open-source library to demonstrate features that C++20 compilers will support eventually.
 1  // fig04_12.cpp
 2  // Compound-interest example with C++20 text formatting.
 3  #include <iostream>
 4  #include <cmath> // for pow function
 5  #include <fmt/format.h> // in C++20, this will be #include <format>
 6  using namespace std;
 7  using namespace fmt; // not needed in C++20
 8
 9  int main() {
10     double principal{1000.00}; // initial amount before interest
11     double rate{0.05}; // interest rate
12
13     cout << format("Initial principal: {:>7.2f}
", principal)
14          << format(" Interest rate: {:>7.2f}
", rate);
15
16     // display headers
17     cout << format("
{}{:>20}
", "Year", "Amount on deposit");
18
19     // calculate amount on deposit for each of ten years
20     for (int year{1}; year <= 10; ++year) {
21        double amount = principal * pow(1.0 + rate, year);
22        cout << format("{:>4d}{:>20.2f}
", year, amount);
23     }
24   }
Initial principal: 1000.00
    Interest rate:    0.05

Year    Amount on deposit
   1             1050.00
   2             1102.50
   3             1157.63
   4             1215.51
   5             1276.28
   6             1340.10
   7             1407.10
   8             1477.46
   9             1551.33
  10             1628.89
Fig. 4.12 Compound-interest example with C++20 string formatting.
Formatting the Principal and Interest Rate
The format calls in lines 13 and 14 each use the placeholder {:>7.2f} to format the values of principal and rate. A colon (:) in a placeholder introduces a format specifier that indicates how a corresponding value should be formatted. The format specifier >7.2f is for a floating-point number (f) that should be right-aligned (>) in a field width of 7 position with two digits of precision (.2)—that is, two positions to the right of the decimal point. Unlike setprecision and fixed shown earlier, format settings specified in placeholders are not “sticky”—they apply only to the value that’s inserted into that placeholder.
The value of principal (1000.00) requires exactly seven characters to display, so no spaces are required to fill out the field width. The value of rate (0.05) requires only four total character positions, so it will be right-aligned in the field of seven characters and filled from the left with leading spaces, as in

Numeric values are right aligned by default, so the > is not required here. You can left-align numeric values in a field width via <.
Formatting the Year and Amount on Deposit Column Heads
In line 17’s format string
"
{}{:>20}
"
"Year" is simply placed at the position of the first placeholder, which does not contain a format specifier. The second placeholder indicates that "Amount on Deposit" (17 characters) should be right-aligned (>) in a field of 20 characters—format inserts three leading spaces to right-align the string. Strings are left-aligned by default, so the > is required here to force right-alignment.
Formatting the Year and Amount on Deposit Values in the for Loop
The format string in line 22
"{:>4d}{:>20.2f}
"
uses two placeholders to format the loop’s output. The placeholder {:>4d} indicates that year’s value should be formatted as an integer (d) right-aligned (>) in a field of width 4. This right-aligns all the year values under the "Year" column.
The placeholder {:>20.2f} formats amount’s value as a floating-point number (f) right-aligned (>) in a field width of 20 with a decimal point and two digits to the right of the decimal point (.2). Formatting the amounts this way aligns their decimal points vertically, as is typical with monetary amounts. The field width of 20 right-aligns the amounts under "Amount on Deposit".
4.16 Wrap-Up
In this chapter, we completed our introduction to all but one of C++’s control statements, which enable you to control the flow of execution in member functions. Chapter 3 discussed if, if…else and while. Chapter 4 demonstrated for, do…while and switch. We showed C++17’s enhancements that allow you to initialize a variable in the header of an if and switch statement. You used the break statement to exit a switch statement and to terminate a loop immediately. You used a continue statement to terminate a loop’s current iteration and proceed with the loop’s next iteration. We introduced C++’s logical operators, which enable you to use more complex conditional expressions in control statements. We showed C++20’s attributes [[likely]] and [[unlikely]] for hinting to the compiler which paths of execution are likely or unlikely to execute in selection statements. In our objects-natural case study, we used the miniz-cpp open-source library to create and read compressed ZIP archive files. Finally, we introduced more of C++20’s powerful and expressive text-formatting features. In Chapter 5, you’ll create your own custom functions.