Chapter 17
Color Your World

You now have the beginnings of a functioning game. And it looks boring. Plain old black-and-white text. Blah! In this chapter, we’ll show you how to install and use third-party Python libraries, and we’ll use one to introduce a splash of color to our game.
Installing Third-Party Libraries
We mentioned third-party libraries way back in Chapter 3. Python comes with all sorts of built-in libraries, and you’ve used many of them. third-party libraries are created by Python developers, and you can use them just as you would the built-in libraries.
Of course, before you can use libraries, you need to install them. To add color to our game’s output we’ll be using a popular third-party Python library called Colorama. The truth is that you can add color to your output without any libraries by adding codes like ESC [ 31 m to your output. (That’s red text, by the way.) But, by using Colorama, you can actually use sensible text (like the word RED), which is much easier.
So how do you install libraries in Python? When you installed Python back in Chapter 1, a series of tools and utilities were installed, too. One of them is called PIP, and its job is to install (and update and remove) third-party libraries.
You use PIP right inside the Terminal window (where application output is usually displayed). Yep, when your code isn’t running, you can type terminal commands in that window. To install Colorama, the command is:
Windows users:
pip install coloramaMac and Chromebook users:
pip3 install colorama
After issuing the command, you see this:

Don’t worry if you see a different version number. The version will change as the library developer makes changes and updates. The key here is the last line. So long as it says Successfully installed, you’re good to go.
Using Colorama
To color text in the Terminal window, you need to embed special codes (called escape sequences) in the output. Rather than deal with obscure codes, Colorama lets you use English color names, which it converts to the necessary codes.
So, to display text in red, you’d do something like this:
print(colorama.Fore.RED+"Hello, this is in red")
Easy enough.
Importing and Initializing the Library
Before we can use Colorama, we need to import the library. You know how to do that:
import colorama
colorama is a long name. You can shorten it with an alias, as we did back in Chapter 15 with the Inventory file:
import colorama as col
This way, you can shorten the above code to:
print(col.Fore.RED+"Hello, this is in red")
This is all syntax you’ve seen before.
But there is another way to use import that you’ve not seen yet. Look at this import statement:
from colorama import Fore
This import is a little different. It imports just the Fore part of the colorama library and lets us access Fore without needing to fully qualify the name. What does that mean? We could do this:
print(Fore.RED+"Hello, this is in red")
Now the code is even shorter!
You can use any syntax you want. We’ll use this new one just so you can get used to it.
The two parts of the colorama library we need are init (which initializes the library) and Fore (which has the codes for foreground colors). So, your updated import code block should look like this:
# Imports
import Strings
import Utils
import Inventory as inv
import Player
from colorama import init, Fore
The last thing we need to do before using Colorama is to initialize it. Add this code to the top of your Main.py (either before or after the player class instantiation):
# Initialize colorama
init()
Test your app to make sure nothing’s broken. You’ll not see any color just yet, but things should just work exactly as they did previously. If they do, then all is good, and we can move on to adding color to your output.
Coloring Your Output
You have pretty limited color options in the Terminal window. Basically, you can use BLACK, RED, GREEN, YELLOW, BLUE, MAGENTA, CYAN, and WHITE as text colors.
Foreground color means the color of the text itself. Colorama also supports background colors (so you can have red on yellow, for example), but we’ll just use foreground colors here to keep things simpler. And you’ll want to pick different colors for different parts of the text.
We’ve decided to use GREEN for the main game text, YELLOW for menus (as they need to be bright and clear), RED for when something goes wrong, and CYAN for the inventory.
To use these colors, we simply need to add the right codes to the print() functions. For example, this is the updated doWelcome() function:
# Welcome the player
def doWelcome():
    # Display text
    print(Fore.GREEN+Strings.get("Welcome"))
All that has changed is the inclusion of Fore.GREEN that has been prepended into the display text. That’s all you need to do.
When the player tries to open the door, we’ll display prompts in the standard GREEN, unless there’s an error (you can’t open the door, sorry), in which case we display the text in RED. Here’s a snippet from the doStructureDoor() function:
# Location: Structure door
def doStructureDoor():
    # Display text

print(Fore.GREEN+Strings.get("StructureDoor"))
    if inv.hasStructureKey():

print(Fore.GREEN+Strings.get("StructureDoorKey"))
    else:

print(Fore.RED+Strings.get("StructureDoorNoKey"))
As you can see, this is all pretty simple.
Where things get less simple is coloring the menus or inventory display. Why? Open Inventory.py and try adding Fore.CYAN. VS Code underlines Fore, as you can see here:

Why did this happen? Because the code in Main.py knows about Colorama, but the code in Inventory.py does not. You’ll need to add the import to this file, too.
Add this to the top of Inventory.py:
# Imports
from colorama import Fore
We don’t need to initialize Colorama again, so we just need Fore this time. With this change, things will work.
Oh, you’ll need to do the same for Utils.py if you want to color the choices in those print() statements.
Save your code and run the game. Depending on the colors used, you should see output like this:
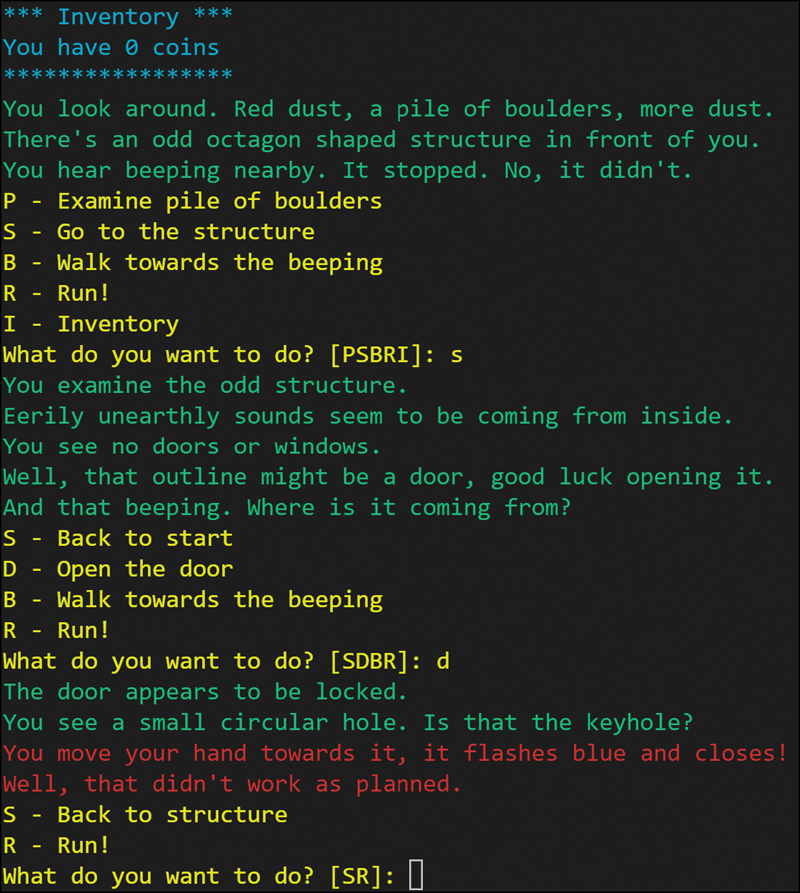
This looks much better. You can use as much or as little color as you’d like. Just keep in mind:
Pick colors that make sense. By that we mean don’t use green for errors or warnings.
Be consistent in color use, with all menus one color, all messages one color, and so on. That helps orient players, as the color helps them identify what they are seeing.
For greater impact, you can use background colors, too. If you want to do so, you’ll need to add
Backto theimportline, and then you can do things likeBack.WHITE+Fore.RED.Remember that colors are sticky. What does that mean? If you don’t set a color in a
print(), then the last color you set will be used. Setting a color basically turns it on, and it remains the active color until you change it. So if something isn’t coloring as expected, you probably didn’t exactly provide a color, and the previously chosen color is being used. This applies to setting background colors, too.You’ll also want to set colors back when your application finishes running. If you don’t, the last color used will remain the Terminal text color. So, in the
gameOver()function, you should probably set the color back toFore.WHITEwhen you are done.
 TIP
TIP
You Can Auto Reset If you don’t want colors to be remembered, change your init() to init(autoreset=True). This way, colors will be applied to the current print() only.
Summary
In this chapter, you learned how to install and use third-party Python libraries. You use the fun Colorama library to color your game’s output.