5
Fun with Hardware
Chapter Contents
Sous Vide Cooking: Low-Temperature Poaching
Sous Vide Cooking and Food Safety
Cooking Times for Fish, Poultry, Beef, and Fruits and Veggies
How to Make a 500-Pound Doughnut
WHAT WOULD IT LOOK LIKE IF YOU HAD SUPERPOWERS IN THE KITCHEN? You know, if you could slow time down? Or had heat vision? Or could suck all the air out of the room? Okay, maybe that last one isn’t so awesome sounding—VacMan?!—but interesting stuff happens when you have superpower control over the basic variables of cooking. We usually work with the variables of time, temperature, air, and water (discussed in the previous two chapters) at moderate values: making a soft-cooked egg in 6 minutes, baking pizza at 450°F / 230°C, or churning ice cream at –20°F / –29°C for half an hour. What happens when we stray outside these usual ranges?
Increasing air pressure changes the boiling point of water, speeding up how quickly foods cook. Separation techniques and tools from dehydrators to centrifuges change textures and flavors in multiple ways. Or consider sous vide cooking: essentially ultra-low-temperature poaching. When upping the variable of time, we have to drop temperature to keep time-and-temperature reactions in line. But something fascinating happens: as we dial down the temperature, it eventually has to equal the target temperature of the cooked food. It becomes impossible to accidentally overcook foods. This is amazing!
What if you take temperature beyond the limits of your kitchen thermometer? Ice cream made with liquid nitrogen at –320°F / –196°C sets in 30 seconds, and it’s great—the water crystals don’t form large aggregates, so this method creates the smoothest ice cream you’ll ever have. And at 900°F / 480°C, thin-crust pizza bakes in under a minute, and it’s delicious! Let’s see what techniques and fun culinary creations come out of using hardware that lets you play with these variables.

High-Pressure Situations
As I’ve learned more about food science, I’ve come to realize just how critical water is! It impacts cooking in so many different ways: transmitting heat via steam, dissolving trace minerals to change how gluten forms and yeast multiplies in breads, and altering textures in cookies (chewy or crispy) and dried foods. Water is everywhere.
One water variable that doesn’t change much in the kitchen is its boiling point. Adding salt can increase its boiling point by a few degrees, but what could we do if we raised it even more? If most heat-related reaction rates in cooking roughly double with every 18°F / 10°C increase, then increasing water’s boiling point from 212°F / 100°C to 230°F / 110°C should, in theory, cut braising times in half and cook rice twice as quickly. Raising it again, to 248°F / 120°C, would slash cooking times by up to a whopping 75%. And this is exactly what happens under pressure.
How much pressure, you ask? There’s a nifty type of science chart called a phase diagram that shows a substance’s phase—solid, liquid, or gas—at various pressures and temperatures. Here’s one for water at the various temperatures and pressures normally found in the kitchen.
A quick primer on how to read this: consider the line at 14.7 psi (1,013 hPa—that’s hectopascals) equal to one atmospheric pressure or what you’d experience at sea level on an average day. The freezing point at one atmosphere is 32°F / 0°C; the boiling point is 212°F / 100°C. Move that line down a little bit to 12.1 psi (834 hPa), equivalent to an altitude of 5,280 feet (1,609 meters) above sea level, and you’ll see why water boils at 203°F / 95°C in Denver, Colorado. Go up to 30 psi (2,070 hPa), and voilà! Water boils at roughly 248°F / 120°C. This is the science behind what makes pressure cookers amazing. I know, I know, getting excited by the idea of keeping water liquid at a higher temperature may seem strange, but trust me, you’ll love what it can do.

Phase Diagram of Water for the Kitchen
What else happens when we increase pressure? Water is more complicated than this simple phase diagram suggests, because nothing in the kitchen is a pure substance. Your salt has trace minerals in it—probably silica too. Table sugar isn’t actually 100% sucrose; a spoonful of it includes ash, proteins, and inorganic impurities. And water, even purified distilled water, isn’t actually 100% H2O: there’s gas dissolved in there. With pressure, we can dissolve more gas into liquids like water for both fun and useful purposes.
Food is always mixtures of solids, gases, and liquids. (Actually, food is almost always mixtures of mixtures, and figuring out how to separate them has its own challenges, as we’ll see later in this chapter.) We talked about humidity—dissolved water vapor in air—in the previous chapter, but what do we call dissolved air in water? It’s what fish breathe, but we don’t even have a word for it!
Gases dissolve into liquids all the time—think carbonated drinks, or the small bubbles you see when heating water to boil—and changes in pressure change how much gas can be dissolved. This is known as Henry’s Law: essentially, the higher the pressure of a gas above a liquid, the more soluble that gas becomes. (Huh. There’s no Potter’s Law yet. Probably too late; all these laws seem to have been named about two centuries ago. The English chemist William Henry came up with this one in 1803.) You can dissolve gases into foods to make foams like whipped cream (and Aero chocolate!), and you can use a pressurized container to make wild things like carbonated fruit.
In the following sections, we’ll take a look at how to cook with pressure cookers and cream whippers, covering what they are and how to use them.
Dropping the temperature of a liquid increases the amount of gas that will dissolve into it. If you’re trying to saturate gas into a liquid, cool the liquid down first.
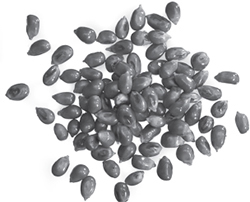
Because of pressure! Popcorn kernels have the magic combination of a tough, airtight hull and a moist interior (~13% water) that explodes when heated. Most grains have this combination: amaranth, quinoa, and sorghum also pop. Increasing temperature in a fixed volume also increases pressure, with different results.
Below 300°F / 150°C
As kernels heat up, water inside them also heats up. Because the water can’t boil—there’s very little space for the water to expand into water vapor—the pressure inside the kernel increases.
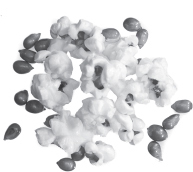
310–340°F / 155–170°C
Some weak kernels rupture, but there’s not enough pressure built up to explode the kernel’s starches out very far, making small, not-really-delicious popcorn pieces.

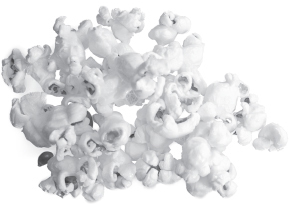
350°F / 177°C and up
At 135 psi—nine times atmospheric pressure!—the kernel’s hull ruptures. With the drop in pressure, the water inside instantly boils and converts to steam, expanding ~1,500-fold and dragging the outer layer of starches along for the ride.

Pressure Cookers
Pressure cookers are like an old-fashioned version of the microwave: a convenient appliance that speeds up cooking. Our grandparents used a manual version, essentially fancy pots with locking lids that went on the stovetop. Manual versions are still available today—now enhanced with safety locks and over-pressure release valves to prevent accidents—and are a worthwhile investment for the serious pressure cooker enthusiast. Manufacturers also make electric units, which can safely be left unattended and are what I suggest for first-time buyers. If you have a tiny kitchen, get an electric unit that has modes for slow cooking and cooking rice.
It’s not the pressure itself that changes how foods cook, but the impact of pressure on physical and chemical processes. Increasing pressure always increases the boiling point of water. In wet cooking methods, the temperature differential between the food and the liquid heating it is what determines how quickly the food heats up. (See page 139 for more.) Increasing the pressure increases the boiling point of water, but it’s not boiling water per se that does the cooking—it’s the larger temperature difference between the higher-temperature liquid and colder food that results in a faster rate of heat transfer.
How much faster heat will transfer into food depends on the maximum temperature at which the liquid can boil. Depending on the make and model, a pressure cooker can increase the pressure by 11–15 psi (758–1,034 hPa). There’s no formal standard for how much pressure a cooker should operate at, but most recipes are written assuming a high pressure of 15 psi (1,034 hPa) and low pressure of 8 psi (550 hPa). (Underwriters Laboratories won’t certify units above 15 psi, which is why you don’t see higher pressures than that.) You will need to adjust cooking times based on the pressure at which your model operates!

Pressure vs Boiling Point of Water
Figure out your starting air pressure, add the operating pressure of your cooker, and check the boiling point of water for that absolute pressure.
Pressure increases are relative to your current atmospheric pressure, so the maximum boiling point of water is based on your current air pressure plus the additional pressure your unit adds to it. If you live at sea level and have a higher-pressure unit, you’ll be able to get water up to 29.7 psi (2,048 hPa) for a boiling point of 250°F / 121°C, but a mile up and with a unit that only adds 11 psi (758 hPa), you’ll only raise the boiling point to 236°F / 113°C. Take a look at this zoomed-in part of the phase diagram of water from the previous section, cropped to the starting and maximum pressures possible in pressure cooking. Add the operating pressure of your pressure cooker to the air pressure at your elevation to look up how hot (and thus how quickly!) your foods will cook.
One fun science comment: Maillard reactions don’t readily occur in most wet cooking methods. It’s not that water inhibits the reaction itself; there actually needs to be some water present in the food (see page 213). The limiting factor is that water, when used as a source of heat, prevents the necessary temperatures from being reached, at least at atmospheric pressure. Some combinations of amino acids and reducing sugars will begin to undergo Maillard reactions just above water’s normal boiling point. Lysine/glucose, for example, will combine at around 212–230°F / 100–110°C in a solution with a pH between 4 and 8, reacting much faster at the hotter and more basic ranges. A few novel recipes use this quirk to create Maillard reactions in soups using baking soda, but it’s not even a minor part of most pressure cooking. Fortunately, Maillard reactions don’t happen too much at the pressures used in pressure cooking (you’d need to go to ~70 psi / ~4,800 hPa to really see them). If they did happen, foods would have Maillard reactions center-to-edge and taste disgusting—too much of a good thing, in this case, gives horrible flavor.
Pros
• Speed! Raising the boiling point of water from 212°F / 100°C to 248°F / 120°F roughly quadruples how quickly culinary reactions can occur, cutting cooking times by ~60–70% (it takes some time to heat up the food; otherwise, it’d be closer to 75%). Pressure cookers are fantastic for cooking slow-cooking grains and legumes (rice and lentils in 5–8 minutes instead of 30), beans (30 minutes for dry, unsoaked beans to be ready to serve), and higher-collagen meats (ribs, pot roast, and pulled pork can all be cooked in under an hour are deliciously easy).
The French scientist Denis Papin served the very first pressure cooker meal way back in 1679 to a group of scientists in London, calling it a bone digester and serving bones rendered to something like jelly (along with cooked meats). Oh, 17th-century British cooking...
• Electric units are extremely energy efficient, meaning they’re great for summer cooking where you want something that’s normally slow-braised for hours—say, pulled pork—but don’t want to adds lots of heat to your kitchen.
Cons
• You won’t be able to poke at food while it cooks to adjust seasoning or check if it’s done. What goes in the pot at the start is what you’re going to get at the end, as when baking a cake. If you’re an intuitive cook, winging it as you go, treat pressure cooking as a way of cooking one ingredient that you’ll then use as a component in your meal.
• With the faster rate of reactions, overcooking will happen much more quickly. It’s better to slightly undercook something and continue cooking it “off pressure.” Take notes on cooking times on your recipes. (Use the low-pressure setting on vegetables to avoid overcooking.) Different pressure cookers will run at slightly different pressures, so treat times for recipes as starting points and take notes.
• Pressure cookers rely on boiling water or steam for transmitting heat—it’s a wet cooking method—and trap and condense most of the moisture, making it hard to reduce sauces. You may need to reduce the liquids after cooking. On the flip side, don’t skimp on the liquid: make sure that you have at least a cup or two of water in the unit; otherwise, there won’t be anything to turn into steam and you’ll end up burning the bottom of whatever you’re cooking.
Pressure frying uses oil instead of water to cook at even higher temperatures, creating crispy, browned outsides and moist interiors on foods like breaded chicken drumsticks. Pressure frying is how Harland Sanders made his original “Kentucky Fried Chicken,” and why it was so successful! Unfortunately, pressure fryers are industrial appliances; there’s no safe consumer version for the home. This is one you don’t want to try hacking: using oil in a standard pressure cooker can melt the sealing gaskets and lead to explosive decompression with hot oil spraying everywhere.
Tips and tricks
• If you want to adapt other recipes to a pressure cooker, think about things that normally cook via steaming, braising, or any wet cooking method, and try cooking for a third of the suggested time. Make sure not to fill the cooker more than two-thirds full; some ingredients will expand as they cook, and blocking the release valve is bad. If using ingredients that foam while cooking—applesauce, barley, oatmeal, pasta—don’t fill the cooker more than one-third full. Be aware that dairy curdles under pressure, so add any dairy ingredients after pressure cooking.
• If you have a stovetop unit, you can rinse it under cool tap water to cool it down quickly after cooking; this is useful for quick-cooking foods like vegetables or polenta where the residual heat would continue cooking them.
• Many electric pressure cookers operate at 12 psi (830 hPa) instead of 15 psi (1,034 hPa), meaning cooking times for recipes based on the slightly higher pressure may need to be extended by 15–20%. Check the manual for the operating pressure, not the rated air pressure—manufacturers tend to list the maximum pressures their units reach and bury the true pressures at which they cook.
• Steam vegetables and artichokes using a metal steaming tray to raise them above the water level. You can also cook small quantities of food in a small glass or metal bowl this way—just remember to pour a cup or two of water into the pressure cooker! Don’t use plastic containers in a pressure cooker; they’ll melt.
• Pressure cookers are great for making stock. Save bones from meals in a container in the freezer. Once the container is full, transfer the contents to the pressure cooker, cover them with water, and cook for 30 minutes. Cool and strain the liquid.
• Try using your pressure cooker to render tallow or lard: toss chopped-up fatty meats into a jar, cover them with water, add a cup of water to the pressure cooker, and render for about 2 hours. Let the fat cool to a safe-to-handle temperature and pour through a strainer.
We covered collagen earlier (see page 195), but it’s worth taking another look here to see what a difference a pressure cooker can make. Collagen is a tough protein and meats that are high in it need to be cooked for lengthy times to properly break it down. Pressure cookers, as you’d guess, speed up that process, turning an all-day project into an after-work one.
In a bowl, mix together:
2/3 |
cup (150g) brown sugar, packed (that is, press the sugar down to fit as much into the cup as possible) |
¼ |
cup (60 mL) red wine vinegar |
¼ |
cup (60g) ketchup or tomato sauce |
1 |
tablespoon (7g) paprika |
2 |
teaspoons (4g) freshly ground black pepper |
½ |
teaspoon (3g) salt |
½ |
teaspoon (1g) ground coriander (optional) |
½ |
teaspoon (1g) cayenne pepper (optional, of course) |
Feel free to improvise and add (or drop) whatever spices you like, and then mix to combine.
Add:
3–4 |
pounds (1.5–2 kg) pork shoulder or pork butt, with or without bone (make sure to buy something that’ll fit in your pressure cooker; if in doubt, have the butcher saw it in half or quarters) |
Remove any skin from the pork, then coat the pork on all sides with the seasoning. Transfer it to your pressure cooker, add any remaining sauce, and cook under high pressure for 45–60 minutes (possibly longer if your pressure cooker doesn’t go to 15 psi).
After it’s done cooking, transfer the cooked meat to a large bowl and pull the bone out (it should just fall out; if not, cook it longer!) along with any large chunks of fat, discarding them (or saving them for some other culinary project, such as rendering your own lard as described on page 311). Use two forks to pull the pork apart, tearing and shredding it.
Pour the liquid from the pressure cooker vessel into the bowl—it should be just enough to submerge the meat—and mix together to thoroughly incorporate the sauce into the meat.
Notes
• Here are some ideas of what to do with pulled pork: serve on toasted hamburger rolls, on a potato pancake, in a French baguette sliced down the middle, or on top of rice. Mix into chili, use in tacos, add on top of pizza, toss into nachos. Or, do what I invariably do: grab a fork and just pig out (pardon the pun).

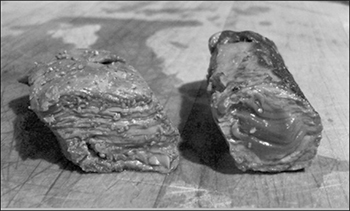
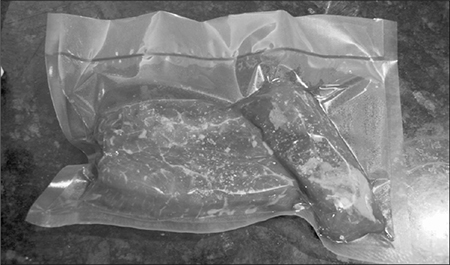
If your pressure-cooked meats are coming out tough (left), it’s because they’re undercooked. Cook longer and the collagen will break down to give that great texture in pulled pork. If your meats are coming out shredded but dry, then cut back on the cooking time the next time.
Cream Whippers
Most of us are familiar with whipped cream in a pressurized can. A cream whipper is a reusable version of the can that you fill with cream or whatever else you like. It is a simple yet clever design: pour your contents into the container, screw on the lid, and pressurize using a small disposable gas cartridge that provides either nitrous oxide or carbon dioxide to the can through a one-way valve. Presto! You now have the ability to increase pressure and dissolve more gas into a liquid, opening up some fun culinary techniques.
Cream whippers take their name from their primary purpose: making whipped cream. With a whipper, you can control the quality of the ingredients and the amount of sugar used. Once filled up, they’re no different than the more familiar whipped cream cans. The obvious extension is to create flavored whipped cream. Toss some orange zest and maybe a bit of vanilla sugar into a pint of organic cream, screw the lid on and pressurize with a gas cartridge, and spray away. Try tea-infused cream: steep some Earl Grey in cream and transfer it to the whipper, or go smoky and use Lapsang Souchong tea. (Strain any tea leaves out before filling the canister of the whipper!) You can also spike the cream—make amaretto cream to go on your coffee with 4 parts heavy cream, 2 parts amaretto liqueur, and 1 part powdered sugar.
But the real fun with cream whippers is passing other liquids through them. You can whip any liquid or mixture that has the ability to hold air. Chocolate mousse can be made instantly with a cream whipper. Adding a small amount of gelatin or lecithin (see page 430) to liquids will give them the capability of foaming, producing a light, bubble-bath-like foam that’s edible and flavored. Foamed carrot juice sounds strange, but as part of an avant-garde meal can be amazing. You can even put pancake batter in a cream whipper (and yes, some entrepreneur has already tried commercializing “pancakes in a can”). Because the contents are ejected under pressure, any small, pressurized bubbles come along for the ride and expand instantly, leading to mechanical injection of air into the liquid. This is why cream turns into whipped cream, although the foam that’s generated isn’t as stable as manually whisked whipped cream.
One downside of cream whippers is the expense of the disposable gas cartridges. They add up, but if you’re a regular user of whipped cream, the long-term savings alone will make buying a whipper worthwhile, not to mention the quality gains. If you want to play around with textures and flavors in the kitchen, it’s a downright cheap option.
Whippers come in an insulated variety, made of metal with an insulated center, that’s useful for keeping contents cold. These are handy if you’re using the whipper only for whipped cream. These thermal versions can’t be heated in a warm water bath, though, making it harder to do hot foams or to partially poach the contents à la sous vide for egg-based custards, so snag a noninsulated one for those purposes.
You can also use a whipper as a source of pressure. One technique uses an adapter you can find in the plumbing section of your local hardware store to connect the threaded spray nozzle of the whipper to a length of plastic tubing. Fill the tubing with a hot liquid and some agar or another gelling agent (which we’ll talk about later—see page 418), let it set, and use the whipper as a source of compressed air to force-eject the “noodle.”
Don’t overlook the fact that cream whippers are also pressurized containers themselves, if you ignore the spray valve. Volatile compounds—most odors are volatile; otherwise, how could we smell them?—will dissolve into a liquid more readily under higher pressure. Dropping flavored items into the container (spices, fruit, peppers), covering them with a liquid (water, alcohol, oil), and pressurizing the container will rapidly infuse the liquid with the flavors. Then you just vent the pressure with the container in the upright position, taking care not to spray, unscrew the top, and pour your infused liquid through a strainer.
Another thing to try is using a CO2 cartridge to create “whipper fizzy fruit”—fruit that has been carbonated, giving it a fizzy texture. Try popping grapes, strawberries, or sliced fruit such as apples and pears into the canister and pressurizing it. Let it rest for an hour, depressurize the can, and remove the fruit. Not exactly haute cuisine, but fun to do as a party trick. Fizzy raspberries make a great basis for a mixed drink.
A few things to keep in mind when you’re working with a whipper:
• Make sure to get a whipper that allows for liquids other than cream—some manufacturers make “mini whippers” only usable with cream.
• Check that the gasket is properly seated and the threads on the lid are clean when screwing on the lid, unless you want chocolate cake batter, cream, or pancake mix sprayed 10 feet in a random direction.
• Always run your liquid through a strainer (~500 micron is fine—see page 348) to remove any particles that might clog the nozzle. You can skip straining things like plain cream, of course.
• When working with heavier batters, you can double-pressurize the canister. After pressurizing with one cartridge, remove it and pressurize with a second one. You’ll find that the pressure decreases as you run through the contents, because the airspace in the whipper increases as the contents are ejected.
• If your liquids fail to foam correctly, make sure they are cold! Cream will not foam when it is even slightly warm. Also try adding some gelatin, which provides structure. If you don’t mind taking a shortcut, try using flavored Jell-O.
• Don’t use gas cartridges made for nonfood applications, like BB guns. They aren’t food grade, and contaminants like manufacturing oils and solvents can come along for the ride.

This egg foam is something like a whipped mayonnaise, but incredibly light. Try it with steak and fries. This recipe is based on one by Alex Talbot and Aki Kamozawa, available online at http://www.ideasinfood.com and in the bookstore (Ideas in Food, Clarkson Potter, 2010).
Measure out into a bowl:
4 |
large (200g) eggs |
5 |
tablespoons (75 mL) heavy cream |
½ |
teaspoon (3g) salt |
½ |
teaspoon (2.5 mL) hot sauce, like sriracha |
Using a blender, thoroughly mix the ingredients. Strain into a noninsulated whipper and screw the lid on, but do not pressurize. Place the whipper in a water bath at 158°F / 70°C and cook until the mixture begins to thicken, around 60–90 minutes. Remove the whipper from the bath, check that the eggs are just partially set, and then pressurize the whipper. Dispense the eggs onto small serving plates and garnish, or use them as a component in a dish.
Note
• When I first made this, I accidentally overcooked the eggs in a too-hot water bath. They set inside the container and wouldn’t spray, but were also, hands-down, the best scrambled eggs of my life—something about the amount of cream and hot sauce...

Filter liquids through a strainer when filling the whipper. I use a tea strainer from my teapot because it’s handy, but any small mesh strainer will work.
In a microwave-safe bowl, melt:
3.5 |
oz (100g) chocolate (bittersweet preferably) |
Add and thoroughly whisk together:
4 |
large (200g) eggs |
6 |
tablespoons (75g) sugar |
3 |
tablespoons (25g) flour |
Pass the mixture through a strainer to remove any lumps and to filter out the chalazae (the little white strands that attach the yolk to the egg white). Transfer the batter to a whipper and pressurize.
Spray the mixture into a greased glass, ramekin, or whatever microwave-safe container you will cook it in, leaving at least the top third of the container empty. The first time you do this, I recommend using a clear glass container so that you can see the cake rise and fall as it cooks.
Microwave the batter for 30 seconds or until the foam has set. Flip the cake onto a plate and dust it with powdered sugar.

Powdered sugar is the bacon of the pastry world. It goes well with almost everything and is great for covering up things like tears or holes—in this case, covering up a chocolate filling.
For better-tasting results, try adding chocolate-hazelnut or marshmallow spreads: spray a thin layer of cake batter, drop a spoonful of filling into the center, and then spray more cake batter on top of and around the filling.
After cooking, dip the top of the cake in chocolate and do a small loopy white icing design on the top, and you’ve got something close to commercial cream-filled cupcakes.
Notes
• Try spraying a thin square of the batter onto a plate and cooking that. Peel it off the plate, coat the top with a layer of jam or whipped cream, and roll it up to create a log-shaped chocolate treat.
• If you don’t have a cream whipper, you can still do a close approximation. Search online for “microwave chocolate cake.” Using a whipper aerates the batter and produces a much more uniform, spongier cake.

Aerated microwave cake before cooking (left) and after cooking for 30 seconds (right).

If your cakes are coming out with dense pockets (left image, a cross-section of a cake made with a single charge) instead of fluffy and airy (like the right cross-section), try double-charging the cream whipper: pressurize it once, remove the spent cartridge, and then charge it with a second cartridge.
A Few Low-Pressure Tricks
If high pressure raises the boiling point and increases the solubility of gases into liquids, then it follows that dropping air pressure decreases the boiling point and can remove dissolved gases from liquids. But you can do other fun tricks using a vacuum system that creates low pressures. Craving pickles right now? Air bubbles in your batter ruining cakes or clouding up your soups? Wondering how certain restaurants create “watermelon steaks” or the food industry makes chocolate candies like Aero or freeze-dried ice cream? The answer to all these questions lies within vacuum systems that create low-pressure situations.
• Instant pickles: Some foods—typically ones that pickle well—will spring back to their former shape after being exposed to a vacuum and having the pressure restored. You can take advantage of this property to cleverly suck a liquid into plant tissue. Squeeze a damp sponge and air will leave; let go while holding it under water and what was once air will become water. In cooking, this technique is called flash pickling. Microscopic air pockets in foods like cucumbers and onions will be pulled out and replaced with brine or other liquids, from flavor-infused oils to alcohol, and in a process that takes only minutes instead of days. Instant pickles!
• Removing air bubbles: As pressure drops, the volume a gas occupies increases and the density of the volume decreases. In a viscous liquid (e.g., soup, batter), the decrease in air density means any air bubbles present are going to become more buoyant. Just as the less-dense hot air inside a hot air balloon causes it to rise due to the relative difference of density between it and its environment, less-dense air bubbles in liquids become more buoyant and more likely to rise to the surface. This follows from Stokes’ Law—essentially, viscous liquids exert a drag force around really small spherical objects—and increasing the difference in densities can overcome that drag force. (Shaking or knocking a cake pan against a counter won’t remove smaller bubbles for this reason.) Soups and liquids can become cloudy during cooking due to microscopic air bubbles being blended in; drawing a vacuum on them will clarify them by buoying up the small bubbles. This isn’t beneficial just for visual reasons; removing those air bubbles can change the way a liquid tastes and the way custards bake.
• Translucent fruits: Under vacuum, air bubbles in fruits like pineapple and watermelon will expand with catastrophic results. Cells rupture and tissue walls collapse; upon return to atmospheric pressure, such foods can go through a serious case of the bends and become smaller, denser, and possibly more translucent due to the new absence of light-obscuring air pockets.
• Foamed foods: You can inject air bubbles into liquids and then expand them by dropping the pressure of the air around them. Whipped cream in a can, of course, is the familiar version of this: increase the pressure, dissolve the gas into the liquid, and then rapidly drop the pressure. The dissolved air comes out of solution, and our friend Stokes’ Law keeps it in place (at least for a while, in the case of whipped cream). It works with solids, too: creating chocolate foam, first attempted in the 1930s, involves adding bubbles into melted chocolate, changing the size of those bubbles with pressure changes, and then letting the chocolate set. In industry, manufacturers do this by increasing the pressure around liquid chocolate to drive the gas into suspension (as with whipped cream), then rapidly decompressing it to foam up the chocolate and allowing it to set. Seeing as even professional chefs don’t have rapid decompression chambers, the culinary way to do this is to use a cream whipper to force nitrous oxide into melted chocolate, spray it, evacuate a chamber with the chocolate inside it to cause the bubbles to expand, and then let it set.
• Freeze-dried foods: In our continuing series of “water is wonderfully weird,” the freezing and boiling points of water converge under a strong enough vacuum—called the sublimation point. The phase diagram on page 306 shows a point where solid, liquid, and gas all converge; at pressures below ~0.08 psi (6 hPa), ice converts directly to water vapor, skipping the liquid phase. Freeze-drying can create amazing results and also preserves a large amount of the nutritional value and flavor of the food. The few commercially available freeze-dried goods you might have experienced (such as freeze-dried instant coffee) may not taste as good as traditionally prepared foods, but this is more about economics and the ingredients being used than the freeze-drying process.
So now that I’ve hopefully got you excited about using vacuums, how can you actually do this at home? No, your vacuum cleaner won’t draw a strong enough vacuum. (Plus: eww, gross.) Luckily, there’s already a kitchen device that’s mostly up to the task: the vacuum sealer. Vacuum sealers are traditionally used by home cooks to seal and store foods. Instead of storing food in containers or plastic-wrapped bowls, food is placed into a food-safe plastic bag, air is sucked out of it by the unit’s air pump, and the bag is sealed by a fusing bar that melts and seals the opening of the bag. (Some units use one-way valve systems instead of fusing bars, but they don’t seal as well; avoid those.) The benefit? Removing air from the bag reduces oxidation of fats and minimizes odors that lead to freezer burn, plus the sealed food can be easily defrosted in water before being opened. Sous vide cooking, which we’ll cover next, also relies on vacuum sealers to package the foods being cooked.
Under vacuum, microscopic air pockets in foods like onions and cucumbers lose their air. Upon returning to atmospheric pressure, most foods are rigid enough to keep their shape and pull air back in, like a squeezed sponge expanding back to its original shape. But what if the food is submerged when this happens? Liquid is pulled back in, instead of air.
Why bother? Because pulling liquids into foods this way gives an entirely different result than traditional pickling, leading to crisp textures with the flavors of whatever liquids were infused into the item. Instant pickles! Or if you’d rather convert a cucumber into an edible martini, check out the video “The Edible Martini” (http://cookingforgeeks.com/book/flashpickle/) by the New York Times and Dave Arnold.
Pros like Dave who have commercial vacuum chambers can just drop whatever food they choose into a container with the desired liquid, transfer it to their vacuum chamber, and clamp down on the lid. For the rest of us, though, generating a sufficiently strong vacuum isn’t always so easy. If you have a vacuum food sealer and a canning jar attachment for it, give flash pickling a go: drop some cucumber slices into a flavored brine (half water, half vinegar, some salt and pepper, and spices as you like) and draw a vacuum.

Cucumbers being flash pickled with a consumer jar sealer attachment.
It’s possible, though, that your vacuum sealer won’t draw a strong enough vacuum. If that’s the case and you don’t mind voiding your warranty, there is a way. (I should write an entire chapter called “Voiding Your Warranty.” Maybe someday...)
Consumer vacuum sealers have a pressure switch that triggers them to stop pumping and start sealing, meaning that they stop short of creating a strong enough vacuum to create a good pickle. But if you disable the pressure switch, the unit should continue to pump indefinitely, or until the motor burns out.
To make a DIY vacuum chamber system, you’ll need:
• A toggle switch
• A short piece of wire
• A screwdriver and wire cutters
• A consumer vacuum sealer with jar attachment
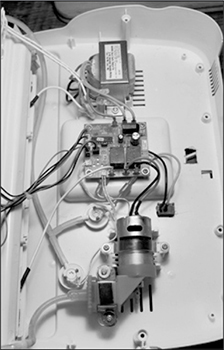
Unscrew the cover of the vacuum sealer. It should look something like this.
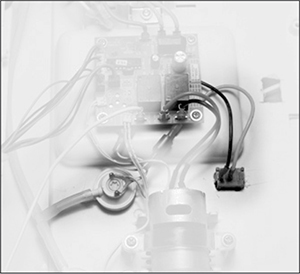
Locate the pressure switch (highlighted on the left). Cut one of the wires that runs back to the circuit board and interpose a toggle switch (highlighted on the right). Cut a small hole in the plastic and mount the toggle switch so that you can flip it from the outside.
PHOTOS USED BY PERMISSION OF CARL HILL-POPPER
To use techniques like flash pickling, look for a vacuum sealer that supports canning attachments. These are devices that fit over the lid of a wide-mouth glass jar and pull air out of the jar—which, being rigid, doesn’t collapse and squish the food, as happens with traditional vacuum sealing bags. Normally these tools are used to extend food’s storage life by reducing oxygen exposure in the jar, but for our purposes they allow for many of the tricks just listed. (True freeze-drying, I’m afraid, requires too strong a vacuum for extended times—many hours—and lower temperatures than are easily manageable at home.)
Vacuum sealing doesn’t pasteurize or sterilize foods.
Removing air does decrease the impact spoilage bacteria can have, but increases some pathological bacteria’s ability to grow. Unless you’re following specific instructions for canning or sterilizing foods, treat vacuum-sealed foods like any other perishable items: store them in the fridge and use them within a few days, or freeze them.
One more note: if you happen to have a vacuum chamber sealer, consider yourself lucky. Vacuum chamber sealers are countertop units with an interior chamber that can easily drop the pressure of that chamber to ~10% of atmospheric pressure. Like consumer vacuum sealers, they’re normally used for rapidly sealing food storage bags, but they operate more quickly and have the benefit of not drawing out liquid or squishing the food during sealing (just upon repressurization). Most of the tricks listed here are super simple with a good vacuum chamber.
Sous Vide Cooking: Low-Temperature Poaching
With a name like sous vide, this cooking technique sounds French, and for good reason: it was French chef Georges Pralus who introduced it to the culinary world in the 1970s. While the name may be unusual-sounding to non-Francophiles, sous vide cooking is not complicated and is one of the most useful techniques to appear in the professional cooking world in the past few decades.
In sous vide cooking, food is immersed in a temperature-controlled liquid bath, usually water, where the temperature of the bath is the same as the target temperature of the food being cooked. Given enough time, an egg will set to soft–poached stage at around 144°F / 62°C. To cook a soft-poached egg sous vide–style, you would drop an egg (still in its shell) into a liquid bath at 144°F / 62°C and leave it there until enough of the proteins denature (about an hour). Perfectly cooked poached eggs! As we’ll see, the same concept applies for many other foods.

Without a temperature gradient, sous vide cooked foods have a uniform level of doneness.
Another benefit of sous vide cooking is that the entire portion of food cooks to the same uniform temperature. There’s no overcooked outer portion with items like meats; the entire piece of food has a uniform temperature and uniform doneness. With traditional cooking techniques, cooking something like a pork chop is a race to tie at the finish line: you want the internal temperature to reach one temperature at the same time that the external surface temperature reaches a different one. Steering two different temperatures at the same time isn’t difficult per se, but it does require skill. Sous vide cooking separates the task of reaching those two temperatures into two different stages: first, bring the entire piece of food up to the desired internal temperature (say, pork chops to 140°F / 60°C); once that’s done, bring the surface temperature way up by dropping the item into a hot pan or tossing it under a broiler for a minute to brown the outside via the Maillard reaction.
Sous vide is a funny name; it should have been called “water bath cooking” because the actual heat source is the water.
The name sous vide translates from the French “under vacuum.” Traditionally, you start the sous vide process by placing foods into a heat-safe vacuum-sealed plastic bag. Using vacuum sealers removes all the air in the bag, which allows the heated liquid of the bath to transfer heat into the food while preventing the liquid from coming into direct contact with the food. This means the heating liquid (e.g., water) does not chemically interact with the food: the flavors of the food remain stronger, because the liquid can’t dissolve and carry away any compounds from the food.
The steak tip on the left was cooked sous vide at 140°F / 60°C; the one on the right was pan-seared. Note that the sous vide steak has no “ring of doneness”: it’s medium-rare, center to edge.
Sous vide cooking doesn’t have to be done with a vacuum-sealed bag. Eggs, for example, are already sealed (ignoring the microscopic pores). If using plastic is a concern for you, you can use small glass jars with oils or marinades inside with the food submerged, making sure that there’s no air getting in. If you use this method, make sure the glass container is small enough that the contents come up to temperature quickly for food safety reasons.

Cooking eggs in a sous vide bath at 144°F / 62°C.
Picking the temperature of the liquid bath is, in theory, simple: understand the chemistry of the food being cooked and pick a temperature range that’s warm enough to trigger desirable reactions and cool enough to avoid triggering other reactions. For the variable of time, the food needs to cook long enough for sufficient quantities of the desired reaction to occur, exactly as we talked about when discussing the rate of reactions (see page 136). Normally these time and temperature ranges are based on certain families of proteins (e.g., collagen, myosin, actin) or polysaccharides like pectin and hemicellulose. We’ll cover temperature ranges for sous vide cooking, along with tips for various items, in the coming pages.
After cooking an egg sous vide, crack it open and drop the egg (without the shell!) into a pot of just-boiled water. Then fetch the egg out immediately. The hot water will rapid-set the outside of the egg for better appearance and easier handling.
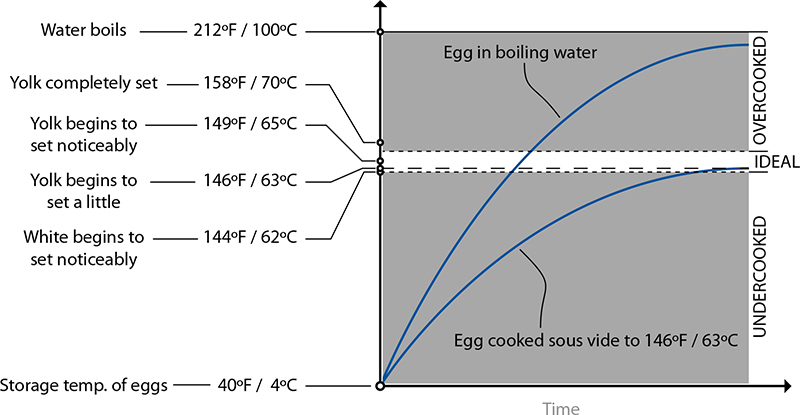
A “perfect” soft-cooked egg should have a slightly runny, custard-like yolk and a mostly set white. Eggs cooked in near-boiling water will overcook if the temperature of the egg ramps up above the “ideal” range before the egg is pulled out. In sous vide, the temperature of the water is equal to the ideal temperature of the cooked egg, so it cannot overcook.
Other points about sous vide cooking:
• Other fluids can be used instead of water, such as oil, or even melted butter. Meats don’t absorb fats the same way that they can water, so using one of these as the liquid medium can allow you to skip sealing, or to seal with fats inside the bag. This can be extremely useful for those foods that might be difficult to vacuum seal. Chef Thomas Keller, for example, has a recipe for poaching lobster tails in a bath of butter and water (beurre monté—melted butter with water whisked in—which will remain emulsified at higher temperatures than butter alone). Even if you’re not using a liquid bath of fats, adding a small amount of liquid inside your bag will help prevent the food from being “squeezed” flat by the vacuum step.
• Temperature-controlled air wouldn’t work, as the rate of heat transfer is too slow compared to water—roughly 23 times slower. Given the low temperatures involved, something like chicken in a 140°F / 60°C “air bath” (like a low-temperature oven) would take so long to come up to temperature that the chicken would spoil. (Thinly sliced meats, though, do heat up quickly enough—this is how beef jerky is made!) Using a liquid such as water ensures that heat can penetrate the food via conduction—liquid touching container touching food—rather quickly.
• Sous vide cooking doesn’t work on all meats and fish: the textures of some foods will break down when held at temperature for any extended period of time. Some species of fish break down due to enzymatic reactions that normally occur at such a slow rate that they are not noticeable in traditional cooking methods.
Sous Vide Hardware
Sous vide cooking requires very little in the way of hardware: a source of heat to keep a liquid bath at temperature, something to hold the liquid, and a way to package the food being cooked. Commercial chefs tend to use expensive professional immersion recirculators dropped in large pans and chamber vacuum sealers; fortunately, there are now several products available for the home cook who wants to try sous vide.
There are two general styles of sous vide units: “clip-on” ones that attach to the side of a pot, and standalone units that have a reservoir that’s better insulated, and thus more energy efficient. Which to use is a matter of counter space and preference. If you’re unsure, go for a clip-on one; they’re cheaper to buy and use less counter space. Search online, or see http://cookingforgeeks.com/book/sousvidegear/ for suggestions on current products.
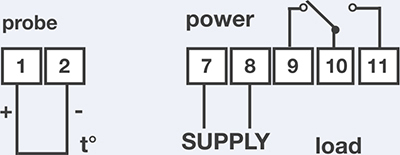
Besides commercial consumer products that supply the heat, a number of emerging products provide the sous vide logic for setups based on “BYOHS” (bring your own heat source). These work by controlling the heat for stovetop burners or appliances like slow cookers: stick a probe thermometer in a pot of liquid or the bowl of the slow cooker, and the device will adjust the burner knob or cycle the appliance power on and off to moderate the temperature. While not as accurate as heater-based sous vide gear, which typically has a water agitator to circulate water to prevent cold spots, the BYOHS method is appealing for its simplicity and cheapness, and many sous vide dishes cooked this way will turn out fine. Hopefully we’ll see more kitchen appliances from mainline manufacturers incorporate digital probes as part of the hardware—why not have a USB port on your stovetop for a probe?—but in the meantime, there’s plenty of fun to be had with wire cutters and rigging up your own sous vide setup.
The other hardware needed is something to package the food being cooked. Traditionally vacuum sealers are used, hence the cooking method’s name. Vacuum-packing food removes air from the package so that air bubbles don’t insulate the food or cause the bag to float, which would prevent the face-up side of the bag from heating up. If you get a sous vide cooker, you really should get at least a cheap consumer vacuum sealer (make sure to get vacuum sealing bags that are heat-safe!).
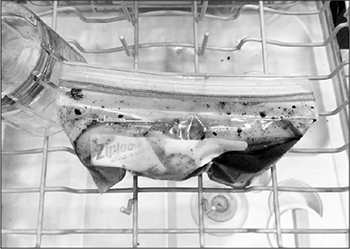
In a pinch, you can use certain brands of resealable sandwich and storage bags (freezer bags work best). To use such a bag, place the food in the bag and add a small amount of marinade, water, or oil (this will help remove air pockets). Then submerge most of the bag in a container of lukewarm water, leaving just the sealing strip at the top above water. Massage the bag to work out any air bubbles, and then seal it. If you’re concerned about plastic, use small canning jars filled with food and marinade (no air!), making sure they are small enough to heat up quickly in the water bath.
Make sure that any plastic you’re using is heat-stable (formulated with plasticizers that are okay with heat) and free of BPA. SC Johnson, the manufacturer of Ziploc bags, does not use BPA and claims its bags are heat-safe up to 170°F / 76°C.
If you’re the type inclined to fiddle with electronics, you can build your own sous vide rig by ordering a few parts online and spending a few hours tinkering.
The actual electronics necessary to maintain a water bath at a set temperature are simple enough: a basic slow cooker or rice cooker, a thermocouple, and a simple thermostat controller to switch the heat source on and off.
First, the cooker. The cooker serves as the brawn, holding and heating water. Snag a cheap cooker—you need one that will turn back on after losing power. Look for a unit that has a physical knob; the digital types reset and stay off after power has been switched off and then restored.

Next, the thermocouple. Hopefully you have a digital probe thermometer, in which case you’re already familiar with a thermocouple: it’s the metal probe used to measure temperature. For a sous vide rig, you’ll need a type J thermocouple, which is made of materials that give it good sensitivity in the temperature ranges of sous vide cooking. (See http://cookingforgeeks.com/book/sousvideprobe/ for an example.)
Finally, the temperature controller. Just about any thermocouple-based temperature switch will work; look for one that runs off 12 volts DC, such as Love Industries’ TCS-4030 (AC units work fine, too, but it’s nice to have less power running around for mistakes). Snag a 12-volt AC/DC power adapter while you’re at it.
Once you have all the parts on hand, it’s a relatively straightforward procedure to perform the lobotomy on the cooker: hook the thermocouple up to the probe inputs on the switch and connect the 12-volt power supply to the switch, then snip the cooker’s electrical cord and run one side of it through the switch. (Feel free to snag an extension cord and interpose on that instead of snipping the cooker’s cord.) Create a small hole in the lid of the cooker and poke the thermocouple through. When cooking, make sure you use enough water so that the thermocouple makes contact with the water when the lid is on.
To see a video explaining all this, see http://cookingforgeeks.com/book/diysousvide/.
Sous Vide Cooking and Food Safety
Sous vide cooking creates amazingly tender chicken, perfect soft-cooked eggs, and succulent steaks. It can also create the perfect breeding ground for not-so-succulent bacteria if done improperly. Here are a few things to be aware of when cooking sous vide:
• The heat involved in sous vide cooking is very low, so it’s possible to violate the “40–140°F / 4–60°C danger zone” rule (see page 170) and its derivative rule, “Thou shalt pasteurize all potentially contaminated foods.” Meats can be cooked to a point where they are texturally done—medium rare, proteins denatured—but have not been held for enough time at temperature to be pasteurized (i.e., had enough bacteria and parasites rendered nonviable). With sous vide cooking, pay attention to hold times to correctly pasteurize foods. A perfect medium-rare hamburger can be cooked and pasteurized with correct hold times!
• Pasteurization is not always an instantaneous process. When cooked to lower temperatures, food must be held at temperature for a sufficient period of time for the appropriate reduction of bacteria to occur. Guidelines that say to cook chicken breasts to 165°F / 74°C are easy to understand because they don’t rely on hold time, plus have a wide margin of error for inaccurate thermometer reading. But you can pasteurize foods at lower temperatures, given longer hold times and accurate thermometers. The hold time for chicken breasts at 140°F / 60°C is around half an hour, meaning the meat needs to reach 140°F / 60°C and then sit at that temperature for at least that long.
• In the US FDA’s Bad Bug Book, the highest survival temperature listed for a foodborne pathogen is 131°F / 55°C, for the relatively uncommon Bacillus cereus; the next highest survival temperature listed is 122°F / 50°C. While these temperatures are below those used in cooking meats sous vide, there’s still a safety issue: given enough time during the heating-up phase, some pathogens can produce harmful toxins. To be safe, make sure that the core temperature of your food product reaches the target temperature within two hours.
• For individuals concerned about safety, sous vide can be a great cooking method: you have the tools to properly pasteurize pathogens. As a guideline, get food above 136°F / 58°C—the lowest temperature given in the US FSIS food guidelines—within a two-hour window and hold it for long enough to pasteurize it. Pay attention to hold times!
You can hold food above 140°F / 60°C for as long as you want; it’s actually safer than storing food in the fridge. The downside is that some reactions, such as enzymatic activity, will continue to occur, leading to potential textural issues when the food is held too long.
• Sous vide cooking methods are either cook-hold or cook-chill. In cook-hold, the food is heated up and held at that temperature until it is served. In cook-chill, the food is heated up, cooked, then rapidly chilled in the fridge or freezer for later use. (Use an ice-water bath to quickly drop the temperature.) With the cook-chill approach, a greater amount of cumulative time is spent in the danger zone: first while the food is being heated, then while it’s being chilled, and then while it’s being heated again. Give preference to the cook-hold method.
Apples are available year-round, but feel free to try this with any firm fruit (ripe pears, peaches, etc.) as poaching fruits will both impart a great flavor and soften the fruit.
In a heat-safe plastic bag or small glass jar, add:
1 |
cup (240 mL) water |
1 |
cup (200g) sugar |
1 |
teaspoon (2g) cinnamon |
½ |
teaspoon (2.5 mL) vanilla extract |
Mix ingredients to combine. Add to fill:
1 |
apple, cored and sliced into about 1/8” / 0.5 cm–thick pieces, optionally peeled |
Seal the bag. Place it on the top rack of the dishwasher and run the dishwasher. Serve poached apples with vanilla ice cream.
Make sure your bag is sealed before you “wash” it!

Douglas Baldwin is an applied mathematician who, failing to find a good guide to sous vide, created one and posted it online for free. (Search online for “A Practical Guide to Sous Vide Cooking.”) He is also the author of Sous Vide for the Home Cook (Paradox Press, 2010).
How did you hear about sous vide, and how did you get involved in it?
I was reading an article in the New York Times by Harold McGee, and he mentioned sous vide. While I knew quite a bit about cooking, I had never heard the term before and was intrigued. So I did what any good geek does: I went to Google and did some research. There was some information, but not enough to meet my curiosity. So I turned to the academic journals and found a wealth of information.
It took me three or four months to collect and distill the 300 or so journal articles I found and publish the first draft of my guide online. I also did some calculations to figure out how long it takes things to cook and how long it takes to make them safe.
What turned out to matter more than you expected when cooking sous vide?
People always worry about the vacuuming process, but that’s really the least important part, even though the name sous vide means “under vacuum.” It’s really the precise temperature control that is important.
Long-term precision is important, because you don’t want slow drifts when you’re cooking for days to cause your meat to be overcooked. But short-term fluctuations in temperature really aren’t that important because they will only affect the very outer portion of the meat. As long as the heat is oscillating less than one or two degrees Fahrenheit and the mean temperature is constant, you should be fine.
Wow! Cooking meats for days? What sorts of meats actually need cooking for that length of time?
Well, my favorite is beef chuck roast cooked for 24 hours at 130°F / 54.4°C. It’s delicious. It transforms one of the least expensive cuts of beef into something that looks and tastes like prime rib.
It’s all about the conversion of collagen into gelatin. This conversion is pretty rapid at higher temperature, taking only 6–12 hours at 175°F / 80°C to completely convert almost everything. But at lower temperatures like 130–140°F / 54.4–60°C, it can take 24–48 hours for the same conversions to occur.
When I look at something like brisket being cooked at 130°F / 55°C for 48 hours, alarm bells go off in my head. Isn’t there a potential bacterial risk here?
Well, certainly there’s no risk at 130°F / 55°C. The pathogen that determines the lowest cooking temperature is Clostridium perfringens. Its highest temperature reported in literature is 126.1°F / 52.3°C. So as long as you’re above that temperature, there won’t be any food pathogens growing.
Now, there is the possibility of spoilage or beneficial microorganisms growing at these lower cooking temperatures. That’s one of the reasons that some people will sear ahead of time or drop the package of vacuum-sealed food in a pot of boiling water for a couple of minutes to kill off any thermophilic microorganisms that might be in there, like lactobacilli. But, in terms of safety, there’s no concern whatsoever.
How about things like salmon, which are cooked at even lower temperature ranges than 130°F / 55°C?
If you would be fine eating the salmon raw, then cooking it for a couple of hours at a very low temperature, say 113°F / 45°C, isn’t going to be a problem. If you wouldn’t be comfortable eating it raw, then you probably shouldn’t be cooking it at anything less than pasteurization temperatures and times.
Most food scientists and food safety experts agree that you should pasteurize fish. Even though it may not taste the same, or possibly quite as good, at least you’ll feel a little more safe.
Food safety is about controlling both the actual and the perceived risk. Many people perceive the risk of fish to be much less than the risk of pork, but in many ways it’s probably the other way around.
In our modern agro-industrial complex, we don’t really know where things come from. With this decrease in knowledge of where our food came from, what field, how it was processed, and how it finally gets to our table, I tend to take the attitude of “pasteurize everything and hope for the best.” Though it may not be what everyone wants or likes to hear.
What are the risks and what can somebody in the kitchen do to partially mitigate those risks?
When you’re trying to deal with food safety, especially when it comes to pathogens, it is about three things. First, starting with a low initial level of contamination, which would mean buying, for example, very good and very fresh fish for which you know the origin. The second is to prevent the increase in the level of contamination and is frequently accomplished with cold temperatures or acids. The third is reducing the level of contamination, usually by cooking.
The problem is that if you’re cooking fish sous vide at only 113°F / 45°C, then you won’t reduce the pathogens to a safe level. So either pasteurize your fish by cooking it at 140°F / 60°C for about 40–50 minutes or make sure that very few pathogens grow and that the fish has a very low amount to begin with by buying from a trusted source.
Can one reduce the level of parasites by freezing?
Parasites, certainly. Though freezing fish at home will affect the quality of fish, because consumer freezers just can’t freeze the fish fast enough to prevent large ice crystals from forming. Now, it’s completely possible that you can buy already frozen, high-quality fish, or simply find out from your fishmonger whether or not it has already been frozen for a sufficient amount of time to kill any parasites.
But freezing won’t kill the different bacterial food pathogens that one might be concerned with, and there’s always the concern of chemical contamination, especially with shellfish that are harvested from questionable waters.
How do you know if something will work when you go to sous vide it?
I never really know, but I like to really scour the research journals for clues to the underlying processes involved. I first look to see if anyone else has already done it. With the wealth of scientific knowledge now available to us through the Internet, it’s very likely that someone has asked and answered a closely related question. Then I just try and adapt it to the home kitchen. It always surprises me how often I can take things directly from an academic journal and apply them in the kitchen.

Cooking Times for Fish, Poultry, Beef, and Fruits and Veggies
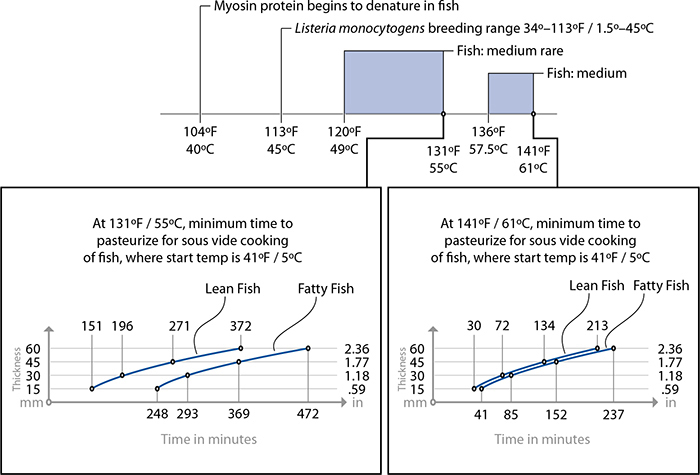
While the principle of sous vide cooking is the same regardless of the food in question, the temperatures required to correctly cook and pasteurize any given food depend upon its specifics. Different meats have different levels of collagen and fats, and denaturation temperatures for proteins such as myosin also differ depending upon the environment that the animal came from. Fish myosin, for example, begins to denature at temperatures as low as 104°F / 40°C, while mammalian myosin needs to get up to 122°F / 50°C. (Good thing, too; otherwise, hot tubs would be torture for us.) Slight changes in cooking temperature can yield improvements in quality—experiment!
Data for the graphs in this section are from Douglas Baldwin’s “A Practical Guide to Sous Vide Cooking”; see the interview with him on page 327 to learn more. If you are going to be using sous vide cooking in a professional setting, I highly recommend consulting Chef Joan Roca’s book Sous Vide Cuisine (Montagud Editores, 2005).
Fish and other seafood
Fish cooked sous vide is amazingly tender, moist, and succulent. Unlike fish that has been sautéed or grilled—cooking methods that can lead to a dry and rough texture—sous vide fish can have an almost buttery, melt-in-your-mouth quality. Other seafood, such as squid, also responds well to sous vide cooking, although the temperatures do vary.
Cooking fish sous vide is so straightforward that you don’t need a recipe to understand the concept. The following tips should help in your experimentation with sous vide fish:
• Fish cooked to a doneness level of medium rare (131°F / 55°C) or more undergoes pasteurization by being held at temperature for a sufficient length of time (see the time-for-thickness graphs provided for lean and fatty fish).
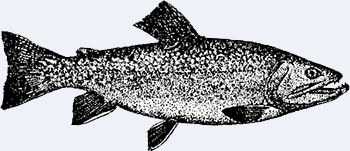
• Lean fish, such as sole, halibut, tilapia, striped bass, and most freshwater fish, requires less time to cook and pasteurize than fattier fish, such as arctic char, tuna, and salmon.
• For fish cooked to a doneness level of only rare (i.e., cooked in a water bath set to 117°F / 47°C), pasteurization is not possible. Thus, if you are poaching salmon at 117°F / 47°C, be mindful that it will not actually get hot enough to kill all types of bacteria commonly implicated in foodborne illnesses. Cooking fish at 117°F / 47°C for less than two hours presents no worse an outcome than eating the fish raw, so the usual precautions for fish intended to be served raw or undercooked apply: buy sashimi-grade, previously frozen fish to eliminate parasites (see page 180), and don’t serve the fish to at-risk individuals.
The US FDA’s 2005 Food Code excludes certain species of tuna and “aquacultured” (read: farm-raised) fish from this requirement, depending upon the farming conditions (see US FDA Food Code 2005 Section 3-402.11b).
• If the type of fish you cook ends up having white beads on the surface after cooking (coagulated albumin proteins), try brining it the next time. Use a 10% salt solution for 15 minutes before cooking. This will “salt out” the albumin via denaturation.
The grocery stores where I live sell frozen fish in vacuum-packed bags. In some cases the fish, which has been cut into individual portions, is frozen in marinade, making it the perfect sous vide–ready food: it’s already vacuum-packed; it has been frozen per FDA standards, thus killing common parasites; and it has been handled minimally, having been frozen and sealed shortly after catch, reducing chances of bacterial cross-contamination.

My favorite use of sous vide—well, besides making so many foods just plain delicious and easy to prepare for dinner parties—is using prepackaged frozen fish to make my daily lunch. My routine is fast, easy, cheap, and yummy:
Drop frozen vacuum-packed fish into sous vide cooking setup, add hot water, and flip on the unit. (Using hot water means I don’t have to wait for the unit to heat up the water, but it’s still running to keep the water at temperature.) Because it’s a single portion, the amount of time it’ll take to thaw is relatively short. Just remember: pasteurization times start once the core of the food has reached the target temperature. With a frozen item, you’ll have a hard time knowing when this occurs. I cook a single portion of fish for long enough to ensure that both thawing and pasteurizing have occurred. And because sous vide cooking is forgiving of longer cook times, for most types of fish leaving it in the water bath for an extra half hour won’t affect the quality.
Go for a run. Go to the gym. Do some errands. Write a section in a book about cooking frozen fish in a bag.
Fish out the bag, cut it open, drop the fish on a plate with some steamed veggies and brown rice, and voilà: lunch.
If you’re preparing yourself a meal to reheat later, you can drop the cooked food into a container with some frozen veggies, which do double duty by acting as ice cubes to rapidly cool the fish down.
The quality of frozen fish can really vary. Frozen salmon from one store can turn out mushy and unappetizing, while the same type of salmon from a different chain can come out moist, succulent, and perfect. This is most likely due to differences in freezing techniques: rapid freezing does less damage to the tissues by limiting the amount of time ice crystals have to aggregate and form larger, dagger-like shapes that can pierce cell walls. If you’ve had bad results with frozen fish, blame the freezing technique, not the fact that it has been frozen.
Chicken and other poultry
One of the greatest travesties regularly foisted upon our dinner plates is overcooked chicken. Properly cooked chicken is succulent, moist, and bursting with flavor—never dry or mealy. The challenge in cooking chicken is that, from a food safety perspective, ensuring pasteurization (sufficient reduction of the bacteria that cause, say, salmonellosis) also overcooks it. “Instant” pasteurization, which is what most recipes call for, happens at 165°F / 74°C, but at this temperature most proteins also denature, giving the chicken that unappealing dry, mealy texture. However, pasteurization can be done at lower temperatures, given longer hold times. Sous vide is, of course, extremely well suited for this: so long as you hold the chicken for the minimum pasteurization time required for the temperature you’re cooking it at, you’re golden. Even if you hold it too long, as long as it’s below the temperature at which actin denatures, the chicken will remain moist. Another benefit of sous vide!

Sous vide chicken breast
As with fish, you don’t need a recipe in the traditional sense to try out sous vide cooking with chicken. Here are some general tips:
• Chicken has a mild flavor that is well suited to aromatic herbs. Try adding rosemary, fresh sage leaves, lemon juice, and black pepper, or other standard flavors, in the bag. Avoid garlic, however, because it tends to impart an unpleasant flavor when cooked at low temperatures. When adding spices, remember that the items in the bag are held tightly against the meat, so herbs will impart flavors primarily in the regions that they touch. I find that finely chopping the herbs or puréeing them with a bit of olive oil works well.
• As with other sous vide items, allow space between the individual items in the vacuum bag to ensure more rapid heat transfer, or place individual portions in separate bags.
“Wait a sec,” you might be thinking, “this ‘sous vide’ thing...how’s it different from a slow cooker?” I thought you’d never ask!
They’re not actually that different. Both hold a reservoir of liquid at a high enough temperature to cook food but not boil water. Sous vide cooking has two advantages over traditional slow cooking, though: the ability to dial in a particular temperature and to minimize the amount of variance that occurs around that temperature.
With a slow cooker, your food cooks somewhere in the range of 170–190°F / 77–88°C. The exact temperature and the extent to which it fluctuates aren’t so important for most slow-cooked dishes. This is because slow cooking is almost always done with meats that are high in collagen and vegetables that have a wide range of acceptable cooking temperatures. As discussed earlier (see page 162), meats high in collagen need longer cook times in order for the collagen to denature, hydrolyze, and transform into something palatable.
However, this leniency in temperature isn’t true for cuts of meat that are low in collagen, such as fish, chicken breast, and lean cuts of meat. For these low-collagen items, cooking needs to denature some proteins while leaving other proteins uncooked (native). The difference in temperature at which different types of proteins cook is only 10°F / 5°C, so precision and accuracy are important. Sous vide wins hands down. It’s not even close.
Try cooking duck legs both ways. Seal up two legs and cook them sous vide at 170°F / 77°C. Meanwhile, prepare a second set of legs in a slow cooker. Cook for at least six hours and then examine the difference.

Sous vide duck legs.

Slow-cooked duck legs.
Beef and other red meats
There are two types of meats, at least when it comes to cooking: tender cuts and tough cuts. Tender cuts are low in collagen, so they cook quickly to an enjoyable texture; tough cuts require long cooking times for the collagen to dissolve. You can use sous vide for both kinds of meat; just be aware of which type of meat you’re working with.
Many chemical reactions in cooking are a function of both time and temperature. While myosin and actin proteins denature essentially instantly at traditional cooking temperatures, other processes, such as the denaturation and hydrolysis of collagen, take noticeable amounts of time at those same temperatures (collagen is a really complicated molecule; see page 162). As with most temperature-dependent reactions, the rate of reaction increases as the temperature increases, so while mammalian collagen will begin to break down at around 155°F / 68°C, poultry legs and stews are often simmered at or above 170°F / 77°C. Even at this temperature, the collagen still takes hours to break down.
The drawback to cooking either type of meat with traditional cooking methods—searing low-collagen meats or stewing high-collagen ones—is that other proteins also denature. Fattier cuts of meat will mask the resulting dryness—hence the premium paid at the butcher counter for meats with good fat marbling. There is another way, though: cooking the meat in a sous vide environment will denature some of the proteins (e.g., myosin) and hydrolyze others (with sufficient time, collagen) while leaving other proteins native, preventing the dryness associated with traditional cooking methods. For low-collagen cuts of meat, the results are stunning: perfectly medium-rare meats in under an hour. For tougher cuts of meats, though, the catch is that the rate of reaction for collagen hydrolysis at these temperatures is so slow that the cooking time stretches into days. This isn’t a problem, technically speaking, as long as you don’t mind the wait.
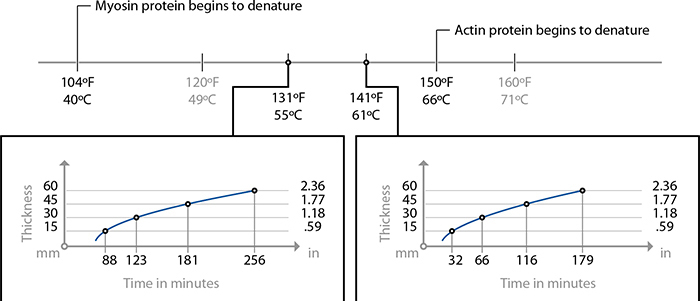
Cooking times for low collagen cuts of meat. For high-collagen cuts, use 24–48 hours at 141 F / 61 C to break down collagen.
One of the primary benefits of sous vide is the ability to cook a piece of meat, center to edge, to a uniform level of doneness. Beef steak tips are a great way to demonstrate this in low-collagen cuts of meat.
Place in a vacuum bag:
1–2 |
pounds (~0.5–1 kg) steak tips, cut into individual serving sizes (~7 oz / 200g) |
1–2 |
tablespoons (15–30 mL) olive oil |
Salt and pepper, to taste |
Shake the bag to coat all sides of the meat with the olive oil, salt, and pepper. Seal the bag, leaving space between each piece of meat so that the sous vide water bath will make contact on all sides.
For medium-rare doneness, cook the meat in a water bath set to 130°F / 54°C for 60 minutes; for medium to medium-well doneness, use 145°F / 63°C for 45 minutes. (See page 166 for a temperature chart.) Remove the bag from the water bath, snip open the top, and transfer the steak tips to a plate. Pat them dry with a paper towel and then drop them into a preheated hot pan, ideally cast iron. Sear each side of the meat for 10–15 seconds. For a better sear, don’t move the meat while cooking each side; instead, drop it on the pan and let it sit while searing.
You can create a quick pan sauce using the liquid generated in the bag during cooking. Transfer the liquid from the bag to a skillet and reduce it. Try adding a dash of red wine or port, a small pat of butter, and a thickening agent such as arrowroot or cornstarch.
Notes
• In sous vide applications, it is generally easier to portion out the food into individual serving sizes before cooking. This not only helps transfer heat into the core of the food faster (less distance from the center of mass to the edge) but also makes serving easier, as some foods—especially fish—become too delicate to work with after cooking. You can still seal all the pieces in the same bag; just spread them out a bit to allow space between the pieces once the bag is sealed. The downside is that vacuum sealing foods can give them an odd edge; be sure to use enough liquid inside the bag to prevent that.
• Add a small amount of olive oil or another liquid inside the bag to displace any small air bubbles that would otherwise exist in a dry-packed bag. The quantities of oil and spices that you use are not particularly important, but the direct contact between the spices and food does matter. If you add spices or herbs, make sure that they are uniformly distributed throughout the bag; otherwise, they will impart their flavor only to the area of meat they are touching. Be careful to not add too much salt, as it appears to stabilize fats from rendering.
Brisket is traditionally braised for many hours in a medium-temperature oven or slow cooker in order to break down the tough collagen in it. In sous vide cooking, we drop the temperature down to a precise 141°F / 61°C, just hot enough to cook it (and prevent spoilage) and trigger hydrolysis of the collagen.
Seal in a vacuum bag:
1–2 |
pounds (0.5–1 kg) high-collagen meat, such as brisket, chuck roast, or baby-back pork ribs |
2+ |
tablespoons (30 mL) sauce, such as barbecue sauce, Worcestershire sauce, or ketchup |
½ |
teaspoon (3g) salt |
½ |
teaspoon (1g) pepper |
Cook the meat for 24-–48 hours at 141°F / 61°C. Cut the bag open, transfer the meat to a sheet pan or baking dish, and broil it to develop browning reactions on the outside of the meat, 1–2 minutes per side. Transfer the liquid from the bag to a saucepan and reduce it to create a sauce. Try sautéing mushrooms in a pan in a bit of butter until they begin to brown and then adding the sauce to that pan and reducing until the sauce is a thick, almost syrupy liquid.
Notes
• If your meat has a side with a layer of fat, score the fat so it doesn’t pull on the meat as it cooks. To score a piece of meat, drag a knife through the fat layer, creating a set of parallel lines about 1” / 2.5 cm apart; then score a second set of lines at an angle to the first set to create a diamond pattern.
• For additional flavors, add espresso, tea leaves, or hot peppers into the bag, along with whatever liquid you use. Liquid smoke (see page 403) can give it a smoky flavor as well.
• If your sous vide setup does not have a lid, be careful that water doesn’t evaporate away, leading to unit burnout or auto-shutoff. One technique I’ve seen is to cover the surface of the water with ping-pong balls (they float); aluminum foil stretched over the top works as well.
Fruits and vegetables
Vegetables, like fish and meats, can also be cooked sous vide. Unlike proteins, the starches in vegetables don’t begin to break down until much warmer temperatures, typically around 180–190°F / 82–88°C. For professional cooks, where consistency and exact reproducible steps are important, cooking vegetables sous vide will produce better results than traditional poaching and blanching.
For the home cook, though, sous vide vegetables raise an “Is it worth it?” question. If you’re sous vide cooking two different parts of a meal at the two different temperatures, then you need to either cook them sequentially, or be willing to pay for two sous vide setups. You can see where this is headed. I’ll confess here that I cook my vegetables the traditional way: blanching in a pot of hot water with a watchful eye, taking care to not overcook them.
Still, you should give sous vide cooking of vegetables a try and compare the outcome with traditional methods. Keeping fruits and vegetables in a sealed bag does keep their juices up against the tissues, leading to stronger flavors. Also consider that the ratios of sugars to starches in your fruits and vegetables will vary, even for the same source, over the course of the year, as weather changes. Expect to adjust cooking times as necessary.
Try this: drop some peeled and halved small carrots or asparagus into a bag, along with olive oil, salt, and pepper; seal the bag; and cook the vegetables at 185°F / 85°C for 10–15 minutes. You may need to rig up some insulation around your sous vide setup if it struggles to maintain temperature; covering with plastic wrap will also help. Asparagus cooked at 185°F / 85°C will remain vivid green; at 203°F / 95°C, it’ll have begun to fade.
Cooking times at 185°F / 85°C
Soft fruits (e.g., peaches, plums): 20–60 minutes
Firm fruits (e.g., apples, pears): 25–75 minutes
Tender vegetables (e.g., asparagus, sliced fennel, peas): 10–60 minutes (longer for thicker slices)
Root vegetables (e.g., potatoes, beets): 2–4 hours
Beyond cooking veggies sous vide, you can do some other useful tricks with them in a water bath. The geeky way to think about cooking is to consider the addition of heat to a system. Adding heat isn’t a spontaneous thing: there will always be a heat gradient, and the difference between the starting and target temperatures of the food will greatly affect both the cooking time and the steepness of the gradient.
This is one reason to let a steak rest at room temperature for 30 minutes before grilling: 30 minutes is short enough that bacterial concerns are not an issue, but long enough to shrink the temperature difference between raw and cooked steak by a third. You can use a water bath to the same effect for vegetables: reduce the heat delta by holding them in a moderate-heat water bath (say, 140°F / 60°C) for 15–20 minutes, and then steam or sauté them.
I often cook steak tips at the same time that I preheat hardy green vegetables like kale or collard greens, using the same water bath for both the steak and the veggies. The veggies don’t actually cook at the temperature that the meat is cooking at! When I’m ready to serve the dinner, I fetch the greens out and give them a quick sauté in a frying pan. Because the greens are already warm, they reach a pleasant cooked texture in just a minute or two. Then I transfer them to a plate and, using the same frying pan, I give the steak tips a quick sear to brown the outsides and finish them off in no time.
There’s another fun trick you can do with vegetables, and this is one where a sous vide setup is definitely needed. Ever wonder why vegetables like carrots in some canned soups are mushy, textureless blobs, but are firm in other brands? It’s not because of differences in the variety of carrots being used. Some vegetables—carrots, beets, but not potatoes—exhibit a rather counterintuitive behavior when precooked at 122°F / 50°C: they become “heat resistant,” so they don’t break down as much when subsequently cooked at higher temperatures. Holding a carrot in a water bath at around 122°F / 50°C for 30 minutes causes enhanced cell-cell adhesion, science lingo for “the cells stick better to each other,” which means that they’re less likely to collapse and get mushy when cooked at higher temperatures or stored for extended periods of time.
During the precooking stage, calcium ions help form additional crosslinks between the walls of adjoining cells, literally adding more structure to the vegetable tissue. Since “mushy” textures occur because of ruptured cells, this additional structure keeps the vegetable tissue firmer by reducing the chance of cellular separation.
The normal solution to mushy vegetables is to refrain from adding them until close to the end of the cooking process. This is why some beef stew recipes call for adding vegetables such as carrots only in the final half-hour of cooking.
For industrial applications (read: canned soups), this isn’t always an option. In home cooking, while you won’t need this trick, it’s a fun experiment to do. Try holding carrots at 120–130°F / ~50–55°C for half an hour and then simmering them in a sauce mixed in with a batch of sliced carrots that hasn’t been heat-treated. (You can cut the heat-treated carrots into slightly different shapes—say, slice the carrot in half and then into half-rounds, versus full-round slices—if you don’t mind your experiment being obvious.)

Try par-cooking vegetables in your sous vide setup at the same time that proteins are cooking. When you’re ready to serve the meal, give the greens a quick sauté to finish them.
Water baths allow for a shortcut in working with chocolate: already tempered chocolate won’t lose its temper if you don’t get it any hotter than around 91°F / 32°C. The desirable forms of fat won’t melt (see page 148), so you’re good to go. To melt already tempered chocolate, seal it in a vacuum bag and submerge it in a water bath set to 91°F / 32°C. (You should be able to go a degree or so warmer; experiment!) Once the chocolate is melted—which might take an hour or so—remove the bag from the water, dry the outside, and snip off one corner: instant piping bag.
If you’re going to be working with chocolate on a regular basis, the sous vide hack will probably get tiring. If you have the dough to spend, search online for chocolate tempering machines. Some vendors sell units that combine a heat source, motorized stirrer, and simple logic circuit that temper and hold melted chocolate suitable for everything from dipping fruit to coating pastries to filling chocolate molds. Of course, if you have a slow cooker, thermocouple, and temperature controller...
My grocery store carries specialty bars of chocolate infused with unusual ingredients: curry powder and coconut; plums, walnuts, and cardamom; even bacon bits. These exotic chocolate bars also carry exotic price tags, so I thought, how hard can it be to make these? With sous vide, it turns out it’s downright simple.

Place tempered chocolate in a vacuum bag. Use chocolate in bar form; chocolate chips might not work if they aren’t as well tempered.
Add your flavorings. Try almonds or hazelnuts (at about a 1:2 ratio—one part nuts to two parts chocolate by weight). Your ingredients should be dry. Any water in them will cause the chocolate to seize up.
Seal the bag, drop it in a water bath set to 91°F / 32°C, and wait for the chocolate to melt, which may take an hour or two.

After the chocolate is thoroughly melted, work the bag to distribute the chocolate and flavorings. You can use a rolling pin to work the fillings around if you’re using something like nuts.
Let the bag rest on the counter to cool.
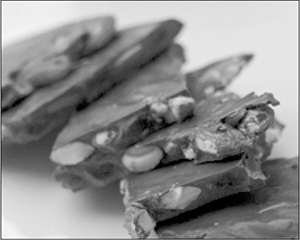
Once cooled, snip the bag open and peel it off the chocolate. You can break the bar up into pieces.
Try using coffee beans (mmm), candied grapefruit rind, dried fruits such as cranberries, or a mix of toasted nuts—almonds, pistachio, and pecans—with maybe a pinch of cayenne pepper. Coconut flakes, toffee pieces, crispy rice cereal, pretzel pieces, potato chips, graham cracker bits...the possibilities are endless!
Making Molds
We tend to take the shapes of foods for granted, but that doesn’t mean we should. There are lots of amazing things you can do with molds besides making heart-shaped chocolates or ice cream cones. You probably don’t think of cake pans or cookie cutters as molds, but they change the shapes of foods: cake pans confine the 3D volume that batters can fill and cookie cutters define the 2D shape of rolled doughs. What sorts of fun arts-and-crafts things can we do to make our own shapes?
A quick primer on molds: molds can be either rigid or flexible and heat-safe or not. Rigid, heat-safe molds are almost always metal (historically copper) and are used for baked foods such as cakes and madeleines as well as cold-setting foods like gels (mmm, Jell-O), chocolates, and sugar decorations. Flexible culinary molds are made with either plastic or food-grade silicone rubber, the latter also being heat-stable.
Before making a mold, think about what food you want to put in or on it. Do you need a heat-safe mold? Does the mold need to be flexible for you to be able to remove the food? Gels are flexible and don’t need to be heated, so even rigid plastic molds work. Jell-O will work (rather boringly so); or get creative and use a flavored panna cotta recipe (see page 424). Heat-safe molds are needed for sugar work—say, shaped lollipops—as well as batters that need to be baked (Bundt cake, anyone?). For these foods, use either metal or silicone molds, opting for either a stiff or a flexible one based on the food.
Enough talk about how molds are normally used. What I want to discuss is how to make your own—in whatever shape you like!
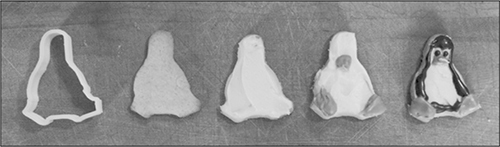
Tux the Penguin cookies, made using a CNC-printed cookie cutter. See http://cookingforgeeks.com/book/cookie-cutter/ for files.
Cookie cutters are easy to create, and making one is a fun holiday project. Plus, you probably already have everything you need on hand. Want an R2-D2–shaped cookie? Grab an empty aluminum soda can, your kitchen shears, and a pair of needle-nose pliers. Snip a round strip from the can, fold in the top and bottom of the strip to create clean edges, and use the pliers to bend and shape the strip. (A cardboard cutout template of the desired shape, R2-D2 or otherwise, will help.) If you happen to have access to a CNC (computer numeric control) printer, you can print a cookie cutter out of ABS plastic molds and wrap it in aluminum foil (ABS plastic isn’t food grade, and some extruder heads contain lead).
Simple crude chocolate and sugar candy molds can be made by pressing an object into a layer of cornstarch. Like with sand casting, pressing an object into the cornstarch and removing it leaves a “footprint” behind. Fill that void with chocolate or hard-crack state sugar (sugar syrup heated to 300°F / 150°C),, let it cool, and voilà! While this method is quick—mmm, chocolate LEGOs—the cornstarch tends to stick to the finished food and the mold doesn’t pick up much in the way of details. It’s a fun experiment that doesn’t require much work, but not likely to be a regular technique.
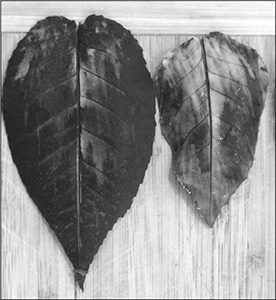
Some molds are just surfaces on which foods are added, cooled, and then removed, such as for making ice cream cones and chocolate leaves. To make chocolate leaves, coat the back side of lemon or rose leaves with tempered chocolate, rest at room temperature for an hour or two, and peel the leaf off. Try coating the leaf with a thin layer of white chocolate first to highlight the leaf venation.
Silicone rubber molds are great at picking up detail (e.g., chocolate coins with recognizable faces) and are usable between –65°F / –53°C and 450°F / 230°C. The downside is availability and cost—you’ll have to order supplies online, and the cost for larger molds can add up. Still, it’s worth it: silicone rubber molds that you see at the store are one-part molds without much detail; the beauty of the DIY option is in detailed multipart molds that can be baked and flexed to pop off of various shapes. Flat objects (coins, keys) and convex objects (no concave shapes, so oddly, asparagus) are easiest to make molds of: drop the object into a flat tray, coat it to cover, let the mold set, remove and flip the object, and then coat the other side. Vintage plastic toys that come from simpler molds (e.g., cars, toy soldiers, dinosaurs) are easy enough to make molds of too: place the toy into a plastic container, coat it to cover, let the mold cure, then unmold the toy and carefully cut the mold in half. (You may need to cut a sprue in before being able to pour food in.)
Plaster of Paris, a.k.a. calcium sulfate, is used to make plaster bandages, which are heat-safe and nontoxic. Plaster bandages are rolls of cloth coated with calcium sulfate; a strip is cut off, dipped in a bowl of water, and wrapped around the object (historically, a broken arm; these days, mainly objects for arts-and-crafts applications). Coat whatever you’re going to wrap—beach ball, tree branch, large tire inner tube—with a generous layer of shortening first, which will act as a mold release, and then cover the object with three to five layers of plaster bandage. If you need to cut the plaster bandages after they’re dry, use an angle grinder with a grit disc. Food-grade calcium sulfate is hard to find (it’s used in making tofu but not in plaster bandages), so you may want to line the mold with parchment paper, depending upon your use.
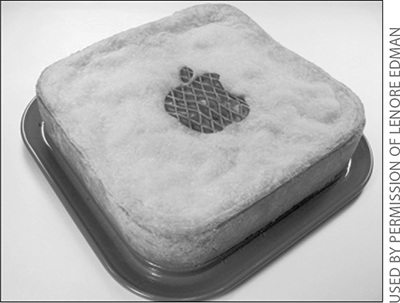
You don’t have to make a mold to get creative: use existing molds in different ways. Bake an “Apple” apple pie in a square cake pan. Use a knife to cut the logo, or do what Lenore Edman and Windell Oskay of Evil Mad Scientist did: use a laser cutter. See http://cookingforgeeks.com/book/appleapplepie/ for details.
Ice cream cones, sugar cone bowls, and even American-style fortune cookies are all the same recipe—a super-sweet sugar cookie—just set into different shapes using different molds. Start with these sugar cone bowls; if you want to get craftier, look online for instructions on how to make molds and templates for sugar cones. (In a nutshell, use thick paper to create a cone, cover it with aluminum foil, and then roll a round disc of sugar wafer around the cone before it cools.)
Expect to have to make a few of these before getting something workable. This recipe should make about 8 small bowls.
Preheat oven to 300°F / 150°C.
In a bowl, thoroughly mix together:
½ |
cup (100g) sugar |
2 |
large (60g) egg whites |
1 |
teaspoon (5 mL) vanilla extract |
½ |
cup (70g) flour |
2 |
tablespoons (30g) butter |
Cut or tear eight sheets of parchment paper, each about the size of a sheet of US Letter paper (8.5” × 11” / 21.5 cm x 28 cm). Each sheet will be used for a bowl; start by baking one at a time, but you can bake them two at a time as you get the hang of it.
Drop about 2 tablespoons of batter on the center of a sheet of parchment paper, and using the back side of a table knife, spread the batter out into a circle of uniform thickness.
Transfer the parchment paper to a cookie sheet and bake the batter in the oven for about 20 minutes, until the entire cookie is a golden brown. (You’ll get a more uniformly brown cookie by baking these at a lower temperature for longer.)

Cookie baked at 300°F / 150°C.

Cookie baked at 350°F / 180°C.
Now, for the mold part: find a drinking glass (that’s made of glass—not plastic!) with a base that’s roughly the shape that you want for your sugar cookie bowl and set it upside down on the counter. Remove the cookie sheet from the oven and, using your fingers, pick up the sheet of parchment paper. Quickly place it upside down on top of the drinking glass (1)—cookie centered over the glass and directly touching it—and continue to hold the parchment sheet in place with one hand. Use your other hand to drape a kitchen towel over the sheet and press down, using the towel as a hot pad (that sugar cookie should be hot!). Use both hands to quickly press the edges of the cookie down the sides of the glass.
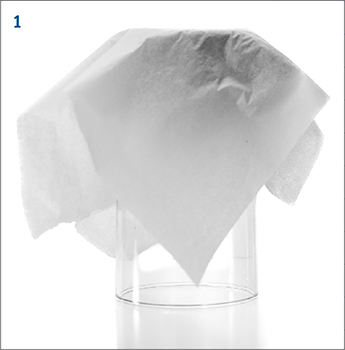
After 20–30 seconds, the cookie will have cooled and set. You can slip it off the glass, and then carefully peel the parchment paper off, tearing it if necessary to work it out of any folds (2).
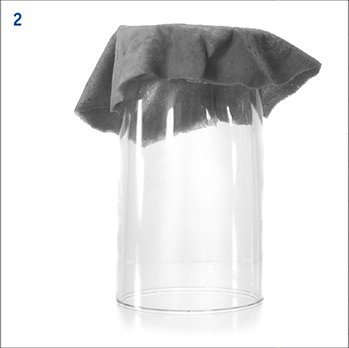
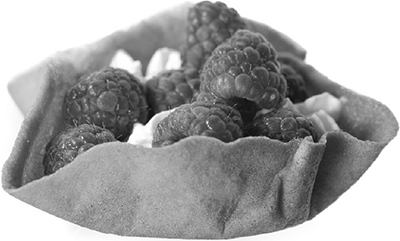
Notes
• Sugar is hygroscopic, so homemade sugar cone bowls will pull in lots of moisture from the air and lose their snap after a few hours. They’re still delicious, of course, just not quite as delicious.
• Try adding seeds or other ingredients—sesame seeds, poppy seeds, candied ginger—to the dough; you can sprinkle these on top around the edges of the flattened-out dough to give the cookie a flavored edge.
How to Make a 500-Pound Doughnut
Doughnuts. Is there anything they can’t do?
—Homer Simpson (“Marge vs. the Monorail”)
Making a monster doughnut on network television is one of those crazy life stories that you never expect to happen to you. But after the first edition of this book came out, I got a call from a production company looking for a food science geek to be in a show for a “network” that “deals with food.”
“How big of a doughnut do you think you could make?” they wanted to know. The show idea was simple: two chefs, each assisted by a pastry chef and a food science geek, would compete to make the tastiest, prettiest, and biggest version of an assigned food. The first (and only) episode of Monster Kitchen was broadcast on July 19, 2011, and showed us making a giant doughnut.
After some reading—yes, a baked doughnut still qualifies as a doughnut—I came up with a plan. I’d make a mold that we could bake in a room-sized industrial oven, Pastry Chef Amy Brown would mix up the batter in a cement mixer, and Chef Eric Greenspan would take care of the doughnut filling. The entire plan hinged on the ability to make a monster mold in the shape of a doughnut. A 5-foot-wide (1.5 meter) mold. As big as Chef Greenspan himself. Yikes.
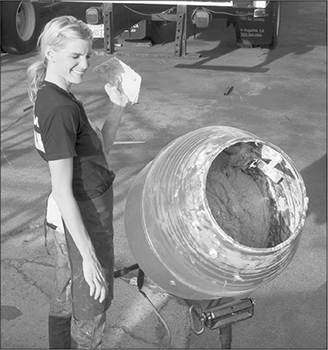
Silicone rubber is often used for food molds, but the curing time would be too long, plus the mold would be too thick for the dough to cook. Metals like copper are also common for food molds, but at this scale a copper mold would be either too flimsy to hold its shape or too thick to manipulate. This left plaster—and plaster bandages, rolls of gauze coated with plaster powder. Bingo! Wet the strips and lay them on the surface of the object you want to create a mold of, and a few hours later they’ll have cured into a hard cast that’s also heat-safe.
For the positive—the item that provides the model for the mold—I needed something torus-shaped, like a white-water-rafting tube. At smaller sizes I could make a positive by crumpling up aluminum foil into the approximate shape and working it, but no way for a 5-foot one. After an admittedly grueling phone and online hunt (thanks, Chris!), we found a tire tube that was just over 5 feet in diameter. I had my materials to make a true torus-shaped mold and something to fabricate the mold around. Add cake batter, bake, and glaze, and you’ve got a monster doughnut.
Mini-monster doughnut mold (for ~1-foot-diameter / 30 cm doughnuts)
1 Make and check a mold positive by crumpling up aluminum foil into a torus shape and then wrapping it in plastic wrap. Check that it’ll fit into your oven (or if you’re daring, your deep-fat fryer) before continuing.
2 Coat the positive with shortening, which will act as a mold release.
3 Create the mold using plaster bandage strips, available online or at craft supply stores. Cut a strip a few feet long, wet it, and wrap it around the positive. Depending upon the size of your mold, either loop the strips around the torus, in which case you’ll have to cut it later, or wrap only the sides and top such that you can remove the aluminum/plastic wrap core later. Repeat until the entire tube is covered, at least 4 or 5 times. (In the show, the mold was wrapped 8–10 times; that was just barely enough for that size.)
4 Allow mold to cure, ideally 24–48 hours.
5 Remove the positive. If you left the bottom uncovered, flip the mold over and pull out the aluminum foil and plastic wrap. If you fully wrapped the mold, cut the top off with an angle grinder (wear a dust mask and eye protection!).
Cake doughnut recipe
The following doughnut recipe, based on Amy Brown’s work, makes fantastic cake-based doughnuts. (Doughnuts are often raised with yeast, but we opted to go with a baking powder and baking soda–based dough for a quicker rise.) Don’t let the “500-Pound Doughnut” title here fool you into thinking you can’t make regular doughnuts with this recipe.
1 In a bowl (for 1 dozen regular doughnuts), Hobart mixer (1-foot-diameter / 30 cm doughnut), or twenty 5-gallon food-grade buckets (5-foot-diameter / 1.5m doughnut), mix:
1 dozen regular doughnuts |
1-foot-diameter doughnut |
5-foot-diameter doughnut |
|
Flour (g) |
516 |
6,192 |
103,200 |
Sugar (g) |
238 |
2,856 |
47,600 |
Baking soda (g) |
3 |
36 |
600 |
Baking powder (g) |
9 |
108 |
1,800 |
Salt (g) |
3 |
36 |
600 |
Nutmeg (g) |
2 |
24 |
400 |
2 In another large bowl (for 1 dozen regular doughnuts or a 1-foot-diameter doughnut), or four 5-gallon food-grade buckets (5-foot-diameter doughnut), mix:
See notes on page 278 for buttermilk substitution
1 dozen regular doughnuts |
1-foot-diameter doughnut |
5-foot-diameter doughnut |
|
Buttermilk (mL) |
192 |
2,304 |
38,400 |
Butter (g) |
64 |
768 |
12,800 |
Vanilla extract (mL) |
4 |
48 |
800 |
Eggs, large (count) |
2 |
24 |
400 |
Egg yolks (count) |
1 |
12 |
200 |
3 Mix dry and wet ingredients, using a spatula for the smaller versions; for a 5-foot-diameter doughnut, mix in four batches in a stand cement mixer. Transfer dough to mold.
For regular doughnuts, roll the dough out to about ½” / 1 cm thickness. Cut it into doughnut shapes using a round punch (a large yogurt container, flipped upside down, will work); punch out the center as well. Fry dough in oil at 375°F / 190°C until golden brown, taking care to keep the heat at the appropriate temperature (use more oil and cook them one or two at a time). Flip doughnuts partway through baking. Once they’re done, transfer to a cooking sheet lined with paper towels to cool.
For 1-foot-diameter doughnuts, bake in an oven set to 350–375°F / 175–190°C until the middle reaches 195°F / 90°C. Remove the doughnut from the oven, cool for at least 30 minutes, and remove the mold. If you choose, optionally fry the doughnut at this point to set the outside to a crispier, mahogany brown color: transfer the doughnut to a sturdy cooling rack and, using a wire to hold that rack, lower the doughnut into a large pot of hot frying oil, fry it, and then lift it out.
For a 5-foot-diameter doughnut, start by baking it in a large oven, somewhere around 350–375°F / 175–190°C, for half a day or so, until the internal temperature reaches 180°F / 80°C. To fry it...well, it’s complicated, involving cranes, sand blasters, welders, dumpsters, and about a million BTU of burners. Thankfully, someone else was footing the bill.
Filling and glazing
As for filling and glazing the doughnut, that’s a personal choice. On the show, we used an egg custard filling and maple glaze, with chocolate-coated bacon strips as sprinkles. Personally, I think powdered sugar is pretty good, and way easier.

Wet Separations
Separating foods is an intriguing chemistry and physics problem that calls for clever solutions (pardon the pun). Many ingredients—olive oil, flour, butter, orange juice—start out as mixtures that involve a separation process to split them, like removing oil from an olive or splitting fat from milk.
How to separate out various parts of an ingredient depends on its properties. There’s the obvious property of size—straining pasta from water is easy—and some liquids, like fresh whole milk, separate on their own when given time. But how would you remove salt from water or separate flavors from liquids? The tools of the industrial world can help us answer these questions, based on differences in aspects like density, boiling points, and even magnetic properties. Here are some of the ways the food industry separates out liquid things:
• Mechanical filtration easily strains solids from liquids, separating pulp from pressed juices and turning cloudy liquids clear. Sometimes a double-whammy approach is taken: adding a temporary ingredient that sticks to cloudy stuff in liquid and then is filtered out to create crystal-clear liquids.
• Centrifuges separate mixtures based on differences in density and are easier to use than the previous option in industrial operations (no filters to clean). Countertop centrifuges can spin a small quantity of liquid, but industry needs something with way more capacity. One option is a decanting centrifuge, which takes a mixture in on one end and then spins the liquid, causing the denser items (pulp in juices, yeast in beverages) to separate out through one pipe while lighter items (fat from milk, vegetable oil from pressed vegetable matter) travel farther and exit through another pipe. Continuous-feed centrifuges are a rather clever way of scaling up mechanical filtration and natural separation.
• Drying, a.k.a. dehydration, works by evaporating water, reducing the moisture content for shelf stability; it changes the texture, color, and flavors of foods.
• Distillation works by evaporating a liquid into a gas and then condensing the gas into another container. The entire liquor industry is based on distillation, and perfumes and many fragrances are also separated out from water this way.
We’ll dive into potential kitchen uses of these separation techniques over the next few pages.
I’d be remiss if I didn’t include two other separation techniques and fun demos of how they work. Neither is useful in the kitchen, but they’re interesting!
• Magnetic separation is used in industrial processing to remove any “ferrous foreign bodies” like bolts or metal shavings that have accidentally entered the food supply. While a consumer countertop magnetic separator isn’t going to do much—toxic metals like mercury won’t respond to a magnetic field—there is a fun demo to show how this works with iron. Toss a handful of iron-fortified breakfast cereal into a blender or plastic bag, pulverize until it’s a powder, and then run a strong magnet through the powder. You should see small black specks coating the surface of the magnet.
• Chromatography separates compounds based on how quickly they travel through another material. I haven’t seen any home applications of chromatography, perhaps because it separates things on such a small scale that it doesn’t lead to culinary bliss. Try marking a paper towel with a row of lines from a few different pens and dipping the edge parallel to the lines into a glass of water. After a few minutes, you should see the various dyes separating out as the water travels through the marks and carries the various pigments different distances.
Mechanical Filtration
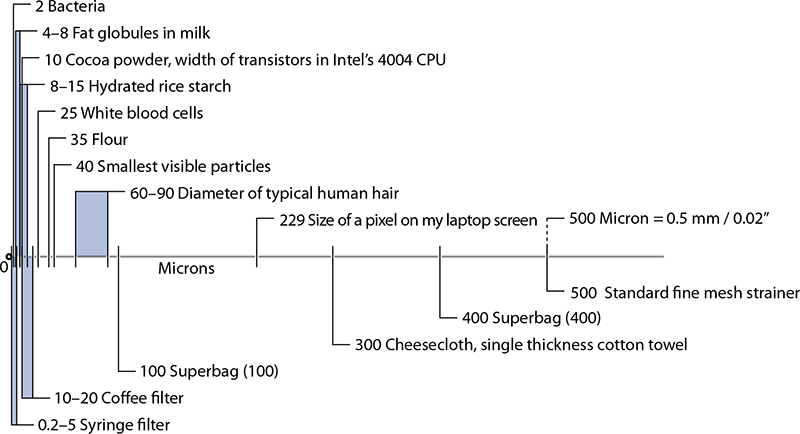
Sizes of common items (top portion) and common filters (bottom portion).
Filtering is a process for separating solids from liquids in a slurry. Separation creates two quantities: the liquid and the solids that are filtered out. Usually it’s the liquid that we want, but the solids can be desirable in some cases. Which filtration method to use depends on the particle size of the solids. You probably don’t think of straining spices and larger particles from something like broth as filtration, but it is (use a simple wire mesh strainer; plastic ones have larger holes, plus they invariably break). In commercial kitchens, a chinois—a conical strainer also used for milling soups and mashed potatoes into a finer texture—is commonly used too.
The interesting stuff with filtration happens at much smaller sizes, and is done in two general ways: the old-fashioned “hey, smaller and smaller holes” way (like running puréed nut milks through a strainer lined with cheesecloth), and a modern method using gels.
You can make your own almond milk by pureéing presoaked almonds and then filtering the purée through a standard kitchen strainer lined with cheesecloth or a clean terrycloth towel, which can trap particulates down in the ~300 micron range (gather up the edges of the towel and squeeze to let the liquid through, if necessary). Or “go industrial” and filter out fine particles with mesh filter sieves—these are heat-safe, reusable, and highly durable filters, typically used by the food industry in pressurized systems but fun to play with at home (search for part 6805K31 on http://www.mcmaster.com).
The more interesting way to filter really small particles is with gels, which can be used to separate out the smallest of solids that produce cloudiness in otherwise clear liquids. Gels work by trapping the particulates, and then the gel structure itself can be removed. The technique isn’t modern: consommé, a clear soup made by clarifying stock or broth, is traditionally made by simmering egg whites in the liquid, which bind to particulates and then coagulate and float, forming a large mass that’s easily removed. And beer and wine makers use isinglass, a collagen derived from fish bladders, to filter the liquids: the isinglass binds with yeast, making denser particles that flocculate and precipitate out. (Sorry, vegetarian beer lovers.)
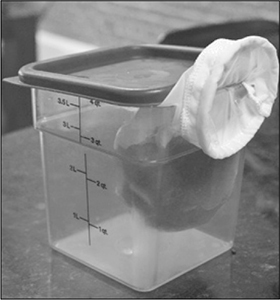
A modern technique for making clarified liquids is to freeze the liquid and drip-thaw it through a mesh filter sieve.
The two common compounds for creating gels for gel filtration are gelatin and agar. If you’re clarifying stock, the gelatin will already be present (from the bones); otherwise, add gelatin or agar (see page 423 for more on agar) to set the gel and then squeeze it through a towel—like the previous description of making almond milk—taking care not to squeeze too hard lest you end up with the gel breaking down and squeezing out of the towel too.
There’s a second, even-more-clever trick that you can do with gel clarifications: drip-thawing. Instead of squeezing the gel through a cheesecloth or towel, freeze and then thaw the gelled liquid in a towel-lined strainer over a bowl (make sure it’s totally frozen before thawing it; and if it’s going to take longer than an hour or two to thaw, thaw it in the fridge for food safety reasons). If the liquid you’re clarifying doesn’t naturally gel, you should add either gelatin (at ~0.5% concentration) or agar (at ~0.25% concentration) to your liquid. The downside of drip-thawing is the time it takes, but you can get clear liquids without needing to hit up the nearest centrifuge.
White stock is one of those ingredients that’s considered foundational to cooking, but given the time commitment and the need for bones, most home cooks just buy a container of it when it’s called for in soups and gravies.
Homemade stock is different from the stuff you buy at the store: it has gelatin in it, so it will set into a gel when chilled. Next time you find yourself with a pile of leftover bones, try making stock from scratch. (You can also ask for “chicken backs” at your grocery store.)
In a large stockpot (6 quart / 6 liter), add the following and sweat the vegetables until they begin to soften, about 5–10 minutes:
2 |
tablespoons (30 mL) olive oil |
1 |
(100g) carrot, diced |
2 |
(100g) celery ribs, diced |
1 |
medium (100g) onion, diced |
Add:
4 |
pounds (2 kg) bones, such as chicken, veal, or beef |
Cover ingredients with water and bring the pot to a slow boil. Add aromatic herbs and spices, such as a few bay leaves, a bunch of thyme, or whatever suits your taste. Try star anise, ginger root, cinnamon sticks, cloves, peppercorns, and Kaffir lime leaves for something closer to the stock used in Vietnamese Phở.
If you have a pressure cooker, transfer the liquid into it and cook it under high pressure for 30 minutes.
Otherwise, simmer the liquid on a burner set to low: 2–3 hours for chicken bones; 6–8 for thicker and heavier bones. Strain and cool the stock; then transfer it to the fridge.
Here’s what straining a batch of white stock in various ways yields, starting with the coarsest straining and going progressively finer. (I removed the bones and vegetable matter with a ~5,000-micron spider strainer before running the stock through the 500-micron filter.)
Note
• To make a brown stock, cook the bones in a roasting pan for one hour at 400°F / ~200°C, and then add ½ cup (~70g) tomato paste in addition to the carrot, celery ribs, and onion listed. Roast the stock for another half hour, then transfer it to a large stockpot and simmer it on a burner set to low, per previous instructions.

500 micron: stuff caught by a chinois or fine strainer.
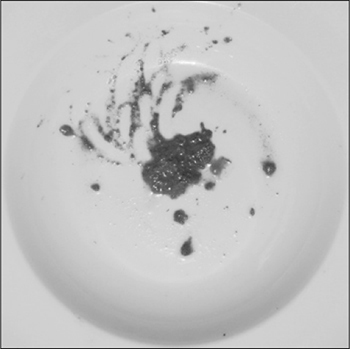
300 micron: stuff caught by a cotton towel.

100 micron: stuff caught by a mesh filter.
To make a drip-filtered consommé, start with a proper stock—not a store-bought one, which won’t contain gelatin. The gelatin is necessary: as with the traditional clarification method of an egg-white raft, the gelatin is what traps any particulates and clarifies the stock.
Once the stock has cooled and gelled (leave it in the fridge overnight), transfer it to the freezer and let it freeze solid. As the water in the stock freezes, it will push the impurities into the gelatin. After it’s frozen, put the stock into a filter sieve or strainer lined with a cotton towel and let it drip-thaw on the counter for an hour, or in the fridge until thawed. The filter or towel will hold on to the gelatin, while the clear consommé will drip through.
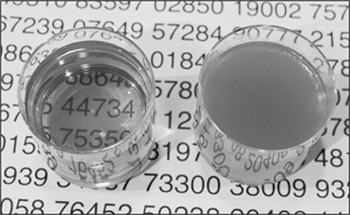
Consommé made via drip-thawing stock (left), compared to the original stock (right) filtered at 100 microns. Note the transparency of the consommé!
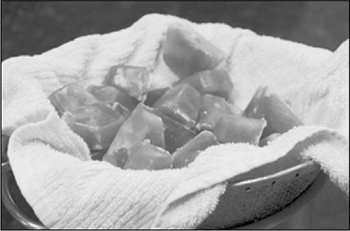
Place frozen stock in a strainer lined with a cotton towel. You can freeze the stock in ice cube trays, as shown here.
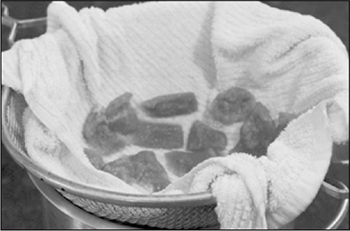
After an hour or two, the stock will have thawed, with the consommé in the pan and the cotton holding on to these weird blob shapes of gelatin.
Centrifuges in the Kitchen
Centrifuges are like your washing machine’s spin cycle gone mad. By spinning objects—clothes, sample vials, tomato juice—at high speeds around a fixed axis, centripetal acceleration causes denser items to separate out faster from lighter things by a process called sedimentation.
Sedimentation normally happens with gravity and time. This causes seasonings to drift to the bottom of salad dressings or packaged items to settle beneath all the foam packing peanuts in a box (although I swear sometimes shippers just stick my order in the box first).
Centrifuges apply way more acceleration than gravity. A thousand g-forces—that’s a thousand times the force Earth’s gravity would exert!—is considered weak by centrifuge standards, although strong enough for many culinary uses. Centrifuges generate a lot of force (well, technically, acceleration), and that force separates compounds via sedimentation very quickly. To put this in perspective, astronauts experience about 2 g-forces during takeoff!
In the culinary world, centrifuges are used by industry. (Low-fat milk does not come from a cow on a diet!) High-end chefs use them, too. Tomato juice, when spun up, separates into three phases, with the middle one looking like clear water (not yellowish at all!) but tasting like tomato. Crushed plant matter—ground nuts, puréed fruits or veggies—can also be spun up to similar effect, making nut oils in minutes (the oil separates to the top, being less dense) and separating out flavorful fats from other plants, which would otherwise be impossible. If you’re lucky enough to have access to a centrifuge, start by spinning tomato juice; the shock of seeing water but tasting and smelling tomato is an unforgettable experience. Check out http://cookingforgeeks.com/book/centrifuge/ to see more.
Drying
You might not think of drying as a separation, but it is: water is separated via evaporation or sublimation when foods are dehydrated. Natural air drying of foods is perhaps the oldest preservation method, and it’s a simple method for transforming foods into shelf-stable versions that won’t spoil or go moldy. Even with modern refrigeration, we still dry foods this way for desirable changes to their texture, creating firm dried fruits, chewy beef jerky, and crispy kale chips.
If you’re lucky enough to live in a warm, arid region, any place where the summertime sunshine pushes the needle above 85°F / 30°C and keeps the humidity well below 60% (ah, California), drying fruit is an easy task. Pick fully ripened fruits, wash and clean them, cut stone fruits in half (removing any pit) and other fruits in slices (peppers and tomatoes, both biologically fruits!), and soak them for 10–15 minutes in lemon juice (or a ~4% solution of vitamin C). Pat the fruits dry, lay them out on a sheet of cheesecloth on top of an oven rack, and dry them during the day for a week or so (bring them indoors at night). If you think your fruit has any insects or insect eggs, freeze the dried fruit (below 0°F / –18°C) for two days or cook it at 160°F / 70°C for half an hour.
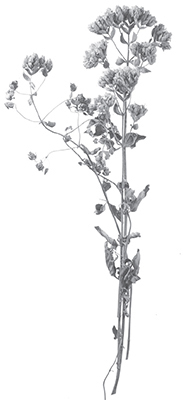
Dry low-moisture herbs like oregano, rosemary, sage, and dill by hanging them upside down in a dark, dry place until the leaves are brittle and crumble when pinched, several days to several weeks.
Why bother? Well, besides handling an influx of 20 pounds of apricots in a week (I grew up with an apricot tree in the backyard), creating your own dried foods can give you access to ingredients that far surpass what you can buy or that don’t even exist commercially. Store-bought paprika, even from good spice sellers, simply cannot compete with what you can make at home. Snag some peppers for making paprika, optionally smoke them if you like smoked paprika (it’s great with chicken; see page 28), and dry them. Once they’re dried, toss them into a blender to pulverize them. (If you have a green thumb, look for NuMex R Naky or Paprika Supreme seeds.)
Freeze-drying is also a dehydration process and works via sublimation—ice evaporating straight to vapor. While it has little impact on shape, flavors, or nutritional values, it’s expensive to do, so it’s generally used only in cases where water weight is an issue, like backpacking and space travel.
If you don’t live in an arid climate—or it’s not summertime—look into getting a food dehydrator. These are essentially boxes with a fan and a heater that speed up evaporation by maintaining air temperature and blowing aside water vapor. The heater isn’t for cooking so much as for maintaining temperature. Water, as it evaporates, will drop the food’s surface temperature, leading to a slower rate of evaporation; the heater fixes that issue and gives a slight bump in temperature to speed up evaporation. Toss in a bunch of sliced apricots or tomatoes and wait a few hours, and presto, they’re dried. (Dip those apricots in melted dark chocolate, by the way. You’re welcome.)
Food dehydrators can be put to other uses as well. Beef jerky, made the old-fashioned way, can spoil or have food safety issues when dried too slowly. A dehydrator fixes that. You can make other jerkies, too: salmon, deboned and sliced ¼” / ½ cm thick and dried for 3–6 hours turns out delicious. Or make your own fruit leathers (thin sheets of chewy dried fruit): purée fruit mixed with a teaspoon of lemon juice per cup of fruit and optionally add sugar to taste, smear the purée on a silicone sheet, and dry it. DIY Fruit Roll-Ups!
While water boils at 212°F / 100°C, it evaporates based on vapor pressure at lower temperatures, assuming the relative humidity is below 100%. You don’t have to heat foods to evaporate their water, although increasing the temperature will increase the rate of evaporation due to changes in vapor pressure.
With just 5 ingredients that take 5 minutes to mix and 5 hours to cook (five-five-five, get it?), there’s no excuse for beef jerky lovers to not make their own: it’ll taste better than packaged stuff, plus you can season it exactly the way you like.
Beef jerky is shockingly easy to make; it’s probably one of the first things humans ever “cooked.” Slice up a good piece of meat, marinate it to add flavor, and dry it out. By sufficiently reducing the moisture content, dehydration makes the meat too dry to support bacterial growth. Of course, it tastes fantastic as well, which is why jerky is still popular today, even with refrigeration.
Fatty cuts of meat will lead to chewier jerky. Leaner cuts of meat left to dry longer will come out drier; too long, and it’ll be crispy.
Snag the following five ingredients:
1–2 |
pounds (~0.5–1 kg) of high-quality beef (use either top round or sirloin cuts; once you’ve tried those, try an eye of round steak if you think you’d like slightly fattier jerky)—finished weight will be about a quarter of your starting weight |
½ |
cup (120 mL) soy sauce |
1 |
teaspoon (5 mL) sriracha sauce, cayenne pepper, or hot chili powder (optional, but gives a nice kick) |
1 |
teaspoon (2g) freshly ground pepper |
4 |
tablespoons (50g) brown sugar |
Mix the marinade ingredients in a bowl. The marinade adds flavor; feel free to add or remove ingredients. Try adding Worcestershire sauce, natural liquid smoke (see page 403), or your favorite hot sauce—or any other flavors you like!
Slice the beef into thin strips using a sharp knife. If you’re having difficulty keeping the meat steady while slicing, pop it in the freezer for an hour to firm it up.
Toss the sliced meat in the marinade. While it’s not necessary to let the meat rest in the marinade, you certainly can do so. Coating the meat with the marinade and proceeding straight to the drying stage will work just fine and save plenty of time, but if you like, stash the covered meat in the fridge for an hour or two.
If you have a food dehydrator, preheat it to ~150°F / 65°C for half an hour. (Check the unit’s temperature using a digital probe thermometer; sometimes the units aren’t that accurate!) Lay the strips of meat onto the trays and pop them into the unit, checking back 5 hours later. If your dehydrator doesn’t pull in fresh air or poorly circulates air, a drying time of 24 hours isn’t unreasonable.
If you don’t have a food dehydrator, line a baking sheet or tray with foil and place a cookie cooling rack on top. Lay out the strips of meat on the rack. Set your oven as low as it goes: ideally around 150°F / 65°C and no lower than 145°F / 63°C. (Too hot, and the meat will crust over and not dry.) Place your tray in the oven, leaving the door cracked open to allow moisture from the jerky to escape the oven and to keep the oven slightly cooler than it’s set.
Five hours later, you should be looking at your first batch of jerky.
Before calling it done, though, you should do one more step: handle some safety issues. Researchers have found that E. coli can survive temperatures of 145°F for 10 hours in these sorts of drying conditions, presumably due to evaporative cooling. Our ancestors didn’t deal with this stuff; they’d just get an occasional bad piece and get ill (or worse). There are two food safety issues you should consider, though:
• Precontamination: If your meat has Salmonella or E. coli along for the ride, it is easily handled by a quick low-temperature heating: pop that jerky in an oven at 275°F / 135°C for 10 minutes. (Traditionalists might abhor this, but it’ll make only subtle changes to the texture.) Alternatively, see page 174 for a pretreatment hot-water-dip method, but the recommendation is still to post-treat the jerky.
• Shelf stability: Okay, this has never been an issue for me, but that’s because I scarf down the jerky pretty much instantly. Still, you should check that you really did dry the meat sufficiently; otherwise, the water activity will be too high (see page 175). Check that your jerky is sufficiently dried by weighing it: dried jerky should weigh about a fourth of the starting weight. Keeping it dry after making it is also important. If you live in a humid environment, the jerky will pull moisture back in. Store it in an airtight container.

There’s another way of separating out solids from liquids in the kitchen: crystallization.
Unexpected crystallization of sugar or water can ruin dishes. Water crystals that grow too large can turn ice cream from creamy to sandy, and unexpected sugar crystallization while you’re making caramel sauce will produce a crystallized mess that looks like the frozen surface of an exotic planet. On the other hand, proper crystallization is what gives chocolate fudge its incredible texture.
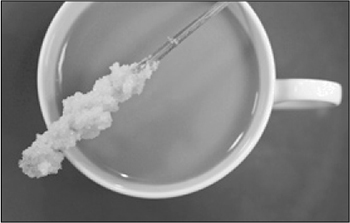
Crystallization can happen when pure substances like sugar are in a supersaturated state—that is, when more sugar is dissolved into a solution than will normally occur. Any seed crystal, even a microscopic amount of the substance arranged in a crystal lattice, can serve as a starting point for the substance to crystallize. This is why recipes for caramel sauce admonish cooks to wet down the sides of the pan while boiling off water: this removes any seed crystals that could lead to that crackled, crystallized mess. (Alternatively, heat slowly and don’t stir—stirring accelerates crystal formation.)
Creating a supersaturated solution is easy: solvents like water will generally (but not always) dissolve more solutes (e.g., sugar) at higher temperatures. Dropping the temperature on a fully saturated solution leads to the chemistry equivalent of an existential crisis: given a seed crystal, the solutes will precipitate back out to the level needed to return the solution to a fully saturated level.
Try making these fancy sugar sticks to see how crystals form and grow.
• 1 cup (200g) sugar
• ½ cup (120g) water
• Narrow drinking glass or small jar
• Wooden cooking skewer (a toothpick will work, but it’s not as nice to use)
• Tape, such as masking tape
• Plastic wrap
• Something to heat and boil the water in
• Food coloring and flavoring extracts (optional)
Dip the wooden skewer into the water to wet the first few inches / ~10 cm, and then dip it into the sugar. This will coat the skewer with seed crystals—starting points for crystallization.
In a saucepan over a stove or in a microwave-safe container, mix together the sugar and water and briefly boil to completely dissolve all the sugar. Allow the mixture to cool for a few minutes, then pour it into the drinking glass or small jar. If you want to make colored or flavored sugar swizzle sticks, add a few drops of food coloring or flavoring extract (use a glycerin-based one; alcohol-based extracts will mostly evaporate away) at this point.
Stretch a piece of tape across the top of the drinking glass and poke the skewer through the tape so that it’s dangling in the center of the glass but not touching the bottom. You might need to use an extra piece of tape around the skewer to keep it from dropping down.
Cover the glass or jar with plastic wrap.
Set the glass someplace where it won’t be disturbed and check it every day as the sugar crystals grow. Remove the skewer when the sugar crystals have reached the desired size, typically after around 5–7 days. (There’s so much sugar present that there’s no need to refrigerate it—bacteria and mold can’t grow.)
What do you think would happen if you used less sugar? Or if you skipped seeding the stick with sugar crystals?
What would happen if you dissolved the sugar in water but didn’t heat the liquid?

Sugar cane can grow to be up to 19 feet / 6 meters tall
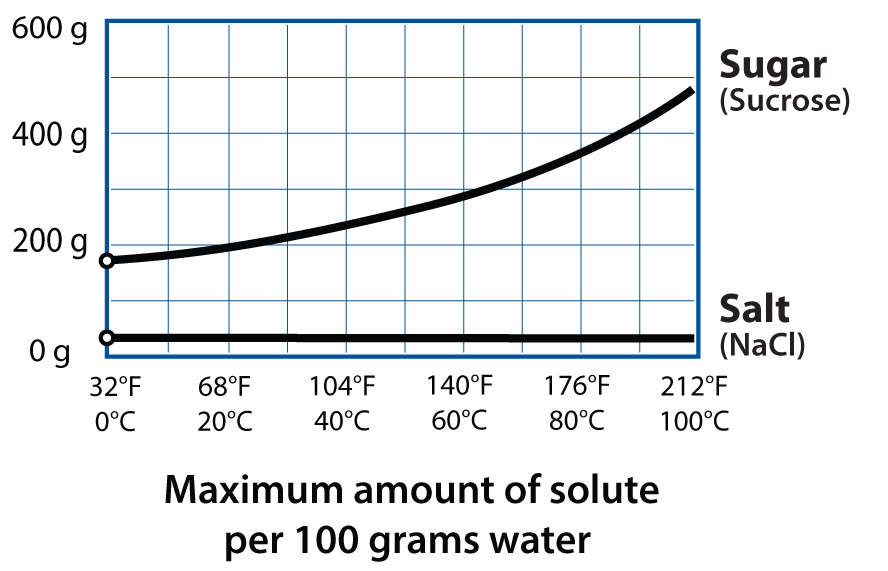
These instructions use sugar crystals as nucleation sites—places where the crystallization can occur. In a perfectly smooth container (difficult to achieve; even a smooth-feeling glass has microscopic bumps), there’s no nucleation site for the separation to occur. The same is true for freezing liquids like water: the ice crystals need a nucleation site to begin to crystallize out.
What do you think happens when there are no nucleation points? Plastic water bottles, still sealed from the manufacturer, can be smooth enough and free enough of impurities to not have any nucleation sites. Try freezing several unopened small water bottles for 2–3 hours and see if you can create a super-cooled liquid—a liquid that’s below its normal freezing point. If one of the bottles remains liquid, you’ve got a super-cooled bottle of water: pour it into a bowl and watch it instantly freeze. For a video demonstration, see http://cookingforgeeks.com/book/supercool/.
Look back at the graph of solubility based on temperature. How would you try to make salt swizzle sticks?

PHOTO OF DAVE ARNOLD USED BY PERMISSION OF JEFF ELKINS HTTP://JEFFELKINSPHOTO.COM
Dave Arnold is the host of the radio show Cooking Issues and author of Liquid Intelligence (Norton, 2014). He previously taught at the French Culinary Institute in New York City, where he instructed students about modern techniques and equipment.
How do you get someone to make the mental leap to think analytically, and to think outside the box, while in the kitchen?
For people who don’t naturally think this way, you can’t expect them to start organically. You just want to give them another set of tools to work with in the kitchen. So we take something that they take for granted, like cooking eggs, and then break it into a zillion little components. We set up grids where we manipulate single variables. This means that we look at two variables at once in a grid format—for example, time against temperature—and manipulate one variable to see how it affects the other.
One of the classic examples is coffee. The variables are knowable, but why is so much coffee, specifically espresso, terrible? There are plenty of people that have machines that are good enough. It’s good to think analytically. If you’re messing around with coffee and you’re changing x, y, and z, it’s the equivalent of standing in front of a big control board with a bunch of dials and then just spinning the dials. To teach someone to make good coffee, you have to teach them how to lock down all their variables and then alter them one at a time. When you’re making espresso, most people choose to alter their grinds as their variable. They find that it’s easier to lock in the temperature, the dosing, the pressure, and then manipulate grinds. It teaches them how to manipulate variables and think analytically about something.
If we’re trying to figure out the variable of temperature with eggs, we’ll just do it. I’ll use a circulator to cook 10 eggs at very precise temperatures. We’ll do it multiple times and we’ll crack them and see what the behavior is. Or we’ll teach people how to make grids to test two different variables in order to figure out something like the effect of heat on searing meat. We’ll set up a tasting grid and they can taste it. I think this helps people to pick up that skill. It’s all about control and the ability to observe.
What sort of hardware have you repurposed for the kitchen?
Basically, a chef is going to want to steal anything that can help them heat differently or homogenize or blend differently. Most of what we use that has been repurposed isn’t necessarily our own ideas. You can crib things off of other people. Everyone is using liquid nitrogen now, which is fantastic stuff.
Even stuff normally found in the kitchen we just use in a different way. A lot of people are doing interesting work with pressure cooking nowadays. We use ultrasonic cleaners and rotovaps a lot. We’ve been running some experiments on torches recently. Why do things that are hit with torches taste like torch? I’m beginning to think that it’s the component added to gases to make them smell so that you can tell when you have a leak. I think the torch flavor is due to not fully combusting all of the stinky stuff. I wanted to crisp something big, and so I fired up the roofing torch with propane, and it didn’t taste bad. I tried to shoot a regular torch through a screen to see whether we could combust any of the torch smell by capturing it on the screen and blowing it through. That also works.
How do you balance experimenting with safety?
Teach yourself as much as you can about the risks involved with any potential new endeavor. The Internet is also good for that, because there are plenty of people who’ve already hurt themselves. Do a lot of research; read a lot of things. There are a lot of opinions out there, and what one person says may not necessarily be true. It doesn’t take too much Googling around to find out that someone has already tried to carbonate something by sticking dry ice in a soda bottle and gotten a bunch of shattered plastic in his face as a result.
You don’t want to stifle anyone’s creativity or their desire to hack around and do things, because that’s the fun of it. But it has to be tempered with a certain amount of base knowledge. Things are dangerous under three circumstances: one, if you don’t know the procedure at all. That’s what happened to the soda bottle guy. He didn’t know the procedures. Two, you’re completely frightened of something, a piece of equipment or a knife. If you decide to use it anyway, you’re more likely to get hurt. Three, when you become complacent. If you’re an inherently cautious person and you don’t become complacent, that’s the safest way to do these kinds of experiments.
What about the safety of used equipment, such as lab gear?
When I got my centrifuge, we bleached and pressure-cooked any parts that would touch any food. When I got my rotovap, I soaked that sucker in a bleach solution and then in boiling water, and then boiling water and bleach. You have biological contaminants and you have poisonous contaminants—all sorts of contaminants. I feel pretty okay that with stainless and glass I can get rid of most bad inorganic stuff, but you just have to pray that you wash enough to get rid of all the organic stuff. From a biological hazards standpoint, you’re worried about prions, you’re worried that someone has been blending up cow brains doing Creutzfeldt–Jakob research or something like that. You can’t cook it away; they’re heat-stable. Then you’re counting on mechanical washing.
I’m curious, what do you do with a centrifuge?
A lot of people buy centrifuges because they think they’re going to get awesome results with a centrifuge. What you really need to do is borrow someone else’s first. All a centrifuge does is separate things based on density.
If you’re cooking, you want a lot of product, because you want to serve a lot of people. It’s not often feasible. Unilever donated a centrifuge to us, and I had more time just to play around. Now we’re doing a lot of things like making our own nut oils, or clarifying things like apple juice, where we’re spinning it down to increase our yield. Also, you can blend olives, cured ones like Kalamata, and then you spin them. It breaks into three layers. You have the best olive brine ever for a dirty martini, hands down. You have a completely flavorless middle layer you throw away. Then you have a really interesting layer of olive oil from cured olives. That’s kind of fun. Expensive, though.
We’re taking things into the kitchen that aren’t from the kitchen, not just laboratory equipment. There’s a whole group of people that make their own chocolates. They use a stone grinder from India that’s used to grind dal. We’ve taken that, and we’re making things that have the textural properties of chocolate, which aren’t related to chocolate at all, like ketchup and mustard. Most stuff in the kitchen is going to be equipment-based, but it’s not necessarily new technology or lab technology. Sometimes it’s just learning new techniques. It’s more of an attitude.
I’ll give you another example: how are you supposed to cook mushrooms? You’re not supposed to soak mushrooms. They always tell you to wipe off your mushrooms.
I usually just do a quick wash. My take has always been that it doesn’t actually absorb that much water.
It actually does. Mushrooms are little sponges, but here is the thing: our contention has always been that it’s just going to take longer to cook. Which is true. We did a test where not only did we soak the mushrooms in slice form but then we crowded the pan—all the things that you’re not supposed to do with a mushroom.
The amazing thing was not that it didn’t make a difference in cooking them, but that the ones that we had soaked and crowded were better. The reason is because while the soaked mushrooms are sitting there giving off their water and stewing in their own juices, they’re collapsing. It’s no longer a sponge to soak up oil, so by the time all the water had boiled off and they started sautéing they had already collapsed, and they weren’t absorbing the oil. The nonsoaked mushrooms, at the end of sautéing, had soaked up all of the oil and in fact wanted more oil. The ones that had been soaked hadn’t even absorbed all of the oil. Some of the oil was still left in the pan.
So just by normal observation, because we had measured things and were trying to figure out what was going on, we realized that everything that they teach you about mushrooms is wrong. You’re not going to measure every time, but you would never pick up on stuff like that unless you were really thinking analytically about what’s going on.
I think it’s actually the key to a lot of this. I think there is a certain something that drives some people to go to lengths, when other people just kind of shrug their shoulders and end up not being as curious.
Right, and that’s why Harold McGee’s website is called “The Curious Cook.” A lot of it is about curiosity, and then after curiosity—and here’s where the real geek thing comes in—is the ability and willingness to actually do something about the curiosity. Go the stupid extra length. Just see whether you can do it.
Evaporation is normally used to get rid of liquid, but what if you want to capture that liquid instead? Distillation—evaporating a liquid from a mixture and then condensing it into another container—separates out solutions based on their physical properties. This process can separate one liquid from another based on differences in boiling points, purify a liquid by leaving behind whatever residues were in solution, or use a liquid as a carrier for volatile aromatic compounds to extract them, as is done for perfumes.
The history of distillation goes way back: the ancient Greeks were known to distill water in the first century; East Asian cultures were distilling an alcoholic drink, arrack, as far back as 800 BCE, and presumably even earlier. These early distillation setups involved nothing more than a container that could be heated and a way to trap and condense the vapors as the liquids evaporated. You can think of it like boiling water in a pot on the stove and having a way to collect the steam that condenses on the lid.
Modern chemists use rotary evaporators (rotovaps), fancy tools that improve on the historical setups. Rotovaps are designed to precisely and accurately control both temperature and pressure, giving fine-grained control over the rate of evaporation of various compounds (rarely are there just two compounds in play). Chefs have made flavorings using a rotovap and everything from common vanilla to offbeat items such as “sea” (using sand) and “the woods” (damp dirt from the forest).
One major advantage of modern equipment is distilling under a vacuum, which lowers the boiling point of the solvent (usually water or ethanol). By dropping the boiling point, this technique leaves any volatile compounds that are heat-unstable undisturbed and uncooked when evaporated, allowing for a larger variety of aromatic flavors to be separated out.
Rotovaps can also be used to remove solvents from a food: reducing water to increase the concentration of fresh-squeezed juices without giving them a cooked flavor, removing alcohol to make whiskey essence, or distilling away both alcohol and water to make sauces such as port syrup without changing their flavor. Unfortunately, rotovaps, like centrifuges, are expensive, and the process of distilling liquids with ethanol is heavily regulated. For this reason, we’re not going to cover how to use them—they’re beyond the realm of practical culinary use—but if you have access to one, try exploring food applications. If you’re curious to read more about rotovaps in cooking, see http://cookingforgeeks.com/book/rotovap/.
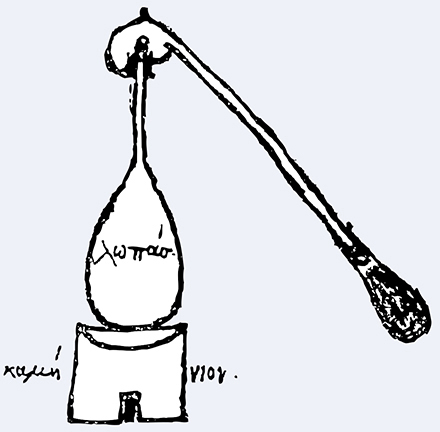
This drawing shows how the 3rd century Greek alchemist Zosimos performed distillations. A container with liquid was heated up, turning the liquid into gas, which was then captured and allowed to condense into a separate container.
Chilling Out with Liquid Nitrogen and Dry Ice
If there were one food-related science demo to rule them all, ice cream made with liquid nitrogen would surely be the winner. Large billowy clouds, the titillating excitement of danger, evil mad-scientist cackles, and it all ends with something delicious for everyone? Sign me up.
While the gimmick of liquid nitrogen ice cream never seems to grow old (heck, they were making it over a hundred years ago at the Royal Institution in London), a number of more recent culinary applications are moving liquid nitrogen (LN2, for those in the know) from the “gimmick” category into the “occasionally useful” column.

Common and uncommon cold temperatures.
But first, a digression into the dangers of liquid nitrogen. Nitrogen is mostly inert and in and of itself harmless, making up 78% of the air we breathe. The major risks are thermal shock and freeze burns, suffocation, and explosions. Let’s take each of those in turn:
• It’s cold. Liquid nitrogen boils at –320°F / –196°C. To put that in perspective, it’s further away from room temperature than oil in a deep-fat fryer: seriously cold. Thermal shock and breaking things are very real concerns with liquid nitrogen. Think about what can happen when you’re working with hot oil, and show more respect when working with liquid nitrogen. Pouring 400°F / 200°C oil into a room-temperature glass pan is not a good idea (thermal shock), so avoid pouring liquid nitrogen into a glass pan. Splashes are also a potential problem, especially for your eyes. Gloves, eye protection, and closed-toe shoes are all good ideas.
• It’s not oxygen. This means that you can asphyxiate as a result of the oxygen being displaced in a small room. When using liquid nitrogen, make sure you’re in a relatively well-ventilated space. Dorm room with the door closed = bad; big kitchen space with open windows and good air circulation = okay.
• It’s boiling. When things evaporate, they like to expand, and when they can’t, the pressure goes up. When the pressure gets high enough, the container fails and turns into a bomb. Don’t ever store liquid nitrogen in a completely sealed container. The container will rupture at some point. Ice plugs can form in narrow-mouth openings, too, so avoid stuffing things like cotton into the opening.
“Yeah, yeah,” you say, “thanks, but I’ll be fine.”
Probably. But that’s what most people think who end up being given, posthumously (posthumorously?), a Darwin Award (for stupid actions that eliminated them from the gene pool). What could possibly go wrong once you get it home? One German chef blew both hands off while attempting to follow a liquid nitrogen–based recipe. And then there’s what happened when someone at Texas A&M University removed the pressure-release valve on a large dewar—an insulated container designed to handle liquid gases—and welded the opening shut. From the accident report:
The cylinder had been standing at one end of a ~20’ × 40’ laboratory on the second floor of the chemistry building. It was on a tile-covered, 4–6” thick concrete floor, directly over a reinforced concrete beam. The explosion blew all of the tile off of the floor for a 5’ radius around the tank, turning the tile into quarter-sized pieces of shrapnel that embedded themselves in the walls and doors of the lab... The cylinder came to rest on the third floor, leaving a neat 20”-diameter hole in its wake. The entrance door and wall of the lab were blown out into the hallway. All of the remaining walls of the lab were blown 4 to 8” off of their foundations. All of the windows, save one that was open, were blown out into the courtyard.
“Okay, I promise to be safe. Where do I get some?”
Look for a scientific gas distributor in your area. Some welding supply stores also carry liquid nitrogen. You’ll need a dewar. Dewars come in two types: nonpressurized and pressurized. Nonpressurized dewars are essentially large insulated containers and are what you should use. The pressurized variety has a pressure-release valve—allowing the liquid nitrogen to remain liquid at higher temperatures, increasing the hold time—and is generally supplied with larger industrial orders.
Standard lab safety protocols for driving small quantities of liquid nitrogen around usually state that two people should be in the car and that you should drive with the windows down.
Small quantities of liquid nitrogen in nonpressurized dewars don’t require hazmat licenses or vehicle placarding when properly secured and transported in a private car (at least where I live). Some jurisdictions consider it a hazardous material, though—after all, handled improperly, it can and will cause death—so check into transportation of “material of trades” for your locale.
When it comes to working with liquid nitrogen, I find it easiest to work with a small quantity in a metal bowl placed on top of a wooden cutting board. Keep your eyes on the container, and avoid placing yourself in a situation where, if the container were to fail, you would find yourself getting splashed.
Don’t sit at a table while working with it. And placing a noninsulated container, such as a metal bowl, directly on the countertop is not a good idea. I once cracked a very nice countertop with an empty but still cold bowl during a talk (I’m still sheepishly apologizing for it).
One final tip: when serving guests something straightaway after contact with liquid nitrogen, use a digital thermometer to check the temperature to make sure the food is warm enough. As a guideline, standard consumer freezers run around –10°F / –23°C.
Making Dusts
One of the classic “silly things you can do with liquid nitrogen” is to freeze a leaf or a rose and then whack it against something to shatter it. Unlike traditional methods of freezing, liquid nitrogen freezes the water in the plant so quickly that the ice crystals do not have time to aggregate into crystals large enough to pierce the cell walls and destroy the tissue, meaning the leaf or flower won’t wilt when thawed.
In culinary applications, you can use this same property to create “dust” from plant material. Lavender flowers, for example, can be rapidly frozen, crushed with a mortar and pestle (which need to be chilled in a freezer to keep the frozen plant material from thawing), and then allowed to thaw back out. Some chefs have frozen larger items—beets, for example—causing them to shatter in an organic pattern that couldn’t be obtained with a knife.
Making Ice Cream
The standard formula for LN2 ice cream goes something like this:
cream + flavoring + liquid nitrogen + whisking / mixing = 30-second ice cream
Unlike with traditional ice cream bases, you don’t have to worry about the ratio of fats to water to sugar, at least for ice cream that will be consumed immediately. (Like there’s any other type.) Traditional ice cream bases rely on precise ratios of the ingredients to get something that has a freezing point over a broad range, making for some fascinating microscopic-level structures. Liquid nitrogen ice cream is closer to soft-serve ice cream: it’s frozen right at the point of consumption and isn’t set as hard. Freezing a batch of LN2 ice cream will give you something closer to a block of frozen milk if the milk fat ratios aren’t high enough.
The other benefit to LN2 ice cream is the lower temperatures in play, which are cold enough to freeze ethanol. While you can make ice cream with a small quantity of alcohol using traditional methods, in those versions the alcohol brings only a mild flavor. With liquid nitrogen, you can make a scoop of ice cream flavored with enough alcohol to really kick the flavor up, producing results unlike anything you’ve had before.
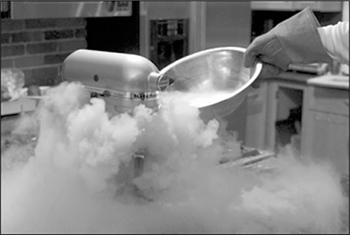

Be sure to take the necessary safety precautions!
To watch a video of making liquid nitrogen ice cream, see http://cookingforgeeks.com/book/icecream/.
This is my favorite flavor of LN2 ice cream, probably because it’s 20% Goldschläger, 9% alcohol, and 100% delicious. It’s a great example of an ice cream that can’t be made using a traditional method.
In the metal bowl of a stand mixer, mix:
1 |
cup (240 mL) milk |
1 |
cup (240 mL) heavy cream |
¾ |
cup (180 mL) Goldschläger (cinnamon schnapps) |
¼ |
cup (60 mL) chocolate syrup |
3 |
ounces (85g) bittersweet chocolate, melted |
2 |
tablespoons (25g) sugar |
½ |
teaspoon (3g) salt |
½ |
teaspoon (1g) cinnamon |
Taste the mixture to check the balance (try not to drink it all at this point), and adjust accordingly. Once frozen, the mixture will not taste as strong, so an overly strong mixture is desirable.
Turn your stand mixer on and (carefully! with goggles and gloves!) slowly pour in the liquid nitrogen. I find it takes about a 1:1 ratio of mixture to liquid nitrogen to set the ice cream. If you don’t have a stand mixer, you can also do this in a metal bowl and stir with a whisk or wooden spoon.
Note
• To melt the chocolate, microwave the milk and then add the chocolate to the hot milk. Let it rest for a minute, so the chocolate warms up, and then mix to combine. You can nuke the chocolate directly as well, but I find it easier and less likely to burn doing it this way.
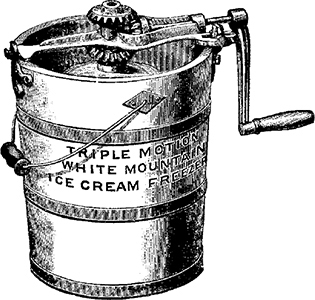
If a griddle cooks foods by adding heat, it should follow that an anti-griddle “cooks” foods by removing heat. A few high-end restaurants make some of their novelty dishes using a super-chilled surface to set the outside of gels and puddings in a few seconds, creating a food that’s crunchy-cold on the outside and creamy warm in the middle, almost like a molten ice cream pop.
You can make a do-it-yourself version by using dry ice, ethanol, and a flat piece of metal, like a mini–cookie sheet. (I happen to have a small chunk of stainless steel that I ordered from an industrial supply house, so that’s what I use.)
Here’s how it works:
Rig up a bed of crushed dry ice. Try using a cookie sheet placed on top of a wooden cutting board. The cookie sheet will hold the dry ice/ethanol slurry, and the cutting board will provide insulation between the extremely cold cookie sheet and your countertop. Alternatively, if you have the lid to a Styrofoam container, using the inside, indented part can serve both purposes.
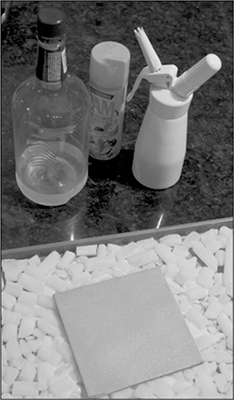
Pour a small amount of rubbing alcohol (or cheap vodka) onto the bed of crushed dry ice—enough to create a level top. The ethanol will remove any air gap between the pieces of dry ice and the “griddle” surface, and it won’t cause the dry ice to froth in billowy clouds like water would.
Plop the square of metal on top of the ethanol-topped dry ice. It should be a complete contact fit. Give it a few minutes to chill.
Coat the top surface of the stainless steel with a nonstick cooking spray, butter, or oil.
Drop the food you want to freeze on the surface, smoothing it out into a flat disc shape if desired. You can make a frozen lollipop by dropping a popsicle stick or skewer into the liquid as it sets; after 10 seconds or so, use a spatula to flip it and set the other side. Or you can try the chocolate mousse recipe from earlier in this chapter (see page 301); almost any pudding or thick custard base will work.
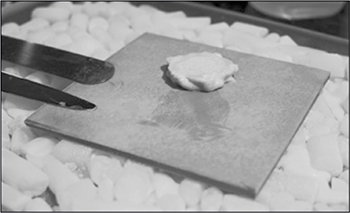
Cooking with a Lot of Heat
20 minutes at 300 degrees is the equivalent of 5 minutes at...let’s see...(mumbles) 1,200 degrees.
—Marge Simpson, baking a cake (“24 Minutes”)
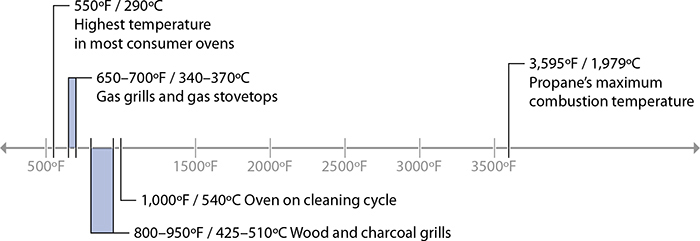
Common and uncommon hot temperatures.
If cooking at 300°F / 150°C produces something yummy, surely cooking at 1,200°F / 650°C must do the same in a quarter the time. Well, okay, not quite—if I said anything otherwise, hopefully your mental model of how heat is transferred through food and the importance of time and temperature would have you slamming this book shut while muttering something unfit to print.
But there are some fun edge cases, just as there are with “cold cooking,” where extremely high heat can be used to achieve interesting results. (And dangerous results—lighting your barbecue in two seconds with liquid oxygen? Yikes.) Let’s take a look at a few dishes that you can make by transferring lots of heat using blowtorches and high-temperature ovens, without melting the appliances.
In cooking, we generally avoid heating the surface temperatures of food above 380°F / 195°C, for good reason: that’s about the upper limit for burnt sugar to not taste like charcoal. Above this temperature, the next set of chemical reactions involves proteins and carbohydrates just tasting nasty. But in small quantities, we enjoy some of these reactions, using words like charred—char having an etymology of “to blacken,” hence charcoal. Charred, grilled, barbecue: all these words describe foods whose surface temperatures get hot enough to just barely burn, and that’s where broilers, searing-hot pans, and grills all come in: they transfer a lot of heat into food. But what about cases where you want to transfer a lot of heat to just one part of a food? Break out a blowtorch.
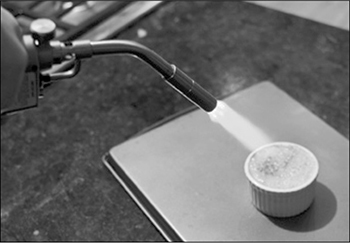
You can create a quick work surface for blowtorching by flipping a cookie sheet upside down and setting the ramekins on top.
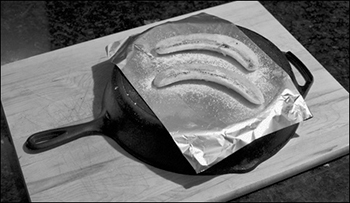
“Upgrade” Bananas Foster—a simple and tasty dessert with butter and sugar and cooked bananas—by sprinkling sugar on the cooked bananas and then using a blowtorch to caramelize the sugar. Need a quick work surface? Flip a cast iron pan upside down and line it with foil.
Blowtorches can be used to provide very localized heat, enabling you to cook just those parts of the food at which you aim the flame. (Flamethrowers can be used too. I’m not going to confess to how much time I spent watching videos I found when searching for “flamethrower cooking.”) Torching tuna sushi keeps the interior raw but adds that charred flavor. Roasting peppers blisters their skin off without overcooking the inside. Browning meats cooked at low heat (sous vide or poached) quickly finishes off the outside. And, of course, creating the sugary crust on crème brûlée is the canonical excuse for a blowtorch in the kitchen. (A broiler will work too, if you run out of fuel.)
When it comes to buying a torch, skip the “gourmet” torches and head to a hardware store to pick up a real blowtorch. The smaller torches sold specifically for the kitchen work okay, but they don’t pack the same thermal punch as the hardware-store variety, which have larger nozzles and thus larger flames. Depending on taste sensitivity, some people may notice an “unburned fuel” taste (sometimes called “torch taste”) created by the fats and compounds in meat breaking down under extremely high temperature (fat is fuel, after all, and undergoes chemical reactions). If you’re noticing this, back off on the heat, and if your torch allows for it, increase the amount of air being mixed in!
Practice using a blowtorch by melting sugar sprinkled on a sheet of aluminum foil on top of a metal cookie sheet or cast iron pan. Don’t get the flame too close; this is the most common mistake people make when cooking with a blowtorch. The blue part of the flame is hottest, but the surrounding air beyond the tip will still be plenty hot. (You’ll know you’re definitely too close when the aluminum foil begins to melt, which happens at around 1,220°F / 660°C.) The trick with blowtorches is to heat up the area in passes, waving the torch back and forth over the total surface, so that you don’t linger on one spot and overheat it.
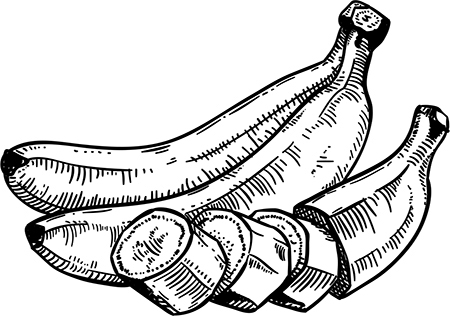
How to Cook a High-Heat Pizza
A serious examination of pizza is clearly a must-have for a book called Cooking for Geeks. Pizza covers so many variables: flavor combinations, Maillard reactions, gluten, fermentation, moisture levels, and temperature. We’ve covered most of these elsewhere in the book, but we haven’t yet talked about temperature, which is key to a good crust.
Great thick-crust pizzas have a great interior that comes from good dough that’s baked at moderate temperatures. My local delicious thick-crust pizza place runs its oven at 450°F / 230°C in the winter, 350°F / 180°C in the summer. (The oven can’t be run any hotter in summer without the kitchen becoming unbearable; they just bake the pizzas longer.) Easy enough.
But if you want to make a crispy thin-crust pizza, high heat is critical for creating a great crust. The lower temperature bound I’ve found acceptable for great flat-crust pizza was 600°F / 315°C. At 700°F / 370°C, the crust becomes noticeably better. The best thin-crust pizzas I’ve had were cooked in wood-fired brick ovens or on a grill over wood charcoal with temperatures running between 750°F / 400°C and 900°F / 480°C. Sadly, most ovens max out at 550°F / 290°C, making great thin-crust pizza hard to do in the oven. What’s a thin-crust-pizza-loving geek to do? If only there were a flow chart for this...
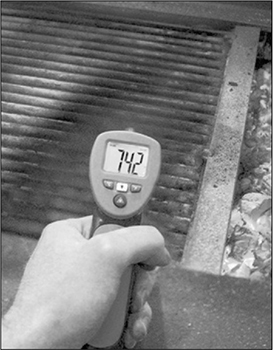
Wood charcoal grill temperature: 742°F/ 394°C.
Wood grill method
This is by far the easiest method. Grills fueled by charcoal or wood get hot, easily up into the 800°F / 425°C temperature range. (Propane grills tend to run cooler, even though propane itself technically burns hotter.)
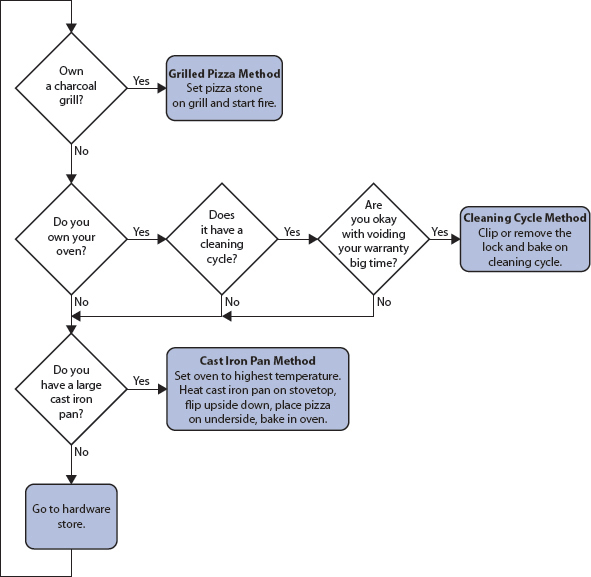
Place a pizza stone on top of the grill and light the fire. Once the grill is hot, transfer the pizza with toppings onto the grill. Depending upon the size of your grill, you may be able to cook the pizza directly on top of the grill, sans stone—give both a try!
Superhot cast iron pan method
Grill-lusting apartment dwellers have to get creative to create high-heat pizza. While most ovens limit the temperature to 550°F / 290°C, both the oven’s broiler and the stovetop reach higher temperatures.
Preheat the oven to 550°F / 290°C, or as hot as it goes.
Heat up an empty cast iron pan on the stovetop at maximum heat for at least 5 minutes.
Switch the oven to broiler mode, transfer the hot cast iron pan to the oven, flipping it upside down and setting under the broiler set to high. Par-bake the pizza dough until it just begins to brown, about 1–2 minutes.
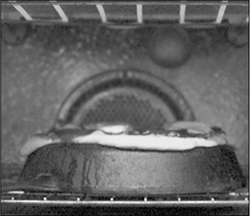
Superheated cast iron under a broiler.
Transfer the dough to a cutting board and add sauce and toppings. Transfer the pizza back to the cast iron pan and bake until toppings are melted and browned as desired.
Cleaning cycle method (a.k.a. “oven overclocking”)
While consumer ovens top out at 550°F / 290°C, that doesn’t mean they can’t get hotter. It’s just dangerous, voids your warranty, and, given that the alternative ways of getting this kind of heat are far easier, is really not worth doing. Still, in the name of science...
To make your base, see the No-Knead Pizza Dough recipe and accompanying pizza-making instructions in “Pizza Dough—No-Knead Method” on page 271.
Ovens get a lot hotter—a lot, lot hotter—when they run in the cleaning cycle. The problem is that ovens mechanically lock the door, preventing you from slipping a pizza in and out, and leaving a pizza in for the entire cleaning cycle will result in less-than-tasty charcoal.
Cut or remove the lock, however, and ta-da! You’ve got access to a superheated oven. After some fiddling, I took my oven to over 1,000°F / 540°C. The first pizza we tried took a blistering 45 seconds to cook, with the bottom of the crust perfectly crisped and the toppings bubbling and melted.
However, the center of the pizza never had a chance to heat up, so the 1,000°F / 540°C pizza wasn’t quite right. Another attempt at around 600°F / 315°C was remarkably good but didn’t capture the magic of the crispy thin crust and toasty-brown toppings. At around 750–800°F / 400–425°C, however, we started getting pizzas that were just right.

Ovens aren’t designed to have their doors opened when running in the cleaning cycle. Honestly, I don’t recommend this approach. I broke the glass in my oven door and had to “upgrade” it, although it is cool to have bragging rights to an oven sporting a piece of PyroCeram, the same stuff the military used for missile nose cones in the 1950s. Given that an upside-down cast iron pan under a broiler or a wood-fired grill turns out delicious flat-crust pizzas, I’d recommend skipping the oven overclocking, as much fun as it is.
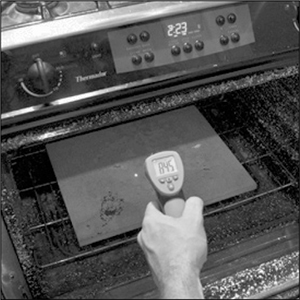

PHOTO USED BY PERMISSION OF NATHAN MYHRVOLD
Nathan Myhrvold, formerly CTO of Microsoft, is the coauthor of Modernist Cuisine (The Cooking Lab, 2011), which covers modern techniques of cooking and won the 2012 James Beard awards for Cookbook of the Year and Cooking from a Professional Point of View.
Tell me about your background with food and how you came to be so interested in it.
I’ve been interested in food as long as I’ve been alive. When I was nine years old, I announced to my mother I was going to cook Thanksgiving dinner. I went to the library, got a bunch of cookbooks, and I did. Amazingly, she let me do it, and even more amazing, it worked out!
In 1995, while I was working at Microsoft as a senior vice president, I decided that I wanted to go to cooking school. I took a leave of absence and went to a school in France, l’Ecole de Cuisine La Varenne. I went through an intensive professional program. After retiring from Microsoft, I started my own little company, but I’d been interested in food and so decided to write a book.
There were lots of big, thick books on cooking, teaching you how to do classical cooking, but there was no modern technique within those books; they were all about the techniques of the past. I got the notion that there really was an opportunity to write a book about modernist cuisine—something that would be encyclopedic for the techniques of modern cuisine.
If I didn’t do it, it’s not clear that anyone else would, at least not for a very long time. I decided that this was my way to make a contribution to the food world. I could create a book many years sooner than anybody else because of the time, energy, and money involved. It could do something unique in terms of bridging the gap between the understanding of science and the practice of cooking in an accessible way.
What’s your definition of modern cooking? The term that would come to many people would be molecular gastronomy.
I deliberately don’t use that name. The term that I’m using is modernist cooking. I call it modernist because it’s analogous to what modernist architecture and modern art did in that it is a somewhat self-conscious attempt to break with the past. It has all of the intellectual hallmarks of modernism.
That happened a hundred or fifty years ago in art and architecture, but not in cooking. There are chefs who take offense to it if you call it molecular gastronomy. It’s not a terrible name per se, but it means so many different things to different people. Modernist is a more inclusive term.
Can you give me an example of something that’s surprised you in studying these techniques?
There’s a cooking technique called confit that means “preserved” in French. You cook the meat in oil or fat at a relatively low temperature for a long period of time, like 8 or 12 hours. Any chef would tell you that confit is a cooking technique that involves cooking in fat, which has a characteristic effect on the meat.
One day we were discussing this, and I said, “How can this possibly work? How can cooking meat in oil actually change the meat? That makes no sense to me at all. The molecules are actually too big to penetrate into the meat. It’s got to be on the outside and so on and so forth.”
So we did a bunch of experiments, and it doesn’t really have the effect that you would think. If you steam meat without any oil and you put oil in at the end, you can’t actually tell the difference.
Presumably you can’t do it just in a water bath with no fat.
We did that, too. You can’t tell the difference! You can tell the difference if you cook it at a different temperature or for a different period of time. But if you’re cooking at the same temperature and time, whether it’s sous vide or steamed or cooked confit, you really can’t tell the difference afterward. That was a big shock to us.
There’s a bunch of other things that have been quite surprising in determining how techniques work. People will frequently drop meat into ice water to stop the cooking. It’s called shocking.
Suppose you’re cooking a big roast or something that’s got some thickness to it. A lot of books will say take it out and then plunge it in ice water to really stop the cooking. It doesn’t work at all! The temperature at the core of the meat will not be affected by you dumping it in ice. You will cool the whole thing by dumping it in ice water, but it’s not actually going to affect the maximum temperature the core reaches.
Heat and cold “travel” at the same speed. It’s not exactly correct, but if you think about a wave of heat going from the outside in, shocking it is going to put a wave of cold, a “negative” wave of heat. But it doesn’t go faster, and the hot wave that started before will hit the center before the cold wave does.
Wow, that makes a lot of sense. Are there other examples of processes that you’ve discovered that apply to the way that most people cook on a day-to-day basis?
One of the things that we’ve spent a bunch of time on in the book is explaining the role of humidity in cooking. Most food is wet. When you heat wet things, they give off water and that takes a tremendous amount of energy to do. The rate at which the water evaporates depends on what the humidity is.
If you cook something in Aspen in the winter when the humidity outside is really low, and you cook that same thing in Miami in the summer when the humidity is very high, you actually get radically different results. It can make a 10 degree [6°C] difference in the temperature that the food is experiencing, particularly at the onset.
We went through a whole bunch of examples like this. It turns out that humidity is a huge factor in how cooking actually happens. A convection steam oven controls the humidity, and that’s its huge advantage. One of the advantages of sous vide is you seal the food up in a plastic bag where there is no variation in humidity. But if you’re cooking out in the open air, humidity actually makes a big difference. That’s one of the reasons that people don’t have their recipes turn out quite like they thought.
Is that something that’s important to absolutely every cook in America? I can’t tell you that it is. I think it’s kind of cool; it certainly will matter to professional chefs. Every chef has had the situation where they try the recipe in the book and it doesn’t work, or the chef travels and the food doesn’t quite turn out right. This is one of the reasons. If you’re not controlling humidity, it’s a free variable, and it will make a big difference.
People don’t generally understand how much energy it takes to boil water. This dramatically affects cooking. If you just look at the latent heat of vaporization of water, it takes 4 joules of energy to move a gram of water 1 degree Celsius, 400 joules to take it from just above freezing up to the edge of boiling, and 2,257 joules to boil it. That’s why steam engines work. All kinds of things are driven off this one fact.
How do you think what you’ve learned will change the approaches of chefs and amateur cooking enthusiasts?
What we’re hoping to do is enable chefs to use a broad range of techniques to make the kinds of food they want to make. Right now there is a set of chefs who are using these very modern techniques. There are a lot of others who don’t.
It’s very hard to learn all of this stuff. We’re hoping that we can give chefs and amateurs an accessible way to understand how it works. If we can do that, I think that we can really make a difference in how folks cook. That’s not world peace; it’s not solving global warming or something like that, but it is something that, within the cooking world, I think people are going to find tremendously exciting and empowering.
Any parting words of wisdom that you would give somebody learning to cook?
Learning to cook is a wonderful thing to do and I highly recommend it to folks. The message in a lot of recipes is, “Don’t worry about how it works, just do this, this, and this, and the right thing will happen.”
When it works, that’s okay. When it doesn’t work, you don’t really know why. I always feel cheated when that’s the case. I want to find out why. I’m still learning how to cook. I think even the best chefs in the world are still learning how to cook, and it’s that learning and that exploration that makes it interesting.