
Chapter 10. Creating a professional UI for a DSL
- Creating an IDE for your DSL
- Integrating an IDE into your application
- Displaying DSL execution
- DSL code generation
We’ve talked about building DSLs, structuring them, adding advanced language options to them, integrating them into our applications, creating unit tests, and even creating test languages. We even looked at versioning them after they were in production. We can create working DSLs, and quite useful ones, but creating a professional-level DSL takes a bit more. Sometimes it takes a lot more.
A professional DSL is composed of more than the language’s code; it also includes the DSL environment, the tools that are provided, and the overall experience of using it. That generally means some sort of an IDE, and it also means a greater investment in the tooling that you provide.
The IDE is usually the least of your worries. It’s the overall tooling that should concern you. For simple DSLs, you can get away with editing the language in Notepad, and managing everything on your own. For more complex DSLs, you have to provide additional tool support to make the DSL easier to use.
We’ll use the Quote-Generation DSL as our example for this chapter. This DSL is a rule engine, at its heart. This implies that we’re going to have a lot of rules: 15,000 rules is a figure from one real-world quote-generation system. Even managing hundreds of rules is a challenge, and we need to consider that when we build the DSL. The approach we have right now, of keeping a set of files in a directory, obviously isn’t going to scale to that level. The DSL could handle it, but the complexity of managing it is too cumbersome. And that’s only considering the naming issues.
An additional problem we’ll face is tracing. Suppose we don’t like the quote we get for a certain scenario, and we need to understand how the DSL came up with it. We can’t physically debug 15,000 scripts in any reasonable amount of time, so we need another way of handling that. Usually, this means tracing, which involves active cooperation from the DSL itself.
Furthermore, although the textual representation of a DSL has a lot of advantages (such as clarity, and the ability to use source control and grep), it’s often advantageous to have a graphical representation as well. It can be clearer in some situations, it might help sell the DSL, or it could be used as a full-fledged editable view of the DSL.
Last, but not least, you might need to provide an IDE environment for your application, with syntax highlighting and code completion. We’ll start with this topic first, because this is likely what you’re most interested in.
10.1. Creating an IDE for a DSL
An IDE can make or break your DSL in terms of acceptance. Regardless of anything else, having an IDE available implies a high level of dedication to this DSL, and thus a high-quality product.
As it turns out, creating an IDE is not that difficult. We’ll look at several off-the-shelf components, but before we do, take a look at figure 10.1. It shows a trivial implementation of syntax highlighting for the Quote-Generation DSL.
Figure 10.1. Hand-rolled syntax highlighting

You probably won’t be able to see the difference all that clearly in the figure, but the keywords have different syntax highlighting. It’s easy to create basic effects like this, as the code in listing 10.1 shows, but the complexity grows significantly if you decide to roll your own IDE without using existing components.
Listing 10.1. Implementing hand-rolled syntax highlighting
private void codeTextBox_TextChanged(object sender, EventArgs e)
{
    // Save current selection
    int prevSelectionStart = codeTextBox.SelectionStart;
    int prevSelectionLength = codeTextBox.SelectionLength;

    // Reset coloring
    codeTextBox.SelectionStart = 0;
    codeTextBox.SelectionLength = codeTextBox.TextLength;
    codeTextBox.SelectionColor = DefaultForeColor;

    // Define keywords
    var keyWords = new[] { "specification", "requires",
                           "users_per_machine", "same_machine_as" };
    foreach (string keyWord in keyWords)
    {
        // Match keywords using regex and color them
        MatchCollection matches = Regex.Matches(codeTextBox.Text, keyWord);
        foreach (Match match in matches)
        {
            codeTextBox.SelectionStart = match.Index;
            codeTextBox.SelectionLength = match.Length;
            codeTextBox.SelectionColor = Color.DarkOrchid;
        }
    }

    // Match references ( @name ) and color them
    foreach (Match match in Regex.Matches(codeTextBox.Text, @"@[wd_]+"))
    {
        codeTextBox.SelectionStart = match.Index;
        codeTextBox.SelectionLength = match.Length;
        codeTextBox.SelectionColor = Color.DarkSeaGreen;
    }

    // Find numbers and color them
    foreach (Match match in Regex.Matches(codeTextBox.Text, @" d+"))
    {
        codeTextBox.SelectionStart = match.Index;
        codeTextBox.SelectionLength = match.Length;
        codeTextBox.SelectionColor = Color.DarkRed;
    }

    // Reset selection
    codeTextBox.SelectionStart = prevSelectionStart;
    codeTextBox.SelectionLength = prevSelectionLength;
}
I will say up front that the code in listing 10.1 suffers from multiple bugs, issues, and is generally not suited for anything but the simplest scenarios. Syntax highlighting can be done, but it generally suffers from far too much complexity to be useful.
I strongly suggest avoiding rolling your own components for this. The scope of the work is huge—much bigger than you would initially assume. You’re far better off using an existing component, and you’re probably already familiar with one called Visual Studio.
10.1.1. Using Visual Studio as your DSL IDE
Using Visual Studio as your DSL IDE seems ideal. It’s a mature product with a lot of options and capabilities. With Visual Studio 2008, there is also the option of using Visual Studio 2008 Shell, which allows you to plug your own language into the IDE. It’s even freely redistributable, and you can create standalone applications that are based on Visual Studio (using isolated mode). For all intents and purposes, this seems like the ideal solution. But there are a few problems with this approach.
Note
Visual Studio 2010 promises much easier integration options, but I haven’t had the chance to really take it for a spin, so I can’t comment on how it compares with VS 2008 from the extensibility standpoint when adding a custom language.
First, Visual Studio isn’t an embeddable solution. You can’t add it as part of your own application. Second, and far more critical, the API that Visual Studio exposes is COM based (there is a managed API, but it’s a thin wrapper) and it isn’t friendly to use. In addition to that, Visual Studio assumes that if you host a language inside it you’ll provide all the services that a language needs, and that’s usually a far bigger task than you’ll want to take on.
There are other issues, mostly related to the development and deployment of Visual Studio’s language service, that make this more difficult than it might be. On the plus side, though, there’s quite a lot of documentation on how to develop extensions for Visual Studio, and there are several screencasts on MSDN that can take you a long way.
There’s also a project being developed that performs most of the work for you: Boo Lang Studio (http://codeplex.com/BooLangStudio) is an add-on for Visual Studio that provides Boo support in Visual Studio. It’s an open source project, so you can take the code, modify it to fit your own language, and save a significant amount of time. The major detraction, from my point of view, is that you’re forced into Visual Studio’s way of working. You have an IDE in your hands, not an application that embeds a DSL editor. Depending on your needs, that might be exactly what you want, but I like having something that’s lightweight in my hands. As we’ll see in the rest of the chapter, creating a usable IDE for a DSL shouldn’t take long. Using Visual Studio to do the same task takes an order of magnitude longer and is much more involved.
Note
As I write this, Boo Lang Studio hasn’t been completed because of the difficulty of working with the Visual Studio API; it is currently waiting for the release of Visual Studio 2010 to see if developing a language service there will be easier.
Because of this issue, and the extensive information already available on Visual Studio, I won’t discuss it further. If you’re interested in this approach, though, you can start with the following two videos from MSDN and go from there:
- How Do I: Create a Language Service? http://msdn.microsoft.com/en-us/vstudio/bb851701.aspx
- How Do I: Add Intellisense Functionality to My Language Service? http://msdn.microsoft.com/en-us/vstudio/bb985513.aspx
If you choose to go with this approach, I strongly recommend using Boo Lang Studio as a base instead of starting from scratch.
If you don’t like the full-blown Visual Studio approach, what other options are there?
10.1.2. Using #develop as your DSL IDE
Visual Studio isn’t the only IDE that we can extend. We also have SharpDevelop (#develop).
#develop is an open source .NET IDE that provides a comparable experience to Visual Studio. Because #develop is built on .NET and doesn’t have many years of legacy code behind it, it tends to be much easier to work with.
For example, setting up a new syntax highlighting scheme in Visual Studio involves building a lexer and parser. Setting up the same thing in #develop involves writing a simple (and readable) XML file. The Visual Studio approach is focused on providing maximum capabilities, whereas the #develop approach is focused on a low learning curve.
Like in Visual Studio, you can extend #develop to provide your own IDE experience. There’s a free ebook, called Dissecting a C# Application: Inside SharpDevelop, that discusses the design and implementation of #develop in depth (available from http://damieng.com/blog/2007/11/08/dissecting-a-c-application-inside-sharpdevelop).
But again, building a complete IDE is something I’d like to avoid. #develop supports Boo natively, so you might be able to get away with providing #develop to your users asis, perhaps with a customized syntax highlighting scheme (which is a simple XML file). But the scenario I want to focus on isn’t building IDEs—it’s integrating the DSL into your application. And for that, we don’t need an IDE; we need an IDE component.
10.2. Integrating an IDE with a DSL application
The main difference between creating an IDE and integrating an IDE lies in the capabilities that you provide the user with. In the IDE scenario, you’re providing the user with the tools to do development. In the integration scenario, you’re allowing the user to work with the DSL.
This is an important difference, because it has big implications for your target audience. You would give an IDE to developers, but that isn’t an appropriate tool to give to non-developers, and it doesn’t demo as well as a tailored tool.
When you’re working with code, syntax highlighting and code completion aren’t something you want to build yourself, but there are existing packaged components that will do it for you. For example, the following IDE components can greatly ease creating an integrated editing experience inside your application:
- Actipro SyntaxHighlighter— On the commercial side, Actipro SyntaxHighlighter comes highly recommended. I haven’t used it myself, but several people I trust have recommended it. It’s available at http://www.actiprosoftware.com/Products/DotNet/WindowsForms/SyntaxEditor/Default.aspx.
- #develop— I have used #develop, and one of the nicer things about it is that you can extract pieces of the IDE and use them in your own application. In order to create an IDE for a DSL, you’ll want to use the ICSharpCode.TextEditor DLL, which contains the text editor and the baseline facilities to enable code completion.
- AqiStar.TextBox— For WPF applications, I can’t say enough good things about AqiStar (http://www.aqistar.com/) text editor. It’s similar to ICSharpCode.TextEditor from the point of view of configuration (down to using the same XML syntax), it’s simple to work with, and it provides all the features I require.
Note
I will refer to the ICSharpCode.TextEditor component as #develop for the rest of this chapter. #develop is a .NET IDE that you can make use of in any .NET language, but more to the point, it comes prebuilt with support for Boo, which you can customize. #develop is open source and is provided under the LGPL license, so you can make use of it in commercial applications.
Listing 10.2 shows how you could use #develop to embed a syntax highlighting textbox into your application. Because #develop natively supports Boo, it’s fairly easy to get the Boo syntax.
Listing 10.2. Embedding a Boo editor in our application
public class TextEditorForm : Form
{
    public TextEditorForm()
    {
        // Create a new text editor and add it to the form
        var editorControl = new TextEditorControl
        {
            Dock = DockStyle.Fill
        };
        Controls.Add(editorControl);
        // This controls how the editor handles indentation
        editorControl.Document.FormattingStrategy =
                new BooFormattingStrategy();
        // Set the syntax highlighting options
        editorControl.SetHighlighting("Boo");
    }
}

// This class was copied from #develop's Boo Binding
public class BooFormattingStrategy : DefaultFormattingStrategy
{
    // Disable the default way of handling lines
    public override void IndentLines(TextArea textArea, int begin, int end)
    {
    }
    // Indent the next line whenever the line ends with a colon
    protected override int SmartIndentLine(TextArea area, int line)
    {
        IDocument document = area.Document;
        LineSegment lineSegment = document.GetLineSegment(line - 1);
        if (document.GetText(lineSegment).EndsWith(":"))
        {
            LineSegment segment = document.GetLineSegment(line);
            string str = base.GetIndentation(area, line - 1)
                                    + Tab.GetIndentationString(document);
            document.Replace(segment.Offset, segment.Length, str
                  + document.GetText(segment));
            return str.Length;
        }
        return base.SmartIndentLine(area, line);
    }
}
The code in listing 10.2 is all you need. If you run this application, you’ll get a working Boo editor that you can play around with, as shown in figure 10.2.
Figure 10.2. A standalone Boo editor

This is impressive, particularly when you consider that it takes less code to wire up the editor component than it took to (badly) handle syntax highlighting manually (in listing 10.1).
But this is still not enough. We have a Boo editor, but what we want is an editor for our DSL.
10.2.1. Extending #develop highlighting for our DSLs
I already mentioned that you can use XML to change the way the #develop TextEditor handles highlighting, so let’s examine this in more depth.
Listing 10.3 shows a simplified version of the Boo language definition. (The full language definition is part of the #develop source code, and can also be found in the source code for this book.)
Listing 10.3. A simplified version of the Boo language definition
<?xml version="1.0"?>
<SyntaxDefinition name="Boo"
extensions=".boo">
<Environment>
<Default bold="false"
italic="false"
color="SystemColors.WindowText"
bgcolor="SystemColors.Window" />
<Selection bold="false"
italic="false"
color="SystemColors.HighlightText"
bgcolor="SystemColors.Highlight" />
</Environment>
<Digits name="Digits"
bold="false"
italic="false"
color="DarkBlue" />
<RuleSets>
<RuleSet ignorecase="false" >
<Delimiters>
&<>~!@$%^*()-+=|#/{}[]:;"' , .?
</Delimiters>
<Span name="LineComment"
stopateol="true"
bold="false"
italic="false"
color="Gray" >
<Begin >#</Begin>
</Span>
<KeyWords name="JumpStatements"
bold="false"
italic="false"
color="Navy" >
<Key word="break"/>
<Key word="continue"/>
<Key word="return"/>
<Key word="yield"/>
<Key word="goto" />
</KeyWords>
</RuleSet>
</RuleSets>
</SyntaxDefinition>
Of particular interest in this listing is the way the syntax highlighting is defined. You don’t have to perform your own parsing; you can instead define the rules for parsing, and #develop will figure out the parsing rules on its own.
For example, you can see how a LineComment is defined. That’s how #develop knows that # starts a line comment. Another example is defining keywords. All you need to do is register them, and #develop will take it from there.
Armed with that knowledge, you can start extending the language definition to support your own keywords. Doing so is as simple as adding the contents of listing 10.4 to the <RuleSet> element defined in the existing highlighting definition (in listing 10.3).
Listing 10.4. Adding keywords to the language definition
<MarkFollowing markmarker="true"
               bold="false"
               italic="false"
               color="Purple">@</MarkFollowing>

<KeyWords name="DslKeywords"
          bold="false"
          italic="false"
          color="DarkOrange" >
  <Key word="specification"/>
  <Key word="users_per_machine"/>
  <Key word="requires"/>
  <Key word="same_machine_as"/>
</KeyWords>
When you do this, remember to change the language name, or you’ll get naming collisions with the default Boo language. For example, I named my new language definition “dsl”.
Note
When adding listing 10.4 to the existing Boo definition file (Boo.xshd), you need to place this code between the last <MarkPrevious> and the first <KeyWords> elements in the first ruleset in the file, in order to maintain the file schema.
The <MarkFollowing> tag is an interesting one. In listing 10.4, it paints all module references (such as @vacations) in purple. This tag will mark all non-delimiters (delimiters are specified in listing 10.3) following the at sign (@) with the appropriate color. It’s surprisingly easy to plug everything together.
To make the text editor recognize your language, you also need to modify listing 10.2 to register the new file. Listing 10.5 shows how to do this (replace the last line in the TextEditorForm constructor in listing 10.2 with the full text in listing 10.5). The results are shown in figure 10.3.
Figure 10.3. Custom keywords highlighting in action

Listing 10.5. Registering the language definition and setting the highlighting strategy
HighlightingManager.Manager.AddSyntaxModeFileProvider(
    new FileSyntaxModeProvider(@"C:Path	olanguagedefinition"));
//.. setup text editor
editorControl.SetHighlighting("dsl");
The full syntax definition is covered in depth in chapter 9 of Dissecting a C# Application: Inside SharpDevelop. I strongly suggest that you read it, and use the #develop forums, when creating UIs based on ICSharpCode.TextEditor.
I hope that I have given you a sense of how easy it is to define the syntax highlighting rules and create a rich editor experience. Now let’s look at code completion.
10.2.2. Adding code completion to our DSL
Code completion is a killer feature that can make all the difference in using a language, but it’s significantly more difficult to define than syntax highlighting rules. The main problem is that you need to deal with the current context.
Let’s take a look at what code completion could do for the Quote-Generation DSL.
- On an empty line, show specification
- On a specification parameter, show all available modules
- On an empty line inside a specification block, show all actions (requires, users_per_machine, same_machine_as)
- On an action parameter, find appropriate values (available modules for the requires and same_machine_as actions, prespecified user counts for the users_per_machine action)
This doesn’t even deal with code completion for the CLR API that we could use.
You can’t re-create Visual Studio in an hour
The approach that I outline here will give you a functional IDE for a small cost. But if you’re truly interested in a full-fledged IDE, rather than embedding DSL editing into the application, this isn’t the approach you should take.
Instead, you should focus on creating a language binding to either #develop or Visual Studio. Both already have base binding for Boo, which you can extend to map to your own language. But this is not a trivial task. Having the full Visual Studio experience will take a significant investment.
#develop offers the baseline facilities to deal with code completion, but the logic of deciding what goes where needs to be written, and you have to deal with it in some fashion. We will explore the facilities that #develop gives us for handling code completion in the following sections.
There are a couple of interesting infrastructure classes that we can make use of. First, there’s the CodeCompletionWindow, which will display the members that the code completion code will suggest to the user. Next, there’s the implementation of ICompletionDataProvider, which is how you provide #develop with the information to be displayed.
Listing 10.6 shows how you can hook up the code for code completion.
Listing 10.6. Hooking up the events to support code completion
private void RegisterCodeCompletionHandling()
{
    var textArea = editorControl.ActiveTextAreaControl.TextArea;
    textArea.KeyDown += delegate(object sender, KeyEventArgs e)
    {
        if (e.Control == false)
            return;
        if (e.KeyCode != Keys.Space)
            return;
        e.SuppressKeyPress = true;
        ShowCodeCompletion((char) e.KeyValue);
    };
}

private void ShowCodeCompletion(char value)
{
    ICompletionDataProvider completionDataProvider =
        new QuoteGenerationCodeCompletionProvider(intellisenseImageList);

    codeCompletionWindow = CodeCompletionWindow.ShowCompletionWindow(
        this, // The parent window for the completion window
        editorControl, // The text editor to show the window for
        "", // Filename - will be passed back to the provider
        completionDataProvider, // Provider to get the list of completions
        value // Key pressed - will be passed to the provider
        );
    if (codeCompletionWindow != null)
    {
        // ShowCompletionWindow can return null when the provider
        // returns an empty list
        codeCompletionWindow.Closed += CloseCodeCompletionWindow;
    }
}
The code in listing 10.6 registers to the KeyDown event and invokes code completion if Ctrl-Space is pressed. The ShowCodeCompletion() method is where we start to deal with the #develop code completion API.
We start by creating an instance of QuoteGenerationCodeCompletionProvider. This class is the heart of our code completion effort, and we’ll discuss it shortly. For now, all you need to know is that it’s where we decide what the user will be shown. Note that the intellisenseImageList is passed to the code completion provider so it can later show the list to the user using the code completion window. (Yes, the code completion provider and the code completion window work closely together.)
Next, we create the code completion window, which will call our code completion provider to check what needs to be done. The parameters for this should be fairly obvious.
Last, we register to close the window when needed.
That’s about it for the common infrastructure. Now we need to start digging into QuoteGenerationCodeCompletionProvider. Figure 10.4 shows the interface that it implements. It has three properties:
Figure 10.4. The ICompletionDataProvider is used by the #develop API to figure out how to show code completion information to the user.

- DefaultIndex— The index of the item you want to be selected in the list of suggestions you show the user.
- ImageList— The icons for the items in the list.
- PreSelection— This one is a bit complex to explain. Figure 10.5 shows an example of preselection.
Figure 10.5. How preselecting is presented to the user

Let’s say that the user has invoked code completion and started to type. In the example in figure 10.5, the user typed “tos”. The code completion provider has determined that a good match for that is the ToString method. The user selects that option and presses Enter.
At this point, inserting the text into the document would be a mistake, because it would result in foo.tosToString(), which is obviously not a desirable result. Preselection helps out by instructing #develop what should be included in the selection and what should be removed when the new code is inserted.
The ProcessKey method decides whether to continue with the code completion dialog or bring it to its conclusion. A typical implementation of that is shown in listing 10.7.
Listing 10.7. Deciding whether to continue code completion based on current character
public CompletionDataProviderKeyResult ProcessKey(char key)
{
    if (char.IsLetterOrDigit(key) || key == '_')
    {
        return CompletionDataProviderKeyResult.NormalKey;
    }
    return CompletionDataProviderKeyResult.InsertionKey;
}
In this case, if the user is typing a symbol (alphanumeric or underscore), code completion should continue; otherwise, it terminates the code completion and inserts the selected item.
The InsertAction() method decides where to place that selected item. A simple implementation of that is shown in listing 10.8.
Listing 10.8. Inserting code completion item into the document
/// <summary>
/// Called when an entry should be inserted. Forward to the insertion
/// action of the completion data.
/// </summary>
public bool InsertAction(
    ICompletionData data,
    TextArea textArea,
    int insertionOffset,
    char key)
{
    textArea.Caret.Position = textArea.Document.OffsetToPosition(
        Math.Min(insertionOffset, textArea.Document.TextLength)
        );
    return data.InsertAction(textArea, key);
}
In listing 10.8, we first find the appropriate place to insert the text (by changing the caret position based on the text offset) and then insert the data at that location by calling InsertAction.
So far, we’ve dealt only with the UI of code completion, and there’s nothing that’s particularly important for the application. Even this tiny API has a lot of functionality built in, and you can add a lot of capabilities to streamline the workflow using the options we’ve just looked through. You can find more information about creating a good user experience in the #develop book and in the #develop forums: http://community.sharpdevelop.net/forums/.
Let’s now focus on the functionality of the code completion provider, rather than on the UI issues.
10.2.3. Adding contextual code completion support for our DSL
Regardless of the infrastructure that you use to implement it, a good code completion function is based on a simple question: from the current position of the caret (the term used in #develop to refer to the cursor position in the document), what are the possible valid options the user could write?
In order to implement this, we need to know two things. First, we need to know where we are in the text, and not only the caret position, but what this position means. Going back to the Quote-Generation example, are we at the beginning of an empty line? Are we at the end of a specification statement? Are we at the end of a requires statement? Once we know that, we need to look at the overall context to decide what the user’s options are.
These two actions are completely independent of how you display the selections (whether by using #develop, integrating a commercial control, or using Visual Studio). We’re going to look at them in the context of a specific tool (#develop), but the same approach is used with any tool. And with that said, let’s get right to the task of figuring out the current context.
The basic approach is simple: we know the current caret position, and we have the text in the editor. Now we need to figure out what the current context is. This generally involves parsing the text and finding the node that matches the position of the caret. With Boo, we can invoke the BooParser.ParseString() method to get the abstract syntax tree (AST) of the code in question, which we can traverse to find the appropriate node.
This is a good solution for high-end needs, but for a simple scenario there’s an even simpler solution. #develop has already parsed the code to display it properly, and it makes this information available to us. This way, we don’t have to do any extra work. Another point in favor of the #develop approach is that it’s already highly focused on displaying the items, whereas the Boo parser’s approach is more focused on textual and processing needs.
The #develop parser isn’t sophisticated, but as long as it fits your needs, you can get a long way fast with it. Listing 10.9 shows how to retrieve and use the parser information.
Listing 10.9. Getting the current context and making decisions based upon it
public ICompletionData[] GenerateCompletionData(
               string fileName, TextArea textArea, char charTyped)
{
    TextWord prevNonWhitespaceTerm = FindPreviousWord(textArea);
    if (prevNonWhitespaceTerm == null)
        return EmptySuggestion(textArea.Caret);

    string name = prevNonWhitespaceTerm.Word;
    if (name == "specification" || name == "requires" ||
         name == "same_machine_as" || name == "@")
    {
        return ModulesSuggestions();
    }
    int temp;
    if (name == "users_per_machine" || int.TryParse(name, out temp))
    {
        return NumbersSuggestions();
    }
    return EmptySuggestion(textArea.Caret);
}

private static TextWord FindPreviousWord(TextArea textArea)
{
    LineSegment lineSegment =
                textArea.Document.GetLineSegment(textArea.Caret.Line);
    TextWord currentWord = lineSegment.GetWord(textArea.Caret.Column);
    if (currentWord == null && lineSegment.Words.Count > 0)
        currentWord = lineSegment.Words[lineSegment.Words.Count - 1];
    // We want the previous word, not the current one,
    // in order to make decisions on it.
    int currentIndex = lineSegment.Words.IndexOf(currentWord);
    if (currentIndex == -1)
        return null;

    return lineSegment.Words.GetRange(
           0,
           currentIndex)
              .FindLast(word => word.Word.Trim() != "");
}
The FindPreviousWord() method (or its more generic cousin, FindRelevantExpression()) is responsible for answering, “What is the current DSL context for the current caret position?” This method takes the text editor as an argument and uses the #develop API to find the current word. A word, in #develop terms, is a token that’s being highlighted in a certain way.
We want the previous word, not the current one, because it’s the previous word that will provide the context. For example, assume that we currently have this text in the editor:
specification [caret position]
If the user invokes code completion now, there is no current word, because it’s positioned at the end of the line, so we go back to the previous one.
Another scenario is when we have this text in the editor:
specification @vac[caret position]
In this case, the current word is still empty, because it’s positioned at the end of the line again, but we select the vac as the current word, back off one to the @, and return @ as the previous word.
The last condition occurs if the user invokes code completion when they’re in the middle of a sentence, like this:
specification [caret position]@vac
Now the current word is the @, and we back off to specification, which is what we’ll return.
The GenerateCompletionData() method makes the decisions. This method receives the current word and decides how to act. In more complex scenarios, we’d probably want to deal with the current context, such as what items are in scope, and GenerateCompletionData() can delegate the final decision about what to display to one of several functions, depending on the context.
If we’re at the beginning of a line, we’ll show the empty selection. If we’re in a specification (or same_machine_as or requires), we’ll show the modules collection. For users_per_machine or for a numeric, we’ll display a list of predefined numbers. It’s as simple as that. Grab the current context and make a decision about it.
Listing 10.10 shows the implementation of ModulesSelection() to show how it’s done. In a real-world scenario, you would probably get the modules collection from a database or configuration file. Here, I’ve hard-coded the values.
Listing 10.10. Generating the code completion list
private ICompletionData[] ModulesSuggestions()
{
    return new ICompletionData[]
    {
        new DefaultCompletionData("@vacations", null, 2),
        new DefaultCompletionData("@external_connections", null, 2),
        new DefaultCompletionData("@salary", null, 2),
        new DefaultCompletionData("@pension", null, 2),
        new DefaultCompletionData("@scheduling_work", null, 2),
        new DefaultCompletionData("@health_insurance", null, 2),
        new DefaultCompletionData("@taxes", null, 2),
    };
}
The first parameter for DefaultCompletionData is the text that the user will see in the completion list, the second is an optional description, and the third is the image index from the image list we expose.
Figure 10.6 shows how everything comes together.
Figure 10.6. Showing off our new code completion support

I want to point out again that this is an 80 percent solution. This can get you going and give you a good experience, but it has limits. When you reach those limits, you need to start working with the parser, or maybe use a more advanced text editor. But a more advanced solution will use the same approach of identifying the context and making a decision based upon that.
Syntax highlighting and code completion aren’t the only options you have for creating professional-looking DSLs. You can also provide a graphical representation of a textual DSL.
10.3. Creating a graphical representation for a textual DSL
The idea of creating a graphical representation for a textual DSL seems nonsensical at first, but doing so can be useful. Consider class diagrams in Visual Studio, or having designer and code views of the same web page.
A common problem with graphical representations is that they are, by their very nature, a high-level form of communication. This makes them extremely useful when we want to talk at that high level, but not so helpful in many DSL scenarios, because they tend to hide too much.
Another common problem with graphical DSLs is the serialization format, which tends to cause severe issues with source control usage. It’s hard or impossible to resolve merge conflict errors along the common development path.
But nothing helps sales as much as a pretty diagram, so we need to explore our options.
Note
I am not a designer, so I decided to build a functional design rather than a pretty one. This will demonstrate the principals of UIs and DSLs, but it shouldn’t be taken as design advice.
10.3.1. Displaying DSL execution
The first thing to remember is that our DSLs are standard .NET code. That means we can use simple code to build the UI from the information that’s given to us. Listing 10.11 shows the essential details.
Listing 10.11. Displaying the results of evaluating a quote-generation rule
private void VisualizeScript_Load(object sender, EventArgs e)
{
    var rule = factory.Create<QuoteGeneratorRule>(
        @" ScriptsQuoteGeneratorsample.boo",
        new RequirementsInformation(50,"vacations", "work_scheduling"));
    rule.Evaluate();
    foreach (var module in rule.Modules)
    {
        ListViewItem item = modulesListView.Items.Add(module.Name);
        item.Tag = module;
    }
}
private void modulesListView_SelectedIndexChanged(
                                 object sender, EventArgs e)
{
    if(modulesListView.SelectedItems.Count==0)
        return;
    var module = (SystemModule)modulesListView.SelectedItems[0].Tag;

    requiresListView.Items.Clear();
    sameMachineAsListView.Items.Clear();

    foreach (var requirement in module.Requirements)
    {
        requiresListView.Items.Add(requirement);
    }

    foreach (var anotherModule in module.OnSameMachineWith)
    {
        sameMachineAsListView.Items.Add(anotherModule);
    }
}
In VisualizeScript_Load, we create a new instance of the DSL script, evaluate the rule with the rule state, and display all the valid modules. In modulesListview_SelectedIndexChanged, we extract additional information from the selected system module and display that to the user.
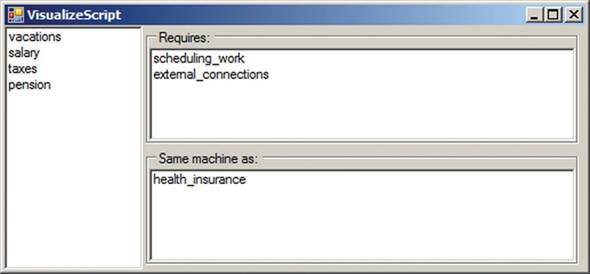
This is pretty trivial, but I’ve shown it for two reasons. The first is to remind you how simple it is to work with the DSL instance. The second is to demonstrate how you can visualize the result of executing a DSL script. Figure 10.7 shows the result in all its glory.
Figure 10.7. Showing the result of executing a quote-generation rule

But, however useful seeing the results of executing the DSL might be, it doesn’t help us visualize the DSL. Did you notice that only the vacations module is visible? That’s because it’s the only one that was selected by the rule. What happens when we want to show the user everything that this script can do? With the current implementation, we don’t have any way of doing that. The code doesn’t execute if the condition isn’t met, and we can’t know up front what all the conditions are.
This is a problem. Luckily, there are several solutions for that.
10.3.2. Creating a UI dialect
The easiest way to extract the information from the DSL script without executing it is to create another backend language implementation for the same DSL syntax. One DSL implementation would be used for the execution and the second for UI purposes. Let’s see what we need to do to get this running.
The first order of business is to investigate what part of the execution engine is causing us to see only the selected modules. Listing 10.12 shows the relevant code.
Listing 10.12. QuoteGeneratorRule.specification selects the module
public void specification(string moduleName, Action action)
{
   if (Array.IndexOf(information.RequestedModules, moduleName)==-1 &&
       Modules.Exists(module=> module.Name == moduleName) == false)
     return;

    currentModule = new SystemModule(moduleName);
    Modules.Add(currentModule);
    action();
}
As you can see, it’s only the if statement that’s causing issues for us. If we could somehow remove it, we’d get the UI that we want.
Listing 10.13 shows a derived implementation of QuoteGeneratorRule, meant specifically for the UI (with specification() made virtual).
Listing 10.13. Derived dialect for quote-generation rules user interface
public abstract class QuoteGeneratorRuleForUI : QuoteGeneratorRule
{
    protected QuoteGeneratorRuleForUI()
         // We don't care about the runtime values; they are unused
         : base(new RequirementsInformation(0))
    {
    }

    public override void specification(string moduleName, Action action)
    {
        currentModule = new SystemModule(moduleName);
        Modules.Add(currentModule);
        action();
    }
}
Note
We also need to create a DslEngine implementation that can process QuoteGeneratorForUI. Using the same approach, I derived from QuoteGenerationDslEngine and changed the implicit base class. In the interest of brevity, I haven’t included that here—you can check the implementation in the book’s source code.
By changing the type of implicit base class (which is the DSL execution engine), we can get (from the same script) the results shown in figure 10.8. The code in listing 10.14 shows the updates required to make listing 10.11 support the new DSL dialect.
Figure 10.8. All the options, not just the ones that were selected by the rule evaluation of the current context
Listing 10.14. Selecting which rule implementation to create at runtime
private void VisualizeScript_Load(object sender, EventArgs e)
{
    QuoteGeneratorRule rule;
    // We can create either a rule that we can execute to get
    // an answer for the current state or a rule instance that
    // describes all the potential states
    if(GenerateRuleForUI)
    {
        rule = factory.Create<QuoteGeneratorRuleForUI>(
                 @" ScriptsQuoteGeneratorsample.boo");
    }
    else
    {
        rule = factory.Create<QuoteGeneratorRule>(
           @" ScriptsQuoteGeneratorsample.boo",
           new RequirementsInformation(50,"vacations", "work_scheduling"));
    }
    // same as Listing 10.11
By performing a simple change, we were able to go from an opaque structure at runtime to a fully discoverable model at runtime. But not all DSLs will be as easy to modify; there will be cases where it is not possible to expose the DSL model so easily.
In those cases, you’ll often be able to create a new DSL engine (implicit base class) that has the same API as the runtime execution engine. But the implementation would be focused on gathering the information required to deal with the UI.
This approach covers an even wider range of scenarios, but it’s still not enough. The Authorization DSL is a good example of one that can’t be treated this way. But there are ways of handling even this situation ...
10.3.3. Treating code as data
Extracting runtime information from our DSLs often won’t be enough to build a graphical representation—we’ll need to deal with things at a lower level than the compiled code will give us. The distinction is clear when we compare declarative DSLs to imperative DSLs. We can’t execute an imperative DSL the way we can a declarative DSL because that would perform the action, not just build the description of the desired action.
The M language and the Oslo toolset
The Oslo Modeling Language (M) is a language from Microsoft that’s aimed at building DSLs. According to Microsoft, “‘M’ lets users write down how they want to structure and query their data using a textual syntax that is convenient to both author and reader” (http://msdn.microsoft.com/en-us/library/dd129519%28VS.85%29.aspx).
The most relevant point for the purposes of this chapter is that M comes with a set of tools, including one called Quadrant, which can inspect an M grammar definition and provide the IDE UI for it.
It’s still early, and I have some doubts about the way it will turn out, but it’s certainly something to keep an eye on. It is worth pointing out that, even in this state, M is intended for creating external DSLs, rather than internal ones. You can refer back to our discussion about the different DSL types in chapter 1 to see why I would much rather write an internal DSL than take on the challenge of writing an external one.
The Authorization DSL is a good example of this. Look at listing 10.15 for a reminder about how the Authorization DSL looks and behaves.
Listing 10.15. An Authorization DSL example
if Principal.IsInRole('Administrators'):
    Allow('Administrators can always log in')
    return

if Principal.IsInRole('Everyone'):
    Deny('We do not allow just anyone, you know')
    return
We can’t take this syntax and deal with it at runtime in some fashion. The interesting part here is the condition in the if statement, not the structure we’re building. How can we create a user interface on top of that?
At this point, we have to start dealing with the DSL as data, not as executable code. And we’ll do it by utilizing the same approach that the compiler does. Say hello to the BooParser class. The BooParser will take a piece of text and return a graph (AST) that represents this text in Boo terms. This allows you to manually process the code and generate the UI that you want.
Let’s take a look at how we can use the power of BooParser and some conventions to build a nice UI to manage the Authorization DSL. Once again, we’re going to touch just the tip of the iceberg here, and we’ll intentionally use the simplest approach to demonstrate the technique.
At the heart of this approach is the idea of pattern recognition. For example, in listing 10.15, we identify the pattern of allowing or disallowing by role. Once we have identified such a pattern, we can automatically recognize it and build the appropriate UI for it. Listing 10.16 shows the highlights of this approach.
Listing 10.16. Recognizing repeating patterns in the Authorization DSL
public class AuthorizationRulesParser
{
    public IEnumerable<Control> GetControlsFor(CompileUnit compileUnit)
    {
        if (compileUnit.Modules.Count != 1)
            throw new NotSupportedException(
                          "we support only a single file parsing");
        var module = compileUnit.Modules[0];
        foreach (var stmt in module.Globals.Statements)
        {
            var ifStatement = (stmt as IfStatement);
            if (ifStatement == null)
                throw new NotSupportedException(
                       "Only if statements are parsable by the UI");
            yield return GetControlFor(ifStatement);
        }
    }

    private Control GetControlFor(IfStatement statement)
    {
        var mie = statement.Condition as MethodInvocationExpression;
        if(mie != null &&
                 ((ReferenceExpression)mie.Target).Name=="IsInRole")
        {
            //We recognize this pattern...
            return AllowByRoleControl(statement, mie);
        }
        throw new NotSupportedException("Could not understand...");
    }

    private Control AllowByRoleControl(IfStatement statement,
                                       MethodInvocationExpression mie)
    {
       var stmt = ((ExpressionStatement)statement.TrueBlock.Statements[0]);
       var action = (MethodInvocationExpression) stmt.Expression;
       return new AllowByRole
       {
            Role = ((StringLiteralExpression)mie.Arguments[0]).Value,
            Allow = ((ReferenceExpression)action.Target).Name=="Allow",
            Reason = ((StringLiteralExpression)action.Arguments[0]).Value
       };
    }
}
In GetControlsFor(CompileUnit), we get the compile unit. This holds the parsed code AST (we only support a single file for this demonstration). We start by reading all the code in the globals section, which is where code that isn’t in a method or a class is located. We go over it statement by statement, failing if we encounter a statement that is not an if statement.
How is this better than using XML?
We’re doing all this hard work to go from the DSL code to the UI. Wouldn’t it be easier to go with something XML-based instead of doing all this work?
Not really, in my opinion. The major benefit of XML is that you don’t have to write a parser, but aside from that, you’re on your own. Using this approach, we don’t need to write a parser; we use an existing one that already contains most of the ideas that we’re dealing with.
Trying to express concepts such as the if statement using XML is a lot of manual work. Doing the same with Boo is a matter of asking the parser for the AST. From there, the amount of work you have to do is more or less identical.
The main problem is that we’re trying to represent concepts that are difficult to deal with in nontextual form. The way we store them doesn’t make a lot of difference.
When we find an if statement, we pass it to GetControlFor(IfStatement). This class is responsible for doing the pattern recognition. In this example, we set it to recognize if statements where the condition is a method invocation for IsInRole. When we find that particular pattern, we call AllowByRoleControl(), which extracts the pertinent information from the AST and creates the appropriate control.
Listing 10.17 shows the setup code that uses the AuthorizationRulesParser.
Listing 10.17. Using the AuthorizationRulesParser to generate the UI
public partial class ViewAuthorizationRules : Form
{
    public ViewAuthorizationRules()
    {
    InitializeComponent();
    var compileUnit = BooParser.ParseString("test", @"

if Principal.IsInRole('Administrators'):
    Allow('Administrators can always log in')
    return

if Prinicpal.IsInRole('Everyone'):
    Deny('We do not allow just anyone, you know')
    return");

    var parser = new AuthorizationRulesParser();
    foreach (var control in
             parser.GetControlsFor(compileUnit).Reverse())
    {
       control.Dock=DockStyle.Top;
       Controls.Add(control);
    }
    }
}
We use the BooParser.ParseString() method to turn a piece of code into an AST, which we then pass to the AuthorizationRulesParser(). From there, it’s pretty straightforward. We get all the controls from the rule parser and display them (in reverse order because of the way WinForm’s DockStyle.Top works, to get the same ordering as in the text). The result is shown in figure 10.9.
Figure 10.9. The UI representation for the Authorization DSL rules shown in listing 10.15

There isn’t much to this approach, as you can see—only the pattern recognition and the specialized UI for each pattern. But although this is a cool demo, there are significant costs in pushing this to its ultimate limits. I would much rather have the textual version than this one. The textual version is richer, just as readable, and easier to work with. Of course, I am a developer, so I am slightly biased.
So far, we’ve seen only half of the solution. We’ve taken an existing script and displayed it. But how do we go the other way around? How can we get from figure 10.9 to the code in listing 10.15?
10.4. DSL code generation
We’ve taken DSL code, parsed it, and made it graphical. That was the hard part. The easy part is going the other way, from the abstract concept down to the DSL code.
At least, that’s how it might seem at first. Let’s take a look at our options for code generation and the benefits each approach buys us.
Using BooParser versus executable code
Why bother with the parser when we could probably get the AST of the code at runtime and represent the same structure without all the parsing work? (We’ll look at how to get the AST at runtime in chapter 12, section 12.3.3.)
One major reason is that the parser is much more robust. A compilation error that would stop us in our tracks at runtime will still probably generate a usable AST that we can access with the parser. The ability to handle slightly off code is important for a tool that needs to accept code written by people. Error handling and recovery isn’t an optional feature.
10.4.1. The CodeDOM provider for Boo
The CodeDOM API is the official API that the CLR provides for generating code without being dependant on a particular language. Using this API, we can build an AST and generate the code in a variety of languages, including Boo.
The Boo implementation of the CodeDOM API is located in Boo.Lang.CodeDOM.dll, and it’s fairly complete. Using it is a good approach (if tedious) when you need to programmatically generate code artifacts.
On the other hand, it doesn’t work at all when you want to generate anything that doesn’t look like code. Because the implementation is built to be as safe as possible, it intentionally specifies nearly everything it can. From the point of view of creating readable, language-oriented output, it’s a failure.
The best way I’ve found to handle this scenario is to build your own DSL writers that understand the language and conventions, and how to express things in the most meaningful way.
10.4.2. Specific DSL writers
A DSL writer is exactly what it sounds like. It’s a class that, given some sort of input, will produce textual output that’s valid input for a DSL. How’s that for an extremely dry definition?
A DSL writer is a glorified name for a class that writes to a TextWriter. The only thing of importance about this class is that it understands how to output the DSL well enough to generate readable output, instead of the usual cautionary output that the CodeDOM API generates, with everything explicitly specified and tediously repeated.
I intentionally put the DSL writer definition in those terms to make it clear that there is absolutely nothing special about DSL writers. And yes, that does leave you on your own to escape strings, handle keywords, and so on. Again, this is mostly intentional; we need to move away from the code-centric way of thinking about the DSL, to get human-readable[1] output. In practice, this isn’t much of an issue, because there tends to be a fairly limited set of inputs for a DSL writer, but it’s important to note that we do have to deal with issues like keyword escaping on our own.
1 I have very strict standards about what is human-readable. Most XML formats aren’t human-readable, for example.
Let’s look at how we can implement a DSL writer for the Authorization DSL, which will allow us to save modifications that are made in the UI in figure 10.10.
Figure 10.10. The output of a simple DSL writer

Note
The scenarios in which you use DSL writers tend to be narrowly focused. That’s the whole point. You have enough information to make a lot of important assumptions, instead of having to support all the possible options.
The implementation of this DSL writer is as simple as you might imagine. You can see it in listing 10.18.
Listing 10.18. A simple DSL writer can have a lot of value
public class AuthorizationDslWriter
{
    public string Write(IEnumerable<Control> controls)
    {
        var sw = new StringWriter();
        foreach (var control in controls)
        {
            var role = control as AllowByRole;
            if (role != null)
                WriteRoleRule(role, sw);
        }
        return sw.GetStringBuilder().ToString();
    }

    private void WriteRoleRule(AllowByRole role, StringWriter sw)
    {
        sw.WriteLine("if Principal.IsInRole('{0}'):", role.Role);
        if(role.Allow)
            sw.WriteLine("	Allow('{0}')", role.Reason.Escape());
        else
            sw.WriteLine("	Deny('{0}')", role.Reason.Escape());
        sw.WriteLine("	return");
        sw.WriteLine();
    }
}

public static class Extensions
{
    public static string Escape(this string self)
    {
        return self.Replace("'", "'");
    }
}
As you can see in listing 10.18, the implementation of DSL writers can be simple. The value that they bring is in being able to understand the DSL that they’re writing.
In this case, we’re feeding the DSL writer directly from the UI, although in most scenarios we’d have an intermediate object model in place. In fact, the most common scenario is to use the DSL instances themselves as the source for the DSL writer. This allows us to take a DSL instance, modify it, and save it back to text.
Another scenario where DSL writers are useful is when you want to use code generation to create a whole bunch of DSL scripts. In my opinion, it doesn’t make a lot of sense to code-gen the DSL scripts. They’re being created to be human-readable and-editable, and if you need to code-gen them with some other tool, something there needs a tune-up. Nevertheless, this is an important technique when you want to deal with migration from one form of DSL to another (such as when performing automatic version updates on existing DSL scripts), or when you’re creating the system for the first time and duplicating rules that exist in non-DSL format.
This is a good tool to have in your toolbox, but its usage should be considered carefully. It’s all too easy to reach for the code-generation hammer without considering whether there is another way to express what you want, perhaps with a different DSL that has more expressiveness than the existing one.
And with that, we’re nearly done creating a professional DSL. We have one last important topic to talk about: error handling.
10.5. Handling errors and warnings
There is nothing that screams “Unprofessional!” like sloppy error handling. That nasty message box with “Unexpected Error” that pops up is about the most annoying thing that can happen, short of a blue screen just before you hit the Save button.
When dealing with a DSL, you need to be prepared to deal with scripts that are invalid. They may contain garbage, invalid code, code that’s valid but will fail at runtime, code for a completely different DSL dialect, or even valid, but nonsensical, code. Those can all be divided into two broad categories: compiler errors and warnings, and runtime errors and warnings.
Note
What are these warnings? You’re familiar with compiler warnings, which let you know that you’re doing something that you probably shouldn’t. Well, you can generate the same types of warnings at runtime, to actively detect and alert against behavior that’s likely to cause issues or errors at a later date.
Compiler errors mean that you can’t execute the script, and you have to be able to handle that gracefully. Usually this means showing the user the error message and allowing them to navigate to the precise location of the fault. Rhino DSL will automatically throw a detailed exception (aided by the Boo compiler) for any compiler errors, so it’s fairly easy to deal with these.
Remember to take care of the lexical info when you extend the language. It allows the compiler to report exactly where an error occurred, and that can be important in troubleshooting. The lexical information is also important when runtime exceptions are raised, because the runtime will use this information to trace back the exception location to the DSL code.
With both compiler and runtime errors, you want to expose them to the user and offer the ability to go directly to the offending line in the DSL script. Think about the Errors & Warning pane in Visual Studio, where a double-click will take you to a compiler error. You want this kind of experience because it makes troubleshooting so much easier.
Compiler warnings occur when the compiler notices something that isn’t quite right, but that isn’t wrong enough to be a bug. The use of obsolete members is a good example of code that would generate a warning.
In addition to compiler warnings, your own code can issue warnings (by adding them to the CompilerContext’s Warnings collection). You can, and should, do that any time you discover some behavior that’s likely to be wrong, but about which you aren’t certain.
Because warnings are, well, warnings, Rhino DSL won’t force you to deal with them the way it does with errors. You can access the warnings collection for the current compilation by overriding DslEngine.HandleWarnings(). I strongly recommend you do that and find a way to show them to the user in a meaningful way.
The rest of it is standard error handling, and that’s not what this book is about.
10.6. Summary
In this chapter, I focused on the DSL mechanics rather than the UI particulars. This makes explaining the concepts easier, and it allows you to easily transfer your knowledge from one particular technology to another.
In many cases, the solutions I have presented are the trivial ones, just barely functional. That’s intentional. Covering code completion in depth, for instance, would be a topic for a book of its own (and I recommend reading the free #develop ebook to get an idea of what building a full-fledged IDE means).
That doesn’t mean you shouldn’t use the techniques shown here. Indeed, I’m using them in several projects. They aren’t appropriate for complex scenarios, but they’re suitable for most reasonable situations, and they can take you a long way before you have to consider alternative approaches.
We covered two different approaches for creating UIs in this chapter. First, we looked at how to create a good text-editing experience for the DSL, providing such features as syntax highlighting and code completion. Then we looked at creating visualizations and a graphical editing experience for the DSL. We saw two different approaches to that: one using the DSL runtime itself, and the second using the AST of the code as it was provided by the Boo parser.
Finally, we touched on how to move from the graphical representation back to a textual representation, using an intentionally simple approach whose main advantage is the embedded knowledge of DSL operation modes.
Error handling is an important part of the UI in any application, and it must be considered when building a UI for a DSL. Compiler and runtime errors and warnings should have a well-thought-out place because they will happen, and the user will expect a good experience when they do.
Now it’s time to move on to another topic that’s critical for producing professional DSLs, although one that most developers would prefer to avoid: documenting the DSL.