
![]()
Integration Using Yammer Rest APIs
In Chapter 5, we explained how to use Yammer Open Graph API to bring information stored in different business applications into Yammer and allow users to discover data from other applications and see the full view in a structured manner. This is all good, but it provides only one-way integration—from your business applications to Yammer. What if you want to integrate Yammer data into your business applications and make your applications more social and able to share content? The Yammer REST APIs provide this capability.
In this chapter, we will explain Yammer REST APIs, which allow developers to access Yammer data from line-of-business applications running on different platforms. Yammer’s REST APIs allow inbound and outbound flow of messages. This chapter covers:
- Explanation of REST
- Introduction to Yammer’s REST APIs
- Yammer features that can be accessed using REST APIs from line-of-business applications
- Yammer’s REST service endpoints details
- Lab exercise using the SPDS University application to see how to access data from Yammer and write data into Yammer using Yammer’s REST API endpoints
REST
As per Wikipedia, “Representational State Transfer (REST) is a software architecture style consisting of guidelines and best practices for creating scalable web services”.
REST relies on stateless, client-server, cacheable HTTP channel and is a lightweight alternative to using web services or RPC. RESTs benefits include:
- It’s platform independent
- It’s programming-language independent
- Can be used when firewalls exist
- REST services use HTTP as main communication channel and have a uniform interface where resources are identified as URIs. This allows easy implementation of REST endpoints.
Any service based on the REST protocol is called a RESTful service. In a RESTful application, REST-enabled resources are maintained in an accessible data store. When a request is sent to a RESTful application to perform an action (create, retrieve, delete, or update), the RESTful application performs the operation and provides a response, as shown in Figure 6-1. All RESTful applications use HTTP requests to post and get data.

Figure 6-1. Client web application communication with web server using REST API over an HTTP channel
As all REST API resources have unique HTTP-accessible URIs, REST enables data caching and is optimized to work with the distributed infrastructure. For more information about REST, you may find the following third-party references useful:
- Wikipedia (http://en.wikipedia.org/wiki/REST) provides a good overview of REST
- HTTP 1.1 method definitions (http://www.w3.org/Protocols/rfc2616/rfc2616-sec9.html); includes a specification for GET, POST, PUT, and DELETE
Like other social networking applications Yammer has provided REST APIs to develop custom integrations with business applications. Yammer REST APIs are most common way to integrate your line-of-business applications with Yammer and enables you to add social features to virtually any type of business application within your organization.
Yammer REST API is the lowest-level API provided by Yammer and enables developers to build both client and server applications. In this chapter, we will go through all the available Yammer REST endpoints and try to explain them in a manner that will allow you to implement integrations with your business applications. First, let’s look at the main features of Yammer APIs.
Before you develop integrations with Yammer REST APIs, it’s useful to know about various features provided by them. Here are the main features of using Yammer REST APIs:
- The REST API is available for any platform that can make HTTP calls over SSL. Current supported platforms are Ruby, Python, JavaScript, iOS, .NET, and Windows Phone.
- Yammer APIs mainly support JSON (JavaScript Object Notation), but it also supports XML format for many APIs.
- Developers simply need to create HTTP requests going to Yammer and process the JSON returned from Yammer in response on their business applications.
- Using Yammer REST APIs, you can work on different Yammer objects, including messages, users, groups, and so on.
- Yammer REST APIs enable developers to access Yammer’s data using simple HTTP methods like GET and POST.
![]() Note As Yammer keeps adding new features, we suggest you review the latest API reference on the Yammer Developer Network for the currently supported API set (https://developer.yammer.com).
Note As Yammer keeps adding new features, we suggest you review the latest API reference on the Yammer Developer Network for the currently supported API set (https://developer.yammer.com).
What You Can Do with Yammer REST APIs
As mentioned, Yammer REST APIs help you develop and add social features to your business application, and you can easily post messages or activity updates from any platform. Here are some useful examples of what you can do.
- Bring Yammer’s social experience to your business applications.
- You can use REST APIs to view, create, edit, or delete messages on Yammer.
- You can use Yammer REST APIs to append or delete attachments or topics to messages or message threads.
- You can provide and manage subscriptions to Yammer topics, discussion threads, and users from business applications.
- You can use Yammer REST APIs to view organizational charts and relationships.
- You can add or remove relationship between users.
- You can send email invites to users who have not joined Yammer using REST APIs.
- Search Yammer content from other applications.
- Using Yammer REST APIs, you can search for Yammer data directly from your business applications.
- You can use the Yammer autocomplete feature in your business applications.
- Meet compliance needs.
- Yammer also provides a data export API, which can help IT administrators archive Yammer Network content and be compliant with an organization’s rules and legal requirements.
- Monitor Yammer usage.
- You can use data export to do reporting on Yammer content, provide useful insight on adoption, and help measure ROI from the Yammer investment.
Before You Start Using the Yammer REST APIs
Before you start using the Yammer REST endpoints, it is important to familiarize yourself with the high-level requirements.
- Authentication on Yammer
- User privileges
Let’s explore why these are required.
Just like any enterprise application, before requesting Yammer data, any request to access Yammer data must be authorized by the authenticated user. This authorization is done using the Yammer Authentication model based on the OAuth2.0 protocol, which we covered in detail in Chapter 4. As you know when you do user authentication, Yammer provides an access token that’s linked to the authorized user. Developers should send an authorization header with the access token to make sure the request to POST/GET/DELETE using the Yammer REST API is authenticated by Yammer.
The format of the authentication header is:
Authorization: Bearer [Access Token]
Any operation that modifies the Yammer data can be performed only by the user who owns that data. It’s important to understand that the user's access token much be strongly protected when used with REST APIs. If a security breach occurs, an attacker can post and read messages to/from Yammer. So, you need to use measures like encryption, permission, and least privilege policy to protect the user authorization access tokens in your business applications.
Your enterprise Yammer network has three types of users and each user type has a different set of permissions on Yammer. As a developer, you should consider which accounts are used while doing integration using Yammer REST APIs.
The different user types are described in Table 6-1.
Table 6-1. Yammer User Account Types and Privileges
|
User Account Type |
Privileges |
|---|---|
|
User |
Read own messages Post messages Delete own messages |
|
Admin |
All User permissions and change some admin settings |
|
Verified Admin |
All User permissions and delete any Yammer message or file Read any content in private Yammer groups. Acquire access tokens for impersonation. Export all Yammer network content. |
Getting Started with Yammer REST APIs
Yammer REST APIs are useful wrappers that speed up the development of your applications. There are different Yammer REST APIs for different Yammer objects:
- Messages
- Users
- Groups
- Relationships
- Notifications
- Suggestions
- Subscriptions
- Autocomplete
- Search
- Networks
Table 6-2 provide the available HTTP methods that can be used for invoking Yammer resources.
Table 6-2. Yammer API Operations
|
HTTP Method |
Description |
REST HTTP Mapping |
|---|---|---|
|
GET |
Get a specific Yammer resource |
GET on Yammer REST API endpoint |
|
POST |
Update an existing resource or create a new one |
POST on Yammer REST API endpoint, where you pass in data associated with a related resource |
|
DELETE |
Delete a specific resource |
DELETE on Yammer REST API endpoint, where you specify the resource to be deleted |
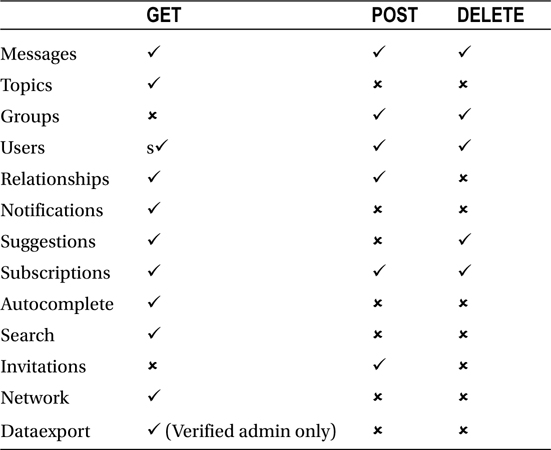
The operations that are supported for the different types of resources are summarized in Table 6-3.
Table 6-3. Operations Supported for the Yammer Resources
There are few other considerations you should know about when implementing Yammer REST APIs in your applications:
- Admin actions: When you plan to use administrative Yammer API for actions like adding or deleting Yammer users, you should only use authorization access tokens from a Yammer-verified admin user.
- Versioning: The Yammer API version is visible in the URL of the REST API endpoints. For example, /api/v1. As per the Yammer guidelines, there could be additional elements added to output from endpoints. When elements are added or removed a new version of the API is typically released.
- Calling styles: There are several ways to invoke the API from your business applications.
- Using a REST endpoint directly
- Using a REST endpoint from JavaScript (no server-side code required)
- Using a server-side application (explained later in the SPDS University application exercise)
- Using REST endpoints directly. You need to specify Yammer actions using the HTTP verbs POST, GET, PUT, or DELETE. The Yammer resource is specified by a unique URI:
https://www.yammer.com/api/v1/users.json
- REST from JavaScript: Developers can invoke the Yammer REST API from JavaScript using the callback query parameter and a callback function. This allows developers to write rich applications without need to write server-side code:
function PostYammerMessage(val) {
   var msg = document.getElementById('msgtxt').value;
   var groupID = "71618329";
    if(msg == ""){
     alert ("Message cannot be empty!");
     return false;
    }
 yam.platform.request(
   {
    url: "https://api.yammer.com/api/v1/messages.json"
    , method: "POST"
    , data: {
     "body" : msg,
     "group_id" : groupID
    }
    , success: function (msg) { alert("Yammer message Post was Successful!"); }
    , error: function (msg) { alert("Yammer Post failed"); }
    }
    )
 }
In the previous code, the PostYammerMessage() function accepts a message and then posts the request to Yammer’s messages REST endpoint to a Yammer group.
Later in this chapter, we will explain the use of REST endpoints using an example. But before that, you need to understand the basics of the different Yammer REST endpoints.
REST Endpoints
Let’s go through all the available endpoints and explore how to use them in your application.
![]() Note Yammer provides a full list of the latest APIs and a new interface (API Explorer) to try the APIs endpoints. For full details, go to https://developer.yammer.com/.
Note Yammer provides a full list of the latest APIs and a new interface (API Explorer) to try the APIs endpoints. For full details, go to https://developer.yammer.com/.
The API references used in this book are from https://developer.yammer.com/.
Messages
All posted Yammer messages are displayed as feeds and messages are grouped into threaded conversations, as shown in Figure 6-2. Using Yammer REST APIs, you can post a message to Yammer, reply to a post, follow a post, share a post, delete a post, email a Yammer message, and do many other operations.

Figure 6-2. Yammer messages
Yammer has provided many APIs to view and retrieve messages. Yammer’s feed is the information hub, and it provides three feed views that users can toggle among, as highlighted in Figure 6-3.
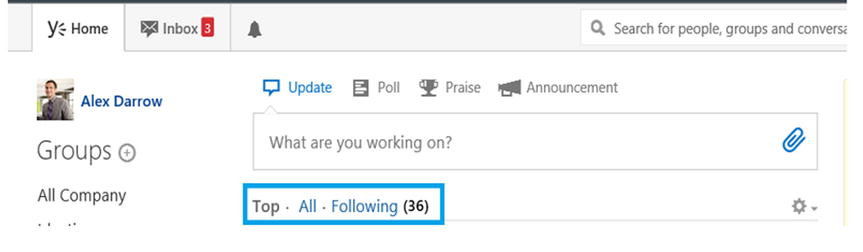
Figure 6-3. Yammer’s feed section
As shown in Figure 6-3, the three view options are Top, All, and Following. The Top view shows the conversations most relevant to user, based on what that user subscribes to and her interactions with the Yammer network content. The All view renders all the conversations to which that Yammer user has access within his Yammer network, and the Following view displays messages that users actively subscribe to. This includes conversations that the user’s followers have participated in or liked, conversations that have been tagged with a Yammer topic that users follow, and conversations that have been posted in one of the user’s Yammer groups.
Retrieve All Public Messages
You use the message.json REST API endpoint to get all the public messages and conversations in the user’s Yammer network. This is linked to the All view in the Yammer web interface.
Endpoint:
https://www.yammer.com/api/v1/messages.json
Or:
https://www.yammer.com/api/v1/messages.xml
Table 6-4 lists the required parameters.
Table 6-4. Yammer Messages REST API Parameters
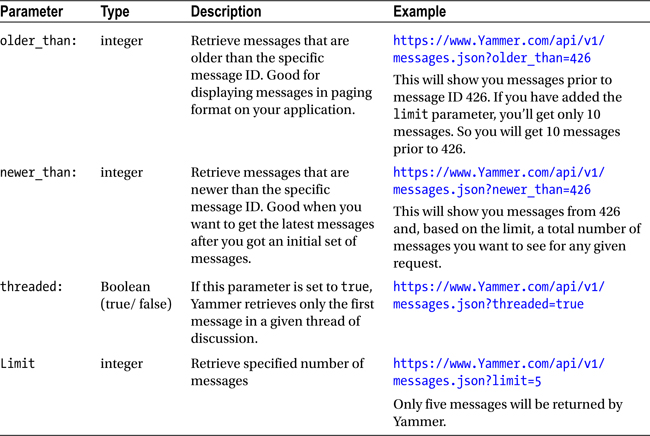
Later in this chapter, you will go through a detailed exercise on how to retrieve messages from Yammer using the SPDS University business application case study.
Other Message REST APIs Used to GET Yammer Messages
Table 6-5 lists the related RESTful APIs used to GET messages from different feeds on Yammer, such as my_feed.json, which is the user’s feed, algo.json, which is the algorithmic feed, and following.json, which is the feed the resource users are following.
Table 6-5. Yammer Messages REST API Endpoints
|
Endpoint ( HTTP Method: GET) |
Description |
|---|---|
|
https://www.yammer.com/api/v1/messages/my_feed.json or |
Provides an endpoint for a Yammer user’s feed, based on the Following and Top conversations. |
|
https://www.yammer.com/api/v1/messages/algo.json or |
Endpoint to get the Top conversations |
|
https://www.yammer.com/api/v1/messages/following.json or |
This endpoint shows the messages feed for a user who is following and is shown in the Following view, including people, groups, and topics that the user is following |
|
https://www.yammer.com/api/v1/messages/sent.json or |
Use this endpoint to get messages sent by a user |
|
https://www.yammer.com/api/v1/messages/private.json or |
This endpoint provides output for any private messages received by the user |
|
https://www.yammer.com/api/v1/messages/received.json or |
Use this endpoint to get all the messages received by a user. |
All the previously mentioned endpoints use the same parameters as mentioned in Table 6-4.
Manipulating/Updating Messages REST API
Yammer’s REST APIs provide a simple way to post messages to Yammer. You can use the same APIs to post your message to the whole company, broadcast to everyone in the network, post to a specific group, send a private message, add topics, and so on.
In order to post messages to Yammer, you need different IDs like a Group ID, User ID, Message ID, and Feed ID. You can use the GET method of message.json to retrieve the IDs of different objects. Tables 6-6 and 6-7 list the endpoints and their related parameters.
Table 6-6. Yammer POST Messages REST API Endpoints
|
Endpoint ( HTTP Method: POST) |
Description |
|---|---|
|
https://www.yammer.com/api/v1/messages.json OR |
To POST a message |
Table 6-7. Yammer POST Messages REST API Parameters
|
Parameter |
Type |
Example |
|---|---|---|
|
Body: The message as string |
string |
String data = "group_id=4659506" + "&body=" + "Greeting, This is my first post"; |
|
Group_ID: The ID of the target group to which this message is to be posted |
integer |
String data = "group_id=4659506" + "&body=" + "Greeting, This is my first post"; |
|
Replied_to_id: The message ID this is in response to |
integer |
String data = "replied_to_id=433483891" + "&body=" + "Greeting, This is my first post"; |
|
Direct_to_id: Sends a private message to a user indicated by the user ID |
integer |
String data = "direct_to_id=1522209393" + "&body=" + "Greeting, this is private message"; |
|
broadcast: The broadcast-=true is used to broadcast the message to all Yammer users on a particular network. For the broadcast=true parameter, the Yammer admin user’s access token should be used |
Boolean |
String data = "broadcast=" + "&body=" + "Greeting, this is private message"; |
|
topicn: Specifies the topics in the message. Can use topic1 through topic20. |
String data = "group_id=4659506&body=A message with Topic" + "&topic1=" + "YammerBook!!" |
Here’s an example:
function postAMessage() {
    var testMessage = { "body": "Hello Test, have you seen this" + location.href };
    yam.platform.request({
        url: "messages.json",
        method: "POST",
        data: testMessage,
        success: function (msg) {
            console.log("Message Posted Successfully");
        },
        error: function (msg) {
            console.log("Message Posting Error: " + msg.statusText);
        }
    });
}
Other parameters for the POST message Open Graph (OG) object parameter include:
- og_<property>: This parameter is required if your message contains an Open Graph (OG) object as an attachment.
- og_fetch (true/false): If this parameter is set to true, Yammer will get all the available Open Graph parameters for a specified page URL.
If you want to delete a message that contains an OG object, you need to specify the og_url parameter. Along with this there are other optional parameters specified in Table 6-8. Refer to the Open Graph site for the latest details (http://ogp.me/).
Table 6-8. Yammer POST Messages REST API Additional Parameters for OG Objects
|
Parameter |
Description |
|---|---|
|
og_url |
This is required and must be a canonical URL of the Object Graph object, which can be used as a permanent ID. For example: |
|
og_title |
Title of the Open Graph object. This will be displayed in a message. For example: The Book |
|
og_image |
URL of a thumbnail image that you want to add to represent the OG object. |
|
og_description |
Description of the OG object. |
|
og_object_type |
The type of your object. For example: audio.song. Also note, depending on the type, there may be other required properties. Check the Open Graph documentation (https://developer.yammer.com/v1.0/docs/schema). |
|
og_site_name |
A unique value to relate objects from a common domain, for example, Yammer Blog. |
|
og_meta |
Use this parameter to specify additional information for custom rendering. |
|
og_fetch |
Get Open Graph object attributes from the Internet (default: false). |
Delete a Posted Message from Your Business Application
You can remove a message from your application using Yammer. Table 6-9 provides the endpoint details.
Table 6-9. Yammer’s Delete a Message REST API Endpoint
|
Endpoint ( HTTP Method: DELETE) |
Parameters |
|---|---|
|
https://www.yammer.com/api/v1/messages/[:id] |
[:id] is the message id to be deleted. Note that in order to delete the message, it must be added/edited on Yammer by current user. |
![]() Note Yammer DELETE requests should be specified with query string parameters. If your app does not support the HTTP DELETE method, try HTTP POST with the parameter _method=DELETE.
Note Yammer DELETE requests should be specified with query string parameters. If your app does not support the HTTP DELETE method, try HTTP POST with the parameter _method=DELETE.
Adding an Attachment to a Message
You can easily add an attachment file to a message from your application. Again, the Yammer message must be related to the current user.
Table 6-10. Yammer REST API Endpoints to Add an Attachement to a POST Message
|
HTTP Method Endpoint |
Description |
Parameter |
|---|---|---|
|
(HTTP method: POST) |
Use this endpoint to create a new pending attachment. |
Attachment: Use HTTP multipart request to upload attachments with Yammer Message |
|
(HTTP method: DELETE) https://www.yammer.com/api/v1/pending_attachments/[:id] |
To delete a pending attachment. |
Attachment: Use HTTP multipart request to specify attachments that you want to delete from a Yammer message. |
Emailing Messages to Yammer
Using Yammer REST API, you can programmatically send a copy of any message in Yammer as email to a currently logged in user. Figure 6-4 shows how the message will appear in email.

Figure 6-4. A copy of private message sent as an email
Table 6-11 provides the endpoints and the parameters for emailing a message.
Table 6-11. Yammer REST API Endpoint to Add an Attachement to a Message POST
|
Endpoints ( HTTP Method: POST) |
Parameter |
|---|---|
|
message_id: The ID of the message to be sent as email. |
Example:
https://www.yammer.com/api/v1/messages/email?message_id=436054827
Viewing a Thread
This endpoint (Table 6-12) is used to get the Yammer conversation thread of a message.
Table 6-12. Yammer REST API Endpoint to view a Yammer Converation Thread
|
Endpoints ( HTTP Method: POST) |
Parameter |
|---|---|
|
JSON: https://www.yammer.com/api/v1/threads/[:id].json XML: https://www.yammer.com/api/v1/threads/[:id].xml |
threadId: The ID of the message to be sent as email. |
Examples:
https://www.yammer.com/api/v1/threads/436054827.json
https://www.yammer.com/api/v1/threads/436054827.xml.
Figure 6-5 shows how the XML looks in Yammer conversation thread output. You can see that the output type is thread and determine which group it is related to.
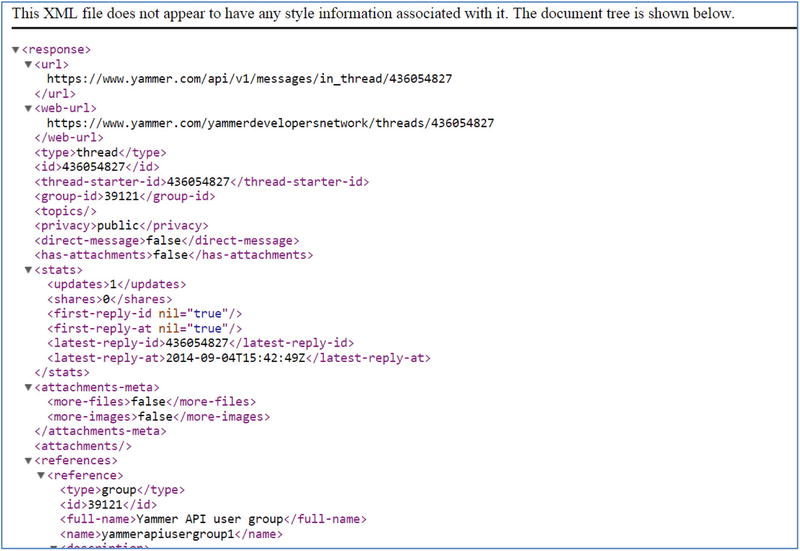
Figure 6-5. The XML output of the Yammer conversation thread view
Yammer provides many different uses of the Like button; for example, people can use the Like button when they prefer a post and feel it is informative.
Yammer provides REST APIs (Table 6-13) to programmatically mark a message as Liked by the current user. Chapter 7 provides a step-by-step guide on how to implement this feature in your line-of-business applications.
Table 6-13. Yammer REST API Endpoints to Posting a Like on Yammer
|
Endpoints ( HTTP Method: POST) |
Parameter |
|---|---|
|
https://www.yammer.com/api/v1/messages/liked_by/current.json?message_id=[:id] |
message_id: The ID of the message to mark as liked by the logged-in user. |
You can also use the Yammer Like button as shown in Chapter 2 with the Yammer Embed functionality.
Example:
https://www.yammer.com/api/v1/messages/liked_by/current.json?message_id=436054827
Unlike a Message
Yammer provides REST APIs (Table 6-14) to programmatically unmark a message liked by current users. Chapter 7 provides a step-by-step guide on how to implement this feature in your line-of-business applications. The implementation remains the same as you saw in previous examples. The only difference is the method type. Instead of using POST, you use DELETE.
Table 6-14. Yammer REST API Endpoint to Delete a Like on Yammer
|
Endpoints ( HTTP Method: DELETE) |
Parameter |
|---|---|
|
https://www.yammer.com/api/v1/messages/liked_by/current.json?message_id=[:id] |
message_id: The ID of the message to unmark the liked message. |
Example:
https://www.yammer.com/api/v1/messages/liked_by/current.json?message_id= 436054827
Yammer Topics
Yammer Topics provides a better way to organize your messages around specific subjects. The user who is posting or editing a message can add topics it and this will allow users to view all the messages posted using the same topics. Users can follow topics. Once a user follows a topic, any posts that contain the topic name will appear in the user’s MyFeed.
If you want to show the trending topics or get all the Yammer posts by topic, the following Yammer REST endpoints (Table 6-15) can be useful.
Table 6-15. Yammer REST API Endpoint for Topics
|
Endpoints |
Description |
Parameter |
|---|---|---|
|
POST https://www.yammer.com/api/v1/topics/[:id].json |
To create a TOPIC on Yammer You can use all other parameters like posting to a group to reply to an existing message or to add topics. Example: String data ="group_id=4659506&body=A message with Topic" + "&topic1=" + "YammerBook!!" |
Topic: integer 1 to 20: The ID of the message to mark as liked by the current user. Body: String The actual message |
|
GET JSON: https://www.yammer.com/api/v1/topics/[:id].json or XML: https://www.yammer.com/api/v1/topics/[:id].xml |
If you know the topic ID and want to retrieve all users who have used that topic. Example: https://www.yammer.com/api/v1/topics/1788026.json |
Id: The ID of the topic to be used/followed by users in your network. |
|
GET https://www.yammer.com/api/v1/messages/about_topic/[:id].json or https://www.yammer.com/api/v1/messages/about_topic/[:id].xml |
If you know the topic ID, you can retrieve all messages that have the specified topic or hashtag. Example: https://www.yammer.com/api/v1/messages/about_topic/1788026.json |
Id: The ID of the topic to used/followed by users in your network. |
Yammer Users
In Yammer, users are the key player of any social platform. Performing user management in Yammer through your line-of-business applications is as important as managing users of your sites. You can view all the users in the network and see their profiles, who they following, and so on, using the Yammer web interface (Figure 6-6).

Figure 6-6. Yammer people
Yammer has provided a REST endpoint to work on the user object in different manners:
- Get all users on a given network for your internal analysis or audit.
- Engage users on an internal application by showing their Yammer profile info on business applications.
- Make applications more social by adding details of messages liked by users, topics specified by users, and group membership of users.
- Update information about users from business applications.
- Suspend or delete a user.
- Delete messages directly from business applications behalf of a user.
- Search users on Yammer by email address and share their Yammer profiles in business applications.
- Show relationships between users and show the org chart of the current user in business applications.
Table 6-16 lists the APIs available from Yammer related to user objects.
Table 6-16. View Data About the Current User
|
Endpoints ( HTTP Method: GET) |
Parameter |
|---|---|
|
https://www.yammer.com/api/v1/users/current.json or |
This endpoint does not require a parameter. |
The best way to view data about a particular user in XML or JSON is to use the browser window and retrieve the user’s data. You can get the user ID from previous examples and form the URL as https://www.yammer.com/api/v1/users/current.xml or https://www.yammer.com/api/v1/users/current.json.
Type the URL in the browser to retrieve the XML, as shown in Listing 6-1 for user ID 1510462475. You will notice when you get the details of the user that you get full profile information, number of followers, number of people followed by the user, the user type, user permissions, different feeds of the user (home, company, and all), number of messages liked by the user, sites bookmarked by the user, and other related details.
Figure 6-7 shows the sample JSON output of the current user using the REST APIs.
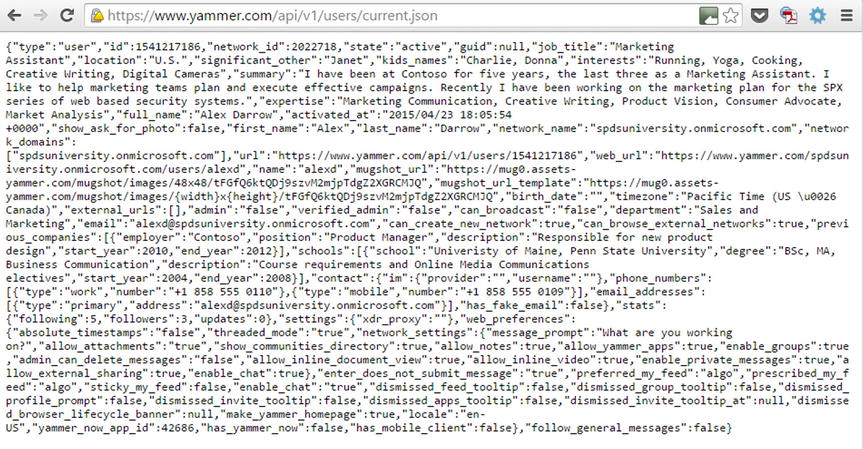
Figure 6-7. Sample JSON output of current user using the REST APIs
Retrieve All Users
You can use Yammer’s REST API endpoints (Table 6-17) to retrieve all users in a Yammer network. These endpoints support parameters for paging, sort_by, and so on, as listed in Table 6-18.
Table 6-17. Yammer REST API Endpoint for Getting Users
|
Endpoints (HTTP Method: GET) |
Description |
Parameter |
|---|---|---|
|
https://www.yammer.com/api/v1/users.json or |
Retrieve all users in a Yammer network |
This endpoint does not require a parameter |
|
https://www.yammer.com/api/v1/users/[:id].json or https://www.yammer.com/api/v1/users/[:id].xml |
View data about any user |
ID: User ID of Yammer network |
|
https://www.yammer.com/api/v1/users/[email protected] or |
Retrieve user’s data about any user using an email ID Example: https://www.yammer.com/api/v1/users/[email protected] or https://www.yammer.com/api/v1/users/[email protected] |
Email: Email ID if existing Yammer user on your Yammer network |
|
https://www.yammer.com/api/v1/users/in_group/:Group_Id.json or |
Get users in a group |
groupId: Add a group specified by the numeric string ID |
Table 6-18. Query String Parameters for Retrieving Users
|
Parameter |
Description |
|---|---|
|
page |
Pagination to 50 users will be shown per page from the Yammer network |
|
letter |
Retrieve users whose username starts with a given letter |
|
sort_by=[ messages | followers ] |
The default behavior for sorting messages while retrieving is alphabetically You can use this parameter to sort number of messages the user has posted or followers of the users |
|
reverse=TRUE |
Should be used with sort_by to reverse the sorting order |
|
Delete=True |
You can suspend user account by passing Delete=true as a parameter Note: This can cause the user Yammer account to be deleted and you’ll have to contact admin to get it reinitiated. |
You can specify the query string parameters listed in Table 6-18.
Create a User
You can create a user using the REST endpoints in Table 6-19.
Table 6-19. Yammer REST API Endpoints for Creating Users
|
REST Endpoint (HTTP Method: POST) |
Description |
Parameter |
|---|---|---|
|
Use this API to provision a new user. For this endpoint the current user must be a verified Yammer Network admin. |
email: Mixed Email for new user full_name: Mixed Full name of user | |
|
PUT https://www.yammer.com/api/v1/users/[:id].json |
To update information about an existing Yammer user. |
user_id: Integer User id specified by the numeric string ID job_title: Mixed updated job title |
Additional parameters are supported for creating or updating users:
email (required for creating a new user), full_name, job_title, department_name, location, im_provider, im_username, work_telephone, work_extension, mobile_telephone, external_profiles, ignificant_other, kids_names, interests, summary, expertise, education[] (school,degree,description,start_year,end_year) - accepts multiple attributes i.e. education[]=UCLA,BS,Economics,1998,2002&education[]=USC,MBA,Finance,2002,2004, previous_companies[] (company,position,description,start_year,end_year) - accepts multiple attributes i.e. previous_companies[]=Geni.com,Engineer,2005,2008
Groups REST APIs
As you know, Yammer uses the concept of groups. Groups are a great way to reach a specific audience in your network, such as a specific department in your company like HR or IT. Yammer groups can be private or public. Figure 6-8 shows how Yammer messages, users, and groups are linked.
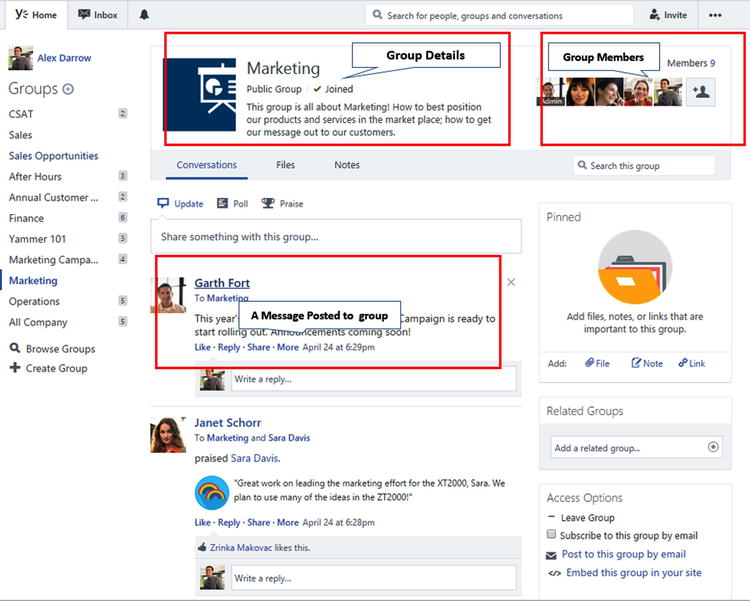
Figure 6-8. Yammer groups
Yammer REST APIs (Table 6-20) allow developers to integration these groups by joining a new group or leaving existing groups.
Table 6-20. Yammer REST API Endpoints for Groups
|
Endpoints |
Description |
Parameter |
|---|---|---|
|
GET https://www.yammer.com/api/v1/group_memberships.json?group_id=[:id] |
To get the current user to join the specified group in group_id Example: https://www.yammer.com/api/v1/group_memberships.json?group_id=4695277 |
group_id: The ID of the group to join |
|
DELETE https://www.yammer.com/api/v1/group_memberships.json?group_id=[:id] |
Similar to the join the group, you can use this functionality to leave the group. You will need to specify the group_id by the numeric string ID. Example: https://www.yammer.com/api/v1/group_memberships.json?group_id=4695277 |
group_id: The ID of the group you’re leaving |
Microsoft introduced the org chart in the My Profile section of SharePoint 2010. It’s a very nice feature that provides a visual org chart. Yammer provides a very similar org chart, as shown in Figure 6-9.

Figure 6-9. Organization chart example on Yammer
By using REST APIs, developers can manipulate the org chart.
Use the REST endpoints listed in Table 6-21 to view or manipulate the Yammer org chart.
Table 6-21. REST Endpoints Points Top View or Manipulate Organization Chart
|
REST Endpoint |
Description |
Parameters |
|---|---|---|
|
GET |
View existing chart relationship |
user_id: Integer (user ID of user who is not the currently logged-in user) subordinate: Email addresses of users who are in relation to user, so are added to the user org chart. All three (subordinate, superior, and colleague) can be passed in one request and can be passed multiple times. id: Integer The user ID of the user you want to remove relationship in organization chart. Must be combined with type. |
|
Add an org chart relationship. You have to specify a user_id if the user is not the current user for whom the relationship is being added. Specify [ subordinate | superior | colleague ] to create the relationship |
user_id: Integer To view or edit the relationships of a user who is different than the currently logged-in user. Subordinate: Email addresses values of users who are in relation to user, so add them to the user org chart. All three (subordinate, superior, and colleague) can be passed in one request and can be passed multiple times. id: Integer The user ID of the user you want to remove relationship in organization chart Must be combined with type. |
To delete existing relationships from the user organization chart, use the endpoints listed in Table 6-22.
Table 6-22. REST Endpoints to Delete Members from an Organization Chart
|
Endpoint (HTTP Method: DELETE) |
Description |
Parameters |
|---|---|---|
|
https://www.yammer.com/api/v1/relationships/[:id].json?type=[relationship_type] |
Deletes the relationship between users by relationship_type. You have to specify a user ID for whom the relationship is deleted. |
user_id: integer To view/edit the relationships of a user other than the current user. [ subordinate | superior | colleague ]=email_address string Specify email addresses of the other users (colleagues, superior, and subordinate) to add them to the org chart. Id: Integer Pass the user ID of the user for whom you want to remove relationship type=relationship_type string Specify each for subordinate, superior, and colleague in the DELETE requests for which you want to remove the relationship. |
Yammer Notifications
Yammer Notifications (Figure 6-10) are a quick way to let people know when some actions are being performed related to them. Yammer notifies users of each interaction the users are a part of on the Yammer network via notification bar, email, SMS, or IM.
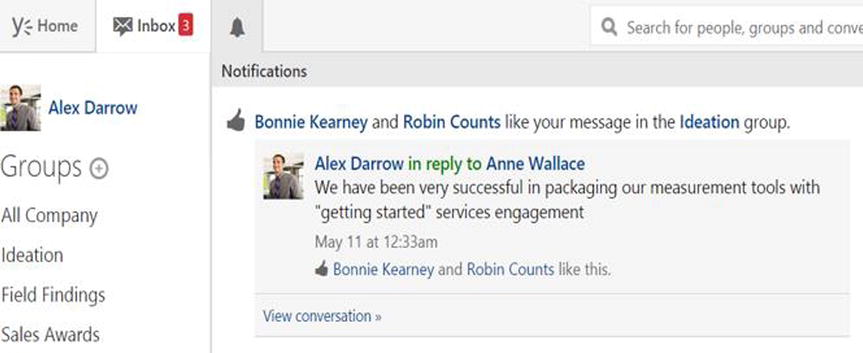
Figure 6-10. Yammer’s notification center
Yammer REST APIs provide an easy way to retrieve notifications for a particular user so that user can take immediate required actions or reciprocate.
Table 6-23 shows the endpoint for getting the notifications feed for the currently logged-in user.
Table 6-23. REST Endpoint to Get Notification Feed for Current User
|
Endpoint (HTTP Method: GET) |
Description |
|---|---|
|
This endpoint is used to get the Yammer notifications feeds for the current user. |
Yammer suggests users join similar group (Suggested Groups) or follow similar people (Suggested People) in the same network. This helps users expand their social circles. Figure 6-11 shows the suggestion process on a Yammer web interface.

Figure 6-11. Yammer’s suggested people to follow
Similarly, developers can use the available REST API endpoints to provide suggestions to users based on certain application types that they work on regularly (Table 6-24). This allows users to find relevant messages more quickly and collaborate with teams and share information.
Table 6-24. REST Endpoints to Show suggested groups to join and suggested user to follow
|
Endpoint (HTTP Method: GET) |
Description |
Parameters |
|---|---|---|
|
This endpoint is used to provide a list of suggested Yammer groups that the current user can join. |
Limit: To get the specified number of suggestions. |
Subscription REST APIs
When you follow or subscribe to other users in your network, all the Yammer messages will also appear in your Yammer feed. Let’s consider an example—you are working on a project and you follow other project members who are also on Yammer network. Each time a new post is submitted by other users, all these posts appear in your feeds, providing you with an easy way to get insight. Yammer REST APIs provide an endpoint to retrieve subscriptions (Table 6-25) or manage the subscriptions by following or unfollowing actions of the POST method.
Table 6-25. REST Endpoints to Manage Scubscriptions
|
Endpoint |
Description |
|---|---|
|
GET https://www.yammer.com/api/v1/subscriptions/to_user/[:id].json |
Use this endpoint to determine if the current user is subscribed to another user specified by the user id. If the current user is not following the specified user, the REST endpoint returns HTTP 404. |
|
GET https://www.yammer.com/api/v1/subscriptions/to_thread/[:id].json |
Use this endpoint to determine if as a user you are subscribed to a discussion thread based on the thread ID. If the current user is not following the specified discussion thread, the REST endpoint returns HTTP 404. |
|
GET https://www.yammer.com/api/v1/subscriptions/to_topic/[:id].json |
This allow you to check the subscription for a particular topic. It takes the topic ID as a parameter. If the topic is not followed error 404 is returned. |
|
This endpoint is used to subscribe to a user or a Yammer topic. It supports the target_type and target_id parameters, which are explained in Table 6-26. | |
|
This endpoint is used to unsubscribe to a user or a Yammer topic. It supports the target_type and target_id parameters, which are explained in Table 6-26. |
Table 6-26. Parameters for REST Endpoints for Manging Subsriptions
|
Parameter |
Description |
|---|---|
|
target_type |
Used with target_id and allows you to specify a user or tag a current user to support subscribe and unsubscribe. |
|
target_id |
Yammer object ID to which the current user will subscribe or unsubscribe. |
AutoComplete
Autocomplete suggests to the users prepopulated values as the users type in the word. As you start typing the name of a user or group in Yammer, it will try to autocomplete your entry. It will show you similar usernames or group names in drop-down list.
Autocomplete is a useful feature when users are composing a new Yammer message from their application and want to add a group, user, or topic. As soon as you start typing the name of user/group/topic, Yammer starts giving you suggestions based on its existing values.
For example, if the user is typing a new message to all the trainers in a company from an internal training application and want to recognize a trainer on new training calendar, they can start typing “Hello @Al”. When the user pauses, they are prompted with the username Alex to complete what they are typing. Table 6-27 lists the REST endpoints related to autocomplete.
Method: GET
Endpoint: https://yammer.com/api/v1/autocomplete/ranked
Table 6-27. Parameters for REST Endpoints Related to Autocomplete
|
Parameter |
Type |
Description |
|---|---|---|
|
Prefix |
string |
Specified text for getting the output of the fields in the specified models. (Users, group, topic, etc.). For example, the prefix text “al” will return results for models that have fields beginning with “al”. |
|
models=modelName:count |
string |
Specify comma-separated values of models that can be searched on and a count of results should be returned for each model. Format supported is: modelName1:count1, modelName2:count2. countn is an integer and model Name can be one of the following: • user • group • topic • file • page (note) • open_graph_object • department • external_network • domain For example: the parameter models=user:2,group:2,topic:2 would return autocomplete six results for users, groups, and topics. |
We will show you how to use autocomplete with REST API endpoints in the exercise later in this chapter.
![]() Tip When using the Autocomplete REST endpoint, avoid excessive network activity and ensure your application adheres to the rate limits. As of now, Yammer Autocomplete has a maximum of five words per search.
Tip When using the Autocomplete REST endpoint, avoid excessive network activity and ensure your application adheres to the rate limits. As of now, Yammer Autocomplete has a maximum of five words per search.
We also suggest that as a developer you use caching mechanisms to cache the Yammer returned results to improve the performance of the application for autocomplete. Users will sometimes start to type text and then press Delete or Backspace. Use the cache results for the same prefix rather sending multiple requests.
Invitations REST APIs
The invitations REST APIs (Table 6-28) give developers the ability to send email to users who have not joined the Yammer network programmatically. The Yammer admin can invite people outside your organization, but if the person (who inviting users) is not the Yammer admin, only the official company domain’s email addresses will be allowed.
Table 6-28. REST Endpoints to Invite Users
|
REST Endpoint (POST) |
Description |
Parameters |
|---|---|---|
|
Use this endpoint to send an email invitation to join the Yammer network. |
Email: A valid email address. Supports inviting multiple users. |
Search REST APIs
Yammer’s another cool feature is search, which allows developers to use REST API to search users, groups, and messages that match the search string programmatically.
The search endpoint (Table 6-29) returns a list of messages, users, topics, and groups that match the user’s search query.
Table 6-29. Search Related REST Endpoints
|
REST Endpoint (GET) |
Description |
Parameters |
|---|---|---|
|
The search endpoint returns a list of messages, users, topics, and groups that match the search query text. |
Search: String In the search query, Yammer fetches all results that match the search query. Page: Integer Output is restricted to 20 results count per given object type for each page. Along with the results, you get the total count of results with each query. For example, Page=1 (the default) will return items 1-20, page=2 will return items 21-30, and so on, depending on the results. num_per_page: Integer This parameter limits the count of results of per object type per page. By default, its 20 maximum results. |
The return JSON contains the following objects
- Messages
- Groups
- Topics
- Uploaded files
- Pages
- Praises
Later in the training web application exercise, you will see how to include search results from Yammer using the REST APIs.
Yammer Networks
Yammer provides two types of networks—the internal network and external network (Figure 6-12). An internal network, also known as a home network, is private to an organization and only for its internal employees.

Figure 6-12. Yammer networks
An external network is a separate extension of your home network where organizations can invite users from outside their organization, such as partners, vendors, and so on. While external networks can accommodate users with different email domains, access is invite-only based on users invited by the home network.
The network endpoint (Table 6-30) allows users to select different Yammer networks. The network permalink in indicated in the URL https://www.yammer.com/network_permalink/resource_path.
Table 6-30. REST Endpoints to Get a List of Networks for the User
|
REST Endpoint (GET) |
Description |
Parameters |
|---|---|---|
|
Gets a list of Yammer networks for the current user using this REST endpoint. It also supports Include_suspended for networks where the user account is in the suspended state. |
include_suspended=TRUE This field is optional and gets a list of Yammer networks where the user is suspended. exclude_own_messages_from_unseen=TRUE Excludes the messages of users from an unseen count. This field is optional. |
There are different OAuth tokens when you make REST API requests from your application for each user per network.
Return JSON contains the following properties:
|
Name Permalink Web_URL show_upgrade_banner header_background_color header_text_color navigation_background_color navigation_text_color paid moderated created_at enable_job_title enable_work_phone |
is_org_chart_enabled is_group_enabled is_chat_enabled is_translation_enabled profile_fields_config unseen_message_count preferred_unseen_message_count private_unseen_thread_count inbox_unseen_thread_count is_primary unseen_notification_count enable_mobile_phone |
For an example, follow these steps:
- Open a browser windows and log in to Yammer.
- Open another tab in the same browser window and type https://www.yammer.com/api/v1/networks/current.json.
The REST API request will return the following JSON detailing lists of Yammer networks of which the current user is a member.
Return value:
{"type":"network","id":54605,"name":"Yammer Developers Network","community":true,"permalink":"yammerdevelopersnetwork","web_url":"https://www.yammer.com/yammerdevelopersnetwork","show_upgrade_banner":false,"header_background_color":"#F7CC65","header_text_color":"#000000","navigation_background_color":"#292929","navigation_text_color":"#FFFFFF","paid":true,"moderated":true,"is_org_chart_enabled":false,"is_group_enabled":true,"is_chat_enabled":true,"is_translation_enabled":true,"created_at":"2009/07/02 22:33:32 +0000","profile_fields_config":{"enable_job_title":true,"enable_work_phone":false,"enable_mobile_phone":false},"unseen_message_count":1,"preferred_unseen_message_count":1,"private_unseen_thread_count":0,"inbox_unseen_thread_count":0,"is_primary":false,"unseen_notification_count":1}]
This covers the main Yammer REST API endpoints. You can refer to these endpoints based on your integration requirements. There are few additional APIs we will talk in this chapter, but first let’s look at how to view Yammer’s REST endpoint output.
Yammer Output in a JSON/XML Viewer
As mentioned, the output of the REST API comes in two formats—JSON and XML. You can retrieve the output of the REST API using the browser. While working with JSON, you may need a JSON viewer.
First we will retrieve the JSON by using the REST APIs. To do this, open Internet Explorer or any other browser (see Figure 6-13).

Figure 6-13. JSON showing current user membership to different Yammer networks
Type this URL in the address bar: https://www.yammer.com/api/v1/messages.json.
You will be prompted with the screen shown in Figure 6-14.

Figure 6-14. Using Internet Explorer to retrieve a message
If you use Chrome, the JSON will be rendered in the browser window, which you can copy directly. You can save the JSON on your local system or open the JSON in a tool like Notepad.
The next step is to use the online JSON viewer. There are many JSON viewers available. The one used in this book is jsonviewer.stack.hu. Open a browser and type in the URL: http://jsonviewer.stack.hu/.
You will be presented with the screen shown in Figure 6-15.
![]()
Figure 6-15. Open/save JSON output
Now click on the Text tab and copy and paste the JSON you retrieved in previous step. Alternatively, you can use the Load JSON Data button to supply an URL and the viewer will load the JSON from that resource.
After pasting in the JSON, click on the Viewer tab (Figure 6-16). You will be presented with the screen shown in Figure 6-17. Clicking on Viewer changes the mode of the viewer. You can expand or collapse the JSON tree on the left side to view the name and the values on the right side.

Figure 6-16. Using the JSON viewer, you can copy the JSON and use a viewer to view the JSON object
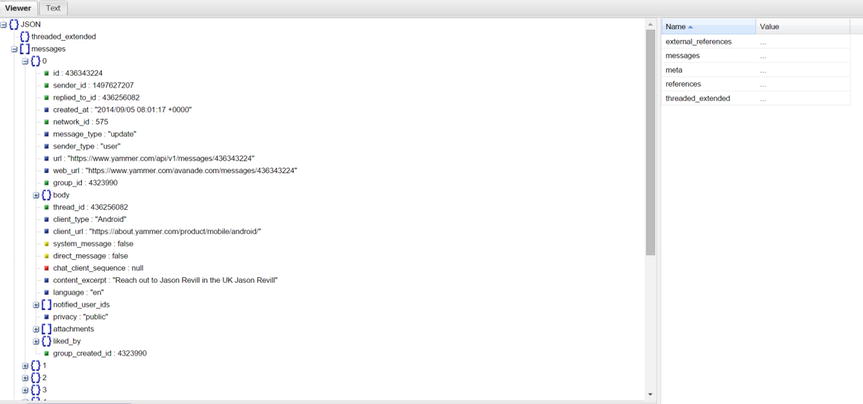
Figure 6-17. The JSON object viewer window
In order to view the output in the XML, change the REST APIs endpoint URL by changing the .JSON to .XML. For example, from https://www.yammer.com/api/v1/messages.xml (Figure 6-17), type the XML URL in the browser window. The browser will render the output XML file shown in Figure 6-18.
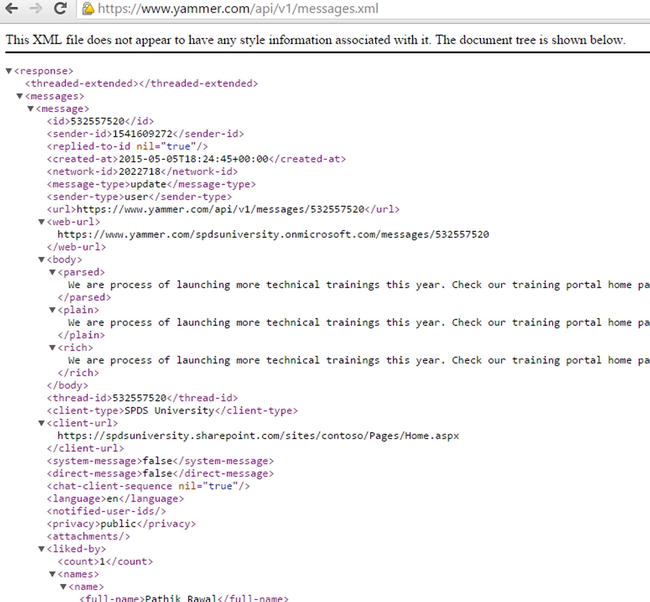
Figure 6-18. The XML is parsed by Internet Explorer
The previous methods to view output from REST endpoints are helpful for debugging and validating purposes when developing integrations.
Now, let’s look at additional REST endpoints provided by Yammer for administration and analysis purposes.
Data Export
![]() Note This option is for verified Yammer Admin users only.
Note This option is for verified Yammer Admin users only.
The Yammer REST API for data export contains the raw data you would use to perform social mining on the enterprise.
Developers and Yammer administrators can use the available reporting tools to use data exports from Yammer to get reporting models for data visualizations. Developers can use Microsoft Excel and Power BI to get these detailed reports. This helps your organization start analyzing the information contained in Yammer, identify key trends/insights, and use those trends/insights to become a more responsive organization.
![]() Tip There are MSDN blogs which provides details how to use standard data exports from Yammer and convert them into detailed reporting models with rich data visualizations.
Tip There are MSDN blogs which provides details how to use standard data exports from Yammer and convert them into detailed reporting models with rich data visualizations.
Yammer exports include the following list of elements:
- Admins
- Files
- Groups
- Messages
- Networks
- Pages
- Topics
- Users
Using Data Export APIs, you can automate the process of getting regular reports. The data export is a .ZIP file that includes messages, users, topics, and groups that are exported in separate .CSV files. This contains complete details of each data type, such as message ID, timestamps, participants, group names, topic IDs, user IDs, usernames, and so on.
The Files and Notes folders will be exported in folders that are separated from your Yammer network. Notes will be exported in the .HTML format. Note that data exports will only return Files and Notes created or modified during the time mentioned in the data export request.
Yammer (https://developer.yammer.com/v1.0/docs/data-export-api) has provided good guidance on Yammer Data Export using the Yammer Data Export API and a script for your Yammer network admin
Method: GET
Endpoint: https://www.yammer.com/apa/v1/export
When you develop business applications integrations that use Yammer REST APIs, you may run into a situation where you are notified that you have been rate limited. This means the business application has tried to get information from Yammer too many times. Yammer limits the number of times you can call REST APIs in a given timeframe. When this limit is exceeded, Yammer returns the status code 429(Too Many Requests). So when you’re designing the integrations with Yammer, you have to consider these rate limits.
Yammer enforces the rate limit per user, per Yammer app. Table 6-31 lists the different rate limits.
Table 6-31. Yammer REST Endpoint Rate Limits
|
Yammer Resource |
Limit |
|---|---|
|
Messages |
In 30 seconds you can make only 10 requests |
|
Autocomplete |
In 10 seconds you can make only 10 requests |
|
Notifications |
In 30 seconds you can make only 10 requests |
|
All Other Resources |
In 10 seconds you can make only 10 requests |
![]() Note Note that these rate limits are subject to change. For the latest, check https://developer.yammer.com.
Note Note that these rate limits are subject to change. For the latest, check https://developer.yammer.com.
All rate limits are independent of each other. For example, your application can make 10 messages and 10 notifications separately in the same 30 seconds.
There are certain guidelines that you need to adhere to make sure your application is not blocked due to rate limits.
- Do not exceed one poll per minute when polling for messages using the Yammer REST APIs.
- Try to limit the frequency of checking new messages from your application. This impacts the message’s latency.
- As autocomplete objects are designed to provide instant response for a user as they start typing the text, the Yammer REST APIs allow more frequent polling.
Now that you understand the concepts and details of the Yammer REST APIs, it is important that you can implement them properly. The following exercise will help you adopt Yammer REST APIs in your real world integration scenarios. In the next section, we will cover an exercise on implementing the Yammer REST endpoints.
Yammer REST Endpoint in Practice
EXERCISE 6-1: ASP.NET SPDS University WEB APPLICATION INTEGRATION WITH YAMMER USING REST APIS
In this exercise, you are going to use the same web application developed in Chapter 4, Exercise 4-1 to implement writing and reading data from Yammer using Yammer RESTful APIS. You are going to add classes, methods, and UI controls to write data into Yammer from an ASP.NET web application using Yammer REST APIs.
In Chapter 4, you learned about implementing authentication by developing a ASP.NET web application. If you have not developed that ASP.NET web application by following the detailed steps in Exercise 4-1, we strongly recommend you read Chapter 4 and create a new project by following step-by-step guide.
- Launch Microsoft Visual Studio and open the project created in Exercise 4-1. The structure of the project should look like Figure 6-19.
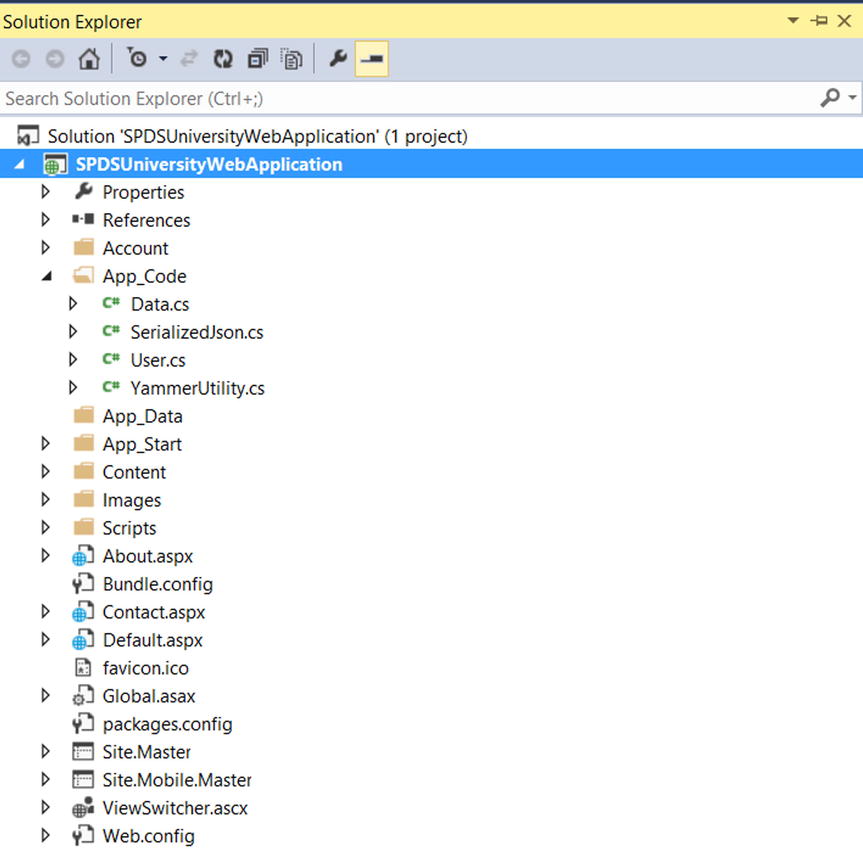
Figure 6-19. Existing ASP.NET web application project structure developed in Exercise 4-1
The solution developed in Exercise 4-1 implements the authentication and stores the access token in a textbox that will be used to make further calls to Yammer.
Post a Message
The actual fun of working with Yammer data begins in this section. You will start by posting a message to Yammer from the SPDS University web application.
- Open the YammerUtility.cs and add the following code to the using directive:
using System.Web.Configuration; - You need to add a method to the YammerUtility.cs class. The method is a generic PostRequesttoYammer method. Add the following code to the YammerUtility.cs class.
/// <summary>
        /// PostRequesttoYammer
        /// </summary>
        /// <param name="Body"></param>
        /// <param name="url"></param>
        /// <param name="authHeader"></param>
        /// <param name="contentType"></param>
        /// <returns></returns>
        public static string PostRequesttoYammer(string Body, string url, string authHeader = null, string contentType = null)
        {
            string results = string.Empty;

            try
            {

                HTTPWebReq = WebRequest.CreateHttp(url);
                HTTPWebReq.Method = "POST";

                //if an authHeader was provided, add it as a Bearer token to the request
                if (!string.IsNullOrEmpty(authHeader))
                    HTTPWebReq.Headers.Add("Authorization", "Bearer " + authHeader);

                byte[] postByte = Encoding.UTF8.GetBytes(Body);

                if (string.IsNullOrEmpty(contentType))
                    HTTPWebReq.ContentType = "application/x-www-form-urlencoded";
                else
                    HTTPWebReq.ContentType = contentType;

                HTTPWebReq.ContentLength = postByte.Length;
                Stream RequestStream = HTTPWebReq.GetRequestStream();
                RequestStream.Write(postByte, 0, postByte.Length);
                RequestStream.Close();

                HTTPWebRes = (HttpWebResponse)HTTPWebReq.GetResponse();
                RequestStream = HTTPWebRes.GetResponseStream();
                StreamReader streamReader = new StreamReader(RequestStream);

                results = streamReader.ReadToEnd();

                streamReader.Close();
                RequestStream.Close();
            }
            catch (Exception ex)
            {
                Console.WriteLine("Error has occured in PostRequesttoYammer: " + ex.Message);
            }

            return results;
        }
This method takes four parameters—body, endpoint, authheader, and content type. The body is the message to be posted, URL is the endpoint of the Yammer REST API, and authheader is simply a bearer (an access token) received from OAuth. Finally you have the content type value.
- Now add the endpoint URL to the web.config file. Add the following code to <AppSetting>:
<add key="Messageendpoint" value="https://www.yammer.com/api/v1/messages.json" />On the Default.aspx page, you will add some static content for demonstration purposes. Here we will add the upcoming trainings details.
- Add the following HTML markup to Default.aspx in <asp:Content runat="server" ID="BodyContent" ContentPlaceHolderID="MainContent">:
<table class="table" id="tblupcoming" border="1" runat="server" style="border-style: solid;border-width:medium">

                 <tr>
                    <th class="auto-style7" scope="col">
                        Course
                        Name</th>
                    <th class="auto-style6" scope="col">
                        Level</th>
                    <th class="auto-style5" scope="col">
                        Type</th>
                    <th class="auto-style4" scope="col">
                        Seats Available</th>

                </tr>

                <tr class="row1">
                    <td class="auto-style7">
                        SharePoint 2013</td>

                    <td class="auto-style6">
                        Level 300</td>
                    <td class="auto-style5">

                        Online</td>
                    <td class="auto-style4">
                      5</td>
                </tr>

           <tr class="row2">
                    <td class="auto-style7">
                        Microsoft Dynamic 2014 Advanced
                    </td>

                    <td class="auto-style6">
                        Level 300</td>
                    <td class="auto-style5">

                        In Person</td>
                    <td class="auto-style4">
                        10</td>
                </tr>
          <tr class="row1">
                    <td class="auto-style7">
                     Office 365 Ignite Training
                    </td>

                    <td class="auto-style6">
                        Level 300</td>
                    <td class="auto-style5">

                        In Person</td>
                    <td class="auto-style4">

                        10</td>
                </tr>

           <tr class="row1">
                    <td class="auto-style7" colspan="4">
                          <asp:Button ID="btnPost" runat="server" Text="Post Upcoming Trainings on Yammer" Width="514px" OnClick="btnPost_Click" />
                    </td>
                </tr>

</table>

    <asp:TextBox ID="txtCode" runat="server" Visible="False"></asp:TextBox>
    <asp:TextBox ID="txtaccesstoken" runat="server" Visible="false"></asp:TextBox>

    <asp:Label ID="lblMessage" runat="server" ForeColor="#FF3300" Text=" "></asp:Label>
<br /> - Add the following code to the Page_Load event to hide the table when the page loads. Note that you need to add just two lines of code, as highlighted, which is tblupcoming.Visible = true and tblupcoming.Visible = false. You add these to the if and else blocks, as the rest of code already exists:
/// <summary>
        /// Page load event to check if query string contains a key called "Code"
        /// </summary>
        /// <param name="sender"></param>
        /// <param name="e"></param>
        protected void Page_Load(object sender, EventArgs e)
        {

            string qsCode = Request.QueryString["Code"];
            if (qsCode != null)
            {
                txtCode.Text = qsCode;
                Obtain_Access_Token();
tblupcoming.Visible = true;
            }
            else
            {
tblupcoming.Visible = false;
            }
} - Add the following code button event handler code to Default.aspx.cs:
/// <summary>
        /// Post to Yammer Button's Click event
        /// </summary>
        /// <param name="sender"></param>
        /// <param name="e"></param>
        protected void btnPost_Click(object sender, EventArgs e)
        {
            //Get the current URL of the Page
            string url = HttpContext.Current.Request.Url.AbsoluteUri;
            //Read the Message endpoint from web.config file
             string Messageendpoint = WebConfigurationManager.AppSettings["Messageendpoint"];

            ///Construct the messagebody
             string Messagebody = "group_id=4966305" + "&body=Hi All, We have seats available for upcoming trainings, Kindly self-nominate before the registration deadline. View all training using the following link: " + url;

            //call the YammerUtlity's PostRequesttoYammer methis passing the message, endpoint and the access token stored in a textbox
            string response = SPDS UniversityWebApplication.App_Code.YammerUtility.PostRequesttoYammer(Messagebody, Messageendpoint, txtaccesstoken.Text);

            if(!string.IsNullOrEmpty(response))
            {
                lblMessage.Text = "Message posted";
            }

        }
The “Post Upcoming Trainings to Yammer” button’s click event first gets the current page URL, then it gets the message endpoint from the web.config file, followed by the code to construct the message body. It finally invokes the YammerUtility’s PostRequesttoYammer method. The post targets a specific group, which is mentioned in the POST body with a tag group_id=4966305.
Run the Application
Let’s see this application in action now. You can use Visual Studio to debug and run the application.
- Click on the Debug button using the Google Chrome option, as shown in Figure 6-20.
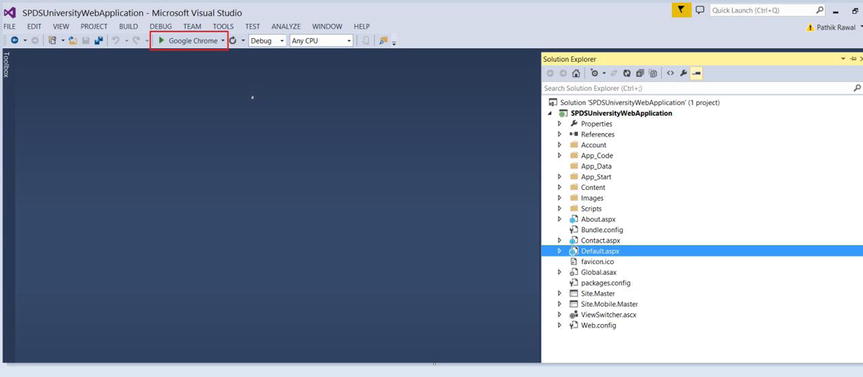
Figure 6-20. Run the application using Debug in Google Chrome or in the browser of your choice
- You will be presented with the screen shown in Figure 6-21, where you see a message saying, “You are not logged in...” Click on the Log In button on the top-right side of the screen.
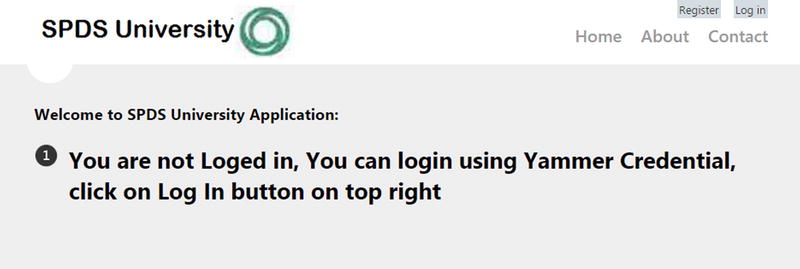
Figure 6-21. SPDS University web application’s home page
- You will be presented with the login page shown in Figure 6-22. Click on the “Sign In with Yammer” button, which implements the OAuth authentication.

Figure 6-22. SPDS University web application’s login page with a “Sign In with Yammer” button
- You will be presented with the Yammer login page. Enter your credentials and click Log In, as shown in Figure 6-23.

Figure 6-23. Yammer’s Login page
- Next you will be presented with the home page of the SPDS University application, with upcoming training details as shown in Figure 6-24. To demonstrate the messaging posting from this application to Yammer, click on the “Post Upcoming Trainings on Yammer” button.

Figure 6-24. SPDS University home page with a “Post Upcoming Trainings on Yammer” button
- After you click on the “Post Upcoming Trainings on Yammer” button, your message will be posted on Yammer (Figure 6-25).
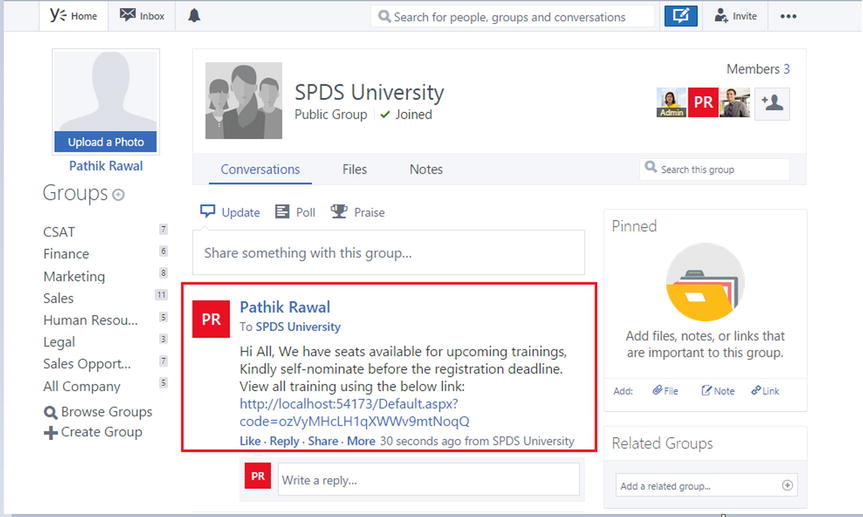
Figure 6-25. The message is posted on Yammer
Retrieve Messages Using the Message API
Next you can retrieve all messages using message RESTful APIs. We will add a new web form to the ASP.NET project and will implement an ASP.NET grid control to display messages retrieved from Yammer.
- Add a new web form to the project by right-clicking on the project in the Solution Explorer and choosing Add
 New Item.
 - You will be presented with another window. Enter the name of the web form as YammerMessage and click OK.

Figure 6-26. Add a web form to the project
You are now going to add a Grid View control to the new page. This grid will render the posts retrieved from Yammer.
- Add the following code to YammerMessage.aspx within <asp:Content runat="server" ID="BodyContent" ContentPlaceHolderID="MainContent">:
<div>
    <asp:GridView ID="grdYammerMessage" runat="server" AutoGenerateColumns="false">
<Columns>

            <asp:BoundField DataField="id" HeaderText="Post ID" />
            <asp:BoundField DataField="weburl" HeaderText="URL" />
            <asp:BoundField DataField="ContentExcerpt" HeaderText="Post Body" />
               <asp:BoundField DataField="YammerPostLikedBy.Count" HeaderText="Number of Likes" />

        </Columns>
    </asp:GridView>

</div> - Add a class called YammerMessage.cs to the App_code folder and then add the following code to the Yammer.cs file:
using System;
using System.Collections.Generic;
using System.Linq;
using System.Web;
using System.Runtime.Serialization;

namespace SPDS UniversityWebApplication.App_Code
{
    [DataContract]
    public class YammerPost
    {
        [DataMember(Name = "id")]
        public string ID { get; set; }

        [DataMember(Name = "sender_id")]
        public string SenderID { get; set; }

        [DataMember(Name = "replied_to_id")]
        public string RepliedToID { get; set; }

        [DataMember(Name = "created_at")]
        public string CreatedAt { get; set; }

        [DataMember(Name = "network_id")]
        public string NetworkID { get; set; }

        [DataMember(Name = "message_type")]
        public string MessageType { get; set; }

        [DataMember(Name = "sender_type")]
        public string SenderType { get; set; }

        [DataMember(Name = "url")]
        public string Url { get; set; }

        [DataMember(Name = "web_url")]
        public string WebUrl { get; set; }

        [DataMember(Name = "group_id")]
        public string GroupId { get; set; }

        [DataMember(Name = "body")]
        public YammerPostContent MessageContent { get; set; }

        [DataMember(Name = "rich")]
        public YammerPostContent MessageContent1 { get; set; }

        [DataMember(Name = "thread_id")]
        public string ThreadID { get; set; }

        [DataMember(Name = "client_type")]
        public string ClientType { get; set; }

        [DataMember(Name = "client_url")]
        public string ClientUrl { get; set; }

        [DataMember(Name = "system_message")]
        public bool SystemMessage { get; set; }

        [DataMember(Name = "direct_message")]
        public bool DirectMessage { get; set; }

        [DataMember(Name = "chat_client_sequence")]
        public string ChatClientSequence { get; set; }

        [DataMember(Name = "content_excerpt")]
        public string ContentExcerpt { get; set; }

        [DataMember(Name = "language")]
        public string Language { get; set; }

        [DataMember(Name = "privacy")]
        public string privacy { get; set; }

        [DataMember(Name = "group_created_id")]
        public string group_created_id { get; set; }

        [DataMember(Name = "liked_by")]
        public YammerPostLikedBy YammerPostLikedBy { get; set; }

        public YammerPost()
        {

            this.MessageContent = new YammerPostContent();
        }
    }

    [DataContract]
    public class YammerPostContent
    {
        [DataMember(Name = "parsed")]
        public string ParsedText { get; set; }

        [DataMember(Name = "plain")]
        public string PlainText { get; set; }

        [DataMember(Name = "rich")]
        public string RichText { get; set; }

    }

    [DataContract]
    public class YammerPostLikedBy
    {
        [DataMember(Name = "count")]
        public int Count { get; set; }

        [DataMember(Name = "names")]
        public List<YammerLikedbyNames> Names { get; set; }

    }

    [DataContract]
    public class YammerLikedbyNames
    {
        [DataMember(Name = "full_name")]
        public string FullName { get; set; }

        [DataMember(Name = "permalink")]
        public string Permalink { get; set; }

        [DataMember(Name = "user_id")]
        public int Userid { get; set; }

        [DataMember(Name = "network_id")]
        public int Networkid { get; set; }

    }

    [DataContract]
    public class YammerPosts: SerializedJson<YammerPosts>
    {
        [DataMember(Name = "messages")]
        public List<YammerPost> Posts { get; set; }

        public YammerPosts()
        {
            this.Posts = new List<YammerPost>();
        }
    }
}
This code contains the main classes listed in Table 6-32.
Table 6-32. Login Function Parameters
Name
Type
Description
YammerPost
Class
Instance of Yammer post with properties like message ID, message body, liked by count and names.
YammerPostContent
class
This class contains the actual message body in pursed text, plain text, and rich text.
YammerPostLikedBy
Class
This class contains properties like count and object of the YammerLikedbyNames class.
YammerLikedbyNames
Class
This class contains the names object with properties like by name, user_id, and network_id.
YammerPosts
Class
Yammer Post's collection object, which contains the YammerPost object.
- Open the YammerMessage.aspx.cs file and add the following code to the using directive:
using System.Web.Configuration; - The final code for post retrieval is to be added to the YammerMessage.aspx.cs file. This is a Load_YammerPost function, which will be invoked from the Page_load event.
/// <summary>
        /// Load_YammerPost method invokes YammerUtility.InvokeHttpGetRequest and then the response is SerializedJson
        /// </summary>
        private void Load_YammerPost()
        {
            string response = default(string);
            //Read the Message endpoint from web.config file
            string Messageendpoint = WebConfigurationManager.AppSettings["Messageendpoint"];

            //call the YammerUtlity's PostRequesttoYammer methis passing the message, endpoint and the access token stored in a textbox
            if (Session["accesstoken"] != null)
            {
                response = SPDS UniversityWebApplication.App_Code.YammerUtility.InvokeHttpGetRequest(Messageendpoint, Session["accesstoken"].ToString());

                SPDS UniversityWebApplication.App_Code.YammerPosts allposts = SPDS UniversityWebApplication.App_Code.YammerPosts.GetObjectInstanceFromJson(response);

                grdYammerMessage.DataSource = allposts.Posts;
                grdYammerMessage.DataBind();
            }

        }
This method first retrieves the message endpoint from the web.config file, then it invokes the YammerUtility.InvokeHttpGetRequest method by passing the message endpoint and access token stored in the session variable. The JSON response is then serialized and the object is used as the data source of the grid control.
- Now add markup for the button control in the Default.aspx file, next to the “Post Upcoming Trainings on Yammer” cell:
<asp:Button ID="btnPostView" runat="server" Text="Retrieve all Post from Yammer" Width="514px" OnClick="btnPostView_Click" /> - Finally, add the click event for the “Retrieve all Post from Yammer” button you added in the previous step.
/// <summary>
/// Post to Yammer Button's Click event
/// </summary>
/// <param name="sender"></param>
/// <param name="e"></param>
protected void btnPostView_Click(object sender, EventArgs e)
{
     Response.Redirect("YammerPost.aspx");
}
Run the Application
Let’s see this application in action now. You can use Visual Studio to debug and run the application.
- Click on the Debug button using Google Chrome, as shown in Figure 6-5, and then click on the Log In button on the top-right, as shown in Figure 6-6. Follow the login process.
- After you are successfully logged into the application, you will see the home page shown in Figure 6-27.
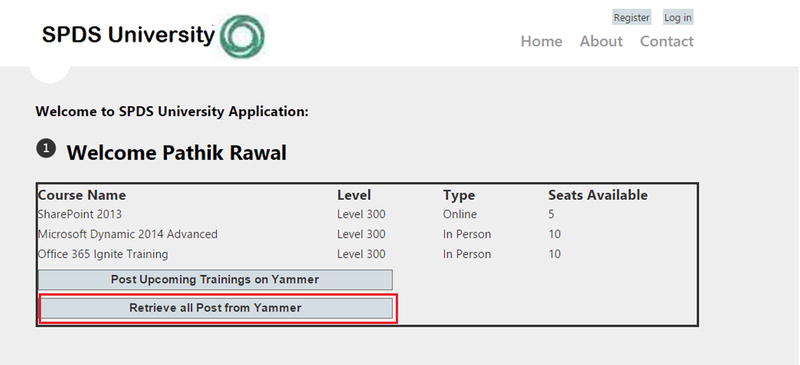
Figure 6-27. SPDS University home page with the “Retrive All Post from Yammer” button
- You will be presented with a screen as shown in Figure 6-28. The page uses an ASP.NET grid control to show you all the message retrieved from Yammer. It displays four properties—message_Id (as the post ID), the web URL of the message, the message body as Post Body, and number of likes for that particular message.

Figure 6-28. SPDS University home page with the “Retrive all Post from Yammer” button
In this section, we show you how to retrieve messages from Yammer using the REST APIs. In the next section, you will see more REST APIs in action.
- You will now add the endpoint URL to the web.config file. Add the following code to <AppSetting> (you can do it only to a shared resource):
<add key="Searchendpoint" value="https://www.yammer.com/api/v1/search.json" /> - Add markup for the button control in the Default.aspx file next to the “Post Upcoming Trainings on Yammer” cell:
<tr class="row1">
<td class="auto-style7" colspan="2">
<asp:Button ID="btnSearch" runat="server" Text="Search On Yammer" Width="514px" OnClick="btnSearch_Click" />
</td>
<td class="auto-style7" colspan="2">
</td>
</tr> - Add the click event for the “Retrieve all Post from Yammer” button you added in the previous step.
/// <summary>
/// Search Button Event
/// </summary>
/// <param name="sender"></param>
/// <param name="e"></param>
protected void btnSearch_Click(object sender, EventArgs e)
{
    Response.Redirect("YammerSearch.aspx");
} - Add a new web form to the project by right-clicking on the project in the Solution Explorer and choosing Add New Item.
- You will be presented with another window, as shown in Figure 6-29. Enter the name of the web form as YammerSearch and click OK.

Figure 6-29. Add a web form to the project to implement Yammer Search using REST API
- Replace ContentPlaceHolderID="MainContent" with the following code.
<asp:Content ID="Content3" ContentPlaceHolderID="MainContent" runat="server">
<table class="auto-style1">
<tr>
<td class="auto-style2">Seach keyword</td>
<td>
<asp:TextBox ID="txtSearch" runat="server" Width="590px">Enter seach keyword</asp:TextBox>
</td>
</tr>
<tr>
<td class="auto-style2">Pages </td>
<td>
<asp:TextBox ID="txtPages" runat="server" Width="590px">Enter number of pages</asp:TextBox>
</td>
</tr>
<tr>
<td class="auto-style2">Search items/Page</td>
<td>
<asp:TextBox ID="txtItems" runat="server" Width="590px">Enter items per page</asp:TextBox>
</td>
</tr>
<tr>
<td class="auto-style2"> </td>
<td>
<asp:Button ID="btnsearch" runat="server" OnClick="btnsearch_Click" Text="Search Now" />
</td>
</tr>
<tr>
<td>
</td>
<td>
<asp:GridView ID="grdYammerMessage" AutoGenerateColumns="false" runat="server" ShowHeader="true" Width="100%" BorderWidth="2" GridLines="Both">
<Columns>
<asp:BoundField HeaderText="ID" DataField="ID" />
<asp:BoundField HeaderText="SenderID" DataField="SenderID" />
<asp:BoundField HeaderText="Message" DataField="ContentExcerpt" HeaderStyle-Width="600" />
<asp:BoundField HeaderText="WebUrl" DataField="WebUrl" />
</Columns>
</asp:GridView>
</td>
</tr>
</table>
</asp:Content>This code adds three input textboxes (the search keyword, the number of result pages, and the search items per page) and the button to invoke the search APIs.
- Open the YammerSearch.aspx.cs file and add the following code to the using directive:
using System.Web.Configuration; - Add the search button click event to YammerSearch.aspx.cs.
/// <summary>
        /// Search Button event
        /// </summary>
        /// <param name="sender"></param>
        /// <param name="e"></param>
        protected void btnsearch_Click(object sender, EventArgs e)
        {
            string response = default(string);
            //Read the Message endpoint from web.config file
            string Messageendpoint = WebConfigurationManager.AppSettings["Searchendpoint"] + "?search=" + txtSearch.Text + "&page=" + txtPages.Text + "&num_per_page=" + txtItems.Text;

            //call the YammerUtlity's PostRequesttoYammer methis passing the message, endpoint and the access token stored in a textbox
            if (Session["accesstoken"] != null)
            {
                response = SPDS UniversityWebApplication.App_Code.YammerUtility.InvokeHttpGetRequest(Messageendpoint, Session["accesstoken"].ToString());

                SPDS UniversityWebApplication.App_Code.SearchResults results = SPDS UniversityWebApplication.App_Code.SearchResults.GetObjectInstanceFromJson(response);

                grdYammerMessage.DataSource = results.Results.Posts;
                grdYammerMessage.DataBind();

            }

} - Add a new class to the project and name it SearchResults.cs. Then add the following code to the class:
using System;
using System.Collections.Generic;
using System.Linq;
using System.Web;
using System.Runtime.Serialization;

namespace SPDS UniversityWebApplication.App_Code
{
    [DataContract]
    public class SearchResults : SerializedJson<SearchResults>
    {
        [DataMember(Name = "messages")]
        public YammerPosts Results { get; set; }

    }

}
That’s it from search. The class object will be used to store the converted JSON response (the serialized object). The exercise uses a minimum of object properties from JSON. You can add more properties in the class to convert the entire JSON object into a C# object.
Run the Application
Let’s see this feature of the application in action now. You can use Visual Studio to debug and run the application.
- Click on the debug button using the Google Chrome option, as shown in Figure 6-5. Then click on the Log In button at the top right, as shown in Figure 6-6. Follow the login process.
- After you have successfully logged into the application, you will see home page shown in Figure 6-30.

Figure 6-30. SPDS University home page with the “Search on Yammer” button
- You’ll be presented with a search page, as shown in Figure 6-31. This page allows users to enter the search keyword and the number of pages and items per page. Click on the Search on Yammer button now.
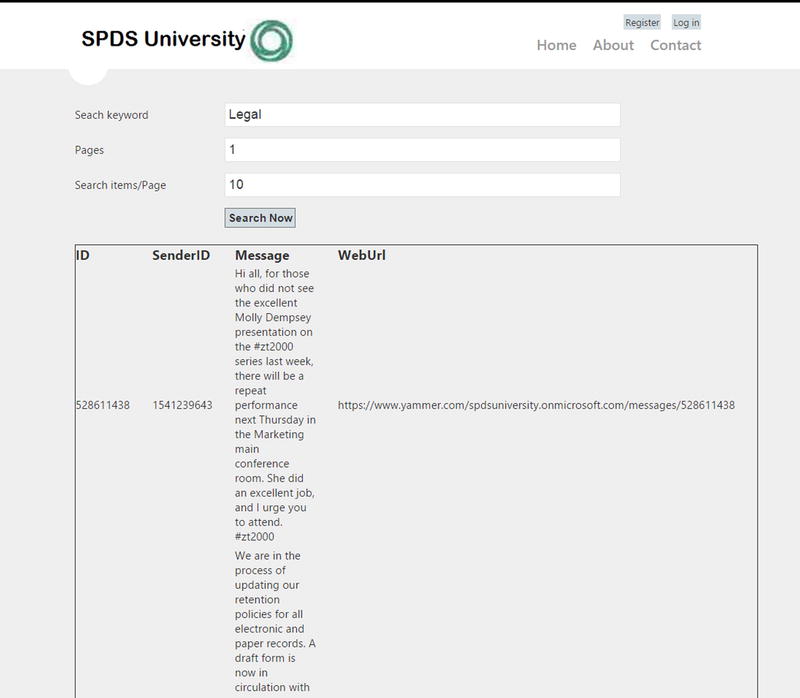
Figure 6-31. Search page with three textboxes as per the search API parameters and the result
The page uses an ASP.NET grid control to show the result retrieved from Yammer. It displays four properties—message_Id (as Post ID), the web URL of the message, the message body as the post body, and the sender ID for that particular message. For demonstration purposes, a simple grid is used to display the result. You can add more features to display other properties and allow users to navigate to actual data pages.
In this exercise, you learned to implement Yammer REST APIs to post a massage, retrieve Yammer posts, and search the API in action. You should be able to call other REST APIs in a similar way.
It’s not possible to create exercises for all endpoints in this book, so we expect you to look at your business case and adopt appropriate endpoints per your business needs.
Summary
Yammer REST API are one of the easiest and most comprehensive ways to do integrations with business applications. As a developer, you need to understand the architecture of Yammer REST API endpoints and the important requirements to start using Yammer REST services endpoints. You should also follow the best practices and rate limits when using Yammer REST APIs for creating objects in Yammer. In the following chapter, we will cover the different Yammer SDKs and use them to integrate with HTML-based business applications.