
Chapter 2. Exporting Movies
The ubiquity of audio and video compression in all facets of production, post-production, and distribution makes both the QuickTime architecture and the container files it produces the best choices for cross-platform workflows. The flexibility of QuickTime Pro, with its standard installation of a wide array of codecs as well as the ability to use third-party codecs, enables you to not only play and save movies, but to export them in different formats.
Perhaps the most common use of QuickTime Pro is to transcode one media type to another—for example, to transcode a DV NTSC movie exported from Final Cut Pro to a high-quality H.264 movie bound for the web. All transcoding performed in QuickTime uses QuickTime’s internal set of codecs (and any third-party codecs you have installed).
A basic understanding of codecs and the role they play in media compression is key to your successful transcoding from one format to another. Codec stands for COmpressor/DECompressor and refers to the process of compressing media from its original state with a set of instructions that another device can use to decompress the media and play it back. Each codec handles compression differently, with an engineering focus on the final output (encoding for the web is different than encoding for DVDs). For a primer, see Appendix A, “Codec Central,” which describes all codecs installed with QuickTime Pro. Here are a few basic concepts:
• Compression reduces output file size but at the cost of quality. For example, if you start with high-definition (HD) source video and encode for the web, the output file will be exponentially smaller, but the picture quality will be drastically lower.
• The best approach is always to start with the highest-quality, highest-resolution, least-compressed footage and then convert downward. For example, you will get better results starting with DV NTSC video and encoding for the iPod with video than you will with that process in reverse.
• Choose your export codec based on your output destination. For example, if you want to encode for cell phones, choose one of the 3G codecs instead of the codec that matches your source video.
Exporting for the iPod with Video in Five Easy Steps
iPods with video display high-quality QuickTime movies in a very portable format. The advantage of using QuickTime Pro to encode for iPods is that you don’t need to know anything about compression to successfully export a movie.
1. Open the source movie in QuickTime Pro.
2. Choose File > Export.
3. In the Save dialog, name the movie and select the destination.
4. From the Export pop-up menu, choose Movie to iPod. Notice that the Options button stays dimmed because you don’t need to adjust any settings.

5. Click Save.
QuickTime Pro will encode your movie using H.264 for video and AAC for audio. The output file will adhere to the specification established for playback on iPods with video. The movie will have the file extension .m4v.
This workflow is the base template for all other export examples in this chapter. By marrying these initial steps with an understanding of your desired output codec, you will quickly and easily harness QuickTime Pro as a transcoding platform.
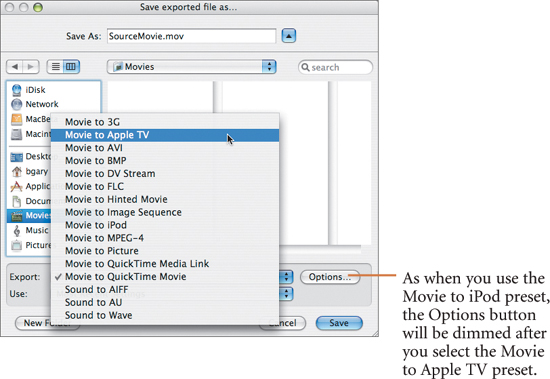
Exporting for Apple TV
Using QuickTime Pro to export your movies for Apple TV is simple and easy. In fact, the steps are very similar to the steps presented earlier for exporting to the iPod with video. The resulting file will contain H.264 video with AAC audio both tuned for playback on Apple TV.
1. Open the source movie in QuickTime Pro.
2. Choose File > Export.
3. In the Save dialog, name the movie and select the destination.
4. From the Export pop-up menu, choose Movie to Apple TV.
5. Click Save.
Exporting Using the Animation Codec
The name Animation codec is derived from the codec’s primary initial use by CGI artists, who needed a lossless codec to transfer media from one workstation to another. Use this codec if you’re working in Film or CGI environments and want pristine video quality without regard for the resulting file size, but keep in mind that the high quality comes with the cost of increased file size. You should also use the Animation codec if you want the exported video to include an alpha channel (for working with transparency). Movies encoded with the Animation codec are very resource intensive and require robust workstations to achieve real-time playback.
The output quality of the Animation codec is inextricably linked to the quality of the source video: that is, quality will not miraculously increase during transcoding. Because the processing demands are so high, use the Animation codec only if you are starting with the highest-quality source video and need a lossless mechanism to transfer to another platform.
1. Open the source movie in QuickTime Pro.
2. Choose File > Export.
3. In the Save dialog, name the movie and select the destination.
4. From the Export pop-up menu, choose Movie to QuickTime Movie.
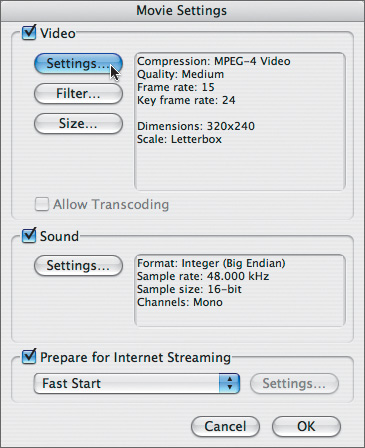
5. Click the Options button to open the Movie Settings window.
6. Click the Settings button.
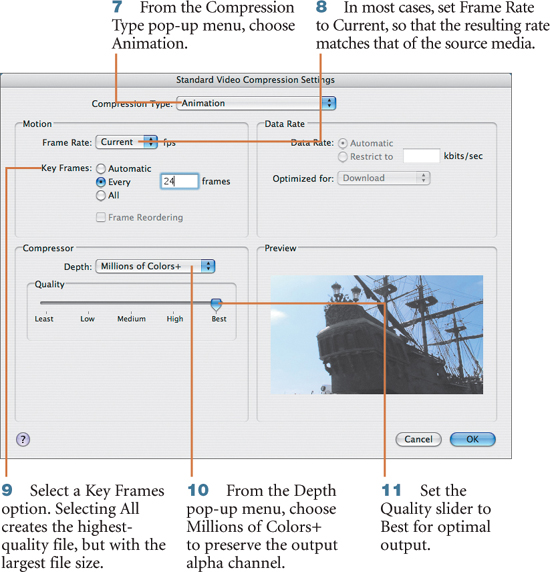
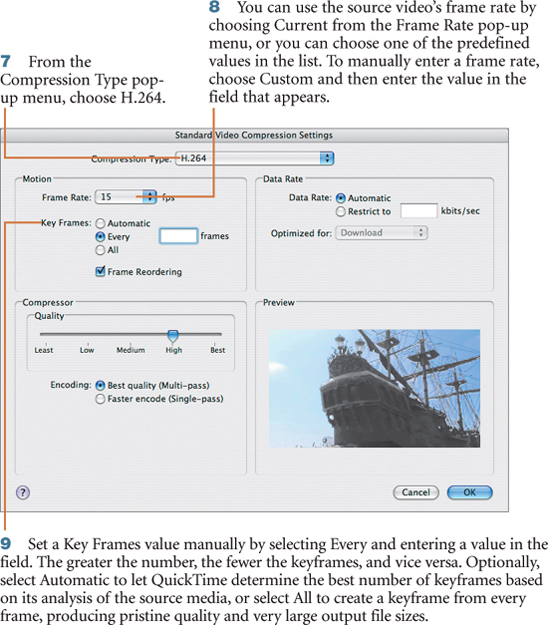
Selecting Automatic Key Frames in conjunction with a Quality slider setting below will let the encoder determine the best compromise between size and quality. You can also set your own keyframe frequency by selecting Every and entering a value in the frames field. The greater the value, the fewer the keyframes, resulting in smaller output files, but with reduced overall output quality.
12. Click OK to close the Standard Video Compression Settings window.
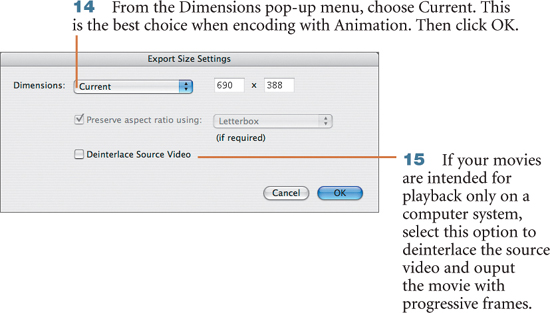
13. In the Movie Settings window, click the Size button.
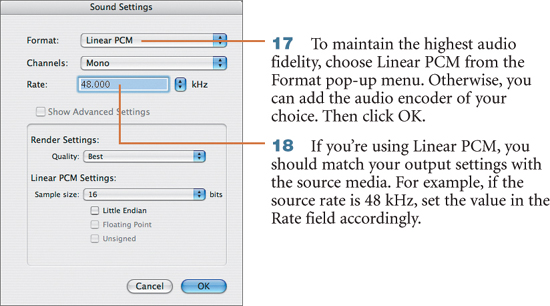
16. If your movie has audio, click the Settings button in the Sound field of the Movie Settings window.
19. In the Movie Settings window, click OK.
20. In the Save dialog, click Save.
Exporting Using H.264
MPEG-4 Part 10, better known as H.264, is an interframe codec that produces high-quality video with relatively small file sizes. In comparison to MPEG-4 Part 2, H.264 can deliver up to four times the frame size while using the same data rate. This codec is also known as Advanced Video Codec, or AVC.
You can deliver H.264 content for both the web and high-definition DVDs. Use H.264 for the web if your audience runs the latest version of QuickTime Player (version 7 or higher) on relatively new hardware.
1. Open the source movie in QuickTime Pro.
2. Choose File > Export.
3. In the Save dialog, name the movie and select the destination.
4. From the Export pop-up menu, choose Movie to QuickTime Movie.
5. In the Save dialog, click the Options button.
6. In the Video section of the Movie Settings window, click the Settings button.

13. Click OK when you have completed your adjustments.
H.264, like MPEG-4, employs an interframe compression scheme. Keyframes hold all the image data, and delta frames contain the interpreted image information between the keyframes. Frame reordering allows the delta frames to look to any keyframe in the movie for relative information, allowing H.264 to encode high-quality media very efficiently.
14. In the Movie Settings window, click the Size button.

17. In the Sound section of the Movie Settings window, click the Settings button.

21. In the Movie Settings window, click OK.
22. In the Save dialog, click Save.
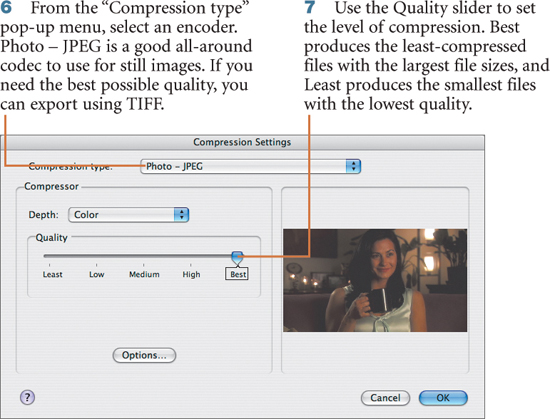
Exporting a Still Image
Sometimes you don’t need to encode the entire source media: you need only a single frame to represent the movie. For example, if you are creating storyboards for a project, you can use a single image to represent an entire clip. QuickTime Pro easily produces the stills for each piece of media.
1. Open the movie in QuickTime Pro.
2. Park the playhead on the frame you want to export as the still image.
3. Choose File > Export.
4. From the Export pop-up menu, choose Movie to Picture.
5. Click the Options button.
8. Click OK to save the changes.
9. Name and select a destination for the output file and then click Save.
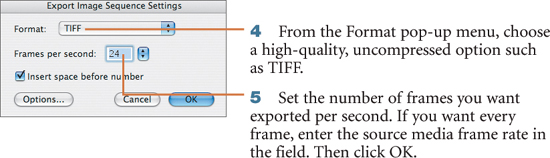
Exporting an Image Sequence
For certain CGI work, you may need all the frames of a movie exported as stills. The process in QuickTime Pro is very similar to that for exporting a single image, with a few exceptions:
1. Follow steps 1 through 3 in the preceding exercise.
2. From the Export pop-up menu, choose Movie to Image Sequence.
3. Click the Options button.
6. Image sequences produce a large number of files, so it’s best to create a folder to hold them all instead of saving them to the desktop or the root of your hard drive.
7. Give the export a name. QuickTime Pro will use the export name combined with the frame number to uniquely label all the frame files. Then click Save.
Exporting Audio to 48 kHz AIFF
The sampling rate of an audio stream specifies how often analog audio is monitored and converted to digital information. Most sequences in Final Cut Pro have their audio sampled at 16-bit 48 kHz. All audio CDs are sampled at 16-bit 44.1 kHz, and MP3 files downloaded from the web can be sampled at as low as 32 kHz. You can use QuickTime Pro to easily produce sampled audio at a Final Cut Pro–friendly rate.
1. Open an audio file sampled at 44.1 kHz in QuickTime Pro.
2. Choose File > Export.
3. From the Export pop-up menu, choose Sound to AIFF.
4. Click the Options button.

10. Name and save the file.
Exporting Using AAC
By default, when iTunes encodes an audio CD in your iTunes library, it uses Advanced Audio Coding (AAC) as the codec. AAC also works very well as an efficient encoder for audio bound for the web. You can use QuickTime Pro to transcode audio sources using the same high-quality compression as iTunes with even greater control of the encoder’s settings.
1. Open a QuickTime-compatible audio file in QuickTime Pro.
2. Choose File > Export.
3. From the Export pop-up menu, choose Movie to MPEG-4.
4. Click the Options button.

11. Name and save the file.
Podcasting with AAC
You can easily translate the previous AAC steps into an audio podcast workflow:
1. Create the podcast in an audio application that can export in either the .wav or .aif file format.
2. Open the audio file in QuickTime Pro and choose File > Export.
3. Follow steps 3 through 11 in the preceding exercise with the following possible adjustments:
• If your podcast is primarily voice, you can reduce the data rate to 96 with no noticeable loss in quality and achieve a smaller export file size.
• Setting Channels to Mono reduces the overall export file size.
• You can reduce the sample rate to 44.1 with no noticeable loss in quality and achieve a smaller export file size.
Using Third-Party Codecs
QuickTime is installed with a wide variety of codecs that service a large number of production, post-production, and distribution channels. Formats such as Windows Media (.wmv), RealPlayer (.rm), and Flash Video (.flv) require third-party software for encoding. Fortunately, QuickTime has a plug-in architecture that allows you to easily install software from third parties and export using the same techniques presented in this chapter.
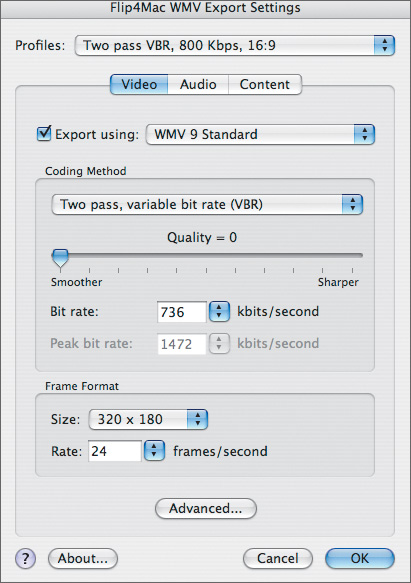
For example, the Flip4Mac plug-in by Telestream adds Windows Media encoding to QuickTime Pro. When this plug-in is installed, the Movie to Windows Media option appears in the Export pop-up menu of the Save Export window. When you click the Options button, the Flip4Mac WMV Export Settings window opens and allows you to adjust the encoder settings.
Each third-party plug-in adds a window for adjusting the encoder. Consult the vendor’s documentation for information on how best to set the options for your particular source media.
Before purchasing a plug-in, go to the QuickTime website to check for compatibility.