Chapter 3. Editing Movies
QuickTime Player is often regarded as an application solely for playback, but QuickTime Pro can perform many basic editing functions easily and efficiently. For example, if you’re on the road with a portable computer (Mac or PC) and you need to quickly add or delete content from a movie, you can use QuickTime Pro to define sections for addition or removal and then perform the edit. You can then save the file as a new file or use QuickTime Pro’s powerful export function to transcode the movie in another format.
Displaying Movie Information
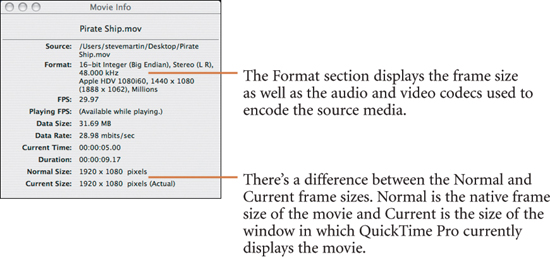
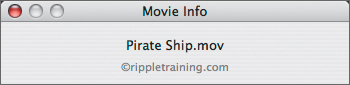
QuickTime Pro displays the most useful information about a piece of media it can open in one easy-to-read window: the Movie Info window. If multiple movies are open at once, the Movie Info window displays information about the movie that is currently the active movie.
To open the Movie Info window, choose Window > Show Movie Info or use the shortcut Command-I.
Displaying Movie Properties
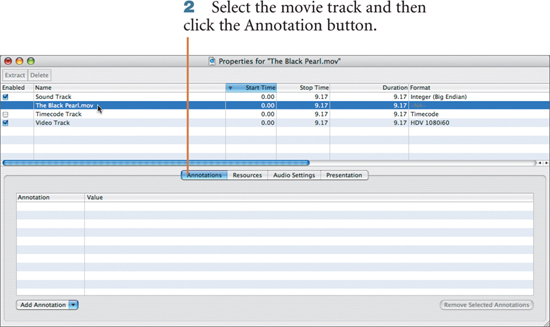
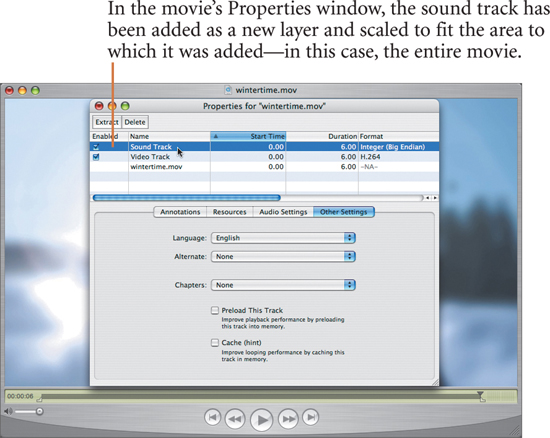
You interact passively with a movie’s Movie Info window, whereas in a movie’s Properties window, you can directly manipulate the tracks that comprise the movie. A standard QuickTime movie contains separate tracks for any media assets plus a default metadata track. As you will read in Chapter 4, QuickTime movies can also have tracks that contain code, text, and even interactive skins. Each track also has a set of user-configurable properties that vary depending on the track type.
The movie’s Properties window lets you add and delete tracks and adjust track settings. Whereas QuickTime Pro displays only one Movie Info window, for the current movie, it displays an associated Properties window for each open movie. When multiple movies are open, make sure that you’re adjusting the tracks for the correct movie by checking the title bar at the top of the Properties window.
To open a movie’s Properties window, select the movie and then choose Window > Show Movie Properties or use the shortcut Command-J.
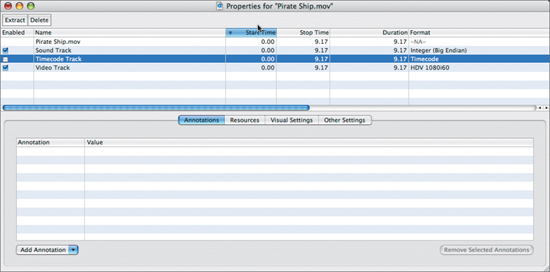
Working with Movie Properties
The track adjustments you make depend greatly on the track’s type, but the basic workflow remains the same: Select a track in the table at the top of the window, click the desired tab in the bottom half of the window, and then adjust the settings.
Changing the Movie’s Name Without Changing the Filename
QuickTime allows you to change the movie’s display name without altering the filename. This feature can be useful when file-naming conventions dictate a name that is more technical than descriptive—with a movie hosted on a server, for example.
1. Open a movie and choose Window > Show Movie Properties.

After you save the movie, the new name appears at the top of the player window, but the filename remains unchanged.
Displaying a Copyright Notice
QuickTime lets you embed a copyright notice into movies so you can brand your output media.
1. Open a movie and choose Window > Show Movie Properties.
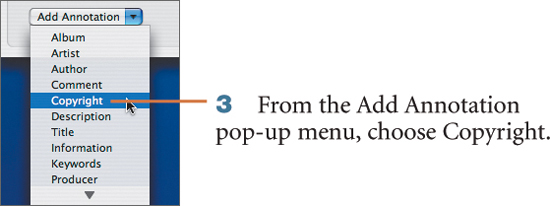

5. Save the movie to preserve the changes.
6. To view the copyright information, choose Window > Show Movie Information, or press Command-I.
Working with Movie Tracks
Tracks let you quickly and easily manage the content in your movie. When working with tracks, remember that QuickTime files are just container files: buckets that hold data. As long as QuickTime Pro has the proper codecs, it can work with the data in the tracks.
Adding a Track from Another Movie
The Edit > Add to Movie command essentially superimposes or composites content onto an existing movie. In much the same way that video tracks work in Final Cut Pro, you can place one QuickTime track on top of another—superimpose them—to create a layering effect. This command differs from the Edit > Paste command, which extends the target movie’s length by the duration of the pasted media—in essence performing the equivalent of an insert edit in Final Cut Pro.
The Add to Movie command takes clipboard content and places it in the target movie, so you must first have content loaded on the clipboard. The easiest way to load the content of an entire movie on the clipboard is to open the movie and choose Edit > Select All.


A new track is created in the target movie for each stream of content in the added movie.
4. Press Command-J to open the movie’s Properties window and view the tracks.

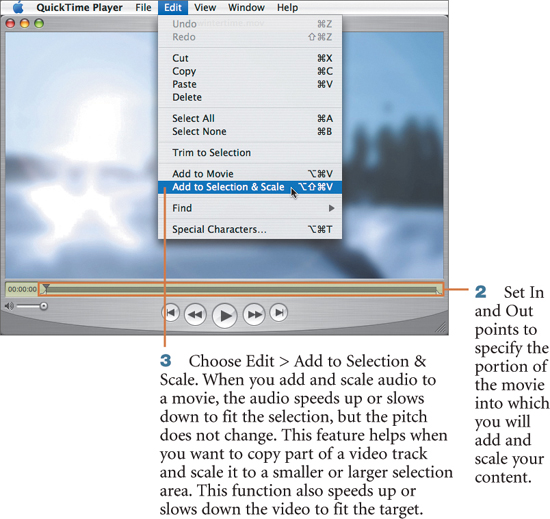
Using Add to Selection & Scale
Sometimes you may want to add content to a movie to make it perfectly fit the target movie’s length. For example, you may want to do this when syncing music to a piece of video. Add to Selection & Scale composites a selection as a new track, just as Add to Movie does, but it also scales the video, audio, text, or graphic to the target movie’s duration (or selection length if you define one).
The following exercise adds audio to a target movie.
1. Select and copy an entire audio file so that you can add and scale it to the selected part of another movie.

Adding a Graphic Bug
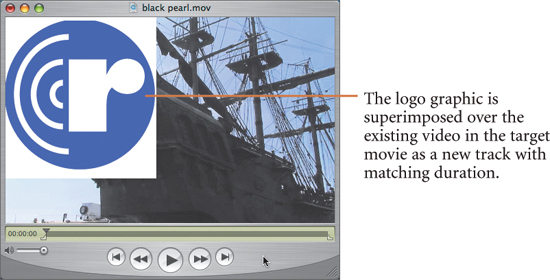
You can brand your video content by using graphics or logos, also called bugs. Imported content enters the target movie on a separate track and behaves like a layer sitting on top of the existing media. In the Properties window, tracks with lower numbers are on top of tracks with higher numbers. That’s why you always add the bug to the target and not vice versa.
Follow these steps to add a bug to a QuickTime movie using tracks in QuickTime Pro.
1. Create a graphic or logo to use as the bug.
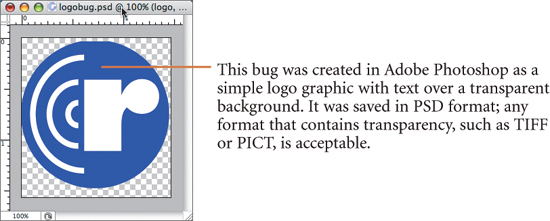
2. Choose File > Open File. Navigate to your graphic and open it in QuickTime Pro.

3. Choose Edit > Select All.
4. With the target movie selected, choose Edit > Add to Selection & Scale.
5. Choose Window > Show Movie Properties.

QuickTime tracks with lower numbers in the Layer field of the Visual Settings display of the Properties window will appear ahead of those with higher numbers. If you want to adjust a track’s visual placement, manually enter a value in the Layer field or click the up and down buttons to set the desired value.
Basic Editing
QuickTime Pro lets you perform fundamental edits on your media. This capability can prove helpful, for example, when you need to make fast, simple edits in the field or when you’re working on a system without an editing platform, like Final Cut Pro.
The following exercises show you the most useful tools in the QuickTime Pro editing arsenal.
Working with Selections
Selections define areas of the media that you can then manipulate within the source movie or use as content to add to another movie. The following exercises demonstrate the actions you can perform after you’ve made a media selection.
1. Open a movie in QuickTime Pro.
2. Move the playhead to the start frame of your selection and then press I.

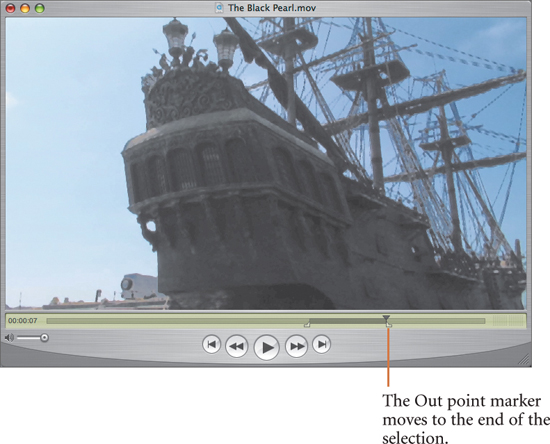
3. Move the playhead to the last frame of the selection and then press O.
Playing a Selection
Before you do anything with your selection, you can audition it by choosing View > Play Selection Only and then pressing the spacebar.
Jumping to the In or Out Point
If the playhead is positioned to the left of the In or Out point marker, press Option–Right Arrow key to jump to the marker.
If the playhead is positioned to the right of the In or Out point marker, press Option–Left Arrow key to jump to the marker.
Nudging a Selection
To move the In or Out point marker earlier or later in a movie (and so lengthen or shorten your selection), select either marker; then use the Left and Right Arrow keys to move it to where you want it.
Deleting Parts of a Movie
You can remove content from your movie in three ways: You can delete the selected portion of your movie, you can delete everything except the selected portion, or you can delete the selection and retain the content on the clipboard.
To delete the selected portion only:
1. Make your selection using any of the selection methods described previously.
2. Choose Edit > Delete.
To delete everything but the selected portion:
1. Make your selection using any of the selection methods described previously.
2. Choose Edit > Trim to Selection.
To delete the selected portion and retain the content on the clipboard:
1. Make your selection using any of the selection methods described previously.
2. Choose Edit > Cut.
The overall file size of QuickTime movies edited using the steps presented here will not reflect the removal of media until you choose File > Save As and output the project as a self-contained movie.
Removing a Garbage Frame
Sometimes a movie has one frame that’s undesirable—a garbage frame of black or white at the end of the file, for example. Instead of re-encoding the entire media, you can erase the one garbage frame with a few clicks.
1. Position the playhead over the garbage frame.
2. Choose Edit > Cut, or use the shortcut Command-X.
3. Save the movie.
Combining Movies
You can use QuickTime Pro to paste one movie onto the end of another movie, thereby combining the two. You can then save the results as a newly edited movie.
1. Open two movies in QuickTime Pro.
2. Select the source movie and choose Edit > Select All.
3. Choose Edit > Copy.
4. Select the target movie and move the playhead to the frame where you want to insert the source movie. (Often when you’re combining movies, you will want to position the playhead at either the first or last frame of the target movie.)
5. Choose Edit > Paste.
6. Choose File > Save As to create a new QuickTime movie that is the combination of the source and target movies.

Performing Drag-and-Drop Edits
Drag-and-drop editing allows you to quickly drag movie content from one movie to another. For example, you may want to add an animated logo to the end of your movie as a tag.
The following exercise illustrates a quick way to tag your movies with content from another movie.
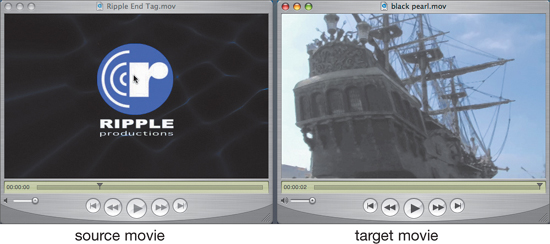
1. Arrange the windows for your two movies on your desktop so they appear side by side.
2. Select the movie that contains the source content.
3. Choose Edit > Select All or create a selection (see the preceding exercises) of the desired frames.
4. In the target movie, position the playhead at the end of the movie.
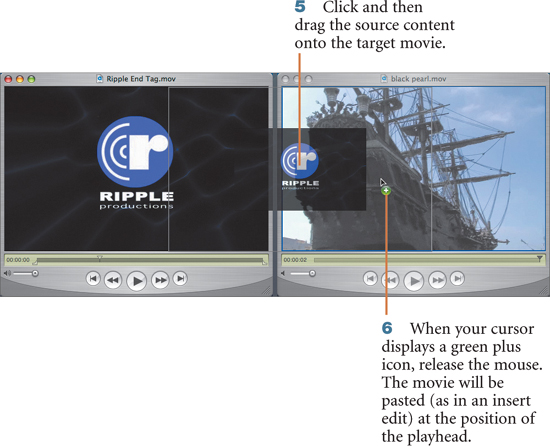
7. Choose File > Save As and then rename and save your project as a self-contained movie.