Bring Your Own Device (BYOD) Implementation and Evaluation
In this appendix, we discuss the system setup and user experiments for our BYOD framework. Samsung Exynos 5250 is present in many tablets such as Samsung Chromebook, Nexus 9, etc. The steps for this part are similar to Virtual Open System guide for KVM over Arndale [46] and tutorial from Linaro Linux group [186].
D.1 Hardware Requirements
The hardware requirements for setting up the test environment include:
• System to prepare the host, guest images, QEMU. A system with sufficient disk space and Ubuntu-12.04 is suggested.
• Samsung Exynos 5250 Arndale Board.
• A memory card (16 GB suggested) to load host and guest OS.
• A serial port cable to communicate with the board using Minicom.
• Power supply (5 V).
• LAN cable connected to the Arndale development board.
D.2 Host and Guest Setup
Ubuntu 12.04 LTS is used as a base system to setup Linux Kernel and rootfs for both host and guest OS. We will first install the following packages on host system:
• Qemu which is a generic opensource machine Emulator [46].
• debootstrap which is a tool that installs the base system into a subdirectory of another already installed system.
• An ARM Cross Compiler for cross compiling the packages.
The implementation script can be run as follows:
 $  sudo apt-get install -y gcc-arm-linux-gnueabihf
 $  sudo apt-get install -y QEMU QEMU-user QEMU-user-static
 $  sudo apt-get install -y debootstrap
D.2.1 Host File System and Kernel Setup
We install arm-precise-root using QEMU-debootstrap and setup root password for arm-precise-root [186] as follows:
 $  sudo QEMU-debootstrap --arch=armhf raring ./arm-precise-root
 $  sudo chroot ./arm-precise-root
Then, we need to copy the file etc/init/tty1.conf to ttySAC2.conf, and change tty1 to ttySAC2.conf. Then we also perform the same steps to create a file ttyAMA0.conf in the same directory. We also need to change the baud rate to “115200” for serial port login. In addition, we need to add a line ttySAC2 to file etc/security.
The next step is to add the following lines to etc/source.list:
 deb http://ports.ubuntu.com/ precise main restricted universe
 deb-src http://ports.ubuntu.com/ precise main restricted universe
Now, we need to update the sources.list file, reconfigure locales and install the following packages and exit from host rootfs:
  $ locale-gen en_US.UTF-8
  $ dpkg-reconfigure locales
  $ apt-get install -y ssh gcc make xorg fluxbox tightvncserver
  $ apt-get install -y libsdl-dev libfdt-dev bridge-utils uml-utilities
  $ apt-get clean
  $ exit
The following is to setup kernel for the host OS. For this part, we need to download linux-linaro-lng version 3.14.32 and unzip it to act as a source tree. We will use it to generate dtb and uImage for the host file system. Run the commands below on your Linux machine. We need to download sources from “tar.gz” repository. If we download from “git” repository, we will get errors while installing the Linux Kernel modules on the Arndale development board. The following shows the details of implementation steps:
  $ wget https://releases.linaro.org/14.06/components
  /kernel/linux-linaro-lng/linux-linaro-lng-3.14.3-2014.06.tar.bz2
  $ tar -zxvf linux-linaro-lng-3.14.3-2014.06.tar.bz2
  $ cd linux-linaro-lng
  $ export CROSS_COMPILE=arm-linux-gnueabihf-
  $ export ARCH=arm
  $ mkdir ../lll-kvmhost ./scripts/kconfig/merge_config.sh
  -O ../lll-kvmhost/ linaro/configs/linaro-base.conf
  linaro/configs/distribution.conf linaro/configs/kvm-host.conf
  linaro/configs/arndale.conf linaro/configs/ovs.conf

  $ make O=../lll-kvmhost/ uImage dtbs modules

  $ cp -t /tftpboot/ ../lll-kvmhost/arch/arm/boot/uImage
  ../lll-kvmhost/arch/arm/boot/dts/exynos5250-arndale.dtb

  $ sudo make ARCH=arm CROSS_COMPILE=arm-linux-gnueabihf-
  O=../lll-kvmhost/ INSTALL_MOD_PATH=${KVMHOST_ROOT} modules_install
The presented deployment can generate uImage in the folder lll-kvmhost/arch/arm/boot and exynos5250-arndale.dtb in lll-kvmhost/arch/arm/boot/dtc, and these two files will be used later.
D.2.2 Guest File System and Kernel Setup
The guest file system that will be used as a VM on top of the host file system can be downloaded from Virtual Open System [35]. We are using “Versatile Express” – an ARM release – as the guest kernel. We can download guest-zImage and guest-vexpress.dtb from the website [46]. We will then need to create a bootable guest OS image and copy the precise file system used for host OS in that image. The following steps are set for this purpose:
  $ dd if=/dev/zero of=./ubuntu.img bs=1MiB count=512
  $ mkfs.ext3 ./ubuntu.img
  $ sudo mount -o loop ubuntu.img mnt/
  $ sudo cp -a precise/* mnt/
  $ sudo umount mnt/
The bootloader used for booting up the host file system in Hypervisor mode and two additional files can also be downloaded directly from Virtual Open System [46].
  u-boot.bin
  arndale-bl1.bin
  smdk5250-spl.bin
D.2.3 Qemu for ARM Setup
On the x86 Laptop/PC run the commands below:
   sudo apt-get install -y pkg-config-arm-linux-gnueabihf

   cat | sudo tee /etc/apt/sources.list.d/armhf-raring.list <<END
   deb [arch=armhf] http://ports.ubuntu.com/ubuntu-ports precise main
   restricted universe multiverse
   deb-src [arch=armhf] http://ports.ubuntu.com/ubuntu-ports precise
   main restricted universe multiverse
   END

   sudo xapt -a armhf -m -b zlib1g-dev libglib2.0-dev libfdt-dev libpixman-1-dev
   sudo dpkg -i /var/lib/xapt/output/*.deb
   git clone git://git.QEMU.org/QEMU.git
   cd QEMU
   git checkout -b v1.6.0 v1.6.0
   git submodule update --init dtc
   mkdir build; cd build
   ../configure --cross-prefix=arm-linux-gnueabihf- --target-list=arm-softmmu
   --enable-kvm --audio-drv-list="" --enable-fdt --static
   make
This will generate QEMU that would be used to emulate the ARM guest OS on top of the host OS using an Open vSwitch bridge.
D.3 Booting up Arndale Board
We will be using Secure Digital (SD) card (16 GB suggested) as a boot-up media to run host OS Ubuntu-12.04 on top of the Arndale board. Use a SD card reader and plug it into a laptop or desktop for copying file system.
Copy bl1, spl, and u-boot to the SD card. The SD card will be present as a storage device on the PC and can be viewed by using the command “fdisk -l”. In this case, it is “/dev/sdb”. The following command will be performed:
   $ sudo dd if=arndale-bl1.bin of=/dev/sdb bs=512 seek=1
   $ sudo dd if=smdk5250-spl.bin of=/dev/sdb bs=512 seek=17
   $ sudo dd if=u-boot.bin of=/dev/sdb bs=512 seek=49
Now we will copy the host kernel and DTB file. These values will depend upon the size of the device tree and the Linux kernel. For instance, the Linux kernel size is about 4.6 MB, so that we can copy DTB file, and it does not overlap with the address space of kernel (uImage). The following command will be executed:
 $ sudo dd if=uImage of=/dev/sdb bs=512 seek=1105
 $ sudo dd if=arndale.dtb of=/dev/sdb bs=512 seek=13393
It is time to format the SD card and copy “precise” file system, and source tree onto the SD card. Remember to format from the start block address after DTB file, so leave sufficient space, and do the following:
  $ sudo fdisk /dev/sdX
  $ n
  $ p
  $ 1
  $ 16384
  $
  $ w
  $ mkdir mnt
  $ sudo mkfs.ext3 /dev/sdb1
  $ sudo mount /dev/sdb1 mnt
  $ sudo cp -a ./arm-precise-root/* mnt/
  $ sudo umount /dev/sdb1
We need to copy the guest file system, guest device tree, guest kernel and QEMU generated for ARM to the SD Card. So simply copy these files to “root” folder of the SD card. Alternatively you can use “scp” to copy these files once the board boots up and gets an IP address via DHCP. The next step is to insert the SD card into the appropriate slot on the board and then boot it up.
The procedure to boot up the board is provided as follows:
• Connect the serial port cable provided with the Arndale board to a USB port of a PC/Laptop.
• Download and install “minicom” or a similar application on the PC.
• Check the DIP switch settings on the Arndale board. It should be “001000” from left to right.
• Press the boot-up key present on the Arndale board. For more details, please refer to the following reference [279], which provides a more detailed version of booting up the Arndale board.
• As soon as the board starts loading the kernel and reads device tree properly, press escape key and enter commands below to configure boot arguments and environment variables. These commands will vary depending upon location of your kernel and device tree.
 $ env edit bootargs
 $     root=/dev/mmcblk1p1 rw rootwait earlyprintk
       console=ttySAC2,115200n8 --no-log
 $ env edit bootcmd
 $     mmc read 40007000 451 3000;mmc read 42000000
       3451 100;bootm 40007000 - 42000000
 $ env save
 $ boot
If the configuration is correct, the board will be booted up in the HYP mode as can be seen in Fig. D.1.

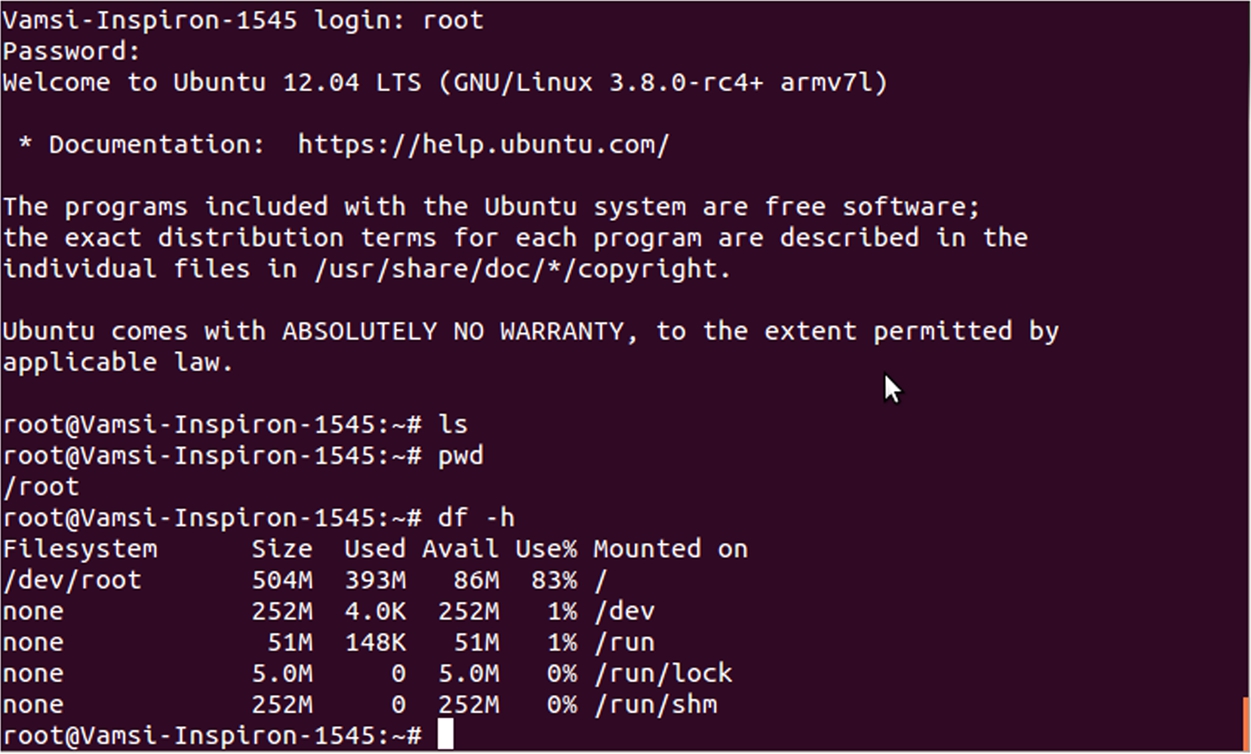
Once this is done, the board will boot up successfully. Enter username and password to login on the board as a root user. Once the system boots up and gets the IP address, run the following command in root mode. The board has a time skew and this command syncs it with online ntpserver.
$ ntpdate -s time.nist.gov
D.4 Open vSwitch with KVM
This section presents the installation and configuration of Open vSwitch on the Arndale board, and running KVM on top of Open vSwitch. The first step is to check if the KVM driver has been successfully installed by using the command
$ ls /dev/kvm
The installation of openvswitch daemon depends upon the modules: stp.ko, llc.ko, bridge.ko, and vxlan.ko. Before configuring Open vSwitch, we need to make sure these modules have been installed properly. A user can use the command “lsmod modulename” to check if a module is present or absent.
Next, we need to build Open vSwitch. It requires “linux-headers” or a source tree to build openvswitch.ko module. For this purpose, we can copy sources from linux-linaro-lng-3.14.32 into the directory “/lib/modules/3.14.32/build” so that Open vSwitch is able to find dependent modules for its build. The version for Open vSwitch used for build is openvswitch-2.3.10 as it is compatible with Linux kernel 3.14.32.
The steps below are followed to install Open vSwitch:
 $ apt-get update
 $ apt-get install -y git automake autoconf gcc uml-utilities
   libtool build-essential git
 $ wget http://openvswitch.org/releases/openvswitch-1.10.0.tar.gz
 $ tar zxvf openvswitch-2.3.10.tar.gz
 $ cd openvswitch-2.3.10
 $ ./boot.sh
 $ ./configure --with-linux=/lib/modules/`uname -r`/build
 $ make && make install
 $ insmod datapath/linux/openvswitch.ko
 $ mkdir -p /usr/local/etc/openvswitch
 $ ovsdb-tool create /usr/local/etc/openvswitch/conf.db
   vswitchd/vswitch.ovsschema
 $ ovsdb-server -v --remote=punix:/usr/local/var/run/openvswitch/db.sock
                     --remote=db:Open_vSwitch,manager_options
                     --private-key=db:SSL,private_key
                     --certificate=db:SSL,certificate
                     --pidfile --detach --log-file
 $ ovs-vsctl --no-wait init
 $ ovs-vswitchd --pidfile --detach
 $ ovs-vsctl show
Fig. D.2 shows the expected outcome after a correct configuration of Open vSwitch.

Now, we need to create custom versions of qemu-ifup and qemu-ifdown scripts that would be used in KVM configuration of guest OS. The custom versions will make use of Open vSwitch bridges [267]. The configuration files “/etc/ovs-ifup” and “/etc/ovs-ifdown” should be created for this purpose, which is done as follows:
$ vim /etc/ovs-ifup
  #!/bin/sh
  switch='br0'
  /sbin/ifconfig $1 0.0.0.0 up
  ovs-vsctl add-port ${switch} $1

$ vim /etc/ovs-ifdown
  #!/bin/sh
  switch='br0'
  /sbin/ifconfig $1 0.0.0.0 down
  ovs-vsctl del-port ${switch} $1
The next step is to add a bridge using Open vSwitch and a port to the bridge over which the guests can communicate. The steps for establishing this connection and configuring IP address for the bridge and gateway are as follows:
ovs-vsctl add-br br0
ovs-vsctl add-port br0 eth0
ovs-vsctl add-port br0 tap0
ovs-vsctl list port

#ifconfig eth0 0
ifconfig eth0 0.0.0.0 up
ifconfig tap0 0.0.0.0 up


ifconfig br0 10.218.108.16 netmask 255.255.248.0
route add default gw 10.218.104.1 br0
The commands shown in Fig. D.3 are used to verify the correct configuration for Open vSwitch.

The final task for bringing up the guest OS requires that the guest image ubuntu.img, guest device tree guest-vexpress.dtb, and guest kernel guest-zImage are already present on the SD card. We will issue the command to QEMU to boot up the guest OS on top of Open vSwitch as follows:
./QEMU-system-arm
  -enable-kvm -kernel guest-zImage
  -nographic -dtb ./guest-vexpress.dtb
  -m 512 -M vexpress-a15 -cpu cortex-a15
  -netdev type=tap,id=net0,script=no,downscript=no,ifname="tap0"
  -device virtio-net,transport=virtio-mmio.1,netdev=net0
  -device virtio-blk,drive=virtio-blk,transport=virtio-mmio.0
  -drive file=./ubuntu.img,id=virtio-blk,if=none
  -append "earlyprintk console=ttyAMA0 mem=512M
   root=/dev/vda rw ip=dhcp --no-log
   virtio_mmio.device=1M@0x4e000000:74:0
   virtio_mmio.device=1M@0x4e100000:75:1"
Then, the guest OS will boot up and get IP address via DHCP, as it can be seen in Fig. D.4

Finally, the guest OS terminal will be visible and can be used for communication with other hosts or guest OS; see Fig. D.5.