7. Core Data
Core Data is, in many ways, a replacement for our application’s model layer. It is much more than just storage; it also manages the life cycles of our data objects, tracks and validates any changes to our data, provides effortless undo support, and, yes, saves our data to disk. The UIManagedDocument class only further improves on Core Data, automatically setting up our Core Data stack, managing file input and output on background threads, and adding simple iCloud integration. In this chapter, we will look at the technologies underlying both Core Data and UIManagedDocument. Then we will replace Health Beat’s entire model layer with a UIManagedDocument-based model. As you will see, this provides a much simpler, much more robust system than our previous custom-built approach.
Introducing Core Data
The Core Data framework provides support for automatically managing many common model layer tasks. We have already seen how Xcode simplifies our application’s view layer. With Interface Builder, we can draw our application’s scenes. The built-in guidelines ensure that our application follows Apple’s Human Interface Guidelines, but it goes beyond that. We can draw connections between our view and controllers, linking objects to outlets and events to actions. With storyboards, we can link scenes with segues, letting us rapidly sketch out the entire application’s workflow. With a few clicks of the mouse, Xcode helps us build complex structures that would normally require a considerable amount of boilerplate code.
Core Data brings a similar magic to our model. For most applications, the models share a number of features. This includes one or more object graphs. These graphs define both the content and the relationships in our application’s data. Applications need to manage the life cycles of these object graphs, adding, modifying, and deleting objects in the graphs. They also need to validate the graphs, and save and load them to disk. Undo and redo support would also be nice. Furthermore, if the format of our data changes, we need to migrate our saved data from one schema to the next.
Core Data provides all of these features and more. In many cases, it can perform these tasks automatically. In others, it presents a rich API for expanding and customizing its behavior. It is also tightly integrated with Xcode’s tool chain. Core Data is mature, well tested, and highly optimized. It is used by millions of customers across thousands of applications. While we could try to build a custom solution to better fit our specific needs, it would require a considerable amount of effort to match the performance and stability already provided by Core Data. In most cases, it’s more cost effective to just use Core Data and to focus the developer effort on other areas.
And, yes, we can even graphically lay out our object graphs.
This chapter will start with a quick overview of Core Data’s architecture, to give you an idea of how it works and how you might use it for other projects. Then we will convert our Health Beat application over from a custom model to Core Data. Along the way, we will look at many of the tricks and tips (and possible traps) involved in using Core Data.
Architecture Overview
Our Core Data model can be divided into two parts. The managed object model defines our data’s schema, describing how our data is organized. We also have the Core Data stack. This combines both the managed object context (our application’s live data) and the persistence stack (for saving and loading our entities to disk).
Managed Object Model
The NSManagedObjectModel object defines the structure of our data. It describes what type of data we can store, and how the individual pieces of data relate. We do this by creating one or more entity descriptions. The managed object model then maintains the mapping between these descriptions and the corresponding NSManagedObject objects in our Core Data stack.
You can create managed object models programmatically at runtime, but we generally use Xcode’s Data Model Design tool to graphically lay out our schema.
Entity Descriptions
Core Data uses the NSEntityDescription class to define our model’s entities. At a minimum, this description includes a unique name for the entity and the name of the managed object class that will be instantiated in the Core Data stack (either NSManagedObject or a custom subclass). Most entities also have one or more properties.
Properties represent the type of data stored in our entity. They become our instance variables when we instantiate objects for our entities. All Core Data properties are completely key-value compliant; Core Data automatically defines equivalent Objective-C properties for us. Finally, Core Data supports three types of properties: attributes, relationships, and fetched properties. Each specifies a different relationship between the entity and its data.
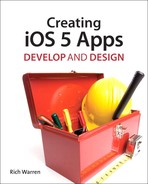
Attributes are the simplest Core Data property type. They represent values stored within the entity itself. Unfortunately, we are somewhat limited in the type of attributes that we can use. Table 7.1 shows the complete list of Core Data attribute types and their corresponding Objective-C data types.
Table 7.1 Core Data Attribute Types
Some of these deserve a little special attention. Let’s take the easiest one first. Internally, Core Data saves date attributes as the number of seconds since the reference date (January 1, 2001 GMT). It doesn’t store the time zone. Internally, NSDate operates the same way—however, NSDate will implicitly use the device’s default time zone. This means your date values will appear in PST when saved in Los Angeles, and in EST when read in New York. If you need to save the time zone information, you must explicitly create a separate attribute to store it.
Next, let’s look at the undefined attribute type. This type can only be used with transient attributes (attributes that are not saved to the persistent store but whose changes are monitored, allowing undo/redo support). Any Objective-C object can be assigned to an undefined attribute. As we will see in the “Managed Objects” section, undefined attributes are often used to provide a friendly Objective-C wrapper around more primitive Core Data types.
Finally, we have the transformable data type. This type uses an NSValueTransformer object to convert the attribute to and from an instance of NSData. By default, Core Data will use NSKeyedUnarchiveFromDataTransformerName. In practice, this means we can assign any Objective-C object that adopts the NSCoding protocol to a transformable attribute, without requiring any additional work on our part. Of course, if we’re feeling ambitious, we could always select a different NSValueTransformer or even write our own custom transformer to handle various special cases.
Attributes also have a number of settings. They can be optional, transient, or indexed.
• Optional: The attribute can have a nil value. More specifically, if the optional setting is turned off, we must assign a non-nil value before we can save the entity.
• Transient: Core Data does not save or load the attribute’s value from the persistent store. It will still track the value, however, for undo, redo, and validation.
• Indexed: This attribute is important when searching through a list of entities. Persistent stores may use indexed attributes to improve search performance on fetch requests. This is particularly true of SQLite-backed stores.
Additionally, each attribute type has a number of validation settings. For numeric attributes, we can assign a minimum, maximum, and default value. For strings, we can set the minimum length, maximum length, default value, and regular expression that the string must match.
Relationships represent the second property type. Core Data uses relationships to define connections between entities. We will typically define both sides of a relationship. For example, if our Department entity has a Manager relationship, then the Manager entity should have a matching Department relationship. Furthermore, the Manager’s relationship should be assigned as the Department’s inverse relationship.

While inverse relationships are not required, they are highly recommended. Core Data uses this information to ensure that the object graph remains consistent as the application makes changes. If you do not use inverse relationships, then you are responsible for ensuring the consistency, tracking changes, and managing the undo support. See the “Unidirectional Relationships” section of the Core Data Programming Guide for more information.
Relationships can be either to-one or to-many. To-one references are modeled using a pointer to the target object. Before iOS 5, all to-many relationships were modeled using NSSets. The relationship did not have any inherent order; it could be sorted based on any of the values from the entities. With iOS 5, we can also create ordered relationships, which use an NSOrderedSet. This allows us to place our entities into any arbitrary order we wish, without regard to the entities’ values.
Like attributes, relationships support optional and transient settings. For to-many relationships, we can also set the minimum and maximum number of entities in the relationship. Finally, we can specify a delete rule. Delete rules describe what happens to the relationship when we delete our entity. The different options are listed here:
• Cascade: Deleting the source object also deletes all the objects at the relationship’s destination. For example, deleting a Course object also deletes all its Students.
• Deny: If there is at least one object at the relationship’s destination, then the source object cannot be deleted. If you want to delete a Course entity, you first need to remove all its Students.
• Nullify: Sets the inverse relationship for any entities at the destination to nil. Deleting the Course entity sets all the Students’ Course relationship to nil.
• No Action: The entity at the other end remains unchanged. In general, this should only be used for unidirectional relationships. If it has an inverse relationship, that relationship now points to an entity that no longer exists. For example, our Students will still think they’re registered for the now-nonexistent Course.
Fetched properties are similar to relationships, but they are used to model weak one-way connections between entities. As the name suggests, the fetched property’s value is calculated using a fetch request. We will discuss fetch requests in more detail later this chapter, but basically fetch requests let us look up entities that match a given entity description. We can also apply a predicate to filter our results and then sort them according to a set of sort descriptors. For example, we could create a fetch request that returns all students (entity description) who are taking more than 18 credit hours (predicate), and then we could sort them by descending GPA (sort description).
Fetched properties use lazy initialization. The actual fetch is not performed until the property’s value is accessed. However, once the value is calculated, it is cached for future use. Our system models fetch properties using arrays, not sets, since fetched properties have a defined sort order. Additionally, fetched properties are the only way to model cross-store relationships. Normal relationship properties can only refer to objects saved in the same persistent store.
In many ways, an entity description is similar to a class. It is a blueprint used to instantiate managed objects—and, like classes, entity descriptions support inheritance. If you have a number of similar entities, you can factor out the common properties into a super-entity. You can even explicitly declare abstract entities (something not supported by the Objective-C object model).
However, there are a few important differences between entity inheritance and object inheritance. Remember, the entities describe how our data is organized. We use the entities to create objects—but the resulting object inheritance tree is separate from our entity inheritance tree. For example, we will often use NSManagedObjects for all of our entities—superclasses and subclasses alike. If we are creating custom classes for our entities, we probably want the model’s inheritance tree to match our entities—but that’s not required, and it’s something we will have to manage by hand.
Most importantly, however, entity inheritance can have unexpected performance implications. If you save your entities in an SQLite-based store, then the database will place your entire hierarchy in a single table. It will create a column for each property, requiring a table large enough to contain all the properties from all the different sub-entities.
If you have a large number of sub-entities, and your sub-entities each add a significant number of unique properties, you may end up with large, sparsely populated tables. This can affect both the amount of disk space you need to store your entities, and the performance of fetch requests.
Migrating Data
Changes to the schema may make the model incompatible with previously created data stores. When this happens, you will need to migrate the old stores before you can open them. By default, Core Data manages this with a three-step process:
1. Model versioning
2. Mapping model
3. Data migration
Core data lets us create multiple versions of our managed object model. We can add a new version by selecting our managed object model and then selecting Editor > Add Model Version.
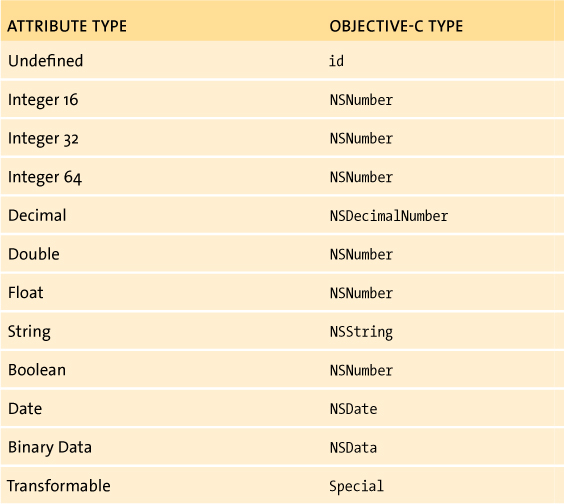
The mapping model describes how to transform the data from one version to the next. Typically, we add a new mapping model to our project by selecting File > New File and then selecting iOS > Core Data > Mapping Model (Figure 7.1). Xcode’s mapping model editor allows us to graphically set the transformations between the source and destination models.
Figure 7.1 Adding a mapping model
Finally, you must migrate the existing data from your old model to your new one. Most of the time, you will perform automatic migration by calling addPersistentStoreWithType:configuration:URL:options:error: to open your persistent store. For the options: parameter, pass in an NSDictionary containing the NSMigratePersistentStoresAutomaticallyOption key with an NSNumber object set to YES.
NSDictionary *optionsDictionary =
[NSDictionary
dictionaryWithObject:[NSNumber numberWithBool:YES]
forKey:NSMigratePersistentStoresAutomatically];
if (![self.persistentStoreCoordinator
addPersistentStoreWithType:NSSQLiteStoreType
configuration:nil URL:storeURL
options:optionsDictionary
error:&error]) {
NSLog(@"Unable to open persistent store at %@, %@: %@",
storeURL, error, [error userInfo]);
abort();
}
Not surprisingly, data migration gets quite complex. To help manage this, Core Data provides additional support for injecting custom code when detecting version skew and while performing the actual data migration. See Apple’s Core Data Model Versioning and Data Migration Programming Guide for more information.
Remember, not all changes require migration. You can change an attribute’s default value or validation constraints without altering the existing stores. Additionally, you will want to test your data migration very carefully. You don’t want to corrupt or lose your user’s data. If you’ve ever updated an app only to have it erase all your data, you know exactly what I mean.
Support Data
The model may also contain fetch requests and configurations. As noted, fetch requests let us request all the entities that match a given specification. While we often create our fetch requests at runtime, we may want to build complex or commonly used fetch requests directly into our model.
Xcode’s predicate builder can be helpful when creating complex fetch requests—though the version included with Xcode 4 lacks many of the features found in previous versions. We can only select attributes in the left-hand side and constants in the right—no variables, keys, or nested compound predicates. Hopefully Apple will restore the full set of features in later releases.
Additionally, we cannot add a sort description using the graphic interface. This isn’t a huge problem, though, since we can use the predicate builder to build the basic fetch request, and then we can add the sort descriptors at runtime, if necessary.
Configurations, on the other hand, represent the second type of support data. Technically, they are just arrays of entity descriptions. We access our configurations using NSManagedObjectModel’s entitiesForConfiguration: and setEntities:forConfiguration: methods. We can use these to define different subsets of our model. For example, a user logged in as an administrator may have access to a broader set of entities than someone logged in as a user.
Mostly, however, we use configurations when we want to split our model across several persistent data stores. In this case, we need to partition our model using configurations. Then we specify the correct configuration for each store as we add them to our persistent store coordinator. Core Data handles the rest.
Managed Object Context
We now move from defining our data to actually managing it. The managed object context acts as a temporary scratch space. When you fetch objects from a persistent store, they are placed in the context. We can then manipulate them, change their properties, or even add or remove objects from the context. The managed object context monitors these changes, recording them and enabling undo/redo support. In addition, when we save these changes back to our persistent store, the context validates our objects, ensuring that everything remains in a valid state before committing the changes.
We can open more than one managed object context at a time. In fact, an object in our persistent store may be modified by multiple contexts simultaneously. By default, the context will attempt to merge these changes, causing an error if there are conflicts. We can further control the merge process by changing the merge policy or by observing NSManagedObjectContextObjectsDidChangeNotification notifications. Note that the system may use its own managed object contexts internally, so we want to make sure we specify known contexts when we register as an observer. Otherwise, we may receive notifications from these system-level sources.
Starting with iOS 5, we can create nested contexts, where each parent context may contain one or more child contexts. When connected this way, saving a child context merely pushes the changes up to the parent context. Data is not saved to the persistent store until the top-level context is saved. Fetch requests will pull data down through every context level, while objectWithID: will pull through the fewest number of contexts possible.
Nested contexts can greatly simplify a number of difficult problems, including performing asynchronous saves on a background thread, sharing unsaved changes between different contexts, and even simplifying background fetching.
For example, to implement asynchronous saves, we simply need to create two managed object contexts with a simple parent-child relationship. Our application makes all its changes to the child context. When it wants to save, we start by saving the child context on the main thread. This creates a snapshot of our data—pushing our changes up to the parent context. Then we save the parent context on a background thread. As we will see, UIManagedDocument uses this technique when auto-saving document data.
Note
In previous Core Date project templates, Xcode’s auto-generated code accessed the managed object context directly from the app delegate. With iOS 5, Apple highly recommends switching to a “pass the baton” approach, where the correct context is handed from object to object along the view controller hierarchy. This is especially true in any applications using multi-layer contexts.
Managed Objects
All Core Data entities are instantiated as an NSManagedObject or one of its subclasses. Each managed object is associated with an entity description. This includes both the object’s metadata and information about the managed object context where our object resides.
In many cases, we can simply use raw managed objects in our project. Each managed object will automatically generate both public and primitive accessors for all the modeled properties. For attributes and other to-one relationships, these follow the standard <key> and set<Key> naming conventions.
For to-many relationships, these accessors can be used to get and set the entire collection (as an NSSet or NSOrderedSet, depending on the type of to-many relationship). However, if we want to simply add or remove individual members, we can request a mutable set using the mutableSetValueForKey: or mutableOrderedSetValueForKey: method. We can then add or remove entities from this set—all changes will be made to the managed object context’s object graph. We can also use the dynamic relationship accessors add<Key>Object: and remove<Key>Object: (insertObject:in<Key>AtIndex: and removeObjectFrom<Key>atIndex: for ordered to-many relationships).
NSManagedObject also creates primitive accessors. These take the form primitive<Key> and setPrimitive<Key>:. Unlike the public accessors, these do not trigger KVO notifications. We will typically use these primitive accessors when writing our own custom accessors. We will see some examples later.
While these auto-generated accessors are cool, they have a downside. Unfortunately, the compiler does not know about these methods, so they may generate warnings (and if you’re following my advice, these warnings will be treated like errors, preventing your app from building successfully). There are a couple of ways around this. First, we can always use key-value coding to access data from raw managed objects. Alternatively, we could create a category on NSManagedObject that declares the properties. Finally, we could create a custom subclass for our entity.
Xcode 4 makes creating custom subclasses easy. Just select File > New > New File and select the iOS > Core Data > NSManagedObject subclass template. Xcode will automatically generate the properties for you and link your subclass to its entity in the managed object model.
Custom subclasses are particularly important when you need to implement custom accessors or validation methods, implement non-standard attributes, specify dependent keys, calculate derived values, or implement other custom logic. However, there are a few points you should keep in mind when subclassing NSManagedObject:
• Core Data relies on NSManagedObject’s implementation of these methods to function properly: primitiveValueForKey:, setPrimitiveValue:forKey:, isEqual:, hash, superclass, class, self, zone, isProxy, isKindOfClass:, isMemberOfClass:, conformsToProtocol:, respondsToSelector:, managedObjectContext, entity, objectID, isInserted, isUpdated, isDeleted, and isFault. You should never override any of these methods.
• You are discouraged from overriding the following methods: description, initWithEntity:insertIntoManagedObjectContext:, valueForKey:, and setValue:forKeyPath:. If they are not handled properly, they can cause unexpected results.
• You should invoke the superclass’s implementation before executing your own code for the following methods: awakeFromInsert, awakeFromFetch, and validation methods like validateForUpdate:.
• You can override the awakeFromInsert and awakeFromFetch methods to perform any custom initialization when a new object is created or when an object is loaded from the persistent store, respectively.
• You should not provide instance variables for any properties in the model. Core Data will automatically manage the life cycles of these objects.
• The declaration for any object properties should use (nonatomic, retain). In iOS 5, we can declare scalar properties for any of our scalar values; these properties should be declared using (nonatomic). In both cases, we should use the @dynamic property implementation directive for all of these. NSManagedObject will create the correct accessors based on our declaration.
• If you create custom accessors for any modeled properties, be sure to manually trigger KVO access and change notifications by calling willAccessValueForKey:, didAccessValueForKey:, willChangeValueForKey:, didChangeValueForKey:, willChangeValueForKey:withSetMutation:usingObjects:, and didChangeValueForKey:withSetMutation:usingObjects:, as appropriate. Core Data disables automatic KVO notification for any modeled properties.
Note
Even though we’re using ARC, we can use (nonatomic, retain) to declare the properties generated by our managed object context. Actually, (strong, nonatomic) also works, but Xcode will use (nonatomic, retain) in its auto-generated code. Remember, Core Data manages the object’s life cycle. We don’t need to think too hard about what it’s doing behind the scenes.
We often create custom subclasses when we want to implement non-standard attributes. There are two ways of doing this. The first is to set the attribute’s type to transformable and then assign an NSValueTransformer that can convert the class to and from an NSData object. The vast majority of the time, we can simply use the default transformer—just make sure the properties adopt the NSCoding protocol. Everything will just work.
If we need more control, we can create custom accessors. Typically, we declare two attributes. One is the non-standard attribute. We declare this as transient with an undefined type. The other attribute must be a standard, concrete type—this will hold the actual data that is saved to our persistent store. Then we write our accessor methods to convert our data back and forth between the two attributes.
Let’s say we want to add a non-standard NSTimeZone attribute to our entity. NSTimeZone adopts the NSCoding protocol, so the simplest approach is to just declare it as a transformable attribute. We can then declare the property in our custom subclass, as shown here:
@property (nonatomic, retain) NSTimeZone* timeZone;
Then, in the @implementation block, declare the property as dynamic. This tells the compiler that the accessors’ implementations will be provided at runtime (if not earlier). Remember, NSManagedObject automatically creates these accessors for us.
@dynamic timeZone;
That’s it. Core Data will automatically handle the conversion to and from an NSData object.
Next, let’s look at implementing the same non-standard attribute using custom accessors. This time add both a transient, undefined timeZone attribute and a string timeZoneName attribute. In our NSManagedObject subclass’s @interface, declare the timeZone property as shown in the previous example. However, in the implementation file, start by declaring two private properties:
@interface MyManagedObject()
@property (nonatomic, retain) NSString * timeZoneName;
@property (nonatomic, retain) NSTimeZone* primitiveTimeZone;
@end
Then, in the implementation block, declare the two private properties as dynamic:
@dynamic timeZoneName;
@dynamic primitiveTimeZone;
Since we will be implementing our own custom accessors for the timeZone property, we don’t need to call either the @dynamic directive or the @synthesize directive. Instead, just implement the methods as shown here:
- (NSTimeZone*)timeZone {
// Get transient value.
[self willAccessValueForKey:@"timeZone"];
NSTimeZone* timeZone = self.primitiveTimeZone;
// If we have no transient value,
// try to generate it from the persistent value.
if (timeZone == nil) {
// Get the persistent value.
NSString* name = self.timeZoneName;
if (name != nil) {
timeZone = [NSTimeZone timeZoneWithName:name];
// Set the transient value.
self.primitiveTimeZone = timeZone;
}
}
[self didAccessValueForKey:@"timeZone"];
return timeZone;
}
- (void)setTimeZone:(NSTimeZone *)timeZone {
// Set transient value.
[self willChangeValueForKey:@"timeZone"];
self.primitiveTimeZone = timeZone;
// Set persistent value.
self.timeZoneName = [timeZone name];
[self didChangeValueForKey:@"timeZone"];
}
The getter simply calls the auto-generated primitiveTimeZone method to access our transient attribute’s current value. Remember, unlike the other attributes, timeZone is transient. Its value is not loaded from the persistent store. If we haven’t programmatically set it, its value defaults to nil. In this case, we try to create a new NSTimeZone object using the value stored in our private timeZoneName attribute. We then set the timeZone’s value and return that value. The next time we call timeZone, we will be able to pull the value directly from the timeZone attribute.
The setter is even simpler. Here, we first set our timeZone attribute, and then we set the underlying timeZoneName attribute. Remember, in both accessors we need to send out the proper KVO notifications.
These are probably the simplest implementations, but there are other possibilities. You could pre-calculate the timeZone attribute during the awakeFromFetch method, or you could delay setting the timeZoneName attribute until the willSave method is called. Both of these approaches are shown in the “Non-Standard Persistent Attributes” section of Apple’s Core Data Programming Guide.
Note

Although we declared the timeZoneName attribute as private in our sample NSManagedObject subclass, this is not necessarily required. We could declare a public read-only property for timeZoneName. We could even declare it as publicly read/writeable—however, this complicates things. We would need to make sure our timeZone value is updated whenever the timeZoneName value is changed. We would also need to make sure our implementation is KVO compliant by declaring timeZone as a dependent key.
A hybrid approach is sometimes useful when trying to save non-object values. This is especially true for structures that are supported by the NSValue class (e.g., CGPoint, CGRect, and CGSize). Here, you simply define the attribute as a transformable type and then write custom accessors to convert the structs to and from an NSValue object.
Before iOS 5, we had to use a similar approach to simplify access to scalar values (floats, ints, and BOOLs). This is even easier: You set the attribute to the correct numeric type and then write custom accessors to convert your values to and from NSNumber.
However, while these approaches can simplify the interface, they are not generally recommended. Core Data tries to optimize its auto-generated accessors. The performance advantages gained by letting Core Data manage its own data usually outweigh any ease of use that is granted by dealing directly with the structs and scalar values. This is especially true in data-intensive applications.
Fetch Requests
We access our managed objects using NSFetchRequest. At a minimum, our fetch request needs an entity description. Traditionally, this involved accessing the entity descriptions from our modeled object contexts using the entityForName:inManagedObjectContext: and then instantiating our NSFetchRequest object. With iOS 5, we can use the fetchRequestWithEntityName: convenience method to create a new fetch request with a single method call. Once we have our fetch request, we call the executeFetchRequest:error:, which returns an array containing all instances of the named entity, including any sub-entities.
The fetch will return objects based on their state in the managed object context—even if these changes have not yet been saved. This means a fetch will return new objects added to the context and will not return any objects deleted from the context. Likewise, the system will evaluate predicates based on the object’s in-memory state—not its saved state. Of course, if we haven’t yet loaded the objects into managed object context, then the fetch request loads them from their persistent store (or from the parent context, if it has one).
We have a lot of control over which objects are returned and how they are organized. By adding an NSPredicate to our fetch request, we can set constraints on our request. Our fetch request will return only those entities that match our predicate. An array of NSSortDescriptors defines the order in which our objects are returned.
Predicates are a rich and complex topic. Previous versions of Xcode included a robust predicate editor to help visually design complex predicates. Unfortunately, the predicate builder in Xcode 4 is severely limited by comparison. We can only use it for fetch requests, not fetched properties, and we can only use it to create a small subset of relatively simple predicates. This means that (at least for the time being) if you want to make any moderately complex fetch requests, you need to learn how to write your own predicate expressions.
Basically, a predicate is a logical operator. When the predicate is evaluated on an object, it performs the specified comparison and then returns YES or NO.
We can build our NSPredicate object using a combination of NSComparisonPredicate, NSCompoundPredicate, and NSExpression objects; however, it’s usually easier to create our predicate using a formatting string. The NSPredicate class then parses this string and builds a predicate to match.
The predicate parser is whitespace insensitive. It is also case insensitive when it comes to keywords, and it supports nested parenthetical expressions. The simplest predicates have three parts: the left expression, a comparison, and the right expression.
These expressions can be constants, key paths, or variables. Most of the time, we will compare one of the object’s key paths against a constant. String constants can be typed directly into the formatting string, but they must be surrounded by double quotes. Most of the other values (e.g., NSDate or NSNumber) are passed in using the %@ formatting argument. We can even pass in string constants using %@, and the parser will automatically quote them for us.
The comparison includes most of what we expect: ==, <, >, <=, >=, and !=. The parser often understands common variations for these. For example, the following comparisons are also valid: =, =<, =>, and <>. The parser also adds the BETWEEN comparison—whose right-hand side must be a two-value array.
For strings, we have the BEGINSWITH, CONTAINS, ENDSWITH, LIKE, and MATCHES comparisons. Most of these should be relatively straightforward. LIKE simply checks to see if the left-hand string is equal to the right-hand string. However, it supports the ? and * wildcards for matching a single character or zero or more characters. MATCHES, on the other hand, treats the right-hand value as a regular expression. Appending [cd] to the end of the comparison makes it case and diacritic insensitive.
A few sample predicates are shown below:
// Determines if the object's lastName attribute equals @"Jones".
[NSPredicate predicateWithFormat:@"lastName LIKE 'Jones'"];
// Determines if the object's pubDate occurred before
// the given targetDate.
[NSPredicate predicateWithFormat:@"pubDate < %@", targetDate];
// Determines if the person is in our target demographics.
[NSPredicate predicateWithFormat:@"age BETWEEN %@",
[NSArray arrayWithObjects: [NSNumber numberWithInt:18],
[NSNumber numberWithInt:34], nil]];
Note that we can also include literal array constants by placing a comma-separated list of values inside curly braces. This means that the target demographics example could be simplified as shown:
// Determines if the person is in our target demographics.
[NSPredicate predicateWithFormat:@"age BETWEEN {%@, %@}",
[NSNumber numberWithInt:18], [NSNumber numberWithInt:34]];
The key paths can even include to-many relationships. Often we will prefix these expressions with one of the aggregate operators: ANY, ALL, or NONE, as shown:
// The target has at least one child under 18.
[NSPredicate predicateWithFormat:@"ANY children.age < %@",
[NSNumber numberWithInt:18]];
// All the target's children are under 18.
[NSPredicate predicateWithFormat:@"ALL children.age < %@",
[NSNumber numberWithInt:18]];
// None of the target's children are under 18.
[NSPredicate predicateWithFormat:@"NONE children.age < %@",
[NSNumber numberWithInt:18]];
We can also check the size of the to-many relationship by appending [size] to the key path.
// Determines if the target has at least 3 children.
[NSPredicate predicateWithFormat:@"children[size] < 3"];
Finally, we can combine simple comparisons using AND, OR, or NOT.
// Determines if the target has at least 3 adult children.
[NSPredicate predicateWithFormat:
@"(children[size] < 3) AND (NONE children.age < %@)",
[NSNumber numberWithInt:18]];
These formatting strings allow us to specify a wide range of predicates in a relatively compact format. Unfortunately, it’s very easy to accidentally misspell a key path or inadvertently pass in the wrong type of object. These mistakes will only show up as runtime errors. It is, therefore, very important to test all your predicates.
Additionally, not all data sources support all of NSPredicate’s features. This is particularly important for Core Data, since the predicate’s behavior can change when we switch from one type of persistent store to another. The behavior can also vary depending on whether we use it in a fetch request or to filter the returned NSArray. We’ll talk about these differences more in the “Persistent Stores” section, later in this chapter.
OK, this should be enough to get you started. For more information, check out Apple’s Predicate Programming Guide. It covers a number of advanced topics, like programmatically creating predicates, creating predicate templates with variables, and dynamically setting key paths. It also includes a full description of the syntax for predicate format strings.
Note
Each fetch request requires a round trip to the persistent store. Therefore, if you need to get a subset of objects, it is faster to filter an existing array than to perform a new fetch request. Additionally, you cannot perform fetch requests using predicates based on transient attributes, since these attributes are ignored by the persistent store. You can, however, use these attributes when filtering arrays of objects in memory.
Finally, iOS provides additional support for Core Data-driven table views using the NSFetchedResultsController class. This class analyzes the results of a fetch request (including any predicate or sorting descriptors) and automatically maps the returned objects to their corresponding index paths. You can even specify a key path that will be used to partition the results into sections.
In addition, the NSFetchedResultsController monitors changes to the objects in its managed object context and reports these changes to its delegate. The controller also caches its results, improving performance if the table is re-displayed.
We will get a chance to use an NSFetchedResultsController when we revise Health Beat’s history view (see “Updating the View Controllers,” later in this chapter).
Persistent Store Coordinator
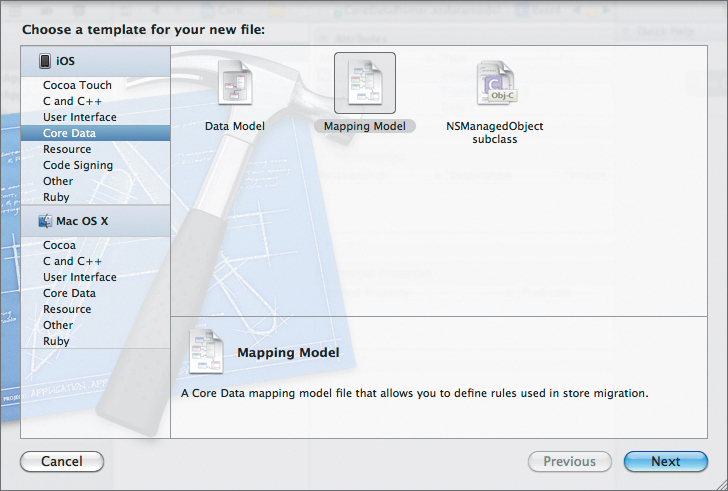
Each managed object context has a single persistent store coordinator. This coordinator sits between the context and the stores. Each managed object context can have one and only one persistent store coordinator. The coordinator, however, can support more than one context. It can also connect to any number of persistent stores (Figure 7.2).
Figure 7.2 The persistent store coordinator’s role in the Core Data stack
The persistent store coordinator primarily acts as a façade for a number of stores. We could have just a single persistent store, or we could have a hundred. As far as the managed object context is concerned, it doesn’t matter. The persistent store coordinator provides a single, unified interface, presenting the union of all the data in all the provided stores.
The persistent store coordinator also plays an important role in concurrent application, by serializing access to the underlying data. By default, if you want to access data in multiple threads, then each thread should have its own persistent store coordinator (and by extension, its own managed object context).
This is also referred to as thread confinement concurrency. With iOS 5, we have two additional concurrency options: private queue concurrency and main queue concurrency. These options often remove the need to create multiple managed object contexts—greatly simplifying our code.
Private queue concurrency uses a private queue to manage access to the managed object context. Whenever we want to use our context, we call performBlock: or performBlockAndWait:. We can then access the managed object context normally within the provided block.
Main queue concurrency works similarly to private queue concurrency, except the managed object context is created on the main thread. All our code on the main thread can access the context normally. Any code on any other thread must use performBlock: or performBlockAndWait: to access the context. This concurrency model is highly recommended when interacting with the user interface, since most UI work must be done on the main thread.
When creating hierarchies of managed object contexts, all parent contexts must use either private queue or main queue concurrency. The final child contexts can use any concurrency model.
Persistent Stores
Persistent stores act as a wrapper for a data source (usually a file saved to disk). The store is responsible for mapping objects in the managed object context to the data in the data source—both saving objects to disk and instantiating objects from disk. iOS supports three types of persistent stores: binary, in-memory, and SQLite.
All three stores are fast, especially when compared to plists or other XML-based storage. The binary format stores the object graph in a single binary file. As a result, the persistent store must load the whole object graph into memory at once. In most cases, however, this produces the smallest file size of any data store. Binary stores also write out their data as an atomic action—either the entire file will be written or nothing will be written. You will never have corrupted data from a half-written file.
The in-memory store acts more like a virtual scratch space. It does not store the objects to disk; rather it keeps them in active memory. Objects placed into an in-memory store benefit from Core Data features like validation, change tracking, and undo support; however, you would have to write additional code to load and save these objects outside Core Data.
Most of the time we will use the SQLite persistent stores. This has a significant advantage over the other stores: We do not need to load the entire object graph into memory. We only load the objects we actually intend to use.
By default, a fetch request to an SQLite-based store only instantiates the objects it returns. All the relationships for those objects are represented by faults. Basically, a fault is a placeholder for an object or array. If you access the fault, it fires, and Core Data uses lazy initialization to instantiate an actual copy of the object. Most of the time this occurs transparently behind the scenes. The NSFetchRequest class includes a number of methods to manage whether the request returns faults or objects, how many objects it returns, and whether any of the objects’ relationships are also pre-fetched.
While faults help us save memory by letting us limit the number of objects we need to load, firing faults can be inefficient, particularly if you fire a number of faults in series. If you know you’re going to need a large number of faulted objects, it may be better to batch fire all the faults or pre-fetch all the objects.
To batch fire a number of faults, you just need to create a fetch request to load those objects. Of course, this means that all your faults must be of the same entity type. Simply build an array containing the faulted relationships, and then build a predicate using the IN operator as shown here:
NSArray* faults =
[NSArray arrayWithObjects: fault1, fault2, fault3, ... , nil];
NSPredicate* predicate =
[NSPredicate predicateWithFormat:@"self IN %@", faults];
Alternatively, you can use NSFetchRequest’s setRelationshipKeyPathsForPrefetching: method. This lets you set an array of key paths. All the relationships represented by those key paths are also instantiated as full objects when the fetch is executed. This lets us pre-fetch objects that we know we are going to need.
We have to be careful with this, however. It is easy to accidentally grab more memory than we originally intended. As always, it’s a good idea to profile our code. Looking at actual performance numbers will help us find the right balance between runtime performance and memory usage.
We can also reduce memory overhead by re-faulting individual objects. To do this, call the managed object context’s refreshObject:mergeChanges: method. If the mergeChanges: flag is set to NO, then the object is converted back into a fault and all pending changes are lost. In addition, all of the object’s relationships are released—possibly trimming them from the in-memory object graph as well.
Faulting is just one of many differences between SQLite and other stores. With non-SQLite stores (and when working with NSArrays or other collections), the system executes both predicates and search descriptors in Objective-C. This means we have full access to NSStrings comparison methods. We can even incorporate our own Objective-C code (by providing a custom selector or NSComparator block for our sort descriptor, or by creating a predicate using the predicateWithBlock: method).
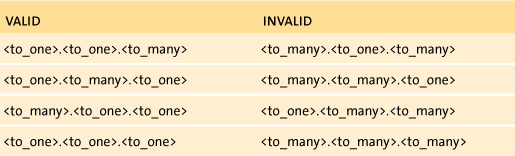
When using SQLite stores, however, the predicates and sort descriptors are translated into SQL and executed in the database. We cannot use predicates or sort descriptors that incorporate custom Objective-C code. SQLite only supports the following NSString sort selectors: compare:, caseInsensitiveCompare:, localizedCompare:, localizedCaseInsensitiveCompare:, and localizedStandardCompare:. Finally, key paths in predicates can only include a single to-many relationship. But you can string together any number of to-one relationships and attributes with the to-many relationship (Table 7.2).
Table 7.2 Sample Key Path Patterns
Remember that if you need additional features, you can always perform a more general fetch request and then execute the custom sorting and filtering on the resulting array. This wastes memory, but sometimes you just gotta do what you gotta do.
Note
iOS 5 also allows the creation of custom incremental stores, letting us connect Core Data to any arbitrary data storage. This involves creating a subclass of the NSIncrementalStore abstract class, overriding a number of methods to support data access. This lets us connect Core Data to the data storage technology of our choice. It is also the preferred way to connect Core Data to a Web service.
Data Protection
For iOS 5 applications, the persistent stores now encrypt the data on disk. The persistent stores support a range of encryption options:
• NSFileProtectionNone turns off encryption.
• NSFileProtectionComplete provides the tightest security. The files can only be accessed after the device is authenticated and as long as the device is unlocked. Unfortunately, this can prevent your app from accessing the data while operating in the background.
• NSFileProtectionCompleteUnlessOpen prevents access to files unless the device is authenticated and unlocked. Your application can continue to access any open files while locked; however, you cannot open new files.
• NSFileProtectionCompleteUntilFirstUserAuthentication prevents access to files while the device is booting and until the user authenticates with their password. However, once the user authenticates, the files remain accessible, even if the device is later locked.
Core Data will use NSFileProtectionCompleteUntilFirstUserAuthentication by default. We can change the protection level by assigning a value to the NSPersistentStoreFileProtectionKey when configuring our persistent store.
iCloud Support
Core Data provides easy integration with iCloud. The iCloud support focuses on managing many of the details that were dealt with in Chapter 6. If you’re using a single centralized Core Data store, then setup is simple: Set a couple of preferences when setting up the persistent store, then listen for updates. Everything else is handled automatically. There’s no need to use NSMetadataQuery to search for the file. We no longer need to worry about merging conflicts. We don’t even need to tell the application how to save and load our data. All of that is handled for us automatically.
When using Core Data with SQLite stores, each application manages its own local database, and the database is never actually uploaded into iCloud storage. Instead, each database saves transaction log files and uploads the log files to iCloud. Other copies of the application can then identify and download these log files, using them to update the local database. This also means the file is only uploading deltas—the differences between the files on a per-entry basis. This greatly minimizes the amount of data that Core Data transmits between the app and iCloud.
iCloud also uses three-way merges to automatically resolve conflicts on a per-entry basis. Here, the system compares both of the conflicting copies with the original. This allows for a much more accurate and autonomous merging.
For example, look at the two-way merge we implemented in Chapter 6. Imagine a case where a WeightEntry instance is present in version A, but missing from version B. Our two-way merge had no way of telling whether this entry had been added to A or deleted from B. So, we erred on the side of caution, always choosing to keep the mismatched entry.
A three-way merge, on the other hand, would be able to positively identify whether the entry had been added or deleted and would be able to take the appropriate action when merging. If it had been added to A, it should be included in the merged version. If it had been deleted from B, it should be removed.
To set up a centralized Core Data store, we simply set the NSPersistentStoreUbiquitousContentNameKey and NSPersistentStoreUbiquitousContentURLKey keys in the options dictionary that we pass to addPersistentStoreWithType:configuration:URL:options:error: when creating our persistent store. We then register for the NSPersistentStoreDidImportUbiquitousContentChangesNotification (probably the longest constant name in Objective-C history), and in the notification block, we call the managed object context’s mergeChangesFromContextDidSaveNotification:. That’s it. Core Data handles the rest.
Of course, if we want to have a separate Core Data store for each document, things get a little more complicated—especially when opening a saved document. We will need to use NSMetadataQuery to search for the DocumentMetadata.plist file inside our Core Data package. Then, we’ll need to open this and extract the NSPersistentStoreUbiquitousContentURLKey for that store. With this in hand, we can instantiate our local copy of the store. See the “iCloud Storage” section of the iOS App Programming Guide for all the details.
The transaction logs are stored in a directory named <NSPersistentStoreUbiquitousContentNameKey>/<NSPersistentStoreUbiquitousContentKeyName>. If we delete our data file or remove it from iCloud, we must also make sure we delete the transaction logs by using a coordinated write block.
UIManagedDocument
UIManagedDocument is a concrete subclass of UIDocument that is specifically designed for managing Core Data. UIManagedDocument greatly simplifies the setup of a Core Data model. It will automatically merge all model objects in the application bundle and then use the combined model to create an SQLite-based persistent store attached to a two-layer managed object context. The two-level context helps support asynchronous background saves.
The child layer uses main queue concurrency, letting us interact with this context directly on the main thread. UIManagedDocument monitors changes made to this context and automatically saves the changes at a convenient point during the application’s run cycle.
When it decides to save changes, it starts by making a snapshot of the changes. This is easily accomplished by saving the child context. This will push the current batch of changes up to the parent context. Then, it saves the parent context on a private background queue. This actually saves the changes to disk. During this step, it also logs the changes to the iCloud storage container, letting them sync up with the cloud.
Much of the time, we can use UIManagedDocument without further subclassing. We simply instantiate a new UIManagedDocument object, then set the options for the persistent store. Finally, we call openWithCompletionHandler: to open an existing document, or we call saveToURL:forSaveOperation:completionHandler: to create a new document.
We can subclass UIManagedDocument to modify its default behaviors. For example, we can change the name of the persistent store in our document package. We can change the type of persistent store or modify how the document models or stores are created. We can even enable support for saving and loading data from outside Core Data. For more information, check out the UIManagedDocument Class Reference.
iCloud Limitations
Now for the bad news. Currently, using Core Data on iCloud imposes the following restrictions:
• No support for ordered relationships.
• We cannot use mapping models to migrate our schema. Lightweight migration is still OK.
• When creating a new store, we should not populate it with a pre-existing database file. If we need to set up some initial data, we should either programmatically create the data in code or use NSPersistentStoreCoordinator’s migratePersistentStore:toURL:options:withType:error: to load the data from an existing file.
For more information, be sure to look over the latest release notes.
Core Data Performance
Core Data is a mature, efficient object graph management framework. Its classes have been highly optimized. For example, NSManagedObject instances use reflection to examine their internal data. The managed object then leverages this information to optimize access to this data. Therefore, accessing values from an NSManagedObject is often faster than comparable accessors on generic Objective-C objects.
SQLite-based persistent stores help us minimize the number of objects held in active memory, letting us fetch and hold only the objects we need. This is especially important for iOS applications, since memory management remains one of our key concerns.
Still, there are some key points to remember to avoid poor performance.
Fetch Requests
Fetch requests are expensive. They start by accessing the data from the persistent store. Then they merge this data with the existing data in the managed object context. Most of the time, we want to reduce the total number of fetches. In general, this means combining groups of smaller fetches into a single larger fetch.
However, there are times when we want to quickly return a small subset of the data and then fill in the rest while the system is idle. We might do this, for example, when filling in a table view.
We can restrict the number of objects loaded into memory by setting either setFetchLimit: or setFetchBatchSize:. In both cases, the full fetch is calculated, and all the other objects are returned as faults. When calling setFetchLimit:, we can manually load in the remaining objects by calling setFetchOffset: and then setting the fetch limit to 0. A second fetch will then grab the remaining objects.
Setting the batch size, on the other hand, returns a proxy array that automatically faults new batches when needed.
Faulting
When a fault fires, it acts like a fetch request, except only a single object is returned. This becomes very expensive if we accidentally iterate over an array of faults, firing each one individually. Instead, we need to batch fault or pre-fetch our data to reduce the total number of trips to the persistent store (see “Persistent Stores” for more information).
Note that we can safely call the following methods on a fault without causing it to fire: isEqual:, hash, superclass, class, self, zone, isProxy, isKindOfClass:, isMemberOfClass:, conformsToProtocol:, respondsToSelector:, description, managedObjectContext, entity, objectID, isInserted, isUpdated, isDeleted, and isFault.
Among other things, this means we can freely store faults into collections. However, we must treat these collections carefully. It is easy to accidentally trigger faults when calling the collection’s methods. Anything that calls valueForKey: on the collection’s objects will trigger faults—most likely triggering all the faults in the entire array.
Reducing Memory Overhead
In general, unless you have a very good reason to do otherwise, you should always use an SQLite-based store. You should also avoid loading more objects into memory than is absolutely necessary. I also recommend saving changes as you go—rather than letting unsaved changes accumulate in the managed object context. This also helps free up memory and can help you avoid problems with overly long save times.
By default, Core Data only retains objects that have unsaved changes. However, managed objects do retain each other through relationships. This can easily create retain cycles, which will prevent objects from being released. If you find that you are accumulating large numbers of objects in memory, you can break these cycles by re-faulting the objects.
We can manually refault objects by calling the context’s refreshObject:mergeChanges: method. We can also clear the entire managed object context by calling its reset method.
Note
Calling reset on the managed object context will invalidate any objects currently in the context. Be sure to dispose of all references you have to these objects before resetting. Accidentally holding onto these references will produce dangling pointers, leading to errors that are bizarre, intermittent, and otherwise difficult to debug.
Large Data Objects
Adding large binary objects (i.e., images, sounds, videos, etc.) to a persistent store can severely affect performance. Here we get into an area that’s more art than science. How large is large? Well, the answer really depends on how your application uses the data. If you’re only loading one or two objects into memory at a time, then large attributes may not be a problem. If you’re loading hundreds or thousands—you really need to think things through.
In general there are three approaches. You can store the object directly in the data as an attribute. This is usually only recommended for small binary objects.
Next, you can create a separate entity for the data and refer to it using a to-one relationship. This can be particularly helpful if the binary data isn’t always used. When your object is fetched, the to-one relationship will be a fault. You won’t load the binary data unless you actually need it. This is recommended for modestly sized data objects.
Finally, you can store the data object directly in the device’s file system and save the path in the database. You then manually load the data when necessary. This is recommended for the largest objects.
As a rule of thumb, if your object is measured in kilobytes, it’s probably modest; if it’s measured in megabytes, it’s large. However, this is an area where you definitely want performance testing. Just remember, the end users often use applications in unexpected ways. Don’t be surprised when they add 100,000 entities to the persistent store or try to load a 10 MB text file. Try to test these extremes, if possible.
Fortunately, iOS 5 simplifies all this. Binary data attributes now have an Allows External Storage checkbox. Simply select this when configuring the attribute. The system will heuristically decide whether to store your binary data directly in the database or to simply store a URL and load the file as needed. All of this is transparently handled behind the scenes. There is, however, one small restriction: Once external storage is enabled, we cannot use the binary data in our fetch request’s predicate.
Tools
Performance testing is covered in more detail in Bonus Chapter B, which can be found at the book’s website: http://www.freelancemadscience.com/book. However, it’s worth noting that Instruments has a number of tools to help troubleshoot Core Data performance issues. These include instruments to track Core Data fetches, saves, faults, and cache misses. You will want to use these in conjunction with the regular allocations, leaks, and time profile when testing your application.
As always, you should focus on getting the application working properly first and then try to optimize the code based on actual performance data. Premature optimization often wastes your time without producing any tangible results.
Converting Health Beat
Throughout the rest of this chapter, we will modify our Health Beat application so that it uses Core Data. Let’s start by gutting our old model. Open up Health Beat and delete both WeightHistory.h and WeightHistory.m. We can also delete NSMutableArray+Union.h and NSMutableArray+Union.m.
Next, rename our WeightEntry class. Open WeightEntry.m, right-click the class name, and select Refactor > Rename. Set the new name to OldWeightEntry, and follow the prompts to accept the changes. Note that you’ll still have to change the WeightEntry.m filename to OldWeightEntry.m once we are done. The header file, however, is modified automatically.
Finally, add the Core Data framework to our project. Click the project icon, and make sure the Health Beat target is selected. In the Build Phases tab, add the CoreData.framework in the Link Binary with Libraries listing.
We still need to remove the references to WeightHistory and WeightEntry in our view controllers; however, much of the time we’ll simply be replacing the old references with new ones. So let’s start by setting up Core Data. Then we can fix everything else in a single step.
Creating UIManagedDocument
First, open TabBarController.h and delete both the WeightHistory forward declaration and the property. In the implementation file, delete the line to import WeightHistory and the line to @synthesize our property. Then delete everything in viewDidLoad except the call to super. That gives us a fresh palette to work on.
Now, create a property to hold our document. In TabBarController.h, start by importing the Core Data framework.
#import <CoreData/CoreData.h>
Next, add the following declaration.
@property (strong, nonatomic) UIManagedDocument* document;
And, in the implementation file, synthesize it.
@synthesize document = _document;
Now, scroll back down to the viewDidLoad method. We will create our document here. Let’s take it in steps.
- (void)viewDidLoad {
[super viewDidLoad];
// Override point for customization after application launch.
NSFileManager* fileManager = [NSFileManager defaultManager];
NSURL* ubiquitousURL =
[fileManager URLForUbiquityContainerIdentifier:nil];
The first few lines simply get a reference to the default file manager and then look up the URL for our iCloud storage container. Remember, this will return nil if iCloud is unavailable. Additionally, this method also extends our sandbox to include the iCloud container—letting us call other iCloud methods.
NSDictionary *options;
if (ubiquitousURL != nil) {
options = [NSDictionary dictionaryWithObjectsAndKeys:
[NSNumber numberWithBool:YES],
NSMigratePersistentStoresAutomaticallyOption,
[NSNumber numberWithBool:YES],
NSInferMappingModelAutomaticallyOption,
@"com.freelancemadscience.Health_Beat.history",
NSPersistentStoreUbiquitousContentNameKey,
ubiquitousURL,
NSPersistentStoreUbiquitousContentURLKey, nil];
} else {
// Create options for local sandbox storage only.
options = [NSDictionary dictionaryWithObjectsAndKeys:
[NSNumber numberWithBool:YES],
Converting Health Beat 401
NSMigratePersistentStoresAutomaticallyOption,
[NSNumber numberWithBool:YES],
NSInferMappingModelAutomaticallyOption, nil];
}
Here, we create an option dictionary. These are the options that UIManagedDocument will pass to addPersistentStoreWithType:configuration:URL:options:error: when it adds the SQLite persistent store to its persistent store coordinator.
In both cases, we enable both automatic and lightweight migration. If iCloud is available, we also set the options needed to enable automatic iCloud support. NSPersistentStoreUbiquitousContentNameKey sets the content’s name. This name is used to uniquely identify our store across all of the user’s different devices, ensuring the application can find and sync its updates. Not surprisingly, all our stores must have unique names. Here we use an inverted domain name, followed by the app-specific label Health_Beat.history.
We also set the NSPersistentStoreUbiquitousContentURLKey. This key should contain the URL to a directory inside one of our iCloud storage containers. We could place this inside the Documents directory—but then each individual transaction log would show up in our documents list. We really don’t want to let the user delete just one or two of these—that could leave our database in a bad state. Instead, we are just using the URL for our iCloud container. Our transaction logs will be saved in the com.freelancemadscience.Health_Beat.history directory inside the container.
According to the documentation, Core Data should automatically set the NSPersistentStoreUbiquitousContentURLKey key for us. However, I’ve had trouble with it generating URLs into a different container than the one defined in my entitlements. It’s probably easiest to just set it with a known good value.
NSURL* localURL = [fileManager URLForDirectory:
NSDocumentDirectory
inDomain:NSUserDomainMask
appropriateForURL:nil
create:NO
error:nil];
NSURL* localCoreDataURL =
[localURL URLByAppendingPathComponent:@"MyData"];
// Now Create our document.
self.document =
[[UIManagedDocument alloc] initWithFileURL:localCoreDataURL];
self.document.persistentStoreOptions = options;
Next, we create a URL for our SQLite database inside the local sandbox. We instantiate our document using that URL and then set the persistent store options. Again, the only differences between a local document and an iCloud-synced document are the persistent store options.
if ([fileManager fileExistsAtPath:[localCoreDataURL path]]) {
[self.document openWithCompletionHandler: ^(BOOL success) {
[self passDocumentToSubViewControllers];
}];
} else {
// Clean up the container.
NSFileCoordinator* coordinator =
[[NSFileCoordinator alloc] initWithFilePresenter:nil];
[coordinator
coordinateWritingItemAtURL:ubiquitousURL
options:NSFileCoordinatorWritingForDeleting
error:nil
byAccessor:^(NSURL *newURL) {
[[NSFileManager defaultManager]
removeItemAtURL:newURL error:nil];
}];
[self.document
saveToURL:localCoreDataURL
forSaveOperation:UIDocumentSaveForCreating
completionHandler:^(BOOL success) {
[self passDocumentToSubViewControllers];
}];
}
}
Finally, if the file exists, we open it. Otherwise, we create a new file by calling saveToURL:forSaveOperation:completionHandler:. In both cases, we call passDocumentToSubViewControllers in the completion handler to pass our document along to our other view controllers.
Note that, before creating a new document, we clear out the container. We need this code to work around a fairly serious problem.
Turns out, if the user goes into their iCloud settings and deletes this document, it will automatically revert to a local document. The devices won’t sync their updates to iCloud ever again. However, we still have our transaction logs in the iCloud container. If the user removes the app from the device, then reinstalls it, it will go into an invalid state. The app will try to load the transaction data but won’t be able to, and the document will fail to open. By clearing the container before we create a new document, we prevent this problem.
Note
Alternatively, we can use NSMetadataQuery to confirm the document’s presence in the cloud. If the document isn’t found, we clear the iCloud storage and ask the user if they want upload it again. Additionally, the UIManagedDocument creates a directory for our logs. NSMetadataQuery cannot search for directories. Instead, we search for the package’s DocumentMetadata.plist file.
We still need to create passDocumentToSubViewController. Declare this method in a class extension, and then implement it as shown.
- (void)passDocumentToSubViewControllers {
// Create a stack, and load it with the view
// controllers from our tabs.
NSMutableArray* stack =
[NSMutableArray arrayWithArray:self.viewControllers];
// While we still have items on our stack.
while ([stack count] > 0) {
// Pop the last item off the stack.
id controller = [stack lastObject];
[stack removeLastObject];
// If it is a container object, add its view
// controllers to the stack.
if ([controller
respondsToSelector:@selector(viewControllers)]) {
[stack addObjectsFromArray:
[controller viewControllers]];
}
// If it responds to setDocument, pass our document.
if ([controller
respondsToSelector:@selector(setDocument:)]) {
[controller setDocument:self.document];
}
}
The first half of this method should look familiar. It’s the same code we used to forward the WeightHistory objects in Chapter 6. The only real difference is that this time we extracted it into its own method.
[[NSNotificationCenter defaultCenter]
addObserverForName:
NSPersistentStoreDidImportUbiquitousContentChangesNotification
object:[self.document.managedObjectContext
persistentStoreCoordinator]
queue:nil
usingBlock:^(NSNotification *note) {
[self.document.managedObjectContext performBlock:^{
NSLog(@"Merging Changes");
[self.document.managedObjectContext
mergeChangesFromContextDidSaveNotification:note];
}];
}];
}
In the last half, we register for change notifications. Whenever we receive updates from iCloud, we need to refresh our managed object context. However, remember that the context may contain its own unsaved changes. mergeChangesFromContextDidSaveNotification: lets us automatically merge these changes with the incoming data.
That’s it. It’s still long. We have to take into account both whether the file exists and whether the device supports iCloud storage. Still, it’s clearly an order of magnitude simpler than what we wrote in Chapter 6.
Creating the Managed Object Model
Next, we need to build the managed object model for our project. In Xcode, right-click the Model group and select New File > iOS > Core Data > Data Model. Then click Next. Name the file WeightHistory and click Create.
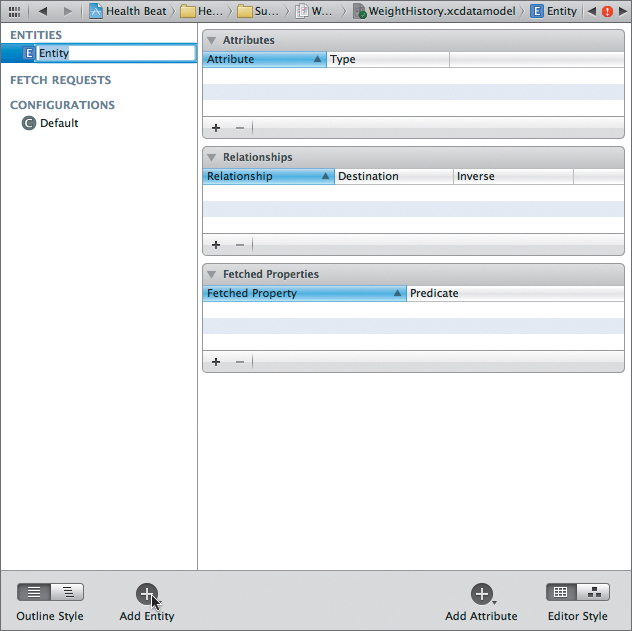
Xcode will add an empty WeightHistory.xcdatamodeld file to your project. Make sure this is selected. You should see the data model editor in the Editor area. For this project, our model is about as simple as it gets. We just need a single WeightEntry entity. Click the Add Entity button to add this to your model (Figure 7.3).
Figure 7.3 Adding a new entity
A new entity is added to the Entities list. Xcode should automatically highlight its name. If not, click the entity to select it, and change its name to WeightEntry.
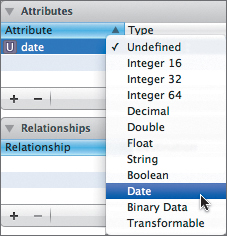
Now we need to add our date and weightInLbs attributes. With WeightEntry still selected, click the Add Attribute button. This adds an undefined attribute to the list of attributes. Again, Xcode should automatically select the name. Type in the new name: date. Under the Type setting, click Undefined and then select Date (Figure 7.4).
Figure 7.4 Setting the attribute’s type
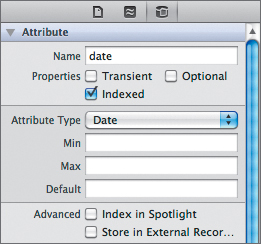
Make sure the Utilities panel is visible, and select the Data Model inspector. We want to index our date attribute, but it should not be optional or transient. Also, it does not need Min, Max, or Default values (Figure 7.5).
Figure 7.5 The date attribute’s settings
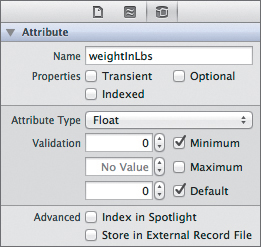
Repeat these steps, but this time name the attribute weightInLbs and set the type to Float. This attribute should not be indexed, transient, or optional; however, it should have a 0.00 Minimum value and a 0.00 Default value (Figure 7.6).
Figure 7.6 The weightInLbs attribute’s settings
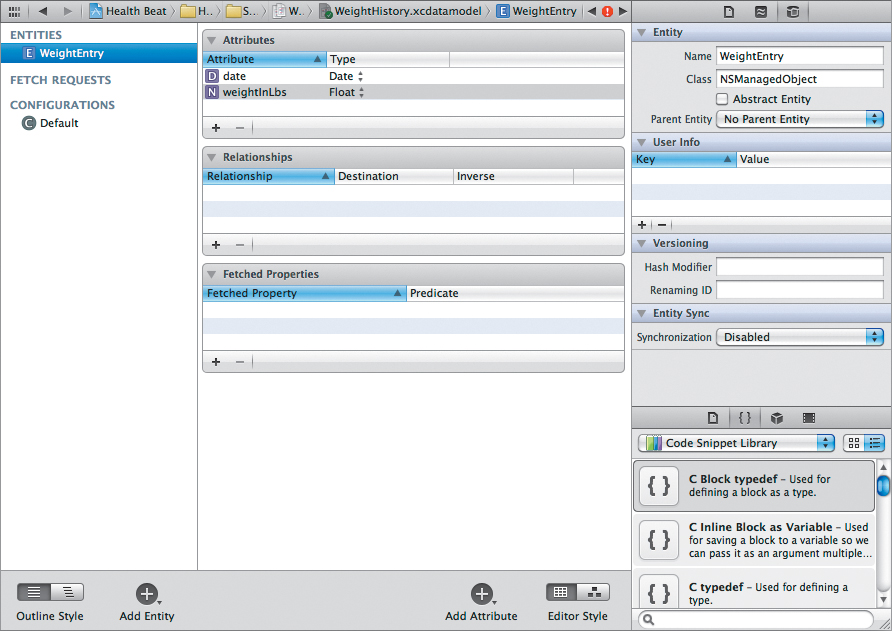
The data model should now match Figure 7.7.
Figure 7.7 The completed managed object model
Generating a Custom WeightEntry Class
We could use the model exactly as it is, but I like creating custom NSManagedObjectModel subclasses for my entities. Fortunately, Xcode 4 makes this as simple as possible. Right-click the Model group, select New File > iOS > Core Data > NSManagedObject subclass, and click Next.
When generating multiple NSManagedObject subclasses, Xcode may try to infer the model and entity we wish to implement. Other times it will ask us to specify one or both—especially the first time we generate a subclass. In our case, we only have one model, so just select WeightEntry. We also only have one entity—but Xcode should automatically detect that. In the next page, it will ask us where we want to save our files. We aren’t given the chance to name our class, but that’s OK. Xcode will use our entity’s name.
We can just accept the default location; however, let’s select the “Use scalar properties for primitive data types” checkbox. This will force Xcode to generate scalar properties for our attributes. Click the Create button to continue.
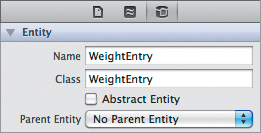
Xcode now adds a new WeightEntry object to our project. If you select WeightEntry.h, you will see that it automatically created properties for all our attributes. Now select the Core Data model again. Make sure the WeightEntry entity is selected, and open the Data Model inspector (Figure 7.8). Xcode has automatically set our entity’s class to our new WeightEntry class.
Figure 7.8 The entity’s Class setting
Unfortunately, there are two problems with the auto-generated properties. First, our original WeightEntry class was immutable; the new version is not. Second, Xcode generated a scalar property for our date attribute—we really want it to return NSDate. Fortunately, both of these are easy to fix. Open WeightEntry.h, and modify the property declarations as shown:
@property (nonatomic, readonly, retain) NSDate* date;
@property (nonatomic, readonly) float weightInLbs;
Now open the implementation file, and add the following extension:
@interface WeightEntry()
@property (nonatomic, readwrite, retain) NSDate* date;
@property (nonatomic, readwrite) float weightInLbs;
@end
We’ve seen this pattern before, when declaring public getters and private setters for our properties.
We also need to copy all the class methods from OldWeightEntry to our new WeightEntry class. Open OldWeightEntry.h, and copy all the method declarations that start with a +. There should be two conversion methods and three string generation methods. Paste these into WeightHistory.h as shown:
@interface WeightEntry : NSManagedObject {
@private
}
@property (nonatomic, retain) NSDate * date;
@property (nonatomic, retain) NSNumber * weightInLbs;
+ (CGFloat)convertLbsToKg:(CGFloat)lbs;
+ (CGFloat)convertKgToLbs:(CGFloat)kg;
+ (NSString*)stringForUnit:(WeightUnit)unit;
+ (NSString*)stringForWeight:(CGFloat)weight
ofUnit:(WeightUnit)unit;
+ (NSString*)stringForWeightInLbs:(CGFloat)weight
inUnit:(WeightUnit)unit;
@end
Now open the implementation files. First, let’s copy our static LBS_PER_KG and formatter variables (we won’t need the WeightInLbsKey or DateKey variables). Place these before the WeightEntry() extension.
#import "WeightEntry.h"
static const CGFloat LBS_PER_KG = 2.20462262f;
static NSNumberFormatter* formatter;
@interface WeightEntry()
Next, copy the implementations for the following methods: convertLbsToKg:, convertKgToLbs:, initialize, stringForUnit:, stringForWeight:, and stringForWeightInLbs:inUnit:. Note that in stringForWeight: and stringForWeightInLbs:inUnit:, you need to change all the references to OldWeightEntry back to WeightEntry as shown:
+ (NSString*)stringForWeight:(CGFloat)weight
ofUnit:(WeightUnit)unit {
NSString* weightString =
[formatter stringFromNumber:
[NSNumber numberWithFloat:weight]];
NSString* unitString = [WeightEntry stringForUnit:unit];
return [NSString stringWithFormat:@"%@ %@", weightString,
unitString];
}
+ (NSString*)stringForWeightInLbs:(CGFloat)weight
inUnit:(WeightUnit)unit {
CGFloat convertedWeight;
switch (unit) {
case LBS:
convertedWeight = weight;
break;
case KG:
convertedWeight = [WeightEntry convertLbsToKg:weight];
break;
default:
[NSException raise:NSInvalidArgumentException
format:@"%d is not a valid WeightUnit", unit];
}
return [WeightEntry stringForWeight:convertedWeight
ofUnit:unit];
}
Finally, let’s copy the weightInUnit: and stringForWeightInUnit: methods over from our OldWeightEntry class. In both cases, we need to make sure we change OldWeightEntry back to WeightEntry.
#pragma mark - Public Methods
- (CGFloat)weightInUnit:(WeightUnit)unit {
switch (unit) {
case LBS:
return self.weightInLbs;
case KG:
return [WeightEntry convertLbsToKg:self.weightInLbs];
default:
[NSException
raise:NSInvalidArgumentException
format:@"The value %d is not a valid WeightUnit", unit];
}
// This will never be executed.
return 0.0f;
}
- (NSString*)stringForWeightInUnit:(WeightUnit)unit {
return [WeightEntry stringForWeight:[self weightInUnit:unit]
ofUnit:unit];
}
Finally, instantiating new managed objects takes a bit of boilerplate. Let’s wrap that in a convenience method. While we’re at it, let’s add a second convenience method that returns our entity’s name—we will use this when looking up the entity description in our managed object context.
Declare the following methods in the header file:
+ (NSString*)entityName;
+ (WeightEntry*)addEntryToDocument:(UIManagedDocument*)document
usingWeightInLbs:(CGFloat)weight
date:(NSDate*)date;
Our entityName implementation is, not surprisingly, very simple.
+ (NSString*)entityName {
return @"WeightEntry";
}
Unfortunately, addEntryToDocument:usingWeightInLbs:date: requires a bit more work. Let’s go over this implementation a step at a time.
#pragma mark - Convenience Methods
+ (WeightEntry*)addEntryToDocument:(UIManagedDocument*)document
usingWeightInLbs:(CGFloat)weight
date:(NSDate*)date
{
NSManagedObjectContext* context = document.managedObjectContext;
NSAssert(context != nil,
@"The managed object context is nil");
This is just a bit of sanity checking. We’re getting a local reference to the managed object context, and we check to make sure it isn’t set to nil. We cannot create new managed objects without the context.
NSEntityDescription* entity =
[NSEntityDescription entityForName:[WeightEntry entityName]
inManagedObjectContext:context];
NSAssert1(entity != nil,
@"The entity description for WeightEntry in %@ is nil",
context);
WeightEntry* entry =
[[WeightEntry alloc] initWithEntity:entity
insertIntoManagedObjectContext:context];
Next, we grab our entity description from the context, and then we use that description to instantiate a new WeightEntry object. WeightEntry is automatically inserted into our context as part of its initialization.
entry.weightInLbs = weight;
entry.date = date;
// Save a snapshot to the parent context.
NSError *error = nil;
if (![context save:&error]) {
// Ideally, we should replace this
// with more-robust error handling.
// However, we're not saving to disk,
// we're just pushing the change
// up to the parent context--so most errors should be
// caused by mistakes in our code.
[NSException
raise:NSInternalInconsistencyException
format:@"An error occurred when saving the context: %@",
[error localizedDescription]];
}
return entry;
}
Finally, we push the change up to the parent context and then return our new entry. Remember, we’re working with a child managed object context, so we aren’t actually saving anything. We’re just updating the document’s snapshot.
Actually, this save isn’t strictly necessary. UIManagedDocument will handle all the saves automatically. However, this helps make our intentions clear and will assist the undo manager. Without the explicit saves, the undo manager will register all changes as undo actions—including the undo actions themselves. This means that our shake will undo and then redo the same action repeatedly. By explicitly adding these saves, the undo actions are not recorded, letting us undo multiple changes.
That’s it. Our WeightEntry is complete, and we’re done with the OldWeightEntry class. Delete OldWeightEntry.h and OldWeightEntry.m from the project. Now we just need to update our view controllers.
Updating the View Controllers
Let’s start with EnterWeightViewController. Open the header file, and delete the forward declaration and the property. In the implementation file, start by deleting the import and synthesize lines. Repeat this procedure for the GraphViewController and HistoryViewController classes. If we try to build the application now, we will see a number of orphaned weightHistory references in our implementation file. That’s OK. We will use these as guideposts, helping us find all the methods that need to be modified.
Next, we need to add the following document property to our enter weight, graph, and history view controllers:
@property (strong, nonatomic) UIManagedDocument* document;
Be sure to synthesize it in all three implementation files. With that out of the way, the real work can begin.
EnterWeightViewController
Now, open EnterWeightViewController.m. Start by importing WeightEntry.h. Next, we want to clear out all our error messages. Navigate down to the saveWeight: method. Replace the existing implementation with the following:
- (IBAction)saveWeight:(id)sender {
CGFloat weight =
[[self.numberFormatter
numberFromString:self.weightTextField.text]
floatValue];
if (getDefaultUnits() != LBS) {
weight = [WeightEntry convertKgToLbs:weight];
}
// This creates a new weight entry and adds
// it to our document's managed object context.
[WeightEntry addEntryToDocument:self.document
usingWeightInLbs:weight
date:self.currentDate];
// Automatically move to the second tab.
// Should be the graph view.
self.tabBarController.selectedIndex = 1;
}
Here, we call the convenience method we just wrote, adding a new WeightEntry to our document. Once that’s done, we tell the tab bar controller to shift to the graph view.
Next, scroll down to the setWeightHistory: method. We just need to convert this to use UIManagedDocument instead. That essentially means replacing all the weight history references with document references.
#pragma mark - Custom Accessor
- (void)setDocument:(UIManagedDocument *)document {
NSNotificationCenter* notificationCenter =
[NSNotificationCenter defaultCenter];
// If we're assigning the same document, don't do anything.
if ([_document isEqual:document]) {
return;
}
// Clear any notifications for the old document, if any.
if (_document != nil) {
[notificationCenter
removeObserver:self
forKeyPath:UIDocumentStateChangedNotification];
}
_document = document;
// Add new notifications for the new document, if any,
// and set the view's values.
if (_document != nil) {
// Register for notifications.
[notificationCenter
addObserver:self
selector:@selector(updateSaveAndEditStatus)
name:UIDocumentStateChangedNotification
object:_document];
// Update our save and edit status.
[self updateSaveAndEditStatus];
}
}
Both UIManagedDocument and our old WeightHistory class are subclasses of UIDocument—so everything should still work fine. Specifically, we still want to watch the document’s state, and disable editing or display save warnings when necessary.
Finally, look at the updateSaveAndEditStatus method. We need to change self.weightHistory to self.document in the first few lines.
- (void)updateSaveAndEditStatus {
if (self.document == nil) {
// Disable editing.
[self.weightTextField resignFirstResponder];
self.weightTextField.enabled = NO; return;
}
UIDocumentState state =
self.document.documentState;
Our EnterWeightViewController class is now finished and ready to go. Next, let’s look at the history view.
HistoryViewController
We need to modify the history view controller so that it uses an NSFetchedResultsController. As we will see, the NSFetchedResultsController manages data from Core Data, letting us easily display the data in a UITableView. We can also assign a delegate to the fetched request controller, letting us respond to any changes in the underlying data.
To begin, open HistoryViewController.h. Import the Core Data framework, and have HistoryViewController adopt the NSFetchedResultsControllerDelegate protocol.
#import <UIKit/UIKit.h>
#import <CoreData/CoreData.h>
@interface HistoryViewController : UITableViewController
<NSFetchedResultsControllerDelegate>{
}
@end
Switch to the implementation file. We start by updating our #import directives. Make sure we are importing WeightEntry.h.
#import "HistoryViewController.h"
#import "DetailViewController.h"
#import "HistoryCell.h"
#import "WeightEntry.h"
Next, we need to update the class extension. Delete the weightHistoryChanged: declaration and add a new property and the instantiateFetchedResultsController method.
@interface HistoryViewController()
@property (nonatomic, retain) NSFetchedResultsController*
fetchedResultsController;
- (void)instantiateFetchedResultsController;
- (void)reloadTableData;
@end
Basically, the fetchedResultsController manages our table’s data, and instantiateFetchedResultsController sets up and configures that data. Since we’ve added a new property, we need to synthesize it.
@synthesize fetchedResultsController = _fetchedResultsController;
Next, delete both ObserveValueForKeyPath:ofObject:change:context: and weightHistoryChanged:. We no longer need them.
With these preliminaries out of the way, we finally reach the table view methods. Here we get to see our fetched results controller in action. Let’s begin by modifying numberOfSectionsInTableview: as shown:
- (NSInteger)numberOfSectionsInTableView:(UITableView *)tableView
{
return [[self.fetchedResultsController sections] count];
}
In our old implementation, we hard-coded the number of sections. Here, we can pull this data from our fetched results controller. This lets us easily change the number of sections without modifying this code.
Similarly, tableView:numberOfRowsInSection: should extract the row count from our fetched results controller.
- (NSInteger)tableView:(UITableView *)tableView
numberOfRowsInSection:(NSInteger)section
{
id <NSFetchedResultsSectionInfo> sectionInfo =
[[self.fetchedResultsController sections]
objectAtIndex:section];
return [sectionInfo numberOfObjects];
}
Here, we get the section information for the given section index. This gives us direct access to the array of objects, as well as to the section’s name and index title. In this case, we are only interested in the number of objects.
Then we change the way we access our WeightEntry objects in tableView:cellForRowAtIndexPath:. Here, we access them directly from our fetched request controller.
- (UITableViewCell *)tableView:(UITableView *)tableView
cellForRowAtIndexPath:(NSIndexPath *)indexPath
{
static NSString *CellIdentifier = @"History Cell";
HistoryCell *cell =
[tableView dequeueReusableCellWithIdentifier:CellIdentifier];
WeightEntry* entry =
[self.fetchedResultsController objectAtIndexPath:indexPath];
[cell configureWithWeightEntry:entry
defaultUnits:getDefaultUnits()];
return cell;
}
Ironically, our code for tableView:commitEditingStyle:forRowAtIndexPath: actually gets more complex. However, it’s doing a bit more work, so that’s only fair.
- (void)tableView:(UITableView *)tableView
commitEditingStyle:(UITableViewCellEditingStyle)editingStyle
forRowAtIndexPath:(NSIndexPath *)indexPath
{
if (editingStyle == UITableViewCellEditingStyleDelete)
{
WeightEntry* entry =
[self.fetchedResultsController objectAtIndexPath:indexPath];
// Delete the managed object for the given index path.
NSManagedObjectContext *context =
[self.fetchedResultsController managedObjectContext];
[context deleteObject:entry];
NSError* error;
if (![context save:&error]) {
// Again, we should replace this with
// more-robust error handling.
[NSException
raise:NSInternalInconsistencyException
format:@"An error occurred when saving the context: %@",
[error localizedDescription]];
}
}
}
If the user deletes a row, we need to get the weight entry for the provided index path. Fortunately, NSFetchedResultsController understands index paths; in fact, it is the direct support for sections and index paths that makes NSFetchedResultsController such a good fit for UITableViews. With the weight entry in hand, we request a reference to our managed object context from the fetched request controller, and we delete the entry from the context. Finally, we save our changes.
We still need to modify the behavior when the user selects a row. As before, prepareForSegue:sender: does all the real work.
- (void)prepareForSegue:(UIStoryboardSegue *)segue
sender:(id)sender {
if ([segue.identifier
isEqualToString:DetailViewSegueIdentifier]) {
NSIndexPath* path =
[self.tableView indexPathForSelectedRow];
DetailViewController* controller =
segue.destinationViewController;
controller.weightHistory =
self.fetchedResultsController.fetchedObjects;
controller.selectedIndex = path.row;
}
}
Here, instead of passing our model object, we return the array of fetched objects from our fetchedResultsController. We will need to update our WeightViewController, but other than that, everything remains unchanged.
Next, we need to set up our fetched results controller. This is a big method, so we’ll take it in steps.
- (void)instantiateFetchedResultsController {
// Create the fetch request.
NSFetchRequest *fetchRequest =
[NSFetchRequest fetchRequestWithEntityName:
[WeightEntry entityName]];
// Set the batch size.
[fetchRequest setFetchBatchSize:20];
Here, we create a fetch request for our weight entry. By default, this fetch request will return all the weight entries in our Core Data store. Unfortunately, this could cause performance issues—especially when our application attempts to load a large number of entries all at once.
To solve this, we set the batch size. The batch size determines the number of objects that the fetch request will return in each batch. In our case, it will return the first 20 entries as objects and will return the rest as faults. If we try to access one of the faulted entries, the fetch request will fill in a new batch of 20 objects, including the fault. This provides a nice compromise between performance and memory usage. We don’t need to load unnecessary objects into memory, but we also minimize the number of faults triggered while scrolling through the history.
// Set up sort descriptor.
NSSortDescriptor *sortDescriptor =
[[NSSortDescriptor alloc] initWithKey:@"date" ascending:NO];
NSArray *sortDescriptors =
[[NSArray alloc] initWithObjects:sortDescriptor, nil];
[fetchRequest setSortDescriptors:sortDescriptors];
This section adds a sort descriptor to the fetch request. First, we create our sort descriptor. This will sort our weight entry objects in descending order based on their date property. We then place this descriptor in an array of sort descriptors and assign it to our fetch request.
Our code only uses a single sort descriptor, but we could assign more than one. Their order of precedence is determined by their order in the array. The first descriptor will perform the initial sort. Any objects that are still equal are then sorted by the second descriptor. Objects that are still tied are passed to the third descriptor, and so forth.
// Nil for section name key path means "no sections."
self.fetchedResultsController =
[[NSFetchedResultsController alloc]
initWithFetchRequest:fetchRequest
managedObjectContext:self.document.managedObjectContext
sectionNameKeyPath:nil
cacheName:@"History View"];
self.fetchedResultsController.delegate = self;
Here, we create our NSFetchedResultsController using our fetch request and our managed object context. The sectionNameKeyPath: argument can be used to partition the entities into sections. The system will look at the values associated with the given key path and create a section for each unique value. In our case, we simply pass nil, indicating that we want all the data in a single section.
The cacheName: argument is used to specify a cache for the fetched results controller. The controller will try to use the cache to avoid duplicating the effort that goes into splitting the data into different sections and sorting it. The cache persists across application launches. If two fetch request controllers are requesting the same data (same entity, predicate, and sort descriptors), then they can share a cache. Otherwise, each controller needs a unique cache. Alternatively, you can pass in nil, but then the system won’t perform any caching.
Once we have instantiated the fetched request controller, we assign our view controller as its delegate.
NSError *error = nil;
if (![self.fetchedResultsController performFetch:&error])
{
// We may want more-thorough error checking; however,
// at this point, the main cause for errors tends to be
// invalid keys in the sort descriptor. Let's fail fast
// so we're sure to catch that during development.
[NSException
raise:NSInternalInconsistencyException
format:@"An error occurred when performing our fetch %@",
[error localizedDescription]];
}
}
Finally, we call performFetch: to gather the requested data. As with other Core Data methods, this can produce errors. However, errors at this point are typically caused by sort descriptors with invalid key paths. These errors should be caught and fixed during development.
If you’re just accessing data from a locally created store, then the call should be reasonably safe. If there is an I/O problem, we should have detected it when instantiating the persistent store. However, you may want to add better error checking if you are doing things that reduce the reliability (e.g., modifying the entity in two or more managed object contexts, using user input in the sort descriptors, downloading Core Data files from a remote server, or using Core Data to access a remote store).
We’re almost done. We still need to add the NSFetchedResultsControllerDelegate methods. First, let’s implement controllerWillChangeContent: and controllerDidChangeContent:.
#pragma mark - Fetched results controller delegate
- (void)controllerWillChangeContent:
(NSFetchedResultsController *) controller
{
[self.tableView beginUpdates];
}
- (void)controllerDidChangeContent:
(NSFetchedResultsController *) controller
{
[self.tableView endUpdates];
}
Here, we’re just bracketing our changes with calls to beginUpdates and endUpdates. If we make multiple changes to our table, all the changes will be animated at once. For example, if a row is moved, we first delete it from its old location in the table and then insert it into its new location. This ensures that the deletion and insertion are animated simultaneously.
Next, we need to implement controller:didChangeObject:atIndexPath:forChangeType:newIndexPath:. This method is called whenever the underlying data changes.
- (void)controller:(NSFetchedResultsController *)controller
didChangeObject:(id)anObject
atIndexPath:(NSIndexPath *)indexPath
forChangeType:(NSFetchedResultsChangeType)type
newIndexPath:(NSIndexPath *)newIndexPath
{
UITableView *tableView = self.tableView;
WeightEntry* entry;
HistoryCell* cell;
switch(type)
{
case NSFetchedResultsChangeInsert:
[tableView
insertRowsAtIndexPaths:
[NSArray arrayWithObject:newIndexPath]
withRowAnimation:UITableViewRowAnimationAutomatic];
break;
case NSFetchedResultsChangeDelete:
[tableView
deleteRowsAtIndexPaths:
[NSArray arrayWithObject:indexPath]
withRowAnimation:UITableViewRowAnimationAutomatic];
break;
case NSFetchedResultsChangeUpdate:
entry =
[self.fetchedResultsController
objectAtIndexPath:indexPath];
cell = (HistoryCell*)
[self.tableView
cellForRowAtIndexPath:indexPath];
[cell configureWithWeightEntry:entry
defaultUnits:getDefaultUnits()];
break;
case NSFetchedResultsChangeMove:
[tableView
deleteRowsAtIndexPaths:
[NSArray arrayWithObject:indexPath]
withRowAnimation:UITableViewRowAnimationAutomatic];
[tableView
insertRowsAtIndexPaths:
[NSArray arrayWithObject:newIndexPath]
withRowAnimation:UITableViewRowAnimationAutomatic];
break;
}
}
As you can see, we receive notifications when an entity has been added or deleted, when its attributes change, or when it moves (i.e., when its indexPath changes). In every case, we simply modify the table to match.
The system sends these notifications whenever the model changes—even when our code has programmatically triggered the change. It’s a good idea to trace through your code and make sure you’re not accidentally creating any change loops or other unnecessary work. For example, what happens when the user edits the table and deletes a row? In our case, the system first calls tableView:commitEditingStyle:forRowAtIndexPath:. Here, we delete the specified object from the model; however, we don’t change the table. Instead, changing the model triggers a call to controllerWillChangeContent: and then a call to controller:didChangeObject:atIndexPath:forChangeType:newIndexPath:. This is where we actually modify the table. Finally, the system calls controllerDidChangeContent: and our animation begins.
While this is the typical use case, there may be times when you want to respond to a bulk set of changes, rather than monitoring and animating each and every change (e.g., when loading new data on a background thread). In these cases, you may just choose to wait and reload the entire table in the controllerDidChangeContent: method.
We still need to update our undo code. In motionEnded:withEvent:, change self.weightHistory to self.Document.
- (void)motionEnded:(UIEventSubtype)motion
withEvent:(UIEvent *)event {
// Only respond to shake events.
if (event.type == UIEventSubtypeMotionShake) {
[self.document.undoManager undo];
}
}
Finally, we need to update our setWeightHistory: accessor to use our new document property. In this case, it may be easiest to just delete the old method and write an entirely new one.
- (void)setDocument:(UIManagedDocument *)document {
// If we're assigning the same history, don't do anything.
if ([_document isEqual:document]) {
return;
}
// Remove any old fetched results controller.
if (_document != nil) {
self.fetchedResultsController = nil;
}
_document = document;
// Add new notifications for the new history, if any.
if (_document != nil) {
[self instantiateFetchedResultsController];
// If the view is loaded, we need to update it.
if (self.isViewLoaded) {
[self.tableView reloadData];
}
}
}
We no longer need to set up or tear down our notifications, since we’ll get all our updates directly from the fetched results controller. Instead, if we have a fetched results controller, we clear it. If we’re adding a new document, we call instantiateFetchedResultsController to create a new controller, and then we update our table.
That’s it. Our HistoryViewController is now completely converted to Core Data. However, we still need to modify our DetailViewController class. Let’s tackle that next.
Note
Most of the changes we made in this section are boilerplate code. You can use exactly the same pattern for any navigation controller/fetched results controller pair. In fact, if you’re using a lot of Core Data-backed navigation controllers, it would be worth creating a UINavigationController subclass to encapsulate much of this. I’ll leave that as homework.
Open DetailViewController.h. Change the weightHistory’s type to NSArray.
@property (nonatomic, strong) NSArray* weightHistory;
Now switch to the implementation file. Start by deleting the import declaration for WeightHistory.h. Next, there are two references to self.weightHistory.weights in the viewWillAppear: method. We need to change them to self.weightHistory.
- (void)viewWillAppear:(BOOL)animated
{
[super viewDidAppear:animated];
WeightUnit unit = getDefaultUnits();
WeightEntry* currentEntry =
[self.weightHistory objectAtIndex:self.selectedIndex];
CGFloat weight = [currentEntry weightInUnit:unit];
// If the entry is within the same month.
NSDate* startOfMonth;
NSTimeInterval monthLength;
[[NSCalendar currentCalendar] rangeOfUnit:NSMonthCalendarUnit
startDate:&startOfMonth
interval:&monthLength
forDate:currentEntry.date];
CGFloat minWeight = CGFLOAT_MAX;
CGFloat maxWeight = CGFLOAT_MIN;
int monthlyCount = 0;
CGFloat monthlyTotal = 0.0f;
for (OldWeightEntry* entry in self.weightHistory) {
CGFloat sampleWeight = [entry weightInUnit:unit];
...
We also need to replace all occurrences of OldWeightEntry with WeightEntry. Enough with the scrolling and fixing. This time, let’s use a simple replace all. Press Command-F to bring up the find bar at the top of the Editor area. On the left side, switch from Find to Replace. Type OldWeightEntry in the search field. Type WeightEntry in the bottom text field, and then click Replace All (Figure 7.9).
Figure 7.9 Replacing all instances of OldWeightEntry

There’s only one view controller left. Let’s update the graph view.
GraphViewController
GraphViewController needs to populate the graph with data from Core Data, but unlike what we did with HistoryViewController, we won’t be using an NSFetchedResultsController. Instead, we will be using a raw NSFetchRequest. This means we must manage any changes ourselves. Of course, for the graph view, it’s easy to handle these changes; we simply redraw the entire graph.
Let’s start by opening GraphViewController.m. and importing WeightEntry.h. Next, delete the WeightKey string constant. Then, create a class extension and declare a weightHistory property. Don’t forget to synthesize the property.
#import "GraphViewController.h"
#import "GraphView.h"
#import "WeightEntry.h"
@interface GraphViewController()
@property (strong, nonatomic) NSArray* weightHistory;
@end
@implementation GraphViewController
@synthesize document = _document;
@synthesize weightHistory = _weightHistory;
Now, navigate to viewDidLoad. We use self.weightHistory.weights twice in this method. Change them both to self.weightHistory.
- (void)viewDidLoad
{
[super viewDidLoad];
id graphView = self.view;
[graphView setWeightEntries:self.weightHistory
andUnits:getDefaultUnits()];
// Register to receive notifications when the default unit changes.
[[NSNotificationCenter defaultCenter]
addObserverForName:NSUserDefaultsDidChangeNotification
object:[NSUserDefaults standardUserDefaults]
queue:nil
usingBlock:^(NSNotification *note) {
[graphView setWeightEntries:self.weightHistory
andUnits:getDefaultUnits()];
}];
}
Next, find the observeValueForKeyPath:ofObject:change:context: method. Delete it. We won’t be using KVO in this implementation.
Finally, just as with the other view controllers, we need to convert our setWeightHistory: custom accessor into setDocuments:. This is long, but we’ve seen most of it before.
#pragma mark - Custom Accessor
- (void)setDocument:(UIManagedDocument*)document {
NSNotificationCenter* center =
[NSNotificationCenter defaultCenter];
// If we're assigning the same history, don't do anything.
if ([_document isEqual:document]) {
return;
}
// Clear any notifications for the old history, if any.
if (_document != nil) {
[center
removeObserver:self
name:NSManagedObjectContextObjectsDidChangeNotification
object:self.document.managedObjectContext];
}
_document = document;
// Add new notifications for the new history, if any,
// and set the view's values.
if (_document != nil) {
// Create the fetch request.
NSFetchRequest *fetchRequest = [NSFetchRequest
fetchRequestWithEntityName:[WeightEntry entityName]];
// Set up sort descriptor.
NSSortDescriptor *sortDescriptor =
[[NSSortDescriptor alloc] initWithKey:@"date" ascending:NO];
NSArray *sortDescriptors =
[[NSArray alloc] initWithObjects:sortDescriptor, nil];
[fetchRequest setSortDescriptors:sortDescriptors];
NSError* error;
self.weightHistory =
[self.document.managedObjectContext
executeFetchRequest:fetchRequest
error:&error];
if (self.weightHistory == nil) {
// We may want more-thorough error checking; however,
// at this point, the main cause for errors tends to be
// invalid keys in the sort descriptor. Let's fail fast
// so we're sure to catch that during development.
[NSException
raise:NSInternalInconsistencyException
format:@"An error occurred when performing our fetch %@",
[error localizedDescription]];
}
[center
addObserverForName:
NSManagedObjectContextObjectsDidChangeNotification
object:self.document.managedObjectContext
queue:nil
usingBlock:^(NSNotification* notification) {
NSError* fetchError;
self.weightHistory =
[self.document.managedObjectContext
executeFetchRequest:fetchRequest
error:&fetchError];
if (self.weightHistory == nil) {
// We may want more-thorough error checking; however,
// at this point, the main cause for errors tends
// to be invalid keys in the sort descriptor. Let's
// fail fast so we're sure to catch that during development.
[NSException
raise:NSInternalInconsistencyException
format:@"An error occurred when performing "
@"our fetch %@",
[fetchError localizedDescription]];
}
// If the view is loaded, we need to update it.
if (self.isViewLoaded) {
id graphView = self.view;
[graphView setWeightEntries:self.weightHistory
andUnits:getDefaultUnits()];
}
}];
// If the view is loaded, we need to update it.
if (self.isViewLoaded) {
id graphView = self.view;
[graphView setWeightEntries:self.weightHistory
andUnits:getDefaultUnits()];
}
}
}
By now, there shouldn’t be any surprises. Obviously, we change many references from weightHistory to document. We also switch from using KVO to using notifications. Here, we observe the managed object context directly, watching for changes.
The only really interesting part is the fetch request, and even this is largely identical to what we saw in HistoryViewController’s instantiateFetchedResultsController method. The main difference is that instead of wrapping our fetch request in a fetch results controller, we execute it directly. Additionally, since we’re going to use all the objects immediately, we don’t set a fetch batch size.
Note
Our implementation has some duplicate code. Specifically, we execute the fetch request and handle errors both in our method and in the notification block. My first instinct was to refactor these into a separate method—however, doing it this way has an advantage: We use the same NSFetchRequest object for both. Fetch requests can be somewhat costly to create, so it’s always good to reuse them whenever possible.
Of course, there’s a lot of room for improvements. We could share a single fetch request between both the HistoryViewController and the GraphViewController. Better yet, we could use an NSFetchedResultsController here as well, sharing the same cache as the HistoryViewController. Having the caching and the built-in support for change detection would be nice. We don’t need the section or index path support, and it would be a little harder to get our array of WeightEvents, but it might be worth the effort.
Still, users often only enter a single weight per use. This means we only call the fetch request once. So, go easy with the changes. Unless we find a compelling reason to make changes (after profiling and stress testing, that is), it’s probably best to just leave things alone.
Wrapping Up
That’s it. Run the application. Try adding and deleting weights. Navigate to the history view, and shake to undo. Everything should work as expected. Launch it on a second device; all the weights should transfer over. Put the first device on the graph view. Then enter a new weight on the second device, and put that app into the background. Within a minute or so, the first device’s screen should change. If everything looks good, commit your changes.
Of course, there is one big difference between this version and the last. Shake to undo no longer asks for permission before making a change. It immediately undoes the last action. It turns out that we threw out most of our undo support code when we deleted the old WeightHistory class. That means we didn’t even register any actions for undo, or create the inverse undo methods. Core Data handled everything for us automatically.
I’ll leave the alerts as homework. It shouldn’t be hard to move the relevant WeightHistory code over to the HistoryViewController. Just be sure to set the undo action name every time you save the context. Then add the alert methods.
Next chapter, we will take a break from the Health Beat application to look at custom controls. In particular, we will focus on using Core Motion and custom gestures. Finally, in Chapter 9, we will look at all the little details that need to be completed before submitting your app to the App Store.