
5. Configuring the Android Manifest File
Every Android project, for Kindle Fire or otherwise, includes a special file called the Android manifest file. The Android system uses this file to determine application configuration settings, including the application’s identity and what permissions the application requires to run. In this chapter, we examine the Android manifest file and look at how different applications use its features.
Exploring the Android Manifest File
The Android manifest file, named AndroidManifest.xml, is an XML file that must be included at the top level of any Android project. If you use Eclipse with the ADT plug-in, the Android project wizard will create the initial AndroidManifest.xml file with default values for the most important configuration settings. The Android system uses the information in this file to do the following:
• Install and upgrade the application package
• Display application details to users
• Launch application activities
• Manage application permissions
• Handle a number of other advanced application configurations, including acting as a service or content provider
You can edit the Android manifest file by using the Eclipse manifest file resource editor or by manually editing the XML.
The Eclipse manifest file resource editor organizes the manifest information into categories presented on five tabs:
• Manifest
• Application
• Permissions
• Instrumentation
• AndroidManifest.xml
Using the Manifest Tab
The Manifest tab (see Figure 5.1) contains package-wide settings, including the package name, version information, and minimum Android SDK version information. You can also set any hardware configuration requirements here.

Figure 5.1. The Manifest Tab of the Eclipse Manifest File Resource Editor
Using the Application Tab
The Application tab (see Figure 5.2) contains application-wide settings, including the application label and icon, as well as information about application components, such as activities, intent filters, and other application functionality, including configuration for service and content provider implementations.

Figure 5.2. The Application Tab of the Eclipse Manifest File Resource Editor
Using the Permissions Tab
The Permissions tab (see Figure 5.3) contains any permission rules required by the application. This tab can also be used to enforce custom permissions created for the application.

Figure 5.3. The Permissions Tab of the Eclipse Manifest File Resource Editor
Using the Instrumentation Tab
You can use the Instrumentation tab (see Figure 5.4) to declare any instrumentation classes for monitoring the application.

Figure 5.4. The Instrumentation Tab of the Eclipse Manifest File Resource Editor
Using the AndroidManifest.xml Tab
The Android manifest file is a specially formatted XML file. You can edit the XML manually in the AndroidManifest.xml tab of the manifest file resource editor (see Figure 5.5).

Figure 5.5. The AndroidManifest.xml Tab of the Eclipse Manifest File Resource Editor
Figure 5.5 shows the Android manifest file for the HelloKindle project you created in Chapter 1, “Getting Started with Kindle Fire,” which has fairly simple XML.
Note that the file has a single <manifest> tag, within which all the package-wide settings appear. Within this tag is one <application> tag, which defines the specific application with its single activity, called .HelloKindleActivity, with an Intent filter. In addition, the <uses-sdk> tag is set to target only API Level 9 (Android 2.3), for this example.
Now, let’s talk about each settings in more detail.
Configuring Basic Application Settings
If you use the Android project wizard in Eclipse to create a project, then an Android manifest file will be created for you by default. However, this is just a starting point. It is important to become familiar with how the Android Manifest file works; if your applications manifest file is configured incorrectly, then your application may not run properly.
In terms of the XML definition for the Android manifest file, it will always start with an XML header:
<?xml version="1.0" encoding="utf-8"?>
Many of the important settings your application requires are set using attributes and child tags of the <manifest> and <application> blocks. Now, let’s look at a few of the most common manifest file configurations.
Naming Android Packages
You define the details of the application within the scope of the <manifest> tag. This tag has a number of essential attributes, such as the application package name. Set this value using the package attribute, as follows:
<manifest
xmlns:android="http://schemas.android.com/apk/res/android"
package="com.androidbook.hellokindle"
android:versionCode="1"
android:versionName="1.0.1">
Versioning an Application
Manifest version information is used for two purposes:
• To organize and keep track of application features
• To manage application upgrades
For this reason, the <manifest> tag has two separate version attributes: a version name and a version code.
Setting the Version Name
The version name is the traditional versioning information, used to keep track of application builds. Smart versioning is essential when publishing and supporting applications. The <manifest> tag android:versionName attribute is a string value provided to keep track of the application build number. For example, the HelloKindle project has the version name 1.0.1. The format of the version name field is up to the developer. However, this field is visible to the user.
Setting the Version Code
The version code allows the Android platform to programmatically upgrade and downgrade an application. The <manifest> tag android:versionCode attribute is an whole number integer value that the Android platform and Android marketplaces use to manage application upgrades and downgrades. android:versionCode generally starts at a value of 1. This value must be incremented with each new version of the application deployed to users. The version code field is not visible to the user and need not stay in sync with the version name. For example, an update might have a version name of 1.0.2, but the version code would be incremented to 2.
Setting the Minimum Android SDK Version
Android applications can be compiled for compatibility with several different SDK versions. You use the <uses-sdk> tag to specify the minimum SDK required in order for the application to build and run properly. The android:minSdkVersion attribute of this tag is an integer representing the minimum Android SDK version required. Table 5.1 shows the Android SDK versions available for shipping applications.
Table 5.1 Relevant Android SDK Versions for the Kindle Fire

For example, in the HelloKindle project, you specified that the minimum SDK as Android 2.3.3 SDK (as API Level 10, which is also 2.3.4, which is what the Kindle Fire runs):
<uses-sdk
android:minSdkVersion="10"
android:targetSdkVersion="10" />
Each time a new Android SDK is released, you can find the SDK version number in the SDK release notes. This is often referred to as the API Level within the tools, especially the Android SDK and AVD Manager. For an up-to-date list of the available API Levels, see http://goo.gl/n0fUZ. The value need not be a number, as witnessed by the Honeycomb Preview SDK with an API Level of Honeycomb.
As of this writing, it’s unclear what major SDK updates Kindle Fire will receive. The user interface is already thoroughly customized and much different from any stock version of Android. For users, Kindle Fire doesn’t necessarily need a new version of the Android platform in the future, above and beyond bug fixes.
Naming an Application
The <application> tag android:label attribute is a string representing the application name. You can set this name to a fixed string, as in the following example:
<application android:label="My application name">
You can also set the android:label attribute to a string resource. In the HelloKindle project, you set the application name to the string resource as follows:
<application android:label="@string/app_name">
In this case, the resource string called app_name in the strings.xml file supplies the application name.
Providing an Icon for an Application
The <application> tag attribute called android:icon is a Drawable resource representing the application. There is a default icon (ic_launcher) by default. In the HelloKindle project, you could set a custom application icon to the Drawable resource you include in the project (such icon.png) as follows:
<application android:icon="@drawable/icon">
Providing an Application Description
The <application> tag android:description attribute is a string representing a short description of the application. You can set this name to a string resource:
<application
android:label="My application name"
android:description="@string/app_desc">
The Android system and application marketplaces use the application description to display information about the application to the user.
Setting Debug Information for an Application
The <application> tag android:debuggable attribute is a Boolean value that indicates whether the application can be debugged using a debugger, such as Eclipse. This value is automatically set when you do a debug build in Eclipse. If you manually turn it on, you must reset this value to false before you publish your application. If you forget, the publishing tools usually warn you to adjust this setting.
Setting Other Application Attributes
Numerous other settings appear on the Application tab, but they generally apply only in specific cases, such as when you want link secondary libraries or apply a theme other than the default to your application. There are also settings for handling how the application interacts with the Android operating system. For most applications, the default settings are acceptable.
You will spend a lot of time on the Application tab in the Application Nodes box, where you can register application components—most commonly, each time you register a new activity.
Defining Activities
Recall that Android applications comprise a number of different activities. Every activity must be registered within the Android manifest file by its class name before it can be run on the device. You will therefore need to update the manifest file each time you add a new activity class to an application.
Each activity represents a specific task to be completed, often with its own screen. Activities are launched in different ways, using the Intent mechanism. Each activity can have its own label (name) and icon, but uses the application’s generic label and icon by default.
Registering Activities
You must register each activity in the Application Nodes section of the Application tab. Each activity has its own <activity> tag in the resulting XML. For example, the following XML excerpt defines an activity class called HelloKindleActivity:
<activity android:name=".HelloKindleActivity" />
This activity must be defined as a class within the application package. If needed, you may specific the entire name, including package, with the activity class name. For example, to register a new activity in the HelloKindle project, follow these steps:
1. Open the HelloKindle project in Eclipse.
2. Right-click /src/com.kindlebook.hellokindle and choose New, Class. The New Java Class window opens.
3. Name your new class HelloKindleActivity2.
4. Click the Browse button next to the Superclass field and set the superclass to android.app.Activity. You may need to type several letters of the class/package name before it resolves and you can choose it from the list.
5. Click the Finish button. You see the new class in your project.
6. Make a copy of the main.xml layout file in the /res/layout resource directory for your new activity and name it second.xml. Modify the layout so that you know it’s for the second activity. For example, you could change the text string shown. Save the new layout file.
7. Open the HelloKindleActivity2 class. Right-click within the class and choose Source, Override/Implement Methods.
8. Check the box next to the onCreate(Bundle) method. This method is added to your class.
9. Within the onCreate() method, set the layout to load for the new activity by adding and calling the setContentView(R.layout.second) method. Save the class file.
10. Open the Android manifest file and click the Application tab of the resource editor.
11. In the Application Nodes section of the Application tab, click the Add button and choose the Activity element. Make sure that you are adding a top-level activity. The attributes for the activity are shown in the right side of the screen.
12. Click the Browse button next to the activity Name field. Choose the new activity you created: HelloKindleActivity2.
13. Save the manifest file. Switch to the AndroidManifest.xml tab to see what the new XML looks like.
You now have a new, fully registered HelloKindleActivity2 activity that you can use in your application.
Designating the Launch Activity
You can use an Intent filter to designate an activity as the primary entry point of the application. The Intent filter for launching an activity by default must be configured using an <intent-filter> tag with the MAIN action type and the LAUNCHER category. In the HelloKindle project, the Android project wizard set HelloKindleActivity as the primary launching point of the application:
<activity
android:name=".HelloKindleActivity"
android:label="@string/app_name" >
<intent-filter>
<action
android:name="android.intent.action.MAIN" />
<category
android:name="android.intent.category.LAUNCHER" />
</intent-filter>
</activity>
This <intent-filter> tag instructs the Android system to direct all application launch requests to the HelloKindleActivity activity.
Managing Application Permissions
The Android platform is built on a Linux kernel and leverages its built-in system security as part of the Android security model. Each Android application exists in its own virtual machine and operates within its own Linux user account (see Figure 5.6).

Figure 5.6. Simplified Android Platform Architecture from a Security Perspective
Applications that want access to shared or privileged resources must declare those specific permissions in the Android manifest file. This security mechanism ensures that no application can change its behavior on-the-fly or perform any operations without the user’s permission.
Android applications can access their own private files and databases without any special permissions. However, if an application needs to access shared or sensitive resources, it must declare those permissions using the <uses-permission> tag within the Android manifest file. These permissions are managed on the Permissions tab of the Android manifest file resource editor.
For example, to give your application permission to access the network resources, use the following steps:
1. Open the HelloKindle project in Eclipse.
2. Open the Android manifest file and click the Permissions tab of the resource editor.
3. Click the Add button and choose Uses Permission. The Name attribute for the permission is shown in the right side of the screen as a drop-down list.
4. Choose android.permission.INTERNET from the drop-down list.
5. Save the manifest file. Switch to the AndroidManifest.xml tab to see what the new XML looks like.
You have now registered the Internet permission. Your application will be able to access the network APIs, including non-networking APIs that can read from Internet URLs, within the Android SDK without causing security exceptions to be thrown.
Table 5.2 lists some of the most common permissions used by Android applications.
Table 5.2. Common Permissions Used by Kindle Fire Applications
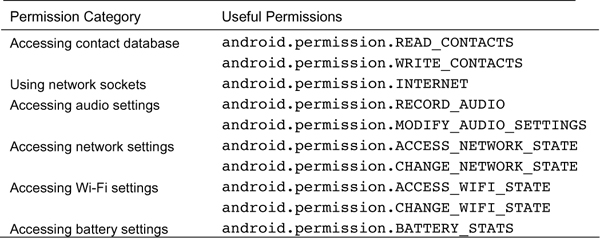
During the application installation process, the user is shown exactly what permissions the application uses. The user must agree to install the application after reviewing these permissions. For a complete list of the permissions used by Android applications, see the android.Manifest.permission class documentation.
Managing Other Application Settings
In addition to the features already discussed in this chapter, a number of other specialized features can be configured in the Android manifest file. For example, if your application requires a hardware keyboard or a touch screen, you can specify these hardware configuration requirements in the Android manifest file.
You must also declare any other application components—such as whether your application acts as a service provider, content provider, or broadcast receiver—in the Android manifest file.
Summary
The Android manifest file (AndroidManifest.xml) exists at the root of every Android project. It is a required component of any application. The Android manifest file can be configured using the manifest file editor built into Eclipse by the ADT plug-in, or you can edit the manifest file XML directly. The file uses a simple XML schema to describe what the application is, what its components are, and what permissions it has. The Android platform uses this information to manage the application and grant its activities certain permissions on the Android operating system.
Exercises
1. Review the complete list of available permissions for Android applications in the Android SDK documentation. You can do this with your local copy of the documentation or online at the Android Developer website (http://goo.gl/II3Uv).
2. Edit the Android manifest file for the HelloKindle application again. Add a second permission (any will do, this is just for practice) to the application. Look up what that permission is used for in the documentation, as discussed in the previous exercise.
3. Add another Activity class to the HelloKindle application and register it within Android manifest. Take this exercise a step further and make this new Activity your application’s default launch activity with the proper intent filter. (More than one activity can be a launcher activity. Each one with the launcher category will appear in the application list with an icon. This is not typical, so you may want to move the intent filter rather than copy it.) Save your changes and run your application.