
Chapter 4. Hello, Toast
The temptation with any project is to start big. We could architect an entire complex of bundles, fully proving how our application will function before we write a single line of code. But that’s not how agile projects evolve. And evolve they do. So much so that often the initial code might be totally unrecognizable by the time the project is finished.
So rather than start with architecture, we’ll start with a humble understanding of one simple scenario in the telematics domain. In fact, the first pass at the Toast application will not even concern itself with OSGi at all. By the time this chapter concludes, however, Toast will be built of bundles. In subsequent chapters we’ll add functionality to Toast in terms of both telematics and OSGi.
The goals of this chapter are to
• Create a group of very simple classes that implement one simple telematics scenario
• Create three bundle projects derived from this initial code base using the PDE tooling
• Run our three-bundle application using an OSGi launch configuration
4.1 A Simple Scenario
Our first telematics scenario covers the case of emergency notification. Here the vehicle has two devices—an airbag and a GPS. If the airbag deploys, an emergency monitor is notified. The monitor queries the GPS for the vehicle location and notifies an off-board service center about the emergency. For now, we’ll just print the vehicle’s location on the console.
4.1.1 The Project
Our first foray into creating a project for our code is not the typical path taken when developing for OSGi. We just want to get the function working before worrying about bundles and other OSGi things. As soon as this first non-OSGi iteration of Toast runs, we’ll refactor and abandon it for a more modular approach.
As with all the samples in this book, if you’d rather not follow along with the step-by-step instructions, you can simply read along and later load the sample code for “Chapter 4.1 Hello, Toast” using the Samples Manager.
• Start by creating a normal Java project. From the workbench select File > New > Project, expand Java, and select Java Project to start the New Java Project wizard shown in Figure 4-1.
Figure 4-1 New Java Project wizard
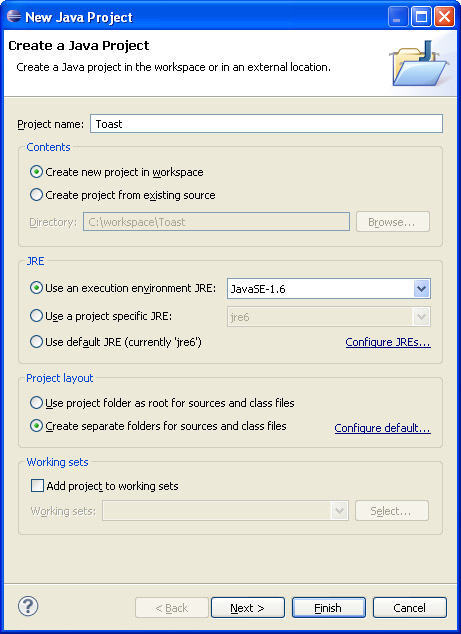
• For the project name, enter Toast. Accept all the other defaults and click Finish.
• You may see a dialog asking you to switch to the Java perspective. If so, just click Yes.
4.1.2 Gps
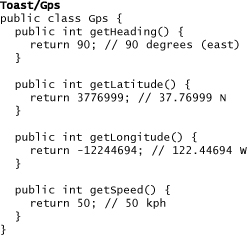
Now we have to create a couple of devices—the GPS and the airbag. Let’s create the Gps class first. The Gps class provides APIs for querying the vehicle’s location. Since we don’t have real GPS hardware with which to communicate, this Gps class will simply return hard-coded values.
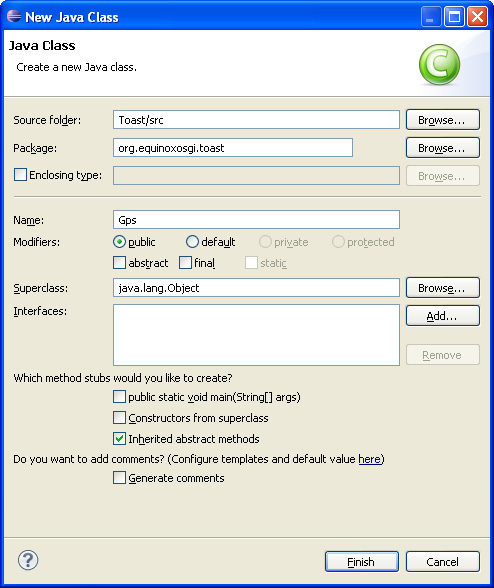
• Create the Gps class by selecting File > New > Class to start the New Java Class wizard shown in Figure 4-2. Enter Toast/src for the source folder and org.equinoxosgi.toast for the package. For the class name, enter Gps. With all the other fields in their default values, click Finish.
Figure 4-2 New Java Class wizard
The Gps class is created and a Java editor on the new class opens.
• Fill in the content of the Gps class as follows:
4.1.3 Airbag and IAirbagListener
Now define the airbag and a means of listening to deployment events:
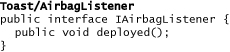
• Select File > New > Interface to create the listener interface and place it in the Toast/src source folder and the org.equinoxosgi.toast package. Having a listener interface allows the airbag to be independent of objects that are interested in it.
• Use the same techniques as before, but this time create the interface IAirbagListener as follows:
In the same source folder and package create an Airbag class as shown here that has addListener and removeListener methods:
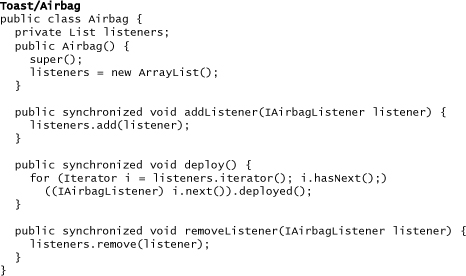
• To fix any compilation errors, organize Airbag’s imports by selecting the file in the Package Explorer or opening it in a Java editor and using either Ctrl+Shift+O or Source > Organize Imports from the context menu. You’ll make use of this operation often as you progress through the tutorial.
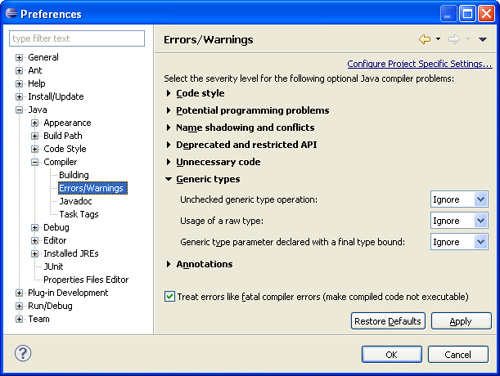
• Since Toast is targeting Java 1.4 and does not use generics, we can safely disable these compiler warnings. Open the preferences dialog by choosing Window > Preferences, and then select Java > Compiler > Errors/Warnings. Expand the Generic types section and change each compiler setting to Ignore. Upon clicking OK, you will be asked if you wish to perform a full build, to which you should answer Yes. (See Figure 4-3.)
Figure 4-3 Workspace compiler preferences
4.1.4 EmergencyMonitor
With the Gps and Airbag classes and the IAirbagListener interface defined, the next step is to write the emergency monitor logic:
• Create an EmergencyMonitor class that implements the IAirbagListener interface as follows:
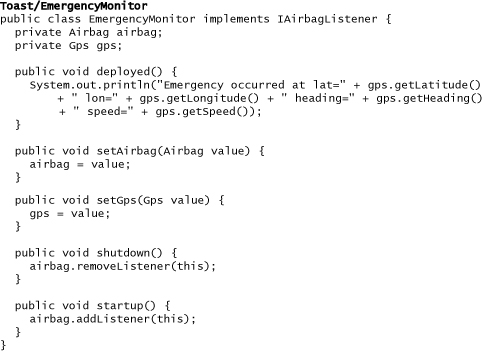
The setGps and setAirbag methods allow us to use dependency injection to set the dependencies independent of instantiation. We could have done all of this in a constructor, but as we will see in later chapters, the separation of instantiation and initialization logic is quite useful.
Similarly, the separate startup and shutdown methods further decouple the monitor’s lifecycle from the EmergencyMonitor class’s instantiation. This, too, will prove to be a useful approach as Toast becomes more and more modular and dynamic.
Notice that the business logic of the monitor is contained mostly in the deployed method. This method satisfies the listener interface and implements the real emergency behavior. All the other methods are infrastructure in support of this code.
4.1.5 Main
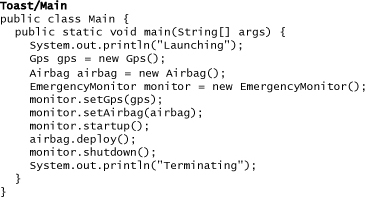
Now, to run this minimal non-OSGi Toast application, we need a main method that instantiates the three classes, binds them together, and forces the airbag to deploy:
• Define the Main class as follows:
4.1.6 Running
Running the example is simple:
• Select the Main class in the Package Explorer and use Run As > Java Application from the context menu to start Toast.
The Console view displays the following output:
![]()
4.1.7 Checkpoint
At this point Toast is very simple, but it is already starting to show the beginnings of some architectural patterns that will turn out to be very powerful as the system gets larger and more complex—keeping devices independent of business logic to increase cohesion and reduce coupling.
4.2 Slicing Toast into Bundles
At this point Toast is a single project with no OSGi awareness. This relates to what you might see in the real world—many applications start as monoliths or have some minimal homegrown modularity mechanism. As requirements and deployment scenarios grow, so grows the need for modularity. This is when the power of OSGi comes into play.
In this section we slice Toast up into a set of OSGi bundles. Even though Toast is very simple and moving it to OSGi is easy, the patterns and approaches we follow are useful when you are porting your more complex applications to OSGi.
The first step in modularizing an application is identifying its essential structure. This helps you understand the dependencies and identify interactions, and thus define the modules. Consider the diagram in Figure 4-4.
Figure 4-4 Bundle dependencies
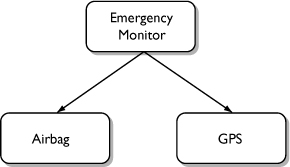
Notice that the Emergency Monitor depends on both the GPS and Airbag and that the GPS and Airbag are independent of one another. This is a good clue that our system can be broken into three independent parts. Furthermore, we know the direction of the dependencies and can avoid circular dependencies.
Having identified some candidate components, the next step is to consider whether each should be in a bundle of its own or if parts can be packaged together. In many ways these become deployment questions: Does it make sense to have a GPS without an airbag or an airbag without a GPS? In this case, it does. Does it make sense to have an airbag or a GPS without an emergency monitor? Again, it does. So here we get ultimate flexibility, at the cost of modest additional complexity, by putting each function in its own bundle. This is another example of creating a design that favors components that exhibit high cohesion and loose coupling. We will leverage this several times in the evolution of Toast and talk more about this and other best practices for bundling code throughout the book.
To get going on the OSGi-based Toast, follow along with the step-by-step instructions here, or read along and load the sample code from “Chapter 4.2 Hello, Toast,” using the Samples Manager.
4.2.1 GPS Bundle
Start by creating a new plug-in project for the GPS bundle:
• Select File > New > Project.... From the resulting dialog, expand Plug-In Development, select Plug-in Project, and click Next to get the New Plug-in Project wizard shown in Figure 4-5.
Figure 4-5 New Plug-in Project wizard
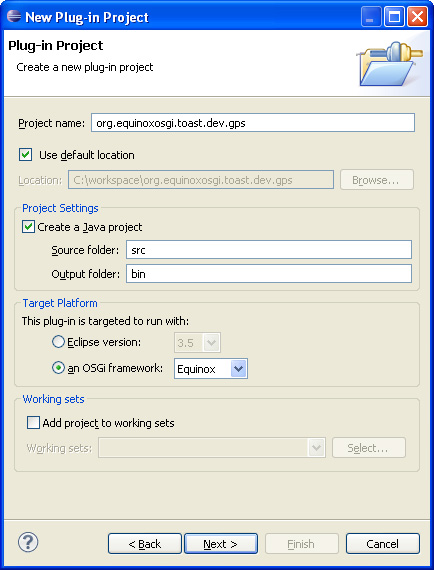
• For the project name, enter org.equinoxosgi.toast.dev.gps. Under Target Platform choose the radio button labeled an OSGi framework and select Equinox from the drop-down list.
• Match the remainder of the settings to the wizard shown in the figure and click Next.
• On the Content page of the wizard, type Toast Gps for the Name, and select J2SE-1.4 for the Execution Environment. Get in the habit of doing this for every bundle you create in this tutorial.
• Make sure that all of the items in the Options section are not checked, accept the rest of the default values, and click Finish.
• You may see a dialog asking you to switch to the Plug-In Development perspective. If so, just click Yes.
Once the project is created, the OSGi bundle manifest editor appears. Leave it open for now; we’ll come back to it in a bit.
Since we already have a working Gps class from our first iteration, just move that class into this project:
• Select the Gps class in the Toast project. From the context menu, select Refactor > Move.... Select the src folder under the org.equinoxosgi.toast.dev.gps project and press the Create Package... button.
• Name the package the same as the project: org.equinoxosgi.toast.dev.gps.
• Then select the newly created package and click OK.
Now the GPS bundle has the functionality it needs, but it is all inside the bundle—nothing outside the bundle can see it. In fact, the original Toast project now shows compile errors because of this. To make the code visible, the packages containing the functionality others can use must be exported.
• To do this, go back to the OSGi bundle manifest editor that opened earlier. If it’s not still open, just double-click on the MANIFEST.MF file in the META-INF folder of the GPS project and open it.
• On the Runtime tab, in the Exported Packages section, click the Add... button.
• Select the org.equinoxosgi.toast.dev.gps package and click OK. Then save the editor.
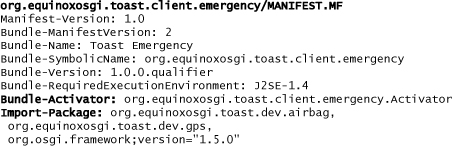
While you are in the manifest editor, take some time to explore the bundle. The tabs on the manifest editor allow you to edit the various aspects of the bundle manifest, as summarized in textual form in the MANIFEST.MF tab. Let’s review the details of the MANIFEST.MF file for the GPS bundle:
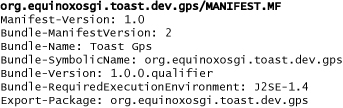
Notice the Bundle-SymbolicName and Bundle-Version headers. These are mandatory, and together they uniquely identify the bundle. Many of the other headers appear as a result of the answers we provided when filling out the wizard for creating this bundle. The Export-Package header lists the one package in this bundle as exported so other bundles can use it.
That does it for your first bundle. Certainly as you progress through the subsequent chapters, your bundles will get more complex, but a bundle really needs only two things to qualify as a bundle: some interesting artifacts (in this case the Gps class) and a manifest.
4.2.2 Airbag Bundle
Rather than repeat the detailed instructions from the first bundle, here we give a list of steps you can follow to create the airbag bundle:
• Create a project for the bundle named org.equinoxosgi.toast.dev.airbag. Remember to use Toast Airbag for the Name and J2SE-1.4 for the Execution Environment.
• Move the existing Airbag class and the IAirbagListener interface into a new package named org.equinoxosgi.toast.dev.airbag in the new bundle.
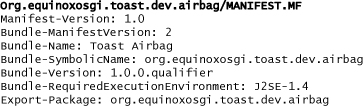
• Open the bundle’s manifest editor and export the package org.equinoxosgi.toast.dev.airbag.
A review of the MANIFEST.MF tab in the manifest editor shows similar content to that of the GPS bundle, with a single package being exported:
4.2.3 Emergency Monitor Bundle
Creating the emergency monitor bundle follows a similar pattern:
• Create a project for the bundle named org.equinoxosgi.toast.client.emergency. Remember to use Toast Emergency for the Name and J2SE-1.4 for the Execution Environment.
• Move the existing EmergencyMonitor class into a package named org.equinoxosgi.toast.client.emergency in the new bundle.
There is no need to export the new package as there is no code for other bundles to use. Instead, the emergency bundle needs to import packages from the other two bundles. In fact, if you are following along, you should have some compile errors in your workspace as the airbag- and GPS-related types are not visible to the emergency monitor bundle.
• Open the emergency bundle’s manifest editor and select the Dependencies tab.
• Add the org.equinoxosgi.toast.dev.gps and org.equinoxosgi.toast.dev.airbag packages to the Imported Packages list on the right. This lets the emergency bundle see the GPS and airbag code from the other bundles.
• While you are there, add org.osgi.framework to the Imported Packages list. The OSGi framework types will be needed in the next step.
All that is left to do is the code from Main—the code that instantiates and starts the logic. In OSGi-based systems, applications do not have a main method. Instead, applications are a community of bundles that hook into the OSGi framework lifecycle. One of the ways a bundle can participate in the framework lifecycle is by defining a bundle activator.
A bundle activator must implement the OSGi BundleActivator interface. That’s why we needed to import the org.osgi.framework package previously. Now create a new bundle activator class in the emergency project:
• In the manifest editor, click on the Activator link on the Overview tab. This opens a partially completed New Java Class wizard.
• Fill in the package as org.equinoxosgi.toast.client.emergency and the class name as Activator. Click Finish to create a skeleton activator class containing stubs for the required start and stop methods.
• Fill in the rest of the code as follows:

Notice that the start method is basically the same as the original main method we wrote. The OSGi framework invokes this method as it starts the bundle. Similarly, the OSGi framework invokes stop when the framework is about to stop the bundle.
The emergency bundle is complete, so take a look at its manifest. Notice the Bundle-Activator header that identifies the bundle’s entry point. Also, you can see that the bundle imports three packages but does not export any.
• With the refactoring complete, you can now safely delete the original Toast project from your workspace.
4.2.4 Launching
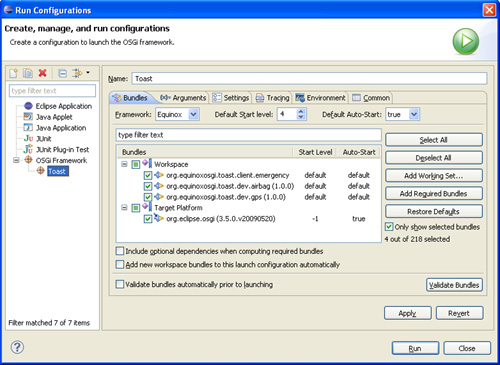
Now that the three bundles are complete, the OSGi-based Toast is ready to run. Recall that in Section 4.1.6, “Running,” we were able use the Run As > Java Application menu entry to run Toast. Under the covers that created a launch configuration describing how to run Toast. Here we show you how to do that for OSGi-based systems. Alternatively, you can use the Samples Manager to install the final code for this chapter and then use the launch configuration in the emergency project. Follow these steps to create a launch configuration as shown in Figure 4-6:
• Select Run > Run Configurations... from the menu bar.
• Select OSGi Framework and choose New from the context menu to create a new launch configuration.
• Name the launch configuration Toast.
• Click the Deselect All button at the right.
• Select the three Toast bundles from the list of Workspace bundles by checking the box beside each one.
• Scroll down to the Target Platform section and check the box beside the bundle org.eclipse.osgi.
• Uncheck the box beside Add new workspace bundles to this launch configuration automatically.
• On the Common tab, select the Shared file option and use /org.equinoxosgi.toast.client.emergency as the folder. This causes the launch configuration to be saved in the project, making it easier to share with other team members.
• Finally, click the Run button.
Figure 4-6 OSGi-based Toast launch configuration
Running this launch configuration causes the OSGi framework to start. The framework then installs and starts the bundles listed in the launch configuration. As a result, start on the emergency monitor’s bundle activator is run, and you should see the following output on the Console view:
![]()
The framework continues to run until you shut it down by typing close in the Console view. Shutting down the framework invokes the stop method on the emergency bundle’s activator. The console will show the following:

4.3 Summary
We started this chapter with a simple telematics scenario. The first pass was done without regard for OSGi, focusing instead on a clean object-oriented design. This first iteration of Toast was then refactored into three bundles, one for each device and one for the emergency monitor, and the bundle dependencies were properly captured. OSGi’s bundle lifecycle was hooked by writing a bundle activator in the emergency bundle. The system was run using an OSGi-based launch configuration, and system startup and shutdown were visible through application output on the console.
In this chapter you learned how to refactor a non-OSGi project into OSGi bundles. You learned how to create bundle manifests and how to run an OSGi application using a launch configuration.
There’s still a long way to go to turn this simplistic system into a dynamic and fully functional telematics application, but the first steps of defining and running bundles are complete.