Chapter 4
Configuring Service Applications
Microsoft Exam Objective Covered in This Chapter:
- Maintaining a SharePoint Environment
- Configure Service Applications
We live in a world driven by information, and that, in part, is why you are reading this book and pursuing a certification in information technology. Yet we also are in a world where that information is supposed to provide some sort of service—and so it is with the technology of SharePoint.
SharePoint is designed to provide specific services to its users, and in SharePoint Server 2010, you can select just those services your users, partners, and customers require. This chapter focuses on configuring resources that can be shared across sites within your server farm or even across multiple farms.
There are really two large and related portions to this chapter. The first part addresses the post-installation or post-upgrade tasks associated with service application configuration and services. This is much like laying the foundation so you have a platform on which to build. The other part is the actual services application management, which includes both configuring service applications and creating and configuring individual application services.
Service Applications Configuration Overview
Just when you think you’ve gotten past configuring your server farm, you are still faced with the Farm Configuration Wizard. This is a quick and straightforward way to deploy services on your server farm. You’ll take a brief look at this wizard before proceeding to the next steps in service configuration.
Service applications and web applications are associated by service application connections. Services on a server are stopped, started, and managed individually. Central Administration and Windows PowerShell are both used to manage services and to create service application connections between a service application and a web application. You will also need to configure the Security Token Service (STS) to respond to requests for security tokens.

The configuration of individual services such as Access Services and Excel Services will be covered in the second half of this chapter.
Server Farm Configuration Wizard
The quickest and easiest way to enable all of your major services in the SharePoint server farm is to use the SharePoint Farm Configuration Wizard. This simple and powerful tool lets you deploy major services such as Excel Services and Visio Graphics Services to the entire farm. Exercise 4-1 will show you how it works.
Exercise 4-1: Using the Farm Configuration Wizard
1. Navigate to Central Administration. In the Quick Launch menu on the left, click Configuration Wizards.
2. On Configuration Wizards page, click Launch The Farm Configuration Wizard.
3. On the Configure Your SharePoint Farm page, select Walk Me Through The Settings Using This Wizard; then click Next.
4. Under Service Account, select either Use Existing Managed Account or Create New Managed Account. Then enter a username and password of an account with farm administrator permissions in the available fields.
5. Use the available check boxes to select the desired services; then click Next. Many of the services may already be selected and unavailable to be deselected.
6. When the Create Site Collection page appears, you can click Skip and create the first site collection later, or you can create the first site collection during the wizard.
7. To create the first site collection, give the site collection a name in the Title field.
8. Add an optional description in the Description field.
9. Under Web Site Address, append the URL with a descriptive name for the site collection URL in the URL field.
10. Under Template Selection, choose the desired template tab, choose the desired template, and then click OK.
11. When you get to the last page of the wizard showing you a list of services running on the site collection, click Finish.
The Farm Configuration Wizard is used to add services only. Once the services are added, you cannot run the wizard again to remove services. If you run the wizard and see that services are selected and grayed out, it means the services have already been configured for the farm, either because you set them up in a prior run of the wizard or because you configured the services through some other means. If you need to remove services, you can do so manually.
Service Applications and Services
Managing the individual services running on each server in your farm and creating and managing service applications to be used as resources by SharePoint web applications go hand in hand. This section of the chapter walks you through the process of starting and configuring services and then moves on to managing service applications and beyond.
Initial Configuration of Services
The tasks related to managing the services running on servers in the farm range from starting or stopping a specific service to configuring global services. Exercise 4-2 illustrates how to stop and start a service using Central Administration. You must be a member of the Farm Administrators group to successfully perform this task.
Exercise 4-2: Stopping and Starting a Service in Central Administration
1. Navigate to Central Administration. On the main page, click System Settings.
2. On the System Settings page, click Manage Services On Server under Servers.
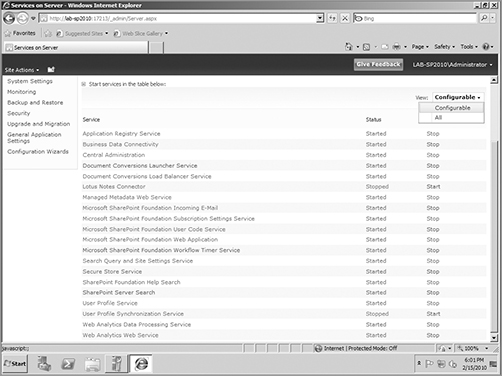
3. To select the server for which you want to configure services, click Change Server in the Server menu and then select the desired server’s name.
4. Open the View list and either select Configurable to view just configurable services or select All to view all services, as shown here.
5. In the Action column, click Start or Stop, depending on what you want to do with the desired service or services.
6. If a confirmation dialog box appears, click OK.
You can perform the same actions from Windows PowerShell. Exercise 4-3 takes you through the steps. You will need to know the GUID of the service you want to manage. You will also need to be a member of the SharePoint_Shell_Access role on the configuration database and a member of the WSS_ADMIN_WPG local group on the computer containing SharePoint 2010 to successfully accomplish this task.
Exercise 4-3: Starting and Stopping a Service in Windows PowerShell
1. Click Start All Programs Microsoft SharePoint 2010 Products; then click SharePoint Management Shell.
2. At the command prompt, type the following and afterward press Enter:
Start-SPServiceInstance -Identity <GUID of the service >
This starts the service.
3. Click Start All Programs Microsoft SharePoint 2010 Products; then click SharePoint Management Shell.
4. At the command prompt, type the following and afterward press Enter:
Stop-SPServiceInstance -Identity <GUID of the service>
This ends the service.
When you build a web application for a single purpose, you can probably hard-code everything, since your application will be accessed for only one reason. However, most of the applications in SharePoint are going to be accessed from multiple websites for multiple reasons, so the settings for these applications must be more accessible so they’ll apply to all sites contained within a web application.
Some of the services running on your server farm machines have global settings that require more complex management procedures. The following series of exercises will show you how this is done under the hood, using the general task of configuring global workflow settings as an example.
Configuring Global Workflow Settings Example
Workflows in SharePoint are a series of associated tasks that produce a single outcome by automating the progress of an item or document through a sequence of checks or actions related to a business goal. For example, a documenter or other content contributor may submit a deliverable for review and approval. The reviewers, such as development and technical editors, each will have an approve or reject option, so each person controls a portion of the workflow.
Each approver can receive the content from the contributor and either approve it, sending it to the next step in the workflow, or reject it, sending it back to the contributor with suggestions for changes, which the contributor must make before resubmitting the content. At the end of the process, the contributor and the reviewers may have interacted with several revisions of the content before it completed the workflow process and was given final approval.
Workflow settings can be applied globally to all websites contained within a web application. The subsequent exercises will illustrate how to configure global application settings for workflow.
Exercise 4-4 shows you how to either enable or disable declarative workflows in SharePoint using Central Administration. This feature lets you determine whether you want users to be able to deploy declarative workflows. This means users who possess the Design permission level on a site can create and deploy their own workflows using the Workflow Editor in Microsoft SharePoint Designer 2010 or in a third-party application. You must be a member of the Farm Administrators group to successfully complete this exercise.
Exercise 4-4: Enabling or Disabling Declarative Workflows
1. On the Central Administration main page, click Application Management in the Quick Launch menu on the left.
2. On the Application Management page, click Manage Web Applications under Web Applications.
3. On the Web Applications Management page, select the web application you want to manage.
4. On the Ribbon in the Manage group, open the General Settings menu and select Workflow.
5. In the Workflow Settings dialog box, under User-Defined Workflows, either click Yes to enable declarative workflows for all sites in the application or click No to disable declarative workflows in the web application, as shown here.
6. Click OK to close the dialog box.
Usually, only authenticated SharePoint users will receive email messages in response to workflow tasks, but you can configure workflow global settings to allow unauthenticated users to also be notified. This can be used with contributors who are external partners or customers. Exercise 4-5 provides the instructions for how to allow internal users without site access to participate in workflows. These are SharePoint users who do not have specific access to the site in which you want them to participate in workflows. You must be a member of the Farm Administrators group to successfully complete this task.
Exercise 4-5: Enabling Nonauthenticated Users to Participate in Workflows
1. From the Central Administration main page, click Application Management in the Quick Launch menu on the left.
2. On the Application Management page, click Manage Web Applications under Web Applications.
3. On the Web Applications Management page, select the web application you want to manage.
4. On the Ribbon in the Manage group, open the General Settings menu and select Workflow.
5. In the Workflow Settings dialog box, under Workflow Task Notifications, click Yes for the Alert Internal Users Who Do Not Have Site Access When They Are Assigned A Workflow Task? option.
6. Click OK to close the dialog box.
Each external user who you intend to access this option must also be granted minimally the Contribute permission level to the task list used by the required workflow. The setup is almost identical to what you performed in Exercise 4-5. Follow all the steps described in Exercise 4-5, but at step 5, click Yes for the Alert Internal Users Who Do Not Have Site Access When They Are Assigned A Workflow Task? option. Then complete the action described in step 6.
As previously mentioned, this is just an example of configuring global settings for an application. There are many other global setting tasks that can be accomplished in SharePoint; the following are some examples:
- Managing connections in directory services
- Managing enterprise application definitions
- Managing site directory links
Configuring specific services will be presented later in this chapter, and non-application-driven global setting configurations will be described in subsequent chapters.
Configuring the Security Token Service
The STS is a specialized web service that responds to requests for security tokens and provides identity management for web applications that use a security token service.
A security token consists of a collection of identity claims, such as a username, role, or anonymous identifier, and a security token can be issued in a variety of formats, such as Security Assertion Markup Language (SAML). Tokens must be protected with an X.509 certificate to ensure the integrity of the token’s contents in transit and to validate trusted issuers.
All the Windows PowerShell code samples in this and subsequent chapters are generic and contain only example code, including the values contained between <>. Please see Chapter 15, “Working with Windows PowerShell 2.0 Administration,” for details regarding how to enter production values and use “real-world” code.
An Identity Provider-STS (IP-STS) is a web service that handles requests for trusted identity claims. An IP-STS accesses an identity store, such as a database, to store and manage identities. Clients who want to create and manage identities can use the IP-STS, as can Relying Party STS (RP-STS) applications that need to validate any identities offered them by the clients.
A number of tasks are associated with configuring the STS for use by web applications in SharePoint. The following example will show you how to configure a SharePoint claims-based web application. This task is performed using Windows PowerShell, so you’ll need to log in to SharePoint with an account belonging to the SharePoint_Shell_Access role on the configuration database and also as a member of the WSS_ADMIN_WPG local group on the computer containing SharePoint 2010. All the code in the following exercise is example code and not meant to be run “as is” in production.
The tasks performed in this section assume that the SharePoint server farm is part of an Active Directory domain.
Configuring a SharePoint Claims-Based Web Application Using Windows PowerShell
1. Open Windows PowerShell, and at the prompt, type the following to create an X509Certificate2 object.
$cert = New-Object
System.Security.Cryptography.X509Certificates.X509Certificate2("path to cert file")
2. Type the following example to create a claim type mapping to use in your trusted authentication provider:
New-SPClaimTypeMapping "http://schemas.xmlsoap.org/ws/2005/05/identity/claims/emailaddress"
-IncomingClaimTypeDisplayName "EmailAddress" -SameAsIncoming
3. Type the following to create a trusted login provider, first creating the value for the realm parameter:
$realm = "urn:" + $env:ComputerName + ":domain-int"
4. Type the following to create a value for the signinurl parameter, pointing to the Security Token Service web application:
$signinurl = "https://nicstu-test-2/FederationPassive/"
5. Type the following to create a trusted login provider, using the same IdentifierClaim value as in the claim mapping:
$map1.InputClaimType.
$ap = New-SPTrustedIdentityTokenIssuer -Name
"WIF" -Description "Windows® Identity Foundation" -Realm
$realm -ImportTrustCertificate $cert
-ClaimsMappings $map1[,$map2..] -SignInUrl
$signinurl -IdentifierClaim $map1.InputClaimType
6. Type the following to create a web application, first creating a value for the application pool account for the current user, which must be a managed account:
$account = "DOMAIN" + $env:UserName
To create a managed account, use New-SPManagedAccount.
7. Type the following to create a value for the web application URL:
$wa = New-SPWebApplication -name "Claims WIF"
-SecureSocketsLayer -ApplicationPool "SharePoint SSL"
-ApplicationPoolAccount $account -Url $webappurl -Port 443
-AuthenticationProvider $ap
8. Type the following to create a claim object:
$claim = New-SPClaimsPrincipal
-TrustedIdentityTokenIssuerr $ap -Identity
$env:UserName
9. Type the following to create a site:
$site = New-SPSite $webappurl -OwnerAlias
$claim.ToEncodedString() -template "STS#0"
Editing Bindings and Configuring the Web.config File
Once you create the SharePoint claims-based web application as shown in the previous example, edit bindings and configure the Web.config file. You will need to be in Windows PowerShell or on the Stsadm.exe command line.
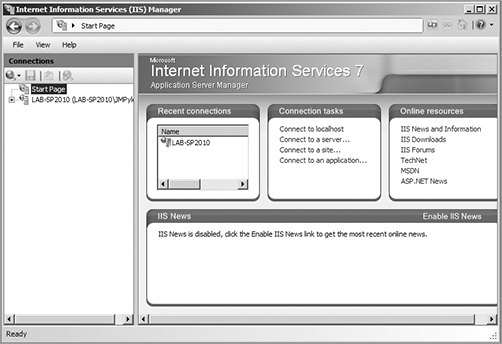
1. At the command prompt, type INETMGR and press Enter. When INETMGR appears in the list, double-click to open the Internet Information Services (IIS) Manager, as shown in Figure 4-1.
2. Right-click Claims Web Application in the left pane and select Edit Bindings.
3. Select https; then click Edit.
4. Under SSL Certificate, select any of the listed certificates.
5. In the left pane, right-click /_trust/ and then select Explore.
6. Open the Web.config file with a text editor.
7. Locate the <AudienceUri> area in the file and type https://webappname/, where webappname is the URL of the desired web application.
8. Save and close the Web.config file.
Configuring a Web Application to Use STS
Once you have edited the bindings and configured Web.config file, configure a Security Token Service web application.
1. On a domain controller, open the Active Directory Federation Services (AD FS) 2.0 Management Console.
2. In the left pane, expand Policy and select Relying Parties.
3. In the main pane, click Add Relying Party.
4. When the Active Directory Federation Services (AD FS) 2.0 Configuration Wizard launches, click Next.
5. Select Enter Relying Party Configuration Manually; then click Next.
6. Verify that Active Directory Federation Services (AD FS) 2.9 Server profile is selected, and then click Next.
7. Accept the default of not using an encryption certificate; then click Next.
8. Type the name of the desired web application’s URL, append /_trust in the available field, such as https://webapplication/_trust/, and then click Next.
9. Type an identifier, click Add, and then click Next.
10. On the Summary page, click Next and then click Close.
11. When the Rules Editor Management Console opens, expand New Rule in the left pane and select Predefined Rule.
12. Select Create Claims From LDAP Attribute Store.
13. In the main pane, open the Attribute Store drop-down list and select Enterprise Active Directory User Account Store.
14. Under LDAP Attribute, select sAMAccountName.
15. Under Outgoing Claim Type, select E-Mail Address.
16. In the left pane, click Save and then close the console.
Service Application Management
Once you have performed the initial post-installation configuration tasks for service administration, it’s time to set up the service applications and put them to work. SharePoint provides a large number of services to web applications and to the site collections and sites accessed by SharePoint users. When setting up service application resources in SharePoint, there are two general and very important components:
- The general configuration of service applications
- Setting up specific service application
Managing Service Applications
Managing service applications involves making connections between the service application and the web application, publishing service applications so that they can be consumed by other farms, connecting to service applications on remote farms, and performing other global activities. This section will take you through all the areas involved in enabling service application access for targeted users.
Connecting and Disconnecting Service Applications to Web Applications
It certainly makes sense that once you’ve enabled service applications in SharePoint, you’d want to connect them to the various web applications containing site collections and individual sites so that your users and customers can access all the collaboration services available.
As described earlier in this chapter, when you create a service application, a service application connection is also created. This connection, also called an application proxy, associates the service application to the web application using membership in the service application connection group, or the application proxy group.
When you create a new service application connection in Central Administration, it’s automatically added to the server farm’s Default group of service application connections, but this behavior can be circumvented. If you create the new service application in Windows PowerShell, the connection is not automatically added to the Default service group. If you so choose, you can add it to the Default group by using the -default parameter.
Exercise 4-6 will start you off with adding a service application group using Central Administration. You must be a member of the SharePoint Farm Administrators group to successfully complete this task.
Exercise 4-6: Adding a Service Application Connection Using Central Administration
1. From the Central Administration main page, click Application Management.
2. On the Application Management page, click Configure Service Application Associations under Service Applications.
3. On the Service Application Associations page, if necessary, use the View drop-down menu to select Web Applications.
4. In the list of web applications, in the Application Proxy Group column, click the name of the service application connection group you want to add or edit (Default may be the only option).
5. When the Configure Service Application Associations box appears, to add the service connection to the group, select the check box next to the desired service application, as shown here.
6. When finished, click OK.
To edit the page by adding or removing connections, access the Configure Service Application Associations box again and select or deselect the desired check boxes next to the service application names.

You can also manage custom but not default service applications connection from Application Management in Central Administration by clicking Manage Web Applications, selecting a web application, and then clicking Service Connection on the Web Applications tab on the Ribbon. Use the menu on the box that appears to select Custom and then select or deselect the desired check boxes.
You can also use Windows PowerShell to add and remove service application connections. Exercise 4-7 provides the instructions. The code included in the following activity is example code and not meant to be run “as is” in a production environment. To successfully accomplish this task, you must be a member of the SharePoint_Shell_Access role on the configuration database and a member of the WSS_ADMIN_WPG local group on the computer containing SharePoint 2010.
Exercise 4-7: Adding and Removing a Service Application Connection Using Windows PowerShell
1. Open Windows PowerShell.
2. To add a service application connection, type the following and then press Enter:
Add-SPServiceApplicationProxyGroupMember
[-Identity <the service application proxy group>]
[-Member <members to add to the service application proxy group>]
3. To remove a service application connection, type the following and then press Enter:
Remove-SPServiceApplicationProxyGroupMember
[-Identity <SPServiceApplicationProxyGroupPipeBind>]
[-Member <SPServiceApplicationProxyPipeBind[]>]
Allowing Trust Certificates to Be Exchanged between Farms
Up until this point, you have probably been thinking about configuring services on your server farm so they can be consumed by web applications and users with access to the farm; however, Chapter 2, “Planning and Deploying a SharePoint 2010 Installation and Upgrade,” outlined how to design a SharePoint deployment using a number of different multifarm topologies.
To allow cross-server farm access to resources, the SharePoint administrator must take a number of actions, such as exporting and copying certificates and establishing trust on both the consuming and publishing farms.
The administrator of the farm consuming the resource must provide two trust certificates to the farm publishing the resource: a root certificate and an STS certificate. The administrator of the publishing farm must provide a root certificate to the consuming farm. The following sections outline how to accomplish the required tasks.
All of the tasks in this section are performed using Windows PowerShell. Exercise 4-8 will show you how to exchange trust certificates between the publishing and consuming farms. This task must be performed in the consuming farm, and you must be a member of the SharePoint_Shell_Access role on the configuration database and a member of the WSS_ADMIN_WPG local group on the computer containing SharePoint 2010.
Exercise 4-8: Exporting Certificates Using Windows PowerShell
1. Open Windows PowerShell.
2. To export the root certificate from the consuming farm, type each of the following commands at the prompt and then press Enter after each command, replacing <C:ConsumingFarmRoot.cer> with the path of the root certificate:
$rootCert = (Get-SPCertificateAuthority).RootCertificate
$rootCert.Export("Cert") | Set-Content <C:ConsumingFarmRoot.cer> -Encoding byte
3. To export the STS certificate from the consuming farm, type the following commands and then press Enter after each command, replacing <C:ConsumingFarmSTS.cer> with the path of the STS certificate:
$stsCert = (Get-SPSecurityTokenServiceConfig).LocalLoginProvider.SigningCertificate
$stsCert.Export("Cert") | Set-Content <C:ConsumingFarmSTS.cer> -Encoding byte
4. To export the root certificate from the publishing farm, on a server running SharePoint in the publishing farm, type the following commands and then press Enter after each command, replacing <C:PublishingFarmRoot.cer> with the path of the root certificate:
$rootCert = (Get-SPCertificateAuthority).RootCertificate
$rootCert.Export("Cert") | Set-Content <C:PublishingFarmRoot.cer>-Encoding byte
The final task in this section, copying the certificates, is quite simple. Copy the root certificate and the STS certificate from the server in the consuming farm to the server in the publishing farm. Copy the root certificate from the server in the publishing farm to the server in the consuming farm.
Your next step is to establish trust on the consuming farm by importing the root certificate that you just copied from the publishing farm and then to create a trusted root authority using Windows PowerShell. Exercise 4-9 shows you how.
Each trusted root authority must have a unique name.
Exercise 4-9: Importing the Root Certificate and Creating a Trusted Root Authority on the Consuming Farm
1. Open Windows PowerShell.
2. On a server in the consuming farm, type the following commands at the command prompt and then press Enter, replacing <C:PublishingFarmRoot.cer> with the path of the root certificate that you copied to the consuming farm from the publishing farm and replacing <PublishingFarm> with a unique name that identifies the publishing farm:
$trustCert = Get-PfxCertificate <C:PublishingFarmRoot.cer>
New-SPTrustedRootAuthority <PublishingFarm> - Certificate $trustCert
Establishing trust on the publishing farm requires that you not only import the root certificate and create a trusted root authority but also import the STS certificate and create a trusted service token issuer. Exercise 4-10 outlines the details.
Exercise 4-10: Importing the Root and STS Certificates and Creating a Trusted Authority and Token Issuer
1. Open Windows PowerShell.
2. To import the root certificate and create a trusted root authority, on a server in the publishing farm, type the following commands at the prompt and then press Enter after each command, replacing <C:ConsumingFarmRoot.cer> with the name and location of the root certificate that you copied to the publishing farm from the consuming farm and replacing <ConsumingFarm> with a unique name that identifies the consuming farm:
$trustCert = Get-PfxCertificate <C:ConsumingFarmRoot.cer>
New-SPTrustedRootAuthority <ConsumingFarm> -Certificate $trustCert
3. To import the STS certificate and create a trusted service token issuer, type the following commands at the prompt and then press Enter after each command, replacing <C:ConsumingFarmSTS.cer> with the path of the STS certificate that you copied to the publishing farm from the consuming farm and replacing <ConsumingFarm> with a unique name that identifies the consuming farm:
$stsCert = Get-PfxCertificate <c:ConsumingFarmSTS.cer>
New-SPTrustedServiceTokenIssuer <ConsumingFarm> -Certificate $stsCert
Each trusted root authority must have a unique name, and each trusted service token issuer must have a unique name.
Publishing Service Applications
As you may recall from Chapter 2, some service applications can be published across farms and made available over remote connections:
- Business Data Connectivity
- Managed Metadata
- People
- Search
- Secure Store
- Web Analytics
Publishing these service applications across farms first requires that you establish a trust between the publishing and consuming farms, as you did in the previous section of this chapter.
Publishing cross-farm service applications lets you offer a single service to numerous farms so that you can optimize your resources and avoid redundant service publication. You can also provide enterprise-wide services without having to deploy a dedicated enterprise services farm.
You have the option of publishing a cross-farm service application using either Central Administration or Windows PowerShell. Exercise 4-11 shows you how to use Central Administration to accomplish the task. You must be a member of the SharePoint Farm Administrators group to complete the exercise successfully.
When you click a service, you are clicking the service name the way you click a hyperlink. When you click a row, you click next to the link to select the row but not actually open the service.
Exercise 4-11: Publishing a Service Application Using Central Administration
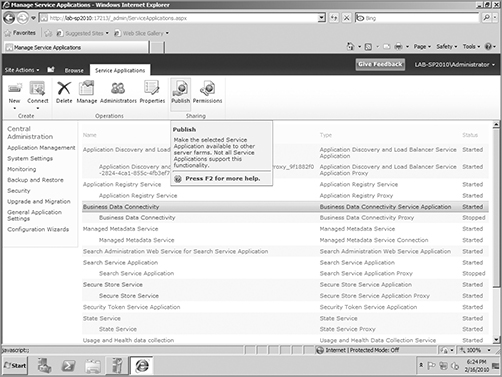
1. On the Central Administration main page, click Application Management. On the Application Management page, click Manage Service Applications under Service Applications.
2. Click the row for the service application you want to publish to select it. On the Ribbon, click Publish, as shown here.
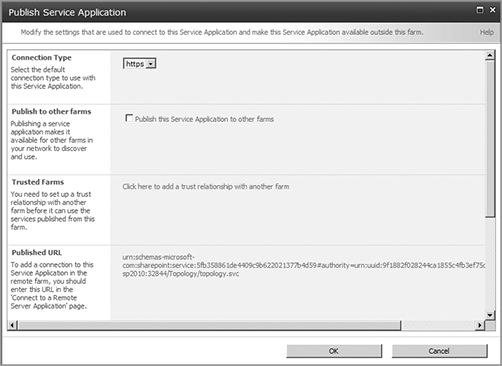
3. When the Publish Service Application box appears, use the Connection Type drop-down menu to select the desired connection type, as shown here.
4. Select the Publish This Service Applications To Other Farms check box.
5. Under Published URL, copy the URL string to a text editor so that the string can be provided to the remote farms so they can connect to your published service application.
Copy this information down and save it. You’ll need it for Exercise 4-13.
6. Under Description Text, you can provide an optional description of the link in the Description field for the administrators of remote farms connecting to the service application.
7. In the Information URL field, you can provide a “human-friendly” URL that will be displayed to the administrators of remote farms connecting to the service application.
8. When you are done, click OK.
You can perform the same task using Windows PowerShell. Exercise 4-12 will show you how. You must be a member of the SharePoint_Shell_Access role on the configuration database and a member of the WSS_ADMIN_WPG local group on the computer containing SharePoint 2010.
Exercise 4-12: Publishing a Service Application Using Windows PowerShell
1. Open Windows PowerShell.
2. At the command prompt, type the following command and then press Enter, making note of the output so you can provide the information to the administrators of connecting remote farms:
Publish-SPServiceApplication -Identity <GUID of the service application>
3. At the prompt, type the following and press Enter to provide other farms with the data required for them to consume your published service application:
Get-SPTopologyServiceApplication
Save the output from the Get-SPTopologyServiceApplication command. You’ll need it for Exercise 4-14.
Connecting to a Service Application on a Remote Farm
Once a service application is published, it can be used by a remote farm as a resource when connecting to that resource on the source farm. Now that there is a service application available for cross-farm consumption, you can go through the process of making the connection to that application.
Performing connection tasks is very similar to performing the publishing tasks. You can use either Central Administration or Windows PowerShell. Exercise 4-13 will show you how to use Central Administration to connect to a service application on a remote farm. You must be a member of the SharePoint Farm Administrators group to successfully complete this exercise.
Exercise 4-13: Connecting to a Remote Service Application Using Central Administration
1. On the Central Administration main page, click Application Management. Then on the Application Management page, click Manage Service Applications under Service Applications.
2. On the Ribbon, open the Connect drop-down menu and select the desired service application.
3. When the Connect To A Remote Service Application field appears, paste or type the URL you gathered in step 5 of Exercise 4-11 in the field; then click OK.
4. In the new Connect To A Remote Service Application dialog box, click the row containing the name of the desired service application, select the check box to add the service application to the farm’s default list of service application selections, and then click OK.
5. When prompted, either accept the default entry or type a new name for the connection in the Connection Name field; then click OK.
6. Click OK again to finish the process.
7. To associate the new service application with a local web application, see Exercise 4-6 or 4.7.
You can also accomplish this task using Windows PowerShell. Exercise 4-14 will show you the steps. You must be a member of the SharePoint_Shell_Access role on the configuration database and a member of the WSS_ADMIN_WPG local group on the computer containing SharePoint 2010.
Exercise 4-14: Connecting to a Remote Service Application Using Windows PowerShell
1. Open Windows PowerShell.
2. At the command prompt, type the following command and then press Enter, replacing <Publishing farm topology service URL> with the output of the Get-SPTopologyServiceApplication command you ran in step 4 of Exercise 4-12:
Receive-SPSharedServiceApplicationInfo -FarmUrl <Publishing farm topology service URL>
3. At the prompt, type the following command and then press Enter:
New-SP*ServiceApplicationProxy cmdlet -Name <Unique name for the service application proxy> -Url <URL of the published service application>
4. To associate the new service application with a local web application, see Exercise 4-6 or 4.7.

Working with Another Administrator to Share Resources
Although you may get the idea from the textbook scenarios that you’ll be the only SharePoint administrator in your company, in fact there will be an entire collection of technical staff members who are all working together to integrate each of their areas into the overall purpose and goal of the business. When you create a resource, such as a Secure Store Service service application in your server farm, administrators of other server farms will want to have access to the resource so they don’t have to duplicate the effort.
Remember, part of the planning process you go through before you install and deploy SharePoint is defining which server farms will contain which specific resources and defining how those resources will be shared among other server farms for the organization. You may have immediate control and responsibility over your individual farm environment, but you must plan and manage as part of a much larger team.
Also, as part of that team, you can benefit from the work of the other SharePoint administrators, accessing their resources remotely so the users connecting to web applications on your farm can be more productive.
Deleting a Service Application
As with the other related exercises, you can also delete a service application using either Central Administration or Windows PowerShell. The tasks are substantially similar to creating a service application, and you may have even noticed the option to do so on the Service Application page in Central Administration.
This is how you delete a service application in Central Administration:
1. Navigate to Central Administration, click Application Management, and then click Manage Service Applications.
2. On the page that appears, click the row containing the service application you want to delete and then click Delete in the Ribbon.
3. When the confirmation box appears, select the check box next to Delete Data Associated With Service Applications to remove the service application database.
4. When you’re finished, click OK to complete the action.
If you wanted to delete the service application but retain the database, in step 3 do not select the check box.
To perform the same task in Windows PowerShell, do the following:
1. In Windows PowerShell at the prompt, type the following and then press Enter to retrieve the service application you want to delete:
$spapp = Get-SPServiceApplication -Name "<Service application display name>"
2. To delete the selected service application but retain the associated database, type the following at the prompt and then press Enter:
Remove-SPServiceApplication $spapp
3. To delete both the selected service application and the database, type the following at the prompt and press Enter:
Remove-SPServiceApplication $spapp -RemoveData
You will receive a confirmation message to which you type Y and then press Enter. Another message will appear letting you know the operation is being performed.
Configuring Individual Service Applications
The content in this part of the chapter is probably what you think about when you consider configuring services in SharePoint. It’s certainly the content that the end users, partners, and customers you support think about. The services that the user sees in SharePoint are the tools that they use: Access Services, Excel Services, Visio Services, and the like.
The following sections contain the exercises necessary to create, configure, and use these services. This is the point in SharePoint where your work as an administrator directly touches the people who depend on you and upon SharePoint to make sure their jobs get done.
Managing Access Services
Access Services is new in SharePoint Server 2010 and allows people to host Access databases directly within SharePoint. You can create, edit, and update linked Access 2010 databases and then view them directly in SharePoint. Once an Access database is linked to SharePoint, any changes you make to the database are almost instantly reflected in what you see in SharePoint.
Exercise 4-15 gives you the opportunity to configure Access Services in SharePoint using Central Administration. This is the only step in allowing your users to take advantage of this new SharePoint feature; however, subsequent exercises will show you how to modify the default configuration settings to more closely fit your organization’s business needs. You must be a site administrator for the Access Services service application and have the Designer permissions to successfully complete this exercise.
Exercise 4-15: Configuring Access Services in Central Administration
1. On the Central Administration main page, click Manage Service Applications under Application Management.
2. In the list on the Manage Service Applications page, select the desired Access service you want to configure.
3. On the Access Services Settings page, under Lists and Queries, enter a value from 1 to 255 for Maximum Columns Per Query, with 32 being the default value.
4. Set the Maximum Rows Per Query setting to a value between 1 and 200000, with 50000 being the default.
5. Set the Maximum Sources Per Query setting to a value between 1 and 20, with 8 being the default.
6. Set the Maximum Calculated Columns Per Query setting to a value between 0 to 32, with 10 being the default.
7. Set the Maximum Order By Clauses Per Query setting to a value between 1 and 8, with 4 being the default.
8. Set Allow Outer Joins by selecting or clearing the check box Outer Joins Allowed, with inner joins always being allowed.
9. Set Allow Non Remote-able Queries by selecting or clearing the Remote-able Queries Allowed check box.
10. Set Maximum Records Per Table to any positive integer, with 500000 being the default and –1 indicating that there is no limit.
11. Under Application Objects, set Maximum Application Log Size to any positive integer, with the default being 3000 and –1 indicating that there is no limit.
12. Under Session Management, set Maximum Request Duration in seconds to a value between 1 and 2007360 (24 days), with a default value of 30 and with –1 meaning there is no limit.
13. Set Maximum Sessions Per User to any positive integer, with a default of 10 and with –1 meaning there is no limit.
14. Set Maximum Sessions Per Anonymous User to any positive integer, with a default of 25 and with –1 meaning there is no limit.
15. Set Cache Timeout to a value in seconds between 1 and 2007360 (24 days), with a default of 300 and with –1 meaning there is no limit.
16. Set Maximum Session Memory to a value in megabytes between 0 (disable) and 4095, with a default of 64.
17. Under Memory Utilization, set Maximum Private Bytes (In MB) to any positive integer, with a default of –1 indicating the use of 50 percent of the physical memory on the computer.
18. Under Templates, set Maximum Template Size (In MB) to any positive integer, with a default of 30 and with –1 indicating there is no limit.
19. When you are done, click OK.
You may have to create an Access Services application before you can configure it in your SharePoint deployment. Exercise 4-16 will show you how to create and delete such an application in Central Administration. You must be an administrator of the Access Services service application to successfully perform this task.
Exercise 4-16: Adding and Deleting an Access Service Application
1. From the Central Administration main page, click Manage Service Applications under Application Management.
2. On the Ribbon, open the New menu and select Access Services.
3. When the Create page opens, give the new service application a name in the Service Application Name field.
4. In the Database Name field, either accept the default database or enter a new database server and name.
5. Choose an existing application pool or create a new one.
6. Choose whether to create an Access Services application proxy.
7. When finished, click OK.
8. When you want to delete an Access Services service application, in Central Administration, under Application Management, click Manage Service Applications.
9. On the Manage Service Applications page, select the Access Services service application you want to delete.
10. On the Ribbon, click Delete.
11. When the confirmation dialog box appears, click OK.
Once you have enabled Access Services, you can use these services in a variety of ways. Each of the following methods presented requires that you have Designer permissions. Five web database templates are provided for Access Services users, and sites can be created from these templates, just like using any other site template in SharePoint.
- Assets Web Database
- Charitable Contributions Web Database
- Contacts Web Database
- Issues Web Database
- Projects Web Database
Using a Web Template to Create an Access Services Website
The following procedure uses Central Administration as a starting point.
1. On the Central Administration main page, click Site Actions; then click New Site.
2. On the New SharePoint site page, give the new site a name in the Title field and an optional description in the Description field.
3. In the URL name field, append a descriptive name to the URL for the new site.
4. Under Template Selection, select the Web Databases tab.
5. In the Select A Template area, select the desired template.
6. Under Permissions, choose either to use the same permissions as the parent site or to use unique permissions.
7. Under Navigation, choose whether to display the site on the top link bar of the parent site.
8. Under Navigation Inheritance, choose whether to use the top link bar from the parent site.
9. Click Create.
Make note of the URL for the Access Services website. You’ll need the URL for the next task.
Uploading an Offline Access Template to SharePoint
There are also methods of uploading and modifying templates from Microsoft Access 2010 to SharePoint.
1. Open Microsoft Access 2010 and then open the desired template.
2. If necessary, make modifications to the template and then save the template locally in Access.
3. Select the Access Office button, point to Share, and then click Publish To Access Services, as shown in Figure 4-2.
4. Choose Save As and then click the Address bar.
5. Type the URL of your Access Services site.
6. Give the file a name and then click Save.
Managing Excel Services
If you’re familiar with MOSS 2007, you know how versatile and useful Excel Services are in allowing users to view and share Excel workbooks in SharePoint. In SharePoint Server 2010, this service application also enables data-connected Excel Services workbooks and worksheets to be refreshed and updated from a variety of data sources.
Enabling and configuring Excel Services is substantially similar to when you enabled Access Services in Exercise 4-15. In Exercise 4-17, you’ll perform the steps yourself.
Exercise 4-17: Configuring Excel Services in Central Administration
1. On the Central Administration main page, click Manage Service Applications under Application Management.
2. On the Service Applications page, click Excel Services.
3. On the Manage Excel Services page, click Global Settings.
4. For the File Access method under Security, select one of the following:
- Select Impersonation to enable Excel Calculation Services (ECS) to authorize users who attempt to access workbooks stored in HTTP and UNC locations.
- Select Process Account if you have ECS application servers opening workbooks in HTTP and UNC locations. Under Connection Encryption, select either Not Required or Required.
- Under Allow Cross Domain Access, select Allow Cross Domain Access to display files from one HTTP domain to another.
5. Under Load Balancing and then under Load BalancingScheme, select one of the following:
- Select Workbook URL to specify which ECS process opens a workbook and to ensure requests from a specific workbook are always sent to the same ECS server.
- Select Round-Robin With Health Check to determine which ECS process is used to open a workbook.
- Select Local if the ECS process available is local to the server computer where the workbook is located.
6. Under Session Management, type the maximum number of sessions with Excel Services that an individual user is allowed per ECS application server in the Maximum Sessions Per User field, where –1 indicates no limit and 25 is the default value.
7. In the Maximum Private Bytes field under Memory Utilization, type the value in megabytes for the maximum amount that an ECS process can use, where –1 indicates a value equaling 50 percent of the physical memory on the server machine.
8. In the Maximum Size Of Workbook Cache field, type the value in megabytes that you want allocated to workbooks being used by Excel Services.
9. Select the Caching Enabled check box to allow caching of objects not being used in any sessions.
10. Under External Data and under Unattended Service Account, type the target application ID from the Secure Store Service in the Application ID field.
11. When you are finished, click OK.
Step 10 in Exercise 4-17 addresses the unattended service account, which is an account ECS can impersonate when making a data connection using a non–Windows Secure Store Service authentication or a None authentication method. If you require such connections and you do not configure this feature, the authentication will fail.
Once Excel Services is enabled, you can extend the ECS capacities from Central Administration in a number of ways to add and modify user-defined functions (UDFs).
To configure UDF support, you must enable UDFs on all trusted file locations containing workbooks that need to access UDFs, and you must register UDF assemblies on the Excel Services user-defined function assembly list. You must be a local administrator on the server machine containing the Central Administration site. With those permissions, you can also delegate Excel Services administrator permissions without granting access to manage other Central Administration services or features.
Exercise 4-18 will show you how to enable UDFs on trusted file locations using Central Administration.
Exercise 4-18: Enabling User-Defined Functions for Trusted Site Locations Using Central Administration
1. On the Central Administration main page, click Manage Service Applications under Application Management.
2. On the Manage Service Applications page, click the Excel Services Web Service Application.
3. On the Manage Excel Services page, click Trusted File Locations.
4. On the Trusted File Locations page, click the trusted file on which you want to enable user-defined functions.
5. On the Edit Trusted File Location page, select the User-Defined Functions Allowed check box under User-Defined Functions.
Once you’ve enabled user-defined functions, you can manage, add, edit, and delete a user-defined function assembly. Exercise 4-19 takes you through this set of processes.
Exercise 4-19: Managing Excel Services User-Defined Function Assemblies
1. On the Central Administration main page, click Manage Service Applications under Application Management.
2. On the Manage Service Applications page, click the Excel Services Web Service Application.
3. On the Manage Excel Services page, click User Defined Function Assemblies.
4. On the Excel Services User Defined Functions page, click Add User-Defined Function Assembly.
5. On the Add User-Defined Function Assembly page, under Assembly, type the path of the assembly containing the user-defined functions in the Assembly field.
6. Under Assembly Location, select either Global Assembly Cache to indicate a global location where signed assemblies are deployed or File Path to indicate a local or network share.
7. Under Enable Assembly, select the Assembly Enabled check box to let ECS call the assembly and then type an optional description in the Description field.
8. Click OK to add the assembly.
9. To edit the assembly, on the Excel Services User Defined Functions page, click the UDF assembly you want to edit, click the arrow that appears, and then click Edit.
10. To delete the assembly, click the UDF assembly you want to delete on the Excel Services User Defined Functions page, click the arrow that appears, and then click Delete.
11. When the confirmation box appears, click OK.
Managing PerformancePoint Services
PerformancePoint Server 2007, once a separate Microsoft product, has been merged into SharePoint Server 2010 and is now called PerformancePoint Services for SharePoint. This consolidates the dashboard, scorecard, and analytical features of PerformancePoint directly into SharePoint, expanding SharePoint’s business intelligence abilities by tying PerformancePoint capacities to SharePoint’s Excel Services and other business intelligence (BI) tools.
Although you can enable and configure PerformancePoint Services using the Farm Configuration Wizard, if you are running SharePoint as a single-server deployment with Microsoft SQL Server, you can instead set up PerformancePoint manually.
If you have performed a clean installation of Microsoft SharePoint Server 2010 on a single server with a built-in database, PerformancePoint Services is configured for you. That means, in the test setup for this book, you don’t need to take any further action to enable and configure PerformancePoint Services.
If you choose to configure PerformancePoint Services manually, the general list of required activities includes the following:
- Creating one or more web applications in SharePoint
- Creating one or more service applications in SharePoint
- Enabling PerformancePoint site and site collection features
PerformancePoint Services data source connections are located in document libraries, while the data content, such as KPIs and scorecards, is located in lists. Each library and list containing SharePoint Services data and data source connections must be set up as a trusted source. You can mark either all of your lists and libraries as trusted or only those that contain PerformancePoint services data and data connections.
Once PerformancePoint Services is up and running, you can launch PerformancePoint Dashboard Designer from a site or site collection and start creating dashboards, KPIs, and scorecards, as well as publishing those items that already exist. The PerformancePoint Dashboard Designer is typically launched from the Business Intelligence Center, but you can set it up to be launched from other sites.
The first step in manually configuring PerformancePoint Services is to create a web application. In Chapter 2, see Exercise 2-4 for basic instructions on creating a web application. Also see Chapter 9, “Managing Web Applications and Host Sites.”
The easiest way to create a PerformancePoint Services site is to select the Business Intelligence Center template while going through the Farm Configuration Wizard; however, you can also add PerformancePoint Services content to any existing site manually. Exercise 4-20 shows you how this is done.
Exercise 4-20: Enabling PerformancePoint Services for a Site Manually
1. On the parent site for the site collection where you want to enable PerformancePoint Services, click Site Actions and then click Site Settings.
2. On the Site Settings page, select Site Collection Features under Site Collection Administration.
3. On the Features page, click Activate next to SharePoint Server Publishing Infrastructure in the list of features that appears.
4. After the Active Status button appears, navigate to the site for which you want to enable PerformancePoint Services as a site feature.
5. Click Site Actions and then click Site Settings.
6. On the Site Settings page, click Manage Site Features under Site Actions.
7. In the list of features that appears, click Activate next to PerformancePoint Services Site features and wait until the Active status button appears.
The PerformancePoint Site Template option will appear as a site template under the Enterprise tab once you have enabled PerformancePoint Services as a site collection feature.
Once you have enabled SharePoint Publishing Infrastructure and PerformancePoint Services for site collections and sites, to continue to manually configure PerformancePoint Services, you must create a service application. You have performed very similar tasks earlier in this chapter, and the steps are virtually the same for creating a service application for PerformancePoint Services as it is for Access Services.
See Exercise 4-16 for a walk-through, and substitute PerformancePoint Services for Access Services in the instructions.
After either selecting an existing application pool or creating a new one, you can choose the optional step of selecting Register A New Managed Account. If you do so, you will need to create a new managed account and use it as the application pool identity by running the following Windows PowerShell script:
PS> $w = Get-SPWebApplication -identity <your web application>
PS> $w.GrantAccessToProcessIdentity("<insert service account>")
This is required to allow access to the associated content database. This will grant db_owner access to SharePoint Foundation content databases, but PerformancePoint Services will not function if you do not do so. Remember, this script must be run only if you select the optional Register A New Managed Account option before creating the service application.
You may have to start the PerformancePoint Services service on the server computer. To review the steps for doing so, see Exercise 4-2 or Exercise 4-3.
The next step in the manual configuration process is to configure the Secure Store Service and proxy, which are required in order to store the unattended service account’s password for the PerformancePoint Services service application. The unattended service account is a shared domain account used to access the PerformancePoint Services data sources. See the section “Configuring the Secure Store Service” later in this chapter.
Now you need to verify that the service application connection, the PerformancePoint Services service application, and the Secure Store Service are all associated with the web application.
To do this in Central Administration, click Manage Web Applications under Application Management. Then on the Web Applications tab, click Service Connections. You should see the default group of service applications, but if you didn’t choose Make This Application Service The Default when you created the PerformancePoint Services service application, it won’t appear in this list. Use the drop-down menu and switch from Default to Custom if you don’t see the PerformancePoint Services service application in the default list.
Once you have PerformancePoint Services up and running, quite a lot of options are available to you. However, you must remember that PerformancePoint was once a separate server product. You may have content on PerformancePoint Server 2007 that you want to import into SharePoint. The following will walk you through the steps of how this is done. To actually perform this task, you will need to have a separate PerformancePoint Server 2007 product running and a SQL Server that contains valid content.
Importing Data from PerformancePoint Server 2007 into SharePoint
To import data, follow these steps:
1. In SharePoint, go to the main page of Central Administration.
2. Under Application Management, click Manage Service Applications.
3. Select the PerformancePoint Service application from the list on the page that appears.
4. On the Ribbon, click Manage to open the PerformancePoint Services settings page.
5. When the page appears, click Import PerformancePoint Server 2007 Content.
6. When the import wizard launches, click Next.
7. Type the name and instance of the SQL Server instance used for PerformancePoint Server 2007 content in the available field.
8. Select the authentication method, enter a valid username and password, and then click Next.
9. Select the database you want to import, such as the default name PPSMonitoring, and then click Next.
10. Select a site collection, site, and list where you want to import the Dashboard items and then click Next.
11. In the site collection you selected in the previous step, select a site and document library where you want to import your data sources and then click Next.
12. Review your settings on the page that appears; if you are satisfied, click Import.
13. After the import completes, on the results page, look for any errors indicating items that didn’t import.
14. Click View List or View Library to review the data that was successfully imported, if desired.
15. When finished, click Done to close the wizard.
Configuring the Secure Store Service
The Secure Store Service is used by SharePoint Server 2010 to allow designers to create target applications that map user and group credentials to the credentials of external data sources. This lets external content types in the Business Data Connectivity (BDC) service read, write, create, and edit content stored in the external data sources. You also read in the previous section of this chapter that you must enable the Secure Store Service in order to be able to use PerformancePoint Services.
This section will present you with the necessary steps to enable the Secure Store Service application in SharePoint. The first task is to provide a passphrase that will be used to generate a key used to encrypt and decrypt the credentials stored in the Secure Store Service database. You must be a Service Application Administrator for the desired instance of the Secure Store Service.
The passphrase must contain at least eight characters, which can be uppercase, lowercase, numerals, and the following special characters:
! " # $ % & ‘ ( ) * + , - . / : ; < = > ? @ [ ] ^ _ ` { | } ~
Initializing an Instance of a Secure Store Service Application
To initialize an instance of a secure store service application, follow these steps:
1. Select the desired instance of a Secure Store Service application and then click the Edit tab.
2. Under Key Management, click Generate New Key.
3. On the Generate New Key page, type the passphrase in the Pass Phrase field. Then type the same passphrase again in the Confirm Pass Phrase field.
4. Click OK to generate the key.

The passphrase isn’t stored, so you should write it down and keep it in a safe place.
The steps in the previous task also show how to generate a new encryption key should you desire. You can also force the Secure Store Service database to be reencrypted using the new key.
You may have to refresh the encryption key if you add a new application server, restore a previously backed up Secure Store Service database, or receive an “Unable to get master key error” message. The following steps show you this procedure. You will need to belong to the Service Application Administrator group for the instance of the Secure Store Service.
Refreshing a Secure Store Service Application Encryption Key
To refresh a secure store service application encryption key, follow these steps:
1. Select the desired instance of a Secure Store Service application and then click the Edit tab.
2. Under Key Management, click Refresh Key.
3. In the Pass Phrase field, type the passphrase you initially used to generate the encryption key and then click OK.
At this point, you are ready to create a target application so that you can map user, group, or claim credentials to a set of credentials on an external data source. After you create the target application, associate it with the external content type or application model so you can gain access to the external data source. You will need to be a Service Application Administrator for the instance of the Secure Store Service.
Creating a Target Application
To create the target application, follow these steps:
1. Select the desired instance of a Secure Store Service application; then click the Edit tab.
2. Under Manage Target Applications, click New.
3. Type a text string in the Target Application ID field that will be used by the Secure Store Service application as a unique identifier for the target application.
4. In the Display Name field, type the text string you want to use to display the identifier.
5. In the Contact Email field, type the email address of the primary contact person for this application.
6. If you desire, in the Target Application Page URL, enter the URL of a custom web page so users can add their credentials for the destination data source and then select one of the following:
- Use Provided Page if you want users to add their credentials automatically when accessing the page.
- Use Custom Page if you want users to provide their credentials manually when accessing the page.
- Use None to not provide a sign-up page, which requires the Secure Store Service administrator to add individual credentials.
7. In the Target Application Type field, type either Group for group credentials or Individual for individual credentials to be mapped to the external data source.
8. Select the Windows check box if the credentials on the external data source are Windows credentials.
9. Click Next.
10. In the Specify the credential fields for your Secure Store Target Application, enter the required information in the available fields to provide credentials to the external data source, such as username and password.
11. To create an additional field on this page for credentials, click Add Field and then use one of the following field types:
- Generic for values that do not apply to any other field types
- User Name for usernames
- Password for passwords
- PIN for personal identification numbers
- Windows User Name for a username on a Windows account
- Windows Password for the password on a user’s Windows account
12. When you are done, click Next.
13. On the Specify The Membership Settings page, list all the users you want to be able to manage the target application settings in the Target Application Administrators field.
14. If the target application type is a group, list the required user groups in the Members field.
15. When you are done, click OK.
Managing Visio Services
Like Access Services and Excel Services, the Visio Graphics Service lets users view and share Visio diagrams in SharePoint. When you data-connect a Visio diagram in SharePoint, the diagram refreshes in SharePoint whenever it is modified at the source.
The following group of exercises demonstrates how to enable Visio services in SharePoint if you have not already enabled them using the Farm Configuration Wizard.
Creating and deleting the Visio Graphics Service in Central Administration is virtually identical to performing the same tasks for other services such as Access Services and Excel Services; however, you can also create and delete the service using Windows PowerShell. You must be a member of the SharePoint_Shell_Access role on the configuration database and a member of the WSS_ADMIN_WPG local group on the computer containing SharePoint 2010 Products.
Creating and Deleting the Visio Services Service Application Using Windows PowerShell
Follow these steps:
1. Open Windows PowerShell. At the prompt, type the following and press Enter:
New-SPVisioServiceApplication <ServiceAppName>
-serviceapplicationpool <AppPoolName> -AddToDefaultGroup
You must substitute the correct values for the service application name and the application pool name where indicated.
2. To delete the service application, type the following at the prompt and then press Enter:
Remove-SPServiceApplication <ServiceAppName>
You must substitute the correct value for the service application name where indicated.
You can also view a list of all Visio Services service applications via Windows PowerShell using the command Get-SPVisioServiceApplication.
Creating and Deleting a Visio Graphics Services Service Applications Proxy Using Windows PowerShell
Creating and deleting a Visio Graphics Services service applications proxy can also be done using Windows PowerShell. A service applications proxy allows other farms to access and use the service application remotely.
1. To create the Visio Graphics Services service application proxy, at the Windows PowerShell prompt type the following and then press Enter, using the correct service application name:
New-SPVisioServiceApplicationProxy <ServiceAppName>
2. To delete the service application proxy, type the following and press Enter, using the correct proxy ID:
Remove-SPServiceApplicationProxy <ProxyID>
You can also view a list of all Visio Graphics Service service applications via Windows PowerShell using the command Get-SPVisioServiceApplicationProxy.
Earlier in the chapter, you learned about global settings for service applications. You can set global settings for Visio Graphics Services in the same way you did for Excel Services in Exercise 4-17.
Configuring Global Settings for the Visio Graphics Service
From Central Administration, once you click Manage Service Applications under Application Management and then click the Visio Graphics Services service application you want to configure, perform the following steps:
1. Set the Maximum Diagram Size value in megabytes that can be rendered, setting smaller sizes for servers under heavy loads in order to manage performance speeds.
2. Set the Minimum Cache Age value in minutes that a diagram remains cached in memory, with smaller values allowing for more frequent data refresh operations.
3. Set the Maximum Cache Age value in minutes, after which time the diagrams will be cleared.
4. Set the Maximum Recalc value in seconds before refresh operations time out.
5. Set External Data when using external data sources and when you require the Secure Store Services to be operational and configured to provide credentials to the correct external source.
6. When you are finished, click OK.
Generally, the smaller the values you configure for cache age, the more CPU and memory performance you’re asking out of your server.
Configuring Global Settings for Visio Graphics Service with Windows PowerShell
You can perform the same action using Windows PowerShell, which requires that you belong to the SharePoint_Shell_Access role on the configuration database and that you’re a member of the WSS_ADMIN_WPG local group on the computer that contains SharePoint 2010. Open Windows PowerShell, and at the prompt follow these steps:
1. To manage the performance parameters in the service application, type the following and then press Enter, typing in the actual values for minutes, size in megabytes, seconds, minutes, and Visio service application you see represented in the code:
Set-SPVisioPerformance -MaxDiagramCacheAge <Minutes>
-MaxDiagramSize <SizeMB> -MaxRecalcDuration <Seconds>
-MinDiagramCacheAge <Minutes> VisioServiceApplication <VisioServiceApp>
2. To manage the data configuration parameters in the service application, type the following and then press Enter, typing the actual values for VisioServiceApp and ApplicationID you see represented in the code:
Set-SPVisioExternalData
-VisioServiceApplication <VisioServiceApp> -UnattendedServiceAccountApplicationID <ApplicationID>
Trusted data providers are external databases used by Excel Services and Visio Graphics Services that are specifically trusted by these services when processing information. You can create a trusted data provider for Visio Graphics Services in either Central Administration or Windows PowerShell.
Creating a Trusted Data Provider for Visio Graphics Services in Central Administration
To create a trusted data provider for the Visio Graphics Service in Central Administration, follow these steps:
1. On the Central Administration main page, click Manage Service Applications under Application Management.
2. Click the Visio Graphics Service service application where you want to create a trusted data provider.
3. Click Trusted Data Providers.
4. Click Add A New Trusted Data Provider.
5. Enter the provider ID in the Trusted Data Provider ID field.
6. Enter the provider type in the Trusted Data Provider Type field.
7. Enter a description of the trusted data provider in the Trusted Data Provider Type Description field.
8. When you are finished, click OK.
If you want to edit a trusted data provider, follow the steps listed previously and in step 4 click Edit Trusted Data Provider. Edit the information and then click OK. To delete a trusted data provider, click Delete Trusted Data Provider in step 4.
Managing a Trusted Data Provider for Visio Graphics Services Using Windows PowerShell
You can manage Visio Graphics Services the same way using Windows PowerShell:
1. To create a trusted data provider for the Visio Graphics Service, type the following at the Windows PowerShell prompt and then press Enter, providing the proper parameters:
New-SPVisioSafeDataProvider -DataProviderId <ProviderID> -DataProviderType <Int32> VisioServiceApplication <VisioServiceApp>
2. To edit a trusted data provider, type the following at the prompt and then press Enter, providing the proper parameters:
Set-SPVisioSafeDataProvider -DataProviderId <ProviderID> -DataProviderType <Int32> -Description <String>
-VisioServiceApplication <VisioServiceApp>
3. To delete a trusted data provider, type the following at the prompt and then press Enter, providing the proper parameters:
Remove-SPVisioSafeDataProvider -DataProviderId <ProviderID> -DataProviderType <Int32> -VisioServiceApplication <VisioServiceApp>
Although this chapter has certainly covered a representative sample of the individual service applications that can be configured in SharePoint, it by no means is exhaustive. Chapter 5, “Configuring Indexing and Search,” will address the configuration of search services, and Chapter 6, “Managing Operational Settings,” shows how to create and set up others, such as InfoPath Forms Services and User Profile Services configuration.
Summary
In this chapter, you received a summary on creating and configuring SharePoint Server 2010 service applications.
- Using the Farm Configuration Wizard to set up your service applications in a single process
- Managing services on servers in the farm
- Performing the initial configuration tasks for services in SharePoint, including global settings
- Creating and managing individual service applications and service application proxies
- Connecting to service applications on a remote farm
- The introduction of individual service applications such as Access Services, Excel Services, and Visio Graphics Services
Exam Essentials
Understanding the Various Tasks Required to Set Up Services and Service Applications Set up the general environment supporting the creation and configuration of services and service applications in SharePoint, including the ability to access service applications on remote server farms.
Configuring Service Applications and Service Application Proxies for Individual Services Perform the mandatory and optional tasks to enable SharePoint users to take advantage of the many services available.
Review Questions
1. You are a SharePoint administrator for your organization. You are ready to deploy service applications to SharePoint so your users can access the many advantages SharePoint offers. Of the following options, which is the most straightforward method of service application deployment?
A. In Central Administration, click Manage Services On A Server under System Settings and then configure services applications for the server farm.
B. In Central Administration, click Manage Service Applications under Application Management. Then click New, select each service application in turn, and configure the service.
C. In Central Administration, click Manage Services On A Server Farm under System Settings and then launch the Farm Configuration Wizard.
D. In Central Administration, click Configuration Wizards in the Quick Launch menu and then click Launch The Farm Configuration Wizard.
2. You are the SharePoint administrator for your organization, and you are in the process of setting up your server farm for service applications. You are performing the initial tasks for services configuration and need to start and stop various services on your server farm servers besides using the SharePoint Farm Configuration Wizard. Of the following options, which is the most correct procedure for managing services on multiple servers?
A. At the desired server, click Start All Programs Administrative Tools, click Services, and then click the service you want to start or stop.
B. At the desired server, click Start Control Panel Administrative Tools, click Services, and then click the service you want to start or stop.
C. At the Central Administration main page, click System Settings, click Manage Services On The Server Farm, and then click the service you want to start or stop.
D. At the Central Administration main page, click System Settings, click Manage Services On Server, click Change Server, select the desired server’s name, and then select the service you want to start or stop.
3. Once you create a service application, it must be connected to a web application to be accessible by users on the sites in site collections that are dependent on the web application. As the SharePoint administrator for your company, what should you do to connect a service application to the desired web application?
A. You can use either Central Administration or Windows PowerShell.
B. You can use Central Administration only.
C. You can use Windows PowerShell only.
D. You must perform separate tasks in both Central Administration and Windows PowerShell.
4. You are the SharePoint administrator for your organization, and you’ve been tasked with configuring your local SharePoint server farm environment to be able to consume application resources on other server farms within the organization managed by other administrators. To do this, you must perform various tasks to allow trust certificates to be exchanged between server farms. Of the following options, what is true about these tasks?
A. You can use either Central Administration or Windows PowerShell to perform the related tasks.
B. You can only use Central Administration to perform the related tasks.
C. You can only use Windows PowerShell to perform the related tasks.
D. You must perform separate tasks in both Central Administration and Windows PowerShell.
5. You must perform a wide variety of tasks as a SharePoint administrator using Windows PowerShell when configuring service applications, yet for each of these PowerShell-related activities, you require the same set of credentials. Of the following, which are the required credentials? (Choose all that apply.)
A. You must be a member of the SharePoint_Shell_Access group.
B. You must be a member of the SharePoint Farm Administrators group.
C. You must be a member of the WSS_ADMIN_WPG local group on the computer containing SharePoint 2010 Products.
D. You must be a member of the processadmin group for the SQL database containing the application service data.
6. You are a SharePoint administrator for your organization, and you are in the process of publishing certain services for consumption by other server farms in the SharePoint environment. During the publication process, you must acquire a specific piece of information to give to the administrator of the server farm that will be consuming your published service. Of the following options, which are true about what you must provide? (Choose all that apply.)
A. When you publish the service application in Central Administration, you must acquire the URL to the published service.
B. When you publish the service application in Central Administration, you must acquire the FQDN to the published service.
C. When you publish the service application using Windows PowerShell, you must acquire the URL to the published service using the Get-SPTopologyServiceApplication command.
D. When you publish the service application using Windows PowerShell, you must acquire the FQDN to the published service using the Get-SPTopologyServiceApplication command.
7. You are a SharePoint administrator for your organization, and you are in the process of connecting to another server farm in your SharePoint environment in order to access a published application service. You are using Central Administration to perform this task. You have been given the appropriate information by the administrator of the publishing server farm to connect to the application and have input that data in the Connect To A Remote Service Application field. You complete the process and click OK on the Connect To A Remote Service Application page, but no one using the default site collection can access the new resource. Of the following options, what could be wrong? (Choose all that apply).
A. You could have entered the incorrect string in the Connect To A Remote Service Application field.
B. You could have entered the incorrect name in the Connection Name field on the Connect To A Remote Service Application page.
C. You could still need to associate the new service application with the required local web application.
D. The users of the default site collection in the web application may not be using the correct permissions to access the resource.
8. You are a SharePoint administrator for your organization, and you are in the process of connecting to another server farm in your SharePoint environment in order to access a published application service. You are using Windows PowerShell to perform this task. You have the correct string information to enter in order to connect to the remote resource. There are two commands you must issue at the command prompt in order to successfully accomplish this task. When do you enter the string provided by the remote server farm administrator?
A. You enter the string in the first command.
B. You enter the string in the second command.
C. You enter the string in both the first and second commands.
D. You do not enter the string. The string is required only when you make this connection from Central Administration.
9. You are a SharePoint adminstrator for your organization, and you are in the process of deleting an application service that is no longer required. You are using Central Administration to accomplish the task. You want to delete the service but retain the database related to the service for further use. On the Manage Service Applications page, what must you do to successfully complete the job?
A. Select the application service you want to delete, clear the Connect To Database check box next to the service name and click Delete in the Ribbon. When the confirmation box appears, click OK.
B. Select the application service you want to delete and click Delete in the Ribbon. When the confirmation box appears, do not select the Delete Data Associated With Service Applications check box. Then click OK.
C. Select the application service you want to delete and click Delete in the Ribbon. When the confirmation box appears, select the Do Not Delete Data Associated With Service Applications check box and then click OK.
D. Whenever you delete an application service, the database is automatically deleted. There is no option to retain it.
10. You are a SharePoint administrator for your organization, and you are preparing a presentation to the board of directors on the advantages of SharePoint Server 2010. One of the points you want to cover is how Access Services allows you to create SharePoint sites using web database templates. Of the following, which Access-based website templates are available by default? (Choose all that apply.)
A. Charitable Contributions Web Database
B. Contacts Web Database
C. Issues Web Database
D. Organizational Web Database
11. You are a SharePoint administrator for your organization, and you have recently enabled the Access Service application service. You have been tasked with creating a new website based on a specific web database template. You are on the New SharePoint Site page and ready to select a template. Under Template Selection, which tab must you choose to see the template selections?
A. None. The web database templates appear on the tab open by default.
B. The Web Database tab.
C. The Web Database Template tab.
D. The Enterprise tab.
12. You are a SharePoint administrator for your organization, and you’re configuring Excel Services in Central Administration. You want to enable the unattended service account so that Excel Services can access a non-Windows information sources. What other service must you enable in SharePoint to allow the unattended service account to access external data?
A. The Secure Store Service
B. The Security Token Service
C. The Single Sign-on Service
D. The User Defined Functions Service
13. PerformancePoint Server 2007 functionality has been fully integrated into SharePoint Server 2010 and no longer exists as a separate Microsoft product. You are a SharePoint administrator for your organization. Another member of the IT department is responsible for retiring your company’s PerformancePoint Server 2007 deployment, and you are tasked with importing the information contained on that server into SharePoint. What other server information is required by the Import PerformancePoint Server 2007 Content Wizard in Central Administration?
A. The wizard requires the URL of the Windows Server 2003 machine hostingPerformancePoint Server 2007.
B. The wizard requires the URL of the SQL Server instance containing the database for PerformancePoint Server 2007.
C. The wizard requires the name and instance of the SQL Server instance used forPerformancePoint Server 2007.
D. The wizard requires the hostname or IP address of the Windows Server 2003 machine hosting PerformancePoint Server 2007.
14. You are a SharePoint administrator for your organization, and you are running a test deployment of SharePoint Server 2010 as a single-server installation with a built-in database. You want to explore the option of configuring PerformancePoint Services in Central Administration, but when you attempt to create the PerformancePoint Services service application, you find that the required option does not exist. What is the most likely cause of this problem?
A. You must create a web application for PerformancePoint Services before the option to create a PerformancePoint Services service application becomes available.
B. You can only enable and configure PerformancePoint Services in SharePoint Server 2010 by using the Farm Configuration Wizard.
C. You must import PerformancePoint Server 2007 data into SharePoint before thePerformancePoint Services service application options becomes available.
D. On a single-server installation with a built-in database, PerformancePoint Services is automatically configured.
15. You are a SharePoint administrator for your organization. You have enabled thePerformancePoint Services service application, created a web application, created thesite collection and sites in the application, and enabled PerformancePoint features forthe site collection and in the relevant sites. You are discussing PerformancePoint with a new IT staff person, and she asks how PerformancePoint information is stored in SharePoint. Of the following, which are the correct answers? (Choose two.)
A. PerformancePoint Services data source connections are located in document libraries.
B. PerformancePoint Services data source connections are located in lists.
C. PerformancePoint Services data content is located in document libraries.
D. PerformancePoint Services data content is located in lists.
16. You are a SharePoint administrator for your organization. You have enabled thePerformancePoint Services service application, and created a web application, and created the site collection and sites within the web application. You now want to enable PerformancePoint Services in the site collection and for sites in the collection. Which specific features must be enabled? (Choose two.)
A. You must activate SharePoint Publishing Infrastructure for the site collection.
B. You must activate PerformancePoint Services Site features for specific sites.
C. You must activate PerformancePoint Services Publishing for the site collection.
D. You must activate PerformancePoint Services Infrastructure features for specific sites.
17. You are a SharePoint administrator for your organization, and you want to enable the Secure Store Service application to allow designers to create target applications that map credentials to external data sources. In the process of creating an encryption key for the Secure Store Service, you enter a passphrase as required. Later, you realize you’ve forgotten the passphrase you used. Where can you find the passphrase stored so you can recover it?
A. The passphrase is stored in the application log on the server used to generate the encryption key.
B. The passphrase is stored in the log generated by the Secure Store Service when it was initialized.
C. The passphrase is stored in the registry on the computer used to generate the encryption key.
D. The passphrase is not stored.
18. You are a SharePoint administrator for your organization. You have initialized an instance of the Secure Store Service application and generated an encryption key. You are briefing your staff on this process and are describing the circumstances when the encryption key may need to be refreshed. Of the following options, which are valid circumstances? (Choose all that apply.)
A. When you add a new application server
B. When you add a new web server
C. When you restore a previously backed up Secure Store Service database.
D. When you receive an “Unable to get master key error” message
19. You are a SharePoint administrator for your organization, and you are configuring the Visio Graphics Services service application in Central Administration. A number of settings require you input values for the cache age. The SharePoint users who make extensive use of Visio ask that you maximize the amount of time a diagram remains in the cache before it is cleared to get the most out of the service. What potential problems could this cause? (Choose all that apply.)
A. It could result in a potential performance slowdown because of greater CPU use on the server.
B. It could result in a potential performance slowdown because of greater memory use on the server.
C. It could result in a potential performance slowdown because of greater network activity between user locations and the server.
D. There are no issues related to maximizing the amount of time a diagram remains in the cache.
20. You are a SharePoint administrator for your organization, and you are discussing services application administration in SharePoint Server 2010 with your staff. Currently, you are discussing the steps for configuring Visio Graphics Services in SharePoint. One person asks whether there is any significant difference in configuring Visio Graphics Services and Access or Excel Services in Central Administration. What is the answer you most likely will provide?
A. Visio Graphics Service must be configured in Windows PowerShell.
B. Visio Graphics Service must be configured by running the Farm Configuration Wizard.
C. Visio Graphics Service requires that a trusted data provider be created at the same time the Visio Service is configured.
D. There is no significant difference.
Answers to Review Questions
1. D. Options A, B, and C are bogus. Option D is the quickest and most straightforward method of configuring service applications in the SharePoint server farm.
2. D. Using Central Administration, you can select the desired server and manage the services running on that server.
3. A. You can perform the task in either Central Administration or Windows PowerShell. The other options are bogus.
4. C. The tasks related to importing and exporting trust certificates must be performed using Windows PowerShell.
5. A, C. Only membership in the SharePoint_Shell_Access and WSS_ADMIN_WPG local groups is required to perform the application service configuration tasks in Windows PowerShell.
6. A,C. Regardless of whether you use Central Administration or Windows PowerShell, you must acquire and save the URL to the published service. The administrator for the SharePoint Server farm wanting to consume the published service will require the URL to point to the service application they want to use.
7. A, C. You must enter the URL to the remote resource correctly in order to make the connection. You must also associate the application service to your local web application that contains the site collection needing the resource before it can be accessed.
8. A. You enter the text string containing the URL to the remote resource at the first command, as in Receive-SPSharedServiceApplicationInfo -FarmUrl <Publishing farm topology service URL>.
9. B. Only option B describes the correct procedure. The other options are bogus.
10. A, B, C. The options are Assets Web Database, Charitable Contributions Web Database, Contacts Web Database, Issues Web Database, and Projects Web Database.
11. B. Only option B is correct. All of the other options are bogus.
12. A. The Security Token Service (STS) is a specialized web service that responds to requests for security tokens but is not specifically involved in the functioning of the unattended service account. The Single Sign-on Service stores and maps credentials to allow portal site-based applications to retrieve data from third-party applications but is not relevant to the unattended service account. User-defined functions (UDFs) can be enabled to extend the functionality of Excel Services but are used only once Excel Services is configured and operating.
13. C. To import the required data, you must input the name and instance of the SQL Server used for the PerformancePoint Server 2007 content. All other options are bogus.
14. D. If you performed a clean installation of SharePoint Server 2010 on a single-server installation with a built-in database, PerformancePoint Services is automatically created and configured, and there are no further configuration tasks available.
15. A, D. The data source connections are stored in document libraries while the data content, such as KPIs and scorecards, are stored in lists.
16. A, B. Only options A and B are the correct answers. Options C and D are bogus.
17. D. The passphrase is not stored, so it is recommended that you write it down at the time you are initializing an instance of the Secure Store Service application.
18. A, C, D. You will not likely have to refresh the encryption key when you add a new web server to the server farm. All other options are valid circumstances that may require a refresh of the key.
19. D. Keeping the diagram in cache for the maximum amount of time requires little out of the server, but the more frequently a diagram is refreshed, the more performance is required from the server’s CPU and memory.
20. D. Although the Visio Graphics Service can be configured by using Windows PowerShell or by running the Farm Configuration Wizard, they are not absolutely required. You only need to create a trusted data provider for Visio Graphics Service if you intend to use an external database for the service.