
Chapter 7
Managing User Accounts and Roles
Microsoft Exam Objective Covered in This Chapter:
- Maintaining a SharePoint Environment
- Configure Service Applications
- Manage Accounts and User Roles
For all its technological and collaborative advantages, SharePoint wouldn’t be much good to anyone unless people were able to access and use it. For that to happen, you must have the ability to create and manage users and roles on SharePoint. Beyond that, user accounts are considered a resource in SharePoint, and you must have the ability to manage people not only as system users but as system resources. Users and organizations have profiles and profile properties that can be managed, and users can belong to groups you can configure to be targeted audiences for specific content. Like any other aspect of SharePoint, the job starts with configuring user profiles as a service.
Managing the User Profile Service
The User Profile service is another shared service in SharePoint Server 2010. This service lets you create and manage SharePoint user profiles, and these profiles can be accessed from sites, site collections, and server farms. As a SharePoint farm administrator, you can manage user profiles yourself or delegate this task to the service application administrator.
Administering the User Profile Service Application
Service applications in SharePoint 2010 provide a central location from which to manage all of the different features and actions associated with the service. The User Profile service application offers you a central place from which to specifically manage personalization settings. These settings include the following:
- Audiences
- My Site settings
- Organization browsing and management settings
- Profile synchronization settings
- User profile properties
This section in the chapter teaches you the process of creating and configuring the User Profile service application. Before you can continue with this part of the chapter, you must meet the following requirements:
- The version of SharePoint Server 2010 you are using must be either Standard or Enterprise.
- You must have configured at least one site collection that uses the My Site Host template.
- You must have an application pool that can be used by My Sites.
- You must be running an instance of the Managed Metadata Services.
- At least one managed path must exist.
See Chapter 6, “Managing Operational Settings,” for information on Managed Metadata Services and Chapter 10, “Managing Site Collection,” for more on site collections and My Sites.
Creating the User Profile Service Application
The first step in administering user profiles is to create a User Profile service application. This can be done either in Central Administration or with Windows PowerShell. Exercise 7-1 will show you how to accomplish the task in Central Administration. You must be a member of the Farm Administrators group to successfully complete the exercise.
Exercise 7-1: Creating a User Profile Service Application in Central Administration
1. Navigate to Central Administration and click Manage Service Applications under Application Management.
2. On the Manage Service Applications page, select the Service Applications tab, if it isn’t already selected, to activate the Ribbon.
3. Click Create on the Ribbon, click New, and then click User Profile Service Application, as shown here.

4. When the Create New User Profile Service Application box opens, type a unique name for the User Profile service application under Name.
5. Under Application Pool, select Use Existing Application Pool to choose an existing pool under which you’ll consolidate most of your services or select Create A New Application Pool to create a new pool to be used mainly for customizations.
6. For Select A Security Account For This Application Pool, select Predefined to choose an existing predefined security account or select Configurable to select an existing managed account.
7. Under Profile Database, type the name of the database server where the profile database will be located in the Database Server field.
8. In the Database Name field, type the name of the database.
9. Select either Windows Authentication (Recommended) or SQL Authentication and, if you choose the latter, enter the username and password for the SQL Server authentication method.
10. If you want to use SQL Server database mirroring, type the name of the database server to be used in the Failover Database Server field and then select an authentication method as you did for the database server.
11. Under Synchronization Database, to use a synchronization database, type the name of the server in the Database Server field and then name the synchronization database in the Database Name field.
12. Select either Windows Authentication (Recommended) or SQL Authentication and, if you choose the latter, enter the username and password for SQL Server.
13. If you want to use SQL Server database mirroring for the synchronization server, type the name of the database server to be used in the Failover Database Server field and then select an authentication method as you did for the database server.
14. Under Social Tagging, enter the name of the database server and database as well as the authentication method, just as you did for the failover database server and the synchronization database server.
15. If you want to use SQL Server database mirroring for the social tagging database server, type the name of the database server to be used in the Failover Database Server field and then select an authentication method as you did for the database server.
16. Under Profile Synchronization Instance, select a machine in the server farm on which you want to run the Profile Synchronization service.
17. Under My Site Host URL, type the URL of the site collection where the My Site host has been created.
18. Under My Site Managed path, type the managed path where individual My Site websites are to be created.
19. Under Site Naming Format, select a format for naming personal sites such as User Name (Do Not Resolve Conflicts), User Name (Resolve Conflicts By Using domain_username), or Domain And User Name (Will Not Have Conflicts).
20. Under Default Proxy Group, choose whether you want to make the proxy of the User Profile service as part of the default proxy group.
You can enable self-service site creation in a web application hosting My Site websites to allow users the ability to create their own My Site websites. Users must possess the Create Personal Site permission, which is enabled by default for all authenticated users. Learn more about turning the self-service site creation feature on or off in Chapter 10, “Managing Site Collections.”
As previously mentioned, the identical task can be performed using Windows PowerShell. Relative to the number of steps involved, it appears that it is much easier, or at least much faster, to create a User Profile service application using PowerShell than Central Administration, but you must have a fair degree of comfort working with the command-line interface to do so.
Exercise 7-2 shows you how this is accomplished. To successfully complete this task, you must be a member of the SharePoint_Shell_Access role on the configuration database and a member of the WSS_ADMIN_WPG local group on the computer where SharePoint 2010 is present.
Exercise 7-2: Creating a User Profile Service Application Using Windows PowerShell
1. Run Windows PowerShell as an administrator.
2. At the command prompt, type the following (all on one line, even though we had to break the code to fit here in the book) and then press Enter, inserting the actual names for the User Profile application and application pool for the sample values in the code.
$app_UPA = New-SPProfileServiceApplication -Name UPA -PartitionMode
-ApplicationPool $appPool
One of the prerequisites for creating a User Profile service application is that at least one managed path must be present. Exercise 7-3 takes you through the steps of defining a managed path using Central Administration. You must be a member of the Farm Administrators group to successfully complete this exercise.
Exercise 7-3: Defining a Managed Path
1. Navigate to Central Administration and click Application Management.
2. On the Application Management page, click Manage Web Applications under Web Applications.
3. On the Manage Web Applications page, select the desired web application and then, on the Ribbon, click Managed Paths.
4. When the Define Managed Paths box appears, under Add A New Path, type the path within the URL namespace in the Path field, as shown here.

5. Click Check URL to verify that the URL functions and that the site indicated in the Path Field opens in a separate browser window.
6. In the type list, select Wildcard Inclusion to include all paths that are subordinate to the specified path or select Explicit Inclusion to include the site indicated by the specified path and not include subordinate sites.
7. To delete a specific path or paths, under Included Paths, select the check boxes for the undesired paths and then click Delete Selected Paths.
8. When you are finished, click OK.
Once you’ve created a User Profile service application, you may want to edit its settings. Exercise 7-4 shows you how this is done. You must be a member of the Farm Administrators group to successfully complete this exercise.
Exercise 7-4: Editing a User Profile Service Application
1. Navigate to Central Administration and click Manage Service Applications under Application Management.
2. On the Manage Service Applications page, click User Profile Service Application in the Type column to select it.
3. On the Ribbon, click Operations and then click Properties.
4. When the Edit User Profile Service Application box opens, edit the desired properties present.
5. When you are done, click OK.
The process of deleting a User Profile service application is almost the same as editing said service application. Once you’ve selected User Profile Service Application in the Type column and then clicked Operations, click Delete in the menu that appears. Then, in the Delete Service Application box, verify you’ve selected the correct service application and then select Delete Data Associated With The Service Applications. Click OK when you’re finished.
Delegating Authority of a User Profile Service Application
Once you have created and configured a User Profile service application, you can assign managerial authority over the service application to another user, easing the administrative burden on you. This task can be performed either using Central Administration or using Windows PowerShell.
Exercise 7-5 will illustrate the Central Administration method. You must be a member of the Farm Administrators group to successfully complete this exercise.
Exercise 7-5: Assigning an Administrator to a User Profile ServiceApplication in Central Administration
1. Navigate to Central Administration and click Manage Service Applications under Application Management.
2. On the Manage Service Applications page, select the desired User Profile service application.
3. On the Ribbon, click Administrators.
4. When the Administrators For User Profile Service Application box opens, type the user or group account in the available field and then click Add, as shown here.
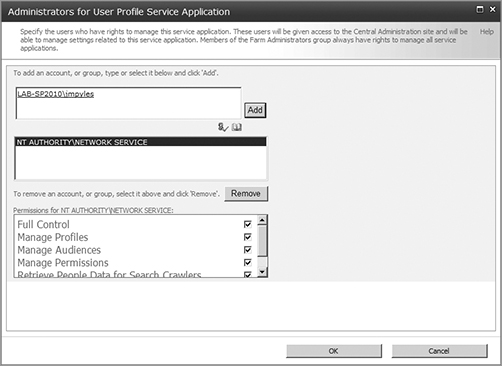
5. For Permissions For Administrator, select Full Control.
6. Click OK when you are finished.
The same task can be performed using Windows PowerShell, and Exercise 7-6 explains the procedure. You need to be a member of the SharePoint_Shell_Access role on the configuration database and a member of the WSS_ADMIN_WPG local group on the computer where SharePoint 2010 is present to successfully complete this exercise.
Exercise 7-6: Assigning an Administrator to a User Profile Service Application Using Windows PowerShell
1. Run Windows PowerShell as an administrator.
2. Type the following lines of code at the command prompt, minus the comments (//), each on a separate line, and then click Enter:
// // Display a list of all service applications and their GUIDs
Get-SPServiceApplication
// Create a variable that contains the guid for the User Profile service for
// which you want to delegate Full Control
$serviceapp = Get-SPServiceApplication <guid>
// Create a variable that contains the list of administrators
// for the service application
$security = Get-SPServiceApplicationSecurity $serviceapp -Admin
// Create a variable that contains the claims principal for a user account
$principalUser1 = New-SPClaimsPrincipal -Identity "domainuser" -IdentityType WindowsSamAccountName
// Give Full Control permissions to the claims principal you just created
Grant-SPObjectSecurity $security -Principal $principalUser1 -Rights "Full Control"
// Apply the changes to the User Profile service application
Set-SPServiceApplicationSecurity $serviceapp -objectSecurity $security -Admin
You must change some of the values in the lines of sample code presented in the previous exercise. For <guid>, type the GUID for the User Profile service for which you want to delegate full control to the new administrator. For <domainuser>, type the domainusername pair for the user being assigned to administer the User Profile service.
To find the GUID for the User Profile service or other services running in SharePoint, open Windows PowerShell, type Get-SPServiceApplication at the prompt, and then press Enter. When the output of the command is returned, locate the User Profile service in the DisplayName column and then the GUID for the service in the Id column. The GUID for the User Profile service will look something like 89b203c8-5baa-4f24-8de8-992739e710ad.
There will come a time when you’ll need to remove an administrator of a User Profile service application, such as when the user changes job duties or leaves the company. You can also perform this task on the Manage Service Application page under Application Management in Central Administration. Just select the User Profile service application, click Operations on the Ribbon, and then click Administrators. On the Administrators For User Profile Service Application page, select the desired user or group account, click Remove, and then click OK.
The same task can be performed in Windows PowerShell. Open Windows PowerShell as an administrator, type the following, minus the comments (//), and then press Enter:
// Get a list of all service applications and their GUIDs
Get-SPServiceApplication
// Create a variable that contains the guid of the User Profile service
// application
// for which you want to remove an administrator
$serviceapp = Get-SPServiceApplication <guid>
// Create a variable that contains the list of administrators for the
// User Profile service application
$security = Get-SPServiceApplicationSecurity $serviceapp -Admin
// Remove the user from the list of service application administrators
Revoke-SPObjectSecurity $security -Principal <user name>
-Rights "Full Control"
// Apply the changes to the User Profile service application
Set-SPServiceApplicationSecurity $serviceapp
-objectSecurity $security -Admin
For <guid>, enter the GUID of the User Profile service for which you want to remove the administrator. For <user name>, substitute the username of the administrator.
Delegating Authority over User Profile Service Features
In addition to assigning administrative authority over a User Profile service application, SharePoint administrators with farm administrator rights can assign authority over selected features of the User Profile service application to specific users. For instance, you could assign a particular user Manage Audiences rights in a User Profile service application but give them no authority over any other features. This person would be known as a feature administrator. The ability to create one or more feature administrators is helpful when you want to delegate some authority over a User Profile service application but retain authority over other, more key features.
You can delegate authority over any of the following tasks to a feature administrator:
- Manage Audiences
- Manage Permissions
- Manage Profiles
- Manage Social Data
- Retrieve People Data For Search Crawlers
You can perform this task using either Central Administration or Windows PowerShell; however, the use of the different interfaces isn’t interchangeable. You usually perform the task in Central Administration if you are running SharePoint as a stand-alone deployment. You are more likely to use Windows PowerShell to perform this task in an enterprise-level environment where you want to automate the process.
Exercise 7-7 will show you how to create a feature administrator using Central Administration. To successfully complete this exercise, you must belong to the Farm Administrators group, or you must have been delegated permission to administer the User Profile service application.
Exercise 7-7: Delegating Administration of User Profile ServiceFeatures Using Central Administration
1. Navigate to Central Administration and click Manage Service Applications under Application Management.
2. In the list of service application that appears, click User Profile Service Application.
3. On the Ribbon, click Operations and then click Administrators.
4. When the Administrators For User Profile Service Application box opens, type the name of the user or group account you want to delegate to in the available field and then click Add.
5. Under Permissions For Administrator, select the feature or features you want to delegate to the designated user.
6. Click OK.
As was previously mentioned, the steps performed in Exercise 7-7 are usually done in a stand-alone SharePoint deployment. In an enterprise-level server farm environment, you are more likely to perform this task using Windows PowerShell.
Open Windows PowerShell as an administrator and run the following commands, typing them one line at a time, minus the comments (//), and then press Enter:
// Display a list of all service applications and their GUIDs
Get-SPServiceApplication
// Create a variable that contains the guid for the User
// Profile service for which you want to delegate Full Control
$serviceapp = Get-SPServiceApplication <guid>
// Create a variable that contains the list of administrators
// for the service application
$security = Get-SPServiceApplicationSecurity $serviceapp -Admin
// Create a variable that contains the claims principal for a user account
$principalUser1 = New-SPClaimsPrincipal -Identity "domainuser"
-IdentityType WindowsSamAccountName
// Give "Manage Social Data" permissions to the claims
// principal you just created
Grant-SPObjectSecurity $security -Principal $principalUser1
-Rights "Manage Social Data"
// Apply the changes to the User Profile service application
Set-SPServiceApplicationSecurity $serviceapp -objectSecurity $security -Admin
For <guid>, enter the GUID of the User Profile service for which you want to delegate feature authority. For <domain/user>, enter the domain-username pair for the user to whom you want to delegate authority. In the previous sample code, the feature being delegated is the Manage Social Data permission. If you want to delegate authority over a different feature, substitute the name of that feature in the relevant sections of the code.
User and Organization Profile Management
The User Profile service application comes with a default set of user profile properties. In addition to the defaults, you can add, edit, and delete customized user profile properties in the service application. This allows you to track specific data by associating specific properties of users with important business processes.
In addition to managing user profiles, you can also administer organizational profiles including components such as organization profile properties and organization subtypes. This section of the chapter will show you the various related tasks.
Administering Custom User Profile Properties
The first step in administering a customized user profile property is to create one. Exercise 7-8 will show you how. To successfully complete the task, you must belong to the Farm Administrators group or be a service application administrator for the User Profile service application. This task is related to the creation and management of My Sites. See Chapter 10 for more on My Site administration.
Exercise 7-8: Creating a Custom User Profile Property
1. Navigate to Central Administration and click Manage Service Applications under Application Management.
2. On the Manage Service Applications page, select the desired User Profile service application in the Type column.
3. On the Manage Profile Service page, click Manage User Properties under People.
4. On the Manage User Properties page, click New Property.
5. On the Add User Profile Property page, under Property Settings, type the name of the new user property to be used by the service application in the Name field such as AuthorProperty.
6. Type the name of the custom property as you want it displayed to users in the Display Name field such as Author Property.
7. Use the Type drop-down menu to select the data type for the property such as String.
8. Type the maximum number of characters you want to allow for values for this property in the Length field such as 255.
9. Click Configure A Term Set to be used for this property and then select a term set from the drop-down menu to associate the profile property with a managed term set.
10. Under Sub-type To Profile, select Default User Profile Subtype to associate a default user profile subtype to use with the user profile property.
11. Under User Description, type the data or instructions you want to impart to users about this user profile property in the Description field such as a brief description of the characteristics of author users in SharePoint.
12. Under Policy Settings, select the policy setting such as Required, Optional, or Disabled and the default privacy setting you want to give to this property such as Only Me, My Manager, My Workgroup, My Colleagues, or Everyone. If desired, select User Can Override to enable the user to override this setting.
13. Under Edit Settings, select whether users can edit the values of the property.
14. Under Display Settings, determine whether or how the property will be seen by users.
15. Under Search Settings, select Alias, Indexed, or both to determine the kinds of searches you want associated with the user profile.
16. Under Property Mapping For Synchronization, click Remove to delete or change an existing mapping, if desired.
17. Under Add new Mapping, specify the source data connection, attribute, and synchronization direction for the mapping and then click Add.
18. When you are finished, click OK.
If you select String (Multi Value) in the Type menu in step 7, the property will be permanently set as a multivalued property and you will not be able to change it after you click OK. The only way to edit this value is to delete the property and add it again as a new single-value property.
For the Display Name settings and the User Description settings, if you use multiple languages in your SharePoint sites, you can provide different display names for each language by clicking Edit Languages. When the dialog box opens, click Add Language, select the desired language from the menu, and then type the display name.
Compared to creating a custom user profile property, editing the property is a relatively simple task. Exercise 7-9 shows you how. You require the same permissions to edit a property as you do to create one.
Exercise 7-9: Editing a Custom User Profile Property
1. Navigate to Central Administration and click Manage Service Applications under Application Management.
2. On the Manage Service Applications page, select the desired User Profile service application in the Type column.
3. In the Manage Profile Service box, click Manage User Properties under People.
4. On the page that appears, in the Property Name column, select the desired user profile property and then click Edit.
5. On the Edit User Profile Property page, edit the desired elements and then click OK.
To delete a custom user property profile, follow the steps in Exercise 7-9 up through step 4. Then in the Property Name column, select the desired user profile property, and then click Delete. When the verification dialog box appears, click OK.
Administering the Organization Profile Property
Like the default user profile properties, the default organization profile properties can be augmented by adding customized profile properties. This is done for the same reason: to associate such properties with key information for tracking purposes. Organization profile components available to be managed include the following:
- Delegation for organizations
- Organization profile properties
- Organization properties
- Organization subtypes
This will enable you to track specific data regarding particular profiles that isn’t available with the default properties such as team or division projects. For instance, if you create a custom property for a key business project assigned to a given team in the organization, you can track the organization activity around that project.
As with customized user profile properties, the first step in managing a customized organization profile property is to create one. Exercise 7-10 starts you off. To successfully complete the task, you must belong to the Farm Administrators group or you must be a service application administrator for the User Profile service application. This task is related to the creation and management of My Sites. See Chapter 10 for more on My Site administration.
Exercise 7-10: Creating a Custom Organization Profile Property
1. Navigate to Central Administration and click Manage Service Applications under Application Management.
2. On the Manage Service Applications page, click the desired User Profile service application.
3. On the User Profile Service Application page, click Manage Organization Properties under Organizations.
4. On the View Organization Profile Properties page, click New Property.
5. On the Add Organization Profile Property page, under Property Settings, type the name of the customized profile property to be used by the User Profile service application in the Name field.
6. In the Display Name field, type the name for the customized property you want to be displayed to users.
7. Open the Type drop-down list and select a data type for the property.
8. Type the maximum number of characters allowed for values of the property in the Length field.
9. Under Sub-type Of Profile, select Default Organization Profile Subtype to associate the organization profile property with the default organization profile subtype.
10. Under User Description, type the information or instructions about the property you want users to see in the Description field.
11. Under Property Settings, select the policy setting and default privacy setting you want for the property.
12. Under Edit Settings, choose whether users will be able to change the values of the property.
13. Under Display Settings, choose if or how the property will be viewed by users.
14. Under Search Settings, select Alias, Indexed, or both, depending on the type of searches you want associated with this profile property.
15. Under Add New Mapping, specify the source data connection, attribute, and synchronization direction for the mapping; then click Add.
16. When you are finished, click OK.
The process is very similar to Exercise 7-8, including the notes regarding the multivalue selection for Type and the multiple language options for Display Name and User Description. See Exercise 7-8 for more details.
The processes for editing and deleting a custom organization profile property are virtually the same as for performing the same actions on a custom user profile property. Exercise 7-9 and the paragraph after it describe the details of editing and deleting a property.
Basically, you navigate back to the Manage Service Applications page and select the User Profile service application. From there, on the page that appears, click Organizations as you did before and then Manage Organization Properties. In the Property Name column, click the name of the desired customized property and click either Edit or Delete, depending on your purpose.
You can delegate the authority to manage both user profile properties and organization profile properties. The steps are almost identical to those in Exercise 7-7. You perform exactly the same set of steps up to step 5 and then, under Permissions for Administrator, click Manage Profiles. Then click OK.
As in the task for delegating authority over user profile properties, you typically use Central Administration to perform this task in a stand-alone SharePoint deployment. For enterprise-level server farm environments, you should use Windows PowerShell.
To delegate administrative authority over user and organization profile properties, open Windows PowerShell as an administrator, type the following commands, and then press Enter:
$security = Get-SPProfileServiceApplicationSecurity $serviceApp -Admin
Grant-SPObjectSecurity $security $principal "Manage Profiles"
Set-SPProfileServiceApplicationSecurity $serviceApp -Admin $security
The sample code retrieves the SPObjectSecurity object that maps to the administrator access control list (ACL) on the User Profile service application. The new user is added to the ACL and assigned administrator rights for the Manage Profiles feature in the User Profile service.
Managing Profile Synchronization
While you’ve been exploring user and organizational profiles that are specific to SharePoint thus far, in fact, there is more than one location profile information can be stored. User and group profiles stored in SharePoint’s profile store can be synchronized with profile data stored in both directory services and business systems throughout the enterprise. To perform the following tasks related to profile synchronization, you must have been assigned administrator rights tothe User Profile service. You must also possess at least Replicate Directory Changes permissions on Active Directory Domain Services (AD DS) if this is the directory service to be used.
One or more directory services must be available on the same network where you are running SharePoint Server 2010 in order for you to perform profile synchronization tasks. Directory services that can be synchronized with SharePoint include the following:
- Active Directory Domain Services (AD DS)
- Business Data Connectivity Services
- Novell eDirectory version 8.7.3 (LDAP)
- SunOne version 5.2 (LDAP)
- IBM Trivoli 6.2 (LDAP)
You must use either a Standard or Enterprise version of SharePoint Server 2010 and run in a server farm. You cannot perform profile synchronization using a stand-alone installation of SharePoint with a built-in database, as is the test environment configured for this book.
Additional requirements are as follows:
- An instance of the User Profile service application must exist and be started.
- If you are using SQL Server 2008, it specifically must be with Service Pack 1 (SP1) with Cumulative Update 2 (CU2).
- If you are using Windows Server 2008 R2, hotfix KB976462 must be installed.
As of this writing, you can find the hotfix at http://go.microsoft.com/fwlink/?LinkID=166231.
Profile synchronization can be set to occur when profile data has changed either in SharePoint or in the directory service. You determine how and when the import and export processes occur when you configure profile synchronization. By default, no user profile property is set to export.
Some user profile properties in SharePoint are automatically mapped to their counterparts in the external directory service by default, including first name and last name. If you set synchronization to occur on a recurring schedule, the synchronization is incremental. This means the only information that is synchronized is data that has changed since the last scheduled synchronization. You can also use either a nonrecurring full synchronization or a nonrecurring incremental synchronization.
The tasks for profile configuring and starting profile synchronization must be performed in the order they are presented here.
The first task to perform is starting the User Profile Synchronization service, which is not started by default.
You can start and stop the profile synchronization service in the same way that you do any other service. For details, see Exercise 4-2 or Exercise 4-3 in Chapter 4, “Configuring Service Applications.”
To successfully perform this task, you must be a member of the Farm Administrators group on the computer containing Central Administration and the local administrator on the computer where the User Profile Synchronization service is deployed, which should be the same computer. The Farm Administrators account must also be a service administrator for the User Profile service you are configuring.
When you start the User Profile Synchronization service, you are asked to associate the service with the desired User Profile service application. Use the Select The User Profile Service Application drop-down menu to make your selection and then click OK. You must then wait 5–10 minutes before performing the following steps.
Starting the User Profile Synchronization Service
On the computer containing Central Administration and the User Profile Synchronization service, select Start Control Panel Administrative Tools Services.
1. Verify that the Forefront Identity Manager Synchronization service and the Forefront Identity Manager service are running, as in Figure 7-1, and if not, start the services.
Figure 7-1: User Profile Synchronization service

2. Navigate to %Programfiles%Microsoft Office Servers 14.0Synchronization ServiceMaData and verify that ILMMA and MOSS-<User Profile Service application name> are present (the folders will be empty).
3. Restart the IIS service using IISReset by opening a command-line window, typing iisreset/noforce computername, and then pressing Enter, replacing computername with the name of the computer on which you are starting the User Profile Synchronization service.
Creating a Profile Synchronization Connection
Once the service has started, your next task is to create a new Profile Synchronization connection. To do this, you must know which directory service containers you want to synchronize with SharePoint. It is also important to create only one Profile Synchronization connection per directory service forest. If you are synchronizing with AD DS, you must have a minimum of Replicate Directory Changes permissions in AD DS. If you plan to export properties such as profile pictures to AD DS, you will also need AD DS Create All Child Objects permissions.
1. In Central Administration, click Manage Service Applications under Application Management.
2. On the Manage Service Applications page, click the name of the desired User Profile service application.
3. On the User Profile Service Application page, click Configure Synchronization Connections under Synchronization.
4. On the Synchronizations Connections page, click Create New Connection.
5. On the Add New Synchronization Connection page, type the name of the new synchronization connection in the Connection Name field.
6. Use the Type list to select the desired directory service.
7. If you select Business Data Connectivity, you must type the name for the connection in the Name box, select a Business Data Connectivity Application from the Business Data Connectivity Entity box, select either the 1:1 mapping or the 1:many mapping, and then click OK; otherwise, skip this step, and proceed with the subsequent steps.
8. Under Connection Settings, type the name of the directory service forest you want to connect to, type the account credentials for the directory service and the desired port, and then either select Auto Discover Domain Controller or type the name of the domain controller in the Domain Controller Name field.
9. Select the Use SSL-Secured Connection check box if you want to use a Secure Sockets Layer connection to connect to the directory service.
10. Under Containers, click Populate Containers and then select the desired containers for which you want to create connections; otherwise, click Select All to make connections for all containers.
11. When finished, click OK.
Editing Profile Synchronization Connection Filters
Once at least one Profile Synchronization connection has been made, you can editthe connection filters. To begin, follow steps 1 through 3 of the previous task to getto the Synchronization Connections page. Then perform the following. You’ll need the same permissions as you did in the previous task.
1. On the Synchronization Connections page, click the connection you want to edit and then select Edit Connection Filters.
2. On the Edit Connection Filters page, under Exclusion Filters For Users, select the user property for which you want to apply a synchronization filter in the attributes list.
3. Select All Apply (AND) if you want all filters applied or select Apply Any (OR) if you want only one filter condition to be met.
4. Configure the specific filter parameters you want and then click Add.
5. Under Exclusion Filters For Groups, select the desired group property from the attributes list and then select either All Apply (AND) or Apply Any (OR).
6. Select and configure the desired filter parameters and then click Add.
7. When you are finished, click OK.
In steps 3 and 5, you can select from a number of different attributes, each of which requires a different set of steps to configure.
Mapping User Profile Properties
To set up user profile mapping, you need to possess the same permissions as in the previous tasks. In Central Administration, you must navigate to the Manage Service Applications page as you did previously, click the desired User Profile service application, and then, under People, click Manage User Properties. Then perform the following steps:
1. On the Manage User Properties page, right-click the desired user property and then select Edit from the menu that appears.
2. On the Edit User Profile Property page, under Add New Mapping, select the desired Profile Synchronization connection from the Source Data Connection list.
3. Select the desired directory service attribute from the Attribute list.
4. Select Import if you want to import the property value from the directory service into SharePoint, or select Export if you want to export the property value from SharePoint to the directory service.
5. When you’ve made your selection, click Add.
6. When you have finished, click OK.
If you want to synchronize user profile pictures between SharePoint, AD DS, and Outlook 2010 using the Outlook social connector, set the Data Source Connection for the Picture Property Mapping to Export.
Once the mappings are set up, your next step is to configure the profile synchronization settings. You must possess the same permissions as in the other task and verify that you have Full Control permissions as a service administrator for the User Profile service you are configuring. You must also be a system administrator on SQL Server. Navigate to the Manage Profile Service page in Central Administration and under Synchronization, click Configure Synchronization Settings; then perform the following steps.
1. On the Configure Synchronization Settings page, under Synchronization Entities, select Users And Groups to synchronize both types of information or select only Users to synchronize just user information.
2. Under Synchronize BDC Connections, clear the Include Existing BDC Connections For Synchronization check box if you want to exclude any data imports from the Business Data Connectivity service.
3. Under External Identity Manager, select Use SharePoint Profile Synchronization to use SharePoint’s synchronization engine or select Enable External Identity Manager if you want to use an external synchronization application such as Microsoft Identity Lifecycle Manager 2007.
4. When you are finished, click OK.
When setting up synchronization settings, you should run a full synchronization for just users and then run an incremental synchronization of both users and groups. Also, if you choose to use an external synchronization engine, you will disable all the profile synchronization options in SharePoint.
Configuring a Nonrecurring Profile Synchronization
Once the configuration of profile synchronization is complete, you are able to set up nonrecurring or recurring profile synchronization. You must possess the same permissions as you needed to create a profile synchronization connection.
1. In Central Administration, click Manage Service Applications under Application Management.
2. On the Manage Service Applications page, click the desired User Profile service application.
3. On the User Profile Service Application page, click Start Profile Synchronization under Synchronization.
4. On the Start Profile Synchronization page, select either Start Incremental Synchronization or Start Full Synchronization and then click OK, as shown in Figure 7-2.
When using AD DS, you must run full synchronization first and then again when any new profile property mapping is created. Once the synchronization is completed, you will be able to search for a known profile or accounts beginning with a known domain name from within the Manage User Profiles page.
Configuring a Recurring Profile Synchronization
To set up recurring profile synchronization, follow steps 1 through 3 in the prior section to get to the User Profile Service Application page, and click Configure Synchronization Timer Job under Synchronization. Then on the Edit Timer Job page under Recurring Schedule, use the radio buttons and menus to set the frequency and start times of the Profile Synchronization job, as shown in Figure 7-3. When finished, click OK.
Daily is the recommended scheduling frequency.
Managing User and Group Social Features
By default, any authenticated user can create a personalized My Site in SharePoint and then configure the personal and social features in their My Site. You can modify how a SharePoint user utilizes the social features within their My Site, including altering their permissions, activating or deactivating social tags, and so on. This section of the chapter will address how you can perform such tasks.
Figure 7-2: The Start Profile Synchronization page

See Chapter 10 for more on My Sites.
The three general features you can enable for users and groups in the User Profile service are Use Personal Features, Create Personal Site, and Use Social Features. Use Personal Features includes the ability to use My Colleagues, My Links, My Personalization links, and user profile properties within a My Site. The Create Personal Site feature allows users to create a My Site website, and Use Social Features includes using social tags, Note Board, and ratings.
The following set of tasks shows you how to change user access to these features. An instance of the User Profile service application must be active in SharePoint to complete these tasks as well as an instance of the Managed Metadata Service. You must also be a member of the Farm Administrators group or have been delegated permission to administer the User Profile service application. The first task is to enable users and groups to use personal and social features. Exercise 7-11 gets you started.
Figure 7-3: Setting the recurring schedule for profile synchronization

Exercise 7-11: Enabling Users or Groups to Use Personal and Social Features
1. In Central Administration, click Manage Service Applications under Application Management.
2. On the Manage Service Applications page, click the desired User Profile service application to open it.
3. Under People, click Manage User Permissions.
4. When the Permissions For User Profile Service Application box opens, type or select the desired user or group account, and then click Add.
5. Under Permissions For, check the feature or features you want to allow the selected account or accounts to access, and then click OK.
In SharePoint Server 2010, users have the option of marking documents and items in document libraries and lists with social tags and referencing note board by default. For instance, on the Ribbon of a document library, the selections I Like It and Tags & Notes are available. You, as a SharePoint administrator, have the ability to deactivate these features, but you cannot enable or disable social tags and note boards on the level of the individual web application in a server farm. Any changes you make will be server farm wide. Also, any user data associated with these features may be lost.
Activating and deactivating these features is usually done in Central Administration for a stand-alone SharePoint deployment and performed using Windows PowerShell in an enterprise environment.
Since these social features are activated by default, to deactivate them in Central Administration, click Manage Farm Features under System Settings. On the Manage Farm Features page, click the Deactivate button next to Social Tags and Note Board Ribbon Controls, as shown in Figure 7-4. If you have previously deactivated this option, click the Activate button.
Figure 7-4: The Manage Farm Features page

To deactivate or activate the social features in the server farm using Windows PowerShell, you must be a member of the SharePoint_Shell_Access group on the configuration database and a member of the WSS_ADMIN_WPG local group on the computer where SharePoint 2010 is present.
To deactivate the social features in the farm, open Windows PowerShell as an administrator, type the following at the prompt, and press Enter:
Get-SPFeature -Farm
Disable-SPFeature -Identity "SocialRibbonControl"
To enable these social features, perform the same task using the following code:
Get-SPFeature -Farm
Enable-SPFeature -Identity "SocialRibbonControl"
While the previous set of steps enables and disables social tags and note board for the entire farm, you can also prevent specific users or groups from accessing these features but allow the features to remain available to everyone else. Of course, you will need to be running an instance of the User Profile service application and have social tags and note boards enabled. Also, an instance of the Managed Metadata Service must exist and be active. Exercise 7-12 takes you through the process.
Exercise 7-12: Disabling Social Tags and Note Boards for a User or Group
1. In Central Administration, click Manage Service Applications under Application Management.
2. On the Manage Service Applications page, click the desired User Profile service application.
3. On the User Profile Service Application page, click Manage User Permissionsunder People.
4. In the Permissions For User Profile Service Application box, type or select the user or group account you do not want to have access to social features, and then click Add.
5. Under Permissions for, clear the Use Social Features check box and then click OK.
The ability to administer the User Profile service application not only lets you manage the service related to notes and tags but also lets you manage notes and tags specific to an individual. You can, for instance, remove all tags created by a certain person or delete one individual tag. As with the other tasks in this section of the chapter, you must have an instance of the User Profile service application running in SharePoint to proceed with the subsequent exercises.
Exercise 7-13 will show you how to remove all tags or notes associated with a specific SharePoint user or for a URL. This is a common task to perform when an employee has left the company. Keep in mind that removing social tags doesn’t remove any of the related terms in the term store. If you need to remove the related terms, you’ll need to use the Term Store Manager.
See Chapter 6, “Managing Operational Settings,” for more information about the term store and the Managed Metadata service application.
To successfully perform this exercise, you must have rights to create My Site websites and either be a member of the Farm Administrators group or be a service application administrator. You may also need to have My Sites websites available in your SharePoint deployment.
Exercise 7-13: Deleting All Tags and Notes for a User or URL
1. In Central Administration, click Manage Service Applications under ApplicationManagement.
2. On the Manage Service Applications page, click the desired User Profile service application.
3. On the Manage Profile Service page, under My Site Settings, click Manage Social Tags And Notes.
4. On the Manage Social Tags And Notes page, use the Type list to select the social item you want to delete.
5. Type either the username in the User field or the first part of the URL in the URL field, and then click Find.
6. Select the specific social items you want to remove and then click Delete.
You can also delete all notes and tags for a user or URL for a particular date range. To do so, follow steps 1 through 5 in the previous exercise, then enter a start and end date in the Date Range fields, and finally click Find. Select the social items you want to remove and then click Delete. The items for the user or URL within the selected date range will be removed.
You can even use the same process to remove a specific tag or note. Follow steps 1 through 5 in Exercise 7-13, type a text string for the tag or note you want to remove in the Tag/Note Contains fields, and then click Find. When the search results are returned, select the social items you want to remove, and then click Delete.
Managing Audiences
An audience is a grouping of users defined by their membership in a Microsoft Exchange distribution list (DL), by a SharePoint group, or by rules configured by a SharePoint administrator. The rules applied to an audience can be based on user profile data or membership in an identity management system, such as Active Directory Domain Services (AD DS) or Business Connectivity Services (BCS). Audiences and their definitions are contained in the User Profile service application and allow organizations to target content to specific users or groups of users. This allows you, the SharePoint administrator, to specify data deployment to a specific group or groups only and not to all authenticated SharePoint users.
Put another way, an audience, as part of a User Profile service application, lets you target content to specific users based on a quality existing in the user’s profile such as job title, task, or team. An audience can be defined by one or any combination of items such as any custom or default properties in the user profiles, location in the structure of the organization, any distribution list membership, or membership in a Windows security group or SharePoint group.
In SharePoint Server 2010, information targeting can be defined down to the list item level. Before being able to target an audience, the audience must be compiled to identify its membership using data crawling in the identity management system. This process cannot run during user profile synchronization, and audiences are not used in place of configuring permissions for SharePoint users and groups. An audience is used to allow administrators and managers to aim specific information to specific groups of users. For instance, you may want to provide data on the latest sales figures in a web part for the sales team but not have other teams or groups of SharePoint users see the same data. Being part of an audience does not allow members of the audience access to data on a permissions level but rather allows managers the ability to determine which users are part of a specific audience for which you want to aim particular information.
The first task to perform is to add an audience. When you add an audience, you are creating a group of members for which you want to target specific information. When you add an audience, you also add an audience rule by default, as well as creating an owner for the audience. You’ll learn how to add more audience rules later, but Exercise 7-14 will show you how to add your first audience. You won’t be able to view the audience members until you compile the audience, which you will also do in a later task.
To successfully complete this task, you must be a member of the Farm Administrators group, a service application administrator for the User Profile service application containing the audience, or an administrator for the Audience feature in the User Profile service application containing the audience.
Exercise 7-14: Adding an Audience
1. In Central Administration, click Manage Service Applications under ApplicationManagement.
2. On the Manage Service Applications page, click the desired User Profile service application.
3. On the Manage Profile Service page, click Manage Audiences under People.
4. On the View Audiences page, click New Audience.
5. On the Create Audience page, under Properties, type the name for the new audience in the Name field such as Sales Team.
6. Type a detailed description of the audience in the Description field such as Magic Product Sales Group in Idaho.
7. Type the name of the user account you want to own the audience in the Owner field, such as JMPyles, and then click Check Names.
8. Select Satisfy All Of The Rules or Satisfy Any Of The Rules to determine the members of the audience and then click OK.
9. On the Add Audience Rule page, to add a rule based on a user, follow steps 10 through 12. To add a rule based on a user profile property, follow steps 13 through 15.
10. Under Operand, to add a rule based on the user, select User or select Property to add a rule based on a property of the audience.
11. Select Reports Under to create a rule based on your organization’s hierarchy or select Member Of to create a rule based on a group or distribution list.
12. To test the rule, type or select the username in the Value field, selecting a person who manages the user you want in your audience to test the Reports Under rule and selecting the group or distribution you want to include to test the Member Of rule.
13. To add a rule based on a user profile property, select Property under Operand and then select a specific property from the available list such as PositionState.
14. Use the Operator list to select an operator for the property such as * or +.
15. In the Value field, type the value you want to use to evaluate the property against the rule such as ID.
16. When you are done, click OK.
To add a rule that contains more complex logic, you must use the SharePoint Server 2010 object model. To find out more about this object model, visit http://msdn.microsoft.com/library/microsoft.office.server.audience.audience%28office.14%29.aspx.
Once you have at least one audience created, you can edit the properties of the audience. Exercise 7-15 will get you started. To begin, follow steps 1 through 3 to get to the People section of the Manage Profile Service page.
Exercise 7-15: Editing an Audience
1. Under People, click Manage Audiences.
2. On the View Audiences page, click next to the name of the audience, such as Sales Group, you want to edit to make the arrow appear and then click Edit.
3. On the Edit Audience page, under Properties, change the name or description of the audience if you desire, such as changing the description to the Magic Product Sales Group in California.
4. In the Owner field, change the name of the owner to a different name than the current owner, such as LJPyles, and then click Check Names.
5. For Value, change the text from ID to CA.
6. When you are finished, click OK.
Planning Audience and Audience Rule Organization
You are a SharePoint administrator for your organization, and you have been tasked with creating a number of audiences for the purpose of targeting relevant information based on user profile data. You have divisions in five major U.S. cities, and the CIO wants authenticated SharePoint users in each city to receive information based on their locale. In addition, at each location, you are to create different audiences for managers, sales and marketing, and new employees so that relevant data can be routed appropriately.
You are considering the basis for creating audiences, such as user profile data, Active Directory service group membership, and Microsoft Exchange distribution lists. You are also reviewing the types of audience rules that can be created by default in SharePoint and whether the “off-the-shelf” rules will be sufficient.
You decide to consult with one of the SharePoint developers, and she suggests using the Microsoft Office Server Audience class to create audience rules that are more complex and that may offer more flexibility when creating audiences. You both review the information on this topic at msdn.microsoft.com and develop a plan you can present to the CIO.
You can delete an audience using many of the same steps as in Exercise 7-15. Just navigate to the People section on the Manage Profile Service page and click Manage Audiences. On the View Audiences page, click near the audience you want to delete so the arrow appears and then click Delete.
Once you have created an audience with its one default rule, you can add more rules, edit rules, and delete rules for the audience. As you saw in Exercise 7-14, each audience rule consists of an operand, an operator, and a value. The operand is used to identify the user or property you want to include in the query for the rule. The operator determines whether users being compared to the value are included or excluded by the rule. The value is the point of comparison used by the query.
When you create multiple rules for an audience, you must apply one of the two available sets of logic: satisfy all of the rules or satisfy any of the rules. In the former selection, users must match all of the rules for the audience in order to be members of the audience. In the latter selection, users can match any one of the existing rules to be considered audience members.
Adding or editing an audience rule is substantially similar to the activities in which you engaged in Exercises 7-14 and 7-15. To delete a rule, select the rule on the View Audience Properties page; then, on the bottom of the Edit Audience Rule page, click Delete and then click OK to confirm your action.
So far, all the tasks you’ve performed are well and good, but as you recall, an audience cannot be used until it’s compiled. Once you have created an audience and added the necessary rules, the next step is to compile it. Exercise 7-17 guides you through this process. The compiling task is very straightforward.
Exercise 7-17: Compiling an Audience
1. In Central Administration, click Manage Service Applications under ApplicationManagement.
2. On the Manage Service Applications page, click the User Profile service application.
3. On the Manage Profile Service page, click Compile Audiences under People.
Although that was a very simple task, you may not want to have to manually compile your audiences all of the time. Fortunately, you can schedule the compilation process to occur at regular intervals. Exercise 7-18 shows you step-by-step.
Exercise 7-18: Scheduling an Audience to Be Compiled
1. In Central Administration, click Manage Service Applications under ApplicationManagement.
2. On the Manage Service Applications page, click the User Profile service application.
3. On the Manage Profile Service page, click Schedule Audience Compilation under People.
4. On the Specify Compilation Schedule page, select the Enable Scheduling check box.
5. Select the start time using the Start At list.
6. Schedule the frequency of the compiling process by choosing Daily, Weekly,or Monthly.
7. When you are finished, click OK.
The audience will be compiled automatically based on the schedule you have created.
Finding just a few audiences may not be much of a chore, but if you create a large number of audiences, locating a specific one may not be easy if you are searching manually. You can use the search feature to locate any particular audience. Just navigate to the Manage Profile Service page and click Manage Audiences under People. On the View Audiences page, type the first few letters of the name of the audience in the Find Audiences That Start With field, and then click Find. The desired audience will appear in the search results.
In this chapter, you learned a about a variety of user and organizational profile management responsibilities carried by the SharePoint administrator, including the following:
- Creating and editing the User Profile service application
- Creating and editing User Profile service features
- Managing user and organizational profiles
- Configuring profile properties and managing profile synchronization
- Creating, compiling, and managing audiences and administrating audience rules
Understanding the Administrative Tasks Associated with the User Profile Service Application Show the ability to create an instance of the User Profile service application, edit the service application, and delegate authority to manage the application to others.
Managing User and Organization Profiles and Properties Demonstrate how to create and manage profiles for user and organization groups, as well as configure and manage the properties for those profiles, which includes profile synchronization.
Creating, Compiling, and Managing Targeted Audiences Indicate competence in the tasks related to the creation and configuration of targeted audience groups, including creating a group, adding and editing audience rules, and compiling an audience.
1. You are a SharePoint administrator for your organization. You are discussing the procedures for creating and configuring a User Profile service application with your staff. You are presenting the general characteristics of the application. Of the following choices, which ones are personalization settings that can be managed in this application? (Choose all that apply.)
A. Audiences
B. Defining Managed Paths
C. My Site settings
D. Profile synchronization settings
2. You are a SharePoint administrator for your organization. You are discussing the procedures for creating and configuring a User Profile service application with your staff. You are discussing circumstances that may inhibit the creation and use of a User Profile service application. Of the following options, which must be present in order for you to createthe application? (Choose all that apply.)
A. You must be running the Standard or Enterprise version of SharePoint Server 2010 in a full server farm.
B. At least one managed path must exist.
C. You must have an application pool that is used by My Sites.
D. You must be running an instance of Managed Metadata Services.
3. You are a SharePoint administrator for your organization. You are discussing the procedures for creating and configuring a User Profile service application with your staff. Of the following processes regarding the creation of this application, which one is the most true?
A. You should use Central Administration when creating the application for a stand-alone deployment and use Windows PowerShell for creating it in the enterprise.
B. You should use Central Administration when creating the application for the enterprise and use Windows PowerShell for creating it in a stand-alone deployment.
C. You can use either Central Administration or Windows PowerShell regardless of deployment.
D. You can use only Central Administration.
4. You are a SharePoint administrator for your organization, and you have created a User Profile service application. You want to delegate authority to manage the application to a member of your staff and need to verify what role the staff person must possess to make this possible. Of the following, what role or group at a minimum must the person belong to in order for you to delegate this authority?
A. The person must be a member of the Farm Administrators group.
B. The person must be a member of the SharePoint_Shell_Access role.
C. The person must be an local administrator on the server containing CentralAdministration.
D. The person must be a SharePoint authenticated user.
5. You are a SharePoint administrator for your organization, and you have created a User Profile service application. You want to delegate authority to manage the application to a member of your staff, but you want to limit the specific features the person can administer. Of the following, what options can you select? (Choose all that apply.)
A. You can delegate the ability to Manage Audiences.
B. You can delegate the ability to Manage Permissions.
C. You can delegate the ability to Retrieve People Data For Search Crawlers.
D. You must delegate the ability to manage all features in the application.
6. You are a SharePoint administrator for your organization, and you have created a User Profile service application. You want to delegate authority to manage the application to a member of your staff. You are reviewing the various procedures for delegating authority over a User Profile service application. Of the following, which one is true about how to delegate authority to the application?
A. You should use Central Administration when delegating this authority in a stand-alone deployment and use Windows PowerShell for delegating it in the enterprise.
B. You should use Central Administration when delegating this authority for the enterprise and use Windows PowerShell for delegating it in a stand-alone deployment.
C. You can use either Central Administration or Windows PowerShell regardless of deployment.
D. You can use only Central Administration.
7. You are a SharePoint administrator for your organization, and you have created a User Profile service application. The User Profile service application comes with a default set of user profile properties, but you also need to create a series of custom user profile properties to track various business processes. You want to make these properties available to different language groups. What does your research tell you about this?
A. You can set the user description in different languages when you are configuring the display name settings.
B. You can set the custom property in specific languages when you click New Property on the Manage User Property page.
C. You can set the customization to display in more than one language when you are adding a new mapping.
D. You can only set the customized profile property to display in the default language used in your SharePoint deployment.
8. You are a SharePoint administrator for your organization, and you have created a User Profile service application. The User Profile service application comes with a default set of organization profile properties. Of the following, which components in an organization profile can be managed? (Choose all that apply.)
A. Delegation for organizations
B. Organization paths
C. Organization profile properties
D. Organization properties
9. You are a SharePoint administrator for your organization, and you have created a User Profile service application. The User Profile service application comes with a default set of userand organization profile properties. In addition, you need to create some customized user and organization profile properties. In the process of creating the search settings for both, what are the differences in setting options?
A. You can set either Alias or Indexed search options for custom user profile properties but only Alias for custom organization profile properties.
B. You can set either Alias or Indexed search options for custom organization profile properties but only Indexed for custom user profile properties.
C. Custom user profile properties can only use the Alias search option, and Custom organization properties can only use the indexed search option.
D. There is no difference. The search settings for either profile property are identical.
10. You are a SharePoint administrator for your organization, and you have created a User Profile service application. You want to be able to access, use, and synchronize user and group profiles from a number of different sources in the SharePoint environment. You are developing a plan with your staff and discussing what directory services types can be synchronized with the SharePoint profile store. Of the following, what are correct choices? (Choose all that apply.)
A. Active Directory Domain Services (AD DS)
B. Business Data Connectivity Services
C. SunOne version 5.2 (LDAP)
D. Windows NT Server 4.0 Directory Services
11. You are a SharePoint administrator for your organization, and you have created a User Profile service application. You want to be able to access, use, and synchronize user and group profiles from a number of different sources in the SharePoint environment. You are developing a plan with your staff and discussing any specific requirements that may have previously been overlooked. Of the following, what requirements are valid? (Choose all that apply.)
A. You must use either a Standard or Enterprise version of SharePoint Server 2010 and run in a server farm.
B. If you are using SQL Server 2008, it specifically must be with Service Pack 1 (SP1) with Cumulative Update 2 (CU2).
C. The Forefront Identity Manager Synchronization Service must be stopped.
D. The Forefront Identity Manager Service must be running.
12. You are a SharePoint administrator for your organization, and you have created a User Profile service application. You want to be able to access, use, and synchronize user and group profiles from a number of different sources in the SharePoint environment. You are developing a plan with your staff and discussing automation of the synchronization process. Of synchronizations that can be automated, what are the valid options? (Choose all that apply.)
A. Full
B. Differential
C. Incremental
D. Mirror
13. You are a SharePoint administrator for your organization, and you have created a User Profile service application. You want to be able to access, use, and synchronize user and group profiles from a number of different sources in the SharePoint environment. You are developing a plan with your staff and discussing automation of the synchronization process. By default, the User Profile Synchronization service is not started. You want to be able to delegate the responsibility of starting the service. What permissions must the person have to be able to perform this task? (Choose all that apply.)
A. The person must be a member of the Farm Administrators group on the computer containing Central Administration.
B. The person must be the local administrator on the computer where the User Profile Synchronization service is present.
C. The person must be a service administrator for the User Profile service being configured.
D. The person must be a member of the Forefront Identity Manager Service’s administration group.
14. You are a SharePoint administrator for your organization, and you have created a User Profile service application. You want to be able to access, use, and synchronize user and group profiles from a number of different sources in the SharePoint environment. You are developing a plan with your staff and discussing automation of the synchronization process. After starting the User Profile Synchronization Service, what is the next necessary task?
A. Creating a Profile Synchronization connection
B. Creating Profile Synchronization connection filters
C. Configuring a nonrecurring profile synchronization
D. Mapping user profile properties
15. You are a SharePoint administrator for your organization, and you have created a User Profile service application. You want to be able to access, use, and synchronize user and group profiles from a number of different sources in the SharePoint environment. You have performed all the other necessary steps and are now ready to configure profile synchronization. Of the following, what permissions must you possess to successfully complete this task in Central Administration? (Choose all that apply.)
A. You must have Full Control permissions as a Service Administrator for the User Profile service.
B. You must be a system administrator on SQL Server.
C. You must be a member of the SharePoint_Shell_Access role.
D. You must be a member of the Farm Administrators group.
16. You are a SharePoint administrator for your organization, and you have created a User Profile service application. You want to be able to access, use, and synchronize user and group profiles from a number of different sources in the SharePoint environment. You have performed all the other necessary steps and are now ready to configure profile synchronization. When using AD DS, you must run full synchronization. What other event will require a full synchronization under this condition?
A. When any new profile mapping is created.
B. When changing permissions for a person, you are delegating to manage profilesynchronization.
C. When synchronizing to Business Data Connectivity Services.
D. When synchronizing to SunOne version 5.2 (LDAP).
17. You are a SharePoint administrator for your organization, and you have created a User Profile service application. You want to be able to access, use, and synchronize user and group profiles from a number of different sources in the SharePoint environment. You want to configure recurring profile synchronization. What option on the User Profile Service Application page lets you do this?
A. The Activate Configure Synchronization option
B. The Activate Recurring Synchronization option
C. The Configure Synchronization Timer Job option
D. The Recurring Synchronization Timer Job option
18. The Create Personal Site feature allows users to create a My Site website and Social Features including using social tags, Note Board, and ratings. As a SharePoint administrator, you have the ability to modify how a SharePoint user utilizes social features within their My Site website. You are discussing the corporate plan for how authenticated users will use these social features with your staff. In your review, what do you determine is true in this area? (Choose all that apply.)
A. Users can access I Like It and Tags and Notes selections in both libraries and lists.
B. As an administrator, you can disable social features at the farm, site collection, and site levels.
C. As an administrator, you can delete all tags and notes for a specific user.
D. By default, all authenticated users can create a personalized My Site website.
19. You are a SharePoint administrator for your organization, and you are developing a plan with your staff to create audiences so that specific content can be targeted to defined groups. An audience is a grouping of users defined by their membership in certain groups or containers. Of the following, what can be used to define an audience? (Choose all that apply.)
A. A Business Data Catalog group
B. A Microsoft Exchange distribution list
C. A SharePoint group
D. Rules configured by a SharePoint administrator
20. You are a SharePoint administrator for your organization, and you are developing a plan with your staff to create audiences so that specific content can be targeted to defined groups. An audience is a grouping of users defined by their membership in certain groups or containers. After creating an audience, defining rules, and making sure the audience has an owner, what must you do before the audience can be used?
A. Compile the audience.
B. Distribute the audience.
C. Configure the audience.
D. Publish the audience.
1. A, C, D. Defining managed paths is done in web application management, not in the User Profile service application.
2. B, C, D. Although you must be running either the Standard or Enterprise version of SharePoint Server 2010, it does not have to be running in a full server farm. This is a requirement only when you perform other tasks such as profile synchronization.
3. C. Although there are some creation processes that typically use Central Administration for one deployment type and Windows PowerShell for another, the creation of a User Profile service application isn’t one of them.
4. D. You can assign this responsibility to any SharePoint authenticated user, although it is likely you will choose someone with the necessary technical background as well.
5. A, B, C. You can delegate one or more specific features without delegating total control of the application to another user.
6. A. Use Central Administration to perform this task in a stand-alone deployment and Windows PowerShell in an enterprise environment.
7. A. For the Display Name settings and the User Description settings, you can use multiple languages in your SharePoint sites and provide different display names for each language by clicking Edit Languages. When the dialog box opens, click Add Language, select the desired language from the menu, and then type the display name.
8. A, C, D. Option B is incorrect, but in addition to the other choices, you can also administer organization subtypes.
9. D. You can set either Alias, Indexed, or both for custom user profile properties and custom organization profile properties.
10. A, B, C. Windows NT Server 4.0 Directory Services is not supported, but in addition to the other correct selections, Novell eDirectory version 8.7.3 (LDAP) and IBM Trivoli 6.2 (LDAP) are.
11. A, B, D. Both the Forefront Identity Manager Synchronization Service and the Forefront Identity Manager Service must be running.
12. A, C. You can only set automated synchronizations to full or incremental. The other options do not exist.
13. A, B, C. Option D is bogus, but all other permissions listed are required to perform start the User Profile Synchronization service.
14. A. You must create a profile synchronization connection after starting the User Profile Synchronization service but before performing any other task.
15. A, B, D. Option C is not required to perform this task in Central Administration.
16. A. When using AD DS, you must run full synchronization first and then again when any new profile property mapping is created.
17. C. Only C is the correct option. All the other selections are bogus.
18. A, C, D. A SharePoint administrator can only disable social features at the farm level.
19. B, C, D. All groups listed are valid options except the Business Data Catalog group, which is bogus.
20. A. Audience members don’t become available until the audience is compiled. The other options are bogus.