
Chapter 8
Managing Authentication Providers and Permissions
Microsoft Exam Objective Covered in This Chapter:
- Maintaining a SharePoint Environment
- Manage Authentication Providers
- Manage Accounts and User Roles
In any networked environment, ideally you have access to only the information and services your credentials allowyou to access. This is true for both people and other services and systems. The gatekeepers to every site and service in SharePoint are the authentication systems you configure, and from the point of view of the casual observer, their numbers are vast. Beyond that, you have the responsibility of making SharePoint user permissions and roles work with authentication providers, including the task of configuring custom permissions. You also need to recognize when an access issue is authentication based. Each of these areas is covered in this chapter.
Managing Authentication Methods
This section is the primary focus of the chapter. As mentioned in the introduction, as a SharePoint administrator, you are responsible for understanding and configuring a variety of authentication methods, including the following:
- Kerberos
- Claims-based authentication
- Forms-based authentication
- Windows Challenge/Response NTLM
- Secure Store Service (SSS)
- Active Directory Federation Services (ADFS)
The Secure Store Service was described in detail in Chapter 4, “Configuring Service Applications,” but the other authentication methods will be presented, including the specific tasks required to install and configure the services.
Configuring authentication methods is performed after the installation and initial configuration of SharePoint. When you are ready to create sites and site collections, you must configure authentication at the level of the web application where the site collections will live. Authentication methods typically used are Kerberos and claims-based authentication but can include many others.
NTLM is the default authentication protocol for most SharePoint environments, but sometimes administrators change back and forth between Kerberos and NTLM. Of course, Active Directory Federation Service (AD FS) extends single sign-on security and functionality beyond what can exist within a single security boundary.
Chapter 3, “Configuring SharePoint Farm Environments,” showed you how to create a web application and configure services for the application. See Chapter 9, “Managing Web Applications and Host Sites,” and Chapter 10, “Managing Site Collections,” for more information related to configuring a web application and site collection security.
Administering Kerberos
Kerberos is an industry-standard authentication method that is implemented in Active Directory Domain Services (AD DS). If you plan on using Kerberos authentication on your server farm, you must install and configure several applications on the computers in your farm. The goals of these tasks are to allow communication between SharePoint and the SQL Server database, allow access to the Central Administration web application, and allow access to other web applications including the portal site and My Site web applications.
Configuring Kerberos will require that SharePoint 2010 be installed on Windows Server 2008 or Windows Server 2008 R2 and that all of your Active Directory domain controllers be running Windows Server 2008 or Windows Server 2008 R2. Make sure all your server computers are fully updated before proceeding.
SharePoint Server 2010 Search cannot crawl SharePoint Server 2010 web applications that are configured to use Kerberos authentication if theweb applications are hosted on IIS virtual servers that are bound to nondefault ports. You must use TCP port 80 and Secure Sockets Layer (SSL) port 443. If you want to use nondefault ports and have SharePoint Server 2010 Search be able to successfully complete crawls, you must use either Basic authentication or NTLM authentication.
Another Kerberos requirement is the ability to create service principal names (SPNs) in AD DS, which requires that you have domain administrative-level access. The SPNs must include the port numbers if you plan on using nondefault ports.
The server farm topology typical for Kerberos authentication includes separate computers acting as frontend web servers, application servers, and SQL Server instances. One application server must also be running Search Query and another usually runs Search Indexing. The database server should be SQL Server 2008 with the SQL Server service running as account mydomainsqlsvc and the default instance of SQL Server listening on TCP port 1433.
Configuring Kerberos for SQL Communication
A number of Kerberos-related tasks must be performed on Windows Server 2008 to enable SQL Server communication before installing SharePoint Server 2010 on any of the server computers in the farm.
The first required task involved in configuring Kerberos for any service installed on a computer running Windows Server 2008 is creating an SPN for the domain account being used to run the service on the host computer. An SPN comprises the following components:
- A service name such as HTTP
- A hostname, which can be real or virtual
- A port number
As previously mentioned, the default instance of SQL server running on the server computer listens on port 1433 for requests. If the service name was HTTP and the default instance of SQL Server was named sqlsvr, the SPN would look like HTTP/sqlsvr:1433.
The SPNs are created on the instance of the SQL Server instance on the Windows Server 2008 machine hosting SQL for the server farm. To set an SPN for an Active Directory domain account, you can either use setspn.exe, which is part of the Resource Kit tools for Windows Server 2008, or use the adsiedit.msc utility for the Active Directory domain controller.
Creating an SPN for the SQL Server Service Account
The following example shows you how to use the adsiedit.msc method. You will need to have a domain controller running in your networked environment and require domain administrative permissions on the controller.
1. Log in to the Active Directory domain controller.
2. In the Run field, type ADSIEDIT.MSC, and press Enter.
3. In the Actions pane on the right, click More Actions and then click Connect To.
4. When the Connection Settings dialog box appears, either accept the default name in the Name field or type in the desired name.
5. Under Connection point, select the Select A Well Known Naming Context option and then use the drop-down menu to select the desired option.
6. Select the desired options and click OK (you should only have to perform steps 3 through 6 once).
7. In the Management Console dialog box, expand the Domain Container folder.
8. Expand the folder containing user accounts, such as CN-Users.
9. Locate the container for the SQL Server Service account, such as CN=sqlsvr.
10. Right-click the account name and then click Properties.
11. Scroll down the properties list, select serverPrincipleName, and click Edit.
12. In the Value To Add field in the Multi-Valued String Editor dialog box, type the name of the SPN such as HTTP/sqlsvr:1433 and then click Add.
13. Click OK to close the Multi-Valued String Editor and then click OK to close the Properties dialog box.
Once you have installed SharePoint Server 2010 on the server farm, you want to test your ability to use Kerberos authentication to connect SharePoint to SQL. You can do this by installing SQL Client Tools on one of your SharePoint servers and using the utility to confirm your ability to connect to SQL.
Confirming Kerberos Authentication to the SQL Host
To perform the following, go to www.microsoft.com/downloads and then search for Microsoft SQL Server Management Studio Express. Follow the instructions for downloading and installing the utility on one of your SharePoint server machines.
Once you have the utility installed, run Management Studio. When the Connect To Server dialog box appears, type the name of the SQL Server host computer in the available field and then click Connect.
To confirm that Kerberos was used to authenticate the connection, on the SQL Server host computer, run the Event Viewer and review the Security event log. If Kerberos authentication was successfully used, you’ll see a Success Audit record for a Logon/Logoff category event. For Logon Process, you should see Kerberos listed. Also, Logon Type should be 3, and Source Network Address should list the IP address of the SharePoint computer you used to make the connection.
For more information on verifying authentication and how to check the Event Viewer, see the “Errors” section later in this chapter.
Deploying the Server Farm for Kerberos Authentication
Chapter 3 described the various server farm topologies that can be used depending on your business and technical goals for a SharePoint Server 2010 server farm. Deploying the farm for Kerberos authentication is typically performed in a specific order. Once you have installed SharePoint on all the servers in the farm, have run the SharePoint Configuration Wizard, and have joined all of the servers to the farm, you would configure services and applications in the following manner:
1. Configure services on the farm servers starting with the SharePoint Foundation 2010 Search service, then the SharePoint Server 2010 Search Indexing service, and finally the SharePoint Server 2010 Search Query service.
2. Create the web application that will be used for the portal site and the My Site using Kerberos authentication.
3. Create a site collection using the Collaboration Portal template in the portal site web application.
Although the process of creating a web application was covered in Chapter 4, additional exercises will be presented here to highlight the order of creating said web apps specific to Kerberos authentication. Exercise 8-1 will show you the process of creating the web application for the portal site.
Exercise 8-1: Creating the Portal Site Web Application with Kerberos Authentication
1. Navigate to Central Administration and click Manage Web Applications under Application Management.
2. On the Web Applications Management page, on the Web Applications tab, click New on the Ribbon.
3. In the Create A New Web Application box, under Authentication, accept the default selection of Classic Mode Authentication.
4. Under IIS Web Site, select Create A New IIS Web Site, if it is not already selected.
5. Give the portal site a name in the Name field and a description in the Description field.
6. In the Port field, type 80.
7. In the Host Header field, type a URL such as mainportal.domainname.local. For Path, accept the default.
8. Under Security Configuration, select Negotiate (Kerberos) and accept the rest of the default settings.

9. Under Public URL, accept the URL selection and select the Default zone.
10. Select Create New Application Pool.
11. Accept the default name in the Application Pool Name field or create a new name.
12. Select Configurable.
13. Select Register New Managed Account; then in the box that appears, enter the administrator user you want to manage the web application in the format domain/username and click OK.
14. Accept the rest of the defaults.
15. When you are done, click OK.
Create the My Site Web Application
The process of creating a My Site web application using Kerberos is just about the same as doing so for a portal site. You still use port 80, but you give the site a unique name and a description such as My Sites. You still create the application in the Default zone and createa new application pool, naming it something like MySitePool. Other than that, use the same steps as you did in Exercise 8-1.
After creating web applications that are configured to use Kerberos authentication, it’s time to create site collections within the applications. Chapter 10 will provide the details about the mechanics of creating and maintaining sites and site collections, but Exercise 8-2 will show you, in brief, the next step, which is specifically creating a collaboration portal site on the portal web application. This is the collaboration gateway into SharePoint.
Exercise 8-2: Creating the Enterprise Wiki Using the Collaboration Portal Template
1. Navigate to Central Administration, and on the Application Management page, under Site Collections, click Create Site Collection.
2. On the Create Site Collection page, select the web application you created for the portal site that you configured to use Kerberos authentication. See Exercise 8-1 for the name of that application.
3. Give the new site collection a name and description in the available field and give the site collection URL a path.
4. Under Template Selection and under Select A Template, click the Publishing tab and then select the Collaboration Portal template.
5. Under Primary Site Collection Administrator, type the domain and name of the user you want in this role, such as domainadmin.
6. Under Secondary Site Collection Administrator, specify the SharePoint user you want in this role.
7. When you are ready, click OK.
8. Verify that the portal site collection was successfully created.
You can create other site collections on the web applications you set up to use Kerberos authentication. The next step, and it’s an important one, is to make sure Kerberos authentication is actually working. To perform the Exercise 8-3, you must log into a server running SharePoint but not a frontend web server configured for network load balancing (NLB).
Exercise 8-3: Verifying Successful Kerberos Authentication
1. Log in to the required server in the domain as the administrator for the web application hosting the desired site collection (such as domainadmin).
2. Launch Internet Explorer. Attempt to follow the URL for the portal site collection and verify that the home page for the portal site loads in the browser.
3. Close the browser and log out of the server.
4. Log in to one of the load-balanced frontend web servers.
5. Run the Event Viewer by clicking Start Event Viewer or Start Control Panel Administrative Tools Event Viewer.
6. Expand Windows Logs, open the Security log, and verify a Success Audit record (when you open the item, you may have to click the Details tab to get a human-friendly view of the data).
7. Verify that the username is that of the administrator you used to access the portal site, that Kerberos authentication was used, that the login type was 3 (for network login), and that the IP address was that of the server computer you used to access the portal site collection.
Now that you’ve verified that people can authenticate using Kerberos, you still need to make sure Search Indexing is working correctly. Before you can do this, Search must complete a full crawl of the Kerberos-authenticated site collection.
Once the full crawl is completed, open a web browser and go to the portal site collection main page. Type a valid keyword in the search field and start the search. If you receive search results, indexing is working correctly. If not, review the following:
- Verify that you are using a valid keyword.
- Verify that the Search service is running on the Search and Search Indexing and Search Query servers.
- Verify that there are no issues with search propagation from Search Indexing server to the Search Query server.
- Verify that the crawl ran successfully.
If the crawl failed with one or more access denied errors, Kerberos authentication may have failed, or the crawl account does not have the proper access.
See Chapter 5, “Configuring Indexing and Search,” for more information on search and search indexing.
Administering Claims-Based Authentication
Claims-based authentication isn’t cast from the traditional mold of authenticationand authorization you are probably used to employing. Instead, it uses an identitysystem that allows users to present claims that include information about who theuser is and what systems and content they can access. Claims-based authentication has been available for SharePoint since 2007 and is the authentication system of choice for SharePoint.
The claims-based authentication system has the benefit of working with any corporate identity system, including Active Directory, LDAP, application-specific databases, and user-centric identity models such as LiveID and OpenID. The “claims” users make to the system can include their age and group membership and are then validated against a trusted source, granting the user access to SharePoint and other systems integrated into the SharePoint environment.
The prerequisites to configuring a claims-based web application in SharePoint are that SharePoint must be installed and then the configuration wizard must be run. You must then either run the farm configuration wizard or, in the case of individual SharePoint deployments, configure your SharePoint platform. You must configure the first web application and use the Farm Administrators account for the application pool account. Finally, you must configure the first SharePoint site collection.
Exercise 8-4 shows you how to easily set up a web application for claims-based authentication.
Exercise 8-4: Creating the Portal Site Web Application with Claims-Based Authentication
1. Navigate to Central Administration and click Manage Web Applications underApplication Management.
2. On the Manage Web Applications page, click New on the ribbon.
3. On the Create a New Web Application page, select Claims Based Authentication under Authentication.
4. Create the other values for the new web application as you did in Exercise 8-1, giving the host header and path unique values but maintaining the rest of the selections.
5. Click OK and then verify that the new web application has been created.
The only difference between this task and Exercise 8-1 is that you selected Claims Based Authentication instead of Classic Mode Authentication. After you create the web application, create the first site collection in the new web application, which should be your portal site. See Exercise 8-2 for the specific steps required to complete this operation.
Although authentication systems in general assume that the person gaining access must have some special right to services and data, just like on most websites on the Internet, you may want to allow unrestricted access to part of your web infrastructure. To that end, you can configure anonymous claims-based authentication. You will need to use an account that has site collection administrator rights to complete Exercise 8-5.
Exercise 8-5: Configuring Anonymous Access for a Claims-Based Web Application
1. Navigate to Central Administration, and click Security in Quick Launch.
2. On the Security page, click Specify Authentication Providers under General Security.
3. On the Authentication Providers page, use the Web Application menu to select the web application you created for claims-based authentication.
4. Click the zone for the web application.
5. On the Edit Authentication page, select the Enable Anonymous Access check box under Anonymous Access.
6. Click Save.
7. Navigate to the main page for the portal site collection on the relevant web application.
8. Click Site Actions and then select Site Permissions.
9. On the Site Permissions page, click Anonymous Access on the Ribbon.
10. Select either Entire Web Site or Lists And Libraries, depending on the scope of access you want to grant anonymous users, as shown here.

11. Click OK.
You can use this basic set of steps to edit the authentication for any web application and the site collections it contains, not just those web applications created for claims-based authentication.
Converting Forms-Based Authentication toClaims-Based Authentication
Up until this point in the chapter, you may not have given much thought to whether your SharePoint deployment was an upgrade from Microsoft Office SharePoint Server (MOSS) 2007 or a fresh install, but the next exercise is focused on the upgrade scenario.
MOSS 2007 web applications were generally configured to use forms-based authentication or web SSO authentication. If you have upgraded your MOSS 2007 server farm to SharePoint Server 2010, you can convert the authentication type from forms-based to claims-based, but not during the conversion process itself. If you do not perform this action, you won’t be able to use the web applications created under MOSS 2007 in your SharePoint 2010 environment. Once you perform the authentication conversion, you’ll be ready to migrate users and permissions to SharePoint 2010.
The first part of the process involves using Windows PowerShell to convert the existing web applications, post-upgrade, to claims-based authentication. To successfully perform this action, you must be a member of the SharePoint_Shell_Access group on the configuration databases and a member of the WSS_ADMIN_WPG local group on the computer containing SharePoint 2010.
Open Windows PowerShell as an administrator, run the following code, and then press Enter, substituting the example name for the server with the actual server name:
$w = Get-SPWebApplication "http://<server>/"
$w.UseClaimsAuthentication = "True";
$w.Update()
$w.ProvisionGlobally()
You still have to make changes in the authentication type using Windows PowerShell, and you still need to make additional configuration changes using Central Administration. Exercise 8-6 describes how to configure a web application originally set to use forms-based authentication to use claims-based authentication required by an LDAP provider. You must be a site collection administrator to successfully complete this task.
Exercise 8-6: Configuring a Forms-Based Web Application to Use an LDAP Provider
1. Navigate to Central Administration and click Manage Web Applications underApplication Management.
2. On the Manage Web Applications page, click New on the Ribbon.
3. Under Authentication, select Claims Based Authentication.
4. Under Authentication Type, select Enable ASP.NET Membership and Role Provider.
5. Type the membership provider name and the role manager name in the available fields such as membership and rolemanager.
6. When you are done, click OK to create the Web application.
You can perform the same task by running Windows PowerShell as an administrator, typing the following code at the command prompt, and then pressing Enter:
$ap = New-SPAuthenticationProvider -Name "ClaimsForms" -ASPNETMembershipProvider "membership"
-ASPNETRoleProviderName "rolemanager"
$wa = New-SPWebApplication -Name "Claims Windows Web App" -ApplicationPool "Claims App Pool"
-ApplicationPoolAccount "internalappool"
-Url http://servername -Port 80
-AuthenticationProvider $ap
You will need to replace the example values with the actual names in your production system.
Now that you have created the web application, you must perform several tasks to modify Web.config files for the Central Administration web application, the Security Token Service web application, and the forms-based authentication claims-based web application. Each of those tasks is performed in Windows PowerShell run as administrator.
Configuring the Central Administration Web.config File
To configure the Central Administration Web.config file, follow these steps:
1. For the server computer where Central Administration is installed, click Start Run.
2. In the Run field, type INETMGR and press Enter to launch the IIS Manager.
3. In the IIS Manager, navigate to the SharePoint Central Administration site, right-click, and then click Explore.
4. Navigate to and then open the Web.config file.
5. In the Web.config file, locate the section <Configuration> <system.web>.
6. Add the following code to this section of the Web.config file and then save your changes:
<membership defaultProvider="AspNetSqlMembershipProvider">
<providers>
<add name="membership"
type="Microsoft.Office.Server.Security.
LdapMembershipProvider, Microsoft.Office.Server, Version=14.0.0.0,
Culture=neutral, PublicKeyToken=71e9bce111e9429c"
server="yourserver.com"
port="389"
useSSL="false"
userDNAttribute="distinguishedName"
userNameAttribute="sAMAccountName"
userContainer="OU=UserAccounts,DC=internal
,DC=yourcompany,DC= distinguishedName
(of your userContainer)"
userObjectClass="person"
userFilter="(ObjectClass=person)"
scope="Subtree"
otherRequiredUserAttributes="sn,givenname,cn" />
</providers>
</membership>
<roleManager enabled="true" defaultProvider=
"AspNetWindowsTokenRoleProvider" >
<providers>
<add name="roleManager"
type="Microsoft.Office.Server.Security.
LdapRoleProvider, Microsoft.Office.Server,
Version=14.0.0.0, Culture=neutral,
PublicKeyToken=71e9bce111e9429c"
server="yourserver.com"
port="389"
useSSL="false"
groupContainer="DC=internal,DC=yourcompany,
DC= distinguishedName (of your groupContainer)"
groupNameAttribute="cn"
groupNameAlternateSearchAttribute="samAccountName"
groupMemberAttribute="member"
userNameAttribute="sAMAccountName"
dnAttribute="distinguishedName"
groupFilter="((ObjectClass=group)"
userFilter="((ObjectClass=person)"
scope="Subtree" />
</providers>
</roleManager>
7. Close the Web.config file for the Central Administration site, but leave the IISManager open.
Configuring the Security Token Service Web.config File
The next step is to configure the Security Token Service Web.config file. To do so, follow the next set of steps:
1. With the IIS Manager still open, navigate to the SharePoint web services site.
2. Navigate to the SecurityTokenServiceApplication subsite, right-click, and thenclick Explore.
3. Open the Web.config file and locate <Configuration> <system.web>.
4. In this section, add the following code and then save your changes:
<membership>
<providers>
<add name="membership"
type="Microsoft.Office.Server.Security
.LdapMembershipProvider, Microsoft.Office.Server, Version=14.0.0.0,
Culture=neutral, PublicKeyToken=71e9bce111e9429c"
server="yourserver.com"
port="389"
useSSL="false"
userDNAttribute="distinguishedName"
userNameAttribute="sAMAccountName"
userContainer="OU=UserAccounts,DC=internal
DC=yourcompany,DC=com"
userObjectClass="person"
userFilter="(&(ObjectClass=person))"
scope="Subtree"
otherRequiredUserAttributes="sn,givenname,cn" />
</providers>
</membership>
<roleManager enabled="true" >
<providers>
<add name="rolemanager"
type="Microsoft.Office.Server.Security.
LdapRoleProvider, Microsoft.Office.Server, Version=14.0.0.0,
Culture=neutral, PublicKeyToken=71e9bce111e9429c"
server="yourserver.com"
port="389"
useSSL="false"
groupContainer="DC=internal,DC=yourcompany,DC=com"
groupNameAttribute="cn"
groupNameAlternateSearchAttribute="samAccountName"
groupMemberAttribute="member"
userNameAttribute="sAMAccountName"
dnAttribute="distinguishedName"
groupFilter="(&(ObjectClass=group))"
userFilter="(&(ObjectClass=person))"
scope="Subtree" />
</providers>
</roleManager>
5. After saving the Web.config file, close it, but leave the IIS Manager open.
Configuring the Forms-Based Authentication Claims-BasedWeb Application Web.config File
Now you need to perform a similar action on the forms-based authentication claims-based web application Web.config file:
1. With the IIS Manager open, navigate to the claims forms site.
2. Right-click Claims Forms and select Explore.
3. Open the Web.config file.
4. Find the <configuration> <system.web> section and then find the <membership defaultProvider="1"> section.
5. Add the following code, and then save your changes:
<add name="membership"
type="Microsoft.Office.Server.Security.
LdapMembershipProvider, Microsoft.Office.Server, Version=14.0.0.0,
Culture=neutral, PublicKeyToken=71e9bce111e9429c"
server="yourserver.com"
port="389"
useSSL="false"
userDNAttribute="distinguishedName"
userNameAttribute="sAMAccountName"
userContainer="OU=UserAccounts,
DC=internal, DC=yourcompany,DC=com"
userObjectClass="person"
userFilter="(&(ObjectClass=person))"
scope="Subtree"
otherRequiredUserAttributes="sn,givenname,cn" />
6. Find the <roleManager defaultProvider="c" enabled="true" cacheRolesInCookie="false"> section, add the following code, and then saveyour changes:
<add name="roleManager"
type="Microsoft.Office.Server.Security.
LdapRoleProvider, Microsoft.Office.Server, Version=14.0.0.0,
Culture=neutral, PublicKeyToken=71e9bce111e9429c"
server="yourserver.com"
port="389"
useSSL="false"
groupContainer="DC=internal,DC=yourcompany,
DC=com"
groupNameAttribute="cn"
groupNameAlternateSearchAttribute="samAccountName"
groupMemberAttribute="member"
userNameAttribute="sAMAccountName"
dnAttribute="distinguishedName"
groupFilter="(&(ObjectClass=group))"
userFilter="(&(ObjectClass=person))"
scope="Subtree" />
7. After you have saved your changes, close the Web.config file, and then close the IIS Manager.
Now use Windows PowerShell to create an SPClaimsPrincipal and a site collection. Open Windows PowerShell as an administrator. At the command prompt, type the following code and then press Enter, substituting the example values for the actual production values:
$cp = New-SPClaimsPrincipal -Identity "membership:SiteOwner"
-IdentityType FormsUser
$sp = New-SPSite http://servername:port -OwnerAlias $cp.Encode()
-Template "STS#0"
Migrating Users and Permissions from MOSS 2007 to SharePoint Server 2010
The last task in this process is migrating users and permissions from MOSS 2007 to SharePoint 2010.
Open Windows PowerShell as an administrator, type the following code at the command prompt, and then press Enter, changing the example values to the production values:
$w = Get-SPWebApplication "http://<server>/"
$w.MigrateUsers(True)
Configuring Kerberos Authentication forClaims to Windows Token Service
This section of the chapter assumes you are working in an Active Directory domain environment and will need to add one or more service principal name (SPN) entries to Active Directory. You will need to make sure you do not create any SPN entries that are duplicates in the system and that none of your added entries are currently being used by other accounts or services. To check, after you create the necessary SPN entries, check the System log on your domain controllers and look for event ID 11 entries. See the “Errors” section later in this chapter for details.
Although not required, the following set of exercises assumes you are running separate frontend web servers, application servers, and SQL Server servers, as well as at least one external data source. The first task will be for you to set up constrained delegation for the shared service application pool account. You will need to have administrative rights to the domain controllers in your Active Directory domain system.
You must have at least one SPN registered for the account you plan to use in the following exercise. For more information, review “Creating an SPN for the SQL Server Service Account” from earlier in this chapter.
Configuring Constrained Delegation for the SharedService Application Pool Account
You can create an SPN on the domain controller at the command line by running the SETSPN.EXE tool, as well as using the method illustrated earlier in this chapter. At the command prompt, type the following code and then press Enter, substituting the example values for your production values:
setspn -A http/uniquespn1
domainnameuseraccount
1. Log in to your domain controller, click Start Administrative Tools Active Directory Users And Computers.
2. Expand the Domain node and then select Users.
3. Right-click the application pool identity user account and then select Properties.
4. On the Delegation tab, make sure the Trust This User For Delegation To Specified Services Only option is selected.
5. Click use any authentication protocol.
6. Click Add and then click Users or Computers.
7. Type the domain name and user account that is running the service you want to have accept Kerberos credentials, such as domainnameuseraccount, and then click OK.
8. After the available services values for the selected account appear, select MSSQLSvc for the external data source and then click OK.
9. Click OK again to close the Properties dialog box.
Configuring Constrained Delegation for the Claimsto Windows Token Service Account
This task is virtually identical to the previous exercise except, in step 3, right-click the application pool identity account for the Windows Server 2008 machine acting in the Application Server role in the server farm (and not the identity user account). Follow all the other steps in the same way.
By default, the claims to the Windows token service runs under the Local System account on the application server.
Configuring the Claims to Windows Token Service on the Application Server
Your final task is to grant WSS_SPG group permissions to convert claims to Windows identity on the application server. To do so, search for and locate the wtshost.exe file on the application server and locate the <allowedCallers> element under the <windowsTokenService>section. Then add <add value="WSS_WPG" />. The entry will look something like the following example:
<?xml version="1.0"?>
<configuration>
<configSections>
<section name="windowsTokenService" type="yourcompany.IdentityModel.WindowsTokenService
.Configuration.WindowsTokenServiceSection, yourcompany.IdentityModel.WindowsTokenService,
Version=1.0.0.0, Culture=neutral,
PublicKeyToken=31bf3856ad364e35"/>
</configSections>
<windowsTokenService>
<allowedCallers>
<clear/>
<add value="WSS_WPG" />
</allowedCallers>
</windowsTokenService>
</configuration>
Open a command-line window, type the following code at the command prompt, and then press Enter to start the claims to Windows token service:
net start c2wts
sc config c2wts start= auto
Administering Active Directory Federation Services
Active Directory Federation Service (AD FS) allows Federated Identity and Access Management by providing secure sharing of digital identity and entitlements rights across security and enterprise boundaries. AD FS extends the ability to use single sign-on (SSO) functionality available within a single security or enterprise boundary to applications facing the Internet, as well as to customers, partners, and suppliers, offering a streamlined user experience along with accessing the web-based applications of an organization.
The AD FS service provides extensible, reliable, scalable, and secure identity federation and supports SAML token types as well as other client authentication methods such as Kerberos, X.500, and username/password methods. It is also able to use multiple identity store types, such as Active Directory Domain Services (AD DS) and Active Directory Lightweight Directory Services (AD LDS).
The SAML authentication method is typically used in enterprise federation systems, but before you can use a SAML security token for a SharePoint Server 2010 claims-based web application, you must configure AD FS.
Adding AD FS as a Federated Identity Provider in SharePoint 2010
SharePoint Server 2010 brings a completely new method of handling user identities based on Windows Identity Foundation to the table. This is an exciting authentication option that can allow secure, seamless authentication and connectivity from SharePoint to many popular third-party platforms, including Facebook, Google, Twitter, and Yahoo!, as well as other SharePoint server farms and various line-of-business applications. However, before you can enjoy all of these benefits, you first have to add AD FS to SharePoint. The result is that, instead of users connecting to SharePoint directly and authenticating via Active Directory, upon connecting to SharePoint, users will be redirected to an AD FS–hosted web page where they will authenticate using Windows authentication.
Chapter 4’s “Configuring the Security Token Service (STS)” section describes all the necessary steps to add AD FS as a Federated Identity Provider using Windows PowerShell. The following information adds some details regarding performing part of the same process using Central Administration and Windows PowerShell.
The following exercises can be performed on a SharePoint 2010 single-server deployment with an onboard database or running against a SQL Server database server. The first step in the process is to create a claims-based web application. You should already be familiar with the process of creating a new web application. On the Create A New Web Application page, under Authentication, select Claims Based Authentication, and under IIS Web Site, create a new IIS web site, use Port 80, add a new Host Header such as ADFSTest.com, and add a path if necessary, as shown in Figure 8-1.
Figure 8-1: Create New Web Application dialog box

After you create the web application, create your first site collection. See Exercise 8-2 for the specific steps. Since claims-based authentication is SharePoint’s default authentication method, you shouldn’t notice anything different or unusual about your new site collection.
As noted in Chapter 4, SharePoint Foundation ships with a fully functional Security Token Service (STS), so when you first installed SharePoint Server 2010, the STS became fully functional and was already able to use the local Active Directory instance to authenticate users and offer SharePoint a ready-made description of each identity as a series of claims. Since this means the STS is an Identity Provider (IP-STS), you don’t really have to do anything more to take advantage of SharePoint’s built-in STS and use it as an identity provider. You can, however, set up the SharePoint STS to trust a differentIP-STS, which will make it a relying party (RP-STS), thus extending SharePoint to use external systems as identity providers.
You will need to have a domain controller active to provide an AD DS environment and then a server set to the Active Directory Federation Services (AD FS) role after the server has been joined to the domain. AD FS installs into the Default website in IIS and also creates a self-signed certificate for the default site. The task of setting up a domain controller for these roles is beyond the scope of this text. For details, see TechNet’s AD DS Installation and Removal Step-by-Step Guide for Windows Server 2008 and Windows Server 2008 R2 at http://technet.microsoft.com/en-us/library/cc755258(WS.10).aspx.
Once AD FS is installed and configured, it will create a separate instance of SQL Server 2008 Express edition to store its configuration information. The configuration of AF DS should include validating the certificate being used by the Default website and exporting the certificate. The certificate file is needed to add AD FS as a Federated Identity Provider in SharePoint. This is done on the server containing SharePoint Server 2010 Central Administration.
On the required server machine, open Windows PowerShell as an administrator, type or paste the following script at the command prompt, and then press Enter. You need to replace the example values with the production values, including the actual name of the certificate file that was exported from AF DS.
$cert = New-Object System.Security.Cryptography.X509Certificates.X509Certificate2
("c:[YOUR_STS_SIGNING_CERT].cer")
$map1 = New-SPClaimTypeMapping "http://schemas.xmlsoap.org/ws/2005/05/identity/claims/emailaddress"
-IncomingClaimTypeDisplayName "EmailAddress"
-SameAsIncoming
$realm = "urn:" + $env:ComputerName + ":adfs"
$signinurl = "https://[YOUR_SERVER_NAME]/adfs/ls/"
$ap = New-SPTrustedIdentityTokenIssuer -Name "ADFS20Server" -Description "ADFS 2.0 Federated Server" -Realm $realm
-ImportTrustCertificate $cert -ClaimsMappings $map1
-SignInUrl $signinurl -IdentifierClaim $map1.InputClaimType
Adding the AD FS Identity Provider in Central Administration
Once you’ve completed running the script, perform the following actions to add the Federated Identity Provider in Central Administration:
1. In Central Administration, click Manage Web Applications under ApplicationManagement.
2. On the Web Applications Management page, on the Web Applications tab, click the desired web application to select it.
3. On the Ribbon, click the Authentication Providers button.
4. In the Edit Authentication window that appears, under Identity Providers, select the Federated Identity Provider option and the ADFS20Server option, as shown in Figure 8-2.
Figure 8-2: Edit Authentication dialog box

5. You can either select or remove the selection for Enable Windows Authentication or allow it to remain.
6. When you’re done, click OK.
Unlike MOSS 2007, SharePoint Server 2010 can use multiple authentication providers for a web application. If you want to create a web application that will use only AF DS, you should either clear the Windows Authentication option if necessary or create another web application that uses only AF DS.
Previously in this chapter, in the “Configuring Kerberos Authentication for Claims to Windows Token Service” section, you read about the SAML authentication method. In Chapter 4’s “Configuring the Security Token Service (STS)” section, under SAML authentication and IP-STS Identity Providers, you learned a number of tasks related to configuring the STS Service for use by web applications in SharePoint including configuring SharePoint claims-based Web application. The exercises in that section of Chapter 4 will complete the process of adding a Federated Identity Provider.
Configuring Authentication Using a SAML Security Token
You are a SharePoint administrator for your organization, and you have been tasked with creating a Security Token Service in SharePoint 2010. Although SharePoint ships with a fully functional STS that acts as an identity provider (IP-STS), you must set up a SharePoint STS to trust a different IP-STS and act as a relying party (RP-STS). This requires a number of additional steps be performed on your part.
You have configured an STS (IP-STS) web application using Windows PowerShell. Now you need to configure a relying party STS (RP-STS) web application. Your SharePoint deployment exists in an environment, and AD FS is active and available.
You review the steps for completing the task at http://technet.microsoft.com/en-us/library/ff607753%28office.14%29.aspx and then proceed with opening the AD FS Management Console and configuring the relying party. After you have accomplished this task, you continue with establishing a trust relationship with the IP-STS, exporting the trusted IP-STS certificate, defining a unique identifier for claims mapping, creating a new authentication provider, and lastly creating the web application you need to configure to use SAML.
Although both SharePoint and Active Directory come with a default set of user and administrative roles, each with their own sets of access permissions, you can also set up customized permissions within SharePoint. Before you pursue this option, review the standard permissions that exist for SharePoint by default.
The following permissions and their access parameters are for users relative to site collections created with the Team Site template:
Limited Access
- Browse User Information
- Use Client Integration Features Open
Read
- View Items
- Open Items
- View Versions
- Create Alerts
- View Application Pages
- Use Self-Service Site Creation
- View Pages
- Browse User Information
- Use Remote Interfaces
- Use Client Integrations Features
- Open
Contribute
- Read permissions, Plus:
- Manage Unsafe Content
Design
- Approve permissions, Plus:
- Manage Lists
- Add and Customize Pages
- Apply Themes and Borders
- Apply Style Sheets
Full Control
- All Permissions
The following permissions and their access parameters are for users relative to site collections created with all other site collection templates:
Read Restricted
- View Items
- Open Items
- View Pages
- Open
View Only
- Limited Access permissions, plus:
- View Items
- View Versions
- Create Alerts
- Create Mobile Alerts
- View Application Pages
Approve
- Contribute permissions, plus:
- Override Checkout
- Approve Items
Manage Hierarchy
- Design permissions minus Approve Item permissions, plus:
- Manage Permissions
- View Usage Data
- Create Subsites
- Manage Web Site
- Manage Alerts
Configuring Custom SharePoint Permissions
The default permission levels may not give you the type or amount of control over user access to site content, sites, or site collections; however, you can also configure custom permission levels to suit your needs. To perform the following tasks, you must be a member of the Administrators group for the site collection, must be a member of the Owners group for the site, or must have Manage Permissions privileges. Exercise 8-7 gets you started by showing you how to customize an existing permission level.
Exercise 8-7: Customizing an Existing Permission Level
1. On the desired site, click Site Actions and then click Site Settings.
2. On the Site Settings page for the desired site, click Site Permissions under User And Permissions.
3. On the Permission Tools/Edit tab of the Ribbon, click Permission Levels.
4. In the list of permissions levels that appears, click the name of the permission level you want to customize.
5. In the next list, clear or select the desired check boxes to add or remove permissions from the permissions level.
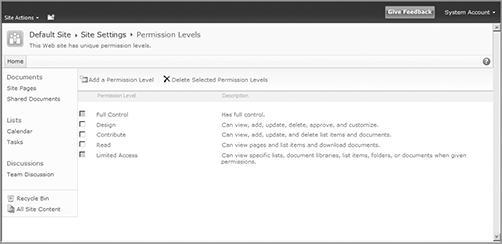
6. Click Submit.
You also have the ability to take a single permission level, copy it, and then adjust the permissions of that level to create a new, customized permission that you can then assign to users and groups. Exercise 8-8 illustrates how to copy a specific permission level and use it to create a new, customized level.
Exercise 8-8: Copying and Customizing an Existing Permission Level
1. On the desired site, click Site Actions and then click Site Settings.
2. On the Site Settings page for the desired site, click Site Permissions under User And Permissions.
3. On the Permission Tools/Edit tab of the Ribbon, click Permission Levels.
4. In the list of permissions levels that appears, click the name of the permission level you want to copy.
5. When the permissions level page opens, scroll to the bottom of the page and click the Copy Permission Level button.
6. On the Copy Permission Level page, give the copied permission level a name in the Name field.
7. Give the copied permission level a description in the Description field.
8. Click or deselect the check boxes on this page to add or remove permissions as desired.
9. Click Create.
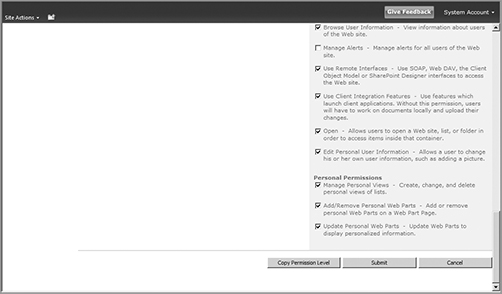
Finally, when neither editing an existing permission nor copying and editing a permission level won’t do, you can always create a completely new permission level from scratch. Exercise 8-9 shows you how.
Exercise 8-9: Creating a New Permission Level
1. On the desired site, click Site Actions and then click Site Settings.
2. On the Site Settings page for the desired site, click Site Permissions under User And Permissions.
3. Under the Permission Tools/Edit tab of the Ribbon, click Permission Levels.
4. On the toolbar above the permissions list, click Add A Permission Level.
5. When the Add A Permission Level page appears, as shown here, give the newpermission level a name and description in the available fields.

6. Under Permissions, either select the Select All check box to select all available permissions or select only the check boxes for the permissions you want to add to the new, customized permissions level.
7. When ready, click Create.
This isn’t the most pleasant subject to consider when configuring authentication and permissions, but you certainly must be prepared for the possibility that something could go wrong. If and when it does, it will be very helpful to know what to do about it.
Although every possible error type isn’t listed here, a few of the more common errors related to the topics presented should help you understand what an error message or symptom means and some of the possible solutions.
Errors on Multiple Systems
Although all the errors listed here are related to SharePoint, authentication, and permissions, not all of them occur on the same system. You will need to know not only how to understand and manage errors but also where to look for error messages. The following list includes errors found on domain controllers, on SQL Server instances, and within a web browser.
Remember, this list is hardly comprehensive. It’s just to give you an idea of what you may encounter and where to start looking. You’ll need to expand this skill set to be truly effective as a systems troubleshooter.
Error Message: Event ID 11 in the Domain Controller System Log
Event The event type will always be Error, and the event source can be either KDC or Kerberos. The event description will be either that multiple accounts with a machine name or domain name exist or that the Kerberos client received an error from a specific server stating the password used to encrypt a Kerberos service ticket is different from on the target server, usually because of identically named machine accounts existing within the domain.
Cause The event ID 11 error is caused when two or more computers have the same service principal name registered and the Key Distribution Center (KDC) receives a ticket request that then discovers that the SPN exists more than one time when checked on the global catalog (GC) for domain forestwide verification.
Solution The solution is to find the computers containing the duplicate SPNs and then either delete the computer from the domain, unjoin and then rejoin the computer in the domain, or use the ADSIEdit utility (asdiedit.msc) to correct the duplicate SPN.
Error Message: 401.1 Is Displayed When You Browse to a Website That’s Using Integrated Authentication and Is Hosted on IIS 5.1 or Newer
Event The error message can look like HTTP 401.1, Unauthorized: Logon Failed. You receive the error only when you try to browse to the website using a web browser directly from the server on which the site is hosted. Visiting the site from a remote, client computer will let you log on to the site normally.
The Security event log on the host server registers the event type as Failure Audit, the event source as Security, and the event category as Logon/Logoff. One of the more telling symptoms is that strange characters can be displayed in the event message itself, such as for Logon Process, rather than the expected text or number values.
Cause This is usually caused when you install a service pack on the affected machine that includes a loopback check security feature designed to help stop reflection attacks on the computer. This feature will cause authentication to fail if the fully qualified domain name (FQDN) or custom host header is different from the name of the local computer.
Solution The most common workaround for this issue involves editing a registry key.
Disable Loopback Check
1. On the affected computer, click Start Run. In the Run box, type regedit and then click OK.
2. In the Registry Editor, navigate to the registry key HKEY_LOCAL_MACHINESYSTEMCurrentControlSetControlLsa.
3. Right-click Lsa, select New, and then click DWORD Value.
4. Type DisableLoopbackCheck and then click Modify.
5. In the Value data field, type 1, and then click OK.
6. Close the Registry Editor and restart the computer.
Error Message: Event 3351 SQL Server Database Login Failed
Event This error is usually associated with a particular SharePoint service that is unable to log in and access content for SharePoint websites stored in the SQL Server 2008 database. In the event log, event ID 3351, “SQL database login failed will appear.”
Cause The name or password for the SharePoint service account either was invalid before the service attempted to log on to the SQL Server or became invalid during the session.
Solution To resolve the issue, you must run the following procedure logged in as a member of the Farm Administrators group in SharePoint.
Assigning the Database Access Account
1. In Central Administration, click Security in Quick Launch. On the Security page, under General Security, click Configure Service Accounts.
2. On the Configure Service Accounts page, under Credential Management, use the top drop-down menu to select the desired web application pool for the web application.
3. In the Select An Account For This Component drop-down list, click the domain account you want to associate with the web Application Pool or click Register a New Managed Account to associate a new domain account with the application pool.
4. When you’ve finished making your selections, click OK.
5. To verify that the account you selected has the correct permissions on the SQL Server, contact the DBA and have them verify the permissions using SQL Server Management Studio. Once permissions have been verified, open Windows PowerShell as an administrator, enter the following code, and then press Enter:
Get-SPSite | Format-Table -Property ID,WebApplication,ContentDatabase
The list produced will display the websites for each web application and the list of sites that use the available database.
Error Message: Event ID 3353 Backup FailedDue to Insufficient Permissions
Event A SharePoint Server 2010 backup fails. When you check the event log, you find the message “Event ID: 3353 Description: Unable to write to the backup folder.”
Cause This is most likely caused by the SQL Server service account or the SharePoint Timer Service account not having Full Control permissions to the backup folder. If someone performed the backup procedure from Windows PowerShell, the user didn’t have Full Control permissions to the backup folder.
Solution In addition to assigning the previously mentioned accounts Full Control permissions and NTFS permissions to the backup folder, make sure anyone required to perform a backup or restore using Windows PowerShell also has those permissions. If the backup folder is a network share, make sure the relevant services and users have access to both the share and the folder. If backup and restore operations are being performed between two SharePoint server farms, verify that both farms have the aforementioned permissions.
Error Message: Event 6395 Insufficient Permissionsto Write to the Configuration Data Cache
Event A timer job used to automate writing data in the configuration database in SQL Server 2008 to the local SharePoint filesystem cache failed. You check the event log and find the message “Event ID: 6395 Insufficient permissions to write to the configuration data cache.”
Cause The configuration cache directory security settings were updated in a farm-wide procedure, but that procedure does not update configuration objects locally. The required local groups were unable to access the configuration data cache in response to the timer job and perform the write procedure.
Solution Access and verify that the WSS_ADMIN_WPG and WSS_RESTRICTED_WPG local groups have updated permissions to write to the %systemdrive%UsersAll UsersMicrosoftSharePointConfig directory. To perform this task, you must have Modify permission to the relevant directory.
Error Message: Event 6590 Application PoolAccount Must Be Registered as Kerberos
Event You discover that the application pool used for IIS services to add users to Active Directory has insufficient permissions to complete the task. You check the event log and discover the message “Event ID: 6590 Description: The application pool account has insufficient permissions to add user accounts to Active Directory.”
Cause
- There are several reasons why this error might occur.
- If you are using Kerberos for authentication, the web application pool account is not registered as a security provider name.
- If you are using forms-based authentication or web single sign-on (SSO), the authentication provider could not be loaded because a membership provider name wasn’t specified.
- The web application pool was changed, but the changes weren’t saved because it wasn’t restarted.
Solution There are multiple methods you can use to apply the correct solution to this error.
Determine Which Authentication Type the Site Is Using
1. Go to Central Administration and click Security in Quick Launch.
2. On the Security page under General Security, click Specify Authentication Providers.
3. On the Authentication Providers page, click the Web Application menu if necessary, click Change Web Application, and then select the desired option.
4. Click the zone for the application and review the authentication settings on the Edit Authentication page.
5. Make any necessary changes and then click Save.
Registering the Application Pool Account as an SPN If this seems the likely cause of the error, you will need to make sure the service account used by the application pool is the registered SPN for all domains listed with the web applications. See the section “Creating an SPN for the SQL Server Service Account” under “Configuring Kerberos for SQL Communication” in this chapter for details.
Specifying Membership Provider Name and a Role Manager
1. In Central Administration, click Security in Quick Launch.
2. On the Security page, click Specify Authentication Providers under General Security.
3. On the Specify Authentication Providers page, select the desired web application and then select the zone for the application.
4. On the Edit Authentication page, under Authentication Type, select either Forms or Web Single Sign On and then click Save.
5. Return to the same page and, under Membership Provider Name, type the name in the Membership Provider Name field.
6. Under Role Manager Name, type the desired name in the Role Manager Name field.
7. Click Save.
Editing Authentication Settings for a Zone
1. Perform steps 1 through 3 from the previous solution to get to the Edit Authentication page.
2. Under Authentication Type, select the desired authentication option.
3. Under IIS Authentication Settings, select the desired setting.
4. Click Save.
There are a wide variety of error messages that can be located on the platforms mentioned. This section contains only a small sample. Both TechNet and http://support.microsoft.com are excellent resources for learning more.
In this chapter, you learned about the different authentication types you can configure in SharePoint, as well as the default user permissions, customizing user permissions, and some of the more common error messages. Details include the following:
- Administering Kerberos in an AD DS environment
- Administering claims-based authentication
- Configuring Active Directory Federation Services (AD FS)
- Setting up custom user permissions
- Interpreting error messages on different platforms related to SharePoint
Managing Authentication Methods Understand the dynamics of administering Kerberos in an Active Directory domain, as well as managing claims-based and forms-based authentication and setting up Active Directory Federation Services.
Managing Custom Permissions Comprehend the standard SharePoint user permissions as well as how to use these permissions to create customized versions, either by copying a permission level or by creating one from scratch.
Reviewing Error Messages Know where to look for error messages when something goes wrong with authentication and permissions, how to interpret errors, and what steps to take to correct them.
1. You are a SharePoint administrator for your organization, and you’re planning to configure Kerberos authentication for web applications in your server farm. To make sure you are fully prepared, you do some research on all the requirements and drawbacks regarding Kerberos authentication in SharePoint. Of the following information, what did you discover is true about Kerberos authentication and SharePoint search? (Choose all that apply.)
A. SharePoint Search cannot crawl web applications using Kerberos authentication if the web applications are in IIS virtual servers using TCP port 80.
B. SharePoint Search cannot crawl web applications using Kerberos authentication if the web applications are using Secure Sockets Layer (SSL).
C. If you want to use nondefault ports and have SharePoint Search crawls be successful on your web applications, you must use either Basic or NTLM authentication.
D. If you want to use Secure Sockets Layer (SSL) on SharePoint web applications and have SharePoint successfully crawl those applications, you must use port 443 for SSL.
2. You are a SharePoint administrator for your organization, and you’re planning to configure Kerberos authentication for web applications in your server farm. To make sure you are fully prepared, you do some research on all the requirements and drawbacks regarding Kerberos authentication in SharePoint. You discover you must create service principal names (SPNs) for the different services running in an Active Directory Domain Services (AD DS) environment. Of the following, what did you discover is true about this process? (Choose all that apply.)
A. If you are using nonstandard ports, the port number must be part of the SPN.
B. You must have domain administrative rights to the domain to create an SPN in AD DS.
C. The real hostname must be included in the SPN but not the virtual hostname.
D. You can use either setspn.exe on Windows Server 2008 or adsiedit.msc on the Active Directory domain controller to set an SPN for an Active Directory domain account.
3. You are a SharePoint administrator for your organization. You have successfully created an SPN for the SQL Server service account. Now you want to test your ability to use Kerberos authentication to connect SharePoint to SQL. You install and use the Microsoft SQL Server Management Studio Express utility on one of your computers and use it to connect to the SQL host computer. Of the following, what else must you do to confirm that the connection was successful?
A. On the SharePoint Server machine you used to make the connection, use the Event Viewer to verify that a success audit is present listing Kerberos as the authentication type and listing the IP address of the SQL Server computer with which you made the connection listed as the destination network address.
B. On the SQL Server machine to which you made the connection, use the Event Viewer to verify that a success audit is present listing Kerberos as the authentication type and listing the IP address of the SharePoint machine you used to make the connection as the source network address.
C. On the SharePoint machine in SQL Server Management Studio Express, in the navigation pane on the left, expand Events and then expand Audits, and verify that a security audit is present with Kerberos listed as the authentication type and the IP address of the SQL server machine listed as the destination network address.
D. Once you type the name of the SQL host computer in the available field in the SQL Server Management Studio Express tool and press Connect, you will automatically receive a success message if the connection was completed. Otherwise, you will receive a failure notice.
4. You are a SharePoint administrator for your organization, and you are creating a web application for a portal site that will use Kerberos authentication. As you go through the creation process, which step or steps are absolutely required to make sure Kerberos will be used for authentication? (Choose all that apply.)
A. You must select Classic Mode Authentication.
B. You must select Claims based Authentication.
C. You must select Negotiate (Kerberos).
D. You must select Default as the zone.
5. You are a SharePoint administrator for your organization, and you have created both a web application and a portal site collection that use Kerberos for authentication. You want to test that Kerberos is being used successfully to connect to the site collection. Of the following, what are the correct procedures? (Choose all that apply.)
A. Log in to the SharePoint server hosting the web application, open a web browser, and attempt to connect to the site collection.
B. Log in to the SharePoint server hosting the web application, open Event Viewer, and verify the success audit in the Security log.
C. Log in to a remote machine, open a command-line window, and attempt to ping the SharePoint server hosting the web application.
D. Log in to a remote machine, open a command-line window, and attempt to ping the domain name of the site collection.
6. You are a SharePoint administrator for your company. You have configured a web application to use Kerberos authentication. To verify that Search Indexing is working correctly, you initiate a full crawl of the application. Once the crawl is complete, you open a web browser on the main page of the portal site collection in the web application, type a keyword in the search field, and attempt a search. You don’t receive any search results. What could be the problem? (Choose all that apply.)
A. The search service may not be running on the Search and Indexing server.
B. The search service may not be running on the Search Query server.
C. The search service may not be running on the frontend web server.
D. The full crawl may not have run successfully.
7. You are a SharePoint administrator for your organization, and you are investigating the possibility of using claims-based authentication on some of the web applications in SharePoint. You understand that claims-based authentication uses an identity system that allows users to present claims about who they are, using information such as group membership or age. As you discuss the benefits of this authentication method with your staff, what are some of the obvious advantages and disadvantages? (Choose all that apply.)
A. This method can work with Active Directory.
B. This method cannot work with LiveID and OpenID.
C. This method can work with LDAP.
D. This method cannot work with anonymous logins.
8. You are a SharePoint administrator for your organization. You have just upgraded your MOSS 2007 environment to SharePoint Server 2010. Now you need to upgrade the authentication systems on your web applications to claims-based authentication from the MOSS 2007 web application default authentication. What default authentication system does MOSS 2007 use?
A. Active Directory Federation Services
B. Forms-based
C. Secure Store Service
D. Windows Challenge/Response NTLM
9. You are a SharePoint administrator for your organization. You have just upgraded your MOSS 2007 environment to SharePoint Server 2010. Now you need to upgrade the authentication systems on your web applications to claims-based authentication from the MOSS 2007 web application default authentication. What is the procedure to perform this task?
A. Open Central Administration and click Security in Quick Launch. Under General Security, click Specify Authentication Providers. On the subsequent page, update the authentication type to the one you want in SharePoint 2010.
B. Open Windows PowerShell as an administrator, type in a script that will perform the authentication upgrade, and then press Enter.
C. You must perform the authentication upgrade in MOSS 2007 before upgrading to SharePoint, by selecting Upgrade, Authentication Providers, and then Upgrade to SharePoint 2010 default authentication.
D. You must perform the authentication upgrade during the upgrade from MOSS 2007 to SharePoint 2010 by selected the Upgrade Authentication For Web Applications option in the upgrade wizard.
10. You are a SharePoint administrator in your organization. You have been tasked with configuring a web application using forms-based authentication to connect to LDAP. What are the essential steps in this process to successfully complete this task?
A. In Central Administration, on the web page for the web application, you must select Claims Based Authentication.
B. In Central Administration, on the web page for the web application, you must select Enable LDAP Membership And Role Provider.
C. In Central Administration, on the web page for the web application, you must select Enable ASP.NET Membership And Role Provider.
D. You can only perform this task using Windows PowerShell.
11. You are a SharePoint administrator in your organization. You have been tasked with configuring a web application using forms-based authentication to connect to LDAP. You have successfully modified the web application, and now you must configure several files called Web.config using INETMGR. For which services must you configure these files? (Choose all that apply.)
A. Central Administration
B. Security Token Service
C. Forms-based Authentication Service
D. Claims-based Authentication Service
12. You are a SharePoint administrator in your organization. You have been tasked with configuring a web application using forms-based authentication to connect to LDAP. You have successfully modified the web application and modified several Web.config files for the required services. What is the last task you must complete?
A. Migrating users and groups from MOSS 2007 to SharePoint 2010
B. Migrating users and permissions from MOSS 2007 to SharePoint 2010
C. Migrating lists and libraries from MOSS 2007 to SharePoint 2010
D. You have successfully completed all required tasks.
13. You are a SharePoint administrator for your organization, and you’ve been tasked with configuring Kerberos authentication for Claims claims to Windows Token Service. As you research this task, you discover a number of requirements and caveats. Of the following, what is true about this task? (Choose all that apply.)
A. You must have at least one SPN registered for the account you plan to use for this task.
B. You must create SPNs using the setspn.exe tool on the command-line.
C. You must avoid creating any SPN entries that are duplicates in the system.
D. You must run separate frontend web servers, applications servers, and SQL Server instances to be successful in this task.
14. You are a SharePoint administrator for your organization, and you’ve been tasked with configuring Kerberos authentication for Claims claims to Windows token service. As you research this task, you discover that you must edit the wtshost.exe file when you configure the claims to the Windows token service on an application server. In what format is this file written?
A. ASP
B. PHP
C. TXT
D. XML
15. You are a SharePoint administrator for your organization, and you’ve been tasked with adding Active Directory Federated Services (AD FS) as a federated identity provider in SharePoint 2010. Although the required tasks can all be performed in Windows PowerShell, you discover that you can also perform certain tasks in Central Administration. With AD FS installed in SharePoint, what are some of the steps in adding AD FS as an identity provider in Central Administration? (Choose all that apply.)
A. You must be on the Web Applications Management page.
B. You must be on the Service Applications Management page.
C. You can click Authentication Provider on the Ribbon.
D. You can click Authentication Providers on the toolbar below the Ribbon.
16. You are a SharePoint administrator for your organization. You are reviewing the standard SharePoint permission levels for users and discover that you need to create a set of modified permission levels to exercise greater control over user access to resources, based on your company’s security policy. You assign the task of creating the modified permission levels to one of your staff and instruct her as to the different methods that can be used. Of the following, which are valid methods of creating customized permission levels? (Choose all that apply.)
A. You can customize an existing permission level.
B. You can copy an existing permission level, customize it, and save it with a new name.
C. You can import an already customized permission level from another SharePoint deployment.
D. You can create a new permission level from scratch and customize it.
17. You are a SharePoint administrator for your organization. One of the services in SharePoint is unable to connect to and access information stored in a SQL Server database. The event ID is 3351, which you know means that the name or password the service is using to access the SQL Server instance is invalid. Of the following options, what can you do to correct this situation?
A. Get the DBA in charge of the SQL Server instance to provide you with valid credentials so you can add them to the service in SharePoint.
B. In Central Administration under Security on the Configure Service Accounts page, create an account that will have correct permissions to access the SQL Server instance.
C. In Central Administration on the Manage Service Applications page, create an account that will have the correct permissions to access the SQL server.
D. Get the DBA in charge of the SQL server to export valid credentials to the necessary service in SharePoint so the service will have appropriate access.
18. You are a SharePoint administrator for your organization. You discover that the application pool used for IIS services to add users to Active Directory has insufficient permissions to complete the task. You check the event log and verify that the event ID is 6590. What is the likely cause and solution?
A. The application pool is using the wrong authentication type, and you must specify the correct authentication provider in the web application.
B. The service account used by the application pool is not a registered SPN for all domains listed with the web applications. You will need to register the application pool account as an SPN.
C. The membership provider name and role manager for the service account used by the application pool have not been specified, and you need to go into Central Administration and specify them on the Edit Authentication page.
D. Any of the causes and solutions could be valid for this particular event.
19. You are a SharePoint administrator for your organization, and you are informed that the error log on the domain controller indicates that SharePoint services running in the domain are using duplicate SPN entries for web applications using Kerberos authentication. The DC administrator informs you there are several solutions to this problem. Of the following, what are valid solutions? (Choose all that apply.)
A. Use the ADSIEdit utility to correct the duplicate SPNs.
B. Use Windows PowerShell to locate and delete the duplicate SPNs.
C. Find the computers containing the duplicate SPNs and delete the computers from the domain.
D. Find the computers containing the duplicate SPNs and unjoin them from; then rejoin them to the domain.
20. You are a SharePoint administrator for your organization. You’ve recently created a new site collection in a web application, and you are checking the site collection using a web browser on the server computer hosting the collection. Instead of accessing the site collection main page, though, you receive an “HTTP 401.1 Unauthorized Logon Failed” message when you try to sign on to the site. What makes the error more mysterious is that users at client computers are able to easily reach and log on to the site collection. After you research this issue, what is the likely cause of the problem?
A. You are using Internet Explorer 6.0 on the server machine, and you need to upgrade to the current version.
B. You are not running the latest service pack on the server computer and need to update to the current version.
C. You recently installed a service pack on the server computer that included a loopback check security feature responsible for the problem.
D. The registry key HKEY_LOCAL_MACHINESYSTEMCurrentControlSetControlLsa on the server computer has become corrupted, and you need to restore the key using the most recent backup.
1. B, C. IIS virtual servers must use standard TCP port 80 for websites and standard port 443 for SSL if you are using Kerberos and want search crawls to be successful. Nonstandard port numbers won’t work for search crawls if you are using Kerberos.
2. A, B, D. You can use either the real or virtual hostname in the SPN.
3. B. You must look for the success audit in the Event Viewer on the SQL host machine to verify that Kerberos was used to make the connection. All of the other options are bogus.
4. C. You can use either Classic Mode or Claims Based and select whatever zone you desire, but you must select Negotiate (Kerberos).
5. A, B. To verify that you are connecting to the site collection via Kerberos, you must first attempt to visit the site collection using a web browser and then check for a “Success Audit” message confirming that you connected from the IP address of the machine you used using Kerberos. Pinging the host machine or domain name will confirm only that you have a network connection, not that Kerberos authentication is working.
6. A, B, D. The search service isn’t required to be running on the frontend web server. All other options are potential reasons for the search results failure.
7. A, C. Claims-based authentication can also work with LiveID and OpenID, and you can configure anonymous logins to work with this method.
8. B. MOSS 2007 web applications were generally configured to use forms-based authentication or web SSO authentication.
9. B. You must use Windows PowerShell to run a specific script after MOSS 2007 has been upgraded to SharePoint Server 2010. No other option is available.
10. A, C. Option B is bogus, and you can perform this task either in Central Administration or using Windows PowerShell.
11. A, B. Although the first two options are correct, the third service containing the Web.config file is forms-based authentication claims-based web application.
12. B. You must migrate all users and permissions from MOSS 2007 to SharePoint Server 2010. All other options are bogus.
13. A, C. You can use either the setspn.exe tool or the adsiedit.msc utility to create an SPN. Although it’s recommended to run separate web servers, application servers, and database servers, it’s not an actual requirement.
14. D. The wtshost.exe file on the application server is written in XML.
15. A, C. To add the AD FS Identity Provider in Central Administration, you navigate to the Web Applications Management page, select the desired web application, click Authentication Providers on the Ribbon to open the Edit Authentication window, and select the Federated Identity Provider options.
16. A, B, D. Option C is bogus. All other options are valid methods of creating a customized permission level.
17. B. The correct procedure is to assign a database access account to the service in SharePoint Central Administration.
18. A, B, C. There are multiple possible causes and solutions for this error including those listed in options A, B, and C.
19. A, C, D. You cannot use Windows PowerShell to provide a solution to this problem. All other options are valid solutions.
20. C. The loopback check security feature included in the Service Pack caused authentication to fail from the web browser on the server computer, because either the fully qualified domain name (FQDN) or the custom host header is different from the local server computer name. The workaround solution is to disable loopback check by editing the HKEY_LOCAL_MACHINESYSTEMCurrentControlSetControlLsa registry key.