Chapter 21
Using SSIS with External Applications
WHAT’S IN THIS CHAPTER?
- Interacting with Office applications
- Interacting with ASP.NET applications
- Interacting with Windows .NET applications
- Executing packages with T-SQL
SQL Server 2012 Integration Services accepts data from nearly any source and presents output, including ADO.NET data sets and SSIS data readers that are consumable by external applications. These features enable SSIS to sink and source external applications with ease. In this chapter, you take a look at three examples of external applications that utilize SSIS. This chapter is not intended to provide an exhaustive look at all possible combinations of external interface with SSIS, but rather to provide a sampling of some available functionality.
SSIS is flexible and configurable, so there are many ways to approach interaction with external applications. This book is rife with examples, including the following:
- Sources and Destinations: These are implicit objects inside SSIS that provide connectivity to data sources and destinations.
- Scripting: Arguably provides the most flexibility when interacting with external applications. The Script Component still comes in three flavors: Source, Destination, or Transformation. You can use C# and VB.NET with it. The .NET Framework version for developing in this component is 4.0. See Chapter 9 for an example and more information.
- Employ a methodology: Chapter 16 provides an introduction to software development life cycles (SDLCs). A development methodology is not a prescribed recipe; it is a framework that assists you in creating the proper design for your software development project.
- Debug: Execute your SSIS package in debug mode in either the Business Intelligence Developer Studio or the Visual Studio Integrated Development Environment (IDE). You may also find that using breakpoints in conjunction with the watch window helps greatly during your development cycle, and it is a highly recommended best practice. Another great tip is to group similar tasks in containers (preferably a Sequence Container) and execute just the container you choose to test. This technique enables you to do unit-type testing without having to run the entire package, thereby avoiding the “all or nothing” approach to package development.
- Test: Whenever possible, obtain a sample of actual (“live”) data and execute your package against this data. This ensures that the business logic implemented in your packages is fine-tuned and will validate the correctness of your package logic. In the absence of access to a copy of live data, populate tables with dummy data based on the business rules embedded in the tables of the production data, and execute your package against them. When populating your tables with dummy data, it is very important that you fully understand the semantics of the production data and be sure to mirror it as accurately as possible. This will prevent you from developing logic that works on test data but raises problems during production.
In the first example, SSIS will read data from a Microsoft Office InfoPath document, perform a Sorting Transformation on the data, and write the data out to a flat file for the destination. The key purpose of this exercise is to demonstrate how Integration Services can easily source and transform data from an XML document.
This example demonstrates the ability of SSIS to interact with an external Microsoft Office application — namely, InfoPath.
Microsoft InfoPath is a desktop forms client that provides a rich interface to XML-based documents.
Using a document created from the Timecard template supplied with the downloads for Chapter 21 (in the InfoPath folder), you will import portions of data stored in an InfoPath document and output the results to a comma-delimited flat file.
Portions of imported data in this demonstration appear disconnected in the Data Flow Task. This example demonstrates an SSIS method to join disconnected data. It also covers some troubleshooting. Many thanks to Wenyang Hu for permission to reuse some elegant XSL!
Create a new Integration Services project in SSIS. Drag an XML Task onto the Control Flow. Double-click the XML Task to open the editor. Configure the XML Task as follows:
- Operation Type: XSLT
- Source Type: File Connection
- Source: New File Connection. Configure the New File Connection as follows:
- Usage Type: Existing File
- File: Click Browse to locate and select an InfoPath timecard directory and file. The timecard file may be generated using the Timecard template, or you can get the Timecard_ARay.xml file from the resources available for this chapter at www.wrox.com (in the InfoPathDocs folder).
- Save Operation Result: True
- Overwrite Destination: True
- Destination Type: File Connection
- Destination: New File Connection. Configure the New File Connection as follows:
- Usage Type: Create File
- File: Use the same InfoPath directory containing the Timecard files.
- Filename: TimecardResult.xml
- Second Operand Type: File Connection
- Second Operand: New File Connection. Configure the New File Connection as follows:
- Usage Type: Existing File
- File: SSISInfoPath.xsl (Wenyang Hu’s XSL file — see the download that accompanies this chapter.)
You need to transform the Timecard XML file because the SSIS XML Task does not support multiple namespaces.
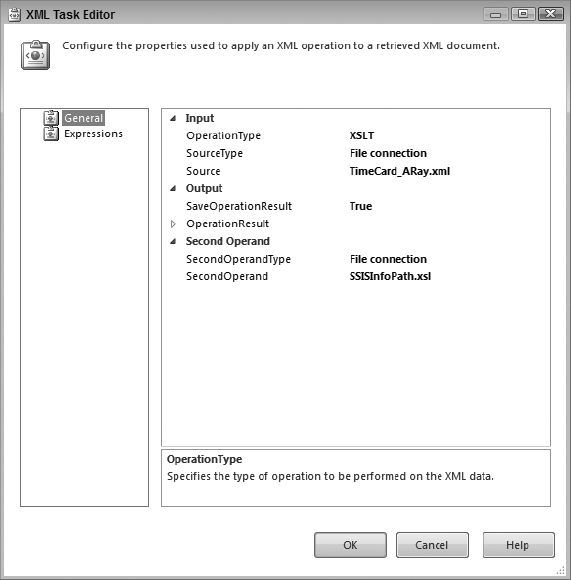
When you’re done, the Task Editor should look like Figure 21-1. Click OK to proceed.
Now take a brief look at some XML Task properties before moving on.
The top property of the task, OperationType, determines the remaining properties. The XML Task Editor varies according to what is selected. There are six OperationType options:
- Diff: This creates a Diffgram (an XML document consisting of the differences between two XML documents) containing the differences between the XML defined in the Source property and the XML defined in the SecondOperand property.
- Merge: This adds XML defined in the SecondOperand property to the XML defined in the Source property. This operation type is useful if you are continuously adding XML fragments to a master XML document, for example.
- Patch: This adds a Diffgram defined in the SecondOperand property to the XML defined in the Source property. This operation can occur after another Diff operation is executed in a previous XML Task, for example.
- Validate: This validates the XML defined in the Source property by the XML Schema Definition (XSD) or Document Type Definition (DTD) defined in the SecondOperand property.
- XPath: This specifies an XPath query in the SecondOperand property executed against the XML defined in the Source property to evaluate or aggregate or to return a node or value list. The XPath operation is useful when you are interested only in certain portions of your XML document. For more information about using XPath, see XSLT 2.0 and XPath 2.0 Programmer’s Reference, 4th Edition, by Michael Kay (Wiley, 2008).
- XSLT: This applies XML Stylesheet Language (XSL) documents defined in the SecondOperand property to the XML defined in the Source property. An XSLT document essentially acts like a template for rendering or transforming your XML documents in a form more suitable for end-user consumption. For more information about XSLT, see XSLT 2.0 and XPath 2.0 Programmer’s Reference, 4th Edition, by Michael Kay (Wiley, 2008).
The OperationResult property defines the output of the XML Task. The DestinationType property can be set to File Connection or Variable, requiring a corresponding Connection Manager or Variable, respectively, to be assigned to the Destination property.
To generate the TimecardResult.xml file, you must execute this task.
It is also a good development practice to test a task after creating it before moving on. You may find that you cannot accomplish what you wish with this type of task, a discovery that may impact downstream development decisions.
Right-click the XML Task and click Execute Task. You may receive a validation error in the Errors window — especially on the first execution of the task. If everything is configured properly, however, the task will succeed and the TimecardResult.xml file will be created in the Timecards directory.
Drag a Data Flow Task onto the Control Flow. Connect the XML Task to the Data Flow Task using the available precedence constraint (the green arrow on the XML Task). Double-click the Data Flow Task to proceed. Drag an XML Source onto the Data Flow and double-click it to edit it. Browse to the location of TimecardResult.xml — generated earlier — to configure the XML Location parameter. Click the Generate XSD button to automatically generate a schema definition for the file (this is such a time-saver!), as shown in Figure 21-2. Click OK to proceed.
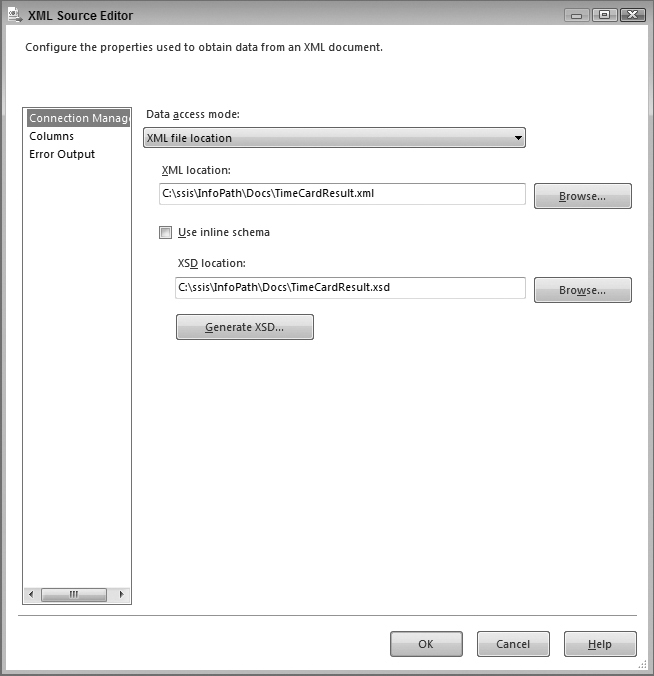
If you receive the error “Unable to infer the XSD from the XML file. The XML contains multiple namespaces” while stepping through this example, make sure you are using the SSISInfoPath.xsl file supplied in the chapter download. If you are adapting this example, make sure your transformation eliminates multiple namespaces from your source XML.
Drag a Merge Join Transformation onto the Data Flow. Merge Joins, discussed in Chapter 5, are designed to join rows of data from disparate sources. This example uses them to join disconnected data from the same source: the same XML file. The desired result is one row from the file containing the employee name and information about the workweek.
In order to join the disconnected data, the Merge Join needs a field upon which to join. To create this field, drag two Derived Column Transformations onto the Data Flow. Connect the XML Source to one of the Derived Column Transformations. Select timecard_employee_name from the Output dropdown list on the Input Output Selection dialog. Connect the XML Source to the other Derived Column Transformation, and select Week as the Derived Column input. Double-click each Derived Column in turn to open its respective editor. Configure the same Derived Column for each as follows (as shown in Figure 21-3):
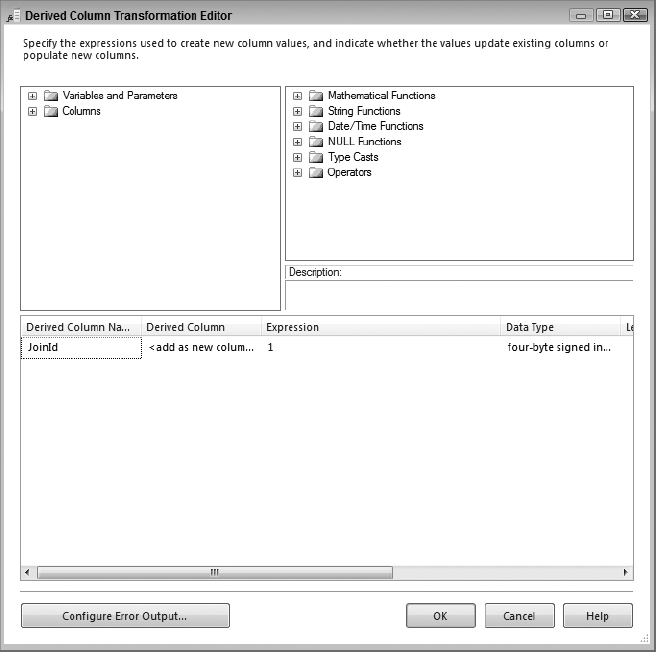
- Derived Column: «add as new column»
- Derived Column Name: JoinID
- Expression: 1
- Data Type: 4-byte signed integer [DT_I4]
Notice that the value for the Expression property is a literal number (1). This may seem a bit confusing if you expect a snippet of code to be placed there. In this case, you are simply providing the value in place of an actual expression.
Click OK to proceed. You can now connect the outputs of the Derived Column Transformations to the Merge Join Transformation, except for one thing: the Merge Join requires the input data to be sorted. Therefore, drag and drop two Sort Transformations onto the Data Flow. Connect the output of each Derived Column Transformation to a respective Sort Transformation. Double-click each Sort Transformation to configure it. Select the JoinID for each Sort, as shown in Figure 21-4, allowing all other columns to pass through the transformation.

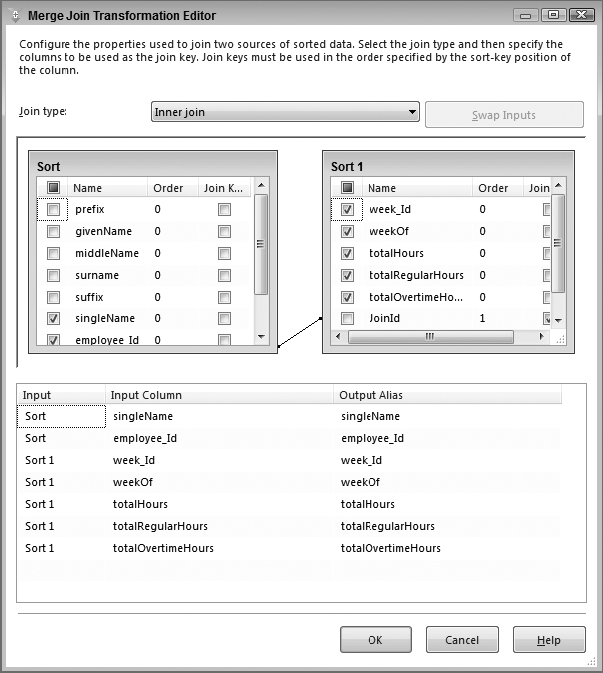
Connect the outputs of each Sort Transformation to the Merge Join Transformation. Assign the output of the first Sort Transformation to the Merge Join. When prompted, select Merge Join Left Input as the input for the first Sort output — the second will connect by default to the remaining available input. Double-click the Merge Join Transformation to edit it. Make sure that Inner Join is selected in the Join Type dropdown list and that the Join Key checkbox for each JoinID field is checked in the Available Input Columns tables. Check the Select checkbox for the JoinID columns in the join, as well as other columns you wish to add to the pipeline, as shown in Figure 21-5. By checking the columns you wish to add, you will ensure the pipeline will allow these columns to be included as input columns in the Flat File Destination in the next step. Click OK to close the editor.
Add a Flat File Destination to the Data Flow and connect the Merge Join to it. Double-click the Flat File Destination to configure it. Click the new Flat File Connector to configure a new file destination named TimeCardOutput. Select Delimited as the Flat File Type. The Flat File Connection will be created, and the Flat File Connection Manager Editor will appear. Click Browse to choose a filename and enter TimecardOutput.csv. Click OK to return to the Flat File Destination Editor. Click the Mappings item to generate the column mappings, as shown in Figure 21-6, and then click OK to close the editor.

Right-click each Sort output, respectively, and click Enable Data Viewer. Then, right-click on the output of the Merge Join and click Enable Data Viewer. Test the Data Flow by clicking the Play button and observing the results. View the line item produced in the Data Viewer in Figure 21-7.

This example demonstrated some techniques for importing and filtering a subset of data from an XML document. In this case, you used an InfoPath-generated XML document as the source, but the approach to the solution is valid for loading any XML document into SSIS.
The first example in this chapter demonstrated the XML Task in SSIS, which adds flexibility by providing a mechanism for working with XML data. In the first example, an InfoPath document was consumed by the XML Task. This example demonstrates the capability of SSIS to interact with custom external applications by interfacing with a simple ASP.NET application.
This example application is written in C# 2010 and displays the output from an SSIS package in an ASP.NET GridView control.
In SQL Server Data Tools, create a new Integration Services project. Drag a Data Flow Task onto the Control Flow and double-click it to open the Data Flow tab. Drag an OLE DB Source onto the Data Flow and double-click to edit. Configure the OLE DB Source as follows (shown in Figures 21-8 and 21-9):

The AdventureWorks database is no longer included with the SQL Server install in 2012, but you can download the version of it used for this chapter at www.wrox.com. In this chapter, the “AdventureWorksDenaliDW” database, renamed to AdventureWorksDW, is being used.
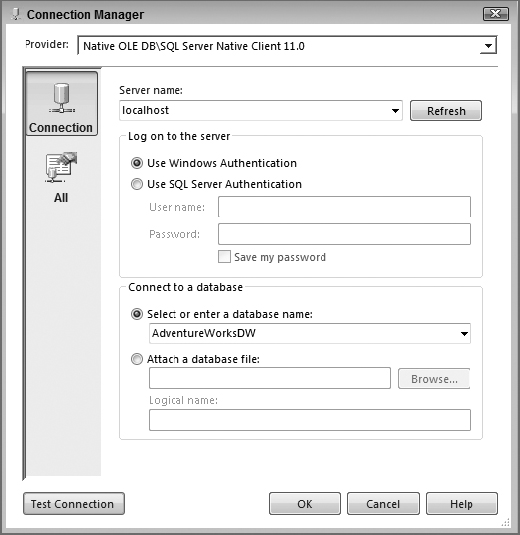
- OLE DB Connection Manager: Click New to open the Configure OLE DB Connection Manager dialog, and then click New to open the Connection Manager dialog. Configure the connection as follows:
- Server Name: [Your server name]
- Log on to the server: Use Windows Authentication
- Select or enter a database name: AdventureWorksDW
Click the Test Connection button to confirm connectivity, as shown in Figure 21-8, and then click OK to proceed.
- Data Access Mode: SQL Command
- SQL Command Text:
SELECT top 10 CustomerKey, FirstName, LastName from dbo.DimCustomer
Select the fields you wish to return by clicking Columns in the listbox and checking the Title and Filename checkboxes. Click OK to close the editor.
Drag a DataReader Destination onto the Data Flow and supply a meaningful name. The naming convention is important when referencing this component from your ASP.NET page. The DataReader Destination name will be used to set the CommandName property when using the SqlClient .NET namespace in the code-behind. Connect the output of the OLE DB Source to the DataReader Destination and double-click the DataReader Destination to begin editing. Click the Input Columns tab on the Advanced Editor for the DataReaderDest dialog. Select the Title and Filename fields (selected earlier in the OLE DB Source) for the DataReader and click OK to close the editor. Test the SSIS functionality before proceeding.
Open a new instance of Visual Studio to create a new website or add a new website to your current SSIS project by selecting File ![]() Add
Add ![]() New Web Site. Name the web project ASP_Feed_Web. Set the Location to File System and select C# as the Language, as shown in Figure 21-10.
New Web Site. Name the web project ASP_Feed_Web. Set the Location to File System and select C# as the Language, as shown in Figure 21-10.

Now that you have created a new project, you need to include a couple of .NET class libraries that will first connect to the SSIS package you just created and then display the data in a GridView ASP.NET control. You include these class libraries by adding a “Reference” to the project. In Solution Explorer, right-click the Web Site project and click Add Reference. If Microsoft.SqlServer.Dts.DtsClient appears in the list of References on the .NET tab, double-click it to add a reference to the project. If not, click the Browse tab and navigate to %Program Files%Microsoft SQL Server110DTSBinnMicrosoft.SqlServer.Dts.DtsClient.dll and click OK.
The DTSClient DLL contains interfaces to SSIS connection and command objects. See Books Online and MSDN for more information about this library.
Right-click the Default.aspx object and click View Designer. The ASP.NET control you will use to display the data from the SSIS package is called a GridView. It displays the data in a table-like format and renders the column names automatically by default. Drag a GridView control from the Toolbox onto the web page. Double-click the page to open the code viewer. Add the following code at the top of the page:
using System.Data.SqlClient;
using Microsoft.SqlServer.Dts.DtsClient;
using System.Data;
In the Page_Load subroutine, add the following line of code, replacing [your package directory] with the actual name of the directory containing your SSIS package:
connectToSSISPackage("[your package directory]Package.dtsx")
Add the following function to the _Default partial class:
protected void connectoToSSISPackage(string packagePath)
{
// Create the DTS connection object
DtsConnection oConn = new DtsConnection();
// Set the ConnectionString Property to the path of the package
oConn.ConnectionString = String.Format("-f {0}", packagePath);
// Open the Connection to the package
oConn.Open();
// Create a new DTSCommand object
DtsCommand oCmd = new DtsCommand(oConn);
// Set the CommandText Property to the Name of the Data Reader Task in
// your SSIS package
oCmd.CommandText = "DataReaderDest";
// Declare a DataReader variable
IDataReader dr;
// Create a new DataSet object
DataSet ds = new DataSet();
// Execute the Command object calling the SSIS package
// and return a DataReader object
dr = oCmd.ExecuteReader(CommandBehavior.Default);
// Load the DataReader object into the DataSet
ds.Load(dr, LoadOption.OverwriteChanges,
dr.GetSchemaTable().TableName);
// Set the GridView's DataSource property to the DataSet
GridView1.DataSource = ds;
// Bind the data to the GridView
GridView1.DataBind();
// Close the Connection
oConn.Close();
}
protected void Page_Load(object sender, EventArgs e)
{
connectoToSSISPackage(@"C:SSISASPSSISASPSSISDataReaderASP.dtsx"); }
ExtMgtCSharp_WebSite2012default.aspx.cs
The connectToSSISPackage function receives a path to an SSIS package through the “path” argument. As a reminder, the “path” argument is the fully qualified path and filename of the location of the SSIS package on your local file system. A new SSIS connection (of DTSConnection type) called oConn is created, which connects to the SSIS package specified in the path argument of the method.
If your environment does not recognize the DTSConnection data type, make sure you have a reference properly defined and have included the Imports Microsoft.SqlServer.Dts.DtsClient statement at the beginning of your code.
The path argument is the connection string for the SSIS connection. After the SSIS connection is opened, a new SSIS command (of DTSCommand type) is created and assigned to the SSIS connection. The CommandText property of the SSIS command object is set to the name of the DataReader Destination in the SSIS package.
Next, a DataReader object is defined and populated with the results of the SSIS command’s execution. A data set is created and filled with the DataReader’s data. The GridView’s DataSource property is assigned to the data set, and the GridView is refreshed with a call to DataBind. Finally, the SSIS connection is closed.
Click the Play button to test. A list of customers should populate the grid, as shown in Figure 21-11.
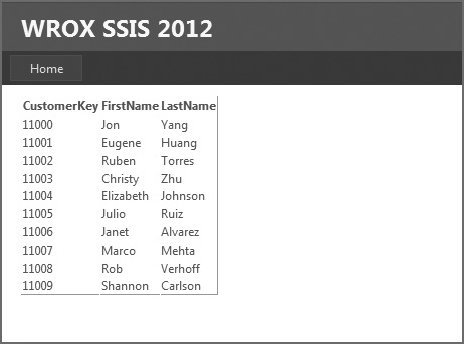
This example demonstrates a simple yet powerful feature of SSIS — the capability to expose output directly to ASP.NET applications. The DataReader Destination provides a flexible interface for SSIS package output.
The previous example in this chapter showed you how to consume data in an ASP.NET GridView control through a DataReader in an external SSIS package. In a sense, the SSIS package was supplying the data in a “push” format using the DataReader Destination. What if you wanted to interact with your packages in a more dynamic way? What if your requirement was to supply information to your package at runtime through a user interface? The next example shows you how to do just that.
This example includes two new projects, an Integration Services project and a Visual C# Windows Application project. The goal of this exercise is to dynamically set a variable and parameter inside an SSIS package from a Windows interface and execute the package. The package itself will take the value of the variable and insert it into a table, which you have to create.
Open SQL Server Management Studio and create a new table in the AdventureWorksDW database called SSIStest. Following is the defined structure for the table:
| COLUMN NAME | DATA TYPE |
| Id | int (set as an identity column) |
| VariableValue | varchar(50) |
| ParameterValue | Varchar(50) |
Save the SSIStest table.
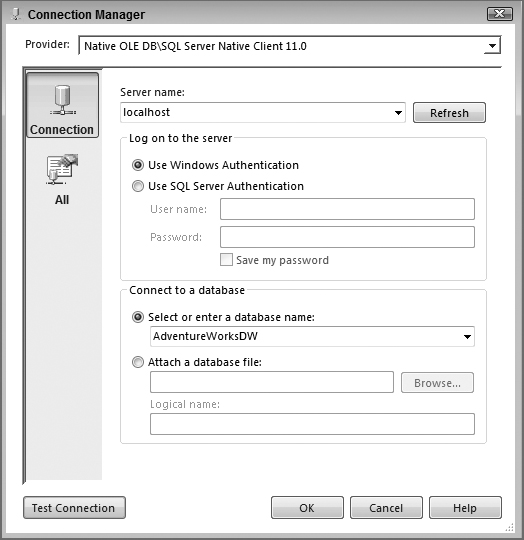
Create a new Integration Services project in SQL Server Data Tools. Rename the default starter package to Package1.dtsx. Create a new OLE DB connection manager that points to the AdventureWorksDW database. Configure its properties as shown in Figure 21-12.
You now need to create a package level variable and parameter that will be used by the Windows interface to be set dynamically. Click in the designer to ensure that you are at the package level. Right-click in the designer and select Variables. In the Variables pane, click the icon to create a new variable. The new variable is defined as follows:

Now click on the Parameters tab and create a new parameter named MyParameter as follows.

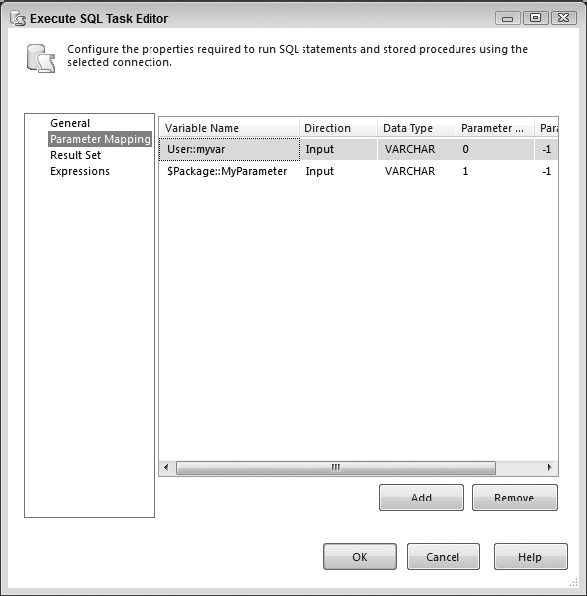
Drag an Execute SQL Task from the Toolbox onto the designer. Double-click the task to configure its properties as shown in Figure 21-13.

Set the Connection to the dsAdventureWorks Connection Manager. Type the following query into the SQLStatement property:
Insert SSIStest (variablevalue, parametervalue) values (?,?)
The question mark in the query will be the placeholder for the input parameter. Click the Parameter Mapping menu item and configure the parameter as shown here and in Figure 21-14:

Click OK when you’re finished to return to the designer. Save your project and note where the package resides on the file system. When you create the user interface to interact with this package, you will need to point to the package located on the file system, as you did in the previous exercise.
In Visual Studio 2010, create a new Visual C# Windows Application project. Once the project is open, a reference to a .NET class library is necessary to interact with the Integration Services package. Right-click the References folder and select Add Reference. Under the .NET tab, find and select the Microsoft.SQLServer.ManagedDTS reference from the list, as shown in Figure 21-15, and click OK. You’re now ready to start designing the interface to this project.

Drag two TextBox controls, two label controls, and a Button control onto the form designer, as shown in Figure 21-16. The look and feel of the UI is not important here; we are mostly concerned about the functionality behind the scenes, so don’t worry about the appearance at this point.
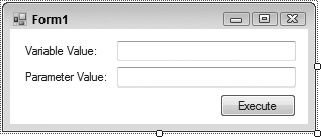
Name the text box that will accept the variable value VariableTextbox, and name the text box that will accept the parameter value ParameterTextbox.
The TextBox you placed on the form will enable the user to enter a value that you will use to dynamically set the variable in the package. The Button control actually executes the operation. Double-click the Button control to open the code window and stub out the Click event for that control.
Before you start writing the code, you need to add a reference to another class library. At the very top of your code, type the following reference:
using SSIS_Runtime = Microsoft.SqlServer.Dts.Runtime;
The SSIS_Runtime declaration is an alias to the .NET reference. This coding technique comes in handy when referencing long namespaces like the preceding one.
In the Form1 class, you will create the ExecutePackage method. This method creates the necessary objects to load your package, set the variable at runtime, and then execute the package. Type the following lines of code into the class file:
public void ExecutePackage()
{
// Create a string variable to hold the location of our SSIS package
string strPackagePath = @"c:ssisinfopathIntegration
Services Project2Package1.dtsx";
// Create a new Application class object
SSIS_Runtime.Application oApp = new SSIS_Runtime.Application();
// Create a new Package class object
SSIS_Runtime.Package oPackage = new SSIS_Runtime.Package();
// Load the SSIS package
oPackage = oApp.LoadPackage(strPackagePath, null);
// Set the myvar variable in the package to the value of the textbox
oPackage.Variables["myvar"].Value = VariableTextbox.Text.Trim();

// set the MyParameter parameter value
oPackage.Variables["MyParameter"].Value = ParameterTextbox.Text.Trim();
// Execute the package
oPackage.Execute();

MessageBox.Show("Package executed");

}
SSIS_Winform folder in Form1.cs
Now that the ExecutePackage method has been created, you need to call this method when the button on your form is clicked. In the Click event method for your button, type the following code:
private void button1_Click(object sender, EventArgs e)
{
ExecutePackage();
}
That’s it! If you don’t happen to see the button1_Click method stubbed out already for you, switch to the designer and double-click the button. This action will create the Click event method and enable you to provide the actual implementation.
Now run the project. You will be presented with the form that you just created. Enter a bit of text into the text box and click the button. Open Management Studio and expand the AdventureWorksDW database. Start a new query and type the following line of SQL:
Select * From SSIStest
You should now see a new record in the table with the text you entered through the Windows application. This simple yet powerful example demonstrates how you can dynamically set properties in an Integration Services package programmatically. This can be useful in a variety of ways if your environment requires frequent changes to SSIS packages at the time of execution, such as variables, task properties, and even data sources.
If you’re copying the examples from the book and not using the examples downloaded from www.wrox.com, you need to be aware of an issue when calling Create on the CatalogFolder class that you may run into. You may receive an error stating “Mixed mode assembly is built against version ‘v.2.0.50727’ of the runtime and cannot be loaded in the 4.0 runtime without additional configuration information.” If you receive this error then you will need to add the following section to the App.Config of your project:
<startup useLegacyV2RuntimeActivationPolicy="true">
    <supportedRuntime="v4.0" />
</startup>type="warning"
Executing a Package with T-SQL
SQL Server 2012 makes it very easy to execute a package deployed to your SSIS catalog. In this section you’re going to deploy the project that was created in this chapter and use T-SQL to execute your package.
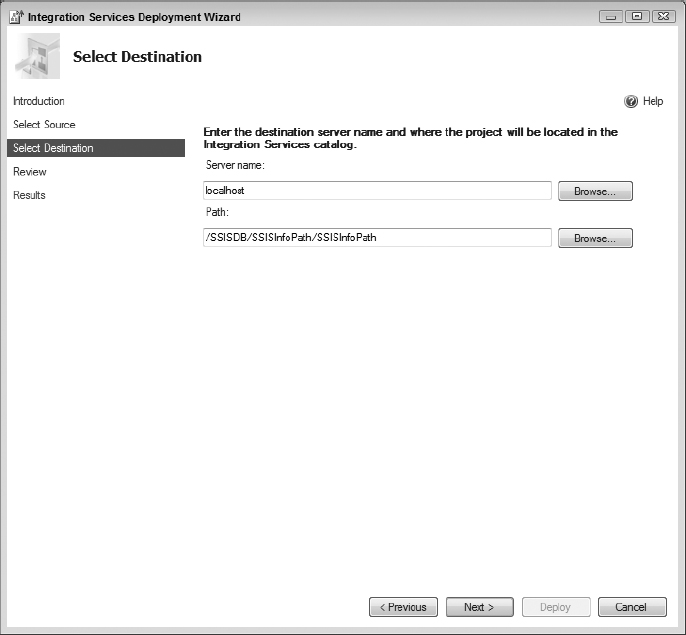
The first step is to deploy your package. Right-click on the SSIS project you created in this chapter and click Deploy. If you’re using the downloaded examples from www.wrox.com, the project name is SSISInfoPath. Follow the steps in the deployment wizard to deploy the package. On the Select Destination step, you will want to create a new folder named SSISInfoPath, as shown in Figure 21-17.
Now that your project is deployed, open up SSMS and connect to your instance of SQL Server 2012. Open a new query window and write the following script.
USE [SSISDB]
GO

DECLARE @RC int
DECLARE @folder_name nvarchar(128)
DECLARE @project_name nvarchar(128)
DECLARE @package_name nvarchar(260)
DECLARE @reference_id bigint
DECLARE @use32bitruntime bit
DECLARE @execution_id bigint

set @folder_name = 'SSISInfoPath'
set @project_name = 'SSISInfoPath'
set @package_name = 'Package1.dtsx'
set @use32bitruntime = 0

EXECUTE @RC = [catalog].[create_execution]
   @folder_name
  ,@project_name
  ,@package_name
  ,@reference_id
  ,@use32bitruntime
  ,@execution_id OUTPUT

EXECUTE @RC = [catalog].[start_execution]
   @execution_id
ExecutePackageTSQL.sql
What the preceding script does is create a package execution record by executing the create_execution stored procedure and then executes the package by calling the start_execution stored procedure.
The execution record created by calling create_execution can be seen by querying the catalog.executions view in the SSISDB table. An execution record must be created before calling start_execution. The parameters for both the create_execution and the start_execution stored procedures should be easy to understand. We’ll start with create_execution, and the parameters are as follows:
- folder_name: The name of the folder where the package resides
- project_name: The name of the project where the package resides
- package_name: The name of the package being executed
- use32bitruntime: Indicates if this package should run with the 32-bit runtime
- execution_id: Outputs the execution_id for the execution record created
start_execution has a single parameter that accepts the execution_id created in create_execution. Keep in mind that start_execution is asynchronous, meaning the execution of the package will start and return immediately to the next query in your script. If you want to prevent asynchronous execution, you will need to set an execution parameter value.
To prevent asynchronous execution, you’re going to set the SYNCHRONIZED parameter value to true by calling the set_execution_parameter_value stored procedure. You will add the following code to your script after create_execution has been called.
EXECUTE @RC = [catalog].[set_execution_parameter_value]
   @execution_id
  ,50 --
  ,N'SYNCHRONIZED'
  ,1
The parameters for set_execution_parameter_value are as follows:
- execution_id: This is the execution_id value created in create_execution.
- object_id: This is the object type being set: 20 is for a project parameter, 30 is for a package parameter, and 50 is for an execution parameter value.
- parameter_name: This is the name of the parameter being set.
- parameter_value: This is the value of the parameter. This is a sql_varient type.
You saw in the preceding bullet list that for the object_id parameter, you can set the value to 20 or 30. This means you can set project and package level parameters using the set_execution_parameter_value. In package1.dtsx you created a package level parameter named MyParameter. If you wanted to set the value of that parameter to 'Test1', this is how you would do that:
EXECUTE @RC = [catalog].[set_execution_parameter_value]
   @execution_id
  ,30 --
  ,N'MyParameter'
  ,N'Test1'
Now you’re going to set the LOGGING_LEVEL parameter. This is done again by executing the set_execution_parameter_value stored procedure. The following code needs to be added after create_execution has been called and before start_execution has been called.
EXECUTE @RC = [catalog].[set_execution_parameter_value]
   @execution_id
  ,50 --
  ,N'LOGGING_LEVEL'
  ,3 -- verbose logging, 0 (none), 1 (basic), 2 (performance), 3, verbose
Setting the logging level to 3 means you’re going to see all the messages logged from the execution of the package. To see those log messages, you’re going to have to query a few views specifically created for retrieving those log messages. We first introduced these tables in Chapter 20. After you call start_execution, you will want to add the following query to your script.
select e.status, em.* from catalog.executions e inner join
catalog.event_messages em on em.operation_id = e.execution_id
where e.execution_id = @execution_id
What this query does is use two different views starting with the catalog.executions view to retrieve the execution message records. catalog_executions retrieves the records created when create_execution execution is called. If you query catalog_executions, you will see each execution record you’ve ever created. You can also tell whether an execution has succeeded or not by looking at the value of the status column in the catalog.executions view. Here are the values and their respective values:
| STATUS VALUE | MEANING |
| 1 | Created |
| 2 | Running |
| 3 | Cancelled |
| 4 | Failed |
| 5 | Pending |
| 6 | Ended Unexpectedly |
| 7 | Succeeded |
| 8 | Stopping |
| 9 | Completed |
catalog.event_messages retrieves the messages for any package execution performed in a catalog. In this query we’re joining the execution_id from the catalog.executions view to the operation_id column in the catalog.event_messages view. Anytime an execution is performed, the value of the operation_id from catalog.event_messages will match the execution_id value of catalog.executions.
Finally we’re restricting the records retrieved to only those with an execution_id in the catalog.event_messages view to the execution_id created by calling create_execution.
Your final script should look like this:
USE [SSISDB]
GO

DECLARE @RC int
DECLARE @folder_name nvarchar(128)
DECLARE @project_name nvarchar(128)
DECLARE @package_name nvarchar(260)
DECLARE @reference_id bigint
DECLARE @use32bitruntime bit
DECLARE @execution_id bigint

set @folder_name = 'SSISInfoPath'
set @project_name = 'SSISInfoPath'
set @package_name = 'Package1.dtsx'
set @use32bitruntime = 0

EXECUTE @RC = [catalog].[create_execution]
   @folder_name
  ,@project_name
  ,@package_name
  ,@reference_id
  ,@use32bitruntime
  ,@execution_id OUTPUT

 EXECUTE @RC = [catalog].[set_execution_parameter_value]
   @execution_id
  ,50 --
  ,N'SYNCHRONIZED'
  ,1

EXECUTE @RC = [catalog].[set_execution_parameter_value]
   @execution_id
  ,30 --
  ,N'MyParameter'
  ,N'Test1'

EXECUTE @RC = [catalog].[set_execution_parameter_value]
   @execution_id
  ,50 --
  ,N'LOGGING_LEVEL'
  ,3 -- verbose logging, 0 (none), 1 (basic), 2 (performance), 3, verbose

EXECUTE @RC = [catalog].[start_execution]
   @execution_id

select e.status, em.* from catalog.executions e inner join
catalog.event_messages em on em.operation_id = e.execution_id
where e.execution_id = @execution_id
ExecutePackageTSQL.sql
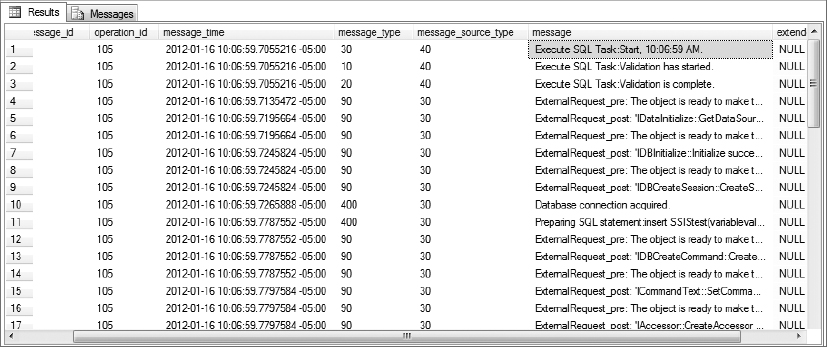
After you execute this code, you should see an output of the messages like you see in Figure 21-18.
This chapter presented four examples that demonstrate how SSIS relates to external applications — as both a source to external applications and a method for reading external sources.
The examples covered four interfaces with external applications:
- An InfoPath data source
- An output to ASP.NET
- A dynamic property assignment through a Winform application
- Executing a package from T-SQL in SQL Server 2012
In these examples, only one used the database — and that was a source of sample data. SSIS is designed to interface with the world beyond SQL Server. Moreover, this enterprise development tool ships with this functionality “off the shelf.” The good folks at Microsoft have delivered a powerful enterprise development solution that reaches well beyond the SQL Server database.
You can learn more by participating in the developer community. A good place to start is the Microsoft TechNet website for SQL Server at http://technet.microsoft.com/en-us/sqlserver/bb671048.aspx?wt.svl=leftnav.