Chapter 23
Case Study: A Programmatic Example
WHAT’S IN THIS CHAPTER?
- Understanding the business situation
- Architecting a data quality solution
- Setting up the case study
- Implementing the ETL
Usually, a book like this has to cover so much material that there is not enough space to really dig into some of the typical issues that can arise when you put the book down and begin your first solution. You end up returning to the book to flip through all the one-off examples, but they just don’t seem to provide the insight you need or to apply to your current project or deadline. Looking at a case study enables you to get specific — that is, to get hands-on experience with a real-world business issue and run with it. By working through the example provided in this chapter, you will gain the fundamental knowledge and skills you need to tackle your own project.
You will use the SSIS environment to solve a payment processing problem; you have payment data of varying levels of quality that has to be validated against corporate billing records. This example is a little different from the typical data warehouse-type ETL case study; it’s a little more programmatic. That’s not to say that there is no ETL. You’ll need to import three heterogeneous data formats, but the interesting part is the use of the SSIS Data Flow Transformations that allow for the development of smart validation and matching programming logic. This will all combine into a solid learning opportunity that showcases the real capabilities of SSIS.
The principal advantages of this case study are multiple opportunities to examine specific techniques and use cases that you can add to your SSIS toolkit. Specifically, you’ll learn all of the following:
- How to use expressions in variables to create uniquely named files
- How to use expressions in package properties
- How to use expressions in variables to dynamically configure OLE DB Connection Managers
- How to set variables within Control Flow Script Tasks and Data Flow Script Components
- How to retrieve and set variables in Control Flows with Execute SQL Tasks with output parameters and result sets for both OLE DB and.NET connections
- How to create conditional workflows with expressions and precedence constraints
- How to retrieve currency amounts from a database into a Double variable data type within an Execute SQL Task
- How to retrieve row counts using the Row Count Transformation
- How to iterate through a set of XML files and import using the Data Flow XML Source
- How to use the Import Column Transformation to save complete files into a database
- How to create a parent package to manage child packages
- How to use the Lookup and Fuzzy Lookup Transformations to compare data elements
Company ABC is a small benefits company that sells several niche products to other small business owners. They offer these products directly to the employees of the small businesses, but the employers are billed, rather than the employees. Company ABC considers the employers to be their customers and creates monthly invoices for the employee-selected services. Each invoice contains an invoice number for reference purposes. Company ABC’s customers deduct the cost of the products from the employee paychecks. These payments are then submitted back to Company ABC in a lump sum, but because of timing issues and ever-changing worker populations, the payment doesn’t always match the billed amount. Customers have the option to pay invoices using one of the following payment methods:
- PayPal or an e-mail payment service: These services directly credit a corporate bank account and typically provide a small description of the service being paid, the amount, and an e-mail address or other type of surrogate user identity. These entries are downloaded daily from an online bank account and are available within an OLE DB–compliant Data Source.
- By check: The customer sends a copy of the invoice and a check in the mail to a special address that is serviced by a bank. The invoice could match fully or partially or not even be provided with the payment. The bank credits the account for each check received and provides an output file containing as much data as practicable from the supporting material to help the company identify and apply the payment. A payment that is serviced like this is commonly known as a lockbox.
- By wire: Payments can be made by direct debit of customer bank accounts or direct credit to the corporate account. These payments are known as wires. This type of payment entry provided through a large bank or an automated clearinghouse is also known as ACH processing.
Working with the low-quality payment data involves a significant amount of manual labor to match payments to customers and invoices. Because Company ABC is growing, the volume of payments is exceeding its capacity to continue to process payments manually. If the invoice number were always received with the payment, an automated process could easily identify the customer from the invoice and make some decisions about the payment by comparing the paid and billed amounts. So far, attempts at automating even the paper invoices sent through the mail have failed because customers don’t always send copies of invoices, or they resend old, outdated invoices. Using a bank lockbox has helped ease the burden of processing the deposits, but the bank makes mistakes too, truncating and transposing customer name or invoice data. Adding the options of wires and PayPal accounts has really complicated matters, because very little corroborating data is provided in these transactions.
Approximately 60 percent of the incoming payments can’t be automatically identified using a strict comparison of invoice number and payment amount. The good news is that they can almost all be manually identified by a small group of subject matter experts (SMEs) who understand the process and know how to use the corporate data. The bad news is that once a customer and invoice are identified by the SMEs, the method of making the match is not recorded. The next month, the process of identification starts all over again. Company ABC needs a way to wade as far as possible through the payments automatically to take the place of the SMEs. This process should match items by invoice number, name, and e-mail address with some measurable certainty and leave only the most troublesome payments for research activity. The company needs a solution that runs continuously to meet the demands of the standard 24-hour turnaround time for its industry.
An alternative to using the pure Integration Services approach discussed in this chapter is to use Data Quality Services. Newly introduced in SQL Server 2012, Data Quality Services creates a knowledge base of data definitions and potential matches to provide a data-cleansing solution. There is a cleansing component provided in Integration Services that can use the Data Quality Services server to manage some of what we are covering here.
Company ABC has made the need to resolve this payment processing hurdle its top priority. It already has a custom software application that enables users to break the bulk payments down to an employee level, but the application requires that the customer and invoice be identified. The solution is to use SSIS to develop a package that can process data from these heterogeneous Data Sources. This solution should require no human intervention on items that can be identified as paid-as-billed items. The solution should be as “smart” as possible and be able to identify bank items that have been manually identified before. Items that can’t be identified will still need to be processed manually, but it is expected that this number should drop 20 to 40 percent.
In preparation for the design of the SSIS package, specification documents for the two input files, from ACH and lockbox processing, have been gathered. Each file provided by the bank contains a batch of multiple payment transactions. These files can be sent by either the bank or the ACH clearinghouse to specific folders. The process should be able to access these folders and continuously look for new files to process. When a file is located in the input folder, it needs to be validated for three items: to ensure proper format, to ensure it has not been previously processed, and to ensure the aggregation of all payments add up to the total deposit. Files not meeting these criteria will be rejected. Once a file is verified, each payment in the file should be examined for matches to existing invoices. If no match is found, the data should be examined against previously matched data. Matched data will flow into a completed queue to be broken into employee-level charges by another piece of software. Unmatched data will flow into a working queue that requires user intervention. Successful customer matches will be stored for future matching. Finally, statistics on the input will be created for reporting purposes. Figure 23-1 is a diagram of the business solution.

Before you jump into building this integration process, you should understand the big picture of what you will accomplish. You have two sets of tasks:
- First, to import files of three different formats, to validate the data, and to load them into your data structures
- Second, to process the payments to find customer and invoice matches
Figure 23-2 shows a design in which the importing logic is divided into three packages, each one specific to the type of file that you need to process. You’ve learned that breaking SSIS packages into service-oriented units simplifies maintenance and troubleshooting, so you will use that method here. Another benefit of this architecture is that it makes it easy for you to choose just one of these three packages to create and still follow along with the case study. Don’t worry about creating these packages at this point; just get the big picture about where you need to go. You can either create the packages for this solution one at a time, as you walk through the case study instructions, or, alternatively, download the complete solution from www.wrox.com.

Because the main job of the first core task is to load, it makes sense to name the three separate packages CaseStudy_Load_Bank, CaseStudy_Load_ACH, and CaseStudy_Load_Email. This enables you to separate the load processes from the identification processes. The identification logic to apply to each transaction in the payment data is universal, so it makes sense to put this logic into a separate package. You can name this package CaseStudy_Process. The final package, named CaseStudy_Driver, is the master package that will coordinate the running of each process using precedence constraints.
When you are building packages that have external dependencies on things such as file hierarchies, it is a good idea to programmatically validate the locations for existence before processing. Therefore, you’ll check for default paths and create them if they don’t exist. If files for the lockbox or ACH processes exist, you should read the files, parse the transaction information, validate totals against a control record in the file, and then persist the information from the file into permanent storage. The toughest part of this processing logic is that the validation routines have to validate file formats, proper data types, and file balances and check for file duplication. When processing any flat file from an external source, be aware of how that import file was generated and what you might find in it. Don’t be surprised to find that some systems allow an invalid date of 02/30/2012 or incomprehensible amount fields with data like 0023E2.
The downloaded bank transactions for the PayPal or e-mail payment transactions will be easier to process — at least from an import standpoint. You only need to read information from a table in another OLE DB–compliant Data Source. You’ll be creating a batch from the transactions, so balancing shouldn’t be an issue either. The hardest part will be identifying these payments, because usually only an amount and an e-mail address are embedded in the transaction. All this information can be summarized in a flowchart like the one in Figure 23-3.

In the CaseStudy_Process package, you will complete a matching process of the payment information to find customers and invoices. You will first attempt a high-confidence match using an exact match to the invoice number. If a match is not made, you’ll move to a Fuzzy Lookup on the invoice number. If a match is still not made, you’ll keep moving down to lower confidence matches until you can retrieve an invoice or at least customer identification. Transactions identifiable only by customer will be checked against available invoices for a match within a billed-to-paid tolerance of 5 percent. Transactions lacking enough certainty to be identified will be left at this point to subject matter experts, who will individually review and research the transactions to identify the customer or refund the payment. Research can be saved via software outside this SSIS project in the CustomerLookup table. A summary flowchart for the CaseStudy_Process package is shown in Figure 23-4.

Naming Conventions and Tips
There’s nothing like opening up a package that fails in production and seeing tasks named Execute SQL Task, Execute SQL Task 1, and Execute SQL Task 2. There’s no way to tell what those tasks actually do without manually examining their properties. On the other hand, too much annotation can be a nightmare to maintain. The right balance depends on your philosophy and your team, but follow these rules for this case study:
- Name the package. Name it something other than Package.dtsx. This matters later when you deploy the packages.
- Name packages with ETL verb extensions. Package Name_Extract, Package Name_Transformation, or Package Name_Load. The extension _Process seems to be explicit enough for those packages that don’t fall into the other three categories.
- Provide a brief annotation about what the package does, where it gets inputs and outputs, and what to do if it fails. Annotations can include answers to the following questions: Can it be rerun again? Is it part of a larger set of packages? Should it be restarted on checkpoints?
- Add short descriptive words to SSIS tasks and components, but don’t alter the name altogether. For example, change an Execute SQL Task to Execute SQL Task to Retrieve Invoice ID. Use the Description field on the object to provide the detailed information. (This information is in a tooltip when the mouse hovers over the object.) It is important to document, but completely changing the name of an Execute SQL Task to Retrieve Invoice ID obscures the “how” that is implied by knowing that the task is an Execute SQL Task. You could, of course, learn what the pictures stand for or use abbreviations, but our stance is that you should use a convention that takes into account the person arriving after you, who has to maintain your package.
Additional SSIS Tips Before You Start a Large Project
This solution has many parts, so don’t feel overwhelmed if you are creating them from scratch or attempting to troubleshoot something. Here are some additional tips for this case study and SSIS package development in general:
- Be aware that packages save themselves when you run them.
- Packages don’t save themselves as you are working, so save periodically as you work on large development packages. There is a nice recovery feature that sometimes will save you — don’t depend on it.
- Data viewers, which are like grid message boxes, are your friends. Add them temporarily to see what is in your transformation stream.
- Default data types are not your friends. If your tables don’t use Unicode text fields, watch your settings when you add columns or source data.
- If you are at a point where you want to troubleshoot or experiment, either use source control or stop and save a copy of the SSIS project directory for the package you are working on. Experiment with the copy until you figure out what is wrong. Go back to the original project folder, make your corrections, and continue.
- Disable tasks or groups of tasks as you work through large packages to focus only on specific functional areas until they work. To disable a task, right-click it and select Disable from the pop-up menu. (Note, however, that you can’t disable a component in the Data Flow.)
This section details the data sources both in SQL Server and in the format of each of the input files. First you’ll create default locations to simulate your receiving area for the external files, and then you’ll take a closer look at each of the input files that are part of the business requirements. All the sample data and complete set of scripts for this step can be downloaded from www.wrox.com. When you unzip the sample files for this chapter to your C:ProSSIS folder, a directory structure will be created, starting with the parent directory C:ProSSIS. The folder structure contains database scripts, sample import files, and all the packages. There is one solution for all packages in this chapter, which contains the process packages, driver packages, and two sets of load packages: one in which all Script Tasks are done in VB.NET, and another for C#, so you can follow along with the .NET language of your choice.
You’ll need to run the database scripts to create a database called CaseStudy, the table structures, the procedures and other database objects, and specific customer and invoice data. The downloaded zip file also puts all the sample import files into the directories so that you can follow along. Therefore, you can work through the chapter and piece this solution together, or you can download the packages and explore.
File Storage Location Setup
Create a base directory or use the download files at www.wrox.com to store the file-based imports to this project. Throughout the case study, the base location is referred to as C:ProSSISFilesCh23_ProSSIS. In the base directory, you’ll need two subdirectories: ach and lockbox. You will use these locations to store the files you are about to create in the next few sections.
Bank ACH Payments
Customers make payments either within their own bank or by using electronic payment systems to Company ABC through an automated clearinghouse. The automated clearinghouse bundles up all the payments for the day and sends one XML file through an encrypted VPN connection to an encrypted folder. The bank wires contain only a minimum amount of information at the transactional level. Each XML file contains a header row with a unique identifier that identifies the file transmission. The header also contains a total deposit amount and a transaction count that can be used to further verify the file transmission.
Each transactional detail row represents a deposit and contains two date fields: the date the deposit item was received, and the date the deposit item was posted to Company ABC’s deposit account. Each payment contains the amount of the deposit and a free-form field that can contain additional information, such as the customer’s name on a bank account, an e-mail address, or anything the customer adds to the wire. More commonly, the description contains the name on the customer’s bank account — which is often very different from the name in Company ABC’s customer data.
To make the sample ACH file, and for each file in this example, you’ll need to recreate these files manually or download the files from this book’s page at www.wrox.com. The bank ACH file looks like the following:
<BATCH>
<HEADER><ID>AAS22119289</ID>
<TOTALDEPOSIT>180553.00</TOTALDEPOSIT>
<DEPOSITDATE>07/15/2012</DEPOSITDATE>
<TOTALTRANS>6</TOTALTRANS>
</HEADER>
<DETAIL><AMOUNT>23318.00</AMOUNT>
<DESC>Complete Enterprises</DESC>
<RECEIVEDDATE>07/15/2012</RECEIVEDDATE>
<POSTEDDATE>07/15/2012</POSTEDDATE></DETAIL>
<DETAIL><AMOUNT>37054.00</AMOUNT>
<DESC>Premier Sport</DESC>
<RECEIVEDDATE>07/15/2012</RECEIVEDDATE>
<POSTEDDATE>07/15/2012</POSTEDDATE></DETAIL>
<DETAIL><AMOUNT>34953.00</AMOUNT>
<DESC>Intl Sports Association</DESC>
<RECEIVEDDATE>07/15/2012</RECEIVEDDATE>
<POSTEDDATE>07/15/2012</POSTEDDATE></DETAIL>
<DETAIL><AMOUNT>22660.00</AMOUNT>
<DESC>Arthur Datum</DESC>
<RECEIVEDDATE>07/15/2012</RECEIVEDDATE>
<POSTEDDATE>07/15/2012</POSTEDDATE></DETAIL>
<DETAIL><AMOUNT>24759.00</AMOUNT>
<DESC>Northwind Traders</DESC>
<RECEIVEDDATE>07/15/2012</RECEIVEDDATE>
<POSTEDDATE>07/15/2012</POSTEDDATE></DETAIL>
<DETAIL><AMOUNT>37809.00</AMOUNT>
<DESC>Wood Fitness</DESC>
<RECEIVEDDATE>07/15/2012</RECEIVEDDATE>
<POSTEDDATE>07/15/2012</POSTEDDATE></DETAIL>
</BATCH>
Files/Ch23_ProSSIS/ach/sampleach.xml
Lockbox Files
Company ABC has started using a lockbox service that their bank provides for a nominal fee. This service images all check and invoice stubs sent to a specific address that the bank monitors. The bank provides a data file containing the following data attributes for each deposit item:
- The amount
- A reference number for the invoice
- An image key that can be used to review images of the item online
The terms of the service dictate that if the bank can’t determine the invoice number because of legibility issues or the invoice is not sent in with the deposit item, either a customer account number or a customer name might be used in place of the invoice number. Periodically during the day, the bank will batch a series of payments into one file containing a header that includes a batch number, the posted deposit date for all deposit items, and an expected total for the batch.
The structure of the file from the bank is as follows:
HEADER:
TYPE 1A TYPE OF LINE H-HEADER
POSTDATE 6A DATE DEPOSIT POSTED
FILLER 1A SPACE(1)
BATCHID 12A UNIQUE BATCH NBR
DETAIL (TYPE I):
TYPE 1A TYPE OF LINE I-INVOICE
IMGID 10A IMAGE LOOK UP ID (2-6 IS ID)
DESC 25A INVOICE OR DESC INFO
DETAIL (TYPE C)
TYPE 1A TYPE OF LINE C-CHECK
IMGID 10A IMAGE LOOK UP ID (2-6 IS ID)
DESC 8S 2 CHECK AMOUNT
Using the following data, download or create a file named C:ProSSISFilesCh23_ProSSISlockboxsamplelockbox.txt to simulate the lockbox transmission in this example:
H080108 B1239-99Z-99 0058730760
I4001010003 181INTERNAT
C4001010004 01844400
I4002020005 151METROSPOOO1
C4002020006 02331800
I4003030009 MAGIC CYCLES
C4003030010 02697000
I4004040013 LINDELL
C4004040014 02131800
I4005040017 151GMASKI0001
C4005040019 01938800
Files/Ch23_ProSSIS/lockbox/samplelockbox.txt
PayPal or Direct Credits to the Corporate Account
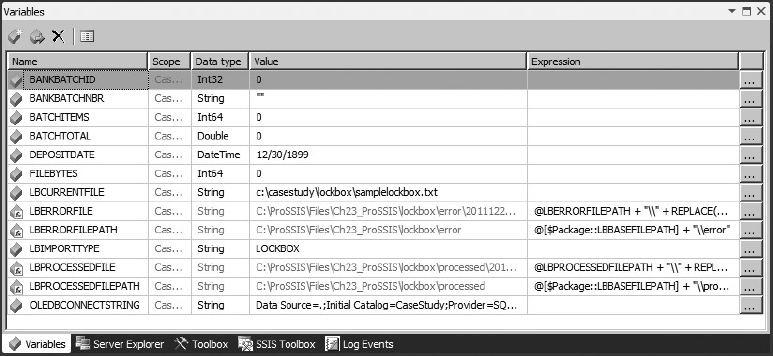
Company ABC has started a pilot program that allows customers to make payments using PayPal and other similar online electronic payment services. Customers like this option because it is easy to use. However, these payments are difficult to process for the Accounting group, because not all e-mail addresses have been collected for the customers, and that is the most common description on the transactions. Accounting personnel have to do some research in their CRM solution to determine who the customer is and to release the deposit to the payment systems. Once they have matched the customer to the transaction description (e-mail address), they would like to be able to save the matching criteria as data to be used in future processing. Currently, the accounting department uses a data synchronization process in its accounting software to periodically download these transactions directly from a special bank account during the day. This information is available through a read-only view in the database called vCorpDirectAcctTrans. Figure 23-5 shows the structure of this view.
Case Study Database Model
The case study database model (see Figure 23-6) is limited to only the information relevant to the case study. The core entities are as follows:

- Customer: An entity that utilizes products and services from Company ABC. To keep it simple, only the customer name, account number, and e-mail address attributes are represented in the table.
- Invoice: A monthly listing of total billed products and services for each customer. Each invoice is represented by a unique invoice number. Invoice details are not shown in the case study data model for simplicity.
- BankBatch: Any set of transactions from a bank or deposit institution that is combined. Auditable information expected for the exchange of monetary data is a major part of this entity. Files, or batches, of transactions must be validated in terms of number of transaction lines and, most important, amount. Care must be taken not to load a batch more than once. Recording the bank batch number or BankBatchNbr field and comparing incoming batches should enable you to prevent this from happening.
- BankBatchDetail: Each bank batch will be composed of many transactions that can be broken down into essentially a check and an invoice. You could receive as much as both pieces of information or as little as none of this information. For auditing purposes, you should record exactly what you received from the input source. You’ll also store in this table logically determined foreign keys for the customer and invoice dimension.
- CustomerLookup: This lookup table will be populated by your SSIS package and an external application. This enables users to store matching information to identify customers for future processing. It enables the data import processes to “learn” good matches from bad data.
Database Setup
To get started, you need to set up the database named CaseStudy. The database and all objects in it will become the basis for your solution to this business issue. Of course, as mentioned earlier, all input files and scripts are available from www.wrox.com. This database is not a consistent data model in the strictest sense. There are places where NVARCHAR and VARCHAR data fields are being used for demonstration purposes, which will be pointed out as you work through this case study. Working with NVARCHAR and VARCHAR fields has been mentioned as one of the difficulties that new SSIS developers struggle with, so you’ll learn how to deal with this issue in this case study.
There are two ways to create a new database. Use Microsoft SQL Server Management Studio to connect to a server or database engine of your choice. On the Databases Node, right-click and select the pop-up menu option New Database. In the New Database editor, provide the database name CaseStudy. Click OK to accept the other defaults. The second easy option is to run the following SQL script in a new query editor, as provided in the file “Step 1. Create Database.sql”:
USE [master]
GO
CREATE DATABASE [CaseStudy] ON PRIMARY
( NAME = N'CaseStudy', FILENAME = N'C:Program FilesMicrosoft SQL
ServerMSSQL11.MSSQLSERVERMSSQLDATACaseStudy.mdf', SIZE = 3072KB, MAXSIZE =
UNLIMITED,
FILEGROWTH = 1024KB )
LOG ON
( NAME = N'CaseStudy_log', FILENAME = N'C:Program FilesMicrosoft SQL
ServerMSSQL11.MSSQLSERVERMSSQLDATACaseStudy_log.ldf',
SIZE = 1024KB, MAXSIZE = 2048GB,
FILEGROWTH = 10%)
COLLATE Latin1_General_CI_AI
GO
EXEC dbo.sp_dbcmptlevel @dbname=N'CaseStudy', @new_cmptlevel=110
GO
Scripts/Ch23_ProSSIS/Database_Scripts/Step 1. Create Database.sql
Customer Table
The Customer table can be created in Microsoft SQL Server Management Studio. Click the New Query button in the toolbar to open a New Query window. Run the following SQL statement:
USE CaseStudy
GO
CREATE TABLE [dbo].[Customer](
[CustomerID] [int] IDENTITY(1,1) NOT NULL,
[AccountNbr] [char](15) NOT NULL,
[Name] [varchar](50) NOT NULL,
[Email] [varchar](50) NULL,
[SendEmailConfirm] [bit] NOT NULL CONSTRAINT [DF_Customer_SendEmailConfirm]
DEFAULT ((0)),
CONSTRAINT [PK_Customer] PRIMARY KEY CLUSTERED
(
[CustomerID] ASC
) ON [PRIMARY]
) ON [PRIMARY]
Scripts/Ch23_ProSSIS/Database_Scripts/Step 2. Create Customer Table and Data.sql
To fill the table with potential customers, you can manufacture some data using the AdventureWorks database. Don’t worry; you don’t have to have AdventureWorks installed. Use the script “Step 2. Create Customer Table and Data.sql” from the downloaded zip file to populate the Customer table. This script doesn’t need access to the AdventureWorks database to load the customer data into the database. Here is a partial listing of the full script:
--NOTE: THIS IS ONLY A PARTIAL LISTING
--THERE ARE 104 CUSTOMERS TO ENTER. EITHER DOWNLOAD
--THE FULL SCRIPT OR FOLLOW ALONG TO GENERATE THE
--CUSTOMER DATA FROM ADVENTUREWORKS DATA

INSERT INTO CaseStudy.dbo.Customer
(AccountNbr, [Name], email, SendEmailConfirm)
SELECT 'INTERNAT0001', 'International', '[email protected]',1
INSERT INTO CaseStudy.dbo.Customer
(AccountNbr, [Name], email, SendEmailConfirm)
SELECT 'ELECTRON0002', 'Electronic Bike Repair & Supplies', '[email protected]',1
INSERT INTO CaseStudy.dbo.Customer
(AccountNbr, [Name], email, SendEmailConfirm)
SELECT 'PREMIER0001', 'Premier Sport, Inc.', NULL, 0
INSERT INTO CaseStudy.dbo.Customer
(AccountNbr, [Name], email, SendEmailConfirm)
SELECT 'COMFORT0001', 'Comfort Road Bicycles', NULL, 0
Scripts/Ch23_ProSSIS/Database_Scripts/Step 2. Create Customer Table and Data.sql
If you are curious, the queries that generated this data from the AdventureWorks database are commented out at the bottom of the script file.
Invoice Table
To create the Invoice table, run the following SQL statement:
USE [CaseStudy]
GO
CREATE TABLE [dbo].[Invoice](
[InvoiceID] [int] IDENTITY(1,1) NOT NULL,
[InvoiceNbr] [varchar](50) NOT NULL,
[CustomerID] [int] NOT NULL,
[TotalBilledAmt] [money] NOT NULL,
[BilledDate] [datetime] NOT NULL,
[PaidFlag] [smallint] NOT NULL CONSTRAINT [DF_Invoice_PaidFlag] DEFAULT (0),
CONSTRAINT [PK_Invoice] PRIMARY KEY CLUSTERED
(
[InvoiceID] ASC
) ON [PRIMARY]
) ON [PRIMARY]
GO
ALTER TABLE [dbo].[Invoice] WITH NOCHECK
ADD CONSTRAINT [FK_Invoice_CustomerID]
FOREIGN KEY([CustomerID])
REFERENCES [dbo].[Customer] ([CustomerID])
GO
ALTER TABLE [dbo].[Invoice]
CHECK CONSTRAINT [FK_Invoice_CustomerID]
Scripts/Ch23_ProSSIS/Database_Scripts/Step 3. Create Invoice Table and Data.sql
You will use the Customer table to generate three months’ worth of invoice data. In doing so, you are creating invoice numbers that have the customer account number embedded in the invoice number. Companies commonly do this because it provides an extra piece of identification as a cross-check in an environment where there is very limited data. Use the following SQL snippet to simulate and create a set of invoice entries or use the downloaded script “Step 3. Create Invoice Table and Data.sql” to load this data statically:
INSERT INTO Invoice(InvoiceNbr, CustomerID, TotalBilledAmt, BilledDate, PaidFlag)
SELECT InvoiceNbr = '151' + Accountnbr,
CustomerID,
TotalBilledAmt = cast(131 * (ascii(left(name, 1)) +
ascii(substring(name,2, 1))) as money),
BilledDate = '06/01/2012 00:00:00',
PaidFlag = 0
FROM customer
UNION
SELECT InvoiceNbr = '181' + Accountnbr,
CustomerID,
TotalBilledAmt = case
when left(Accountnbr, 1) in ('A', 'B', 'C', 'D', 'E', 'F', 'G')
then cast(131 * (ascii(left(name, 1)) + ascii(substring(name,
2, 1)))
as money)
else
cast(191 * (ascii(left(name, 1)) + ascii(substring(name,
2, 1)))
as money)
end,
BilledDate = '07/01/2012 00:00:00',
PaidFlag = 0
FROM customer
UNION
SELECT InvoiceNbr = '212' + Accountnbr,
CustomerID,
TotalBilledAmt = case
when left(Accountnbr, 1) in ('A', 'F', 'G',)
then cast(132 * (ascii(left(name, 1)) + ascii(substring(name, 2, 1)))
as money)
else
cast(155 * (ascii(left(name, 1)) + ascii(substring(name, 2,
1)))
as money)
end,
BilledDate = '08/01/2012 00:00:00',
PaidFlag = 0
FROM customer
GO
UPDATE invoice set totalbilledamt = 18444.00
WHERE invoicenbr = '151INTERNAT0002' and totalbilledamt = 23973
Scripts/Ch23_ProSSIS/Database_Scripts/Step 3. Create Invoice Table and Data.sql
CustomerLookup Table
The CustomerLookup table will be used to store resolutions of bad customer identification data that continues to be sent through the accounting feeds. Data that the auto-processes can’t match would be matched manually, and the bad data string for an existing customer can be stored for each import type for future matching purposes. The structure can be created using the following SQL script, found in the “Step 4. Create CustLookup Table.sql” file:
USE [CaseStudy]
GO
CREATE TABLE [dbo].[CustomerLookup](
[RawDataToMatch] [varchar](50) NOT NULL,
[ImportType] [char](10) NOT NULL,
[CustomerID] [int] NOT NULL,
CONSTRAINT [PK_CustomerLookup] PRIMARY KEY CLUSTERED
(
[RawDataToMatch] ASC,
[ImportType] ASC
) ON [PRIMARY]
) ON [PRIMARY]
GO
ALTER TABLE [dbo].[CustomerLookup] WITH NOCHECK ADD CONSTRAINT
[FK_CustomerLookup_CustomerID] FOREIGN KEY([CustomerID])
REFERENCES [dbo].[Customer] ([CustomerID])
GO
ALTER TABLE [dbo].[CustomerLookup] CHECK CONSTRAINT [FK_CustomerLookup_CustomerID]
Scripts/Ch23_ProSSIS/Database_Scripts/Step 4. Create CustLookup Table.sql
BankBatch Table
The BankBatch table will store not only the summary data from the batch file but also the file itself — in the BatchFile field. This table can be created using either the code in the “Step 5. Create Bank Batch Tables.sql” file or the following SQL statement:
USE [CaseStudy]
GO
CREATE TABLE [dbo].[BankBatch](
[BankBatchID] [int] IDENTITY(1,1) NOT NULL,
[BankBatchNbr] [nvarchar](50) NULL,
[DepositDate] [datetime] NULL,
[ReceivedDate] [datetime] NULL,
[BalancedDate] [datetime] NULL,
[PostedDate] [datetime] NULL,
[BatchTotal] [money] NULL,
[BatchItems] [int] NULL,
[BatchItemsComplete] [int] NULL,
[FileBytes] [int] NULL,
[FullFilePath] [nvarchar](1080) NULL,
[ImportType] [char](10) NULL,
[ErrMsg] [varchar](1080) NULL,
[BatchFile] [ntext] NULL,
CONSTRAINT [PK_BankBatch] PRIMARY KEY CLUSTERED
(
BankBatchID] ASC
)WITH (PAD_INDEX = OFF, STATISTICS_NORECOMPUTE = OFF,
IGNORE_DUP_KEY = OFF, ALLOW_ROW_LOCKS = ON,
ALLOW_PAGE_LOCKS = ON) ON [PRIMARY]
) ON [PRIMARY] TEXTIMAGE_ON [PRIMARY]
GO
CREATE NONCLUSTERED INDEX [IX_BatchNumber_ImportType] ON [dbo].[BankBatch]
(
[BankBatchNbr] ASC,
[ImportType] ASC
)
GO
Scripts/Ch23_ProSSIS/Database_Scripts/Step 5. Create Bank Batch Tables.sql
BankBatchDetail Table
The detail to the BankBatch table can be created using the following SQL script:
USE [CaseStudy]
GO
CREATE TABLE [dbo].[BankBatchDetail](
[BankBatchDtlID] [int] IDENTITY(1,1) NOT NULL,
[BankBatchID] [int] NOT NULL,
[RawInvoiceNbr] [nvarchar](50) NULL,
[RawAccountNbr] [nvarchar](50) NULL,
[ReferenceData1] [nvarchar](50) NULL,
[ReferenceData2] [nvarchar](50) NULL,
[MatchedInvoiceID] [int] NULL,
[MatchedCustomerID] [int] NULL,
[MatchedDate] [datetime] NULL,
[PaymentAmount] [money] NULL,
CONSTRAINT [PK_BankBatchDtlID] PRIMARY KEY CLUSTERED
(
[BankBatchDtlID] ASC
) ON [PRIMARY]
) ON [PRIMARY]
LTER TABLE [dbo].[BankBatchDetail] WITH NOCHECK ADD CONSTRAINT
[FK_BankBatchDetail_BankBatchID] FOREIGN KEY([BankBatchID])
REFERENCES [dbo].[BankBatch] ([BankBatchID])
GO
ALTER TABLE [dbo].[BankBatchDetail] CHECK CONSTRAINT
[FK_BankBatchDetail_BankBatchID]
GO
ALTER TABLE [dbo].[BankBatchDetail] WITH CHECK ADD CONSTRAINT
[FK_BankBatchDetail_CustomerID] FOREIGN KEY([MatchedCustomerID])
REFERENCES [dbo].[Customer] ([CustomerID])
GO
ALTER TABLE [dbo].[BankBatchDetail] WITH CHECK ADD CONSTRAINT
[FK_BankBatchDetail_InvoiceID] FOREIGN KEY([MatchedInvoiceID])
REFERENCES [dbo].[Invoice] ([InvoiceID])
Scripts/Ch23_ProSSIS/Database_Scripts/Step 5. Create Bank Batch Tables.sql
Corporate Ledger Data
To simulate a view into your direct credits to the corporate account, you need to create the GLAccountData structure and your view [vCorpDirectAcctTrans]. All the corporate ledger structure scripts can be found in “Step 6. Create Corporate Ledger Table and Data.sql.” Run the following SQL to create the physical table:
USE [CaseStudy]
GO
CREATE TABLE [dbo].[GLAccountData](
[TransID] [int] IDENTITY(1,1) NOT NULL,
[PostDate] [datetime] NULL,
[ProcessDate] [datetime] NULL,
[DepositAmount] [money] NULL,
[TransDesc] [varchar](50) NULL,
[GLAccount] [char](10) NULL,
CONSTRAINT [PK_GLAccountData] PRIMARY KEY CLUSTERED
(
[TransID] ASC
) ON [PRIMARY]
) ON [PRIMARY]
Scripts/Ch23_ProSSIS/Database_Scripts/Step 6. Create Corporate Ledger Table and Data.sql
Run the following to create the logical view to this data:
USE [CaseStudy]
GO
CREATE VIEW dbo.vCorpDirectAcctTrans
AS
SELECT TransID, PostDate, ProcessDate, DepositAmount, TransDesc
FROM dbo.GLAccountData
Scripts/Ch23_ProSSIS/Database_Scripts/Step 6. Create Corporate Ledger Table and Data.sql
Run this SQL batch to load the GLAccountData with some sample deposit transactions from the direct-pay customers:
INSERT INTO GLACCOUNTDATA
(postdate, processdate, depositamount, transdesc, glaccount)
SELECT '08/09/12', '08/10/12', 22794.00, 'PAYPAL*[email protected]', 'BANK'
UNION
SELECT '08/09/12', '08/10/12', 21484.00, 'PAYPAL*[email protected]',
'BANK'
UNION
SELECT '08/09/12', '08/10/12', 22008.00, 'PAYPAL*[email protected]', 'BANK'
UNION
SELECT '08/09/12', '08/10/12', 22794.00, 'PAYPAL*CBooth@MagicCycle', 'BANK'
UNION
SELECT '08/09/012', '08/10/12', 22401.00, 'PAYPAL*[email protected]', 'BANK'
Scripts/Ch23_ProSSIS/Database_Scripts/Step 6. Create Corporate Ledger Table and Data.sql
ErrorDetail Table
There are some great logging options in SSIS, and the case study will log detailed errors that can occur at the column level when processing. This table will enable you to store that information; by storing the Execution ID, you can later join the custom-logged error detail with the step-level error information logged during package execution. You can create the table using the following SQL script, also found in “Step 7. Create Error Detail Table.sql”:
USE [CaseStudy]
GO
CREATE TABLE [dbo].[ErrorDetail](
[ExecutionID] [nchar](38) NOT NULL,
[ErrorEvent] [nchar](20) NULL,
[ErrorCode] [int] NULL,
[ErrorColumn] [int] NULL,
[ErrorDesc] [nvarchar](1048) NULL,
[ErrorDate] [datetime] NULL,
[RawData] [varchar](2048) NULL
)ON [PRIMARY]
Scripts/Ch23_ProSSIS/Database_Scripts/Step 7. Create Error Detail Table.sql
Stored Procedure to Add Batches
Because this is a rigorous financial processing environment, separating the logic that performs basic data insert from core matching logic provides advantages for auditing purposes and enables the process of creating new batches to be more modular. The other advantage to using stored procedures is higher performance. A stored procedure enables you to place all the T-SQL logic in one place, and it can be optimized by the Query Optimizer. A stored procedure can also be placed under separate execution rights and managed separately, instead of embedding the T-SQL into, and applying the rights to, the package itself. The following three stored procedures can be found in steps 8–10 in the downloadable files. This first stored procedure will be used to add a new bank batch to the payment processing system. Run the script to add it to CaseStudy database:
USE [CaseStudy]
GO
CREATE PROC usp_BankBatch_Add(
@BankBatchID int OUTPUT,
@BankBatchNbr nvarchar(50)=NULL,
@DepositDate datetime=NULL,
@ReceivedDate datetime=NULL,
@BatchTotal money=NULL,
@BatchItems int=NULL,
@FileBytes int=NULL,
@FullFilePath nvarchar(100)=NULL,
@ImportType char(10)
)
AS
/*=======================================================
PROC: usp_BankBatch_Add
PURPOSE: To Add BankBatch Header Basic info
and to validate that the batch is new.
OUTPUT: Will return BankBatchID if new or 0 if exists
HISTORY: 04/01/12 Created
=======================================================*/
SET NOCOUNT ON
If @ReceivedDate is null
SET @ReceivedDate = getdate()
IF LEN(@BankBatchNbr) <= 1 OR Exists(Select top 1 *
FROM BankBatch
WHERE BankBatchNbr = @BankBatchNbr
AND ImportType = @ImportType)
BEGIN
SET @BANKBATCHID = 0
RETURN -1
END
ELSE
BEGIN
INSERT INTO BankBatch(BankBatchNbr, DepositDate, ReceivedDate,
BatchTotal, BatchItems, FileBytes, FullFilePath,
ImportType)
SELECT UPPER(@BankBatchNbr), @DepositDate, @ReceivedDate,
@BatchTotal, @BatchItems, @FileBytes,
UPPER(@FullFilePath),
UPPER(@ImportType)
SET @BANKBATCHID = Scope_Identity()
END
SET NOCOUNT OFF
GO
Scripts/Ch23_ProSSIS/Database_Scripts/Step 8. usp_BankBatch_Add.sql
Stored Procedure to Update a Batch with Invoice and Customer ID
This stored procedure will be used to update a payment with a matching invoice or customer identification number relating back to the dimension tables. Run the script to add this procedure to the CaseStudy database:
CREATE PROC dbo.usp_BankBatchDetail_Match(
@BankBatchDtlID int,
@InvoiceID int=NULL,
@CustomerID int=NULL)
AS
/*===============================================
PROC: usp_BankBatchDetail_Match
PURPOSE: To update as paid an incoming payment
with matched invoice and customerid
HISTORY: 04/01/12 Created
*/
SET NOCOUNT ON
--UPDATE BANKBATCH DETAIL WITH INVOICE AND CUSTOMERID
--NOTE: IF EITHER IS NULL THEN DON'T UPDATE
--MATCHED DATE. THIS WILL PUSH THE ITEM INTO A SUBJECT-
--MATTER-EXPERT'S QUEUE TO IDENTIFY.
UPDATE BankBatchDetail
SET MatchedInvoiceID = @InvoiceID,
MatchedCustomerID = @CustomerID,
MatchedDate = case when @InvoiceID is NULL or @CustomerID is NULL then
NULL
else getdate() end
WHERE BankBatchDtlID = @BankBatchDtlID
SET NOCOUNT OFF
Scripts/Ch23_ProSSIS/Database_Scripts/Step 9. usp_BankBatchDetail_Match.sql
Stored Procedure to Balance a Batch
This stored procedure is used to examine all payments in a batch and to mark the batch as complete when all payments have been identified with an invoice and a customer. Again, you use a stored procedure for all the reasons explained previously for auditing, modularity, and performance:
CREATE PROC usp_BankBatch_Balance
AS
/*======================================================
PROC: usp_BankBatch_Balance
PURPOSE: To update batchdetails when they are matched
Then keep BankBatches balanced by matching all
line items
*/
UPDATE bankbatchdetail
SET MatchedDate = GetDate()
where (matchedinvoiceid is not null
and matchedcustomerid is not null)
and (matchedinvoiceid <> 0
and matchedcustomerid <> 0)
UPDATE BANKBATCH
SET BatchItemsComplete = BatchItems - b.NotComplete
FROM BANKBATCH A
INNER JOIN (
select bankbatchid, count(*) as NotComplete
from bankbatchdetail
where
(matchedinvoiceid is null
OR matchedcustomerid is null
OR matcheddate is null)
group by bankbatchid
)
B
on A.BankBatchID = B.BankBatchID
UPDATE BankBatch
SET BalancedDate = getdate()
WHERE BalancedDate IS NULL
and BatchItems = BatchItemsComplete
Scripts/Ch23_ProSSIS/Database_Scripts/Step 10. usp_BankBatch_Balance.sql
The import integration process, as discussed earlier, will contain three distinct packages (of the four worker packages) that need to be built. To keep this from becoming a 100-step process, you’ll put each together separately, and then within each package, you’ll break up the setup into several sections: Package Setup and File System Tasks, Control Flow Processing, Data Flow Validation, and Data Flow ETL. Each step is explained in detail the first time; then, as things become repetitive, you can see the details on the screenshots to pick up some speed. You can also walk through just one of these load packages and then download the complete solution from www.wrox.com to see and explore the final result.
Bank File Load Package
The bank batch load package will be set up to look in specific file directories for lockbox flat files. External dependencies such as file folders can be a headache during package deployment if you hardcode them, because you have to remember to set them up identically in each environment. Instead, you are going to enable your package to get these paths from variables and build them as needed. You can then use configuration files to set up the package in each environment without any further intervention. However, you could still have some issues if the directories that you provide are not created, so you need to consider this as you set up the precedence and control of flow in your package. It means adding a few extra steps, but it will enable your package to adjust during initial deployment and any future changes to these file locations.
Bank File Package and Variable Setup Tasks
To get started, you need to create a new SSIS project. Create a project named CaseStudy in C:ProSSISCodeCh23_ProSSISCaseStudy. When the project is built, go to Solution Explorer and click the Package.dtsx file. In the Property window, find the Name property and change the name from Package.dtsx to CaseStudy_Load_Bank.dtsx. Alternatively, you can right-click on the Package.dtsx name, select the Rename option, and then type in CaseStudy_Load_Bank.
Begin by creating a parameter in the package by going to the Parameters tab on the package. Click the icon on the far left of the tab to add a new parameter. Set the Name of the parameter to LBBASEFILEPATH with a data type of String and an initial value of C:ProSSISFilesCh23_ProSSISlockbox. Because this is a parameter, it can be set external to the package if the directory location needs to change. Processes and variables within the package will use this parameter to build the appropriate file locations. Because all the other file paths and filenames for processed files are based on this parameter, the package can be easily configured for different server environments.
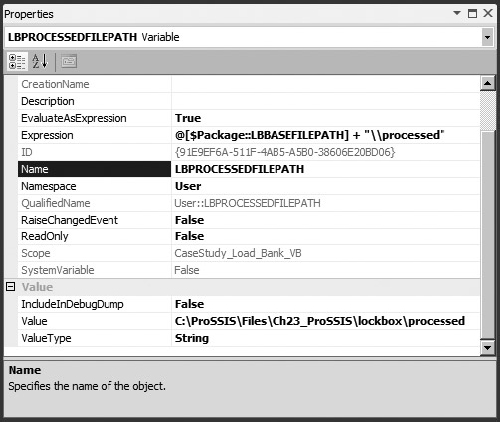
Use the menu named SSIS Variables to access the Variables editor and add the variables at the package level that are shown in the following table. Be sure to use all uppercase letters because variables are case sensitive; when you are new to SSIS, this will help you avoid some frustration if you are not used to case sensitivity. Variable names with all-caps are not required for SSIS package development. Most of these values will be set automatically to default values within each load package, so values are here to aid in understanding.
| VARIABLE NAME | DATA TYPE | VALUE |
| BANKBATCHID | Int32 | 0 |
| BANKBATCHNBR | String | |
| BATCHITEMS | Int64 | 0 |
| BATCHTOTAL | Double | 0 |
| DEPOSITDATE | DateTime | 12/30/1899 |
| FILEBYTES | Int64 | 0 |
| LBCURRENTFILE | String | C:ProSSISFilesCh23_ProSSISlockboxsamplelockbox.txt |
| LBERRORFILE | String | |
| LBERRORFILEPATH | String | |
| LBIMPORTTYPE | String | LOCKBOX |
| LBPROCESSEDFILE | String | |
| LBPROCESSEDFILEPATH | String |
Because the File System Tasks only allow the source and destination properties to be set to variables — not expressions derived from variable values — you need to create a few variables that “go the other way” and instead are derived from expressions.
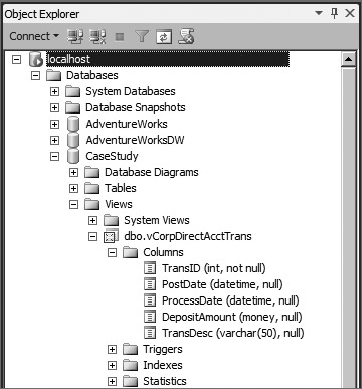
The variables @LBPROCESSEDFILEPATH and @LBERRORFILEPATH need to retrieve their values relative to the base file paths (see the following table). For example, the variable @LBPROCESSEDFILEPATH should be set up relative to the base lockbox file path in a subdirectory called processed. To do this, you’ll use an expression to generate the value of the variable. Click the variable in the Variables Editor and add the expression to match Figure 23-7. The double backslash (\) is required as an escape sequence for the backslash in the Expressions Editor. Set both variables up to be evaluated as expressions the same way. Notice that in the Variables Editor, and as shown in Figure 23-8, the values change immediately.
| FOR VARIABLE NAME: | SET EXPRESSION TO: |
| LBERRORFILEPATH | @[$Package::LBBASEFILEPATH] + "\error" |
| LBPROCESSEDFILEPATH | @[$Package::LBBASEFILEPATH] + "\processed" |
The variables for specific processed and error versions of the current file being processed need to retrieve a unique value that can be used to rename the file into its respective destination file path. Set up the @LBERRORFILE and @LBPROCESSEDFILE variables to be evaluated using expressions similar to the following formula:
@LBERRORFILEPATH + "" + REPLACE(REPLACE(REPLACE(REPLACE((DT_WSTR,50)
GETUTCDATE(),"-","")," ", ""),".", ""),":", "")
+(DT_WSTR, 50)@FILEBYTES + ".txt"
This formula will generate a name similar to 201208160552080160000000.txt for the file to be moved into an offline storage area.
To connect to the database, you will use a new feature in SSIS 2012 called Project Connection Managers. In previous versions of Integration Services, you may recall a folder in Solution Explorer called Data Sources. Unfortunately, the data connection reuse this provided could only be used at design time, so this option was essentially useless. Project Connection Managers have replaced the old Data Sources folder. You can create a connection manager for your project, and it will automatically be included in all packages.
Another helpful feature in SSIS 2012 is parameterization, which we already covered in Chapter 6. Combining Project Connection Managers and parameters will make this case study’s development and configuration even easier than before.
Begin by adding a new OLE DB Connection in Solution Explorer. Name the connection CaseStudy OLEDB. You will use this connection for all control and Data Flow activities that interact with the database. Notice that once it is created, it is immediately added to the package you are developing.
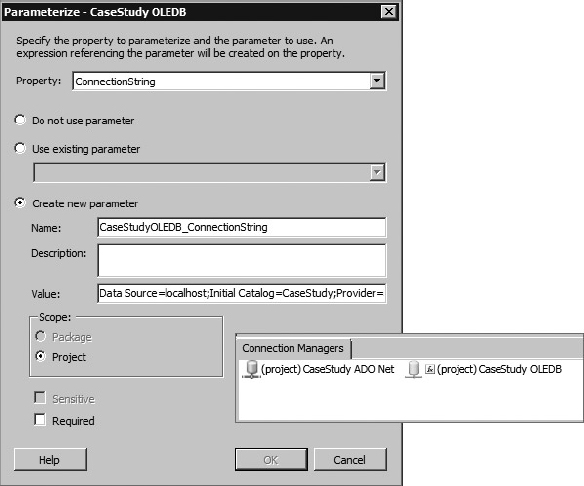
To enable this connection to be configurable during runtime, right-click on the connection manager in the package and select the menu option called Parameterize. The Parameterize menu allows you to modify the value that will initially be used for the connection string.
Notice earlier that this variable was set to the default instance using this connection string value:
Data Source=localhost;Initial Catalog=CaseStudy;Provider=SQLNCLI11.1;Integrated
Security=SSPI;Auto Translate=False;
You may need to specifically name your server instance instead of using the “localhost” identifier if the SSIS package will be executed on a separate server from the database. Once confirmed, the connection manager will have a function “adorner” signifying that the connection manager will be set using an expression based on the parameter. Figure 23-9 shows how the connection and connection manager should appear when complete.
Finally, add a New Flat File Connection in the Connection Managers tab on the package. Because this connection will be used only within this one package, you do not need to add it to the Project Connection Managers collection. Configure the connection properties as shown in the following table. Note that instead of parsing out each individual column in the file, here you are bringing the whole 80-character line into the data stream so that you can parse out each data element later. The reason for doing this is that the lockbox flat file will attempt to cast parsed text values into specific data types, resulting in import errors if there are unexpected non-ASCII characters or nonvalid elements like 00000000 for dates. By bringing in the whole line, you’ll be able to parse and test each element, providing more control in your ETL process. This is the preferred ETL technique if the data quality is found to be poor or inconsistent or if you are not using a staging table.
| PROPERTY | SETTING |
| Name | Lockbox Flat File |
| Description | Flat File for Lockbox processing |
| File Name | C:ProSSISFilesCh23_ProSSISlockboxsamplelockbox.txt |
| Format | Ragged right |
| Advanced:OutputColumnWidth | 80 |
| Advanced:DataType | string[DT_STR] |
| Advanced:Name | line (case is important) |
The only problem with the previous step is that you had to set a filename to a literal in order to set up the connection. However, at runtime you want to retrieve the filename that you will be processing from your variable LBCURRENTFILE. Save the Flat File Connection, and then access the Expressions collection in the Properties tab. To enable this connection to be configurable during runtime, set the connection string property of the connection to the variable @LBCURRENTFILE using the Expressions collection on the Connection Properties window.
At this point, you should have a package named CaseStudy_Load_Bank with two connections and a bunch of variables. In the next section, you’ll start adding to the Control Flow.
Bank File Control Flow Processing
You want the CaseStudy_Load_Bank package to process these flat files streaming in from the bank, but before you start, you need to ensure that the directories needed for your load package exist. You’ll use a File System Task to do this because it can perform the operation of checking for and creating a directory. One nifty thing that it will do by default is create all the subdirectories in the hierarchy, down to the last one, when you create a directory. This is why you’ll set up a File System Task to check for and create a directory using lowest subdirectory path values — LBPROCESSEDFILEPATH and LBERRORFILEPATH. You won’t need to create a path explicitly for the parameter LBBASEFILEPATH. You’ll get this free, when you check for and create the subdirectories. Use this to get started on laying out the Control Flow for the package.
Bank File Control Flow File Loop
Add two File System Tasks to the Control Flow design surface of the package — one for checking and adding the lockbox processed file path, and another for the lockbox error-file path. These two paths represent where the package will move incoming lockbox files depending upon how they are processed. Change the name and description properties to the following:
| NAME | DESCRIPTION |
| File System Task Folder LB Processed Folder | Ensures that the LB Processed Folder exists |
| File System Task Folder LB Error Folder | Ensures that the LB Error Folder exists |
For each File System Task, set the following properties:
| PROPERTY | SETTING |
| Operation | Create Directory |
| UseDirectoryIfExists | True |
| IsSourcePathVariable | True |
| SourceVariable | Choose the corresponding variable for each task (Notice how easy this is when the task is named properly) |
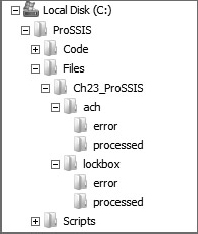
Now connect the two lockbox File System Tasks together by setting a precedence constraint between the File System Task Folder LB Processed Folder Task and the File System Task Folder LB Error Folder Task. The precedence constraint should automatically be set to Success. If you run the package now, you should see a file hierarchy created on your machine resembling Figure 23-10.
Add a Foreach Loop Container named For Each Lockbox File. Connect the precedence from the last Lockbox File System Task to the Foreach Loop Container so that the Foreach Loop Container is not executed unless the File System Task completes successfully.
The Foreach Loop is expecting a literal path to poll. You want the loop to rely on a variable, so you have to use an expression. This task object is a little confusing because there are actually two sets of expression collections: one set, in the left tab, is for the container; the second set appears only when the Collections tab is selected. The second set of expressions is the collection of properties for the Foreach enumerator. It is this second set of expressions that you want to alter. Click the ellipsis to the right of this Expressions collection.
In the Expressions Editor, the property folder doesn’t exist with this name. Don’t worry, it does exist; it is just named Directory instead. Select the Directory property and set its value to the parameter @[$Package::LBBASEFILEPATH]. Evaluate the expression to ensure that it matches the base lockbox path. Close the Expressions Editor. Set the property Files to *.txt. Leave the Retrieve File name property as Fully Qualified. The Collection tab of the Foreach Loop Container should look like Figure 23-11.

To store the name of the file you are processing into a variable, click the Variable Mappings tab on the left side of the Foreach Loop Container. Select the variable named LBCURRENTFILE to retrieve the value of the Foreach Loop for each file found. Leave the index on the variable mapping set to zero (0). This represents the first position in a files collection or the filename returned by the loop. Click OK to complete this task.
Bank File Control Flow Retrieval of File Properties
One of the things you have to save into the BankBatch data table is the filename and the number of bytes in the file. The Foreach Loop Container did the work of storing the filename into the variable LBCURRENTFILE. Now, with the filename, it would be easy to retrieve the file size using a Script Task and some VB.NET or C# code, and then set the value of the variable. You also need to reset the value of some of the other variables, so this is a good spot to add this logic as well. For a more detailed explanation of setting variables within Script Tasks, see Chapter 9.
Getting back to the Control Flow of the Bank File package, add a Script Task within the Foreach Loop. Change the name to “Script LB File Size into Variable.” Provide the variable LBCURRENTFILE for the ReadOnlyVariables property. Select the variables BANKBATCHID, BANKBATCHNBR, BATCHITEMS, BATCHTOTAL, DEPOSITDATE, and FILEBYTES from the dropdown list of variables for the ReadWriteVariables property. Note that if you choose to hand-key variables into this property, that when passing variables into the Script Task, the @ sign should not be used, but you can fully qualify the variables with the namespace, such as User::BATCHITEMS.
Select the Script language of your choice. Click the Edit Script button. This opens the .NET development environment. Add either an Imports or a using reference to the System.IO namespace depending on your selected .NET language, and update the script to pull the file bytes from the filename provided in the DTS object Variables collection. First include a reference to the System.IO library by adding the last line you see in this code:
C#
using System;
using System.Data;
using Microsoft.SqlServer.Dts.Runtime;
using System.IO; //<--Added Input/Output library
VB
Imports System
Imports System.Data
Imports System.Math
Imports Microsoft.SqlServer.Dts.Runtime
Imports System.IO '<--Added Input/Output library
Then add a VB Sub or C# void function to reset the variables that you can call in the Script Task Main() function. This is done only to provide code separation, rather than to work with the large procedural code typically found in the Main() function. Note that the conversion of default values is explicit. This is required. Simply assigning the value of 0 to one of these variables would not cast properly.
C#
public void ResetVariables()
{
//Resets variables
Dts.Variables["BANKBATCHID"].Value = System.Convert.ToInt32(0);
Dts.Variables["BANKBATCHNBR"].Value = "";
Dts.Variables["BATCHITEMS"].Value = System.Convert.ToInt64(0);
Dts.Variables["BATCHTOTAL"].Value = System.Convert.ToDouble(0);
Dts.Variables["DEPOSITDATE"].Value = DateTime.MinValue;
Dts.Variables["FILEBYTES"].Value = System.Convert.ToInt64(0);
}
VB
Public Sub ResetVariables()
'Resets variables
Dts.Variables("BANKBATCHID").Value = System.Convert.ToInt32(0)
Dts.Variables("BANKBATCHNBR").Value = ""
Dts.Variables("BATCHITEMS").Value = System.Convert.ToInt64(0)
Dts.Variables("BATCHTOTAL").Value = System.Convert.ToDouble(0)
Dts.Variables("DEPOSITDATE").Value = DateTime.MinValue
Dts.Variables("FILEBYTES").Value = System.Convert.ToInt64(0)
End Sub
Then replace the Main() function within the Script Task with this one:
C#
public void Main()
{
//'**
//'SCRIPT
//'PURPOSE: To take file bytes and save to global variable
//'==================================================================
Int64 lDefault = 0;
Boolean bVal;
Try
{
//Reset Variables
ResetVariables();
//Use.Net IO Library to examine file bytes
FileInfo oFile = new
FileInfo(Dts.Variables["LBCURRENTFILE"].Value.ToString());
Dts.Variables["FILEBYTES"].Value = oFile.Length;
Dts.Events.FireInformation(0, "Script Task to Vars", _
"File Bytes Found:" +
Dts.Variables["FILEBYTES"].Value.ToString(), "", 0, ref bVal);
//Alternative Troubleshooter
//System.Windows.Forms.MessageBox.Show("File Bytes Found:" +
//Dts.Variables["FILEBYTES"].Value.ToString());
Dts.TaskResult = (int)ScriptResults.Success;
}
catch(Exception ex)
{
Dts.Events.FireError(0, "Script Task To Vars", ex.ToString(),
"", 0);
Dts.Variables["FILEBYTES"].Value = lDefault;
Dts.TaskResult = (int)ScriptResults.Failure;
}
}
VB
Public Sub Main()
'**
'SCRIPT
'PURPOSE: To take file bytes and save to global variable
'==================================================================
Dim oFile As FileInfo
Dim lDefault As Int64
Dim bVal As Boolean
lDefault = 0
Try
'Reset Variables
ResetVariables()
'Use.Net IO Library to examine file bytes
oFile = New FileInfo(Dts.Variables("LBCURRENTFILE").Value.ToString)
Dts.Variables("FILEBYTES").Value = oFile.Length
Dts.Events.FireInformation(0, "Script Task to Vars", _
"File Bytes Found:" +
Dts.Variables("FILEBYTES").Value.ToString(), _
"", 0, bVal)
'Alternative Troubleshooter
'System.Windows.Forms.MessageBox.Show("File Bytes Found:" _'
+ Dts.Variables("FILEBYTES").Value.ToString())
Dts.TaskResult = ScriptResults.Success
Catch ex As Exception
Dts.Events.FireError(0, "Script Task To Vars", ex.ToString(), "", 0)
Dts.Variables("FILEBYTES").Value = lDefault
Dts.TaskResult = ScriptResults.Failure
End Try
End Sub
Now close the Script Editor and save this task. Be sure to click OK to save. If you open the script after you edit and have not saved the task, then your earlier script changes are lost. On that same note, another good practice in SSIS is to code and test smaller units of work.
Back to the code, note the use of the FireInformation method in the script. This method will stream an informational entry into the Execution Results tab containing the value of file bytes found in the file to process.
At this point, you would know the filename and file size. The Foreach Loop stored the filename into a variable. The Script Task retrieved the file size and stored the data into the FILEBYTES variable. You still need to figure out whether you have seen this file before. A unique batch number by import type is embedded in the header of the file. There are a few ways to retrieve that information. One way is to use the System.IO library in the Script Task you just created to open and examine the file header row. Another way is to use a Data Flow Task to open and examine the file. Although you could do the same thing in the Script Task, the Data Flow Task enables you to turn the file into a stream to examine the contents easily. It also provides the added advantage of failure upon encountering a bad format at a column level. You can then alter your Control Flow to push this file to the error folder.
To finish the retrieval Control Flow for now, add a Data Flow Task. Connect the successful completion of the Script Task to this task. Change the Name property to “Data Flow Lockbox Validate File and Header Info.” This task will parse out the batch header information into variables, validate the data contents, and then perform a lookup for a similar batch. An existing BankBatchID will be returned in the BankBatchID variable. You’ll configure the Data Flow in the section “Bank File Data Flow Validation.” Disable the Data Flow Task for now by right-clicking the task and selecting Disable in the pop-up menu. (After you have run the package and tested it, follow the same steps and select Enable to reenable the task.) Save the entire package and run it to ensure that everything is working so far.
Bank File Control Flow Batch Creation
The last task for the Bank File Control Flow is to lay out the workflow to validate that key values are in the Batch file and that the batch has not already been processed. This ultimately will be determined by the Data Flow Task that you added but have not yet completed. For now, you know that if certain basic elements in the batch file, such as the batch number, are missing or the batch amount is zero, then the package should move the file to the error folder.
To enable moving the file, add a File System Task named File System Task Error Folder. Instead of choosing a move file operation in the File System Task, select the option to rename the file. This may not be intuitive, but to move the file you need the filename stored separately. Because the variable @LBERRORFILE is a full file path and a unique filename, it is easier to move the file by simply renaming it. The File System Task properties should be set to the values shown in the following table:
| PROPERTY | VALUE |
| IsDestinationPathVariable | True |
| Destination Variable | User::LBERRORFILE |
| OverwriteDestination | True |
| Name | File System Task Error Folder |
| Description | Moves bad files to an error folder |
| Operation | Rename File |
| IsSourcePathVariable | True |
| SourceVariable | User::LBCURRENTFILE |
The File System Task here will complain if the value for User::LBCurrentFile is empty or if it doesn’t have a default value, so make sure you set this up initially as described in the earlier setup section.
To connect the Data Flow Task and File System Task together, add a precedence constraint that looks for the existence of a Bank Batch identifier and amount. On the constraint, select the Multiple constraint option of Logical OR and set the Evaluation Operation to Expression OR Constraint. Set the Value to Failure and the Expression as follows:
@BANKBATCHID!=0 || @BATCHTOTAL == 0.00
If either Data Flow fails, the Data Flow finds an existing BankBatchId, or there is no valid amount in the amount field in the bank file, the precedence constraint will send the workflow to the File System Task, which archives the file in the error folder.
If the elements are all present, and there is no existing bank batch by batch number, the batch needs to be persisted to the database. To do this, add an Execute SQL Task. This task will use a stored procedure, usp_BankBatch_Add, to add the parsed information in the lockbox file as a row in the BankBatch table to represent a new batch file. The procedure usp_BankBatch_Add will return the new BankBatchId if it could be successfully added. Because you are using an OLE DB Connection Manager, set up the Execute SQL Task properties like this:
| PROPERTY | VALUE |
| Name | Execute SQL task to add Bank Batch Hdr |
| ConnectionType | OLE DB |
| Connection | CaseStudy OLEDB |
| SQLStatement | EXEC dbo.usp_BankBatch_Add ? OUTPUT, ?, ?, ?, ?, ?, ?, ?, ? |
| IsQueryStoredProcedure | (Will be grayed out) |
When you use the OLE DB provider, the parameters have to be marked as ? because of the different provider implementations for handling parameters. Map the input parameters to the procedure parameters on the Parameter Mapping tab. Note that the OLE DB provider uses more generic variable mapping than what you’ll do later with the ADO.NET provider. The finished Execute SQL Task Editor should look like Figure 23-12.

If this Execute SQL Task doesn’t return a new BankBatchId indicating that the batch header has been persisted, you don’t want to execute any other tasks connected to it. Furthermore, the offending file needs to be moved into an error folder to be examined because something is wrong. Create another precedence constraint between the Execute SQL Task and the File System Task Error Folder. The Control Flow should take this path if either the Execute SQL Task fails or the BankBatchId is zero (0). Set up the Precedence Constraint Editor to look like Figure 23-13.

Add a second new Data Flow Task to the Foreach Loop. Change the name property to Data Flow Lockbox Detail Data Load. You’ll configure the Data Flow in the next section. Connect the successful completion of the Execute SQL Task to this task. Add an expression to check for a nonzero BankBatchID, and set the constraint to apply when there is a successful completion and an evaluation of the constraint as true between the Execute SQL Task and this new Data Flow Task.
Now if the Data Flow Lockbox Detail Data Load fails to extract, transform, and load the batch details, you still have an issue. Add a simple Failure constraint between the Data Flow Lockbox Detail Data Load and the previously created File System Task Error Folder.
If the file is processed successfully in the Data Flow Lockbox Detail Data Load, you need to move it to the “processed” folder. Add another new File System Task and connect it to the successful completion of the second Data Flow Task. Set up this task just like the Error Folder File System Task but point everything to the processed folder.
| PROPERTY | VALUE |
| IsDestinationPathVariable | True |
| Destination Variable | User::LBPROCESSEDFILE |
| OverwriteDestination | True |
| Name | File System Task Processed Folder |
| Description | Moves completed files to an error folder |
| Operation | Rename File |
| IsSourcePathVariable | True |
| SourceVariable | User::LBCURRENTFILE |
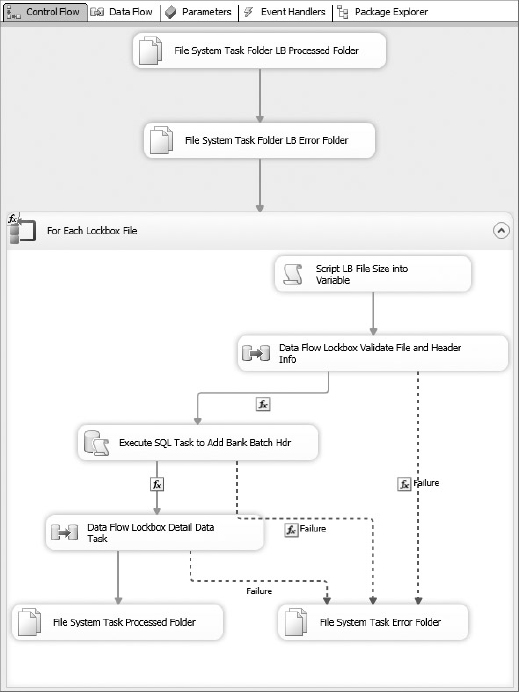
You now have the basic structure set up for the Bank File Lockbox Control Flow. You still need to build your components in the Data Flow Tasks, but you’ll get to that in the next sections. If you are following along, go ahead and save the package at this point. If you want to test the package, you can set up the variables and test the different workflows. Just remember to watch the movement of the sample file into the processed and error folders, and make sure you put it back after each run. The CaseStudy_Load_Bank package at this point should look like Figure 23-14.
Bank File Data Flow Validation
In this section of the package, you are going to fill in the details of the Data Flow Task for validating the lockbox file. The strategy will be to open the lockbox file and retrieve information from the header to pass back to the Control Flow via variables. You’ll use a Flat File Connection to read the file, a Conditional Split Transformation to separate out the header and the check lines, Derived Column Components to parse out the header line, and an Aggregate Count Transformation to count the check transactions. You’ll use Script Component Transformations to pull this information from the transformation stream and store it in your variables to return them back to the Control Flow. Recall that the Control Flow determines whether the file is good or not, and moves the file into either an error or a processed folder.
Bank File Data Flow Parsing and Error Handling
To use the Flat File Connection you defined earlier in the Data Flow, add a Flat File Source to the Data Flow design surface. Select the Flat File Connection created in the previous step named Lockbox Flat File. Name this source component Flat File Lockbox.
One of the main purposes of this Data Flow is to perform an extraction of the header information and then perform a lookup on the batch number. You will use the Lookup Transformation for this task, and one of the “gotchas” to using this task is that it is case sensitive. Because at this point your source contains all the data in a single column, it makes sense to go ahead and run the data through a component that can convert the data to uppercase in one step. Add a Character Map Transformation to the Data Flow. It should be connected to the output of the Flat File Source and be configured to perform an in-line change to the incoming data. Select the incoming column named line and set the Destination to In-Place Change. Set the operation type to Uppercase and leave the output alias as line. Save the Character Map Transformation.
The lockbox file contains three types of data formats: header, invoice, and check. At this stage, you are trying to determine whether this batch has been previously processed, so you only need the information from the header and a count of the check transactions. To split the one-column flat file input, add a Conditional Split Transformation to the Data Flow. Set up the component to use the leftmost character of the input stream to split the line into two outputs: Header and Check. The transformation should look like Figure 23-15.

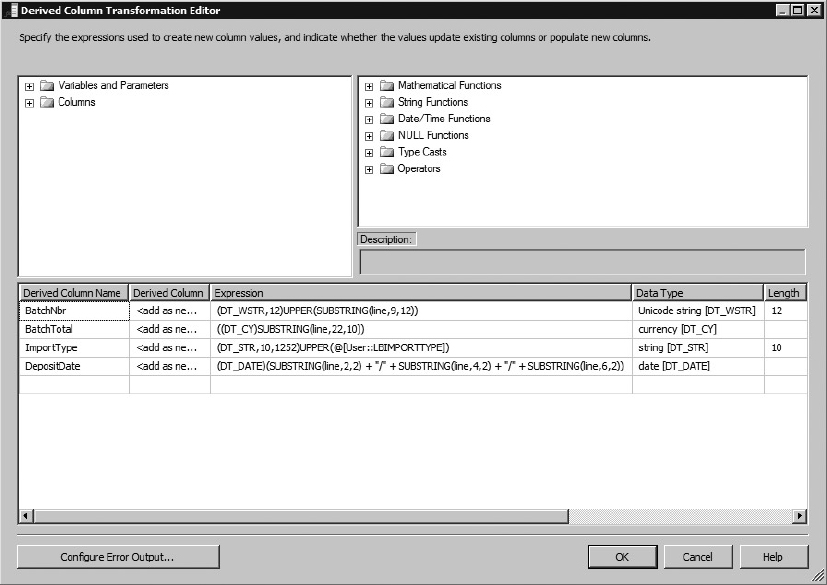
Add a Derived Column Task to the Data Flow and name it Derived Columns from Header. Connect to the Header output of the Conditional Split. This task is where the individual data elements are parsed from the line into the data fields they represent. With the Derived Column Task, you also get the conversion utilities as an added benefit. Because the import stream is a string type, you will convert the data type; this is where you think ahead as to what the final data type should be. Downstream, if you ultimately want to add a row to the BankBatch table, the Batch Number you extract from this input stream must be converted into a Unicode variable text field. If you parse the text string into the data type of [DT_WSTR] at this stage, you will match the destination field. Paying attention to data types early will save you many headaches further into the package. Set up the derived columns to match Figure 23-16.
Wait a minute! These explicit castings of string data could be disastrous. What if the bank provides some bad data in the Batch Total field? Good question. If you just left the default error handling in place, the package would fail. You don’t want that to happen; you just want to reject the file. To do that, you need the Control Flow to recognize that something is wrong and divert the file to the error folder. Notice that we said Control Flow — not Data Flow. This is why the precedence constraint you set up between this Data Flow Task and the Execute SQL Task to add a Bank Batch header is set up to reject the file if the Data Flow Task fails.
To ensure that this happens, click the Configure Error Output button, and make sure that for each derived column the component is set to fail and Redirect Row if there are any errors in creating the columns. See Figure 23-17 for the completed error output.

There are many different options for handling errors in SSIS. In this Data Flow, if there is an error parsing the lockbox header, it is probably an invalid format-type error, so you want to be able to capture information about that error in that column, so the file can be fixed and resubmitted. To do this, add a Script Component to make use of the error stream you created from the Derived Column Component. Set up the Script Component as a transformation. The error stream currently contains your raw data, an error code, and a column number for each error generated. You can use the Script Component to add the error description to your stream, and then in another Component you can log the information into your [ErrorDetail] table. Connect the error output of the Derived Column Component to the Script Component to capture the original input stream. Name this task Script Component Get Error Desc. Open the Script Transformation Editor and select all the input columns on the Input Columns tab. Then, in the Inputs and Outputs tab, expand the Output0 collection and add an output column (not an output) named ErrorDesc. Set the type to [DT_WSTR] with a length of 1048. Open the design environment for the Script Component. Change your ProcessInputRow() method to the following:
C#
public override void Input0_ProcessInputRow(Input0Buffer Row)
{
//'Script
//'Purpose: To retrieve the error description to write to error log
Row.ErrorDesc = ComponentMetaData.GetErrorDescription(Row.ErrorCode);
}
VB
Public Overrides Sub Input0_ProcessInputRow(ByVal Row As Input0Buffer)
'SCRIPT
'PURPOSE: To retrieve the error description to write to error log
Row.ErrorDesc= ComponentMetaData.GetErrorDescription(Row.ErrorCode)
End Sub
Close the Script Editor and then the Script Transformation Editor. Now add a Derived Column Component and name it Derived Column System Variables. Along with the detailed error message, it will be helpful to add other information such as the ExecutionInstanceGUID to log in to your custom ErrorDetail table. The ExecutionInstanceGUID is a unique identifier given to each run of an SSIS package. It enables you to combine your custom error logging with other package error logging to give you a complete picture of what occurred when a package failed. Create the Derived Columns shown in Figure 23-18.

Add an OLE DB Destination to save this data into the ErrorDetail table. Name the component OLE DB Destination Error Log. Set up the OLE DB Connection and set the name of the table to ErrorDetail. Map the columns. Most input columns should match the destination columns in the table. Map the column Line to the RawData column.
Now you’ve handled the worst-case scenario for bad batch header data. Not only do you store the error of a bad conversion or batch header, but the flow of data will stop at this component. This leaves the value of the BankBatchID to the default of 0, which causes the Control Flow to divert the file to the error folder — just what you want.
Bank File Data Flow Validation
Now, if all the data elements of the Bank Batch file parse correctly, the Derived Columns from Header Component should contain data that was successfully converted to proper data types. You now have to determine if the BatchNbr parsed from the file has already been processed. This can be accomplished by checking whether it matches any existing BatchNbr in the BankBatch table by import type. Add a Lookup Component to the flow of the Derived Column. Change the name to Lookup BankBatchID. Connect the CaseStudy OLEDB connection. In the Reference tab, select BankBatch table. The Lookup Component is case sensitive, which is why the derived column converted the contents to uppercase.
In the Columns tab, connect the BatchNbr input column to the BankBatchNbr column. Connect the ImportType input column to the ImportType column. This is the equivalent of running a query against the BankBatch table looking for a matching row ImportType and BatchNbr for each row in the input stream. In the grid, add a lookup column BankBatchID by selecting the field in the lookup table. The result of the lookup will be either a NULL value or a retrieved BankBatchID. Because you are expecting the Lookup Component to return no matches, use the Configure Error Output to set the error output for the lookup to Ignore Failure. Figure 23-19 shows an example of the mapping to retrieve the BankBatchId as a new column.
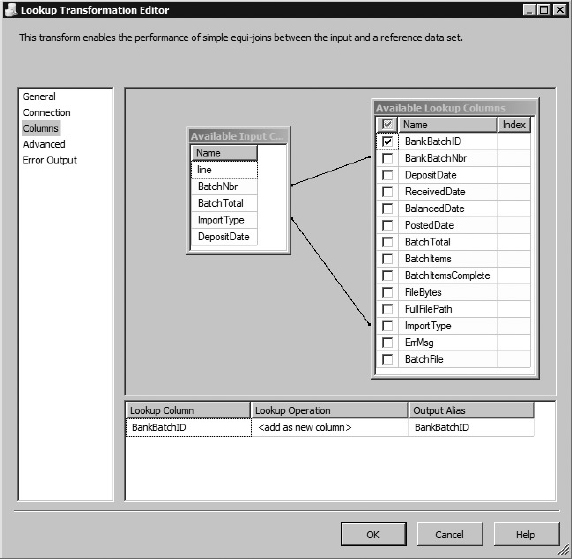
To handle the NULL situation and other validations, add a new Script Component to the Data Flow and connect to the successful output stream of the Lookup Component as a destination. Name this task Script Component to Store Variables. In this task, select the columns Line, BankBatchID, BatchNbr, BatchTotal, ImportType, and DepositDate from the input stream. They will be added automatically as input columns and will be available in a row object. Add the matching variables to the ReadWriteVariable property: BANKBATCHID, BANKBATCHNBR, DEPOSITDATE, and BATCHTOTAL. Remember that variables are case sensitive and must be passed as a comma-delimited list.
In the Script Component, use the row object to retrieve the values that are in the input row stream. Because you are processing the header row, you’ll have only one row to process. Accessing the row values is not a problem. However, saving the value to a package variable is not allowed when processing at a row level. You can access package variables only in the PostExecute event stub. To retrieve the values, use variables to capture the values in the row-level event, and then update the package variables in the PostExecute event. If you need to retrieve information from your Data Flow into variables, as in this example, this technique will be very useful to you. To continue with this example, replace the Script Component script with the following code:
C#
using System;
using System.Data;
using Microsoft.SqlServer.Dts.Pipeline.Wrapper;
using Microsoft.SqlServer.Dts.Runtime.Wrapper;
[Microsoft.SqlServer.Dts.Pipeline.SSISScriptComponentEntryPointAttribute]
public class ScriptMain : UserComponent
{
public int LocalBankBatchId = 0;
public double LocalBatchTotal = 0;
public string LocalBatchNbr = "";
public DateTime LocalDepositDate = DateTime.MinValue;
public bool bVal;
public override void PreExecute()
{
base.PreExecute();
/*
Add your code here for preprocessing or remove if not needed
*/
}
public override void PostExecute()
{
//'SCRIPT
//'PURPOSE: To set SSIS variables with values retrieved earlier
//'============================================================
try
{
//'Attempt to accept the values
Variables.BANKBATCHID = LocalBankBatchId;
Variables.BANKBATCHNBR = LocalBatchNbr;
Variables.DEPOSITDATE = LocalDepositDate;
Variables.BATCHTOTAL = LocalBatchTotal;
}
catch(Exception ex)
{
//'If any failure occurs fail the file
Variables.BANKBATCHID = System.Convert.ToInt32(0);
Variables.BATCHTOTAL = System.Convert.ToDouble(0);
ComponentMetaData.FireError(0, "", ex.Message, "", 1, out bVal);
}
base.PostExecute();
}
public override void Input0_ProcessInputRow(Input0Buffer Row)
{
string Msg = string.Empty;
try
{
//'If there is no header metadata then mark for failure
if( Row.DepositDate_IsNull == true ||
Row.BatchTotal_IsNull == true ||
(double)Row.BatchTotal == 0D )
{
LocalBankBatchId = 0;
LocalBatchTotal = 0D;
}
else
{
//'Retrieve the data from the stream
if( Row.BankBatchID_IsNull )
{
LocalBankBatchId = 0;
}
else
{
LocalBankBatchId = Row.BankBatchID;
}
LocalBatchNbr = Row.BatchNbr;
LocalDepositDate = Row.DepositDate;
LocalBatchTotal = (double)Row.BatchTotal
/ System.Convert.ToDouble(100);
}
Msg = String.Format("Variables: BankBatchId={0}, " +
"BatchTotal={1}, BatchNbr=[{2}]", LocalBankBatchId,
LocalBatchTotal, LocalBatchNbr);
ComponentMetaData.FireInformation((int)0, ComponentMetaData.Name,
Msg, "", (int)0, ref bVal);
}
catch(Exception ex)
{
ComponentMetaData.FireError(0, "", ex.Message, "", 1, out bVal);
}
}
}
VB
Imports System
Imports System.Data
Imports System.Math
Imports Microsoft.SqlServer.Dts.Pipeline.Wrapper
Imports Microsoft.SqlServer.Dts.Runtime.Wrapper
<Microsoft.SqlServer.Dts.Pipeline.SSISScriptComponentEntryPointAttribute> _
<CLSCompliant(False)> _
Public Class ScriptMain
Inherits UserComponent
Public LocalBankBatchId As Integer = 0
Public LocalBatchTotal As Double = 0
Public LocalBatchNbr As String = ""
Public LocalDepositDate As Date = Date.MinValue
Public bVal As Boolean
Public Overrides Sub PreExecute()
MyBase.PreExecute()
End Sub
Public Overrides Sub PostExecute()
'SCRIPT
'PURPOSE: To set SSIS variables with values retrieved earlier
'============================================================
Try
'Attempt to accept the values
Variables.BANKBATCHID = LocalBankBatchId
Variables.BANKBATCHNBR = LocalBatchNbr
Variables.DEPOSITDATE = LocalDepositDate
Variables.BATCHTOTAL = LocalBatchTotal
Catch ex As Exception
'If any failure occurs fail the file
Variables.BANKBATCHID = 0
Variables.BATCHTOTAL = 0
ComponentMetaData.FireError(0, "", ex.Message, "", 1, bVal)
End Try
MyBase.PostExecute()
End Sub
Public Overrides Sub Input0_ProcessInputRow(ByVal Row As  Input0Buffer)
'SCRIPT
'PURPOSE: This sub will fire for each row processed
'  since we only have one header row we only
'  this sub will fire only one time.
'  Store values in variables
'========================================================
Dim Msg As String
Try
'If there is no header metadata then mark for failure
If Row.DepositDate_IsNull = True Or _
Row.BatchTotal_IsNull = True Or _
Row.BatchTotal = 0D Then
LocalBankBatchId = 0
LocalBatchTotal = 0D
Else
'Retrieve the data from the stream
If Row.BankBatchID_IsNull Then
LocalBankBatchId = 0
Else
LocalBankBatchId = Row.BankBatchID
End If
LocalBatchNbr = Row.BatchNbr
LocalDepositDate = Row.DepositDate
LocalBatchTotal = Row.BatchTotal / CDbl(100)
End If
Msg = String.Format("Variables: BankBatchId={0}, " + _
"BatchTotal={1}, BatchNbr=[{2}]", LocalBankBatchId, _
LocalBatchTotal, LocalBatchNbr)
ComponentMetaData.FireInformation(0, ComponentMetaData.Name, _
Msg, "", 0, bVal)
Catch ex As Exception
ComponentMetaData.FireError(0, "", ex.Message, "", 1, bVal)
End Try
End Sub
End Class
Note a few things in this Script Task. First, the NULL possibility is being checked and converted to a 0 to adhere to the Control Flow rules you’ve already set up. Second, the BatchTotal is being converted from an implied to an explicit decimal with the calculation Row.BatchTotal / CDbl(100). This could have occurred in the Derived Column Transformation as well. There are many different ways to approach these validations. Another technique, if the data quality is extremely poor, would be to have the Derived Column Component return only string data, and then this same Script Component could validate, cast, and return very specific information about data quality.
Bank File Data Flow Capturing Total Batch Items
The last variable that you need to retrieve is the number of transactions in the lockbox batch. Recall earlier that the data stream for the lockbox file was split into the header and detail lines. Now you are interested only in the check lines in the file. Add a Row Count Transformation below the Conditional Split Transformation to count the rows in the separated (Check) output detail data stream. Name the transformation Record Check Count. The Row Count has been updated in SQL Server 2012 to be easier to use and read. Rather than having to use the Advanced Editor and be overwhelmed with all the properties, you will see one dropdown where you can select the variable in which you want to store the row count information. Edit the component and select the variable User::BATCHITEMS to store the row count. The component should look like Figure 23-20.

This completes the Bank File Data Flow Validation, which should at this point look like Figure 23-21. Now you can enable the Data Flow Lockbox Validate File and Header Info in the Control Flow and disable the Execute SQL Task (to prevent insertion of a new batch) to run a test of the package. Remember that the only purpose of this Data Flow is to determine whether the file is properly formatted and whether it is indeed a new file to process. All it will do is open the file and parse the information from it. Experiment with the header of the file; for example, add invalid data such as “02/31/12”. You should see the transformation move through the error section of the Data Flow and store a row in the ErrorDetail table. The text file will then be moved into the error folder in the C:ProSSISFilesCh23_ProSSISlockboxerror directory.

This Data Flow is by no means complete and ready for production. The batch lines making up the detail should also be validated for proper data types using the same techniques described in this step. Essentially, the default BANKBATCHID is set to fail prior to this set of transformations. If the transformation flows completely to the Script Component and stores the batch header information, it will be considered a success. If not, this step will be considered suspect, and the file will be rejected. This should give you a good idea of what you can do without having to stage the data before processing it.
Bank File Data Flow Detail Processing ETL
After you have validated your file, loading the detail data into the BankBatchDetail table will be rather simple. You have all the header-related information. The Execute SQL Task will create a row in the BankBatch table to store the batch, and you’ll store the primary key in the BANKBATCHID variable. You now need to reexamine the text file in another Data Flow and process the detail transactions. Your strategy will be to separate the Bank Batch file again into two parts: the header and detail. The difference in this Data Flow is that you’ll then need to split the detail into two parts: one part containing individual payment invoice information, and another part containing check lines from the batch file. After validating the contents, you will recombine the two rows into one. This enables you to do a straight insert of one row into the BankBatchDetail table.
Processing the Bank File Check and Invoice Detail Lines
At this point, you should be a little more familiar with setting up Flat File, Character Map, Lookup, Conditional Split, Script, and Derived Column Transformations. Therefore, this section skips some of the details for setting up this Data Flow. To begin, enable the Data Flow Lockbox Detail Data Load Task in the Control Flow. Double-click it to expose the Data Flow design surface. Add a Flat File Source onto the design surface, and set it up to use the Lockbox Flat File Connection for the lockbox flat file that you set up in the first validation Data Flow. Name it Flat File Lockbox Source.
Because the lookup transactions are case sensitive, it is better to add a Character Map Transformation to convert the stream to uppercase while all the data is in one column. Name the Character Map as Character Map Lockbox to Uppercase and set the operation to Uppercase and the destination to In-place change.
Add a Conditional Split Transformation, similar to what you did earlier when validating the batch file. This time you’ll split the file into each of its parts: the header, check, and invoice lines. Set up the transformation to use the leftmost character of the input stream to split the line into three outputs: Header, Check, and Invoice, based on the characters “H,” “C,” and “I,” respectively.
Add two Derived Column Transformations to the Data Flow. Attach one to the Checks output of the Conditional Split Transformation. Name it Derived Column Check. Attach the other to the Invoice output of the Conditional Split Transformation. Name it Derived Column Invoice. Don’t worry about the header portion for the moment. Using the business specs, create the following new columns to parse out of each line type (note two different Derived Column Components).

Notice that here you don’t need to use an UPPER() expression to ensure that all these parsed values are uppercase for the future Lookup Task. The Character Map Component has already converted the string to all uppercase. Also, notice the auto-conversion to DT_WSTR when you are importing a text source. This is worth mentioning here because the default data types and lengths are inferred from the field from the import source. If you were saving this data to a non-Unicode data field, it can be annoying that your settings are overwritten if you change anything in the expression. However, if you don’t get the data type right here, you’ll need to add a Data Conversion Transformation to convert the data into a compatible format; otherwise, the SSIS validation engines will complain — and may not compile. The other thing to notice here is the use of TRIM statements. In flat file data, the columns are tightly defined, but that doesn’t mean the data within them lines up exactly to these columns. Use the TRIM statements to remove leading and trailing spaces that will affect your lookup processes downstream.
At this point, you have two output streams: one from the invoice lines and one from the check lines. You want to put them back together into one row. Any transformation you use is going to require that you sort these outputs and then find something in common to join them together. In other words, you need some data that matches between the outputs. Luckily, the bank provides the matching information, and you parsed it out in the Derived Column Task. The column name shared by both outputs that contains the same data is ReferenceData1. Look at a two-line sample from the lockbox file. Columns two through six (2–6) contain the string 4001, which is defined in your business specs as the lookup key that ties the transaction together. (The entire sequence 4001010003 refers to an image system lookup identifier.)
I4001010003 181INTERNAT
C4001010004 01844400
Add two new Sort Transformations to the Data Flow and connect one to each Derived Column output. Select the field MatchingKey in both sorts, and sort ascending. Select all columns for pass-through, except for the Line column. You will no longer use the line data, so there is no need to continue to drag this data through your transformation process. Now you are ready to merge the outputs.
Note that the Sort Transformations are asynchronous components, which means the data in the input buffer is manipulated and copied to a new output buffer. This tends to be slower than a synchronous component, and this slowdown will become even more apparent as the file size grows larger.
Add a Merge Join Transformation to connect the two outputs to the component. In the editor, select the RawInvoiceNbr and ReferenceNbr1 columns from the Invoice sort stream. Select the PaymentAmount and ReferenceData2 columns from the Check sort stream. There is no need to bring the Matching Key data forward because that information is embedded in the ReferenceData fields. Make sure the JOIN type is set to INNER Join.
This stream is now one row per check and invoice combination. You are almost ready to insert the data into the BankBatchDetail table. All you need now is the foreign key for the BankBatch table. Earlier you stored this information in a global variable. To merge this into your stream, add a Derived Column Task and add the variable BANKBATCHID to the stream. (You could have done this earlier in either the check or the invoice processing steps as well.) You automatically get all the other fields in the Data Flow as pass-through.
Add an OLE DB Destination and connect to the CaseStudy OLEDB connection. Connect the transformation and select the table BankBatchDetail. Map the columns from the output to the BankBatchDetail table where the column names match. There is a little left to do, but the core of the Bank File Data Flow is shown in Figure 23-22.

Saving a Bank File Snapshot in the Database
You still have one task to do before closing out this Data Flow: saving a snapshot of the file contents into the BankBatch row. Everything else you are doing in this Data Flow is saving data at the payment or detail level. Saving the entire file contents for auditing purposes is a batch-level task. To do this, you need to create a separate stream that will use the header portion of the conditional stream you split off early in the Data Flow. Start by adding a Derived Column Task connecting to the header-based output; this pushes the identification elements down to a later OLE DB Command Component that will update the batch. Add the following columns to the Derived Column Task:
| DERIVED COLUMN | EXPRESSION | DATA TYPE |
| LBCurrentFile | @[User::LBCURRENTFILE] | [DT_WSTR] 100 |
| BankBatchID | @[User::BANKBATCHID] | [DT_I4] |
Add an Import Column Transformation and connect it to this Header Derived Column Transformation. On the Input Columns tab, select the field that contains the file path in the stream: LBCurrentFile. Then go to the Advanced Input Output property tab and expand the Import Column Input and Import Column Output nodes. Add an output column to the Output Column node called FileStreamToStore. Set the DataType property to [DT_NTEXT]. The editor should look similar to Figure 23-23, but the LineageIDs may be different. Note the LineageID and set the property name FileDataColumnID in the LBCurrentFile Input Column to that LineageID. Using Figure 23-23, the identifier would be 99.
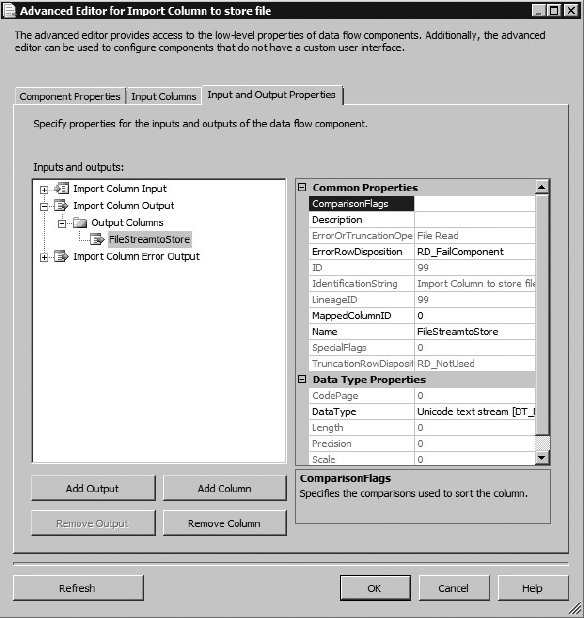
Add an OLE DB Command Component to the output of the Header Derived Column Transformation. Set the OLE DB Connection to CaseStudy OLEDB. Then set the SQL Command to Update BankBatch Set BatchFile = ? where BankBatchID = ? and click Refresh. In the Mappings tab, connect the FileStreamToStore to the Destination Column Param_0, which is the [BatchFile] field in the BankBatch table. Connect the BankBatchID to the Destination column Param_1. Click Refresh and save.
This completes the Data Flow Task. The task will parse and save the lockbox detail file into your BankBatchDetail data table. The entire Data Flow should look similar to Figure 23-22. Now would be a good time to save the package. If you have run the package up to this point, verify that a lockbox sample file exists in the C:ProSSISFilesCh23_ProSSISlockbox folder. Enable the Execute SQL Task and run the package to watch it execute.
To run the test file through multiple times, you need to reset the database by deleting the contents of the BankBatch and BatchBatchDetail tables between runs. Otherwise, in subsequent runs, the package will fail when it determines that the file has been previously processed. Use this script to reset the database for multiple runs:
DELETE FROM BANKBATCHDETAIL
DELETE FROM BANKBATCH
This completes the first third of the ETL processes for the Lockbox Bank Batch payment method. You will next begin to build the two remaining processing options. One is for ACH (which involves processing an XML file) and the other is for e-mail payments that are stored in a database. You can skip ahead to the CaseStudy_Process package if you want to complete the processing of this Lockbox Bank Batch file or continue to build the other payment processing methods.
ACH Load Package
According to the business specs, you have to process ACH files that represent the payment wire detail. The approach to this requirement will resemble closely what you did for the lockbox, but the XML file format that is sent for this payment method adds more data consistency and a few new processing tricks. As before, you can walk through and create this ACH load package or download the complete solution from www.wrox.com to see and explore the final result.
ACH Package Setup and File System Tasks
To get started, you need to create a new SSIS package named CaseStudy_Load_ACH in the CaseStudy project you have been working in. Don’t forget to change the package object name, too!
Select SSIS ![]() Variables to access the Variables editor and add the variables as shown in the following table:
Variables to access the Variables editor and add the variables as shown in the following table:
| VARIABLE NAME | DATA TYPE | VALUE |
| BANKBATCHID | Int32 | 0 |
| BANKBATCHNBR | String | |
| BATCHITEMS | Int64 | 0 |
| BATCHTOTAL | Double | 0 |
| DEPOSITDATE | DateTime | 12/30/1899 |
| FILEBYTES | Int64 | 0 |
| ACHCURRENTFILE | String | C:ProSSISFilesCh23_ProSSISachsampleach.xml |
| ACHERRORFILE | String | |
| ACHERRORFILEPATH | String | |
| ACHIMPORTTYPE | String | ACH |
| ACHPROCESSEDFILE | String | |
| ACHPROCESSEDFILEPATH | String |
In addition, add a package parameter named ACHBASEFILEPATH with a data type of String and a value of C:ProSSISFilesCh23_ProSSISach.
The variables @ACHPROCESSEDFILEPATH and @ACHERRORFILEPATH need to retrieve their values relative to the base file paths. For example, the variable @ACHPROCESSEDFILEPATH should be set up relative to the base lockbox file path in a subdirectory called processed. To do this, you’ll use an expression to generate the value of the variable. Click the variable in the Variables Editor, and set these variables up to be evaluated as expressions, like this:
| FOR VARIABLE NAME: | SET EXPRESSION TO: |
| ACHERRORFILEPATH | @[$Package::ACHBASEFILEPATH] + "\error" |
| ACHPROCESSEDFILEPATH | @[$Package::ACHBASEFILEPATH] + "\processed" |
The variables for specific processed and error versions of the current file being processed need to retrieve a unique value that can be used to rename the file into its respective destination file path. Set the @ACHERRORFILE and @ACHPROCESSEDFILE variables up to be evaluated using expressions similar to the following formula:
@ACHERRORFILEPATH + "" + REPLACE(REPLACE(REPLACE(REPLACE((DT_WSTR,
50)GETUTCDATE(),"-","")," ", ""),".", ""),":", "") + (DT_WSTR, 50)@FILEBYTES +
".txt"
This formula will generate a name similar to 201208160552080160000000.xml for the file to be moved into an offline storage area.
Note that the OLE DB Connection you created in the project is automatically included in the package. The parameterization will also affect this package. In addition, add another connection to the project, just to see the difference between using OLE DB and ADO.NET in the Execute SQL Tasks. Follow the previous steps to add a Project Connection Manager using an ADO.NET Connection that also connects to the CaseStudy database. Name this connection CaseStudy.ADO.NET.
ACH Control Flow Processing
Just like in the CaseStudy_Load_Bank package in the previous example, you need to be able to process many files that are coming in from an ACH institution, but this time the file format is XML. Notice that there is no XML Connection Manager. This presents a new twist that will need to be resolved in the Data Flow Tasks later. Otherwise, the basic structure of this package is the same as the Bank File Load Package.
ACH Control Flow Loop
Add two File System Tasks to the Control Flow design surface of the package. One task will be used for checking and adding the ACH processed file path; the other will be used for the ACH error file path. These two paths represent where the package will move incoming lockbox files depending upon how they are processed. Change the name and description properties to the following:
| NAME | DESCRIPTION |
| File System Task Folder ACH Processed Folder | Ensures that the ACH Processed Folder exists |
| File System Task Folder ACH Error Folder | Ensures that the ACH Error Folder exists |
For each File System Task, set the following properties:
| PROPERTY | SETTING |
| Operation | Create Directory |
| UseDirectoryIfExists | True |
| IsSourcePathVariable | True |
| SourceVariable | Choose the corresponding variable for each task. |
Stack the two File System Tasks on top of each other. The precedence constraint should automatically be set to Success.
Add a Foreach Loop Container named For Each ACH File. Connect the precedence from the last Lockbox File System Task to the Foreach Loop Container, so that the Foreach Loop Container is not executed unless the File System Task completes successfully.
The Foreach Loop is expecting a literal path to poll. You want the loop to rely on a variable, so you have to use an expression. You did this for the bank file package, so you can review that if you are unsure how to do it. On the Foreach Loop, you need to set the Directory property to an expression that gets its value from the parameter ACHBASEFILEPATH. However, if you use the Expressions tab in the editor, you will not see a property called Directory. On this task, you’ll find the properties for the Enumerator in the Collection tab at the top of the dialog (see Figure 23-24). Here you’ll find the Directory property and set it to the parameter @[$Package::ACHBASEFILEPATH]. Evaluate the expression to ensure that it matches the base ACH path. Set the property files to *.xml. Leave the Retrieve File name as Fully qualified. The Collection tab of the Foreach Loop Container should look like Figure 23-24.

To store the name of the file you are processing into a variable, click the Variable Mappings tab on the left side of the Foreach Loop Container. Select the variable named ACHCURRENTFILE to retrieve the value of the Foreach Loop for each file found. Leave the index on the variable mapping set to zero (0). This represents the first position in a files collection or the filename returned by the loop. Click OK to complete this task.
ACH Control Flow Retrieval of XML File Size
Just like the Bank Batch file, you need to examine the file to retrieve the number of complete bytes. As you did before, the variables need to be reset.
To get started, add a Script Task within the Foreach Loop. Change the name to Script ACH File Size into Variable. Provide the variable ACHCURRENTFILE for the ReadOnlyVariables property. Provide the variables BANKBATCHID, BANKBATCHNBR, BATCHITEMS, BATCHTOTAL, DEPOSITDATE, and FILEBYTES into the ReadWriteVariables property.
Select the script language you prefer and click the Edit Script button. This opens the .NET development environment. Add an Imports or using reference to the System.IO namespace and update the script to pull the file bytes from the filename provided in the DTS object Variables collection. First, pull in a reference to the System.IO library by adding the last reference you see in this code:
C#
using System;
using System.Data;
using Microsoft.SqlServer.Dts.Runtime;
using System.IO; //<--Added Input/Output library
VB
Imports System
Imports System.Data
Imports System.Math
Imports Microsoft.SqlServer.Dts.Runtime
Imports System.IO '<--Added Input/Output library
Then add a VB Sub or C# void function to reset the variables that you can call in the Script Task Main() function:
C#
public void ResetVariables()
{
//Resets variables
Dts.Variables["BANKBATCHID"].Value = System.Convert.ToInt32(0);
Dts.Variables["BANKBATCHNBR"].Value = "";
Dts.Variables["BATCHITEMS"].Value = System.Convert.ToInt64(0);
Dts.Variables["BATCHTOTAL"].Value = System.Convert.ToDouble(0);
Dts.Variables["DEPOSITDATE"].Value = DateTime.MinValue;
Dts.Variables["FILEBYTES"].Value = System.Convert.ToInt64(0);
}
VB
Public Sub ResetVariables()
'Resets variables
Dts.Variables("BANKBATCHID").Value = System.Convert.ToInt32(0)
Dts.Variables("BANKBATCHNBR").Value = ""
Dts.Variables("BATCHITEMS").Value = System.Convert.ToInt64(0)
Dts.Variables("BATCHTOTAL").Value = System.Convert.ToDouble(0)
Dts.Variables("DEPOSITDATE").Value = DateTime.MinValue
Dts.Variables("FILEBYTES").Value = System.Convert.ToInt64(0)
End Sub
Replace the Main() function within the Script Task with this one:
C#
public void Main()
{
//'**
//'SCRIPT
//'PURPOSE: To take file bytes and save to global variable
//'=======================================================
Int64 lDefault = 0;
string sNewFile = string.Empty;
try
{
//'Reset Variables
ResetVariables();
//'Retrieve File Byte Info
FileInfo oFile = new
FileInfo(Dts.Variables["User::ACHCURRENTFILE"].Value.ToString());
Dts.Variables["FILEBYTES"].Value = oFile.Length;
//'Dts.Events.FireInformation(0, "Script Task to Vars",_
//' "File Bytes Found:" +
//'Dts.Variables["FILEBYTES"].Value.ToString(), "", 0, bVal)
System.Windows.Forms.MessageBox.Show("File Bytes Found:" +
Dts.Variables["FILEBYTES"].Value.ToString());
Dts.TaskResult = (int)ScriptResults.Success;
}
catch(Exception ex)
{
Dts.Events.FireError(0, "Script Task To Vars",
ex.ToString(), "", 0);
Dts.Variables["FILEBYTES"].Value = lefault;
Dts.TaskResult = (int)ScriptResults.Failure;
}
}
VB
Public Sub Main()
'**
'SCRIPT
'PURPOSE: To take file bytes and save to global variable
'=========================================================
Dim oFile As FileInfo
Dim lDefault As Int64
Dim sNewFile As String
lDefault = 0
Try
'Reset Variables
ResetVariables()
'Retrieve File Byte Info
oFile = New
FileInfo(Dts.Variables("User::ACHCURRENTFILE").Value.ToString)
Dts.Variables("User ::FILEBYTES").Value = oFile.Length
'Dts.Events.FireInformation(0, "Script Task to Vars", _
' "File Bytes Found:" + _
'Dts.Variables("FILEBYTES").Value.ToString(), "", 0, bVal)
System.Windows.Forms.MessageBox.Show("File Bytes Found:" + _
Dts.Variables("FILEBYTES").Value.ToString())
Dts.TaskResult = ScriptResults.Success
Catch ex As Exception
Dts.Events.FireError(0, "Script Task To Vars", ex.ToString(),_
"", 0)
Dts.Variables("FILEBYTES").Value = lDefault
Dts.TaskResult = ScriptResults.Failure
End Try
End Sub
Notice that the filename sent into the Script Task is used to retrieve the file bytes.
To finish the retrieval Control Flow for now, add a Data Flow Task. Connect the successful completion of the Script Task to this task. Change the Name property to Data Flow ACH Validate File and Header Info. You’ll configure the Data Flow from the earlier section “Bank File Data Flow Validation” later. Disable the task for now. Then save the entire package and run it to ensure that everything is working so far.
ACH Control Flow Batch Creation
The last task for the Bank File Control Flow is to lay out the workflow that validates the existence of key values in the Batch file and that the Batch itself has not already been processed. To enable moving the file if there is a problem, add a File System Task named File System Task Error Folder. Instead of choosing a move file operation in the File System Task, select the option to rename the file. The File System Task properties should be set to the values shown in the following table:
| PROPERTY | VALUE |
| IsDestinationPathVariable | True |
| Destination Variable | User::ACHERRORFILE |
| OverwriteDestination | True |
| Name | File System Task Error Folder |
| Description | Moves bad files to an error folder |
| Operation | Rename File |
| IsSourcePathVariable | True |
| SourceVariable | User::ACHCURRENTFILE |
To connect the Data Flow and File System Task together, add a precedence constraint that looks for the existence of a Bank Batch identifier and amount. On the constraint, select the Multiple Constraint option of Logical AND and set the Evaluation Operation to Expression And Constraint. Set the Value to Failure and the Expression as follows:
@BANKBATCHID!=0
If the Data Flow fails, or the Data Flow found an existing BankBatchId, the precedence constraint will send the workflow to the File System Task, which will archive the file in the error folder.
Now if the elements are all present, and there is no existing bank batch by batch number, the batch needs to be persisted to the database. To do this, add an Execute SQL Task. This task will use a stored procedure, usp_BankBatch_Add, to add the parsed information in the lockbox file as a row in the BankBatch table to represent a new batch file. This procedure will return the new BankBatchId if it could be successfully added. This time, you’ll use an ADO.NET Connection Manager so you can compare it to using the OLE DB Connection Manager; set the Execute SQL Task properties up like this:
| PROPERTY | VALUE |
| Name | Execute SQL task to add Bank Batch Hdr |
| ConnectionType | ADO.NET |
| Connection | CaseStudy ADO.NET |
| SQLStatement | EXEC usp_BankBatch_Add @BankBatchID OUTPUT, @BankBatchNbr, @DepositDate, @ReceivedDate, @BatchTotal, @BatchItems, @FileBytes, @FullFilePath, @ImportType |
| IsQueryStoredProcedure | False |
Because you are using an ADO.NET provider now, note that the parameter data types more closely match the types of the variables because they use parameters that start with @ rather than question marks. The finished Execute SQL Task Editor parameter mappings should look like Figure 23-25.
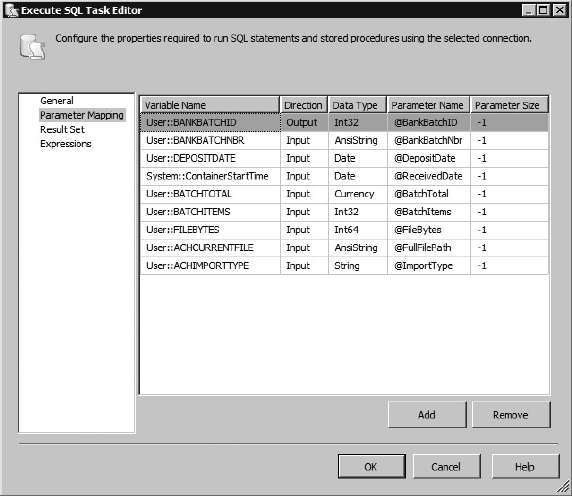
If the Execute SQL Task finds an existing BankBatchID or fails, you also need to move the file into an error folder. Connect the Execute SQL Task to the File System Error Folder Task failure precedence and constraint conditions — except change the expression to apply when the BankBatchID does not equal zero (0) OR the Data Flow Task fails. Set the Evaluation Operation to Expression OR Constraint. Set the Value to Failure and the Expression to @BANKBATCHID == 0. Select the Multiple Constraint property to the option of Logical OR.
Add a second new Data Flow Task to the Foreach Loop. Change the Name property to Data Flow ACH Detail Data Load. You’ll configure the Data Flow in the next section. Connect the successful completion of the Execute SQL Task to this task. Add an expression to check for a nonzero BankBatchID, and set the constraint to successful completion between the Execute SQL Task and this new Data Flow Task.
If the Data Flow Lockbox Detail Data Load fails to extract, transform, and load the batch details, you still have an issue. Add a simple Failure constraint between the Data Flow Lockbox Detail Data Load and the previously created File System Task Error Folder. (You could also use the Event Handler control surfaces to create actions or workflows to occur upon failures.)
If the file is processed successfully in the Data Flow Lockbox Detail Data Load, you need to move it to the “processed” folder. Add another new File System Task and connect it to the successful completion of the second Data Flow Task. Set up this task just like the Error Folder File System Task but point everything to the processed folder.
| PROPERTY | VALUE |
| IsDestinationPathVariable | True |
| Destination Variable | User::ACHPROCESSEDFILE |
| OverwriteDestination | True |
| Name | File System Task Processed Folder |
| Description | Moves completed files to an error folder |
| Operation | Rename File |
| IsSourcePathVariable | True |
| SourceVariable | User::ACHCURRENTFILE |
You now have the basic structure set up for the ACH File Lockbox Control Flow. You still need to build your components in the Data Flow Tasks, but you’ll get to that in the next sections. If you are following along, save the package at this point. If you want to test the package, you can set up the variables and test the different workflows. Just remember to watch the movement of the sample file into the processed and error folders and make sure you put it back after each run. The CaseStudy_Load_ACH package at this point should look like Figure 23-26.
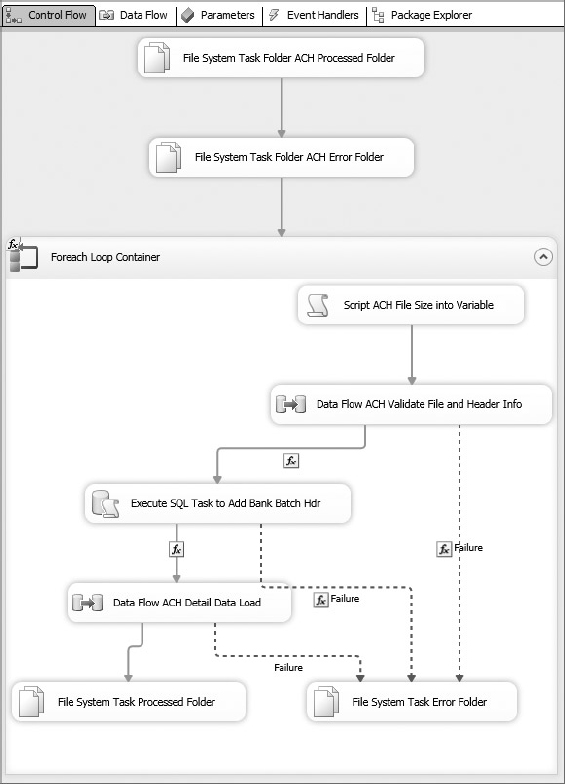
To test the progress so far, disable the Execute SQL Task so that a batch row won’t be created. Save, and then execute the package to ensure that everything so far is set up properly.
ACH Data Flow Validation
In this section of the package, you are going to fill in the details for the ACH Data Flow Container. The strategy will be to open the ACH file, retrieve information from the header, and pass the information back to the Control Flow via variables. You’ll use an XML Data Source combined with an XSD file that you will create and edit to read the file. Because the data is structured and hierarchical, you don’t have the parsing tasks associated with flat files. However, you can still have bad data in the structure, so you have to validate the file. You’ll use a lookup on the header to look for matches by batch number, and a Script Component will pull this information from the transformation stream and send it back into your Control Flow for evaluation and further processing.
ACH Data Flow Parsing and Error Handling
Start by enabling the ACH Validate File and Header Info Data Flow. Click the task to enter the Data Flow, and add an XML Source to it. In the XML Source Editor, set the Data access mode to XML file from variable and select the variable ACHCURRENTFILE in the Variable name dropdown list. You should immediately see the message shown at the bottom of Figure 23-27. This message is acknowledging that an XML-formatted file has been selected, but the task needs schema information from the XSD file to set up data types and sizes. Because you don’t have an XSD file, you can use a utility provided with this component to generate one or use the XSD file provided with the solution on www.wrox.com.

Provide the XML Source with a path to build the XSD as C:ProSSISFilesCh23_ProSSISachach.xsd. Then click the Generate XSD button to create the file. Unfortunately, the XSD generator is not perfect, so if you use this tool, you’ll need to manually validate the XSD file. This is where error-handling strategy and design come into play. You can set up the XSD with all text fields, and the file will always parse successfully. However, you will have to type-check all the fields yourself. If you strongly type your XSD as recommended here, the task could fail, and you won’t get a chance to make any programmatic decisions. Note also that the automatically generated XSD is based on the available data in the XML file, so in the case of your header, which has only one row, it doesn’t have much data to review to pick data types. That’s why the XSD type designation for the BATCHITEMS variable is incorrect. Open the XSD in Notepad and change the XSD type designation from xs:UnsignedByte to xs:UnsignedInt. Now you match the data type of your global BATCHITEMS variable.
In the XML Source Component, go to the Error Output tab. For both header and detail output and for every column and every error type, set the action to Redirect Row. Because you are dealing with an ACH file, the effect of truncating numbers and dates is a big deal. If you have a truncation or date issue, you want the file to fail; redirecting the output enables you to record what went wrong and then end the current Data Flow Task, which exists solely to validate the incoming file.
Like the lockbox, if you do get row errors, you want to gather as much information about the error as possible to assist in the troubleshooting process. The XML Source has two error outputs, Header and Detail, so you’ll have twice as much work to do. Create two Script Components as transformations like you did to capture errors in the Lockbox Data Flow for each of the error outputs from the XML Source. Select the ErrorCode and ErrorColumn columns from the input. Create a new Output Column named ErrorDesc of type Unicode string [DT_WSTR] and size 1048. Open the design environment for the Script Component. Change your ProcessInputRow event code to the following:
C#
public override void Input0_ProcessInputRow(Input0Buffer Row)
{
//'Script
//'Purpose: To retrieve the error description to write to error log
Row.ErrorDesc = ComponentMetaData.GetErrorDescription(Row.ErrorCode);
}
VB
Public Overrides Sub Input0_ProcessInputRow(ByVal Row As Input0Buffer)
'SCRIPT
'PURPOSE: To retrieve the error description to write to error log
'=====================================================================
Row.ErrorDesc= ComponentMetaData.GetErrorDescription(Row.ErrorCode)
End Sub
Add two Derived Column Components with the following derived columns. Connect them to the output of the two Script Component Transformations.
| DERIVED COLUMN | EXPRESSION | DATA TYPE |
| ExecutionID | @[System::ExecutionInstanceGUID] | DT_WSTR 38 |
| ErrorEvent | "ACH" | DT_WSTR 20 |
| ErrorDate | @[System::ContainerStartTime] | DT_DATE |
For the Detail output only, add the following derived column:
Raw Data (DT_STR, 1028, 1252) ErrorDesc DT_STR 1048
Now add two OLE DB Destination Components and connect them to the output of the Derived Columns, mapping the fields to the table ErrorDetail, exactly as you did for the Lockbox Data Flow. Map the converted [rawdata] field to the [rawdata] field for the detail output. Map the ID field of the header output to the output [rawdata] field. The error handling of the bad XML file should look like Figure 23-28.

ACH Data Flow Validation
If the XML data is good, you want to perform a lookup on the batch number. If you recall, the Lookup Transformation is case sensitive, but unlike the flat file, where you could convert the whole line to uppercase, here you have to convert each field of importance. Add a Character Map Component and convert the Header output ID field (a batch number) to uppercase as an in-place change.
You also need a value in your stream to allow a lookup on import type. Batch numbers are guaranteed to be unique only by this type, and it is stored in the global variables. Add a Derived Column Component to add a column ImportType to your output stream. Because the [ImportType] field in the BankBatch table is of type CHAR(10), add the derived column as a type string [DT_STR] of size 10. Also add a casting component to specifically cast the ID column in place to a Unicode [DT_WSTR] string of size 50.
Now you should be ready to add the Lookup Transformation to the Data Flow. Set the OLE DB Connection to CaseStudy OLEDB. This time you’ll set the Lookup to the results of the following query instead of the table directly. Using only what you need is generally more efficient depending upon the table size and index structures. The SQL statement should look like this:
SELECT BANKBATCHID, UPPER(BANKBATCHNBR) AS BANKBATCHNBR,
  UPPER(IMPORTTYPE) AS IMPORTTYPE
FROM BANKBATCH
ORDER BY BANKBATCHNBR
In the Columns tab, link the Input Column ID to the Lookup column of BankBatchNbr. Link the ImportType columns. Add BankBatchID as the Lookup column with an output alias of BANKBATCHID. Because you are expecting that you will not get a match on the lookup and that this is indeed a new file, use the Configure Error Output button and set the Lookup step to Ignore Failure on the Lookup Output.
Add a Script Component as a destination to capture the successful end of your transformation Data Flow. Connect it to the Lookup output. Open the editor and select all the available input columns. Add the following global variables as ReadWriteVariables: BANKBATCHNBR, BANKBATCHID, BATCHTOTAL, BATCHITEMS, and DEPOSITDATE. Insert the following code to store the variables:
C#
public class ScriptMain : UserComponent

public int LocalBankBatchId = 0;
public double LocalBatchTotal = 0;
public string LocalBatchNbr = string.Empty;
public DateTime LocalDepositDate = DateTime.MinValue;
public override void PreExecute()
{
base.PreExecute();
}
public override void PostExecute()
{
bool bVal = false;
//'SCRIPT
//'PURPOSE: To set SSIS variables with values retrieved earlier
//'============================================================
try
{
//'Attempt to accept the values
Variables.BANKBATCHID = LocalBankBatchId;
Variables.BANKBATCHNBR = LocalBatchNbr;
Variables.DEPOSITDATE = LocalDepositDate;
Variables.BATCHTOTAL = LocalBatchTotal;
}
catch (Exception ex)
{
//'If any failure occurs fail the file
Variables.BANKBATCHID = 0;
Variables.BATCHTOTAL = 0;
ComponentMetaData.FireError(0, "", ex.Message, "", 1, out bVal);
}
base.PostExecute();
}
public override void Input0_ProcessInputRow(Input0Buffer Row)
{
//'SCRIPT
//'Purpose: Pull Information from Header row and set variables
bool bVal = false;
string Msg = string.Empty;
try
{
//'If there is no header metadata then mark for failure
if(Row.DEPOSITDATE_IsNull ||
Row.TOTALDEPOSIT_IsNull || System.Convert.ToDouble(Row.TOTALDEPOSIT) == 0D)
{
LocalBankBatchId = 0;
LocalBatchTotal = Convert.ToDouble(0D);
}
else
{
//'Retrieve the data from the stream
if (Row.BankBatchID_IsNull)
{
LocalBankBatchId = 0;
}
else
{
LocalBankBatchId = Row.BankBatchID;
}
LocalBatchNbr = Row.ID;
LocalDepositDate = Convert.ToDateTime(Row.DEPOSITDATE);
LocalBatchTotal = Convert.ToDouble(Row.TOTALDEPOSIT)
}
Msg = String.Format("Variables: BankBatchId={0}, " +
"BatchTotal={1}, BatchNbr=[{2}]", LocalBankBatchId,
LocalBatchTotal, LocalBatchNbr);
ComponentMetaData.FireInformation(0, ComponentMetaData.Name,
Msg, "", 0, ref bVal);
}
catch(Exception ex)
{
ComponentMetaData.FireError((int)0, ComponentMetaData.Name,
ex.Message.ToString(), "", 1, out bVal);
}
}
VB
Public Class ScriptMain
Inherits UserComponent
Public LocalBankBatchId As Integer = 0
Public LocalBatchTotal As Double = 0
Public LocalBatchNbr As String = ""
Public LocalDepositDate As Date = Date.MinValue
Public Overrides Sub PreExecute()
MyBase.PreExecute()
End Sub
Public Overrides Sub PostExecute()
Dim bVal As Boolean
MyBase.PostExecute()
'SCRIPT
'PURPOSE: To set SSIS variables with values retrieved earlier
'============================================================
Try
'Attempt to accept the values
Variables.BANKBATCHID = LocalBankBatchId
Variables.BANKBATCHNBR = LocalBatchNbr
Variables.DEPOSITDATE = LocalDepositDate
Variables.BATCHTOTAL = LocalBatchTotal
Catch ex As Exception
'If any failure occurs fail the file
Variables.BANKBATCHID = 0
Variables.BATCHTOTAL = 0
ComponentMetaData.FireError(0, "", ex.Message, "", 1, bVal)
End Try
End Sub
Public Overrides Sub Input0_ProcessInputRow(ByVal Row As Input0Buffer)
'SCRIPT
'Purpose: Pull Information from Header row and set variables
Dim bVal As Boolean
Dim Msg As String
Try
'If there is no header metadata then mark for failure
If Row.DEPOSITDATE_IsNull = True Or _
Row.TOTALDEPOSIT_IsNull = True Or _
System.Convert.ToDecimal(Row.TOTALDEPOSIT) = 0D Then
LocalBankBatchId = 0
LocalBatchTotal = 0D
Else
'Retrieve the data from the stream
If Row.BankBatchID_IsNull Then
LocalBankBatchId = 0
Else
LocalBankBatchId = Row.BankBatchID
End If
LocalBatchNbr = Row.ID
LocalDepositDate = Row.DEPOSITDATE
LocalBatchTotal = Row.TOTALDEPOSIT
End If
Msg = String.Format("Variables: BankBatchId={0}, " + _
" BatchTotal={1}, BatchNbr=[{2}]", LocalBankBatchId, _
LocalBatchTotal, LocalBatchNbr)
ComponentMetaData.FireInformation(0, ComponentMetaData.Name, _
Msg, "", 0, bVal)
Catch ex As Exception
ComponentMetaData.FireError(0, ComponentMetaData.Name, _
ex.Message, "", 1, bVal)
End Try
End Sub
End Class
The ACH Validation Data Flow is now almost complete; you have only one more minor task.
ACH Data Flow Capturing Total Batch Items
The last variable that you need to retrieve is the number of transactions in the ACH file details. The XML Source automatically splits the file stream into its multiple parts. In this case, the stream is split into header and detail lines. Use a Row Count Component similar to the lockbox package. This component allows you to set a variable directly from an aggregate count. The new configured Row Count Component should look like Figure 23-29.

Now the Data Flow for validation purposes is complete. The final Data Flow should look like Figure 23-30. Go ahead and run the package. When you get it working properly, archive a copy, because you have another Data Flow to build to import the ACH XML file. Play around with the XML file by adding bad data and malforming the structure of the file to see how the Data Flow handles it.
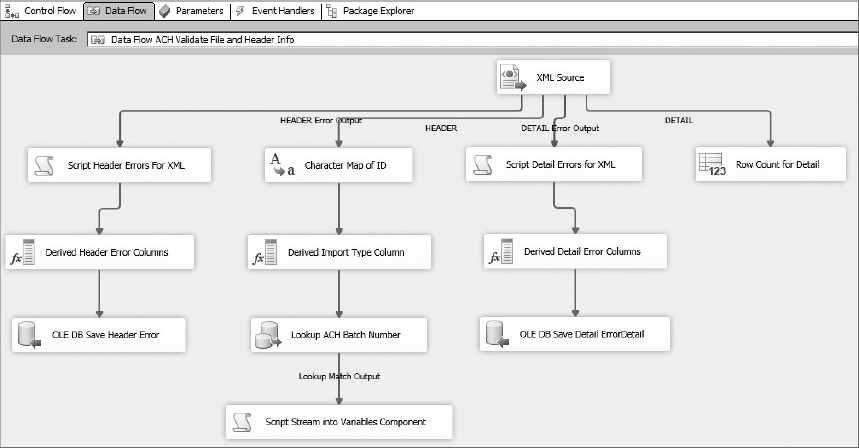
ACH Data Flow Detail Processing ETL
In a lot of ways, this section mirrors the Data Flow for Lockbox Processing. Once you’ve validated the ACH XML file, the Control Flow will create a [BankBatch] row and start the process of importing the detail. You have all the header-related information, just as you did for the Lockbox process, and because the file has been validated, you can simply transform the data into the BankBatchDetail table.
Processing the ACH File
Enable the Data Flow Task named Data Flow ACH Detail Data Load and drill down into its design surface. Add an XML Source and set it up exactly as you did for the Validation Data Flow. However, this time you already have an XSD file, so just point the component to it. Leave the ErrorOutput settings to “Fail component if an error is encountered while processing the file.” You’ll also omit the error-handling components in this Data Flow, although in production you should add them back.
If you ran the package to test the ACH Validation section, you’ll need to move the SampleACH.XML file back into the directory C:ProSSISFilesCh23_ProSSISach.
This time, you are concerned mainly with the detail portion of the XML data. You have the foreign key information stored in a variable, so you don’t need to perform any lookups on data, but you will want to use the Lookup later on the DESC field that you are going to import to the RawInvoiceNbr field in the CaseStudy_Process package. Add a Character Map Transformation to convert the DESC field to uppercase and replace its current value in the stream.
The only other thing you need is that foreign key relationship stored in the variable @BANKBATCHID. Add a Derived Column Transformation to add that variable to the current stream. Add another column named RAWINVOICENBR and select the DESC field from the Columns input collection as a string [DT_WSTR] type of length 50. Selecting the string type enables the import and conversion in one step, as the package will convert the column from a number to a string.
Add an OLE DB Destination and connect to the CaseStudy OLEDB connection. Select the BankBatchDetail table and map the columns as shown in the following table:
| INPUT COLUMN | DESTINATION COLUMN |
| BankBatchID | BankBatchID |
| Amount | PaymentAmount |
| RawInvoiceNbr | RawInvoiceNbr |
Saving the ACH File Snapshot in the Database
The final thing you need to do is save the entire XML file in the BankBatch table. You’ll use exactly the same technique from the Lockbox process. Add a Derived Column Component and connect to the Header output of the XML file. Add columns for the variables BANKBATCHID and ACHCURRENTFILE. Make sure the ACHCURRENTFILE column is set to [DT_WSTR] 100. Refer back to the “Bank File Data Flow Validation” section to see an example of this transformation.
Add an Import Column Component and connect to this Header Derived Column Component. On the Input Columns tab, select the field that contains the file path in the stream: ACHCURRENTFILE. Then, from the Input and Output Properties tab, expand the Import Column Input and Import Column Output nodes. Add an output column to the Output Columns node named FileStreamToStore. Set the DataType property to [DT_NTEXT]. Note the LineageID, and set the property named FileDataColumnID in the ACHCurrentFile Input Column to that LineageID.
Add an OLE DB Destination to the output of the Header Derived Column Component. Set the OLE DB Connection to CaseStudy OLEDB. Then set the SQL Command to Update BankBatch Set BatchFile = ? WHERE BANKBATCHID = ? and click Refresh. In the Mappings tab, connect the FileStreamToStore to the Destination Column Param_0, which is the BatchFile field in the BankBatch table. Connect the field BankBatchID to the Destination Column Param_1. Click Refresh and save.
The final Data Flow for ACH processing should look similar to Figure 23-31. After you have successfully run this Data Flow, archive the package.

E-mail Load Package
The e-mail payment processing is interesting. The payment transactions are stored in a relational database, so you don’t have the same type of data issues. You just need to check whether there are any transactions to process. You also have to ensure that you haven’t picked up the transaction before. In this case, you don’t have a batch, because the information is transactional, so a batch will be the set of transactions available when the package runs. To avoid picking up duplicates, you will store the transactional primary key from the accounting system into the batch detail records as your ReferenceData1 field. You can then use this field in your extraction to keep from pulling a transaction more than once. As before, you can walk through and create this E-mail load package or download the complete solution from www.wrox.com to see and explore the final result.
E-mail Package Setup and File System Tasks
To get started, you need to create a new SSIS package named CaseStudy_Load_Email in the CaseStudy project found in C:ProSSISCodeCh23_ProSSISCaseStudyCaseStudy. Use the menu SSIS ![]() Variables to access the Variables editor and add the variables as shown in the following table:
Variables to access the Variables editor and add the variables as shown in the following table:
| VARIABLE NAME | DATA TYPE | VALUE |
| BANKBATCHID | Int32 | 0 |
| BANKBATCHNBR | String | 0 |
| BATCHITEMS | Int32 | 0 |
| BATCHTOTAL | Double | 0 |
| DEPOSITDATE | DateTime | 12/30/1899 |
| EMAILMPORTTYPE | String | |
| FILEBYTES | Int64 | 0 |
You will see both the OLE DB and ADO.NET connections from the project. Having connections of both types is not necessary for typical package development, but it provides the opportunity to demonstrate the differences between using one or the other.
E-mail Control Flow Processing
Unlike the previous packages, the e-mail processing is a one time interrogation of an external datastore, so no looping is involved. Nor is there any need to examine a file structure to validate data elements. This package is much easier. One interesting technique to point out in this example is the use of casting in SQL Server to be able to retrieve a monetary amount back into an SSIS Double variable type structure. The Double data type is the closest thing to a monetary variable type in SSIS.
Add a new Script Task named Script to Reset Variables Task to the package. This task may be familiar to you, as it is the same one used in previous packages. Feed into the task all the variables, except the EmailImportType. The code is quite simple:
C#
Public void Main()
{
Dts.Variables["BANKBATCHID"].Value = System.Convert.ToInt32(0);
Dts.Variables["BANKBATCHNBR"].Value = String.Empty;
Dts.Variables["BATCHITEMS"].Value = System.Convert.ToInt32(0);
Dts.Variables["BATCHTOTAL"].Value = System.Convert.ToDouble(0);
Dts.Variables["DEPOSITDATE"].Value = DateTime.MinValue;
Dts.Variables["FILEBYTES"].Value = System.Convert.ToInt64(0);
Dts.TaskResult = (int)ScriptResults.Success
}
VB
Public Sub Main()
Dts.Variables("BANKBATCHID").Value = System.Convert.ToInt32(0)
Dts.Variables("BANKBATCHNBR").Value = String.Empty
Dts.Variables("BATCHITEMS").Value = System.Convert.ToInt32(0)
Dts.Variables("BATCHTOTAL").Value = System.Convert.ToDouble(0)
Dts.Variables("DEPOSITDATE").Value = DateTime.MinValue
Dts.Variables("FILEBYTES").Value = System.Convert.ToInt64(0)
Dts.TaskResult = ScriptResults.Success
End Sub
The next task is to add an Execute SQL Task named “Execute SQL to Check for Trans.” This task counts the number of transactions and the total amount in the accounting system not yet processed. The task will set the variables BATCHITEMS and BATCHTOTAL equal to the number and total amounts of available transactions. Set up the properties using the following table:
| PROPERTY | SETTING |
| ResultSet | SingleRow |
| ConnectionType | OLE DB |
| Connection | CaseStudy OLEDB |
| SQLSourceType | Direct Input |
| SQLStatement | SELECT TranCnt, Convert(float, TotAmt) AS TotAmt FROM ( SELECT count(*) as TranCnt, isnull(Sum(DepositAmount), 0) As TotAmt FROM vCorpDirectAcctTrans Corp LEFT OUTER JOIN BANKBATCHDETAIL DTL ON cast(CORP.TRANSID as varchar(50)) = DTL.REFERENCEDATA1 WHERE DTL.REFERENCEDATA1 is null ) SUBQRY |
| ResultSet:ResultName | 0 |
| ResultSet:Variable | User::BATCHITEMS |
| ResultSet:ResultName | 1 |
| ResultSet:Variable | User::BATCHTOTAL |
Remember from the Bank Batch file example that you have to use ordinal positions to capture results when using the OLE DB Connection. In this case, you are capturing two results. The issue that is hidden here is that SSIS has only a Double variable data type. The DepositAmount field in the BankBatch table is a SQL Server money data type. When the T-SQL returns the money amount, it will not bind to the SSIS Double variable, and you’ll get an error that looks like this:
Error: 0xc232F309 at Execute SQL to check for Trans, Execute SQL Task: An error occurred while assigning a value to variable "BATCHTOTAL": "The type of the value being assigned to variable "User::BATCHTOTAL" differs from the current variable type. Variables may not change type during execution.
Variable types are strict, except for variables of type Object.
Because the variable data types can’t be altered, you have to convert the money amount into the equivalent of a Double in SQL Server. In this example, the conversion to float allows the mapping to occur. Connect the Script Task to this Execute SQL Task.
Now add a new Execute SQL Task to the package. (To save time, copy an existing task.) Rename this new Execute SQL Task to Add E-mail Bank Batch Hdr. This task will create the batch header for your e-mail-based transactions using stored procedure usp_BankBatch_Add. Set up the parameters as shown in Figure 23-32.

Notice there is no unique identifier in the accounting system for the batch of transactions, so you can use the Execution Instance GUID that is unique for every run of the package. An alternative here would be to create a variable built by an expression that resolves to a date-based attribute or a combination of date and transactional attributes, like the batch total.
Add a conditional constraint, in combination with an expression, between the two SQL Execute Tasks to prevent the second SQL Task’s execution if there are no transaction items to be handled as e-mail payments. The expression should be set as follows:
@BATCHITEMS>0
The last step is to add the Data Flow Task and connect it to the Execute SQL Batch Task. At the moment, the E-mail Control Flow Tasks should resemble Figure 23-33. Continue on to the next section before testing this Control Flow.
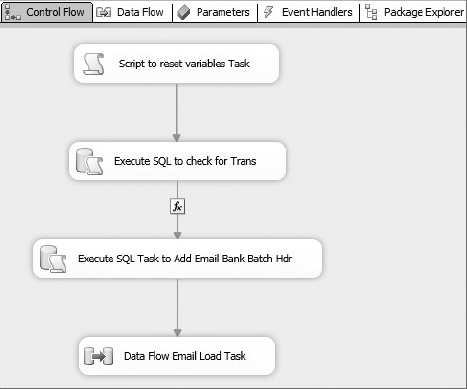
Save the package at this point before proceeding to flesh out the Data Flow Task.
E-mail Data Flow Processing
If the package initiates the E-mail Data Flow, there must be some e-mail-based accounting transactions in the accounting database, and the Execute SQL Task will have already created a new row with a BankBatchID from the BankBatch table that is stored in the BANKBATCHID variable. All you have to do is extract the data from the accounting view, add the foreign key to the data, and insert the rows into the [BankBatchDetail] table.
Start by drilling into the Data Flow E-mail Load Task design surface. Add an OLE DB Source to the Data Flow. Connect to the CaseStudy OLEDB connection and set the data access mode to “Table or view.” Set the name of the table or view to the view vCorpDirectAcctTrans.
You also need to add the BankBatchID foreign key to your stream, so add a Derived Column Transformation to add the BANKBATCHID variable to the stream. Connect the OLE DB Source and the Derived Column Transformations.
Look at a sample of the TransDesc data that is being brought over in Figure 23-34. To get this to match the e-mail addresses in the Customer table, it would be better to strip off the PAYPAL* identifier. Because the BankBatchDetail file expects an nvarchar field of 50 characters, and you need to be consistent in terms of case sensitivity, convert the type and case at the same time by adding an additional column named RawInvoiceNbr as a string [DT_WSTR] of 50 characters, and set the expression to the following:
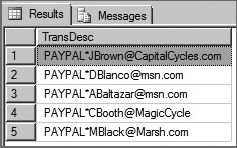
(DT_WSTR, 50)TRIM(UPPER(REPLACE(REPLACE(TransDesc,"PAYPAL",""),"*","")))
Add two more columns to the Derived Column Transformation to also convert the TransID and TransDesc fields to an ANSI string value. Name the columns TransIDtoString and TransDescToString. Set the Data Types to [DT_WSTR] with lengths of 50. The expressions should look like this:
(DT_WSTR, 50)[TransDesc]
(DT_WSTR, 50)[TransID]
Add an OLE DB Destination and connect it to the output of the Derived Column Component. Set the connection to the CaseStudy OLEDB connection. Set the table to BankBatchDetail. Map the fields in the Mapping tab to those shown in the following table:
| INPUT FIELD | DESTINATION IN [BANKBATCHDETAIL] |
| DepositAmount | PaymentAmount |
| <ignore> | ReferenceData2 |
| BankBatchID | BankBatchID |
| RawInvoiceNbr | RawInvoiceNbr |
| TransIDtoString | ReferenceData1 |
| TransDesctoString | ReferenceData2 |
This completes the construction of the Data Flow for the E-mail Load Task. The E-mail Load Data Flow should look like Figure 23-35.
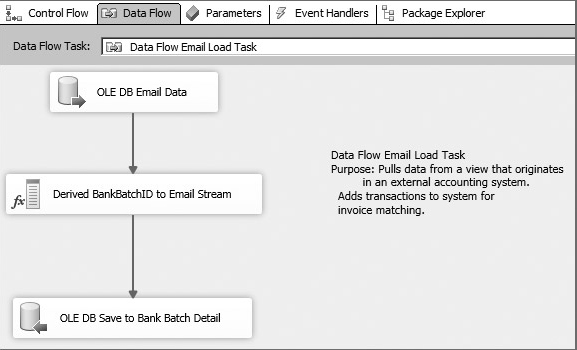
At this point all three of the payment processing packages are complete. Later all the packages will be combined, but for now, each one can be run individually to see how the Bank Batch file, the XML ACH file, and the e-mail data files are loaded into the BankBatch and BankBatchDetail tables. After testing thoroughly, and loading all the payment data, you’ll be ready for the next section, which uses an advanced Data Flow to perform a lot of the matching of payment information to invoices.
Testing
Test the packages by disabling all the tasks and containers. Work your way through each task, enabling them as you go. Use the following SQL script to delete rows that you may be adding to the database during repeated testing that may change the flow of logic in the Control Flow sections:
DELETE FROM BANKBATCHDETAIL

DELETE FROM BANKBATCH
CASE STUDY INVOICE MATCHING PROCESS
Each of the three load packages puts the data into the database. The Process package is going to perform the magic. All this payment data from different sources with varying degrees of quality needs to be matched by invoice or customer attributes against your dimension tables of Invoice and Customer. Combining it in one place enables this package to apply the logic of payment matching to all payments at once. If you do this right, every time the package runs, it is money in the bank for Company ABC.
The strategy for this package is to mimic the logic provided from the business specifications back in Figure 23-4. You will queue all the payment transactions that are unmatched for a moment in time. Then you will run that stream of payments through a gauntlet of matching options until you break through your confidence level for matching. This design will make it easy to add further matching scenarios in the future and enables you to use the advanced fuzzy matching logic available now in the Integration Services.
You’ll be dividing the construction of the package into these sections: Package Setup, High-Confidence Data Flow, and Medium-Confidence Data Flow.
Matching Process Control Flow
This portion of the case study creates the Control Flow steps that are needed to systematically review pending and unmatched payment transactions. You will set up the variables needed to store unmatched payment counts at each stage of the matching process. Then you will create placeholder Data Flow Tasks that perform the matching. Finally, you’ll send an e-mail to report on the statistics for the matching operations.
Matching Process Package Setup
To get started, you need to create a new SSIS package in our existing project. Change the Name property from Package.dtsx to CaseStudy_Process.dtsx.
Use the menu SSIS ![]() Variables to access the Variables editor and add the variables as shown in the following table:
Variables to access the Variables editor and add the variables as shown in the following table:
| VARIABLE NAME | DATA TYPE | VALUE |
| HIGHCONFMATCHCNTSTART | Int32 | 0 |
| HIGHCONFMATCHCNTEND | Int32 | 0 |
| MEDCONFMATCHCNTEND | Int32 | 0 |
| HIGHCONFMATCHAMTSTART | Double | 0 |
| HIGHCONFMATCHAMTEND | Double | 0 |
| MEDCONFMATCHAMTEND | Double | 0 |
| EMAILMSG | String |
In this package, you will use the CaseStudy OLEDB project connection that was previously created.
Add an SMTP Connection to the connection manager that connects to a viable SMTP mail server. Name the connection Mail Server. In the SMTP Connection, provide your available SMTP server address.
The EMAILMSG variable needs to get its value from an expression. Set the variable property EvaluateAsExpression to true and then create this monster expression for the e-mail body:
"COMPANY ABC
Automated Payment Matching Results:
" +
"Job started with " + (DT_WSTR, 25) @HIGHCONFMATCHCNTSTART + " payments for "
+ (DT_WSTR, 50)@HIGHCONFMATCHAMTSTART +
"
We received and successfully processed " + (DT_WSTR, 25)
(@HIGHCONFMATCHCNTSTART-@HIGHCONFMATCHCNTEND) +
" payments for " + (DT_WSTR, 50) (@HIGHCONFMATCHAMTSTART-@HIGHCONFMATCHAMTEND)
+ " automatically with a High-Level of confidence." +
"
We processed " + (DT_WSTR, 25) (@HIGHCONFMATCHCNTEND-@MEDCONFMATCHCNTEND) +
" payments for " + (DT_WSTR, 25) (@HIGHCONFMATCHAMTEND-@MEDCONFMATCHAMTEND) +
" with a Medium-Level of confidence." +
"

Do not respond to this email. This is an automated message."
This expression looks unwieldy, but the resulting message that the package will e-mail looks like this:
COMPANY ABC
Automated Payment Matching Results:
Job started with 0 payments for 0
We received and successfully processed 0 payments for 0 automatically with a
High-Level of confidence.
We processed 0 payments for 0 with a Medium-Level of confidence.
Do not respond to this email. This is an automated message.
Notice in this example that the formatting escape sequence is used to generate a carriage return linefeed, instead of the traditional way VB programmers use to concatenate the constant vbcrlf or the T-SQL method of concatenating CHAR(13) + CHAR(10). The is just one of many formatting escape sequences that you may want to use in expressions like this. You can review these in detail in Chapter 6.
Adding the Matching Process Logic
The matching process logic contains three Execute SQL Tasks that will take snapshots of the total amounts and counts of available payment information to match between two matching workflows encapsulated in two Data Flow Tasks. A final Execute SQL Task will update all batches for balances to complete the Control Flow. To speed up the development of this Control Flow, you’ll build the first Execute SQL Task, and then copy and paste with a few changes to make the others.
To start, add an Execute SQL Task to the Control Flow. This task needs to query the database for the pending payments and then record the total number and dollar amount prior to starting the High Confidence Data Flow Task. Name the task Execute SQL Get High Conf Stats. Connect to the OLE DB Connection. Set up two result columns as follows to retrieve first an amount value into the variable and then a count that represents the unmatched payment transactions at this point.
| PROPERTY | SETTING |
| ResultSet | SingleRow |
| ConnectionType | OLE DB |
| Connection | CaseStudy OLEDB |
| SQLSourceType | Direct Input |
| SQLStatement | SELECT convert(float, sum(paymentamount)) as TotAmt, count(*) as TotCnt FROM bankbatchdetail d INNER JOIN BANKBATCH h ON h.bankbatchid = d.bankbatchid WHERE matcheddate is null AND RawInvoiceNbr is not null AND RawInvoiceNbr <> ' |
| ResultSet:ResultName | 0 |
| ResultSet:Variable | User:: HIGHCONFMATCHAMTSTART |
| ResultSet:ResultName | 1 |
| ResultSet:Variable | User:: HIGHCONFMATCHCNTSTART |
Add a Data Flow Task to the Control Flow and name it High Confidence Data Flow Process Task Start. Connect the Data Flow to the earlier Execute SQL Task. You’ll see this task in the “Matching Process High-Confidence Data Flow” section.
Add another Execute SQL Task by copying the first Execute SQL Task Execute SQL Get High Conf Stats. Name the task High Confidence Data Flow Process Task End. Connect the tasks. Change the variable mappings in the result column to HIGHCONFMATCHAMTEND and HIGHCONFMATCHCNTEND.
Add another Data Flow Task to the Control Flow and name it Medium Confidence Data Flow Process Task. Connect the task to the Execute SQL Task. You’ll see this task in the “Matching Process Medium-Confidence Data Flow” section.
Add another Execute SQL Task by copying the Execute SQL Get High Conf Stats SQL Task. Name the task Medium Confidence Data Flow Process Task End. Connect the tasks. Change the variable mappings in the result column to MEDCONFMATCHAMTEND and MEDCONFMATCHCNTEND.
Add a new Execute SQL Task from the SSIS Toolbox and name it Execute SQL to Balance by Batch. Set the OLE DB Connection. Set the SQLStatement property to EXEC usp_BankBatch_Balance. This procedure will update and balance batch level totals based on the payments that are processed. Neither parameter mappings nor result mappings are required.
Finally, add a Send Mail Task. Set it up to connect to the Mail Server SMTP Connection. Fill in the To, From, and Subject properties. (If you don’t have access to an SMTP Connection, disable this task for testing.) Then set up the expressions to use the variable @EMAILMSG.
The completed Control Flow should look similar to Figure 23-36.

With the Control Flow of the Matching Process Case Study package all ready, you can proceed to filling out the logic in the two Data Flow Containers you added.
Matching Process High-Confidence Data Flow
Your first level of matching should be on the data attributes that are most likely to produce the highest-quality lookup against the target Invoice table. The attribute that would provide the highest-quality lookup and confidence level when matching would be the Invoice Number. An invoice number is a manufactured identification string generated by Company ABC for each created bill. If you get a match by invoice number, you can be highly confident that payment should be applied against this invoice number.
First, you need to create a stream of items to process in your Data Flow. You’ll do this by querying all pending payments that at least have some sort of data in the RawInvoiceNbr field. If there is no data in this field, the items can’t be matched through an automated process until a subject matter expert can look up the item or identify it in another way. Add an OLE DB Source to the Data Flow. Set up the following properties:
| PROPERTY | VALUE |
| Connection | CaseStudy OLEDB |
| DataAccessMode | SQLCommand |
| SQLCommandText | SELECT h.ImportType, BankBatchDtlID, UPPER(RawInvoiceNbr) as RawInvoiceNbr, PaymentAmount FROM bankbatchdetail d INNER JOIN BANKBATCH h ON h.bankbatchid = d.bankbatchid WHERE matcheddate is null AND RawInvoiceNbr is not null AND RawInvoiceNbr <>'' Order by BankBatchDtlID |
Notice that the RawInvoiceNbr field has been converted to uppercase before it is delivered into your data stream, to be consistent with the stored data and to result in more lookup matches.
Because you ordered the incoming data by BankBatchDtlID by adding an ORDER BY clause to the SQLCommandText property in the OLE DB Source, you can set up a sort to prepare for the later Merge Join operation. Be sure to go into the Advanced Editor for the Source Component and set the output’s IsSorted property to be True, along with the BankBatchDtlID to have a SortOrder of 1.
Add the first Lookup Transformation, which is going to be a lookup by invoice. You are going to add many of these, so this first one will be explained in detail. For each item in the stream, you want to attempt to match the information in the RawInvoiceNbr field from the different payment Data Sources to your real invoice number in the invoice dimension table. In other lookups, you may attempt name or e-mail lookups. The invoice number is considered your highest-confidence match because it is a unique number generated by the billing system. If you find a match to the invoice number, you have identified the payment. Set up the following properties on the component:
| PROPERTY | VALUE |
| Connection | CaseStudy OLEDB Connection |
| SQL Query | SELECT InvoiceID, Convert(Nvarchar(50), UPPER(ltrim(rtrim(InvoiceNbr)))) As InvoiceNbr, CustomerID FROM INVOICE |
In the Columns tab, connect the Input Column RawInvoiceNbr to the Lookup Column InvoiceNbr. If there is a match on the lookup, pull back the InvoiceID and CustomerID. This information will be in the Lookup data. Do this by adding these columns as Lookup columns to the Lookup Column Grid.
The default behavior of the Lookup Transformation is to fail if there is a no-match condition. You don’t want this to happen, because you are not expecting to get 100 percent matches on each transformation. What you want to do is separate the matches from the non-matches, so that you only continue to look up items in the stream that are unmatched. To do that, you will use this built-in capability to “know” if a match has been made, and instead of failing the component or package, you will divert the stream to another lookup. In the Lookup Component, use the Configure Error Output button to set up the action of a failed lookup to be Redirect Row, as shown in Figure 23-37.

Because the invoice number can be keyed incorrectly at the bank or truncated, it may be off by only a few digits or because of an “O” instead of a zero. Using only inner-join matching, you may miss the match, but there might still be a good chance of a match if you can use the Fuzzy Lookup. This package is also going to use a lot of Fuzzy Lookup Transformations. They all need to be set up the same way, so you’ll do this one in detail and then just refer to it later:
1. Add a Fuzzy Lookup Transformation to the Data Flow to the right of the Lookup Task. Connect the Error Output of the previous Invoice Lookup Transformation to the Fuzzy Lookup. Set up the OLE DB Connection to CaseStudy OLEDB.
2. Select the option to Generate a New Index with the reference table set to Invoice. (Later it will be more efficient to change these settings to store and then use a cached reference table.)
3. In the Columns tab, match the RawInvoiceNbr fields to the InvoiceNbr field.
4. Deselect the extra Error columns to prevent them from being passed through from the input columns. These columns were added to the stream because it was diverted using the error handler. You aren’t interested in these columns because a no-match is not considered an error for this component.
5. Right-click the line between the two columns. Click Edit Relationship on the pop-up menu. Check all the comparison flags beginning with Ignore.
6. Select the InvoiceID and CustomerID fields to return as the lookup values if a match can be made with the fuzzy logic.
7. In the Advanced tab, set the Similarity Threshold to .70 for the Invoice fuzzy match. This option is essentially a rated value to indicate how close of a match a source data value is to a lookup value. The closer this value is set to 1, the more exact the match must be. This setting of .70 would have been determined after heavy data profiling — which you can now also do in SSIS with the Data Profiler Task.
Because the output of the Fuzzy Lookup contains a number indicating the similarity threshold, you can use this number to separate the stream into high- and low-similarity matches. Low-similarity matches will continue through for further matching attempts. High-similarity matches will be remerged with other high-similarity matches. Add a Conditional Split Component to separate the output into two streams based on the field _Similarity, which represents a mathematical measurement of “sameness” between the RawInvoiceNbr provided by Company ABC’s customers and the InvoiceNbr that you have on file. The splits should always be set up as shown in Figure 23-38.

You want to merge any high-similarity matching from the Fuzzy Lookup and the previous Inner-Join Lookup Transformation, but to do that, the Fuzzy Lookup output must be sorted. This step will also be repeated many times. Add a Sort Component and select to sort the column BankBatchDtlID in ascending order. The Sort Components do two things: they sort data, and they enable you to remove the redundant fuzzy-data–added columns by deselecting them for pass-through. Remove references to these fields (Similarity, Confidence, ErrorCode, and ErrorColumn) when passing data through sorts.
Add a Merge Component to the Data Flow. Connect the output of the Invoice Lookup to the High Similarity output of the Fuzzy Lookup (via the Sort Component). In the Merge Editor, you can see all the fields from both sides of the merge. Sometimes a field will come over with the value IGNORE. Make sure you match these fields; otherwise, some of the data is going to be dropped from your stream. A Merge Transformation looks like Figure 23-39.

At this point, the only items in the merge are matched by invoice, and you should have foreign keys for both the customer and the invoice. These keys can now be updated by executing the stored procedure usp_BankBatchDetail_Match for each of the matching items in your merged stream. Add an OLE DB command to the Data Flow and set up the OLE DB Connection. Set up the SQLCommand property as usp_BankBatchDetail_Match ?, ?, ?. Click Refresh to retrieve the parameters to match. Match the InvoiceID, CustomerID, and BankBatchDtlID fields from the input and output. The stored procedure will run for each row in your stream and automatically update the foreign keys. If a row is found with both invoice and customer keys, the stored procedure will also mark that transaction as complete.
This completes the High-Confidence Data Flow. At this point, your Data Flow should look like Figure 23-40. When this Data Flow returns to the Control Flow, the Execute SQL Task will recalculate the number of remaining pending transactions by count and by amount. The next step is the Medium-Confidence Data Flow.
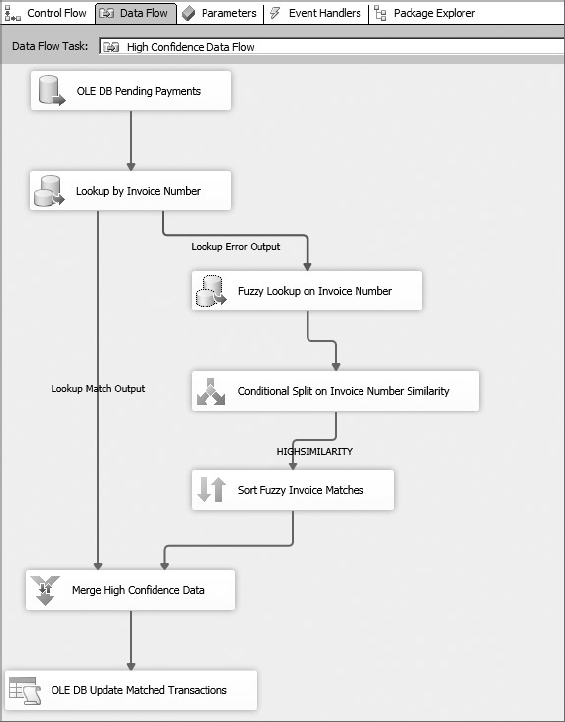
Matching Process Medium-Confidence Data Flow
The Medium-Confidence Data Flow is made up of matches using customer information. Because names and e-mail addresses are more likely to be similar, this level of matching is not as high on the confidence-level continuum as an invoice number. Furthermore, identifying the customer is only the first step. You still need to identify the invoice for the customer. To find the invoice, you’ll attempt to match on the closest nonpaid invoice by amount for the customer. All of these tasks, until you get to the end, are similar to the High-Confidence Data Flow. The only difference is that the lookups use the Customer table instead of the Invoice table. For this reason, you can just use the basic steps that follow. Refer to Figure 23-42, which comes later in this section, to see the final result for use as a road map as you put this Data Flow together.
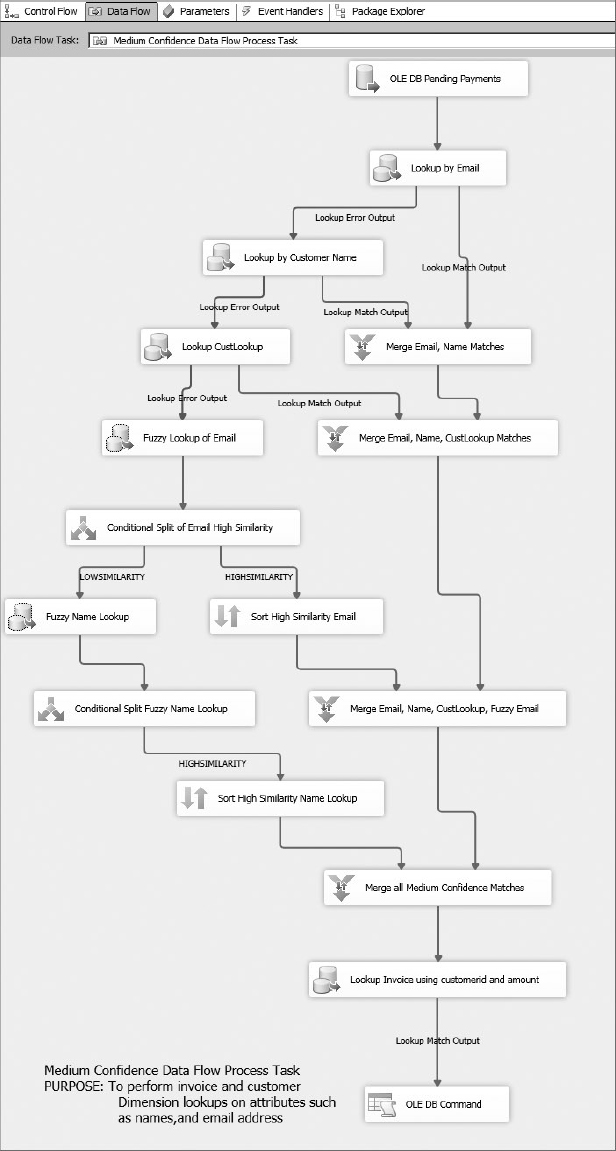
1. Add an OLE DB Source and set it up exactly as you did for the High-Confidence Data Flow using the same SQL statement.
2. Add a Lookup to the Data Flow connecting to the OLE DB Source. Name it Email Lookup. Look for exact matches between RawInvoiceNbr and the field Email in the Customer table. Set the error handling to Redirect when encountering a Lookup error. Use this SQL Query:
Select CustomerID, CONVERT(NVARCHAR(50), UPPER(rtrim(Email))) as Email
FROM Customer WHERE Email is not null AND Email <> ''
3. Add another Lookup by Customer Name beside the Email Lookup. Feed it the error output of the Email Lookup. Look for exact matches between RawInvoiceNbr and the field Name in the Customer table. Set the error handling to Redirect when encountering a Lookup error. Use this SQL Query:
SELECT CustomerID, CONVERT(NVARCHAR(50), UPPER(rtrim([Name]))) as [Name]
FROM CUSTOMER WHERE [Name] is not null and [Name] <> ''
4. Sort Components are not needed on the output of the Lookups because of the IsSorted property being set on the OLE DB Source.
5. Add a Merge Component to merge the two outputs of the Sorts for matches by Email and Name.
6. Add a Lookup using the CustomerLookup table next to the Name Lookup. Feed it the error output of the Customer Name Lookup. Look for exact matches between the fields RawInvoiceNbr and the lookup field RawDataToMatch. This lookup requires an additional match on the field’s ImportType for both the input and the output data. Set the error handling to Redirect. Use the table name CustomerLookup as the source. Look up and return the CustomerID.
7. Add a Fuzzy Lookup Component to the Data Flow. Connect it to the error output of the CustomerLookup Lookup. Connect to the Customer table, and match by RawInvoiceNbr to Email Address. Select the CustomerID for the lookup. Set the Similarity for this component also to 0.70. Remove the columns for pass-through that start with lookup.
8. Add the Conditional Split Component to the output of the Fuzzy Lookup to separate the matches by similarity values above and below 0.70.
9. Moving to the left, add a new Merge Component to merge the results of the e-mail and name merge with the customer lookup matched sort results. Combine the matched results of the two sorted outputs.
10. Add a Sort to the High Similarity Results of the Fuzzy Lookup by Email. Deselect the columns that were added by the Fuzzy Lookup starting with “_”. Sort by BatchDetailID.
11. Add a new Merge Component to combine the Email Fuzzy Lookup Sort to the Email, Name, and CustomerLookup merged results.
12. Add a Fuzzy Lookup Component to the Data Flow beside the Conditional Split from the last Email Fuzzy Lookup. Name it Fuzzy Name Lookup. Move it to the same level to the right of the conditional lookup. Connect the Low Similarity Output from the Email Fuzzy Lookup to the new Fuzzy Name Lookup. Use the Customer table to look for matches, matching RawInvoiceNbr to Name. Uncheck the pass-through checkbox for the input column CustomerID that is being fed by the Low Similarity stream. Retrieve a new lookup of CustomerID. In the Advanced tab, move the Similarity setting to .65. This time, you will accept a lower similarity setting based on previous data profiling.
13. Add another Conditional Split below the Fuzzy Name Lookup and split the output into High and Low Similarity, again using the 0.70 number.
14. Add a Sort to separate the HIGHSIMILARITY output from the Conditional Split you just created. Remove the extra columns.
15. Add the last Merge Component to merge the Sort from the high-similarity fuzzy name match with all the other matches that have been merged so far. At this point, you have captured in the output of this Merge Component all the transactions that you were not able to identify by invoice number but have been able to identify by customer attributes of e-mail or name. These are all of your medium-confidence matches. Knowing the customer might be good, but finding the payment invoice would be even better.
16. Add another Lookup Transformation to the Data Flow below the last Merge Transformation. Name it Lookup Invoice By Customer. Connect the output of the Merge Transformation to it. Open the editor. Add the following basic SQL query as the reference table:
"SELECT INVOICEID, CUSTOMERID, TotalBilledAmt FROM INVOICE"
In the Columns tab, link the CustomerID that you have discovered to the CustomerID in the invoice lookup table. Connect the PaymentAmount field to the TotalBilledAmount field. From the Advanced tab, update the contents of the Caching SQL statement to the following:
 select * from (SELECT INVOICEID, CUSTOMERID, TotalBilledAmt FROM INVOICE) as
refTable where [refTable].[CUSTOMERID] = ? and
(ABS([refTable].[TotalBilledAmt] - ?)<([RefTable].[TotalBilledAmt]*.05))
17. Click the Parameters button. The Set Query Parameters dialog will appear, as shown in Figure 23-41. Select the field PaymentAmount to substitute for Parameter1. This query looks for matches using the CustomerID field and an amount that is within 5 percent of the billed premium.

18. Add an OLE DB Command Component to the Data Flow at the bottom. Attach a connection to the results of the last invoice lookup by amount. Set the connection to CaseStudy OLEDB. Set the SQLCommand property to usp_BankBatchDetail_Match ?, ?, ?. Click Refresh to retrieve the parameters to match. Match the InvoiceID, CustomerID, and BankBatchDtlID fields from the input and output. The stored procedure will run for each row in your stream and automatically update the foreign keys. If a row is found with both invoice and customer keys, the stored procedure will also mark that transaction as complete.
The OLE DB Command Transformation performs its updates on a row-by-row basis, so it tends to slow down the rest of the Data Flow. Use this transformation sparingly and only with smaller data sets.
This completes the task of building the Medium-Confidence Data Flow and the CaseStudy_Process package. The Data Flow should look similar to Figure 23-42.
Once you have the package created and the build is successful, you are ready to run the package and review the results. Go ahead and run the CaseStudy_Process package before proceeding.
Interpreting the Results
Before you started this exercise of creating the CaseStudy_Process SSIS package, you loaded a set of 16 payment transactions for matching into the BankBatchDetail table. By running a series of SQL statements comparing the RawInvoiceNbr with invoices and customers, you could retrieve a maximum of only seven matches. This translates into a 44 percent match of payments to send to the payment processors without any further human interaction. Developing this package with heavy usage of Fuzzy Lookup Components increases your identification hit-rate to 13 out of 16 matches, or an 81 percent matching percentage. The results can be broken out, as shown in the following table:
| STAGE IN PROCESS | # OF NEW MATCHES | MATCH PERCENT |
| High-Confidence Invoice Match | 2 | 12% |
| Med-Confidence Invoice Match | 9 | 56% |
| Med-Confidence Customer Match | 2 | 12% |
As you may recall, the business requirements stipulate an improvement that results in matching all but 20 to 40 percent of the payments received by Company ABC. You are right at, or just under, the best percentage with your test data — and this is just a beginning. Remember that the unidentified items will be worked on by SMEs, who will store the results of their matching customer information in the CustomerLookup table. Incidentally, you used this data even though the table is empty within the Lookup CustLookup Components in the Medium-Confidence Data Flow. As SME-provided information is stored, the Data Flow will become “smarter” about matching incoming payments by referring to this matching source as well.
Now look at the three items that were not matched by your first run:
| ITEM MATCHING INFORMATION | PAYMENT AMOUNT |
| Intl Sports Association | $34,953.00 |
| [email protected] | $21,484.00 |
| 181INTERNA | $18,444.00 |
The first item looks like a customer name, and if you searched in the Customer table, you would find a similar customer named International Sports Association. Because it is highly likely that future payments will be remitted in the same manner, the package could store the match between the customer’s actual name and the string Intl Sports Association in the CustomerLookup table. Refer back to Step 6 of the Matching Process for Medium-Confidence Data Flow to see where this could be plugged in. If you add these entries manually to the CustomerLookup table and reset the BankBatch tables, when you rerun the files you’ll see that future runs match these customers.
The second item looks like a customer e-mail address. If you can find the customer to whom this e-mail address belongs, you can update that information directly into the Customer table to facilitate a future match. There is one customer named Capital Road Cycles that has several invoices at or around $20,000. You could also update the CustomerLookup table with matching data for this e-mail address.
If you query the Invoice table using an invoice number like 181INTERNA, you find several, but they are all for an amount of $34,953.00. This payment is for $18,444.00. Because the payment is significantly different from your billed amount, someone is going to have to look at this payment to approve the processing because you can’t make a reliable match based on amount. This transaction will be manually processed based on your current business rules regardless of anything you could have done. Because the matching is against an invoice number, you do not have anything of use for your CustomerLookup table.
If you were to now delete all the rows from the BankBatch and BankBatchDetail tables and rerun both the CaseStudy_Load and the CaseStudy_Process packages, the payment matching process now improves to 15 out of 16 matches — a whopping 94 percent match. Company ABC will be highly pleased with the capabilities that you have introduced with this SSIS solution.
CREATING A PARENT DRIVER PACKAGE
These packages were designed to run together in a sequence. The three packages that compose the payment ETL processes should always run serially before the CaseStudy_Process package is attempted. Each time the CaseStudy_Process runs, additional payments will be matched to the invoices. Unidentified payments will need to be matched using an external application. However, when users have to manually identify an item, their identification can be stored by updating the data either in the dimension tables or in your lookup tables. The sample packages here would then use that information in the medium-confidence–level Data Flow on the next run of the job. To have each of these packages run in concert, create an additional package called CaseStudy_Driver that will coordinate the running of each of the child packages.
Driver Package Setup
To get started, you need to create a new SSIS package in our existing project. Create a package and name it CaseStudy_Driver.dtsx.
Add four Execute Package Tasks to the Control Flow work surface. Put the first three, which will represent the Load packages, into a Sequence Container to provide a visual indication that they are related. Connect the three Package Tasks in the Sequence Container together with a completion constraint. Then connect the Sequence Container to the last Package Task.
Name the Package Tasks as follows: CaseStudy_Load_Bank, CaseStudy_Load_ACH, CaseStudy_Load_Email, and CaseStudy_Process, respectively. Then open each Package Task and assign the package by browsing to the package matching the name of the task.
The final package should look like Figure 23-43.

This completes development of the Driver package. You can now reset the BankBatch tables and run the whole solution under this one package. When you do this in Visual Studio, the IDE will pop into each child solution so that you can see the Control and Data Flows within each package.
Finally, you can deploy the package and schedule it to run a scheduled basis. For more information on deployment and administration of package, see Chapter 22.
During the case study, you gained experience with many of the tasks and components in the SSIS Toolbox. You learned how to convert a business problem into a powerful and usable ETL solution. By using the new parameter feature, you learned how to easily configure packages for multiple environments. You learned how to use Fuzzy Lookups, Conditional Splits, and Merges to create a data quality solution directly in Integration Services.
Throughout the creation of this case study, you also created best practices for building SSIS solutions for large enterprises. You learned about naming conventions and how to test your packages. By combining the knowledge you’ve learned throughout this book and this chapter, you can now solve that problem on your desk using SSIS.