Chapter 21
vRealize Orchestrator
In this chapter, you will learn to:
- Requirements
- vRO
- PowerShell
- PowerShell Host
- Configuration
- Running an External Script
- Receiving a Return Code from an External Script
- Use Cases
- vSphere Tagging
- vSphere DRS Rule
- Alternative Method to the PowerShell Plug-in
- Requirements
- Configuration
- Use Case
- Calling vRO Workflows from PowerShell
- Retrieving Workflow Details
- Invoking a Workflow
- Querying a Workflow State
- Retrieving Workflow Output
- Querying Workflow Executions
vRealize Orchestrator (vRO) (formerly vCenter Orchestrator) has been bundled as part of vCenter deployments for a long time but was known as one of VMware’s “best-kept secrets.” Those who knew about it and used it were able to take advantage of its ability to simplify the automation of complex IT tasks, both with VMware and third-party products, via the creation of workflows. Recent closer integration with vRealize Automation (formerly vCloud Automation Center) has seen a significant increase in popularity and use. We will explore some of the ways to use PowerShell with vRO, mostly to cover scenarios where vRO is not natively able to integrate with external systems or where the native integration has some drawbacks.
Requirements
If you want to integrate vRO, there are a number of requirements over and above those for a base vRO configuration. They are detailed in the following sections.
vRO
vRO 6.0 is available in two flavors similar to vCenter: a Linux-based appliance or a Windows-based installation process. For the purposes of this book, we will be using the Windows-based installation, since we will be demonstrating not only the use of the official vRO PowerShell plug-in, but also an alternative method that bypasses the plug-in. The alternative method requires the use of a Windows-based vRO system. We will be using Windows Server 2012 R2 for the base OS. A list of supported Windows operating systems for vRO can be found here: http://kb.vmware.com/kb/2091273.
PowerShell
PowerShell v4 is part of the base OS in Windows Server 2012 R2. The vRO PowerShell plug-in version 1.0.4 supports PowerShell v4.
PowerShell Host
vRO needs to communicate with a PowerShell host to execute PowerShell commands and scripts. If you are using the Windows install of vRO, it is possible to use vRO as a PowerShell host. However, for the purposes of this book, we are using another Windows Server 2012 R2 machine as a remote PowerShell host. This also meets the PowerShell host requirement if a vRO Linux appliance is being used.
Configuration
You must take a number of steps to correctly configure the remote PowerShell Host and vRO before you can use the PowerShell plug-in. These are primarily based on what protocol and authentication methods you’ll use to communicate with the remote PowerShell host. The nature of such decisions is beyond the scope of this book. For our purposes, we will be using HTTP and Kerberos.
Time Sync
Since we will be using Kerberos for our authentication, it is important to ensure that all servers being used are synchronized to the same time source.
PowerShell
On the PowerShell host, PowerShell v4 is required either by using Windows Server 2012 R2, where it is built in, or by installing the Windows Management Framework 4.0 for previous versions of Windows. Additionally, the PowerShell Execution Policy should be set to one that permits running scripts on the system. Typically, this will be accomplished by using the RemoteSigned policy, which can be enabled via the following command from a PowerShell console opened with Administrative permissions:
Set-ExecutionPolicy -ExecutionPolicy RemoteSignedWinRM
Open a command prompt with Administrative permissions and run the following commands to configure WinRM.
winrm quickconfig(to create the WinRM Listener)winrm set winrm/config/service/auth @{Kerberos="true"}(to enable Kerberos authentication)winrm set winrm/config/service @{AllowUnencrypted="true"}(to allow HTTP to be used)winrm set winrm/config/winrs @{MaxMemoryPerShellMB="2048"}(to increase the maximum memory each shell can use)
vRO
The following configuration changes on the vRO server are required.
Kerberos
For vRO to use Kerberos, a krb5.conf file needs to be created and populated on the vRO server. The file should be stored in the following location depending on which flavor of vRO is being used:
- Windows Server 2012 R2
C:Program FilesVMwareCISjrelibsecurity - Previous Windows versions
C:Program FilesCommon FilesVMwareVMware vCenter Server - Java Componentslibsecurity - Linux Appliance
/usr/java/jre-vmware/lib/security/
Populate the file with the information in Listing 21-1. For this example, the Windows domain name is sunnydale.local and the domain controller is dc01.sunnydale.local. Make sure capitalizations are matched, since they are important for the solution to work.
Listing 21-1: krb5.conf file contents
[libdefaults]
   default_realm = SUNNYDALE.LOCAL
   udp_preference_limit = 1
[realms]
   SUNNYDALE.LOCAL = {
      kdc = dc01.sunnydale.local
      default_domain = sunnydale.local
   }
[domain_realms]
.sunnydale.local=SUNNYDALE.LOCAL
sunnydale.local=SUNNYDALE.LOCAL
Restart the vRO service once the file is in place.
PowerShell Plug-in
The vRO PowerShell plug-in can now be configured. Navigate to Library/PowerShell/Configuration within the Design workflow view in the vRO console (Figure 21-1).

Figure 21-1: vRO PowerShell host configuration workflow
Start the Add A PowerShell Host workflow. Populate the following text boxes on the PowerShell Host tab (Figure 21-2):
- Name:
vCOPOSH - Host / IP:
vcoposh.sunnydale.local - Port:
5985

Figure 21-2: Adding a PowerShell host (PowerShell Host tab)
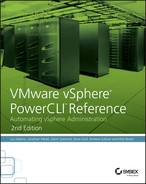
Select the following from the drop-down list boxes on the Host Type tab (Figure 21-3):
- PowerShell Remote Host Type: WinRM
- Transport Protocol: HTTP
- Authentication: Kerberos
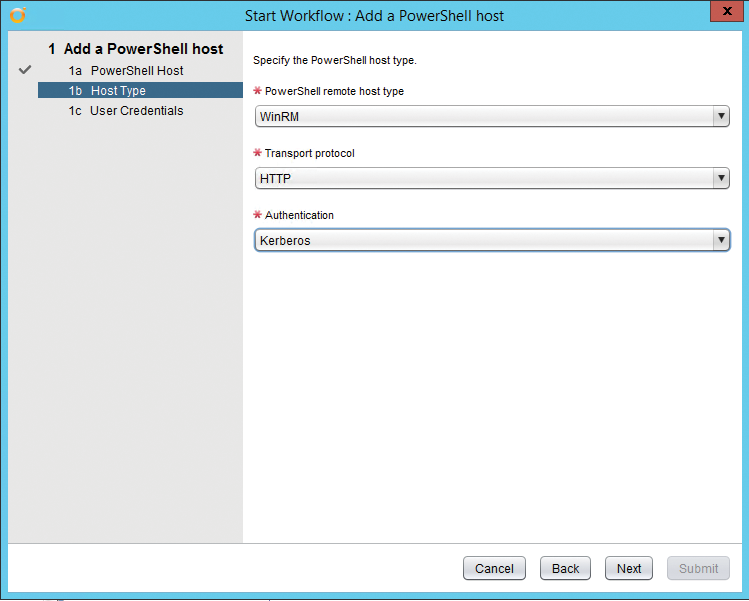
Figure 21-3: Adding a PowerShell host (Host Type tab)
On the User Credentials tab, complete the form with the following (Figure 21-4):
- Session Mode:
Shared session - User Name:
[email protected](make sure to use a domain account) - Password: password for the domain account you used
Click Submit and, all being well, the workflow will complete successfully and the PowerShell host will now be available for use (Figure 21-5).

Figure 21-4: Adding a PowerShell host (User Credentials tab)

Figure 21-5: Successful addition of a PowerShell host
Running an External Script
With the PowerShell plug-in configured, it is now possible to use it to run a script stored on the server configured as the PowerShell host. Let’s take a look with a simple example to see how this is done. We will be using a script, Write-HelloWorld.ps1, stored on the PowerShell host (Listing 21-2).
Listing 21-2: Write-HelloWorld.ps1
param ($a)

$Text = "$a says Hello World!"
$Text | Out-File C:ScriptsTest.txt -Append
Within the vRO client, navigate to Library/PowerShell and run the Invoke An External Script workflow. Set the host to the PowerShell host previously configured in the PowerShell plug-in (Figure 21-6).

Figure 21-6: Invoking an external script (PowerShell Host tab)
On the External Script tab, complete the form with the following (Figure 21-7):
- Name:
C:ScriptsWrite-HelloWorld.ps1(absolute path to the script) - Arguments:
-a Fred(arguments, as if typed at the console)

Figure 21-7: Invoke an external script (External Script tab)
Confirm that the workflow executed without error in vRO and check the text file contents on the PowerShell host C:ScriptsTest.txt for the “…Hello World!” text (Figure 21-8).

Figure 21-8: Contents of C:ScriptsTest.txt
Receiving a Return Code from an External Script
In the previous example of running an external script, we were able to demonstrate that vRO successfully executed the external script. However, what we haven’t captured is whether there were any issues on the PowerShell side during the running of the script or anything—for example, a return code—we wish to return from the script. Typically, when using PowerShell code as part of a larger vRO workflow, you will need to know the result of the PowerShell code in order to know how to progress the workflow further. Consequently, you need a method for receiving a return code from an external script.
It is possible to do this by taking the JavaScript code used within the default Invoke An External Script workflow, modifying it to include some additional content, and creating your own functional workflow to use for this purpose. Listing 21-3 contains the JavaScript code used by vRO in the default Invoke An External Script workflow.
Listing 21-3: vRO JavaScript code for Invoke An External Script
var output;
var session;
try {
    session = host.openSession();
    var script =  '& "' + externalScript + '" ' + arguments;
    output = System.getModule("com.vmware.library.powersh
     ell").invokeScript(host,script,session.getSessionId()) ;
} finally {
    if (session){
        host.closeSession(session.getSessionId());
    }
}
To demonstrate working with a return code, we will use an example PowerShell script, Test-ReturnCode.ps1, that contains some return codes. We return codes 0 or 1 for a successful result and 2 for an error. The code is contained in Listing 21-4.
Listing 21-4: Example of return codes: Test-ReturnCode.ps1
param ($a)

try {

    $Random = Get-Random -Minimum 10 -Maximum 21
    Write-Host "Random number is $Random"
    $Result = $Random * $a
    Write-Host "Result is $Result"

    if ($Result -lt 40){

        Write-Host "Result is less than 40"
        return 0
    }
    else {

        Write-Host "Result is greater than 40"
        return 1
    }
}
catch [Exception]{

    Write-Host "There was an error"
    return 2
}
Back in vRO, we need to create a workflow based on the default Invoke An External Script workflow to use anytime we want to run a PowerShell script and obtain a return code. Create a workflow Invoke-ExternalPSScriptReturnCode. On the Inputs tab, create the following inputs (Figure 21-9):
- For powershellHost Type:
PowerShell:PowerShellHost - For scriptPath Type:
String - For arguments Type:
String

Figure 21-9: Invoke-ExternalPSScriptReturnCode (Inputs tab)
On the Presentation tab, update the Properties of the arguments input to include a Property name of Multi-lines text input (Figure 21-10).

Figure 21-10: Invoke-ExternalPSScriptReturnCode (Presentation tab)
On the Schema tab, add a Scriptable task. On the In tab for the Scriptable task, add the three parameters of the workflow powershellHost, scriptPath, and arguments (Figure 21-11).

Figure 21-11: Invoke-ExternalPSScriptReturnCode (scriptable task inputs)
On the Out tab of the Scriptable task, create the following Out parameter (Figure 21-12):
- returnCode Type: string

Figure 21-12: Invoke-ExternalPSScriptReturnCode Scriptable Task Outputs
On the Scripting tab of the Scriptable task, add the JavaScript code shown in Listing 21-5. Close the task and then Save And Close the workflow.
Listing 21-5: vRO JavaScript code for Invoke-ExternalPSScriptReturnCode
// Create variables
var session
var sessionOutput;
var XMLReturncode = "";
var returnCode = "";

// Use powershell Host session
try {
    session = powershellHost.openSession();
    var script =  '& "' + scriptPath + '" ' + arguments;

    System.log("Script is: " + script);

    // Run the script
    sessionOutput  = session.invokeScript(script);

    // Get the results
    results = sessionOutput.getResults();

    // Get the return code from the results
    if(results != null) {

        XMLReturncode = results.getXml();
        returnCode = XMLReturncode.split(
          "<I32>").pop().split("</I32>").shift();

        System.log("XMLReturnCode is: " +XMLReturncode);
        System.log("returnCode is: " +returnCode);
     }
     System.log("Script output is: " +
         sessionOutput.getHostOutput());
} catch (ex) {
     System.warn(ex);
} finally {
    if (session){
        powershellHost.closeSession(session.getSessionId());
    }
}The Invoke-ExternalPSScriptReturnCode workflow is now available for test with the Test-ReturnCode.ps1 PowerShell script. Run the workflow and supply the following inputs (Figure 21-13):
- For powerShellHost: The PowerShell Host created by the vRO PowerShell plug-in
- For scriptPath:
C:ScriptsTest-ReturnCode.ps1 - For arguments:
-a 3

Figure 21-13: Invoke-ExternalPSScriptReturnCode parameters
In the workflow log you should see something similar to the following output containing the script return code and the output of the script:
[2015-01-12 17:23:19.514][I] Script is: & "C:ScriptsTest-ReturnCode.ps1"
 -a 3
[2015-01-12 17:23:20.420][I] XMLReturnCode is:
<Objs Version="1.1.0.1" xmlns=
"http://schemas.microsoft.com/powershell/2004/04">   <I32>0</I32> </Objs>

[2015-01-12 17:23:20.420] [I] returnCode is: 0
[2015-01-12 17:23:20.420] [I] Script output is: Random number is 10
Result is 30
Result is less than 40
0
It would then be possible to take that return code in a subsequent step of a parent vRO workflow and do something with it. For example, you could create a scriptable task with a JavaScript case statement to do different things based on the return code (Listing 21-6).
Listing 21-6: Example of JavaScript case statement to process return code
switch(returnCode) {
     case "0" : System.log("	Result is less than 40"); break;
     case "1" : System.log("	Result is greater than 40");break
     case "2" : throw "There was an error";
     default : throw "Undefined error occurred";
}
Use Cases
In this section, we will look at a number of use cases for PowerShell within vRO and explain how to go about implementing it.
vSphere Tagging
In vSphere 5.1, VMware introduced new tagging functionality to the vSphere Web Client to replace vCenter attributes as a method of attaching metadata to objects such as virtual machines and datastores. As of this writing, there is no public API to manage these tags and consequently it is not possible to achieve this natively via vRO. However, vSphere tagging functionality was added to PowerCLI in version 5.5 R1 and has been enhanced in later versions. Consequently, we can use PowerCLI via the PowerShell plug-in to bring tagging functionality to vRO.
Requirements
- Ensure that the vRO plug-in has been configured with a PowerShell host, that the
Invoke-ExternalPSScriptReturnCodeworkflow created earlier in this chapter is available, and that PowerCLI has been installed and is functional on the PowerShell host. - Ensure that credentials are available to connect to vCenter with and update tags for virtual machine objects.
- Ensure that a tag category for virtual machines has been created and populated with tags. For example, to create these requirements we could use PowerCLI rather than the Web Client to create a Customer Tag category and tags within that category (Listing 21-7).
Listing 21-7: Creating a Tag category and tags
New-TagCategory -Name "Customer" -Cardinality Multiple `
 -EntityType VirtualMachine
"Customer01", "Customer02", "Customer03" |
 ForEach-Object {New-Tag -Name $_ –Category "Customer"}
PowerCLI Tagging Script
You need a PowerCLI script to carry out the tagging. For the purposes of this example, the script will only handle tagging virtual machines. Listing 21-8 contains the code that will be used in the C:ScriptsSet-VMTagging.ps1 file on the PowerShell host that we will use to achieve this and to send back return codes based on the outcome.
Listing 21-8: Tagging virtual machines via PowerCLI
<#
.SYNOPSIS
Set VM Tagging for vRO with Return Codes
.DESCRIPTION
Set VM Tagging for vRO with Return Codes
.PARAMETER Name
Name of the VM to tag
.PARAMETER Tag
Name of the tag to assign
.PARAMETER vCenter
Name of the vCenter to connect to
.PARAMETER Username
Username to connect to vCenter with
.PARAMETER Password
Password to connect to vCenter with
.INPUTS
String
.OUTPUTS
None.
.EXAMPLE
./Set-VMTagging.ps1 -Name VM01 -Tag Customer01 -vCenter
 vcenter05.sunnydale.local -Username sunnydalevcosvc
 -Password P@ssword1
#>
[CmdletBinding()]

Param
(
[parameter(Mandatory=$true)]
[ValidateNotNullOrEmpty()]
[String]$Name,

[parameter(Mandatory=$true)]
[ValidateNotNullOrEmpty()]
[String]$Tag,

[parameter(Mandatory=$true)]
[ValidateNotNullOrEmpty()]
[String]$vCenter,

[parameter(Mandatory=$true)]
[ValidateNotNullOrEmpty()]
[String]$Username,

[parameter(Mandatory=$true)]
[ValidateNotNullOrEmpty()]
[String]$Password
)

# --- Import the PowerCLI Module
try {

    if ( -not ( Get-Module VMware.VimAutomation.Core ) ){

        Import-Module "C:Program Files (x86)VMware`
        InfrastructurevSphere PowerCLIModules`
        VMware.VimAutomation.SDKVMware.VimAutomation.SDK.psd1"`
         -ErrorAction Stop | Out-Null
        Import-Module "C:Program Files (x86)VMware`
        InfrastructurevSphere PowerCLIModules`
        VMware.VimAutomation.Core`
        VMware.VimAutomation.Core.psd1" -ErrorAction Stop |
        Out-Null
    }
    Write-Host "Successfully imported the PowerCLI Core Module"
}
catch [Exception]{

$error
    Write-Host "Unable to import the PowerCLI Core Module"
    return 2
}

# --- Connect to vCenter
try {

    Connect-VIServer -Server $vCenter -User $Username `
     -Password $Password -WarningAction SilentlyContinue `
      -ErrorAction Stop | Out-Null
    Write-Host "Successfully connected to vCenter $vCenter"
}
catch [Exception]{

    Write-Host "Unable to connect to vCenter $vCenter"
    return 3
}
# --- Test the VM exists
try {
    $VM = Get-VM $Name -ErrorAction Stop
    Write-Host "VM $Name exists"
}
catch [Exception]{

    Write-Host "VM $Name does not exist"
    return 4
}

# --- Test the Tag exists
try {

    $TagObject = Get-Tag -Name $Tag -ErrorAction Stop
    Write-Host "Tag $Tag exists"

}
catch [Exception]{

    Write-Host "Tag $Tag does not exist"
    return 5
}

# --- Set the Tag Assignment
try {

    $TagAssignment = $VM | New-TagAssignment -Tag $Tag `
     -ErrorAction Stop
    Write-Host "Successfully set Tag Assignment for $VM"
    return 0
}
catch [Exception]{

    Write-Host "Unable to set the Tag Assignment for $VM"
    return 1
}
vRO Tagging Workflow
To create a new vRO workflow, you use the Set-VMTagging workflow. Set the inputs as follows (Figure 21-14):
- VM Type: string
- tag Type: string
- vCenter Type: string
- username Type: string
- password Type: SecureString

Figure 21-14: Set-VMTagging (Inputs tab)
Within the workflow presentation, set all of the inputs to Mandatory. Figure 21-15 shows an example of how to set one of these using the VM input. Select the input and on the Properties tab add the Mandatory Input property.
Within the workflow schema, add a scriptable task and name it Set arguments on the Info tab. On the In tab of the task, add all of the parameters of the workflow (Figure 21-16).

Figure 21-15: Set-VMTagging (Presentation tab)
Figure 21-16: Set Arguments scriptable task inputs
On the Out tab of the task, create the following (Figure 21-17):
- arguments Type: string, as workflow attribute

Figure 21-17: Set Arguments scriptable task outputs
On the Scripting tab of the task, add the JavaScript code shown in Listing 21-9. Close the task.
Listing 21-9: vRO JavaScript code for Set-VMTagging Set Arguments task
var arguments = " -Name " + VM + " -Tag " + tag + " -vCenter " +
 vCenter + " -Username " + username + " -Password " + password;
Within the workflow schema, add the previously created Invoke-ExternalPSScriptReturnCode workflow (Figure 21-18).

Figure 21-18: Adding the Invoke-ExternalPSScriptReturnCode workflow
On the In tab of the Invoke-ExternalPSScriptReturnCode workflow, create the following (Figure 21-19):
- powershellHost Type:
PowerShell:PowerShellHost, as workflow attribute. Set the value to be the PowerShellHost created as part of the PowerShell plug-in setup. - scriptPath Type:
String, as workflow attribute. Set the value toC:ScriptsSet-VMTagging.ps1
and select the following existing attribute (Figure 21-19):
- arguments Type:
String

Figure 21-19: Invoke-ExternalPSScriptReturnCode (In tab)
On the Out tab of the workflow create the following (Figure 21-20):
- returnCode Type:
String, as workflow attribute
Close the Invoke-ExternalPSScriptReturnCode workflow and then Save And Close the workflow.

Figure 21-20: Invoke-ExternalPSScriptReturnCode (Out tab)
We are now ready to use the Set-VMTagging workflow. Run it and set the parameters as follows (Figure 21-21):
- VM:
Server02(the VM we wish to tag) - tag:
Customer03(the tag we wish to use) - vCenter:
vcenter05.sunnydale.local(vCenter DNS name) - username:
Sunnydalevcosvc(Active Directory (AD) account with vCenter rights to update the VM tag) - password:
*****(password for that username)

Figure 21-21: Starting the Set-VMTagging workflow
In the workflow log, you should see something similar to the following output containing the script return code and the output of the script:
 [2015-01-19 22:18:44.359] [I] XMLReturnCode is:
<Objs Version="1.1.0.1" xmlns=
 "http://schemas.microsoft.com/powershell/2004/04">
   <I32>0</I32> </Objs>

[2015-01-19 22:18:44.359] [I] returnCode is: 0
[2015-01-19 22:18:44.359] [I] Script output is: Successfully
 imported the PowerCLI Core Module
Successfully connected to vCenter vcenter05.sunnydale.local
VM Server02 exists
Tag Customer03 exists
Successfully set Tag Assignment for Server02
0vSphere DRS Rule
It is possible to create rules within a DRS-enabled vSphere cluster to group VMs together within a cluster or to keep them apart. As of this writing, there is no built-in workflow that ships as part of the vRO vCenter plug-in to cover this functionality. It is possible to achieve it via some JavaScript scripting. Since you are reading a PowerShell book, you may be more comfortable using PowerShell, so we will cover it in this use case.
Requirements
- Ensure that the vRO plug-in has been configured with a PowerShell host, that the
Invoke-ExternalPSScriptReturnCodeworkflow created earlier in this chapter is available, and that PowerCLI has been installed and is functional on the PowerShell host. - Ensure that credentials are available to connect to vCenter with and create DRS rules on a cluster. Ensure that a cluster is available to create a DRS rule on.
PowerCLI DRS Rule Script
You need a PowerCLI script to carry out the creation of the DRS rule. Listing 21-10 contains the code that will be used in the C:ScriptsNew-ClusterDRSRule.ps1 file on the PowerShell host that we will use to achieve this and to send back return codes based on the outcome.
Listing 21-10: Creating a DRS rule via PowerCLI
<#
.SYNOPSIS
Create DRS Rule for vRO with Return Codes
.DESCRIPTION
Create DRS Rule for vRO with Return Codes
.PARAMETER Name
Name of the DRS Rule
.PARAMETER Cluster
Name of the vSphere Cluster to create the rule on
.PARAMETER VM
Name of the VM(s) to add to the Rule
.PARAMETER KeepTogether
Keep the VMs together or not
.PARAMETER vCenter
Name of the vCenter to connect to
.PARAMETER Username
Username to connect to vCenter with
.PARAMETER Password
Password to connect to vCenter with
.INPUTS
String
.OUTPUTS
None.
.EXAMPLE
./New-ClusterDRSRule.ps1 -Name TestRule01 -Cluster Cluster01
 -VM Server01,Server02 -KeepTogether
  -vCenter vcenter05.sunnydale.local -Username sunnydalevcosvc
   -Password P@ssword1
#>
[CmdletBinding()]

Param
(
[parameter(Mandatory=$true)]
[ValidateNotNullOrEmpty()]
[String]$Name,

[parameter(Mandatory=$true)]
[ValidateNotNullOrEmpty()]
[String]$Cluster,

[parameter(Mandatory=$true)]
[ValidateNotNullOrEmpty()]
[String[]]$VM,
[parameter(Mandatory=$false)]
[ValidateNotNullOrEmpty()]
[Switch]$KeepTogether,

[parameter(Mandatory=$true)]
[ValidateNotNullOrEmpty()]
[String]$vCenter,

[parameter(Mandatory=$true)]
[ValidateNotNullOrEmpty()]
[String]$Username,

[parameter(Mandatory=$true)]
[ValidateNotNullOrEmpty()]
[String]$Password
)

# --- Import the PowerCLI Module
try {

    if ( -not ( Get-Module VMware.VimAutomation.Core ) ){

        Import-Module "C:Program Files (x86)VMware`
        InfrastructurevSphere PowerCLIModules`
        VMware.VimAutomation.SDKVMware.VimAutomation.SDK.psd1"`
         -ErrorAction Stop | Out-Null
        Import-Module "C:Program Files (x86)VMware`
        InfrastructurevSphere PowerCLIModules`
        VMware.VimAutomation.Core`
        VMware.VimAutomation.Core.psd1" -ErrorAction Stop |
        Out-Null
    }
    Write-Host "Successfully imported the PowerCLI Core Module"
}
catch [Exception]{

$error
    Write-Host "Unable to import the PowerCLI Core Module"
    return 2
}

# --- Connect to vCenter
try {

    Connect-VIServer -Server $vCenter -User $Username `
     -Password $Password -WarningAction SilentlyContinue `
      -ErrorAction Stop | Out-Null
    Write-Host "Successfully connected to vCenter $vCenter"
}
catch [Exception]{

    Write-Host "Unable to connect to vCenter $vCenter"
    return 3
}

# --- Test the Cluster exists
try {
    $Cluster = Get-Cluster $Cluster -ErrorAction Stop
    Write-Host "Cluster $Cluster exists"
}
catch [Exception]{

    Write-Host "Cluster $Cluster does not exist"
    return 4
}

# --- Test the VM(s) exists
$VMArray = @()
foreach ($VirtualMachine in $VM){
    try {
        $VirtualMachineObject = Get-VM $VirtualMachine `
         -ErrorAction Stop
        Write-Host "VM $VirtualMachine exists"
        $VMArray += $VirtualMachineObject

    }
    catch [Exception]{

        Write-Host "VM $VirtualMachine does not exist"
        return 5
    }
}

# --- Test the DRS Rule doesn't exist
try {
    $DRSRule = Get-DrsRule -Name $Name -Cluster $Cluster `
     -ErrorAction SilentlyContinue

    if ($DRSRule){
        Write-Host "DRS Rule $Name already exists"
        return 6
    }
    else {
        Write-Host "DRS Rule $Name does not already exist"
    }
}
catch [Exception]{

   Write-Host "Unable to determine status of existing DRS Rules"
   return 7
}

# --- Create the DRS Rule
try {

    if ($KeepTogether){


       $Together = $true
    }
    else {

       $Together = $false
    }
    $DRSRule = New-DrsRule -Cluster $Cluster -Name $Name `
    -KeepTogether $Together -VM $VMArray -ErrorAction Stop
    Write-Host "Successfully created DRS Rule $Name"
    return 0
}
catch [Exception]{

    Write-Host "Unable to create DRS Rule $Name"
    return 1
}
vRO New DRS Rule Workflow
Create a new vRO workflow, New-DRSRule. Set the inputs as follows (Figure 21-22):
- drsRuleName Type:
string - cluster Type:
string - vms Type:
string - vms Description:
Separate multiple VMs by comma - keepTogether Type:
boolean - vCenter Type:
string - username Type:
string - password Type:
SecureString

Figure 21-22: New-DRSRule inputs
Within the workflow presentation, set all of the inputs, except keepTogether, to Mandatory. Figure 21-23 shows an example of how to set one of these using the drsRuleName input. Select the input and on the Properties tab add the Mandatory Input property.

Figure 21-23: New-DRSRule (Presentation tab)
Within the workflow schema, add a scriptable task and name it Set arguments on the Info tab. On the In tab of the task, add all of the parameters of the workflow (Figure 21-24).
On the Out tab of the task, create the following (Figure 21-25):
- arguments - Type: string, as workflow attribute

Figure 21-24: Set Arguments (scriptable task inputs)

Figure 21-25: Set Arguments (scriptable task outputs)
On the Scripting tab of the task, add the following JavaScript code (Listing 21-11). Close the task.
Listing 21-11: vRO JavaScript code for New-DRSRule Set Arguments task
var arguments = " -Name " + drsRuleName + " -Cluster " + cluster + " -VM "
 + vms + " -vCenter " + vCenter + " -Username " + username
 + " -Password " + password;

if (keepTogether){
   arguments += " -KeepTogether"
}
Within the workflow schema, add the previously created Invoke-ExternalPSScriptReturnCode workflow (Figure 21-26).

Figure 21-26: Adding the Invoke-ExternalPSScriptReturnCode workflow
On the In tab of the Invoke-ExternalPSScriptReturnCode workflow, create the following (Figure 21-27):
- powershellHost Type: PowerShell:PowerShellHost, as workflow attribute. Set the value to be the
PowerShellHostcreated as part of the PowerShell plug-in setup. - scriptPath Type:
String, as workflow attribute. Set the value toC:ScriptsNew-ClusterDRSRule.ps1.
and select the following existing attribute (Figure 21-27):
- arguments Type:
String

Figure 21-27: Invoke-ExternalPSScriptReturnCode (In tab)
On the Out tab of the workflow, create the following (Figure 21-28):
- returnCode Type:
String, as workflow attribute

Figure 21-28: Invoke-ExternalPSScriptReturnCode (Out tab)
Close the Invoke-ExternalPSScriptReturnCode workflow and Save And Close the workflow.
We are now ready to use the New-DRSRule workflow. Run it and set the parameters as follows (Figure 21-29):
- drsRuleName:
TestRule01(the name of the rule) - cluster:
Cluster01(the name of the vSphere Cluster) - Separate multiple VMs by comma:
Server01, Server02(VMs to add to the rule) - keepTogether:
No - vCenter:
vcenter05.sunnydale.local(vCenter DNS name) - username:
Sunnydalevcosvc(AD account with vCenter rights to create the DRS rule) - password:
*****(password for that username)

Figure 21-29: Starting the New-DRSRule workflow
In the workflow log you should see something similar to the following output containing the script return code and the output of the script:
 [2015-01-19 22:32:34.180] [I] XMLReturnCode is:
<Objs Version="1.1.0.1" xmlns=
 "http://schemas.microsoft.com/powershell/2004/04">
  <I32>0</I32> </Objs>

[2015-01-19 22:32:34.180] [I] returnCode is: 0
[2015-01-19 22:32:34.180] [I] Script output is: Successfully
 imported the PowerCLI Core Module
Successfully connected to vCenter vcenter05.sunnydale.local
Cluster Cluster01 exists
VM Server01 exists
VM Server02 exists
DRS Rule TestRule01 does not already exist
Successfully created DRS Rule TestRule01
0
Alternative Method to the PowerShell Plug-in
There is no denying the fact that configuring the PowerShell plug-in, even within a lab environment, can be challenging at times with the various protocol and authentication methods available. Take that mixture into a corporate environment with internal firewalls, security policies, and Windows operating systems and there is real scope for significant headaches. The note in the section “Configuration” earlier in this chapter lists URLs that help illustrate some of the hurdles that may encounter.
Additionally, once the configuration of the PowerShell plug-in has been completed there are often further issues commonly experienced such as difficulties with PowerShell Remoting multihop authentication and also with the use of external commands and PowerShell modules. Detailed discussion of these issues is beyond the scope of this book, but it is useful to have an alternative method in your toolbox if faced with any of these challenges.
This section will demonstrate a method for using PowerShell within vRO without the PowerShell plug-in.
Requirements
Both vRO and PowerShell have requirements for using PowerShell within vRO without the PowerShell plug-in:
- vRO As mentioned earlier in this chapter, the alternative method is only available when vRO is installed on Windows, so it’s not available when using the vRO Linux-based appliance.
- PowerShell PowerShell v4 should be made available on the vRO Windows server.
Configuration
The following elements need to be configured for the Alternative PowerShell method:
- PowerShell Ensure that PowerShell has an execution policy that permits the running of scripts, as per the PowerShell plug-in configuration steps.
- vRO For vRO we do not need to make any of the configuration steps listed for vRO with the PowerShell plug-in. However, we do need to make sure that vRO can execute local processes:
- Edit the file
C:Program FilesVMwareOrchestratorapp-serverconfvmo.propertiesto include the following line:com.vmware.js.allow-local-process=true
- Restart both vRO Windows services.
Receiving a Return Code from a Local Script
For the alternative PowerShell method we need a new workflow for receiving a return code from a local script since we are not using a remote PowerShell host. We also need an updated version of the Test-ReturnCode.ps1 script since, when using this alternative method, we need to use the PowerShell exit keyword rather than the return keyword to pass the return code through to vRO. Listing 21-12, Test-ReturnCodeLocal.ps1, contains updated code using the exit keyword.
Listing 21-12: Example of return codes: Test-ReturnCodeLocal.ps1
param ($a)

try {

    $Random = Get-Random -Minimum 10 -Maximum 21

    Write-Host "Random number is $Random"

    $Result = $Random * $a

    Write-Host "Result is $Result"


    if ($Result -lt 40){

        Write-Host "Result is less than 40"
        exit 0
    }
    else {

        Write-Host "Result is greater than 40"
        exit 1
    }
}
catch [Exception]{

    Write-Host "There was an error"
    exit 2
}
Now create the new return code workflow Invoke-LocalPSScriptReturnCode. On the Inputs tab, create the following inputs (Figure 21-30):
powershellPathType:StringscriptPathType:StringargumentsType:String

Figure 21-30: Invoke-LocalPSScriptReturnCode (Inputs tab)
On the Presentation tab, update the properties of the arguments input to include a property name of Multi-lines text input (Figure 21-31).

Figure 21-31: Invoke-LocalPSScriptReturnCode Presentation
On the Schema tab, add a scriptable task. On the In tab for the scriptable task add the three parameters of the workflow: powershellPath, scriptPath, and arguments (Figure 21-32).

Figure 21-32: Invoke-LocalPSScriptReturnCode (scriptable task inputs)
On the Out tab of the scriptable task, create the following workflow output parameter (Figure 21-33):
returnCodeType:string
On the Scripting tab of the scriptable task, add the JavaScript code shown in Listing 21-13. Close the task and then Save And Close the workflow.

Figure 21-33: Invoke-LocalPSScriptReturnCode (scriptable task outputs)
Listing 21-13: vRO JavaScript code for Invoke-LocalPSScriptReturnCode
var cmdLine = powershellPath + " -NoProfile -NonInteractive -Command " +
  scriptPath + " " + arguments + "; exit $LASTEXITCODE";

System.log("Command line: " + cmdLine);

var cmd = new Command(cmdLine);
var returnCode = cmd.execute(true);

System.log("Return code: " + returnCode);
The Invoke-LocalPSScriptReturnCode workflow is now available for test with the Test-ReturnCodeLocal.ps1 PowerShell script.
Run the workflow and supply the following inputs (Figure 21-34):
- powershellPath:
C:WindowsSystem32WindowsPowerShellv1.0powershell.exe - scriptPath:
C:ScriptsTest-ReturnCodeLocal.ps1 - arguments:
-a 3

Figure 21-34: Invoke-LocalPSScriptReturnCode parameters
In the workflow log, you should see something similar to the following output containing the script return code and the output of the script:
[2015-01-14 15:34:17.167] [I] Command line:
C:WindowsSystem32WindowsPowerShellv1.0powershell.exe -NoProfile
-NonInteractive -Command C:ScriptsTest-ReturnCodeLocal.ps1 -a 3;
exit $LASTEXITCODE
[2015-01-14 15:34:18.224] [I] Return code: 0
Use Case
In this section, we will look at a use case for PowerShell as well as the alternative method for vRO (and explain how to go about implementing it).
Active Directory User Accounts
Working on virtualization automation projects regularly requires interaction with Microsoft Active Directory (AD). Whether it’s manipulating AD groups for use with vCenter permissions, creating AD computer accounts for newly deployed VMs, or creating AD user accounts for new employees within an organization, it’s a common integration point. vRO ships with an Active Directory plug-in that will meet many of your requirements. However, as of this writing, there are a few restrictions with the plug-in. vRO PowerShell integration may be required to fill in some gaps. Specifically, these restrictions with the AD plug-in version 1.0.6 are as follows:
- To be able to carry out some AD tasks, such as creating an AD Enabled User account, the connection between vRO and AD must use SSL.
- Only a single AD domain is supported.
- Only a single domain controller within the domain is supported. If the domain controller is unavailable for any reason, any workflows using it will fail.
The Microsoft Active Directory PowerShell module is not affected by any of those restrictions. Consequently, it can be used in combination with the vRO PowerShell alternative method to meet scenarios affected by the restrictions, without needing to worry about any multihop authentication issues that may be encountered with the vRO PowerShell plug-in.
In this use case, we will create a vRO workflow using the PowerShell plug-in that maps to the functionality of the Create A User With A Password In An Organizational Unit workflow that is part of the vRO Active Directory plug-in.
Requirements
Ensure that the vRO Windows server has been configured for executing local processes and that the Microsoft AD PowerShell module has been installed and is available on it. For ease of use, the vRO server should be joined to the Windows domain where the user account needs to be created.
Ensure credentials are available to connect to AD with and create user accounts in the desired organizational unit (OU).
Active Directory User Account Script
You need a PowerShell script to create the AD user account. Listing 21-14 contains the code we will use to achieve this and to send back return codes based on the outcome.
Listing 21-14: Creating an AD user account with the AD PowerShell module
<#
.SYNOPSIS
Create an AD User for vRO with Return Codes
.DESCRIPTION
Create an AD User for vRO with Return Codes
.PARAMETER FirstName
FirstName of the User
.PARAMETER Surname
Surname of the User
.PARAMETER OU
DN of the Organization Unit to create the User in
.PARAMETER ADUsername
Username to connect to Active Directory with
.PARAMETER ADPassword
Password to connect to Active Directory with
.INPUTS
String
.OUTPUTS
None.
.EXAMPLE
./New-ActiveDirectoryUser.ps1 -FirstName 'Joe'
 -Surname 'Bloggs' -OU 'OU=Users,OU=HQ,DC=sunnydale,DC=local'
 -ADUsername 'sunnydalevcosvc' -ADPassword 'P@ssword1'
#>
[CmdletBinding()]

Param
(
[parameter(Mandatory=$true)]
[ValidateNotNullOrEmpty()]
[String]$FirstName,

[parameter(Mandatory=$true)]
[ValidateNotNullOrEmpty()]
[String]$Surname,

[parameter(Mandatory=$true)]
[ValidateNotNullOrEmpty()]
[String]$OU,

[parameter(Mandatory=$true)]
[ValidateNotNullOrEmpty()]
[String]$ADUsername,

[parameter(Mandatory=$true)]
[ValidateNotNullOrEmpty()]
[String]$ADPassword
)
# --- Import the Active Directory Module
try {

    if ( -not ( Get-Module ActiveDirectory ) ){

        Import-Module ActiveDirectory -ErrorAction Stop |
         Out-Null
    }
  Write-Host "Successfully imported the Active Directory Module"
}
catch [Exception]{

    Write-Host "Unable to import the Active Directory Module"
    exit 2
}

# --- Generate a random password for the User Account
try {

    Add-Type -AssemblyName System.Web
    $Password = ''
    while ($Password -NotMatch 'd'){
    $Password = [Web.Security.Membership]::GeneratePassword(8,0)
    }
    Write-Host "Successfully created a random password"
}
catch [Exception]{

    Write-Host "Unable to create a random password"
    exit 3
}

# --- Create AD Credential and Forest objects
try {

    $ADPasswd = ConvertTo-SecureString $ADPassword `
     -AsPlainText -Force
    $ADCredential = New-Object `
     System.Management.Automation.PSCredential `
     ($ADUsername, $ADPasswd)
    $Forest = (Get-ADDomain -Credential $ADCredential `
     -ErrorAction Stop).Forest
    Write-Host "Successfully created AD Credential and Forest `
     objects"
}
catch {

    Write-Host "Unable to create AD Credential and Forest `
     objects"
    exit 4
}

# --- Create Username, DisplayName and Principal Name
try {

    $Username = $FirstName.ToLower() + "." + $Surname.ToLower()
    $DisplayName = $FirstName + " " + $Surname
    $PrincipalName = $Username + "@" + $Forest
    Write-Host "Successfully created Username $Username, `
     DisplayName $DisplayName and Principal Name `
     $PrincipalName variables"
}
catch {

    Write-Host "Unable to create Username, DisplayName `
    and Principal Name variables"
    exit 5
}

# --- Check for existing user account
try {

    $User = Get-ADUser -Identity $Username
    Write-Host "User Account $UserName already exists"
    exit 6
}
catch {
    Write-Host "User Account $UserName does not already exist"
}

# --- Create AD User Account
try {

    New-ADUser -GivenName $FirstName -Surname $Surname `
     -SamAccountName $Username -UserPrincipalName `
     $PrincipalName -Name $DisplayName -DisplayName `
     $DisplayName -Path $OU -AccountPassword `
     (ConvertTo-SecureString $Password -AsPlainText -Force) `
     -Enabled $true -ChangePasswordAtLogon $true -Credential `
     $ADCredential -ErrorAction Stop
    Write-Host "Successfully created AD User Account $UserName"
    exit 0
}
catch {

    Write-Host "Unable to create AD User Account $UserName"
    exit 1
}
vRO New AD User Workflow
Create a new workflow New-ADUser. Set the inputs as follows (Figure 21-35):
- firstName Type:
string - surname Type:
string - ou Type:
string - adUsername Type:
string - adPassword Type:
SecureString
Within the workflow presentation, set all of the inputs to Mandatory. Figure 21-36 shows an example of how to set one of these using the firstName input. Select the input and on the Properties tab add the Mandatory Input property.

Figure 21-35: New-ADUser inputs

Figure 21-36: New-ADUser (Presentation tab)
Within the workflow schema, add a scriptable task and name it Set Arguments on the Info tab. On the In tab of the task, add all of the parameters of the workflow (Figure 21-37).

Figure 21-37: Set Arguments (scriptable task inputs)
On the Out tab of the task, create the following (Figure 21-38):
- arguments Type:
string(as workflow attribute)

Figure 21-38: Set Arguments (scriptable task outputs)
On the Scripting tab of the task, add the JavaScript code shown in Listing 21-15. Close the task.
Listing 21-15: vRO JavaScript code for New-ADUser Set Arguments task
var arguments = " -FirstName " + firstName + " -Surname "
 + surname + " -OU '" + ou + "' -ADUsername " + adUsername + "
 -ADPassword " + adPassword;
Within the workflow schema, add the previously created Invoke-LocalPSScriptReturnCode workflow (Figure 21-39).

Figure 21-39: Adding the Invoke-LocalPSScriptReturnCode workflow
On the In tab of the Invoke-LocalPSScriptReturnCode workflow, create the following (Figure 21-40):
powershellPathType:String(as workflow attribute)- Set the value to
C:WindowsSystem32WindowsPowerShellv1.0powershell.exe
- Set the value to
scriptPathType:String(as workflow attribute)- Set the value to
C:ScriptsNew-ActiveDirectoryUser.ps1
- Set the value to
and select the following existing attribute (Figure 21-40):
- arguments Type:
String
On the Out tab of the workflow, create the following (Figure 21-41):
returnCodeType:String(as workflow attribute)

Figure 21-40: Invoke-LocalPSScriptReturnCode (In tab)

Figure 21-41: Invoke-LocalPSScriptReturnCode (Out tab)
Close the Invoke-LocalPSScriptReturnCode workflow and then Save And Close the workflow.
You are now ready to use the New-ADUser workflow. Run it and set the parameters as follows (Figure 21-42):
- firstName:
Buffy(First Name of the new user) - surname:
Summers(Surname of the new user) - ou:
OU=Users,OU=HQ,DC=sunnydale,DC=local(DN of the OU for the user) - keepTogether:
No - adUsername:
Sunnydalevcosvc(AD account with AD rights to create the new user) - adPassword:
*****(password for that username)

Figure 21-42: Starting the New-ADUser workflow
In the workflow log, you should see something similar to the following output, which contains the script return code and the output of the script:
[2015-01-14 23:49:08.116] [I] Command line:
C:WindowsSystem32WindowsPowerShellv1.0powershell.exe
-NoProfile -NonInteractive -Command
C:ScriptsNew-ActiveDirectoryUser.ps1  -FirstName Buffy
-Surname Summers -OU 'OU=Users,OU=HQ,DC=sunnydale,DC=local '
-ADUsername Sunnydalevcosvc  -ADPassword P@ssword1; exit
$LASTEXITCODE
[2015-01-14 23:49:11.111] [I] Return code: 0
Calling vRO Workflows from PowerShell
vRO is manageable via a REST-based API. Since PowerShell is able to work with REST systems, it is possible to interact with vRO workflows in an automated way. The following examples illustrate how to retrieve details about existing workflows, invoke a workflow, and subsequently retrieve the results.
Retrieving Workflow Details
The Get-vROWorkflow function presented in Listing 21-16 will either retrieve all workflows in a vRO system or a category (folder), or search by workflow name.
Listing 21-16: Get-vROWorkflow
function Get-vROWorkflow {
<#
.SYNOPSIS
    Get vRO Workflows
.DESCRIPTION
    Get vRO Workflows
.PARAMETER All
    Retrieve all workflows
.PARAMETER Category
    Retrieve workflow by category
.PARAMETER Name
    Retrieve workflow by name
.PARAMETER Wildcard
    Perform a wildcard search when using the Name parameter
.PARAMETER Server
    vRO Server to connect to
.PARAMETER Credential
    PS Credential Object
.EXAMPLE
    $Credential = Get-Credential
    Get-vROWorkflow -All -Server vRO01 -Credential $Credential
.EXAMPLE
    Get-vROWorkflow -Category Dev -Server vRO01 -Credential `
     $Credential
.EXAMPLE
    Get-vROWorkflow -Name 'New-DRSRule' -Server vRO01 `
     -Credential $Credential
.EXAMPLE
    Get-vROWorkflow -Name 'New' -Wildcard -Server vRO01 -Credential`
    $Credential
#>
[CmdletBinding(DefaultParametersetName="All")]`
 [OutputType('System.Management.Automation.PSObject')]

    Param
    (

    [parameter(Mandatory=$false,ParameterSetName="All",`
     Position=0)]
    [Switch]$All,

    [parameter(Mandatory=$false,ParameterSetName="Category",`
     Position=0)]
    [String]$Category,

    [parameter(Mandatory=$false,ParameterSetName="Name",`
     Position=0)]
    [String]$Name,

    [parameter(Mandatory=$false,ParameterSetName="Name")]
    [Switch]$Wildcard,

    [parameter(Mandatory=$true)]
    [ValidateNotNullOrEmpty()]
    [String]$Server,

    [parameter(Mandatory=$true)]
    [ValidateNotNullOrEmpty()]
    [PSCredential]$Credential
    )


try {

    # --- Convert Credential Object to Username and Password

    $Username = $Credential.UserName
    $Password = $Credential.GetNetworkCredential().Password

    # --- Deal with certificate issues
    # --- Deal with certificate issues
    # --- Note: this code will disable certificate checking
    # --- for this PowerShell session
    if (-not ("TrustAllCertsPolicy" -as [type])){

    Add-Type @"
    using System.Net;
    using System.Security.Cryptography.X509Certificates;
    public class TrustAllCertsPolicy : ICertificatePolicy {
        public bool CheckValidationResult(
            ServicePoint srvPoint, X509Certificate certificate,
            WebRequest request, int certificateProblem) {
            return true;
        }
    }
"@
    }
    [System.Net.ServicePointManager]::CertificatePolicy = `
     New-Object TrustAllCertsPolicy

   # --- Create REST Headers
   $Auth = $Username + ':' + $Password
   $Encoded = [System.Text.Encoding]::UTF8.GetBytes($Auth)
   $EncodedPassword = [System.Convert]::ToBase64String($Encoded)
   $Headers = @{"Authorization"="Basic $($EncodedPassword)";}

    # --- Send REST call and process results
    switch ($PsCmdlet.ParameterSetName) {

        "All"  {

          $URI = "https://$($Server):8281/vco/api/workflows"
        }

        "Category"  {
          $URI = "https://$($Server):8281/vco/api/workflows/?`
           conditions=categoryName=$($Category)"
        }

        "Name" {

          if ($PSBoundParameters.ContainsKey('Wildcard')){

             $URI = "https://$($Server):8281/vco/api/workflows/`
              ?conditions=name~$($Name)"
          }
          else {

             $URI = "https://$($Server):8281/vco/api/workflows/`
              ?conditions=name=$($Name)"
          }
        }
    }

    $Workflows = Invoke-RestMethod -Method Get -Uri $URI `
     -Headers $Headers -ContentType "application/xml"

    foreach ($Workflow in $Workflows.link){

    $Object = [pscustomobject]@{

        Name = ($Workflow.attributes |
         Where-Object {$_.name -eq 'name'}).value
        Server = $Server
        ID = ($Workflow.attributes |
         Where-Object {$_.name -eq 'id'}).value
        Description = ($Workflow.attributes |
         Where-Object {$_.name -eq 'description'}).value
        ItemHref = ($Workflow.attributes |
         Where-Object {$_.name -eq 'itemHref'}).value
        Version = ($Workflow.attributes |
         Where-Object {$_.name -eq 'version'}).value
        CategoryName = ($Workflow.attributes |
         Where-Object {$_.name -eq 'categoryName'}).value
        CategoryHref = ($Workflow.attributes |
         Where-Object {$_.name -eq 'categoryHref'}).value
        CustomIcon = ($Workflow.attributes |
         Where-Object {$_.name -eq 'customIcon'}).value
        CanExecute = ($Workflow.attributes |
         Where-Object {$_.name -eq 'canExecute'}).value
        CanEdit = ($Workflow.attributes |
         Where-Object {$_.name -eq 'canEdit'}).value
    }

    Write-Output $Object
    }

}
catch [Exception]{

    throw "Unable to get vRO Workflows"
}
}
An example use case is shown in Listing 21-17.
Listing 21-17: Using Get-vROWorkflow on a category
$Credential = Get-Credential
Get-vROWorkflow -Category JM-Dev -Server vro01.sunnydale.local `
 -Credential $Credential | ft Name,ID,Version -AutoSize
The output would be similar to this:
Name              ID                                   Version
----              --                                   -------
New-ADUser        5d264cd4-28c2-4c60-9b2c-33e30020162e 0.0.1
Test-ADUser       67dc76c3-4d89-4308-828e-1558828b34de 0.0.0
Set-VMTagging     8c71713b-ab38-4d4d-9a8a-ba84c673e2fc 1.0.0
Test-Output       c0278910-9ae2-46c5-bb45-2292fe88e3ab 0.0.2
Invoking a Workflow
The Invoke-vROWorkflow function in Listing 21-18 will invoke a workflow based on ID. Workflow parameters can be supplied either via a single String parameter or XML for multiple parameters.
Listing 21-18: Invoke-vROWorkflow
function Invoke-vROWorkflow {
<#
.SYNOPSIS
    Invoke vRO Workflow
.DESCRIPTION
    Invoke vRO Workflow
.PARAMETER Server
    vRO Server to connect to
.PARAMETER ID
    vRO Workflow ID
.PARAMETER ItemHref
    vRO ItemHref
.PARAMETER ParameterName
    Supply a single parameter to the workflow
.PARAMETER ParameterValue
    Supply the value of the single parameter
.PARAMETER ParameterType
    Supply the type of the single parameter
.PARAMETER ParameterXML
    Supply workflow parameters via XML
.PARAMETER NoParameters
    Required when using ItemHref and supplying no parameters
.PARAMETER Credential
    PS Credential Object
.EXAMPLE
    $Credential = Get-Credential
    Invoke-vROWorkflow -Server vRO01 -ID`
     c0278910-9ae2-46c5-bb45-2292fe88e3ab -Credential $Credential `
.EXAMPLE
    $Credential = Get-Credential
    Invoke-vROWorkflow -ItemHref
     https://vRO01.sunnydale.local:8281/vco/api/workflows`
      /c0278910-9ae2-46c5-bb45-2292fe88e3ab/ -NoParameters -Credential `
      $Credential
.EXAMPLE
    Invoke-vROWorkflow -Server vRO01 -ID
     c0278910-9ae2-46c5-bb45-2292fe88e3ab -ParameterName 'text'`
     -ParameterValue 'Apple' -ParameterType 'String' -Credential `
     $Credential
.EXAMPLE
    $ParameterXML =
'<execution-context xmlns="http://www.vmware.com/vco">
    <parameters>
        <parameter type="string" name="text" scope="local">
            <string>Apple</string>
        </parameter>
        <parameter type="number" name="a" scope="local">
            <number>7</number>
        </parameter>
    </parameters>
</execution-context>'
    Invoke-vROWorkflow -Server vRO01 -ID
     c0278910-9ae2-46c5-bb45-2292fe88e3ab -ParameterXML $ParameterXML `
     -Credential $Credential
.EXAMPLE
    Get-vROWorkflow -Name 'Test-Workflow' -Server vRO01.sunnydale.local `
     -Credential $Credential | Select Server,ID | Invoke-vROWorkflow `
     -ParameterName a -ParameterValue 'Nature' -ParameterType String `
     -Credential $Credential
.EXAMPLE
    Get-vROWorkflow -Name 'Test-Workflow' -Server vRO01.sunnydale.local `
    -Credential $Credential | Select ItemHref | Invoke-vROWorkflow `
    -ParameterName a -ParameterValue 'Junior' -ParameterType String `
    -Credential $Credential
#>
[CmdletBinding(DefaultParametersetName="A")]`
[OutputType('System.Management.Automation.PSObject')]

    Param
    (

    [parameter(Mandatory=$true,ValueFromPipeline=$true,`
     ValueFromPipelinebyPropertyName=$true,ParameterSetName="A")]
    [parameter(ParameterSetName="B")]
    [ValidateNotNullOrEmpty()]
    [String]$Server,

    [parameter(Mandatory=$true,ValueFromPipelinebyPropertyName=$true,`
     ParameterSetName="A")]
    [parameter(ParameterSetName="B")]
    [ValidateNotNullOrEmpty()]
    [String]$ID,

    [parameter(Mandatory=$true,ValueFromPipelinebyPropertyName=$true,`
     ParameterSetName="C")]
    [parameter(ValueFromPipelinebyPropertyName=$true,ParameterSetName="D")]
    [parameter(ParameterSetName="E")]
    [ValidateNotNullOrEmpty()]
    [String]$ItemHref,

    [parameter(Mandatory=$false,ParameterSetName="A")]
    [parameter(ParameterSetName="C")]
    [ValidateNotNullOrEmpty()]
    [String]$ParameterName,

    [parameter(Mandatory=$false,ParameterSetName="A")]
    [parameter(ParameterSetName="C")]
    [String]$ParameterValue,

    [parameter(Mandatory=$false,ParameterSetName="A")]
    [parameter(ParameterSetName="C")]
    [ValidateNotNullOrEmpty()]
    [String]$ParameterType,

    [parameter(Mandatory=$false,ParameterSetName="B")]
    [parameter(ParameterSetName="D")]
    [ValidateNotNullOrEmpty()]
    [String]$ParameterXML,

    [parameter(Mandatory=$false,ParameterSetName="E")]
    [ValidateNotNullOrEmpty()]
    [Switch]$NoParameters,

    [parameter(Mandatory=$true)]
    [ValidateNotNullOrEmpty()]
    [PSCredential]$Credential
    )
    # --- Convert Credential Object to Username and Password

    $Username = $Credential.UserName
    $Password = $Credential.GetNetworkCredential().Password

    # --- Deal with certificate issues
    # --- Note: this code will disable certificate checking
    # --- for this PowerShell session
    if (-not ("TrustAllCertsPolicy" -as [type])){

    Add-Type @"
    using System.Net;
    using System.Security.Cryptography.X509Certificates;
    public class TrustAllCertsPolicy : ICertificatePolicy {
        public bool CheckValidationResult(
            ServicePoint srvPoint, X509Certificate certificate,
            WebRequest request, int certificateProblem) {
            return true;
        }
    }
"@
    }
    [System.Net.ServicePointManager]::CertificatePolicy = New-Object `
     TrustAllCertsPolicy

    # --- Create REST Headers
    $Auth = $Username + ':' + $Password
    $Encoded = [System.Text.Encoding]::UTF8.GetBytes($Auth)
    $EncodedPassword = [System.Convert]::ToBase64String($Encoded)
    $Headers = @{"Authorization"="Basic $($EncodedPassword)";}


     if ($PSBoundParameters.ContainsKey('ParameterType')){

          $ParameterType = $ParameterType.ToLower()
          $Body = @"
<execution-context xmlns="http://www.vmware.com/vco">
    <parameters>
        <parameter type="$($ParameterType)" name="$($ParameterName)" `
         scope="local">
            <$($ParameterType)>$($ParameterValue)</$($ParameterType)>
        </parameter>
    </parameters>
</execution-context>
"@
        }

    elseif ($PSBoundParameters.ContainsKey('ParameterXML')){

          $Body = $ParameterXML
        }

    else {

          $Body =
'<execution-context xmlns="http://www.vmware.com/vco">
    <parameters>

    </parameters>
</execution-context>'

     }

    if ($PSBoundParameters.ContainsKey('ItemHref')){

     $URI = "$($ItemHref)executions/"
    }
    else {

     $URI = "https://$($Server):8281/vco/api/workflows/$($ID)/executions/"
    }

    $InvokeRequest = Invoke-WebRequest -Method Post -Uri $URI -Headers `
     $Headers -Body $Body -ContentType "application/xml"

    $Object = [pscustomobject]@{

        StatusCode = $InvokeRequest.StatusCode
        StatusDescription = $InvokeRequest.StatusDescription
        Execution = $InvokeRequest.Headers.Location
    }

    Write-Output $Object
}
An example use case is shown in Listing 21-19. The Test-Output workflow contains two parameters text of type String and a of type Number, so we will use XML to supply the parameter information.
Listing 21-19: Using Invoke-vROWorkflow with ParameterXML
$Credential = Get-Credential
$ParameterXML =
'<execution-context xmlns="http://www.vmware.com/vco">
    <parameters>
        <parameter type="string" name="text" scope="local">
            <string>Apple</string>
        </parameter>
        <parameter type="number" name="a" scope="local">
            <number>7</number>
        </parameter>
    </parameters>
</execution-context>'
Invoke-vROWorkflow -Server vro01.sunnydale.local -ID `
 c0278910-9ae2-46c5-bb45-2292fe88e3ab -ParameterXML `
 $ParameterXML -Credential $Credential
The output would be similar to this:
StatusCode        : 202
StatusDescription : Accepted
Execution         : https://vro01.sunnydale.local:8281/vco/api/
 workflows/c0278910-9ae2-46c5-bb45-2292fe88e3ab/executions/
 402880244ae8e2a6014b0961089a0234/
Querying a Workflow State
Once a workflow has been invoked, it may take some time to complete. The Get-vROWorkflowExecutionState function in Listing 21-20 retrieves the state of a workflow by submitting the Execution State reference URL (the Execution output from Listing 21-19) plus the word state to make the following URL. This URL could be used as the value for the ExecutionStateRef parameter in the Get-vROWorkflowExecutionState function.
Listing 21-20: Get-vROWorkflowExecutionState
function Get-vROWorkflowExecutionState {
<#
.SYNOPSIS
    Get vRO Workflow Execution State
.DESCRIPTION
    Get vRO Workflow Execution State
.PARAMETER ExecutionStateRef
    vRO Workflow Execution Reference
.PARAMETER Credential
    PS Credential Object
.EXAMPLE
    $Credential = Get-Credential
    Get-vROWorkflowExecutionState -ExecutionStateRef `
    https://vRO01:8281/vco/api/workflows/`
    565b2c35-3607-4ab9-ace7-9102c1391808/executions/`
    402880244ae8e2a6014b045ea9290213 -Credential $Credential
#>
[CmdletBinding()][OutputType('System.Management.Automation.PSObject')]

    Param
    (

    [parameter(Mandatory=$true,ValueFromPipeline=$true,`
     ValueFromPipelinebyPropertyName=$true)]
    [ValidateNotNullOrEmpty()][Alias("Execution")]
    [String]$ExecutionStateRef,

    [parameter(Mandatory=$true)]
    [ValidateNotNullOrEmpty()]
    [PSCredential]$Credential
    )

begin {

    # --- Convert Credential Object to Username and Password

    $Username = $Credential.UserName
    $Password = $Credential.GetNetworkCredential().Password

    # --- Deal with certificate issues
    # --- Note: this code will disable certificate checking
    # --- for this PowerShell session
    if (-not ("TrustAllCertsPolicy" -as [type])){

    Add-Type @"
    using System.Net;
    using System.Security.Cryptography.X509Certificates;
    public class TrustAllCertsPolicy : ICertificatePolicy {
        public bool CheckValidationResult(
            ServicePoint srvPoint, X509Certificate certificate,
            WebRequest request, int certificateProblem) {
            return true;
        }
    }
"@
    }
    [System.Net.ServicePointManager]::CertificatePolicy = New-Object `
     TrustAllCertsPolicy

    # --- Create REST Headers
    $Auth = $Username + ':' + $Password
    $Encoded = [System.Text.Encoding]::UTF8.GetBytes($Auth)
    $EncodedPassword = [System.Convert]::ToBase64String($Encoded)
    $Headers = @{"Authorization"="Basic $($EncodedPassword)";}
}

process {

try {

    foreach ($Reference in $ExecutionStateRef){

    # --- Send REST call and process results

    $URI = $Reference + "state"
    $State = Invoke-WebRequest -Method Get -Uri $URI -Headers $Headers `
     -ContentType "application/xml"

    $Object = [pscustomobject]@{

        ExecutionStateRef = $Reference
        StatusCode = $State.StatusCode
        StatusDescription = $State.StatusDescription
        Execution = ($State.Content | ConvertFrom-Json).Value
    }

    Write-Output $Object
    }
}
catch [Exception]{

    throw "Unable to get vRO Workflow Execution State"
}
}

end {

}
}
An example use case is shown in Listing 21-21. In this example, we query the state of the workflow executed in Listing 21-19.
Listing 21-21: Using Get-vROWorkflowExecutionState
$Credential = Get-Credential
Get-vROWorkflowExecutionState `
 -ExecutionStateRef https://vro01.sunnydale.local:8281/vco/api/`
 workflows/c0278910-9ae2-46c5-bb45-2292fe88e3ab/executions/`
 402880244ae8e2a6014b0961089a0234/state -Credential $Credential
The output would be similar to the following:
ExecutionStateRef : https://vro01.sunnydale.local:8281/vco/api/`
workflows/c0278910-9ae2-46c5-bb45-2292fe88e3ab/executions/`
402880244ae8e2a6014b0961089a0234
StatusCode        : 200
StatusDescription : OK
Execution         : completed
Retrieving Workflow Output
Once a workflow has completed, it is useful to retrieve the output (if there is any). The Get-vROWorkflowExecutionResult function in Listing 21-22 retrieves the output of a workflow by submitting the Execution reference.
Listing 21-22: Get-vROWorkflowExecutionResult
function Get-vROWorkflowExecutionResult {
<#
.SYNOPSIS
    Get vRO Workflow Execution Result
.DESCRIPTION
    Get vRO Workflow Execution Result
.NOTES
    Source:  Automating vSphere Administration
    Authors: Luc Dekens, Arnim van Lieshout, Jonathan Medd,
                Alan Renouf, Glenn Sizemore, Brian Graf,
                Andrew Sullivan
.PARAMETER ExecutionRef
    vRO Workflow Execution Reference
.PARAMETER Credential
    PS Credential Object
.EXAMPLE
    $Credential = Get-Credential
    Get-vROWorkflowExecutionResult -ExecutionRef https://vRO01:8281/vco/`
    api/workflows/565b2c35-3607-4ab9-ace7-9102c1391808/executions/`
    402880244ae8e2a6014b045ea9290213 -Credential $Credential
#>
[CmdletBinding()][OutputType('System.Management.Automation.PSObject')]

    Param
    (

    [parameter(Mandatory=$true,ValueFromPipeline=$true,`
     ValueFromPipelinebyPropertyName=$true)]
    [ValidateNotNullOrEmpty()][Alias("Execution")]
    [String]$ExecutionRef,

    [parameter(Mandatory=$true)]
    [ValidateNotNullOrEmpty()]
    [PSCredential]$Credential
    )

begin {

    # --- Convert Credential Object to Username and Password

    $Username = $Credential.UserName
    $Password = $Credential.GetNetworkCredential().Password

    # --- Deal with certificate issues
    # --- Note: this code will disable certificate checking
    # --- for this PowerShell session
    if (-not ("TrustAllCertsPolicy" -as [type])){

    Add-Type @"
    using System.Net;
    using System.Security.Cryptography.X509Certificates;
    public class TrustAllCertsPolicy : ICertificatePolicy {
        public bool CheckValidationResult(
            ServicePoint srvPoint, X509Certificate certificate,
            WebRequest request, int certificateProblem) {
            return true;
        }
    }
"@
    }
    [System.Net.ServicePointManager]::CertificatePolicy = New-Object `
     TrustAllCertsPolicy

    # --- Create REST Headers
    $Auth = $Username + ':' + $Password
    $Encoded = [System.Text.Encoding]::UTF8.GetBytes($Auth)
    $EncodedPassword = [System.Convert]::ToBase64String($Encoded)
    $Headers = @{"Authorization"="Basic $($EncodedPassword)";}
}

process {

try {

    foreach ($Reference in $ExecutionRef){

    # --- Send REST call and process results

    $URI = $Reference
    $Result = Invoke-WebRequest -Method Get -Uri $URI -Headers $Headers `
    -ContentType "application/xml"
    $Json = $Result.Content | ConvertFrom-Json

    foreach ($OutputParameter in $JSON.'output-parameters'){

        $Type = $OutputParameter.type
        $Object = [pscustomobject]@{

            ExecutionRef = $Reference
            Name = $OutputParameter.name
            Scope = $OutputParameter.scope
            Type = $Type
            Value = $OutputParameter.value.$Type.value
        }

        Write-Output $Object
    }
    }
}
catch [Exception]{

    throw "Unable to get vRO Workflow Execution Result"
}
}

end {

}
}An example use case is shown in Listing 21-23. Here we query the result of the workflow executed in Listing 21-19.
Listing 21-23: Using Get-vROWorkflowExecutionResult
$Credential = Get-Credential
Get-vROWorkflowExecutionResult `
-ExecutionRef https://vro01.sunnydale.local:8281/vco/api/`
workflows/c0278910-9ae2-46c5-bb45-2292fe88e3ab/executions/`
402880244ae8e2a6014b0961089a0234 -Credential $Credential
The output would be similar to this:
ExecutionRef : https://vro01.sunnydale.local:8281/vco/api/`
workflows/c0278910-9ae2-46c5-bb45-2292fe88e3ab/executions/`
402880244ae8e2a6014b0961089a0234
Name         : result
Scope        : local
Type         : string
Value        : This is an Apple

ExecutionRef : https://vro01.sunnydale.local:8281/vco/api/`
workflows/c0278910-9ae2-46c5-bb45-2292fe88e3ab/executions/`
402880244ae8e2a6014b0961089a0234
Name         : b
Scope        : local
Type         : number
Value        : 700.0
Querying Workflow Executions
Now that we know how to obtain both workflow state and output, it may well be useful to obtain all executions for a given workflow so that state and output can be easily obtained for any execution. Listing 21-24 retrieves all executions for a given named workflow.
Listing 21-24: Get-vROWorkflowExecution
function Get-vROWorkflowExecution {
<#
.SYNOPSIS
    Get vRO Workflow Executions
.DESCRIPTION
    Get vRO Workflow Executions
.PARAMETER Name
    Retrieve workflow by name
.PARAMETER Server
    vRO Server to connect to
.PARAMETER Credential
    PS Credential Object
.EXAMPLE
    Get-vROWorkflowExecution -Name 'New-DRSRule' -Server vRO01 `
    -Credential $Credential
#>
[CmdletBinding()][OutputType('System.Management.Automation.PSObject')]

    Param
    (

    [parameter(Mandatory=$true,ValueFromPipeline=$true,`
     ValueFromPipelinebyPropertyName=$true)]
    [String]$Name,

    [parameter(Mandatory=$true)]
    [ValidateNotNullOrEmpty()]
    [String]$Server,

    [parameter(Mandatory=$true)]
    [ValidateNotNullOrEmpty()]
    [PSCredential]$Credential
    )

begin {

    # --- Convert Credential Object to Username and Password

    $Username = $Credential.UserName
    $Password = $Credential.GetNetworkCredential().Password

    # --- Deal with certificate issues
    # --- Note: this code will disable certificate checking
    # --- for this PowerShell session
    if (-not ("TrustAllCertsPolicy" -as [type])){

    Add-Type @"
    using System.Net;
    using System.Security.Cryptography.X509Certificates;
    public class TrustAllCertsPolicy : ICertificatePolicy {
        public bool CheckValidationResult(
            ServicePoint srvPoint, X509Certificate certificate,
            WebRequest request, int certificateProblem) {
            return true;
        }
    }
"@
    }
    [System.Net.ServicePointManager]::CertificatePolicy = New-Object `
     TrustAllCertsPolicy

    # --- Create REST Headers
    $Auth = $Username + ':' + $Password
    $Encoded = [System.Text.Encoding]::UTF8.GetBytes($Auth)
    $EncodedPassword = [System.Convert]::ToBase64String($Encoded)
    $Headers = @{"Authorization"="Basic $($EncodedPassword)";}
}

process {

try {

    # --- Send REST call and process results

    $URI = "https://$($Server):8281/vco/api/workflows/?conditions=name=`
     $($Name)"
    $Workflow = Invoke-RestMethod -Method Get -Uri $URI -Headers $Headers`
     -ContentType "application/xml"
    $ItemHref = ($Workflow.link.attributes | Where-Object `
     {$_.name -eq 'itemHref'}).value

    $ExecutionURI = $ItemHref + "executions/"
    $Executions = Invoke-RestMethod -Method Get -Uri $ExecutionURI `
     -Headers $Headers -ContentType "application/xml"
    $Data = $Executions.relations.link | Where-Object {$_.attributes}

    foreach ($Execution in $Data){

    $Object = [pscustomobject]@{

        Name = ($Execution.attributes | Where-Object `
        {$_.name -eq 'name'}).value
        ID = ($Execution.attributes | Where-Object `
        {$_.name -eq 'id'}).value
        Execution = "$ExecutionURI$(($Execution.attributes |
         Where-Object {$_.name -eq 'id'}).value)/"
        State = ($Execution.attributes | Where-Object `
        {$_.name -eq 'state'}).value
        StartedBy = ($Execution.attributes | Where-Object `
        {$_.name -eq 'startedBy'}).value
        StartDate = ($Execution.attributes | Where-Object `
        {$_.name -eq 'StartDate'}).value
        EndDate = ($Execution.attributes | Where-Object `
        {$_.name -eq 'EndDate'}).value
    }

    Write-Output $Object
    }
}
catch [Exception]{

    throw "Unable to get vRO Workflows"
}
}

end {

}
}
An example use case is shown in Listing 21-25. Here we return all executions of the workflow Test-Workflow.
Listing 21-25: Using Get-vROWorkflowExecution
Get-vROWorkflowExecution -Name 'Test-Workflow' -Server `
 vRO01.sunnydale.local -Credential $Credential
The output would be similar to the following:
Name      : Test-Workflow
ID        : 402880244cdb38bf014cdc76cd0d003c
Execution : https://vco01.sunnydale.local:8281/vco/api/workflows/cd2fc1d8`
 -1e34-4504-9de4-3bbee0f1ea84/executions/402880244cdb38bf014cdc76cd0d003c/
State     : completed
StartedBy : jmedd
StartDate : 2015-04-21T15:51:55.533+01:00
EndDate   : 2015-04-21T15:51:55.752+01:00

Name      : Test-Workflow
ID        : 402880244cdb38bf014cdc7b4d960041
Execution : https://vco01.sunnydale.local:8281/vco/api/workflows/cd2fc1d8`
 -1e34-4504-9de4-3bbee0f1ea84/executions/402880244cdb38bf014cdc7b4d960041/
State     : completed
StartedBy : jmedd
StartDate : 2015-04-21T15:56:50.582+01:00
EndDate   : 2015-04-21T15:56:50.895+01:00

Name      : Test-Workflow
ID        : 402880244cdb38bf014cdc8248c10053
Execution : https://vco01.sunnydale.local:8281/vco/api/workflows/cd2fc1d8`
 -1e34-4504-9de4-3bbee0f1ea84/executions/402880244cdb38bf014cdc7b4d960041/
State     : completed
StartedBy : jmedd
StartDate : 2015-04-21T16:04:28.097+01:00
EndDate   : 2015-04-21T16:04:28.238+01:00