
4
Single‐Storey Frames, Shells and Lightweight Coverings
This chapter describes the construction of single storey buildings such as sheds, warehouses, factories, lightweight mast and fabric structures, and other buildings, generally built on one floor and constructed with a structural frame of steel, reinforced (prefabricated) concrete or timber, supporting lightweight roof and wall coverings (see also Chapters 5–8). A large proportion of the buildings in this category are constructed to serve a very specific purpose for a relatively short period of time, after which the market and hence the required performance of the building will have changed. It is not uncommon for sheds and warehouses to have a specified design life of between 15 and 30 years. After this time, the building will be deconstructed and materials recovered, reused and recycled. Alternatively (and less likely), considerable works of repair and renewal are required to maintain minimum standards of comfort and appearance. As a consequence, the materials used are selected primarily for economy of initial cost, tend to have limited durability and are often prone to damage in use.
In traditional building forms, one material could serve several functional requirements; for example, a solid loadbearing brick wall provides strength, stability, exclusion of wind and rain, resistance to fire, and to a small extent thermal and sound insulation. In contrast the materials used in the construction of lightweight structures are, in the main, selected to perform specific functions. For example, steel sheeting is used as a weather envelope and to support imposed loads, layers of insulation for thermal and sound resistance, thin plastic sheets for daylight, and a slender frame to support the envelope and imposed loads. The inclusion of one material for a specific purpose is likely to have a significant impact on the performance of adjacent materials; thus the designer needs to look at the performance of individual materials and the performance of the whole assembly.
4.1 Lattice truss, beam, portal frame and flat roof structures
To reduce the volume of roof space that has to be heated and also to reduce the visual impact of the roof area, it is common practice to construct single storey buildings with low‐pitch roof frames, either as portal frames or as lattice beam or rafter frames (Figure 4.1). The pitch may be as low as 2.5°. Alternatively, flat roof structures may be used.
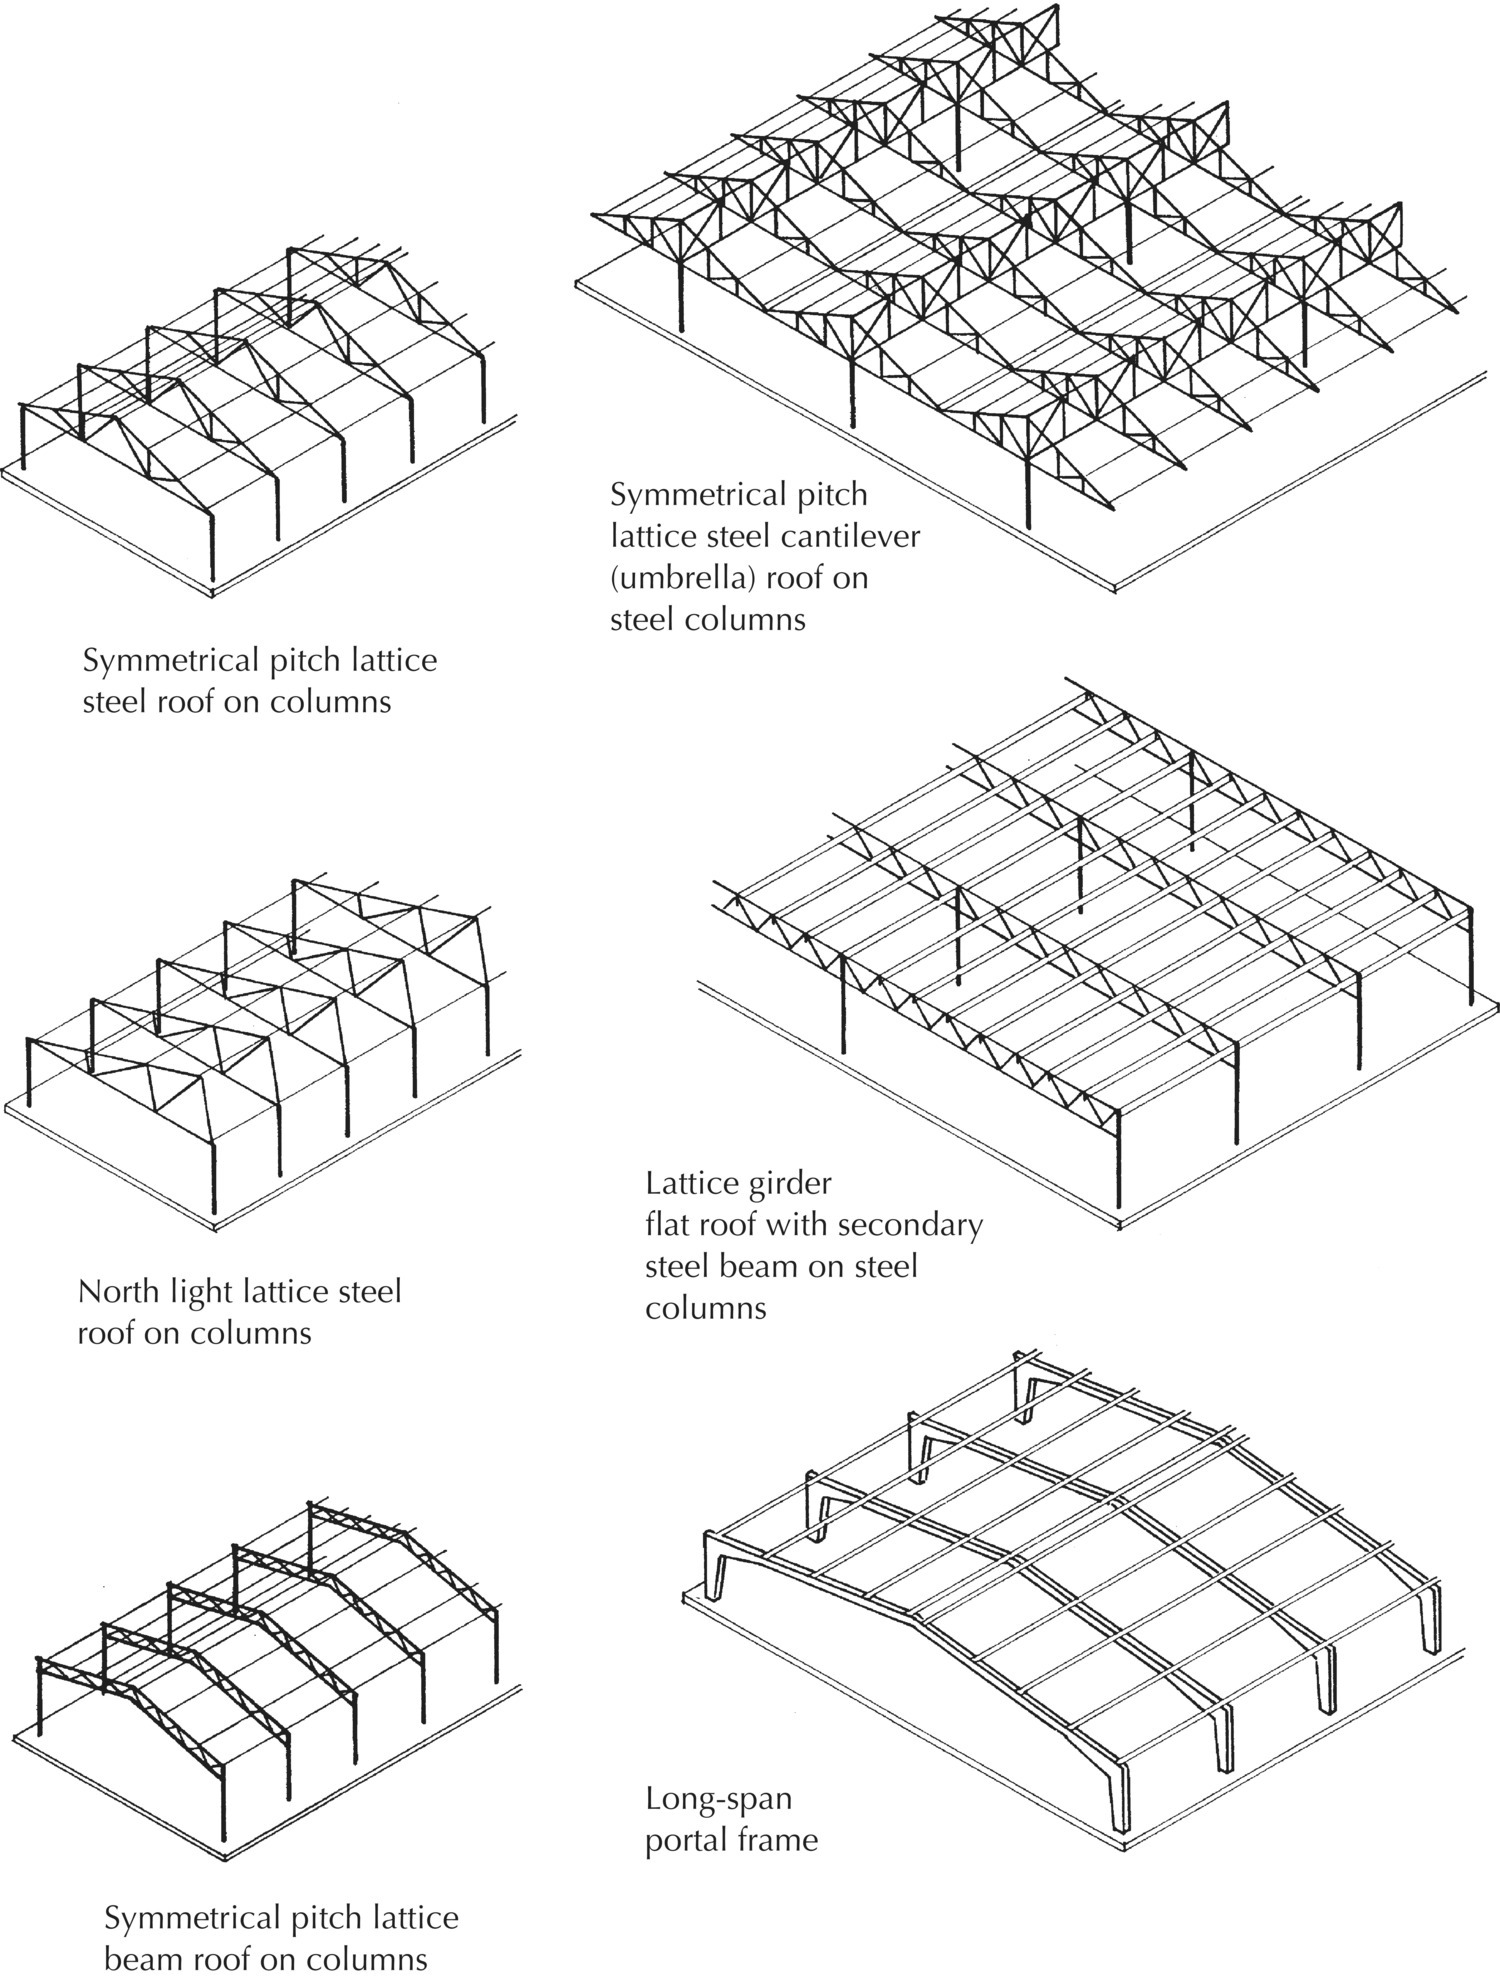
Figure 4.1 Typical lattice and portal frame construction.
Functional requirements
The primary functional requirements of single storey framed structures are:
- Strength and stability
- Durability and freedom from maintenance
- Fire safety
Strength and stability
The strength of a structural frame depends on the strength of the material used in the fabrication of the members of the frame and also on the stability of the frame, which is dictated both by the way in which the members are connected and on the bracing across and between the frames. Steel is most used in framed structures because of its good compressive and tensile strength, and good strength‐to‐weight ratio. Hot rolled steel and cold‐formed strip steel provide a wide range of sections suited to the economical fabrication of structural frames. These sections are also relatively easy to recover and reuse at the end of the building’s life. Concrete has good compressive strength but poor tensile strength and so it is used as reinforced concrete in structural frames to benefit from the tensile strength of the steel and the compressive strength of the concrete. The concrete also provides protection against corrosion and damage by fire to the steel. Timber is often used in the fabrication of roof frames because it has adequate tensile and compressive strength to support the comparatively light loads. Timber tends to be used instead of steel to form lightweight roof frames because of its ease of handling and fixing.
Durability and freedom from maintenance
On exposure to air and moisture, unprotected steel corrodes to form an oxide coating, such as rust, which is permeable to moisture and thus encourages progressive corrosion, which may in time adversely affect the strength of the material. To inhibit rust, steel is painted, coated with zinc or encased in concrete. Painted surfaces will require periodic repainting. Any cutting and drilling operations will damage zinc or painted coatings. Reinforced concrete is highly durable and the surface will need little maintenance other than periodic cleaning. Seasoned, stress‐graded timber treated against fungal and insect attack should require little maintenance during its useful life, other than periodic staining or painting.
Fire safety
All loadbearing structures (including roofs) should be designed so that they do not fail prematurely during a fire. Providing the structure with the necessary fire resistance helps to reduce the risk posed by falling debris to building users, pedestrians and fire fighters.
Elements of the structure that give support or stability to another element of the building must have no less fire resistance than the other supporting elements. Similarly, if a roof provides stability and support to columns, then the roof must have at least the same fire resistance as the columns. All roofs should have sufficient fire resistance to resist exposure from the underside of the roof, remaining sound for a minimum of 30 minutes. The same provision also applies to roofs that form part of a fire escape. Where the roof performs the function of a floor, the minimum period of fire resistance is dependent on the purpose of the building and the height of the building (Table 4.1). If the building is constructed with a basement, this will also have an impact on the required fire resistance.
Table 4.1 Typical fire resistance periods for roofs that form floors
| Minimum period of fire resistance (minutes) | ||||
| Upper storey height (height in metres above ground) | ||||
| Purpose of building | Not more than 5 m | Not more than 18 m | Not more than 30 m | More than 30 m |
| Residential | ||||
| Flats and maisonettes | 30 | 60 | 90 | 129 |
| Office | ||||
| Not sprinklered | 30 | 60 | 90 | Not permitted |
| Sprinklered | 30 | 30 | 60 | 120 |
| Shop and commercial | ||||
| Not sprinklered | 60 | 60 | 90 | Not permitted |
| Sprinklered | 30 | 60 | 60 | 120 |
| Assembly and recreation | ||||
| Not sprinklered | 60 | 60 | 90 | Not permitted |
| Sprinklered | 30 | 60 | 60 | 120 |
| Industrial | ||||
| Not sprinklered | 60 | 90 | 120 | Not permitted |
| Sprinklered | 30 | 60 | 60 | 120 |
Lattice truss roof construction
‘Lattice’ is a term used to describe an open grid of slender members fixed across or between each other, usually in a regular pattern of cross‐diagonals or as a rectilinear grid. ‘Truss’ is used to define the action of a triangular roof framework, where the spread under load of sloping rafters is resisted by the horizontal tie member that is secured to the feet of the rafters (which trusses or ties them against spreading) (Figures 4.2 and 4.3, Photographs 4.1 to 4.3).

Figure 4.2 Truss types.

Figure 4.3 Truss components.

Photograph 4.1 Bowstring truss.


Photograph 4.3 (a) Bowstring truss across airport. (b) Bowstring truss against external wall place alongside.
Symmetrical pitch steel lattice truss construction
The single‐bay frame illustrated in Figure 4.4 is a relatively economic structure. The small section, mild steel members of the truss can be cut and drilled with simple tools, assembled with bolted connections and speedily erected without the need for heavy lifting equipment. Similarly the structure can be readily dismantled and reused or recycled when no longer required.

Figure 4.4 Single‐bay symmetrical pitch lattice steel roof on steel columns.
The small section, steel angle members of the truss are bolted to columns and purlins, and sheeting rails are bolted to cleats to support roof and side wall sheeting. These frames can be fabricated off site and quickly erected on comparatively slender mild steel I‐section columns fixed to concrete pad foundations. The bolted, fixed base connection of the foot of the columns to the concrete foundation provides sufficient strength and stability against wind pressure on the side walls and roof. Wind bracing provides stability against wind pressure on the end walls and gable ends of the roof.
The depth of the roof frames at mid‐span provides adequate strength in supporting dead and imposed loads, as well as rigidity to minimise deflection under load. For maximum structural efficiency, the pitch of the rafters of the frames should be not less than 17° to the horizontal. This large volume of roof space cannot be used for anything other than housing services such as lighting and heating, and where the activity enclosed by the building needs to be heated, it makes for an uneconomical solution. Trusses are usually spaced between 3 and 5 m apart (for economy in the use of small section purlins and sheeting rails) and are often limited to spans of approximately 12 m. Larger trusses can be fabricated to provide large clear spans.
Rooflights are commonly used to provide reasonable penetration of daylight to the interior of the building, as illustrated in Figure 4.5. The thin sheets of profiled steel sheets used to clad the walls have poor resistance to accidental damage and vandalism. As an alternative to steel columns and cladding, loadbearing brick walls may be used for single‐bay buildings to provide support for the roof frames. The masonry walls provide better durability to accidental damage and vandalism. The roof frames are positioned on brick piers, which provide additional stiffness to the wall and transfer the loads of the roof to the foundations, as shown in Figure 4.6. As an alternative, a low brick upstand wall may be constructed to a height of around 1500 mm as protection against accidental impact damage, with wall sheeting above.

Figure 4.5 Single‐bay symmetrical pitch lattice steel roof on columns with corrugated sheeting.

Figure 4.6 Single‐bay symmetrical pitch lattice steel roof on brick side walls.
North light steel lattice truss construction
The north light roof has an asymmetrical profile with the south‐facing slope pitched at 17° or more to the horizontal and the north‐facing slope at around 60°, as illustrated in Figures 4.7 and 4.8. To limit the volume of unusable roof space (that has to be heated), most north light roofs are limited to spans of up to about 10 m.

Figure 4.7 Single‐bay north light lattice steel roof trusses on steel columns.

Figure 4.8 Single‐bay lattice steel north light roof on columns with corrugated sheeting.
Multi‐bay lattice steel roof truss construction
To cover large areas, it is common practice to use two or more bays of symmetrical pitch roofs to both limit the volume of roof space and the length of the members of the trusses.
To avoid the use of closely spaced internal columns (which may obstruct the working floor area) to support roof trusses, a valley beam is used. The valley beam supports the roof trusses between the internal columns, as illustrated in Figure 4.9. The greater the clear span between internal columns, the greater the depth of the valley beam and the greater the volume of unused roof space, as illustrated in Figure 4.10.

Figure 4.9 Two‐bay symmetrical pitch lattice steel roof and columns with valley beam.

Figure 4.10 Increased volume of unused roof space with widely spaced internal columns.
Cantilever (umbrella) multi‐bay lattice steel truss roof
Figure 4.11 shows a cantilever (or umbrella) roof with lattice steel girders constructed inside the depth of each bay of trusses at mid‐span. The lattice girder supports half of each truss with each half cantilevered each side of the truss.

Figure 4.11 Two‐bay symmetrical pitch lattice steel cantilever (umbrella) roof.
Lattice steel truss construction
Lattice steel trusses are often fabricated from one standard steel angle section with two angles positioned back to back for the rafters and main tie, and a similar angle for the internal struts and ties, as illustrated in Figure 4.12. The usual method of joining the members of a steel truss is with steel gusset plates, which are cut to shape to contain the required number of bolts at each connection. The flat gusset plates are fixed between the two angle sections of the rafters and main tie and to the intermediate ties and struts. Bearing plates fixed to the foot of each truss provide a fixing to the columns. The members of the truss are bolted together through the gusset plates.

Figure 4.12 Lattice steel truss construction.
Standard I‐section steel columns are used to support the roof trusses. A steel base plate is welded or fixed with bolted connections, with gusset plates and angle cleats, to the base of the columns. The column base plate is levelled with steel packing plates and then grouted in position with non‐shrinkable cement. The base plate rests on the concrete pad foundation, to which it is rigidly fixed with four holding‐down bolts, cast or set into the foundation, as illustrated in Figure 4.13. The rigid fixing of the columns to the foundation bases provides stability to the columns, which act as vertical cantilevers in resisting lateral wind pressure on the side walls and the roof of the building. A cap is welded or fixed with bolted connections to the top of each column and the bearing plates of truss ends are bolted to the cap plate (Figure 4.14).

Figure 4.13 Cap and base of steel column support for lattice steel truss (3D view).

Figure 4.14 Cap and base of steel column support for lattice steel truss.
Lattice trusses can be fabricated from tubular steel sections that are cut, mitred and welded together, as illustrated in Figure 4.15. Because of the labour involved in the cutting and welding of the members, they tend to be more expensive than a similar sized angle section truss; however, they have greater structural efficiency and are visually more attractive. The truss illustrated in Figure 4.15 has a raised tie, which affords some increase in working height below the raised part of the tie.

Figure 4.15 Raised tie tubular steel lattice truss.
Steel lattice beam roof construction
The two structural forms best suited to the use of deep profiled steel roof sheeting are lattice beam and portal frame. The simplest form of lattice beam roof is a single‐bay symmetrical pitch roof constructed as a cranked lattice beam or rafter.
Symmetrical pitch lattice steel beam roof construction
The uniform depth lattice beam is cranked to form a symmetrical pitch roof with slopes of between 5° and 10°, as illustrated in Figure 4.16. Because of the low pitch of the roof, there is little unused roof space and this form of construction is preferred to lattice truss construction where the space is to be heated. The beams are fabricated from tubular and hollow rectangular section steel, which is cut and welded together with bolted site connections at mid‐span to facilitate the transportation of half‐lengths to the site. The top and bottom chords of the beams are usually of hollow rectangular section for ease of fabrication. End plates, welded to the lattice beams, are bolted to the flanges of I‐section columns. Service pipes and small ducts may be run through the lattice frames, and larger ducts suspended below the beams inside the roof space.

Figure 4.16 Single‐bay symmetrical pitch lattice beam and column frame.
Multi‐bay symmetrical pitch lattice steel beam roof construction
For multi‐bay symmetrical pitch lattice beam roofs, it is usual to fabricate a form of valley beam roof, as illustrated in Figure 4.17. The valley beam is designed to be the same depth as the beams to prevent any increase in the unwanted volume of roof space. To provide the maximum free floor space, a form of butterfly roof with deep valley beams is used, as illustrated in Figure 4.18. The deeper the valley beams, the greater the spacing between internal columns and the greater the unused roof space.

Figure 4.17 Two‐bay lattice beam roof on steel columns.

Figure 4.18 Two‐bay lattice steel butterfly roof.
Steel portal frames
Rigid portal frames are an economic alternative to lattice truss and lattice beam roofs, especially for single‐bay buildings. To be effective, a pitched roof portal frame should have as low a pitch as practical to minimise spread at the knee of the portal frame (spread increases with the pitch of the rafters of a portal frame). The knee is the rigid connection of the rafter to the post of the portal. Portal frames with a span of up to 15 m are defined as short span, frames with a span of between 16 and 35 m as medium span, and frames with a span of 36–60 m as long span. Because of the considerable clear spans afforded by the portal frame, there is little advantage in using multi‐bay steel portal systems, where the long‐span frame would be sufficient. For short‐ and medium‐span frames, the apex or ridge, where the rafters join, is usually made as an on‐site, rigid bolted connection for convenience in transporting half portal frames to the site. Long‐span portal frames may have a pin joint connection at the ridge to allow some flexure between the rafters of the frame, which are pin jointed to the foundation bases.
For economy, short‐ and medium‐span steel portal frames are often fabricated from one mild steel I‐section for both rafters and posts, with the rafters welded to the posts without any increase in depth at the knee, as shown in Figure 4.19. Short‐span portal frames may be fabricated off site as one frame, transported to site and craned into position. Larger‐span portals are assembled on site with bolted connections of the rafters at the ridge with high‐strength friction grip (hsfg) bolts (see Chapter 5) (Figure 4.20).

Figure 4.19 Short‐span steel portal frame.

Figure 4.20 Long‐span steel portal frame.
Many medium‐ and long‐span steel portal frames have the connection of the rafters to the posts haunched at the knee to make the connection deeper and hence stiffer, as illustrated in Figure 4.21. The haunched connection of the rafters to the posts can be fabricated either by welding a cut I‐section to the underside of the rafter (as illustrated in Figure 4.21) or by cutting and bending the bottom flange of the rafter and welding in a steel gusset plate.

Figure 4.21 Haunch to steel portal frame.
In long‐span steel portal frames, the posts and lowest length of rafters, towards the knee, may often be fabricated from cut and welded I‐sections so that the post‐section and part of the rafter is wider at the knee than at the base and ridge of the rafter (Figures 4.22 and 4.23).

Figure 4.22 Portal bays simply added together to increase the length of the building.

Figure 4.23 Long‐span steel portal frames.
The junction of the rafters at the ridge is often stiffened by welding cut I‐sections to the underside of the rafters at the bolted site connection, as shown in Figure 4.24.

Figure 4.24 Stiffening at ridge of steel portal frame.
Steel portal frames may be fixed or pinned to bases to foundations. For short‐span portal frames, where there is relatively little spread at the knee or haunch, a fixed base is often used. The steel plate, which is welded through gusset plates to the post of the portal frame, is set level on a bed of cement grout on the concrete pad foundation and is secured by four holding‐down bolts, which are set or cast into the concrete foundation (illustrated in Figure 4.25). A pinned base is made by positioning the portal base plate on a small steel packing piece onto a separate base plate, which bears on the concrete foundation. Two anchor bolts, either cast or set into the concrete pad foundation, act as holding‐down bolts to the foot of the portal frame, as illustrated in Figure 4.26. The packing between the plates allows some flexure of the portal post independent of the foundation.

Figure 4.25 Fixed base to steel portal frame.

Figure 4.26 Pinned base to steel portal frame.
Short‐span portal frames are usually spaced between 3 and 5 m apart and medium‐span frames at between 4 and 8 m apart, to suit the use of angle or cold‐formed purlins and sheeting rails. Long‐span portals are usually spaced at between 8 and 12 m apart to economise on the number of comparatively expensive frames. Channel, Zed, I‐section or lattice purlins and sheeting rails support roof sheeting or decking and wall cladding. With flat and low‐pitch portal frames, it is difficult to achieve a watertight system of roof glazing; therefore, a system of monitor lights is sometimes used. These lights are formed by welded, cranked I‐section steel purlins fixed across the portal frames (Figure 4.27). The monitor lights finish short of the eaves to avoid any unnecessary complications, and can be constructed to provide natural and controlled ventilation to the interior.

Figure 4.27 Solid web steel portal frame with monitor rooflights.
Wind bracing
The side wall columns (stanchions) and their fixed bases that support the roof frames are designed to act as vertical cantilevers to carry the loads in bending and shear that act on them from horizontal wind pressure on the roofing and cladding. The rigid knee joint between rafter and post will carry the loads from horizontal wind pressure on roof and side wall cladding. Where internal columns are comparatively widely spaced, it is usually necessary to use a system of eaves bracing to assist in the distribution of horizontal loads. The system of eaves bracing shown in Figure 4.28 consists of steel sections fixed between the tie or bottom chord of roof frames and columns. To transfer the loads from wind pressure on the gable ends, a system of horizontal gable girders is formed at tie or bottom chord level.

Figure 4.28 Wind bracing to steel truss roof on steel columns.
Structural bracing and wind bracing
Additional bracing is used to assist in setting out the building, to stabilise the roof frames, square up the ends of the building and offer additional resistance to the wind. The rafter bracing between the end frames, illustrated in Figure 4.28, helps to stabilise the rafters of the roof frames. Longitudinal ties between roof frames stabilise the frames against probable uplift due to wind pressure. The vertical bracing in adjacent wall frames at gable end corners hold the building square and serve as bracing against wind pressure on the gable ends of the building (Photograph 4.4).

Photograph 4.4 Wind bracing fixed to portal frame.
(Source: courtesy of G. Throup).
Purlins and sheeting rails
Purlins are fixed across rafters and sheeting rails across the columns to provide support and fixing for roof and wall cladding and insulation (Figures 4.29 and 4.30). The spacing and size of the purlins and the sheeting rails are determined by the type of roof and wall cladding used. As a general rule, the deeper the profile of the sheeting, the greater its safe span and the further apart the purlins and sheeting rails may be fixed.

Figure 4.29 Gable end framing.

Figure 4.30 Connection of purlin to truss and sheeting rails to columns.
Mild steel angles and purlin rails are sometimes used, but these tend to have been replaced by a range of standard sections, purlins and rails in galvanised, cold‐formed steel strip. The sections most used are Zed and Sigma (Figure 4.31), with more complex sections with stiffening ribs also produced. These thin section purlins and rails help to facilitate direct fixing of the sheeting by self‐tapping screws.

Figure 4.31 Steel section purlin and sheeting rails to support sheet metal and composite sheeting.
Purlins and sheeting rails are fixed to structural supports with cleats, washer plates and sleeves, as illustrated in Figure 4.32. Anti‐sag bars are fixed between cold‐formed purlins to stop them twisting during the fixing of roof sheeting and to provide lateral restraint to the bottom flange against uplift due to wind pressure. The purlins also derive a large degree of stiffness from the sheeting. Anti‐sag bars and apex ties are made from galvanised steel rod that is either hooked or bolted between purlins, as illustrated in Figure 4.33. The apex ties provide continuity over the ridge. For the system to be effective, there must also be some form of stiffening brace or strut at the eaves.

Figure 4.32 Washer plates and sleeves for continuity over supports.

Figure 4.33 Anti‐sag bars to Zed purlins.
The secret fixing for standing seam roof sheeting for low‐pitch roofs does not provide lateral restraint for cold‐formed purlins; thus it is necessary to use a system of braces between purlins. The braces are manufactured from galvanised steel sections and bolted between purlins with purpose‐made apex braces, as illustrated in Figure 4.34.

Figure 4.34 Purlin braces.
To support the wall sheeting (cladding), sheeting rails are fixed across, or between, the steel columns and/or vertical frame members (Figures 4.31 and 4.32). Zed or Sigma section rails are bolted to cleats and then bolted to the structural frame. A system of side rail struts is fixed between rails to provide strength and stability against the weight of the sheeting. The side rails are fabricated from lengths of galvanised mild steel angle, with a fixing plate welded to each end, thus enabling the rails to be bolted to the sheeting rails (Photograph 4.5). A system of tie wires is also used to provide additional restraint, as shown in Figure 4.35.

Photograph 4.5 Sheeting rails.
(Source: courtesy of G. Throup).

Figure 4.35 Struts and ties to side wall rails.
Timber provides an alternative material for short‐ and medium‐span purlins between structural frame members. The ease of cutting and simplicity of fixing make treated timber a convenient and economic alternative to steel.
Precast reinforced concrete portal frames
Following the end of the Second World War (1945), there was a shortage of steel, which led to the widespread use of reinforced concrete portal frames for single storey structures, such as agricultural sheds, storage and factory buildings. A limited range of standard frames is cast in standard moulds under factory conditions. The comparatively small spans, limited sizes and bulky nature of the frames resulted in this method being used much less than steel. The advantages of concrete are its good fire resistance and relative freedom from maintenance.
For convenience of casting, transportation and erection on site, precast reinforced concrete portal frames are usually cast in two or more sections, which are bolted together on site at the point of contraflexure in the rafters and/or at the junction of post and rafter (Figure 4.36). The portal frames are typically spaced between 4.5 and 6 m apart to support precast reinforced concrete purlin and sheeting rails. Alternatively, timber or cold‐formed steel Zed purlins and sheeting rails may be used. The bases of the concrete portals are placed in mortices cast in concrete foundations and grouted in position. Alternatively, base plates can be used in the same way that they are used in steel portal frames. The base plate is welded to the reinforcement and cast into the foot of the concrete frame at the same time as the rest of the precast frame. The clear span for standard single‐bay structures may be up to 24 m, as shown in Figure 4.36.

Figure 4.36 Single‐bay symmetrical pitch portal frames.
Figure 4.37 is an illustration of a two‐bay symmetrical pitch concrete portal frame. In this example, the rafter is bolted to the post at the point of contraflexure. The internal posts are shaped to accommodate a precast reinforced concrete valley gutter, which is bolted to the rafters and laid to a fall. The concrete purlins are fixed by loops protruding from their ends, which fit over studs cast in the rafters, as shown in Figure 4.38.

Figure 4.37 Two‐bay symmetrical pitch reinforced concrete portal frame.

Figure 4.38 Connection of concrete purlins to concrete portal frame.
Timber portal frames
In the middle of the 20th century, the technique of gluing timber laminae improved dramatically with the development of powerful, waterproof, synthetic resin adhesives. Later improvements in the technique of selecting wood of uniform properties and gluing laminations together under stringent quality control led to the development of factories capable of producing laminated timber sections suitable for use in buildings, in lieu of steel and reinforced concrete for all but the more heavily loaded structural elements.
Glue laminated timber (Glulam)
‘Glulam’ is the generic name that has been adopted for the product of a system of making members such as beams and roof frames from laminae of natural wood glued together to form longer lengths and shapes than is possible with natural wood by itself. Glulam is defined as a structural member made from four or more separate laminations of timber arranged with the grain parallel to the longitudinal axis of the member: the individual pieces being assembled with their grain approximately parallel and glued together to form a member, which functions as a single structural unit. The advantage of glulam is that both straight and curved sections can be built up from short, thin sections of timber glued together in long sections, up to 50 m, without appreciable loss of the beneficial properties of the natural wood from which they were cut.
A range of standard glulam straight roof and floor beams are produced in a variety of sizes up to 20 m long and 4.94 m deep. These beams can be cut, holed and notched in the same way as the timber from which they were made. A wide range of purpose‐made portal frames, flat pitched and cambered roof beams and arched glulam structures are practical where the curved forms and natural colour and grain can be displayed and where medium to wide clear spans are required.
Glulam structural members
Because of the labour costs involved in the fabrication of glulam members, glulam cannot compete with any of the basic steel frames in initial cost. However, glulam comes into its own in one‐off, purpose‐designed, medium‐span buildings, where the durability of glulam and the appearance of natural wood are an intrinsic part of the building design, for example, in sports halls, assembly halls and swimming pools (Photographs 4.6 to 4.8). The advantages of timber in this form as a structural material are its low self‐weight, minimal maintenance requirements to preserve and maintain its strength, and that it does not suffer from corrosion. Such properties are particularly important where there are levels of high humidity, as in swimming pools.

Photograph 4.6 Glue‐laminated timber structure.


Photograph 4.8 Glue‐laminated timber frame and roof.
Timber laminae are mostly cut from European white wood, imported from Scandinavia. The knots in this wood are comparatively small; it is widely available in suitable strength grades, has excellent gluing properties and a clear, bright, light creamy colour. The stress (strength) grades are LA, LB and LC, with LC being the weakest of the three. Glulam members are usually composed of LB and LC grades or a combination of LB outer and LC inner laminates. The wood is cut into laminae up to 45 mm finished thickness for straight members and as thin as 13 mm for curved members. Laminates are kiln dried to a moisture content of 12%. Individual lengths of timber are finger jointed at the butt end. The ends of the laminae are cut or stamped to form interlocking protruding fingers that are 50 mm long. The lengths of the end jointed laminates are planed to the required thickness and a waterproof adhesive is applied to the faces to be joined. The adhesive used is, like the wood it is used to bond, resistant to chemical attack in polluted atmospheres and chemical solutions.
The adhesive‐coated laminates are assembled in sets to suit the straight or curved section member they will form. Before the adhesive hardens, the laminates for curved members are pulled around steel jigs to form the shape required. Both straight and curved sets are hydraulically cramped up until the adhesive is hardened. After assembly, the glulam members are cured under controlled conditions of temperature and humidity to the required moisture content. The surfaces of the straight members are then planed to remove adhesive that has been squeezed out and to reduce the section to its required dimensions and surface finish. Curved members are made oversize. The staggered ends of laminae are then cut to the required outside and inside curvature and the faces are then planed in the same manner as that for the straight members. The planed natural finish of the wood is usually left untreated to expose its natural colour and grain.
Timber decking can be used to serve as a natural wood finish to ceilings between glulam frames and rafters and as solid deck to support the roof covering and thermal insulation. The decking is laid across and screwed or nailed to roof beams and portal frames.
Symmetrical pitch glulam timber portal frame
Symmetrical pitch glulam timber portal frames are usually fabricated in two sections for ease of transportation to the site. They are erected and bolted together at the ridge, as illustrated in Figure 4.39. The portals are spaced fairly widely apart to support timber or steel purlins, which can be covered with sheet cladding materials, slates or tiles. Timber decking is commonly used to provide a soffit of natural timber. For buildings that require heating, the thermal insulation is placed above the timber soffit. The laminations of the timber from which the portal is made are arranged to taper so that the depth is greatest at the knee, where the frame tends to spread under load and where the depth is most needed. The portal is more slender at the apex and at the base of the post where the least section is required for strength and rigidity. The maximum radius of curve for shaped members is governed by the thickness of the laminates. A maximum radius of 5625 mm is recommended for 45 mm and 2500 mm for 20 mm thick laminae. Because of the labour involved in the assembly of curved members, they are appreciably more expensive than straight members.

Figure 4.39 Glue‐laminated timber portal frame.
Flat glulam timber portal frame
The flat portal frame illustrated in Figure 4.40 is designed for the most economic use of timber and consists of a web of small section timbers glued together with the top and bottom booms of glued laminate with web stiffeners. The portal frames are used to support metal decking on the roof and profiled sheeting on the walls. This long‐span structure is lightweight and free from maintenance.

Figure 4.40 Glued and nailed timber portal frame.
Mid‐ to large‐span glulam structures
The scale and span of glue‐laminated structures has increased in recent years, as has the quality of the adhesive and structural fixings (Photographs 4.9a–d). Due to the lightweight nature of the frame and coverings, the foundations both transfer the loads to the ground and act as anchors to prevent uplift of the structure in high winds. The structural fixings are formed using angle brackets, bearing plates and splice plates, in much the same way that steel fixings are made (Photographs 4.9e–h).


Photograph 4.9 (a) Glue‐laminated long‐span structure, (b) Mid‐ to large‐span glue‐laminated beam anchor foundation. (c) Mid‐ to large‐span glue‐laminated beam mounted in thrust block and anchor foundation. (d) Steel rope prevents buckling and deformation of the structure. (e) Steel rope threaded through the structure. (f) Glue‐laminated roof structure. (g) Beam to beam connection. (h) Beam to column connections.
Flat roof frame construction
Medium‐ and long‐span flat roof structures are structurally less efficient and therefore less economic than truss, lattice or portal frames. The main reason for this is the need to prevent too large a deflection of the flat roof structure under load, thus leading to ponding of water on the surface of the roof. The advantage of a flat roof is that there is little unused roof space to be heated. Solid web I‐section steel beams supported by steel columns may be used for industrial applications where the main beams are used to support lifting gear, but the most common form of framed flat roof construction is with lattice beam or with space frames.
Lattice beam flat roof construction
The terms beam and girder are used in a general sense to describe lattice construction. The term ‘beam’ is used to describe small depths associated with most roof construction and ‘girder’ for deeper depths associated with (e.g. bridge construction). For flat and low‐pitch roofs, it is convenient to fabricate the top boom to provide a fall for the roof decking or sheeting. Lattice beams are either hot dip galvanised, stove enamel primed or spray primed after manufacture.
Short‐span beams that support relatively light loads may be constructed from cold‐formed steel strip top and bottom booms with a lattice of steel rods welded between them, as illustrated in Figure 4.41. The top and bottom booms are formed as ‘top hat’ sections designed to take timber inserts for fixing roof decking and ceiling finishes.

Figure 4.41 Tapered lattice beam.
The majority of lattice beams used for flat and low‐pitch roofs are fabricated from hollow round and rectangular steel sections. For most low‐pitch roofs to be covered with profiled sheeting, a slope of 6° is provided, as illustrated in Figure 4.42.

Figure 4.42 Lattice beam.
Space grid flat roof construction
Where there is a requirement for a large unobstructed floor area, such as exhibition areas and sports halls, a space deck roof can be used (Figures 4.43 and 4.44). A two‐layer space deck comprises a grid of standard prefabricated units, each in the form of an inverted pyramid, as illustrated in Figure 4.45 and Photographs 4.10 to 4.12. The units are bolted together and connected with tie bars to form the roof structure. The tie bars can be adjusted to create an upward camber to the top deck to allow for deflection under load and also to provide a fall to the roof to encourage rainwater to discharge to gutters and thus avoid ponding. Photographs 4.10 and 4.11 show fixing nodes that allow different length rods to be inserted.

Figure 4.43 Prismatic (V beam) lattice steel roof on steel columns.

Figure 4.44 Steel space deck root.

Figure 4.45 Steel space deck units.

Photograph 4.10 Space frame rods bolted to coupling nodes.

Photograph 4.11 Rods screwed into multiple fixing coupling node.

Photograph 4.12 Fully fabricated and welded spaces frame.
A camber is formed by inserting shorter tie bars in the lower section of the structure. The roof of the structural deck may be covered with thermal insulation and steel decking or sheeting. Rooflights can be easily accommodated within the standard units and the roof can be cantilevered beyond supporting perimeter columns to provide an overhang.
Space deck roofs may be designed as a two‐way spanning structure with a square grid, or as a one‐way spanning structure with a rectangular grid. Economic grid sizes are 12 × 12 m, 18 × 18 m and 12 × 18 m. The main advantage of the space deck roof is the wide spacing of the supporting columns and the economy of the structure in the use of standard units and the speed of erection. One disadvantage is that the members tend to attract dust and will require regular cleaning. Regular maintenance is also required to prevent rust.
Units are usually connected to the supporting steel columns at the junction of the trays of the units. Figures 4.46 and 4.47 illustrate the fixing of a space deck to perimeter and internal columns, respectively. At perimeter columns, a steel cap plate is welded to the cap of the column, to which a seating is bolted. This seating of steel angles has brackets welded to it into which the flanges of the trays fit and to which the trays are bolted. Similarly, a seating is bolted to a cap plate of internal columns with brackets into which the flanges of the angles of four trays fit.

Figure 4.46 Support and fixing of space deck units to perimeter steel columns.

Figure 4.47 Connection of space deck units to an internal column.
The Eden project in Cornwall uses a fabricated steel dome space frame (Photographs 4.13 and 4.14). It was designed to accommodate hexagonal transparent membranes called biomes, which are made of an inflated ethylene tetrafluoroethylene (ETFE co‐polymer foil), a development from the flat roof space frame technology.

Photograph 4.13 The hexagonal steel space frame.

Photograph 4.14 Hexagonal space frame with ETFE biomes.
Composite frame construction
A composite frame construction comprises prefabricated concrete and steel components, usually offered by one supplier as part of a design, manufacture and erection service for both single‐ and multi‐storey‐framed buildings. Precast reinforced concrete structural beams and columns are used to support lattice steel roof beams. The columns and beams are precast under carefully controlled factory conditions, with frame joints and base fixings, etc., cast in as necessary. The advantage of the composite frame construction is that the reinforced concrete columns and beams provide good fire resistance to the main structure and the lattice steel roof provides a lightweight covering. Economy of initial build cost can be made in the extensive use of prefabricated units.
Figure 4.48 is an illustration of a typical two‐bay, single storey composite frame structure. The precast reinforced concrete columns, which have fixed bases, serve as vertical cantilevers to take the major part of the loads from wind pressure. Steel brackets, cast into the column head, support the concrete and lattice steel roof beams. Concrete or lattice steel spine beams are used under the roof valley to provide intermediate support for every other roof beam. The top of the lattice steel roof beams, which are pitched at 6° to the horizontal, supports the low‐pitch profiled steel roof sheeting. Fixing slots or brackets cast into the columns provide a fixing and support for sheeting rails, which in turn support the profiled steel cladding to the walls.

Figure 4.48 Two‐bay single storey composite frame.
4.2 Roof and wall cladding, and decking
Plastic‐coated profiled steel sheeting is the principal sheet material used to provide weather protection to single‐storey‐framed buildings (Photographs 4.15 and 4.16). Laminated (sandwich) panels that incorporate thermal insulation are also available (Photograph 4.15) (see Chapter 8). Fibre cement sheet is also used.

Photograph 4.15 Sample cladding systems fixed to the face of a profile metal sheet cladding system.

Photograph 4.16 Site assembled over purlin roof cladding.
(Source: courtesy of G. Throup).
Functional requirements
The functional requirements of roofs and walls have already been set out in Barry’s Introduction to Construction of Buildings. In relation to wall and roof cladding, the following functional requirements need to be addressed:
- Strength and stability
- Resistance to weather
- Durability and freedom from maintenance
- Safe access during maintenance
- Fire safety
- Resistance to passage of heat
- Resistance to passage of sound
- Security
- Aesthetics
Strength and stability
The strength of roof and wall cladding and roof decking depends on the properties of the materials used and their ability to support the self‐weight of the cladding and the imposed loads of wind and snow between the supporting purlins, rails, bearers and beams. The stability of the cladding and decking depends on the:
- Depth and spacing of the profiles of sheeting and decking
- Composition of the materials and thickness of the boards and slabs used for decking
- Ability of the materials to resist distortion due to wind pressure, wind uplift, snow loads and the weight of personnel engaged in fixing and maintaining the roofs
The strength and stability of the thin sheets of steel or aluminium derive principally from the depth and spacing of the profiles: shallow depth of profile for small spans to deep trapezoidal profiles and standing seams for medium to large spans between supports. Longitudinal and transverse ribs provide additional rigidity against buckling to deep profile sheeting. The comparatively thick corrugated and profiled fibre cement cladding sheets have adequate strength in depth of the profiles for anticipated loads and rigidity in the material to resist distortion and loss of stability over moderate spans between supports. Steel roof cladding sheets fixed across a structural frame act as a diaphragm, which contributes to the stability of the frames in resisting the racking effect of lateral wind forces that act on the sides and roofs of buildings. The extent of the contribution to the stability of the frames depends on the thickness of the sheets and the strength of the fasteners used to fix the sheets, as well as the ability of the sheets to resist the tearing effect of the fasteners fixed through it. Manufacturers provide guidance on the size and thickness of their sheets, minimum end lap, maximum purlin and rail centres, and maximum unsupported overhang of the sheets, as well as guidance on the type and spacing of fixings to match the exposure of the site.
Resistance to weather
Sheet steel and aluminium cladding resist the penetration of rainwater through the material’s impermeability to water and the ability of the side and end laps to keep water out. The lowest allowable pitch of the roof is dictated by the end lap of the sheets. Thermal and structural movement is accommodated by the profiles, the end lap and designed tolerances at the fixings. Where long sheets are used, the secret fixing of the standing seam will allow for movement. Profiled metal sheets are usually fixed with screws, driven through the sheets into steel purlins and rails. Integral steel and Neoprene washers on the screw head effectively seal the perforation of the sheet against water penetration. Fixing is through the troughs of the profiles (where the rainwater runs) or (preferably) at the ridge of the trough, which takes a little more care and skill. Top fixing is preferred to bottom fixing, because the perforation of the sheet is less exposed to water. Profiled cladding for walling is usually fixed through the troughs of the profile for ease of fixing and where the screw heads will be least visible. Standing seams to the edges of long sheets provide a deep upstand as protection against rain penetration, particularly with very low‐pitch roofs.
Fibre cement sheets will resist water penetration through the density of the material, the slope of the roof and the end laps. The sheets will absorb some rainwater and should be laid at a pitch of 10° or more to avoid the possibility of frost damage. The sheets will accommodate moisture, thermal and structural movement through the end and side laps, as well as through the relatively large fixing holes for screws or hook bolts.
Flat roof membranes which resist the penetration of rainwater through the impermeability of the two‐, three‐ or single‐ply membranes and the sealed joints will, in time, harden and no longer retain sufficient elasticity or tensile strength to resist the thermal movements common to flat roof coverings laid over insulation materials.
Durability and freedom from maintenance
Coated profiled steel sheeting is easily damaged and so its durability depends to a certain extent on the care in handling and fixing on the building site. Damage to protective coatings can lead to corrosion of exposed steel, especially around fixing holes, and fixings driven home too tightly can easily distort the thin metal. Durability also depends on the climate and the colour of the coating material. Sheeting on buildings close to marine environments and in polluted industrial areas will deteriorate more rapidly than those in more sheltered, less polluted areas. Light coloured coatings tend to be more durable than dark coatings, due to the effect of ultraviolet light on dark hues and the increased heat released from solar radiation on the more absorptive dark coatings. Organic‐coated sheeting is a relatively short‐lived material with a service life of around 25 years in favourable conditions and as low as 10 years in more aggressive climates.
Fibre cement sheeting does not corrode or deteriorate for many years, provided it is laid at a sufficiently steep pitch to shed water. The material is, however, relatively brittle and is liable to damage from impact and pressure from people accidentally walking over its surface. Reinforced fibre cement sheets are available that have a higher impact strength. These sheets tend to attract dirt because of the coarse texture of the surface, which is not easily washed away; thus the sheets can become unsightly quite quickly.
Flat roof membranes, laid directly over thermal insulation material, will experience considerable temperature variations between day and night. In consequence, there is considerable expansion and contraction of the membrane, which in time may cause the membrane to tear. Solar radiation also causes oxidation and brittle hardening of bitumen saturated or coated materials, which in time will no longer be impermeable to water. The durability of a roofing membrane in an inverted roof (upside down roof) is much improved by the layer of thermal insulation laid over the membrane, which helps protect it from the destructive effects of solar radiation and less extreme variations in temperature. The useful life of bitumen impregnated felt membranes is from 10 years, for organic fibre felts up to 20 years and for high performance felts up to 25 years: this can be extended by using an inverted roof construction. Mastic asphalt will oxidise and suffer brittle hardening over time which, combined with thermal movements, will give the material a useful life of around 20 years.
Safe maintenance
The Construction (Design and Management) (CDM) Regulations 2007 require that buildings should be designed so that they can be constructed, maintained and demolished safely. One in five construction‐related accidents is caused by falls from, or through, roofs (HSE, 1998). Care should be taken when designing structures to ensure that falling through sheeting materials and from the roof is recognised as a hazard and the risks of such occurrence are reduced. Provision should be made to prevent falls, including adequate access for plant and equipment. Safety rails should be used to prevent falls over the edges of roof structures. Harnesses, fall arrest systems and safety nets do not prevent falls but do reduce the risks of injury in the event of a fall. Inclement weather poses a significant risk to those working in exposed positions and at heights. Work at heights should not continue during high winds or conditions that make the risks unacceptable. Debris netting (as well as safety netting) or birdcage scaffolds may be used to offer protection from falling objects and allow work to continue in the zone below the roof area. Debris shoots should also be used to ensure that waste, which presents a hazard if it falls, is quickly removed from the roof. Consideration must be given to maintenance operations once the roof structure is complete. Guarded walkways, access platforms, safety rails, etc., will be needed to ensure safe access.
Fire safety
Particular attention should be given to the internal and external fire spread characteristics of sheet materials in relation to the overall design of the building. A further cause for concern in framed buildings is concealed spaces, such as voids above suspended ceilings, roof and wall cavities. Cavity barriers and smoke stops should be fitted in accordance with current regulations and manufacturers guidance.
Resistance to passage of heat and ventilation
Resistance to the passage of heat is provided by thermal insulation materials, either separate from the sheeting material or as an integral part of the sheet in composite panels. Consideration must be given to thermal bridging in steel‐framed buildings, especially at junctions, and care is required to avoid condensation. The principles of condensation, or rather the manner in which it can be avoided within the roof and wall structures, were discussed in Barry’s Introduction to Construction of Buildings. Sheet metal may, in time, suffer corrosion from heavy condensation on the underside of the sheet. Ventilation to the space between the sheeting and the insulation, combined with a vapour check to the lining sheets, is the most effective way of minimising the risk of condensation. Fibre cement sheet is permeable to water vapour and thus provides less of a risk from condensation.
Resistance to passage of sound
The thin metal skin of profiled metal sheeting affords no appreciable resistance to sound penetration; thus insulation must be provided, usually via the thermal insulation materials and effective seals around the opening parts of doors and windows. If sound insulation is a primary performance requirement, it may be advantageous to adopt a denser form of enclosure, such as brick or concrete to help provide the necessary sound reduction.
Security
Many single‐storey‐framed buildings are only occupied during working hours and are vulnerable to damage by vandalism and forced entry, unless adequately protected through passive and active security measures. Apart from the obvious risk of forced entry through doors, windows and rooflights, there is a risk of entry by prising thin profiled sheeting from its fixing and so making an opening large enough to enter. Given that many buildings clad with steel sheeting are for warehousing purposes, this presents a serious challenge to the owners. Where the cost of the goods contained within is high and the likelihood of theft also high, it is wise to use a more solid form of wall construction, such as brick. Roofs are more difficult to protect, and some form of secondary protection is often used, such as a secondary steel cage under the roof (this is outside the scope of this book).
Aesthetics
Choice of an appropriate cladding for the building frame will also be determined by the appearance of the sheeting used and its ability to withstand weathering for a given timescale. Sheet profile and colour will be primary concerns, and a wide range of profiles and colours are available from manufacturers.
Profiled steel sheeting
The advantages of steel as a material for roof and wall sheeting are that its favourable strength‐to‐weight ratio and ductility make it both practical and economic to use comparatively thin, lightweight sheets that can be cold, roll formed to profiles with adequate strength and stiffness (Figures 4.49 and 4.50). The disadvantage of steel as a sheeting material is that it suffers rapid and progressive corrosion unless protected. The corrosive process is a complex electrochemical action that depends on the characteristics of the metal, atmosphere and temperature, and is most destructive in conditions of persistent moisture, atmospheric pollution and where different metals are in contact. Typically steel is protected with a zinc coating by the hot dip galvanising process.

Figure 4.49 Cladding.

Figure 4.50 Profiled steel cladding and decking.
Organic (plastic)‐coated profiled steel sheets
The majority of profiled sheets used today are coated with an organic plastic coating to provide a protective coating and to provide an attractive finish. The plastic coating is applied to the galvanised zinc‐coated steel sheets to serve as a barrier to atmospheric corrosion of the zinc, the erosive effect of wind and rain, and some degree of protection to damage during handling, fixing and in use. Colour is applied to the coated steel sheets by the addition of pigment to the coating material. There will be loss of colour, which tends not to be uniform over the whole sheet, especially on south‐facing slopes over time. This spoils the appearance of the building, and cladding sheets may need to be replaced long before there is any danger of corrosion of the steel sheet. Light colours tend to exhibit better colour retention than darker colours. Four organic coatings are available, as described further.
Polyvinyl chloride coatings
Polyvinyl chloride (PVC) coatings are the cheapest and most used of the organic plastic coatings (known as ‘plastisol’). The comparatively thick (200 μm) coating that is applied over the zinc coating provides good resistance to normal weathering agents. The material is ultraviolet stabilised to retard the degradation by ultraviolet light and the inevitable loss of colour. The durability of the coating is good as a protection for the zinc coating below, but the life expectancy of colour retention is between 10 and 20 years. PVC is an economic, tough, durable, scratch‐resistant coating but has poor colour retention.
Acrylic‐polymethyl methacrylate coatings
Acrylic‐polymethyl methacrylate is an organic plastic that is applied with heat under pressure, as a laminate to galvanised zinc steel strip to a thickness of 75 μm. It forms a tough finish with high strength, good impact resistance and good resistance to damage in handling, fixing and in use. It has excellent chemical resistance and its good resistance to ultraviolet radiation gives a life expectancy of colour retention of up to 20 years. The hard smooth finish of this coating is particularly free from dirt staining. It costs about twice as much as PVC coatings [unplasticated polyvinyl chloride (uPVC)].
Polyvinylidene fluoride coatings
Polyvinylidene fluoride (PVF) is a comparatively expensive organic plastic coating for profiled steel sheets, which is used as a thin (25 μm) coating for its excellent resistance to weathering, excellent chemical resistance, durability and resistance to all high‐energy radiation. Because the coating is thin, careless handling and fixing may damage it. Durability is good and colour retention can be from 15 to 30 years.
Silicone polyester
Silicone polyester is the cheapest of the organic coatings used for galvanised steel sheet. It has a short life of between 5 and 7 years in a temperate, non‐aggressive climate. Galvanised sheets are primed and coated with stoved silicone polyester to a thickness of 25 pm. The coating provides reasonable protection against damage in handling and fixing.
Profiled steel cladding systems for roofs and walls
The term ‘cladding’ is a general description for materials, such as steel sheets, used to clothe or clad the external faces of framed buildings to provide weather protection. Thermal insulation is fixed under or behind the cladding sheets to provide the required thermal insulation to roofs and walls, respectively. A wide range of profiles are available, some of which are illustrated in Figure 4.51.

Figure 4.51 Trapezoidal profile‐coated steel wall cladding sheets.
Single skin cladding
The simplest system of cladding consists of a single skin of profiled steel sheeting fixed directly to purlins and sheeting rails without thermal insulation. This cheap form of construction is only used for buildings that do not need to be heated, such as warehouses and stores.
Over purlin insulation
The most straightforward and economic system of supporting insulation under cladding is to use semi‐rigid or rigid insulation boards laid across roof purlins and sheeting rails, as shown in Figure 4.52. Timber spacers are used to provide an airspace for passive ventilation between the cladding sheets and the insulation. This system of cladding is suitable for buildings with low to medium levels of humidity and where the appearance of the insulation board is an acceptable finish.

Figure 4.52 Corrugated steel cladding sheets.
Over purlin insulation with inner lining
Where mineral fibre mat insulation is used and where more rigid forms of insulation will not be self‐supporting between widely spaced purlins, it is necessary to use profiled inner lining sheets (or trays) to provide support for the insulation. The lining sheets also help to provide a more attractive finish to the interior.
Linings are cold, roll‐formed, steel strips with shallow depth profiles adequate to support the weight of the insulation. The sheets are hot dip galvanised and coated with a protective and decorative organic plastic coating. To prevent compression of the loose mat or quilt, its thickness is maintained by Zed section spacers fixed between cladding and lining panels, as illustrated in Figures 4.53 and 4.54. The space between the top of the sheeting and the insulation is passively ventilated to minimise condensation, and a breather paper is usually spread over the top of the insulation. The breather paper protects the insulation from any rain or water condensate, yet allows moisture vapour to penetrate it. Some manufacturers also manufacture ‘structural’ trays, which provide a stronger internal lining and thus help to improve security to the roof.

Figure 4.53 Over purlin insulation with inner lining sheets.

Figure 4.54 Profiled steel cladding, insulation and inner lining sheets.
Over purlin composite (site assembled)
The over purlin composite (site assembled) system comprises a core of rigid preformed lightweight insulation (or mineral wool and spacer), shaped to match the profile of the sheet and the inner lining tray. The separate components are assembled on site and fixed directly to purlins and lining sheets with self‐tapping screws (Photograph 4.6). Side and end laps are sealed against the penetration of moisture vapour. Factory‐formed composite panels have largely replaced this system.
Over purlin composite (factory formed)
Factory‐formed composite panels consist of a foamed insulation core enclosed and sealed by profiled sheeting and inner lining tray. The two panels and their insulating core act together structurally, to improve load bearing characteristics. Panels have secret fixings to improve their visual appearance. Figure 4.55 is an illustration of factory‐formed panels.

Figure 4.55 Composite roofing panels.
Standing seams
Standing seams are principally used for low and very low‐pitch roofs to provide a deep upstand as weathering to the side joints of sheeting and to allow space for secret fixings. Sheets usually run from ridge to eaves to avoid the complication of detailing at the end laps with standing seams. The standing seam allows some tolerances for thermal movement of the long sheets and also provides some stiffness to the sheets, thus allowing a shallower profile to be used. Figure 4.56 illustrates a standing seam.

Figure 4.56 Profiled standing seam roofing.
Fasteners
Steel cladding, lining sheets and spacers are usually fixed with coated steel or stainless steel self‐tapping screws, illustrated in Figure 4.57. The screws are mechanically driven through the sheets into purlins or spacers. These primary fasteners for roof and wall sheeting may have coloured heads to match the colour of the sheeting. Secondary fasteners, which have a shorter tail, are used for fixing sheet to sheet and also flashing to sheet.

Figure 4.57 Fasteners for profiled steel sheeting and decking.
Gutters
Gutters are usually made from cold‐formed, organic‐coated steel and are laid at a slight fall to rainwater pipes. Gutters are supported on steel brackets screwed to eaves purlins. Valley gutters and parapet wall gutters usually have the inside of the gutter painted with bitumen as additional protection against corrosion.
Ridges
Ridges are covered with a cold‐formed steel strip that is coated to provide the same finish as the roof sheeting. The ridge may be profiled to match the roof profile, or flat with a shaped filler piece to seal the space between sheet and ridge.
Wall cladding
Profiled steel sheeting is usually fixed to walls with the profile vertical, for convenience of fixing to horizontal sheeting rails fixed across the columns. Horizontal fixed sheeting can also be used for a different appearance, although some additional steel support may be required for widely spaced columns. The wall cladding is usually the same profile as that used for the roof. Figures 4.58 and 4.59 illustrate a typical section through a steel‐framed building with steel sheeting above a lower wall of masonry. A drip flashing helps to keep the top of the wall dry by shedding the rainwater as it runs down the sheets. To provide a flush soffit to the roof cladding, the inner lining and insulation can be fitted under the purlins between the roof frames, as illustrated in Figure 4.60.

Figure 4.58 Profiled steel wall sheeting for portal frame building.

Figure 4.59 Curved profiled steel cladding.

Figure 4.60 Steel roof sheeting with under purlin insulation.
Profiled aluminium roof and wall cladding
On exposure to the atmosphere, aluminium corrodes to form a thin coating of oxide on its surface. This oxide coating, which is integral with the aluminium, adheres strongly and, being insoluble, protects the metal below from further corrosion so that the useful life of aluminium is 40 years or more. Aluminium is a lightweight, malleable metal with poor mechanical strength, which can be cold formed without damage. Aluminium alloy strip is cold rolled as corrugated and trapezoidal profile sheets for roof and wall cladding. The sheets are supplied as metal mill finish, metal stucco embossed finish, pre‐painted or organically coated.
Mill finish is the natural untreated surface of the metal from the rolling mill. It has a smooth, highly reflective metallic silver grey finish, which dulls and darkens with time. Variations in the flat surfaces of the mill finish sheet will be emphasised by the reflective surface. A stucco embossed finish to sheets is produced by embossing the sheets with rollers to form a shallow, irregular raised patterned finish that reduces direct reflection and sun glare and so masks variations in the level of the surface of the sheets. A painted finish is provided by coating the surface of the sheet with a passivity primer and a semi‐gloss acrylic or alkyd‐amino coating in a wide range of colours. A two‐coat PVF acrylic finish to the sheet is applied by roller to produce a low‐gloss coating in a wide range of colours.
Aluminium sheeting is more expensive than steel sheeting and is used for its greater durability, particularly where humid internal atmospheres might cause early deterioration of coated steel sheeting. The material also offers some more interesting architectural features and has been used instead of steel sheet for its attractive natural mill finish. Figure 4.61 is an illustration of profiled aluminium roof and wall sheeting, fixed over rigid insulation boards bonded to steel lining trays, to a portal steel frame.

Figure 4.61 Aluminium roof sheeting.
Fibre cement profiled cladding
Fibre reinforced cement sheets are manufactured from cellulose and polymeric fibres, cement and water, and pressed into a range of profiles. High‐strength fibre reinforced cement sheets are made with polypropylene reinforcement strips inserted along precisely engineered locations along the length of the sheet, which provides greater impact strength without affecting the durability of the product.
Sheets are usually finished in a natural grey colour, especially when used for industrial and agricultural buildings, although a range of natural colours and painted finishes are also available from some manufacturers. Fibre cement sheets are vapour permeable, which greatly reduces the risk of condensation. The sheets are a Class 0 material, provide excellent acoustic insulation, have a high level of corrosion resistance, are easy to fix and are maintenance free. Manufacturers provide guarantees of up to 30 years. The reinforced sheets should comply with the requirements for roof safety, as set out by the Health and Safety Executive.
Fibre cement sheets are heavier than steel sheets and so require closer centres of support from purlins and sheeting rails. Corrugated fibre cement sheet may be pitched as low as 5° to the horizontal in sheltered locations, although upwards of 10° is more common. The detail shown in Figure 4.62 is typical of the type of construction used in unheated outbuildings such as garages and tool sheds clad with fibre sheets. Typical fixings for fibre cement sheets are illustrated in Figures is a typical section through a steel structure with profiled fibre cement sheets, insulation and underlining sheets.

Figure 4.62 Corrugated fibre cement sheet covering to steel‐framed roof.


Figure 4.64 Fibre cement sheeting with insulation and steel sheet underlining.
Manufacturers of fibre cement sheets offer bespoke systems that combine profiled fibre cement weathering sheets with thermal insulation and an underlining sheet of fibre cement or coated steel. These are offered with a proprietary support bar system, which both supports the roof cladding sheets and helps to maintain a clear cavity into which the insulation blanket is placed. The system is built up on site in accordance with the manufacturer’s guidance to provide a highly durable roofing system with tested performance characteristics, giving very good acoustic and thermal insulation as well as high resistance to condensation. Recommended pitch ranges from between 5° and 30°. A typical system is illustrated in Figure 4.65.

Figure 4.65 Fibre cement roofing sheets.
Roof ventilation to agricultural buildings
Fibre cement sheeting is used extensively in agricultural buildings, many of which have very specific ventilation requirements (e.g. cattle sheds or pig pens). A number of profiled prefabricated ridge fittings, including open ridges, are available that provide high levels of ventilation to the covered area given in Figure 4.66.

Figure 4.66 (a) Agricultural roof ventilation: unprotected open ridges.
(Source: adapted from www.marleyeternit.co.uk)
(b) Agricultural roof ventilation: protected open ridges.
(Source: adapted from http://www.eternit.co.uk)
Ridge ventilation is usually used in combination with a spaced roof or a breathing roof. A breathing roof is constructed using Tanalised 50 × 25 mm timber battens or strips of nylon mesh to form a spacer between the courses of profiled sheets, thus providing a simple, cheap and effective means of ventilation (Figure 4.67). A spaced roof is used for buildings that house high unit intensive rearing, which require high levels of natural ventilation. In this roof, the profiled sheets are positioned to create a gap of between 15 mm and 25 mm between the sheets; this provides excellent ventilation but also allows some rain and snow penetration (Figure 4.68).

Figure 4.67 (a) Fibre‐based agricultural roof: breathing roof with timber spacer. (b) Fibre‐based agricultural roof: breathing roof with nylon mesh.

Figure 4.68 Fibre‐based agricultural roof: spaced breathing roof.
Decking
Decking is the general term used for the material or materials used and fixed across roofs to serve as a flat surface on to which one of the flat roof weathering membranes is laid. The decking is also used to support the thermal insulation, thus creating a warm roof construction. The decking is designed to support the weight of the materials of the roof and imposed loads of wind and snow, and is laid to a shallow fall to encourage rainwater run‐off. Decking is sometimes applied to low‐pitch lattice beam and portal frames. The most common form of decking is constructed from profiled steel sheeting. Decking can also be made of timber (for timber structures) or lightweight concrete slabs (for steel or concrete frames).
Profiled steel decking
The most commonly used form of decking is constructed from galvanised profiled steel sheeting, which is fixed with screws across beams or purlins. The underside of the decking may be primed ready for painting or be manufactured with a coated finish. Typical spans between structural frames or beams are up to 12 m for 200 mm deep trapezoidal profiles. The decking provides support for rigid insulation board, which is laid on a vapour check. The weathering membrane is then bonded to the insulation boards, as illustrated in Figure 4.69. Manufacturers produce a range or proprietary composite steel decking systems for long spans that provide high thermal insulation values.

Figure 4.69 Roof decking.
Flat roof weathering
There is no economic or practical advantage in the use of a flat roof structure, unless the roof is to be used (e.g. for leisure). A flat roof structure is less efficient structurally than a pitched roof, and there is little saving on unused roof space compared with the profiled metal sheeting, which can be laid to pitches as low as 2.5° to the horizontal. The roof surface must be constructed to create falls to rainwater outlets to avoid ponding of water on the roof surface, so it is not entirely ‘flat’. In the UK climate, flat roofs have not performed particularly well; however, improvements in flat roof weathering membranes and careful detailing may help to make flat roofs a viable alternative to profiled sheet metal. See Chapter 6 of Barry’s Introduction to Building for further details of materials, insulation and ventilation for flat roofs.
Drainage and falls
Given the importance of removing water from flat roofs, it is important to consider how and in which direction the water will fall to eaves, valley and/or central outlets, as illustrated in Figure 4.70. A one‐direction fall is the simplest to construct, for example from a lattice beam with sloping top boom or with firring pieces of wood or tapered insulation boards laid over the structure to provide the necessary falls. A two‐directional fall is more complicated and hence more time‐consuming to construct, because of the need to mitre the ends of the tapered materials. A wet screed of concrete can be laid and finished with cross falls without difficulty.

Figure 4.70 Falls and drainage of flat roofs.
Flat roof coverings are laid so that they fall directly to rainwater outlets, usually at a fall of 1 in 40. A typical straight‐fall rainwater gutter is illustrated in Figure 4.71, where the roof falls to a central valley and rainwater pipes are positioned to run down against the web of structural columns.

Figure 4.71 Rainwater outlet in built‐up bitumen felt roof.
Built‐up roof coverings to roof decks
The first layer of built‐up roof sheeting has to be attached to the surface of the roof deck to resist wind uplift. The manner in which this is done will depend on the nature of the roof deck. Full and partial bond methods were described in Barry’s Introduction to Construction of Buildings. Particular attention should be given to the detailing and quality of the work to vulnerable areas such as eaves and verges, skirtings and upstands and joints. At control (expansion) joints in the structure, it is necessary to make some form of upstand in the roof on each side of the joint (Figure 4.72). The roofing is dressed up on each side of the joint as a skirting to the upstands. A plastic‐coated metal capping is then secured with secret fixings to form a weather capping to the joint.
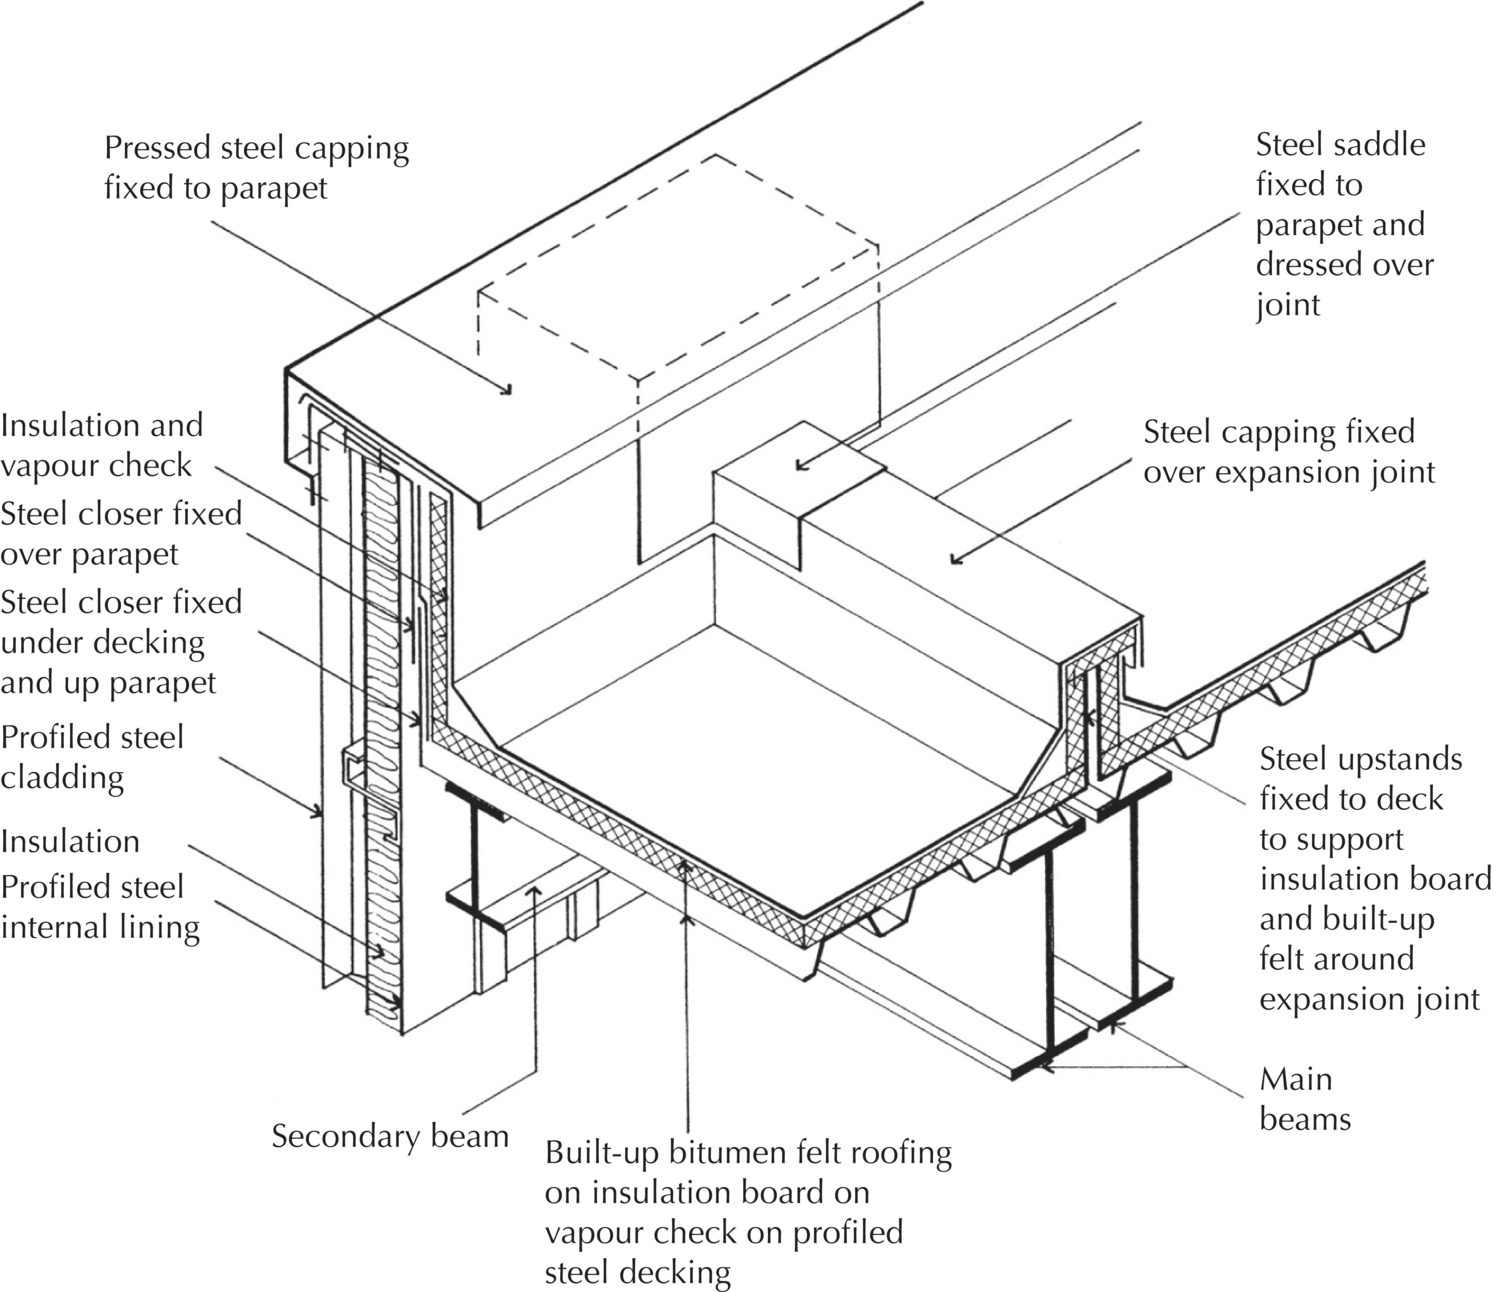
Figure 4.72 Parapet and expansion joint to profiled steel decking covered with built‐up bitumen felt roofing.
Single‐ply roofing
Single‐ply roofing materials provide a tough, flexible, durable lightweight weathering membrane, which is able to accommodate thermal movements without fatigue. To take the maximum advantage of the flexibility and elasticity of the membrane, the material should be loose laid over roofs so that it is free to expand and contract independently of the roof deck. To resist wind uplift, the membrane is held down either by loose ballast, a system of mechanical fasteners or adhesives. The materials used in the manufacture of single‐ply membranes are grouped as thermoplastic, plastic elastic and elastomeric.
- Thermoplastic materials include PVC, chlorinated polyethylene (CPE), chlorosulpho‐nated polyethylene (CSM) and vinyl ethylene terpolymer (VET). The materials are tough with good flexibility. All of these materials can be solvent or heat welded.
- Plastic elastic materials include polyisobutylene (PIB) and butyl rubber (IIR). PIB can be solvent or heat welded; IIR is joined with adhesive.
- Elastomeric, ethylene propylene diene monomer (EPDM). Materials are flexible and elastic with good resistance to oxidation, ozone and ultraviolet degradation. The materials are joined with adhesives.
These single‐ply materials are impermeable to water, moderately permeable to moisture vapour, flexible and maintain their useful characteristics over a wider range of temperatures than the materials used for built‐up roofing. To enhance tear resistance and strength, these materials may be reinforced with polyester or glass fibre fabric. Manufacturers provide detailed guidance on fixing, exposure and durability, together with conformity to relevant standards and product guarantees.
4.3 Rooflights
The traditional means of providing daylight penetration to the working surfaces of large single storey buildings is through rooflights, either fixed in the slope of roofs or as upstand lights in flat roofs. With the increase in automated manufacturing and artificial illumination, combined with concerns over poor thermal and sound insulation, unwanted glare, solar heat gain, and concerns over security, the use of rooflights has become much less common.
Functional requirements
The primary function of a rooflight is to allow the admission of daylight. As a component part of the roof, the rooflight also has to satisfy the functional requirements of the roof, being strength and stability; resistance to weather; durability and freedom from maintenance; fire safety; resistance to the passage of heat; resistance to the passage of sound; and security.
Daylight
Rooflights should be of sufficient area to provide satisfactory daylight, and be spaced to give reasonable uniformity of lighting on the working surface without an excessive direct view of the sky, to minimise glare or penetration of direct sunlight and to avoid excessive solar gain. The area chosen is a compromise between the provision of adequate daylight and the need to limit heat loss through the lights. In pitched roofs, rooflights are usually formed in the slope of the roof to give an area of up to one‐sixth of the floor area and spaced, as indicated in Figure 4.73, to give good uniformity and distribution of light. Rooflights in flat roofs are constructed with upstand curbs to provide a means of finishing and hence weathering the roof covering, and should be designed and positioned to provide an area of up to one‐sixth of the floor area. North rooflights are used to minimise solar heat gain and solar glare; the area of the rooflight may be up to one‐third of the floor area, as shown in Figure 4.73. Monitor rooflights is a term used to describe vertical or sloping slides to a rooflight, as illustrated in Figure 4.73, and these should have an area of up to one‐third of the floor area.


Figure 4.73 Spacing of rooflights.
Strength and stability
The materials used for rooflights tend to be used in the form of thin sheets to obtain the maximum transmission of light and also for economy. Glass will require support at relatively close centres to provide adequate strength and stiffness as part of the roof covering. Plastic profiled sheets tend to have less strength than the metal profiled sheets and so as a general rule require support at closer centres. Plastic sheets extruded in the form of double and triple skin cellular flat sheets have good strength and stiffness. Attention must be paid to the safety of rooflights so as to prevent the possibility of anyone falling through the covering.
Resistance to weather
Metal glazing bars, used to provide support for glass, are made with non‐ferrous flashings or plastic cappings and gaskets that fit over the glass to exclude wind and rain. A minimum pitch of 15° to the horizontal is recommended. Profiled plastic sheets are designed to provide an adequate side lap and sufficient end lap to give the same resistance to the penetration of wind and rain as the profiled metal cladding in which they are fixed. A minimum pitch of not less than 10° to the horizontal is recommended. For lower pitches, it is necessary to seal both side and end laps to profiled metal sheeting with a silicone sealant to exclude wind and rain. Cellular flat plastic sheets are fitted with metal or plastic gaskets to weather the joints between the sheets fixed down the slope and with non‐ferrous metal flashings at overlaps at the top and bottom of sheets. Rooflights in flat and low‐pitch roofs are fixed on a curb (upstand) to which the roof covering is dressed to exclude weather.
Durability and freedom from maintenance
Glass is the most durable of materials; however, regular washing is required to maintain adequate daylight penetration to the working surface below. Plastic materials will discolour over time and, depending on the profile of the plastic sheets, may also trap dirt. Regular cleaning is also required to maintain adequate daylight penetration and a regular replacement strategy will be required to replace the discoloured sheets. Manufacturers provide guidance as to the expected life of translucent sheets.
Fire safety
Fire safety in relation to rooflights is concerned with limiting the internal and external spread of flame. To limit the spread of fire over the surface of materials, it is necessary to limit the use of thermoplastic materials in rooflights. The Building Regulations limit the number, position and use of thermoplastic rooflights. Thermoplastic rooflights must not be used in a protected shaft. Materials for rooflights should be chosen with care and with reference to their spread of flame characteristics. To reduce the risk of a rooflight allowing fire to pass from one building to another, there are limitations on the minimum distance within which a rooflight can be placed in relation to the boundary. The distance of the rooflight from the boundary is dependent on the type of rooflight and the type of roof covering used.
Resistance to passage of heat
Limiting the number and size of rooflight can mitigate heat transfer through rooflights. Sealed double (or triple) glazed units will go some way in helping to improve the thermal resistance of the roof.
Resistance to passage of sound
The thin sheets of plastic or glass used in rooflights offer little resistance to the transfer of sound. Although some reduction in sound transfer can be achieved with double and triple glazed units, it will be necessary to limit the size and number of rooflights for buildings that house noisy activities. In buildings where sound reduction is a critical requirement, only specifically designed acoustic rooflights should be used; normally these are triple glazed units with a 90–150 mm cavity between the internal and external sheets of glass.
Security
Single storey buildings clad with lightweight metal cladding to roofs and walls are vulnerable to forced entry through windows, doors, walls and roof cladding, and through glass and plastic rooflights. Security against forced entry and vandalism is best achieved via secure perimeter fencing and effective 24 hour surveillance. As a general guide, rooflights should be designed and constructed so as not to compromise the security of the roof structure.
Safety – Fragile roofs and rooflights
Rooflights and fragile roofs are a potential source of danger when constructing the roof, when carrying out maintenance on the roof and to trespassers. Falls through fragile material give rise to more fatal accidents in the construction industry than any other single cause (HSE, 1998). Adequate measures must be taken to prevent people from falling through fragile roofs and rooflights. Safe access to, and over, the roof surface must be provided. Platforms and staging may be provided to allow access for maintenance and inspections. Guarding should be provided to prevent persons who are on the roof from entering into the vicinity of the fragile surface. When carrying out refurbishment or maintenance staging, safety nets, birdcage scaffolds, harnesses and line system, as well as other safe means of access may need to be provided to sufficiently reduce the risk of anyone falling through the roof or rooflight. Precautions must also be taken to prevent unauthorised access to fragile roofs. Relevant legislation includes:
- The Health and Safety at Work etc. Act 1974
- The Management of Health and Safety at Work Regulations 1999
- The Construction (Health, Safety and Welfare) Regulations 1996
- The CDM Regulations 2007
- The Lifting Operations and Lifting Equipment Regulations 1998
Materials used for rooflights
The traditional material for rooflights was glass laid in continuous bays across the slopes of roofs and lapped under and over slate or tile roofing. The majority of rooflights constructed today are of translucent sheets of plastic, usually formed to the same profile as the roof sheeting.
Glass
The types of glass used for rooflights are float glass, solar control glass, patterned glass and wired glass, which is used to minimise the danger from broken glass during fires. Glass has poor mechanical strength and must be supported with metal or timber glazing bars, at relatively close centres of about 600 mm for patent glazing. The principal advantage of glass is that it provides a clear view and, with regular washing, maintains a bright surface appearance.
Profiled, cellular and flat plastic sheets
Transparent or translucent plastic sheet material is used as a cheaper alternative to glass. The materials used for profiled sheeting are:
- uPVC – PVC – rigid PVC. This is one of the cheapest materials and has a light transmittance of 77%, reasonable impact resistance and good resistance to damage. The material will discolour when exposed to solar radiation.
- Glass reinforced plastic (GRP). GRP is usually inflammable, has good impact resistance, rigidity and dimensional stability. The material is translucent and has a moderate light transmittance of between 50% and 70%. Translucent GRP sheets comprise thermosetting polyester resins, curing agents, light stabilisers, flame retardants and reinforcing glass fibres. Three grades of GRP sheet are produced to satisfy the conditions for external fire exposure and surface spread of flame.
The materials used for flat sheet rooflights, laylights and domelights are:
- Polycarbonate (PC). This material has good light transmittance, up to 88%, good resistance to weathering, reasonable durability and very good impact resistance. PC is the most expensive of the materials and is used principally for its high impact resistance.
- Polymethyl methacrylate (PMMA). This plastic is used for shaped rooflights, having good impact resistance and resistance to ultraviolet radiation, but softens and burns readily when subject to the heat generated by fires.
Rooflights
The most straightforward way of constructing rooflights in pitched roofs covered with profiled sheeting is by the use of GRP or uPVC, which is formed to match the profile of the roof sheeting. The translucent sheets are laid so that they cover the lower sheet and adjacent sheet to form an end and side lap, respectively. All side laps should be sealed with self‐adhesive closed cell PVC sealing tape to make a weather tight joint. End laps between translucent sheets and between translucent sheet and roof sheets to roofs pitched below 20° should be sealed with extruded mastic sealant. Fixing of sheets is critical to resist wind uplift, in common with all lightweight sheeting materials used for roofing, and the fixing usually follows that used for the main roofing material.
Double skin rooflights are constructed with two sheets of GRP, as illustrated in Figure 4.74, which have the same profile as the sheet roof covering. Profiled, high‐density foam spacers, bedded top and bottom in silicone mastic, are fitted between the sheets to maintain the airspace and also to seal the cavity. Double‐sided adhesive tape is fixed to all side laps of both top and bottom sheets as a seal. The double skin rooflight is secured with fasteners driven through the sheets and foam spacers to the purlins. Stitching screws are then driven through the crown of profiles at side and end laps. Factory‐formed sealed double skin GRP rooflight units are made from a profiled top sheet and a flat underside with a spacer and sealer.

Figure 4.74 Rooflights: translucent sheets in profiled steel‐covered pitched roof.
Translucent PVC (uPVC) sheets are produced in a range of profiles to match most metal and fibre cement sheeting. For roof pitches of 15° or less, the side and end laps should be sealed with sealing strips and all laps between uPVC sheets should be sealed. Fixing holes should be 3 mm larger in diameter than the fixing to allow for thermal expansion of the material. Fasteners similar to those used for fixing roofing sheets are used. Double skin rooflights are formed in a similar manner to that shown in Figure 4.74.
Flat cellular sheets of PC are supported by aluminium glazing bars fixed to purlins, as illustrated in Figure 4.75, to form a rooflight to a north‐facing roof slope. The capping of the glazing bars compresses a Neoprene gasket to the sheets to make a watertight seal.

Figure 4.75 North light roof glazing.
Patent glazing
The traditional method of fixing glass in the slopes of roofs to create a rooflight is by means of wood or metal glazing bars that provide support for the glass and form weather flashings, or cappings, to exclude water. The word ‘patent’ refers to the patents taken out by the original makers of glazing bars. Timber, iron and steel glazing bars have largely been replaced by aluminium and lead or plastic‐coated steel bars. Likewise, single glazing has been replaced by double glazed units and wired glass. Patent glazing is relatively labour intensive due to the provision and fixing of the glazing bars at relatively close centres; however, the result can be an attractive, durable rooflight with good light transmission.
The most commonly used glazing bars are of extruded aluminium with seatings for glass, condensation channels and a deep web top flange for strength and stiffness in supporting the weight of the glass. The glass is secured with clips, beads or cappings. Figure 4.76 illustrates aluminium glazing bars supporting single wired glass in the slope of a pitched roof. The glazing bars are secured in fixing shoes screwed or bolted to angles fixed to purlins and fitted with aluminium stops to prevent glass from slipping down the slope of the roof. Aluminium spring clips, fitted to grooves in the bars, keep the glass in place and serve as weathering between the glass and the bar. Also illustrated is a system of steel battens and angles, an angle and a purlin to provide fixing for the glass and sheeting at their overlap. Lead flashings are fixed as weathering at the overlap of the glass and sheeting.

Figure 4.76 Patent glazing.
Figure 4.77 shows six different types of glazing bar. Aluminium glazing bar for sealed double glazing (Figure 4.77a) and single glazing (Figure 4.77b) are secured with aluminium beads bolted to the bar and weathered with butyl strips. Aluminium glazing bars with bolted aluminium capping and snap‐on aluminium cappings to the bars are illustrated in Figures 4.77c and d. Cappings are used to secure glass in position on steep slopes and for vertical glazing, as they afford a more secure fixing than spring clips; visually they give greater emphasis to the bars. Steel bars covered with lead and PVC sheathing as protection against corrosion are shown in Figures 4.77e and f. Steel bars are used for mechanical strength of the material and the advantage of more widely spaced supports than is possible with aluminium bars of similar depth.

Figure 4.77 (a) Aluminium patent glazing bar with sealed double glazing. (b) Aluminium patent glazing bar for single glazing. (c) Aluminium glazing bar with aluminium cap. (d) Aluminium glazing bar with snap‐on capping. (e) Lead clothed steel core patent glazing. (f) PVC sheathed steel core glazing bar.
Rooflights in flat and low‐pitch roofs
A lantern light is constructed with glazed vertical sides and a hipped or gable‐ended glazed roof. The vertical sides of the lantern light are used as opening lights for ventilation. Lantern lights were often used to cover considerable areas, the light being framed with substantial timbers of iron or steel, to provide top light to large stairwells and internal rooms. Ventilation from the opening upstand sides is controlled by cord or winding gear from below to suit the requirements of the occupants of the space below. The lantern light requires relatively frequent maintenance if it is to remain sound and watertight, and many have been replaced by domelights. Figure 4.78 is an illustration of an aluminium lantern light constructed with standard aluminium window frame and sash sections, aluminium corner posts, aluminium patent glazing to the pitched roof and an aluminium ridge section. The lantern light is bolted to an upstand curb (in common with all rooflights fixed in a flat roof) to resist wind uplift, and the roof covering is dressed to a height of at least 150 mm above the surface of the flat roof.

Figure 4.78 Aluminium lantern light.
Decklights are constructed as a hipped or gable‐ended glazed roof with no upstand sides; thus they provide daylight to the space below but no ventilation, as shown in Figures 4.79 and 4.80. This deck light is constructed with lead sheathed steel glazing bars pitched and fixed to a ridge and bolted to a steel tee fixed to the upstand curb.

Figure 4.79 Deck light (3D view).

Figure 4.80 Deck light.
A variety of shapes are produced to serve as rooflights for flat roofs, as illustrated in Figure 4.81. The advantage of the square and rectangular shapes over the circular and ovoid ones is that they require straightforward trimming of the roof structure around the openings and upstands. Plastic rooflights are made as either single skin lights or as sealed double skin lights, which improves their resistance to the transfer of heat. Plastic rooflights are bolted or screwed to upstand curbs to resist wind uplift, and the roof covering dressed against the upstand as illustrated in Figure 4.82. To provide diffused daylight through concrete roofs, a lens light may be used, comprising square or round glass blocks (lenses) that are cast into reinforced concrete ribs, as illustrated in Figure 4.83. The lens light can be prefabricated and bedded in place on site, or it can be cast in situ. Although light transmission is poor, these rooflights are used primarily to provide resistance to fire, to improve security and to reduce sound transmission through the roof.

Figure 4.81 Pyramid rooflight.

Figure 4.82 Upstand to domelight.

Figure 4.83 Reinforced concrete and glass rooflights.
Lightweight, tensile membrane structures
Film and fabric roof coverings are used in many different ways to create large canopies over open landscaped areas, sport facilities, and buildings. They can also be incorporated in a multi‐function fabric providing a watertight, thermally efficient and light emitting enclosure (Figure 4.84).

Figure 4.84 Main components of lightweight tensile fabric structure.
The Olympic stadium in Munich is a well‐known example of a tensile structure, designed by Frei Otto. Because of the exposed structure, the components can clearly be seen (Photograph 4.17). The stadium was a pioneering design in creativity and scale, designed and built for the 1972 Olympics. The principles now form the basis of many lightweight tensile membrane structures.

Photograph 4.17 Lightweight tensile structure, Munich Stadium.
The stadium is a tensile steel structure primarily designed to cover a large area and allow in natural light. The lightweight translucent skin is supported by masts, anchors and cables, to create a precise steel net covered by rigid acrylic panels. Lightweight acrylic panels are often used in construction, sometimes called acrylic glass, glass/plastic laminate or polymethyl methacrylate (PMMA). PMMA is a transparent shatter‐resistant thermoplastic used as a lightweight alternative to glass, often used in profiled cladding and rooflights.
The structure relies on central masts (columns) and ties, with a network of cables that are pinned together by connectors, which distribute the tensile forces to the ground anchors. The cylindrical welded tube masts are up to 80 m in length. The connectors are made of cast steel, which act as central nodes to resolve and distribute the tensile forces. Each cable is connected to the node by an end bracket that is linked by a large pin to the connector. The nodes and cables are literally pinned together and it is the pin that allows for rotation and movement in the structure. Tensile forces are resolved through the network of pinned cables, which are then distributed to the foundations and ground anchors.
The acrylic panels are 4 mm thick and measure 2.9 × 2.9 m square. They are bolted to the intersection nodes laid on the cables. Neoprene gaskets are used to join, seal and accommodate 6° of movement. The net uses 750 mm aluminium clamps pressed on to all of the strands at 750 mm centres. Connections use one bolt per joint, providing a node that can freely rotate. The cable is made from 19 heavily galvanised, 2 and 3 mm diameter, steel wires. The main cables are made from five strands formed by 37–109 wires each. The cables are held under high tension to control the level deformation that could take place under snow and wind loads and the ropes are coupled to accommodate higher loadings. A combination of tension foundations are used to anchor the main cables including:
- inclined slot foundations, which act like tent pegs
- gravity foundations, using self‐weight plus the weight of the soil surcharge to anchor the foundations
- earth anchor foundations for the masts, which allowed dynamic movement when erecting the mast and accommodates the compressive forces on the mast
Fabric structures can be constructed as a single skin or as an inflated structure. Photograph 4.18 shows a concrete and steel structure covered by inflated transparent laminate, ETFE, film. This material can be used in single skin lightweight fabric construction or used to trap air creating an inflated structure. The transparent laminate does not degrade under ultraviolet light and has an expected service life of 50 years.

Photograph 4.18 Fabric and foil covered structures.
4.4 Diaphragm, fin wall and tilt‐up construction
The majority of tall, single storey buildings that enclose large open areas, such as sports halls, warehouses, supermarkets and factories, with walls more than 5 m high are constructed with a frame of lattice steel or a portal frame covered with lightweight steel cladding and infill brick walls at a lower level. An alternative approach is to use diaphragm walls and fin walls constructed of brickwork or blockwork. Brickwork is preferred to block‐work because the smaller unit of the brick facilitates bonding and avoids cutting of blocks. Some of the advantages of diaphragm and fin wall construction include durability, security, thermal insulation, sound insulation and resistance to fire. Visual appearance of the wall can be enhanced with the use of special bricks and creative design of fin walls.
Brick diaphragm walls
A diaphragm wall is built with two leaves of brickwork bonded to brick cross ribs (diaphragms) inside a wide cavity between the leaves, thus forming a series of stiff box or I‐sections structurally, as illustrated in Figure 4.85. The compressive strength of the bricks and mortar is considerable in relation to the comparatively small dead load of the wall, roof and imposed loads. Stability is provided by the width of the cavity and the spacing of the cross ribs, together with the roof, which is tied to the top of the wall to act as a horizontal plate to resist lateral forces.

Figure 4.85 Brick diaphragm wall.
Construction
The width of the cavity and the spacing of the cross ribs is determined by the size of the box section required for stability and the need for economy in the use of materials by using whole bricks. Cross ribs are usually placed four or five whole brick lengths (with mortar joints) apart and the cavity one‐and‐a‐half or two‐and‐a‐half whole bricks (with mortar joints) apart, so that the cross ribs can be bonded in alternate courses to the outer and inner leaves, as illustrated in Figure 4.86. Loads on the foundations are relatively slight, thus a simple strip foundation can be used in good ground conditions.

Figure 4.86 Bonding of diaphragm wall.
The roof is tied to the top of the diaphragm wall to act as a prop in resisting the overturning action of lateral wind pressure, by transferring the horizontal forces on the long walls to the end walls of the building that act as shear walls. The roof structure is tied to a reinforced concrete capping beam by bolts, as illustrated in Figure 4.87. Care is required at this junction to ensure that thermal bridging does not occur across the capping beam. Roof beams are braced by horizontal lattice steel wind girders, which are connected to roof beams, as illustrated in Figure 4.88.

Figure 4.87 Connection of roof beams to diaphragm wall.

Figure 4.88 Wind girder to beam roof.
Door and window openings should be designed to fit between the cross ribs so that the ribs can form the jambs of the opening. Large door and window openings will cause large local loadings; thus double ribs (or thicker ribs) are built to take the additional load, as illustrated in Figure 4.89. Vertical movement joints are formed by the construction of double ribs at the necessary centres to accommodate thermal movement (Figure 4.90).

Figure 4.89 Openings in diaphragm wall.

Figure 4.90 Movement joint in diaphragm wall.
Diaphragm walls built in positions of severe exposure will resist moisture penetration, although the cavity should be ventilated to assist with the drying out of the brickwork. Given the problem of thermal bridging inherent in the brick diaphragms, the most convenient method of insulation is to fix insulation to the inside face of the wall. A long, high diaphragm wall with flat panels of brickwork may have a rather uninspiring appearance. Variations in the depth of the cavity wall, the use of projecting brick fins and polychromatic brickwork may go some way to alleviate the monotony, although there will be cost implications.
Brick fin walls
A fin wall is built as a cavity wall buttressed with piers (fins), which are bonded to the external leaf of the cavity wall to buttress and hence stiffen the wall against overturning. A fin wall acts structurally as a series of T‐sections, as illustrated in Figure 4.91. The compressive strength of the bricks and mortar is considerable in relation to the comparatively small dead load of the wall, roof and imposed loads. Stability against lateral forces from wind pressure is provided by the T‐sections of the fins and the prop effect of the roof, which is usually tied to the top of the wall to act as a horizontal plate to transfer forces to the end walls. The minimum dimensions and spacing of the fins are determined by the cross‐sectional area of the T‐section of the wall required to resist the tensile stress from lateral pressure and by considerations for the appearance of the building. Spacing and dimensions of the fins can be varied to suit a chosen external appearance. Some typical profiles for brick fins are illustrated in Figure 4.92, with brick specials use for maximum effect.

Figure 4.91 Fin wall.

Figure 4.92 Typical profiles for brick fins.
Construction
The wall is constructed as a cavity wall, with inner and outer leaves of brick tied with wall ties and thermal insulation positioned within the cavity. The fins are bonded to the outer leaf in alternate courses. Thickness of the fin will typically be one brick thick with a projection of four or more brick lengths, with the size of the fin varying to suit structural and aesthetic requirements. The fins should be spaced to suit whole brick sizes, thus minimising the cutting of bricks, and at regular centres necessary for stability and for appearance. The loads on the foundation of a fin wall are relatively slight, and a continuous concrete strip foundation should provide adequate support and stability on good bearing ground. The foundation will extend under the fin, as illustrated in Figure 4.93.

Figure 4.93 Brick pier fin bonded to outer leaf of cavity wall.
Roof beams are usually positioned to coincide with the centres of the fins and tied to a continuous reinforced capping beam that is cast or bedded on the top of the wall, or to concrete padstones cast or bedded on top of the fins, as illustrated in Figure 4.94. To resist wind uplift on lightweight roofs, the beams are anchored to the brick fins through bolts built into the fins, cast or threaded through the padstones and bolted to the beams. Horizontal bracing to the roof beams is provided by lattice wind girders fixed to the beams to act as a plate in propping the top of the wall.
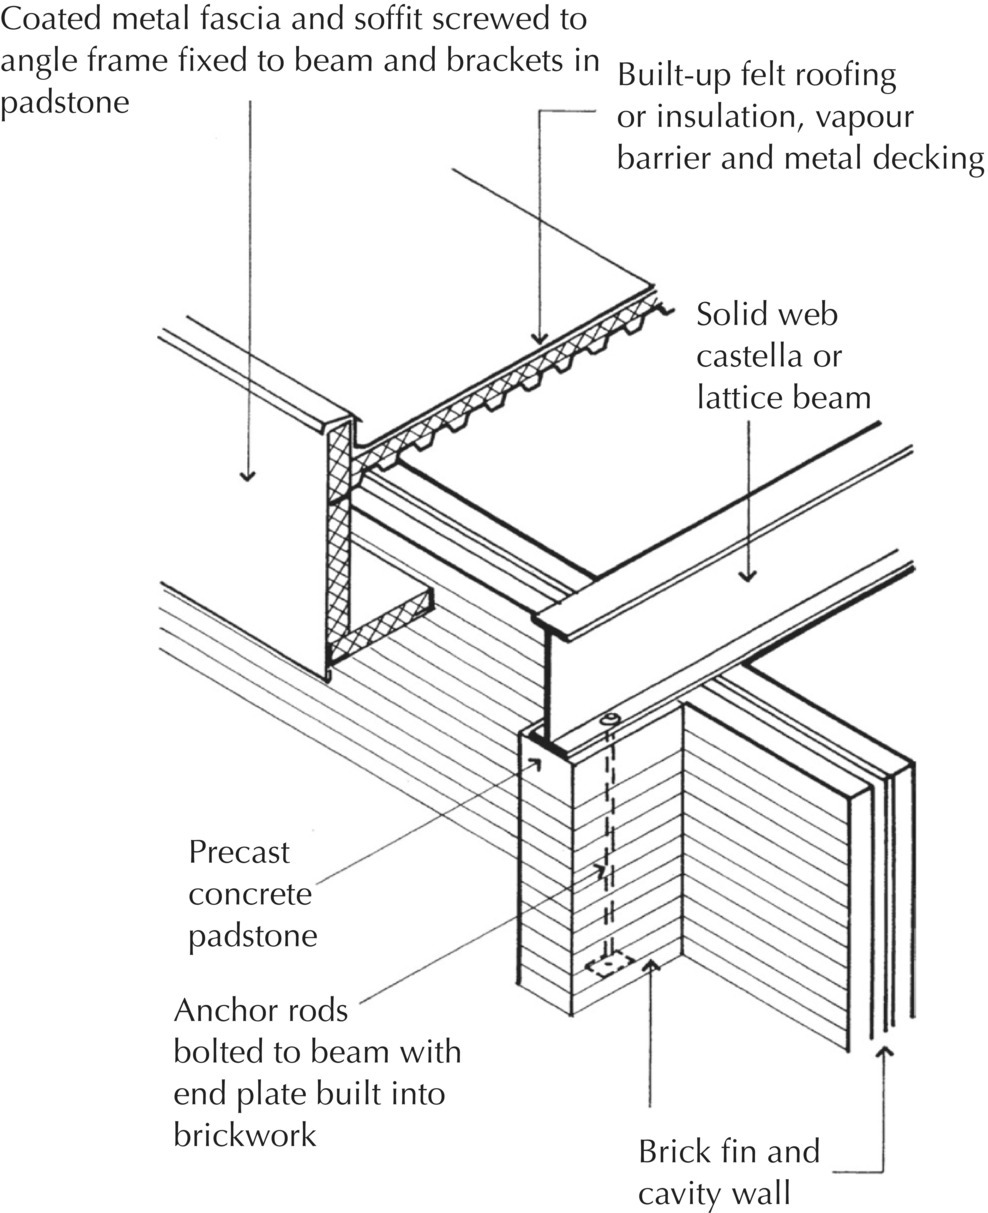
Figure 4.94 Fin wall, beams and roofing.
Door and window openings should be the same width as the distance between the fins for simplicity and economy of construction. To allow sufficient cross‐section of brickwork at the jambs of wide openings, a thicker fin or a double fin is built, as illustrated in Figure 4.95. Movement joints are usually formed between double brick fins, as illustrated in Figure 4.96. In addition to the usual resistance to weather provided by brickwork, the projecting fins may provide some additional shelter to the wall from driving rain.

Figure 4.95 Openings in fin walls.

Figure 4.96 Movement joint in fin wall.
Concrete tilt‐up construction
Tilt‐up construction is a technique of precasting large, slender reinforced concrete wall panels on site (on a temporary casting bed or on the concrete floor slab) which, when cured, are tilted by crane into position. This technique has been used principally for the construction of single storey commercial and industrial buildings on open sites where there is room for casting and the necessary lifting equipment. Tilt‐up construction has been used extensively in the US, where it originated, and many other countries such as Australia and New Zealand, for the speed of casting and speed of erection of the panels. The technique is most economical when there is a high degree of repetitiveness in the structure and the walls are used in a loadbearing capacity. Typical applications include low‐rise warehouses, offices and factories. There are few examples of this type of construction in the UK.
The concrete panels provide good resistance to the penetration of rain and also provide good durability and freedom from maintenance. Panels also provide good fire resistance, resistance to the passage of sound and relatively good security against forced entry. The reinforced concrete panels do not provide adequate thermal insulation for heated buildings. Thermal insulation is usually applied to the internal face of the panels with a moisture vapour check between wall and insulation. Insulation boards are used to provide both insulation and an internal finish to the building, fixed to timber battens which are shot fired to the panel.
Tilt‐up concrete panels vary in size, shape and thickness, but typically will be around 7 × 5 m, 160 mm thick, and weigh between 20 and 30 tonnes. Panel size is limited by the strength of the reinforced concrete panel necessary to accommodate the stresses induced in the panel as it is tilted from the horizontal to the vertical and also by the lifting capacity of the cranes. Wall panels may vary in design from plain, flat slabs to frames with wide openings for glazing, provided that there is adequate reinforced concrete to carry the anticipated loads. A variety of shapes and features are made possible by repetitive use of the formwork in the casting bed, and a variety of external finishes can be produced, ranging from smooth to textured finishes.
Sequence of assembly
The sequence of operations is shown in Figure 4.97. The site slab of concrete is cast over the completed foundations, drainage and service pipework and accurately levelled to provide a level surface on which the wall panels can be cast. A bond breaker/cure‐coat is then applied to the concrete slab and the panels cast around reinforcement inside steel (or timber) edge shuttering, which is placed as near as possible to the final position of the wall panel. Lifting lugs and other fittings are usually cast into the upper face of the panels, which will be covered by insulation and internal finishes. Wall panels may be cast individually or as a continuous strip. If the panels are cast as a continuous strip, they are cut to size once the concrete has gone off but during the early stages of the concrete’s maturity (one or two days).

Figure 4.97 Tilt‐up construction.
Panels may also be cast as a stack, one on top of the other, separated by a bond breaker. Once cured, the hardened panels are then gently lifted or tilted into position and propped or braced ready to receive the roof deck. The panels are tilted up and positioned on the levelled foundations against a rebate in the concrete, or up to timber runners or on to a sheathing angle and then set level on steel levelling shims. A mechanical connection between the foot of the slabs to the foundation and/or floor slab is usually employed. Cast in metal, dowels projecting from the foot of the panels are set into slots or holes in the foundations and grouted into position. Alternatively, a plate welded to studs or bar anchors, cast into the foot of the panel, provides a means of welded connection to rods cast into the site slab, as illustrated in Figure 4.98. The roof deck serves as a diaphragm to give support to the top of the wall panels and to transmit lateral wind forces back to the foundation. Lattice beam roof decks are welded to seat angles, welded to a plate and cast in studs, as shown in Figure 4.98. A continuous chord angle is welded to the top of the lattice beams and to bolts cast or fixed in the panel. The chord angle serves as a transverse tie across the panels and is secured to them with bolts set into slots in the angle to allow for shrinkage movements of the panels.


Figure 4.98 Connection of wall panels to site slab.
4.5 Shell structures
A shell structure is a thin, curved membrane or slab, usually of reinforced concrete, that functions both as a structure and covering, the structure deriving its strength and rigidity from the curved shell form (see Photographs 4.19 and 4.20). The term ‘shell’ is used to describe these structures by reference to the considerable strength and rigidity of thin, natural, curved forms like the shell of an egg. The material most suited to the construction of a shell structure is concrete, which is a highly plastic material when wet and which can take up any shape inside formwork (also known as centring). Small section reinforcing bars can readily be bent to follow the curvature of shells. Wet concrete is spread over the centring and around the reinforcement, and compacted to the required thickness, with the stiffness of the concrete mix and the reinforcement preventing the concrete from running down the slope of the curvature of the shell while the concrete is wet. Once the concrete has hardened, the reinforced concrete membrane or slab acts as a strong, rigid shell, which serves as both structure and covering to the building. The strength and rigidity of curved shell structures make it possible to construct single curved barrel vaults 60 mm thick and double curved hyperbolic paraboloids 40 mm thick in reinforced concrete for clear spans up to 30 m.

Photograph 4.19 Shell roof construction.

Photograph 4.20 Curved and domed shell roof.
The attraction of shell structures lies in the elegant simplicity of the curved shell form that utilises the natural strength and stiffness of shell forms with great economy in the use of material. The main disadvantages relate to their cost and poor thermal insulation properties. A shell structure is more expensive than, for example, a portal‐framed structure covering the same floor area, because of the considerable labour required to construct the centring on which the shell is cast. Shell structures cast in concrete are also difficult to insulate economically, because of their geometry and so are mainly suited to unheated spaces.
Shell structures tend to be described as single or double curvature shells. Single curvature shell structures are curved on one linear axis and form part of a cylinder in the form of a barrel vault or conoid shell; double curvature shells are either part of a sphere as a dome or a hyperboloid of revolution (see Figure 4.99). The terms are used to differentiate the comparative rigidity of the two forms and the complexity of the formwork (centring) necessary to construct the shell form. Double curvature of a shell adds considerably to its stiffness, resistance to deformation under load and reduction in the need for restraint against deformation.


Figure 4.99 Some typical shell roof forms.
Centring (or formwork) is the term used to describe the necessary temporary support on which a curved reinforced concrete shell structure is cast. The centring for a single curvature barrel vault is less complex than that for a dome, which is curved from a centre point. Advances in computer software have made the design of shell structures and the setting out of formwork much easier; however, there is still a considerable demand on labour to make and erect the centring, and the more complex the shape, the greater the amount of cutting and potential waste of material. The simplest, and hence most economic, of all shell structures is the barrel vault, constructed in concrete or timber.
Reinforced concrete barrel vaults
Reinforced concrete barrel vaults consist of a thin membrane of reinforced concrete positively curved in one direction, so that the vault acts as both structure and roof surface. The most common form of barrel vault is the long‐span vault, illustrated in Figure 4.100, where the strength and stiffness of the shell lie at right angles to the curvature. Typical spans range from 12 to 30 m, with the width being about half the span and the rise about one‐fifth of the width. To cover large areas, multi‐span, multi‐bay barrel vault roofs can be used (see Figure 4.101). The concrete shell may be from 57 to 75 mm thick for spans of 12 and 30 m, respectively. The thickness of the concrete provides sufficient cover of concrete to protect the reinforcement against damage by fire and corrosion.

Figure 4.100 Reinforced concrete barrel vaults.

Figure 4.101 Reinforced concrete barrel vault.
Stiffening beams and arches
Under local loads, the thin shell of the barrel vault will tend to distort and lose shape and, if this distortion were of sufficient magnitude, the resultant increase in local stress would cause the shell to progressively collapse. To strengthen the shell against this possibility, stiffening beams or arches are cast integrally with the shell. Figure 4.102 illustrates the four types of stiffening members generally used, with common practice being to provide a stiffening member between the columns supporting the shell. The downstand reinforced concrete beam, which is usually 150 or 225 mm thick, is the most efficient of the four because of its depth. To avoid the interruption of the line of the soffit of the vaults caused by a downstand beam, an upstand beam is sometimes used. The disadvantage of an upstand beam is that it breaks up the line of the roof and also needs protection against the weather. Arch ribs are sometimes used because they follow the curve of the shell and therefore do not interrupt the line of the vault; however, these are less efficient structurally because they have less depth than beams.

Figure 4.102 Stiffening beams and arches for reinforced concrete barrel vaults.
Edge and valley beams
Reinforced concrete edge beams are cast between columns as an integral part of the shell, to resist the tendency of the thin shell to spread and its curvature to flatten out due to selfweight and imposed loads. The edge beams may be cast as dropped beams, upstand beams, or partly upstand or partly dropped beams, as illustrated in Figure 4.103. Between multibay vaults, the loads on the vaults are largely transmitted to adjacent shells and then to the edge beams, thus allowing the use of comparatively slender featheredge beams.

Figure 4.103 Edge and valley beams for reinforced concrete barrel vaults.
Rooflights
Natural light through the shell structure can be provided by decklights formed in the crown of the vault, as illustrated in Figure 4.101, or by domelights. Rooflights are fixed to an upstand curb cast integrally with the shell, as illustrated in Figure 4.101. Care is required to avoid overheating and glare. One way of providing natural light and avoiding glare and overheating is to use a system of north light barrel vaults, as illustrated in Figures 4.104 and 4.105. The roof consists of a thin reinforced concrete shell on the south‐facing side of the roof, with a reinforced concrete‐framed north‐facing slope, and pitched at between 60° and 80°. This construction is less efficient structurally than a barrel vault, because the rigidity of the shell is interrupted by the north lights.

Figure 4.104 Three‐bay reinforced concrete north light barrel vault.

Figure 4.105 Reinforced concrete north light barrel vault.
Thermal insulation
The thin concrete shell offers poor resistance to the transfer of heat, and some form of insulating soffit lining is necessary to meet the requirements of the Building Regulations. This is difficult to achieve without causing thermal bridges and also avoiding interstitial condensation between the insulation and the concrete structure, which adds considerably to the cost of the shell, and combined this makes concrete shells largely unsuitable for buildings which are to be heated.
Expansion joints
To limit expansion and contraction caused by changes in temperature, continuous expansion joints are formed at intervals of approximately 30 m along the span and across the width of multi‐bay, multi‐span barrel roofs. The expansion joints are formed by erecting separate shell structures, each with its own supports and with a flexible joint material between neighbouring elements (see Figure 4.106). Vertical expansion joints are made so as to form a continuous joint to the ground with double columns on either side of the joint. Longitudinal expansion joints are formed in a valley with upstands weathered with non‐ferrous cappings over the joint.

Figure 4.106 Expansion joints and flashings in reinforced concrete barrel vaults. Expansion joints at intervals of not more than 30 m.
Roof covering
A variety of materials may be used to cover concrete shells, the choice depending on the use of the building and to a certain extent the position of the thermal insulation. Lightweight materials such as thin non‐ferrous sheet metal, bitumen felt and plastic membranes may be used.
Walls
The walls of shell structures between the columns are non‐loadbearing, their purpose being to provide shelter, security and privacy, as well as thermal and sound insulation. Thus a variety of partition wall constructions may be used, from brick and blockwork to timber and steel studwork with facing panels.
Conoid and hyperboloid shell roofs
Reinforced concrete conoid shell
In the reinforced concrete conoid shell form, the curvature and rise of the shell increases from a shallow curve to a steeply curved end in which the north light glazing is fixed, as illustrated in Figure 4.99. The glazed end of each shell consists of a reinforced concrete or steel lattice, which serves as a stiffening beam to resist deformation of the shell. Edge beams resist spreading of the shell as previously described.
Hyperbolic paraboloid shells
The hyperbolic paraboloid shells provide dramatic shapes and structural possibilities of doubly curved shells (see Photograph 4.21). The name hyperbolic paraboloid comes from the geometry of the shape: the horizontal sections through the surface are hyperbolas and the vertical sections parabolas, as illustrated in Figures 4.107 and 4.108. The structural significance of this shape is that at every point on the surface, straight lines, which lie in the surface, intersect so that in effect, the surface is made up of a network of intersecting straight lines. Thus the centring (formwork) can consist of thin straight sections of timber, which are simple to fix and support.

Photograph 4.21 Hyperbolic paraboloid shell roof.

Figure 4.107 Hyperbolic paraboloid (saddle) surface.


Figure 4.108 Setting out straight line limited hyperbolic paraboloid surfaces on a square base.
Reinforced concrete hyperbolic paraboloid shell
Figure 4.109 illustrates an umbrella roof formed from four hyperbolic paraboloid surfaces supported on one column. The small section reinforcing mesh in the surface of the shell resists tensile and compressive stress, and the heavier reinforcement around the edges and between the four hyperbolic paraboloid surfaces resists shear forces developed by the tensile and compressive stress in the shell. A series of these roofs can be combined, with glazing between them, to provide shelter to the area below.

Figure 4.109 Reinforced concrete hyperbolic paraboloid.
Timber shell structures
Timber barrel vaults
Single‐ and multi‐bay barrel vaults can be constructed from small section timber with spans and widths similar to reinforced concrete barrel vaults (Figure 4.110). The vault is formed from layers of boards glued and mechanically fixed together and stiffened with ribs at close centres. The timber ribs serve both to stiffen the shell and to maintain the boards’ curvature over the vault. Glue‐laminated edge and valley beams are formed to resist spreading of the vault. Timber barrel vaults have some advantage over concrete, in that the material performs better in terms of providing some thermal insulation. Indeed, it is easier to include thermal insulation within the construction while maintaining the visual integrity of the shell.

Figure 4.110 Timber barrel vault.
Timber hyperbolic paraboloid shell
Timber can also be used to form hyperbolic paraboloid shell structures (Figure 4.111). Laminated boards and edge beams are used. Low points of the shell are usually anchored to concrete abutments/ground beams to prevent the shell from spreading under load.

Figure 4.111 Hyperbolic paraboloid timber shell roof.