![]()
In the previous chapters in this section, you learned about patterns that relate to SQL Server and Oracle Sources. In this chapter, I will move on to patterns that relate to sourcing data from the IBM DB2 database. DB2 describes a variety of databases, so it is essential to learn about the different databases I will discuss, as well as how to use each database as an Integration Services source.
As I described in Chapter 4, setting up a source entails four different objects: connection manager, provider, source component, and a source component query. While this remains true for the DB2 database, you need the additional first step of determining what type of database you own. DB2 has a number of types, providers, and ways to query data. As we look at the different patterns associated with each of these components, picture how they will work with other sources as well. Combining these steps will put you on the right path to pulling data from your DB2 database.
This chapter highlights patterns that may be of use while connecting to a DB2 database, but does not cover every possible scenario that you may run into in your environment.
There are several different types of DB2 databases available on the market today. How you connect to the database depends on the DB2 version. DB2 separates its products into three groups:
- DB2 for i: This version has gone through multiple names over the years, including DB2 for AS/400, iSeries, System I, and Power Systems. DB2 is included in this server, so people commonly refer to this version when they think of DB2.
- DB2 for z/OS: This DB2 version is the main database available for the z/OS platform and is only available in 64-bit mode.
- DB2 for LUW: This version of DB2 is a later addition to the DB2 family. The Linux, UNIX, and Windows (LUW) version comes in multiple editions, depending on the purpose of your database instance. More information on these editions can be found on IBM’s website.
The different product types affect how you query data from Integration Services. As I walk you through setting up your connection, I will point out some of the differences you need to be aware of based on the product type. The first thing you need to do is pick a provider to use in your connection manager.
The first step in pulling data from DB2 is to select a provider that can be used in your environment. There are two steps to accomplishing this:
- Find Database Version
- Pick Provider Vendor
The first step in selecting your DB2 provider is to learn what version you own. Combining the version information with the product type will help you choose what provider to use. If you’re not sure what type of server you’re working with, you have a couple of options. The first option is to use a DB2 administration tool to check the properties of your instance. For example, if you use Control Center, you can right-click on the instance name, and click the About menu option. This will show something similar to Figure 6-1.
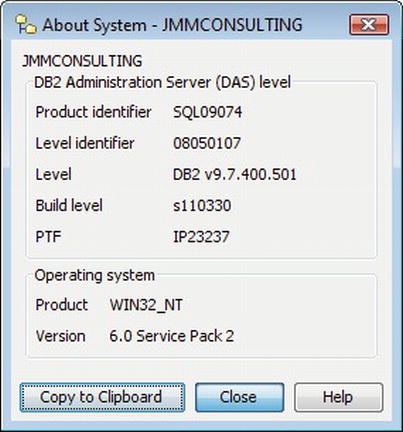
Figure 6-1. Control Center About window showing database version and information
If you don’t have access to connect directly to the instance, you can run a query against the database instead to pull the same information. A sample query that shows this information can be seen in Listing 6-1, with the results shown in Figure 6-2.

Figure 6-2. Query results showing database version and information
Listing 6-1. Sample query to show database version and information
SELECT inst_name
        , release_num
        , service_level
        , bld_level
        , ptf
        , fixpack_num
FROM TABLE (sysproc.env_get_inst_info())
While it is possible to use ODBC or ADO.NET to connect to a DB2 database, we will focus on OLE DB providers in this chapter to ensure that we can use the connection for all transformations. Here are two of the more common providers and when you would use each one.
- IBM OLE DB Provider for DB2: IBM produces their own OLE DB provider, which can be used in applications such as Integration Services. You can download this provider from IBM’s website, www.ibm.com. This provider can be used for all versions and the latest products.
- Microsoft OLE DB Provider for DB2 Version 4.0: Microsoft created a provider that uses OLE DB to connect to DB2. You can download this provider separately, or as part of the Microsoft SQL Server Denali CTP 3 Feature Pack, found here: http://www.microsoft.com/download/en/details.aspx?id=26726. This provider can be used for all versions of DB2. See the latest documentation for which product numbers it supports.
Don’t forget to make sure you’ve selected either the 32-bit or 64-bit version, based on the database server. Also ensure that the database version matches the supported version and product for the provider you want to use. I recommend using the provider most often used in your organization to facilitate ease of development and maintenance. If you are trying a provider for the first time, try the different versions to see what works best for you, as the performance and security discrepancies may vary per environment.
Connecting to a DB2 Database
For this chapter, we’ll use the Microsoft OLE DB Provider for DB2. No matter what provider you choose, the next step is to make a connection to the DB2 database. To do this, you need to create a connection manager, select the correct provider, and fill out the appropriate server information.
Once you download your desired provider, you will install it on the server where you will develop and execute your Integration Services packages. If the provider has installed correctly, you can see it by opening up the Source Assistant. A correctly installed provider can be seen in Figure 6-3.
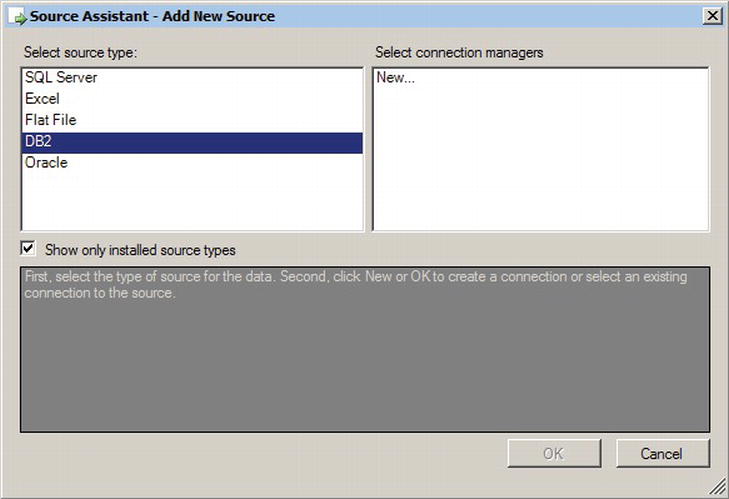
Figure 6-3. Source Assistant’s Add New Source window
Begin by creating a shared OLE DB connection manager in the Solution Explorer of your package. In the provider dropdown list at the top of the Connection Manager window, change the provider to Microsoft OLE DB Provider for DB2, as seen in Figure 6-4.
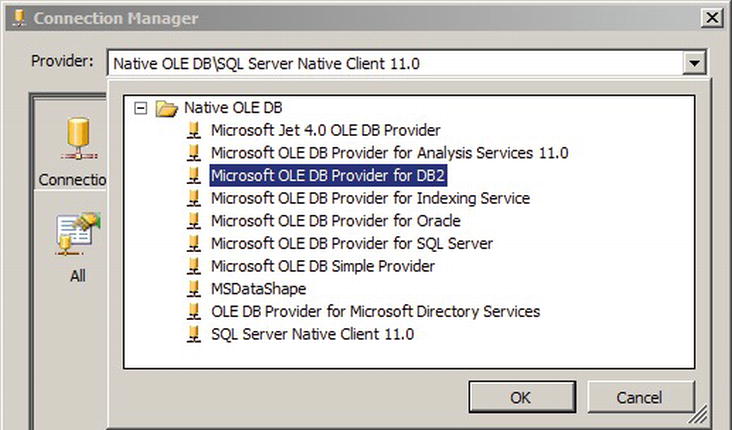
Figure 6-4. Connection Manager window Provider List
Next, you can add the name of the database instance, the correct authentication method, and the database you want to connect to. If you prefer, you can directly enter a connection string in the Connection property of the Source.
![]() Note If you ever have a question on the correct connection string to use, http://www.connectionstrings.com is a great resource to answer your question.
Note If you ever have a question on the correct connection string to use, http://www.connectionstrings.com is a great resource to answer your question.
In additional to telling Integration Services how to connect to the DB2 database, you also need to tell Integration Services how to view the data. To store data, databases use an encoding scheme and character codeset. The two encoding schemes that you need to understand are:
- ASCII: The American Standard Code for Information Interchange is a 7-bit encoding scheme that contains 128 printable and non-printable characters.
- EBCDIC: The Extended Binary Coded Decimal Interchange Code was created by IBM and is an 8-bit encoding scheme used in their mainframe servers.
Both DB2 for i and DB2 for z/OS use the EBCDIC encoding scheme, and DB2 for LUW uses the ASCII encoding scheme. Typically, the EBCDIC schemes use the codeset number 37, and the DB2 for LUW uses the ANSI-1252 codeset. Using the Microsoft OLE DB Provider for DB2, the next step is to modify the codeset for whichever version you are using.
Begin by clicking on the Data Links… button next to the Provider name in the Connection Manager, seen in Figure 6-5.
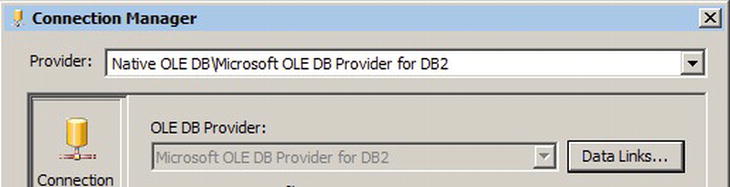
Figure 6-5. Data Links button on the Connection Manager window
The Data Link Properties window should open. Under the Advanced tab > Host CCSID property, you can use the default value of EBCDIC – U.S./Canada [37] or change it to ANSI – Latin I [1252], as shown in Figure 6-6. In addition, you may find it necessary to check the Process binary as character option if you are seeing output that looks like data type names rather than your data.
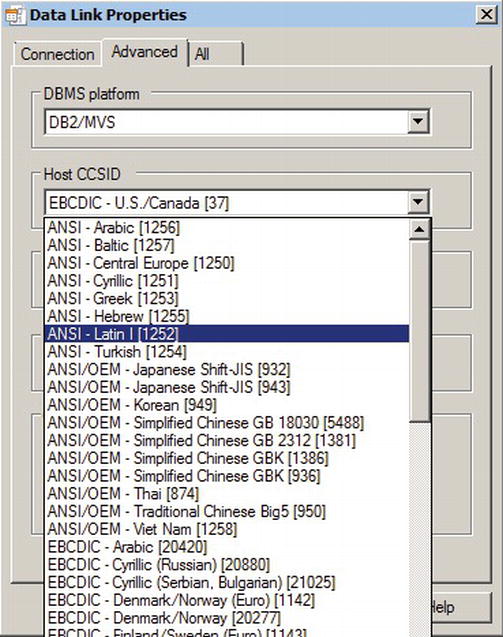
Figure 6-6. Data Link Properties window with Host CCSID List
The final set of DB2 Source patterns covers querying the DB2 database. Because the Integration Services package uses an OLE DB provider, it will also need an OLE DB source component. As with any other database, the source component should point to the DB2 connection manager already created. Once the package successfully connects to the database, it is time to query the database.
![]() Note A number of companies provide alternatives to the Integration Services connection managers and source components. They provide a different interface and different functionality than the OLE DB source component. If you need additional functionality, such as EBCDIC to ASCII conversion, see aminoSoftware’s Lysine EBCDIC source.
Note A number of companies provide alternatives to the Integration Services connection managers and source components. They provide a different interface and different functionality than the OLE DB source component. If you need additional functionality, such as EBCDIC to ASCII conversion, see aminoSoftware’s Lysine EBCDIC source.
All source component queries are written in whatever brand of SQL the database uses. DB2’s RDBMS-specific language is called SQL PL, and PL/SQL can also be used for later versions. If you receive an error message about syntax, be sure that your syntax matches the guidelines found on IBM’s website: http://publib.boulder.ibm.com/infocenter/db2luw/v9r7/index.jsp?topic=/com.ibm.db2.luw.apdv.plsql.doc/doc/c0053607.html.
In certain cases, you may want to use parameters to limit the data returned from the database. Let’s take a look at parameterizing your queries now.
DB2 Source Component Parameters
An important part of writing source queries is the ability to filter the data that enters the pipeline. There are a number of reasons why you would want to do this, including loading data incrementally, reusing the same package for different departments, or reducing the amount of data that is run at one time. When using the Microsoft OLE DB Provider for DB2, you need to set the Derive Parameters property to True. This property is found in the connection manager, under the Data Links… button, and the All tab, as shown in Figure 6-7.
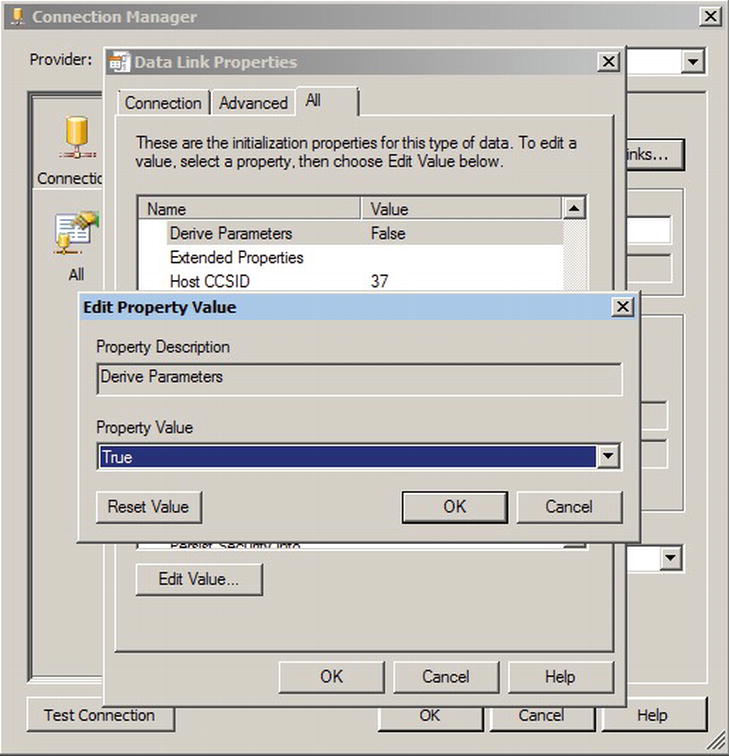
Figure 6-7. Edit Property Value window on the Data Link Properties window
Once the Derive Parameters property is set, you will write your query using question marks, similar to Listing 6-2. Put the query in the SQL command in the source component.
Listing 6-2. Sample query to illustrate DB2 parameters
SELECT col1
       , col2
       , col3
FROM tab1
WHERE col4 = ?
Be sure to click the Parameters button next to the query in the source to assign variables to each parameter that you set. It is important that the list of variables in the Parameters window matched the correct order in the query.
There are some scenarios where using query parameters won’t work. Let’s look at when you can’t use query parameters, and what to do instead.
DB2 Source Component Dynamic Queries
Parameterized queries will not work if the content of the source query needs to be changed for any reason. The table, schema, or column names could change as part of the query content. A typical example of this in DB2 is when you have different schemas in each environment. To fix this, we set an expression on a variable and use the variable in the SQLStatement property. Let’s walk through the steps of setting this up.
Begin by creating two string variables: environment and query. Set the following properties on the query variable:
EvaluateAsExpression: True
Value: "select col1, col2 from" + @environment + ".tab1"
![]() Note In Integration Services’s editions prior to SQL Server 2012, expressions had a limit of 4000 characters. This restriction is now removed, allowing you to create strings as long as needed.
Note In Integration Services’s editions prior to SQL Server 2012, expressions had a limit of 4000 characters. This restriction is now removed, allowing you to create strings as long as needed.
In the OLE DB source component, change the query type to SQL Statement as Variable, and pick the query variable that you just selected, as shown in Figure 6-8.
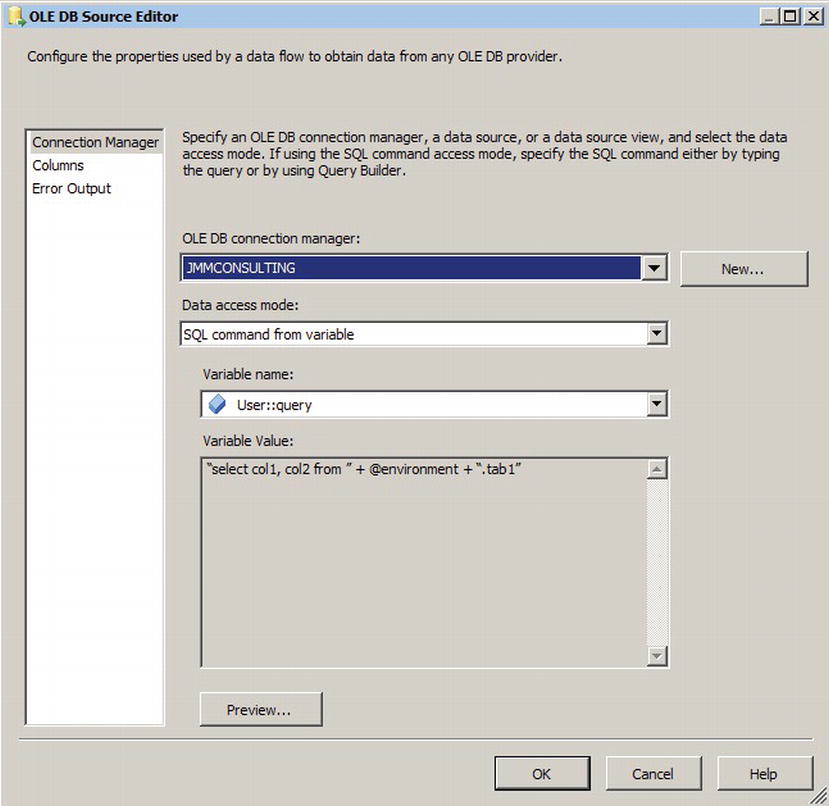
Figure 6-8. OLE DB Source Editor with dynamic query properties
When this package runs, use a package parameter to pass in the correct environment schema name. The expression on the query variable will be set to the new query and execute correctly. Make sure to set the ValidateExternalMetadata property on the OLE DB Source to False to ensure that the package will validate successfully.
Summary
This chapter has covered many of the patterns necessary to connect to the different types of the IBM DB2 database. You’ve learned how to determine what type of DB2 database you own, how to pick the appropriate provider, and different ways of querying the database. Note that sometimes organizations go a different route when dealing with DB2: exporting the data into a file and then loading the file using SSIS. This is a perfectly valid option, and might make sense for you if you have network latencies or problems with connectivity to your DB2 database. If you decide to go this route instead, you can learn how to load the data using Flat File Source Patterns, which I will discuss in Chapter 7.