

Closing the Loop with JavaScript
We’ve come a long way already with JavaScript. We started out by understanding the roots of the language, then graduated to creating complex logic with it. Next, we began to create our own page-level namespaces; and finally, we learned how to hold all of the functionality that we need in a given page or site.
Our next step is to close the loop with the language; we will take what we’ve already learned and combine that with some high-level concepts that will allow us to create complete, professional applications with JavaScript. For example, we will look at the many ways to deal with data; examine how to store data for future use; learn how to load in external data; and explore the finer points of achieving and maintaining excellence in your craft, including how to debug and test your apps.
Let’s begin by looking at data.
Working with data
Working with data is one of the most important things that you will be doing with JavaScript. Storing and retrieving data will comprise a large chunk of the code that you write, whether it’s saving user preferences, allowing a user to vote and updating the results in real time, or looking up and displaying search data results as the user types.
Saving and retrieving client side data
First, let’s ask ourselves why we would want to store data. HTTP is a stateless protocol, which means that no data is stored between sessions or requests. As such, we need to explicitly save data ourselves if we want to retain anything that happened during a browsing session. For example, we might want to save our logged-in state for a set amount of time, prepopulate a user name for the next time someone visits a site, or carry items that have been added to a shopping cart with the user from page to page. Whatever the case, we can use JavaScript for this.
The simplest way to save information from page to page is by using hidden form fields. Hidden form fields are exactly what they sound like: form elements that function like text boxes, but which are not displayed in the presentation of the page. They aren’t exactly hidden from the end user—it’s possible to view a page’s source and see a given element; however, such fields they are extremely useful and lightweight if your only need is to carry information from one page to the next in the same session:
<input type="hidden" id="passedVal">
<script>
document.getElementById("passedVal").value=cartItem;
</script>
The preceding code snippet shows a hidden form field with an id of passedVal and some accompanying JavaScript that stores the variable cartItem in passedVal. Generally, you would store data in the hidden form element before the form submission—see the previous chapter’s example on how to execute code before form submission—and that value gets passed along with the rest of the form values.
The downside to this is that the information is not persistent. If you need your information to be available even after the user closes the browser and comes back the next day, then there are other options you can explore.
Cookies have been around just about as long as the Web has, but the general public has become acutely aware of them only very recently due to the fact that the use of cookies has become more advanced and coordinated, and this has raised concerns over online privacy.
One of the founding engineers at Netscape, Lou Montulli—who is also responsible for a number of other innovations such as web proxies1—first created the concept of a cookie for transmission over HTTP back in 1994. Cookies are packets of data that the browser stores locally on the client machine. They are passed back and forth in the HTTP communication between client and server; and for our purposes, they are accessible to JavaScript.
You can access cookies and create new cookies with JavaScript via the document.cookie object. Essentially, cookies are just name-value pairs stored in a string. Let’s code up a function in our existing page namespace to store cookies:
createCookie: function(cookie_name, cookie_value){
document.cookie=cookie_name+"="+cookie_value;
}
Remember: We’re using object notation here. This function accepts two arguments— cookie_name and cookie_value—and it simply sets a cookie (named whatever string value is in the variable cookie_name) with the value of cookie_value.
We can test this out with the following call:
summerSlam.createCookie("sslam", "myfirstcookie");
This creates a cookie named sslam, and it has the value of myfirstcookie.
This is a good start, but let’s flesh this out a bit more and make it more useful for us. Let’s update our existing code, the code that does form validation, and have it also save the form values in a string of name-value pairs. Next, we will pass the saved name-value pairs to our cookie once the form is successfully submitted.
Let’s begin by adding a new variable called storedValues in the formValidate() function:
//snippet …
formValidate: function(form){
var requiredFields=["name", "email", "party" ];
var storedValues="";
//snippet…
storedValuesis the variable that we will concatenate, or append, all of the form values to; and we will ultimately pass it to our createCookie() function.
Next, let’s add the following lines of code in the for loop, after the if statement that checks for required fields:
if(form.elements[x].id){
storedValues+= form.elements[x].id+"="+form.elements[x].value+",";
}
The preceding code first checks to make sure that the form field we are currently on actually has an id—we don’t want to capture the fieldsets in there. If it does, we then append a string with the form element’s id and value to the end of storedValues. We also store a comma at the end of each id-value pair.
Next, we will add the following code after the for loop:
this.createCookie("sslam", storedValues);
This snippet calls our createCookie() function and passes in the form’s id-value pairs as the cookie value.
We can now successfully store all of the form names and values in a cookie! The only catch? The cookie has no expiration explicitly set, so it will expire at the end of the current browsing session. To get around this, let’s set an expiration date.
Let’s update the createCookie() function to accept another parameter that will be the number of days to keep the cookie:
createCookie: function(cookie_name,cookie_value,daysToExpire ){
var expirationDate=new Date();
expirationDate.setDate(expirationDate.getDate()+daysToExpire);
cookie_value+= ";expires="+expirationDate;
document.cookie=cookie_name+"="+cookie_value;
}
Here we pass in a third parameter that signifies the number of days in the future that the cookie will expire. We also append that date to the cookie value, in the format of expires=[date to expire].
Our namespace should now look like this:
var summerSlam=function(){
return{
formValidate: function(form){
var requiredFields=["name", "email", "party" ]
var storedValues="";
for(var x=0; x<form.elements.length; x++){
if(requiredFields.indexOf(form.elements[x].id)>-1){
if((form.elements[x].value.length<=0) || (form.elements[x].value == " ") ){
form.elements[x].focus()
console.log(form.elements[x].value.length)
alert("please complete all required fields")
return false;
}
}
if(form.elements[x].id){
storedValues+= form.elements[x].id+"="+form.elements[x].value+",";
}
}
this.createCookie("sslam", storedValues, 30)
return false;
},
createCookie: function(cookie_name,cookie_value, daysToExpire){
var expirationDate=new Date();
expirationDate.setDate(expirationDate.getDate()+daysToExpire);
cookie_value+= ";expires="+expirationDate;
document.cookie=cookie_name+"="+cookie_value;
}
};
}();
Excellent! Now whenever a user submits our form, we save her data in a cookie that expires in 30 days.
Now that we can store data on the client side, let’s retrieve it.
Remember that the cookie is stored as a string in the document.cookie object; for our purposes, it has a value formatted like this:
sslam=name=[value],email=[value],phone=[value],
party=[value],dob=[value],yes_first=[value],no_first=[value],
how_hear=[value],
In this case, [value] is the value that the end user entered into the form fields. Let’s think about how to intelligently parse this out.
First, we’ll need to strip out the cookie name from the cookie value. We’ll do this by splitting the string using sslam= as the delimiter. To do this, we’ll use the split() method, which takes a string, breaks it apart into smaller strings, and returns these in an array. It breaks the string up at every instance of the delimiter, which is a variable that you pass in. So, if you took a string that held a sentence and passed in an empty space as the delimiter, split() would return an array containing each word in the sentence. In our case, we’ll pass in sslam=, so that we can strip that out of the stored cookie data.
var cookieVal=document.cookie.split("sslam=")[1]
We can create a variable that will hold the second index in the returned array: the first value will be an empty string, and the second will have our name-value pairs in the cookie data, separated by commas. At this point, cookieVal should look like this:
name=[value],email=[value],phone=[value],party=[value],
dob=[value],yes_first=[value],no_first=[value],how_hear=[value],
Next, we want to split cookieVal at the commas, to give us an array of strings that are just name-value pairs.
namevalueArray=cookieVal.split(",")
Essentially, we’ll create an array of name-value pairs that look like this:
"[name]=[value]"
And finally, we want to iterate through namevalueArray and split each index on the assignment operator (=). To be really efficient, let’s create an object, adding the name as a property of the object and the value as that property’s value:
var formdata={};
for(ind in namevalueArray){
namevalHolder=namevalueArray[ind].split("=")
formdata[namevalHolder[0]]=namevalHolder[1];
}
Oh, but what if there is no cookie saved yet when we try to access this? For the bare minimum in safe coding, let’s wrap our logic in an if statement that tests to see whether document.cookie has data. Next, we’ll encapsulate that functionality in a function called parseCookieData() and have parseCookieData() return the formdata object:
parseCookieData: function(){
var formdata={};
if(document.cookie.length>0){
var cookieVal=document.cookie.split("sslam=")[1]
namevalueArray=cookieVal.split(",")
for(ind in namevalueArray){
namevalHolder=namevalueArray[ind].split("=")
formdata[namevalHolder[0]]=namevalHolder[1];
}
}
return formdata
}
Populating a form with cookie data
OK, so let’s take that object and prepopulate the user’s form with the data if he comes to our site with the cookie. First, we’ll create a function, populateForm(), and have it accept an object as a parameter. In populateForm(), we’ll loop through each key-value pair in the passed in object:
populateForm: function(data){
for (var key in data) {
}
}
In this case, the key variable holds the name of the property.
Next, we need to make sure that each property that we are looping through belongs to the current object—we do this so that we don’t reference properties that could be inherited down the prototype chain (see the last chapter for more information on this). To do this, we test the hasOwnProperty() method of the object:
if (data.hasOwnProperty(key)) {
}
So, as we are looping through each name-value pair, we’ll need to test what the form element type that we are dealing with is. We know from looking at our form that we’ll mainly need to deal with text boxes and HTML5 text box derivations like tel and date that, for our purposes in JavaScript, work just like text boxes and radio buttons. So, let’s do the following:
if(currentElement.type === "radio"){
if(data[key] === "1"){
currentElement.checked=true;
}
}else{
currentElement.value=data[key];
}
As we loop through the properties of the object, we reference the corresponding element on the page (i.e., we get the element on the page that has the id that matches the name of the object property) and test what the type of the element is (e.g., is the element a radio button?).
If it is a radio button and if the value of the corresponding property is the string, "1"—then we set the checked property of the element to true. This selects the radio button for the user.
If it is not a radio button, for our purposes we can assume it is a text box of some sort. Therefore, we set the value property of the element to the value of the object property.
Our complete function should look like this:
populateForm: func tion(data){
for (var key in data) {
var currentElement=document.getElementById(key)
if (data.hasOwnProperty(key)) {
if(data[key] !== undefined){
if(currentElement.type === "radio"){
if(data[key] === "1"){
currentElement.checked=true;
}
}else{
currentElement.vsalue=data[key];
}
}
}
}
}
To tie it all together, we can create a function that we’ll call setFormData() that will call populateForm() and pass in the return of the parseCookieData() function. We will also create an init() function that kicks this all off:
setFormData: function(){
this.populateForm(this.parseCookieData());
}
init: function(){
this.setFormData();
}
And finally, we’ll call the init() function from the body onload event in the HTML page.
<body onload="summerSlam.init();">
At this point, our namespace—the place where we capture submitted form data in a cookie and use the cookie to prepopulate the form when the user returns—should look like this:
var summerSlam=function(){
return{
init: function(){
this.setFormData();
},
formValidate: function(form){
var requiredFields=["name", "email", "party"]
var storedValues="";
for(var x=0; x<form.elements.length; x++){
if(requiredFields.indexOf(form.elements[x].id)>-1){
if((form.elements[x].value.length<=0) ||
(form.elements[x].value == " ") ){
form.elements[x].focus()
console.log(form.elements[x].value.length)
alert("please complete all required fields")
return false;
}
}
if(form.elements[x].id){
storedValues+= form.elements[x].id+"="+form.elements[x].value+",";
}
}
this.createCookie("sslam", storedValues, 30)
return false;
},
createCookie: function(cookie_name,cookie_value, daysToExpire){
var expirationDate=new Date();
expirationDate.setDate(expirationDate.getDate()+daysToExpire);
cookie_value+= ";expires="+expirationDate;
alert(cookie_value)
document.cookie=cookie_name+"="+cookie_value;
},
setFormData: function(){
this.populateForm(this.parseCookieData());
},
parseCookieData: function(){
var formdata={};
if(document.cookie.length>0){
var cookieVal=document.cookie.split("sslam=")[1]
namevalueArray=cookieVal.split(",")
for(ind in namevalueArray){
namevalHolder=namevalueArray[ind].split("=")
formdata[namevalHolder[0]]=namevalHolder[1];
}
}
return formdata
},
populateForm: function(data){
for (var key in data) {
var currentElement=document.getElementById(key)
if (data.hasOwnProperty(key)) {
if(data[key] !== undefined){
if(currentElement.type === "radio"){
if(data[key] === "1"){
currentElement.checked=true;
}
}else{
currentElement.value=data[key];
}
}
}
}
}
};
}();
While cookies are useful, they have certain issues. They are included in the HTTP transmission, so they add to the total payload of the page. Browsers apply certain limitations to cookie usage, such as setting a potential cap of 300 cookies in total, a 20 cookie limit per domain, and a 4 kb limit per cookie2.
HTML5 has brought with it a new API for storing client-side data: web storage. Web storage has two core objects that support different levels of persistence. The sessionStorage object stores data for the current session, but this is cleared when the browser is closed. The localStorage object persists even after the browser is closed and the session ends.
While cookies store data as a string that needs to be parsed, both web storage objects store data as native objects that are built-in to JavaScript. This makes it much easier to store and retrieve data from web storage objects.
Since web storage is part of HTML5, and since at the time of writing a good number of the legacy browsers in use today don’t support HTML5, a professional use of web storage checks for support of the HTML5 API and falls back to cookies if that support isn’t present.
The way we check that web storage is supported is to check the typeof for the Storage object. If this returns an object, we’re in business. Ostensibly, we could keep checking typeof each time we need to save something, but that call would get expensive, especially for browsers that don’t support web storage. Instead, let’s create a boolean variable called webstoragesupport in our namespace object and do our check in the init() function:
webstoragesupported: false,
init: function(){
if(typeof(Storage)){
this.webstoragesupported=true
}else{
this.webstoragesupported=false
}
this.setFormData();
}
Now let’s do a bit of refactoring, so that we can use web storage when it is supported and use cookies when it is not. We’ll pull all of the cookie-specific code out of formValidate() and put it in a function that we’ll call saveToCookie(). Next, instead of calling createCookie() at the end of formValidate(), we’ll call a function that we will define called saveData():
formValidate: function(form){
var requiredFields=["name", "email", "party" ]
for(var x=0; x<form.elements.length; x++){
if(requiredFields.indexOf(form.elements[x].id)>-1){
if((form.elements[x].value.length<=0) || (form.elements[x].value == " ")){
form.elements[x].focus()
alert("please complete all required fields")
return false;
}
}
}
this.saveData(form)
return false;
},
saveToCookie: function(form){
var storedValues="";
for(var x=0; x<form.elements.length; x++){
if(form.elements[x].id){
storedValues+= form.elements[x].id+"="+form.elements[x].value+",";
}
}
this.createCookie("sslam", storedValues, 30)
}
Next, we’ll create the saveData() function. This function should simply check our webstoragesupportedboolean variable and call saveToCookie() or a new function that we’ll create soon called saveToWebStorage():
saveData: function(form){
if(this.webstoragesupported){
this.saveToWebStorage(form)
}else{
this.saveToCookie(form)
}
}
And finally, we’ll create the saveToWebStorage() function. Again, we’ll loop through the form, but this time we’ll create new properties in the localStorage object named after the form element ids and with the same values as the form element values. Note that if we wanted to save this information only for the session (instead of in perpetuity), we would have used sessionStorage instead of localStorage:
saveToWebStorage: function(form){
for(var x=0; x<form.elements.length; x++){
if(form.elements[x].id){
localStorage[form.elements[x].id]=form.elements[x].value
}
}
}
Our page now saves to either a cookie or localStorage! The only thing we have left to do is to refactor our code that retrieves the data. Remember that populateForm(), our function that fills in the form fields, expects an object with properties that match the ids of the form elements on the page. Also, recall that this is exactly the structure that we stored in localStorage.
Retrieving data from local storage
Accordingly, we can make a simple edit to setFormData() to pass either the output of parseCookieData() or the localStorage object to populateForm():
setFormData: function(){
this.populateForm((this.webstoragesupported)?localStorage:this.parseCookieData());
}
Our JavaScript file should now look like this:
var summerSlam=function(){
return{
webstoragesupported: false,
init: function(){
if(typeof(Storage)){
this.webstoragesupported=true
}else{
this.webstoragesupported=false
}
this.setFormData();
},
formValidate: function(form){
var requiredFields=["name", "email", "party" ]
for(var x=0; x<form.elements.length; x++){
if(requiredFields.indexOf(form.elements[x].id)>-1){
if((form.elements[x].value.length<=0) || (form.elements[x].value == " ") ){
form.elements[x].focus()
alert("please complete all required fields")
return false;
}
}
}
this.saveData(form)
return false;
},
saveData: function(form){
if(this.webstoragesupported){
this.saveToWebStorage(form)
}else{
this.saveToCookie(form)
}
},
saveToWebStorage: function(form){
for(var x=0; x<form.elements.length; x++){
if(form.elements[x].id){
localStorage[form.elements[x].id]=form.elements[x].value
}
}
},
saveToCookie: function(form){
var storedValues="";
for(var x=0; x<form.elements.length; x++){
if(form.elements[x].id){
storedValues+= form.elements[x].id+"="+form.elements[x].value+",";
}
}
this.createCookie("sslam", storedValues, 30)
},
createCookie: function(cookie_name,cookie_value, daysToExpire){
var expirationDate=new Date();
expirationDate.setDate(expirationDate.getDate()+daysToExpire);
cookie_value+= ";expires="+expirationDate;
alert(cookie_value)
document.cookie=cookie_name+"="+cookie_value;
},
setFormData: function(){
this.populateForm((this.webstoragesupported)?localStorage:this.parseCookieData());
},
parseCookieData: function(){
var formdata={};
if(document.cookie.length>0){
var cookieVal=document.cookie.split("sslam=")[1]
namevalueArray=cookieVal.split(",")
for(ind in namevalueArray){
namevalHolder=namevalueArray[ind].split("=")
formdata[namevalHolder[0]]=namevalHolder[1];
}
}
return formdata
},
populateForm: function(data){
for (var key in data) {
var currentElement=document.getElementById(key)
if (data.hasOwnProperty(key)) {
if(data[key] !== undefined){
if(currentElement.type === "radio"){
if(data[key] === "1"){
currentElement.checked=true;
}
}else{
currentElement.value=data[key];
}
}
}
}
}
};
}();
Note that our current example could certainly be refactored in several ways, and there are many design choices open to us. For example, we could have created a completely separate namespace to handle saving data. Explore on your own how you can effectively create JavaScript libraries that you can share between pages and even between applications that you may make.
We’ve seen how to save client-side data; now let’s look at how to load external data.
It was when Google started loading type-ahead data into its search box that we first saw the subtle possibilities of loading external data without interrupting the user experience. From showing real time updates, to voting results, to updating shopping cart information while the user shops—we can now reflect a greater degree of the world around our users without interrupting the user experience.
In this section, we will look at how to load in external data.
As we saw in Chapter 8, Ajax—which is short for Asynchronous JavaScript And XML and is provided via the XMLHttpRequest (XHR) object—was one of the most significant recent innovations in JavaScript. It added the ability to add content to the client at run time without refreshing the browser. This opened up a world of complexity that you can introduce to websites; and for the first time, it let you really craft complex, client-facing web applications.
An Ajax transaction consists of the following steps:
- Instantiate an XMLHttpRequest object.
- Create a callback function that will fire whenever the network status of the XHR object changes.
- Send a request for external data, either via an HTTP POST or GET.
- When the network status changes, the callback function should check the readyState and HTTP status of the response.
See Figure 10-1 for a UML sequence diagram of an AJAX transaction.

Figure 10-1. A UML sequence diagram of an AJAX transaction
Let’s take a look at a code example!
First, we create and instantiate a new XMLHttpRequest object. In an earlier time, we had to check whether the browser supported the object natively or if we were dealing with IE 6, in which case we’d need to instantiate an XMLHttpRequest ActiveX object. But for our example, we’ll keep the code pure and assume that our audience has followed Microsoft’s advice and abandoned IE 63 in favor of something modern.
var xmlhttp;
xmlhttp=new XMLHttpRequest();
The open() method of the XHR object accepts five parameters:
- The first parameter specifies the HTTP request method that our Ajax call will use, which is usually GET or POST). However, other methods are supported (e.g., HEAD or PUT), as long as the browser supports them and the server that we are hitting is configured to support them.
- The second parameter is the URL of the remote data source.
- The rest of the parameters are optional. The third parameter is a boolean value that indicates whether the transaction is asynchronous (true) or synchronous (false). This is an important design decision. If your call is asynchronous, the page will continue to function normally and only react when the response is received. If the call is synchronous, all other functionality on the page will block until the response is received. If you leave this parameter off, it is assumed to be true (i.e., asynchronous).
- The fourth and fifth parameters are for the user name and password, if credentials are required.
Our next step is to call the XHR object’s open() method:
xmlhttp.open("GET","",true);
Now we want to assign a callback function to the onreadystatechange property of the XHR object. In our example, we’ll use an anonymous function, but you aren’t limited to just using anonymous functions if you don’t want to.
This callback function gets invoked every time the readyState property of the XHR object gets updated (because it is assigned to onreadystatechange). The readyState property has four potential values: 1, 2, 3, or 4. Here is what those values mean:
- 1: Indicates that the open() method of the XHR object has been called.
- 2: Indicates that the send() method of the XHR object has been called.
- 3: Indicates that the response from the remote server has started to load.
- 4: Indicates that the response has finished loading.
Our callback function needs to check the readyState property of the XHR object to make sure that the response has finished loading. It also needs to check the HTTP status code of the returned response, which is stored in the status property of the XHR object.
We want to make sure the HTTP status has a value of 200, which indicates a good response. We check this to make sure that we aren’t reading in a 4xx or 5xx error message response. We may even want to trap 4xx or 5xx HTTP status codes and alert the user accordingly (or even include retry logic, depending on our business requirements):
xmlhttp.onreadystatechange=function(){
if (xmlhttp.readyState==4 && xmlhttp.status==200)
{
//parse the response
}
}
Finally, we call the send() method to send the request. We can also pass in any additional parameters that we would want to send with the request as a parameter to send():
xmlhttp.send();
}
We also want to make sure that we take into account any error that may occur during the transmission of the data. The XHR object has an onerror event handler that lets us to track when errors occur; we can either log the error for our own purposes, or, if the data was mission critical, alert the user of the error.
Let’s look at a full example that assumes we have external data, formatted as JSON (JavaScript Object Notation) in a file named userData.js:
var user={
id: 21,
uname: "tb4912x",
playlist: [23343,1355,9303]
}
We load that data like this:
var xmlhttp;
xmlhttp=new XMLHttpRequest();
xmlhttp.onreadystatechange=function()
{
if (xmlhttp.readyState==4 && xmlhttp.status==200)
{
user=eval(xmlhttp.responseText) // eval the JSON data in the responseText
// to convert the string to JavaScript
alert(user.uname)
}
}
xmlhttp.onerror=function(){
alert("Sorry, we could not load your user data, please refresh and try again.");
}
xmlhttp.open("GET","userData.js",true);
xmlhttp.send();
But there are limitations to Ajax. The content that you load in must come from the same origin that your code lives on. Specifically, it must use the same domain, protocol, and port. So, a script served up via HTTP cannot call a remote file served up via HTTPS, even if it is at the same domain name. Also, a script that lives at the root domain cannot call a remote data source at a sub-domain of the main domain.
There are work-arounds to these limitations, which we’ll look at in the next section.
Cross Origin Resource Sharing (CORS) is a new working draft from the W3C that allows for resources to be available across origins. The specification for CORS can be found at www.w3.org/TR/cors/.
The idea of CORS is that the remote server announces that content is accessible across origins by specifying Access-Control-Allow-Origin: * in the HTTP response headers. For most modern browsers, the XMLHttpRequest object will work with CORS—the notable exceptions to this are (of course!) IE8 and IE9. We can check for support of CORS proactively by using the withCredentials property of the XHR object.
Be warned: the withCredentials property is a symptom of CORS, not a direct indicator. It checks whether the XHR object supports credentialed HTTP requests, which are needed to set cookies with CORS (and thus indirectly implying support for CORS in the browser). However, this property does not actually indicate that the remote server supports CORS:
var xmlhttp;
xmlhttp=new XMLHttpRequest();
if (xmlhttp.withCredentials !== undefined)
{
// make cross-site requests
xmlhttp.onreadystatechange=function(){
}
xmlhttp.open("GET","userData.js",true);
xmlhttp.send();
}
As noted previously, the major exception to this is Internet Explorer. IE8 and IE9 use a proprietary object that only those browsers implement, the XDomainRequest object. Trying to access CORS content using an XHR object in IE8 or IE9 will result in an error.
The syntax for using the XDR object is very similar to the syntax for using the XHR object:
xdr=new XDomainRequest();
if (xdr)
{
xdr.onprogress=XDRprogress; //callback function
xdr.onload=XDRcomplete; //callback function
xdr.open("get", url);
xdr.send();
}
Arguably, the most important thing that differentiates a robust professional language from a hobbyist’s toy is the toolset available for the language. Having good tools facilitates faster and higher quality development by allowing developers to, among other things, quickly and easily debug issues; create a suite of tests that assures the quality of the end product; profile (or measure) and track memory usage; and package up only the necessary bits for a faster delivery to the client. In recent years, the amount and quality of tools available for JavaScript has really blossomed as the language has come into its own.
Web development turned a major corner in 2006 when Firebug came out. Firebug is a tool created by Joe Hewitt that allows, among many other things, real-time JavaScript debugging in the browser. Firebug started life as a Firefox extension; however, it has since expanded to other browsers. It also created the paradigm that most other browser debugging tools now follow.
Before Firebug, when web developers ran into an error in their JavaScript, the only real method of run-time debugging available was to put alerts in the source code to first try and identify where the error was happening (Does the alert fire here? OK, is the error is above this line? How about here?). And once the approximate location was determined, web developers used alerts to try and figure out the state of each variable when the error happened.
This was an imprecise process and took far too long.
Firebug allows JavaScript developers to enjoy a real debugging environment that previously was only available in compiled or object code languages.
Let’s take a look at how we can use Firebug to debug our code. First, we have to make sure we have Firebug installed. It is available for download here: http://getfirebug.com/. Simply click the Install Firebug button and follow the instructions. When you have done this and your browser has restarted, you’ll see the Firebug icon (usually) in the upper-right corner of your browser. Click it and open up the Firebug panel, which should look something like what you see in Figure 10-2.
Figure 10-2. The Firebug panel
The tabs that we will concern ourselves with right now are Console and Script.
The Console tab is split into two panels:
- The left panel is the console; it displays output-error messages from the page or explicit trace statements that you can embed in your JavaScript via console.log() calls.
- The right panel is the command line; it is an input box where you can enter JavaScript code that you want to run. All of the global variables on the current page are in scope here, and you can interact directly with your code in this window.
To see an example, type console.log(summerSlam) in the command line and click the Run button. You should see our entire namespace object serialized and displayed in the console (see Figure 10-3).
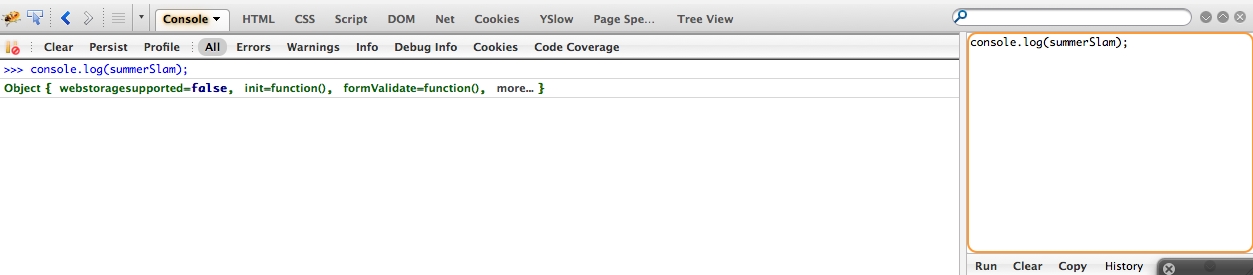
Figure 10-3. The serialized namespace object
This is a great way to invoke functions manually, to see potential issues, or to inspect the structure of objects. However, the real draw of Firebug is the debugger that is available in the Script tab.
If we click the Scripttab, we will be presented with the screen shown in Figure 10-4.

Figure 10-4. The Firebug debugger in the Script tab
The left panel shows our source code, while the right panel lets us keep track of watched expressions, the current stack, or a list of break points. Watched expressions are exactly that—expressions that we can see the current value of while the application is running. The current stack refers to the stack trace, which in JavaScript means the function we are currently in. The current stack shows what function called the current function, and you can use this to show the full chain of functions that were called to bring us to our current point.
In order to debug our application, we first need to create a break point, which is a point in the code where the interpreter will stop and allow the debugger to run the rest of the execution. When the debugger takes over execution, we can watch and step through the execution of the code and see what value each of our currently scoped variables holds. This will allow us to confirm that what is happening is what we expect to be happening. To create a break point, we simply click the left margin of a line of code, to the left of the line number. We will see a red circle where we clicked, which is the break point. Let’s put a break point right in the init() function, so we can step through our JavaScript that populates the form data.
When we refresh the page, the debugger will jump to this break point and allow us to step through the code. Notice the buttons on the upper-right corner of Figure 10-5.
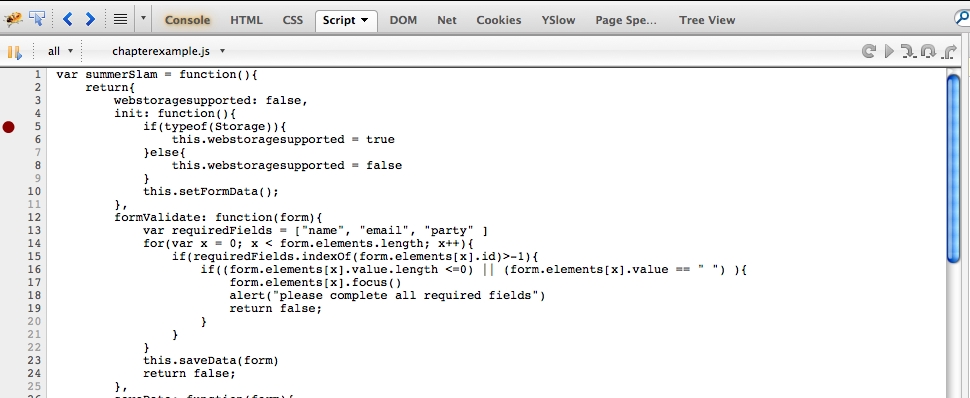
Figure 10-5. Placing a break point
From left to right, these buttons allow us to re-run the code, continue to the next break point, step into a function line-by-line, step over a function so that it executes (but which we don’t debug line-by-line), or step out to finish the current execution and return control to the original caller.
Also, notice that the current state of our application is represented in the Watch panel.
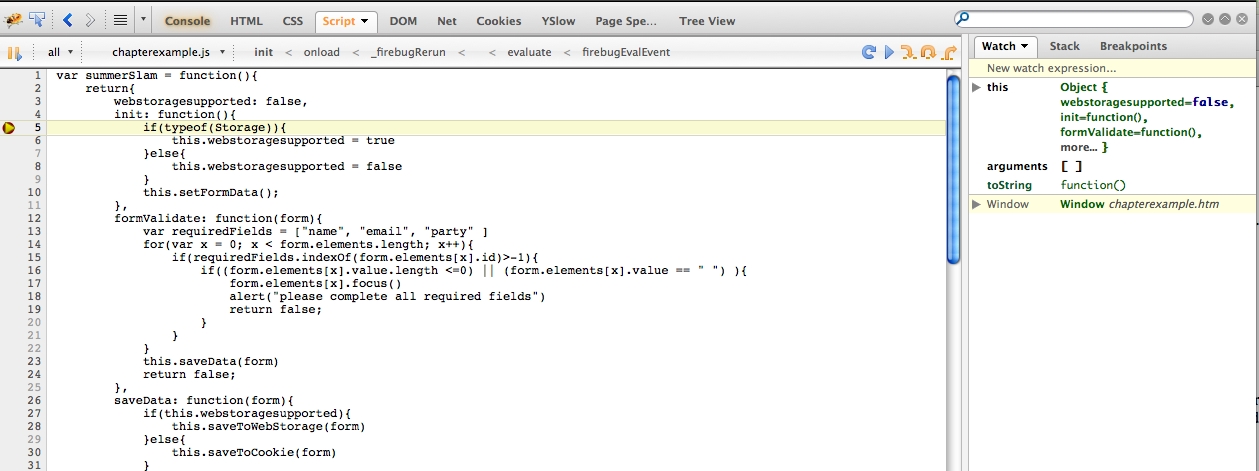
Figure 10-6. We begin debugging at the break point
If we click the Step Into button, the debugger takes us to the next line of code that will be executed. If we continue to step through the code by clicking the Step Into button, we will see the complete execution of our code and the current state of each object as we go.

Figure 10-7. Stepping through the code
JavaScript does not acknowledge extra white space or line breaks. This means that we can pull out all extraneous spaces and new lines (as long as we properly end each expression with a semi-colon), and the JavaScript interpreter will read and execute our code normally.
We can take advantage of this by using a process known as minifying to strip out all of the white space and line breaks and serve up a compressed version of our code. Minification also involves using HTTP compression, which consists of setting the Content Encoding to gzip from the server end, and then combining multiple external JavaScript files into a single file.
Why would we want to minify? Well, when we view a web site, each page has a payload, which is the overall combined size of everything that makes up the page, including its images, CSS files, the mark up in the page itself, and the linked JavaScript files (see Figure 10-8).

Figure 10-8. An app’s payload as represented in Firebug
Stripping out extraneous characters from your JavaScript reduces the size of your JavaScript, which in turn reduces the size of the overall payload of the page, which in turn makes your pages load faster. Combining external files into one file reduces the amount of HTTP transactions needed to build your page, which also makes the page load faster. You see the trend; ultimately, these are optimizations that speed up the delivery of your content to your user.
So how do we minify? There are tons of great tools we can use to minify our apps—a simple Google search will turn up a huge amount of open source options. Google itself makes a minifier called Google Closure Compiler, and Yahoo has one called YUI Compressor. For our example, we’ll use an open source tool called Minify. It is available here: http://code.google.com/p/minify/. Or, if you prefer, you can grab github here: https://github.com/mrclay/minify.
Minify can be downloaded as a zip file that you expand and put at the root of your web site. It has a web interface that you can access via this URL: http://[your%20site]/min/builder/. You can add all of the files you want to combine in the web interface, and Minify will generate a script tag that you can use in your web application to serve up the compressed JavaScript:
<script type="text/javascript" src="/min/f=chapterexample.js"></script>
Figure 10-9 highlights the improvement in page size that we get when we compress our external JavaScript file.

Figure 10-9. The improvement in page size achieved by compressing our JavaScript file
In this case, the file size fell from 2.8 kb to 887 bytes. The overall payload of the page went from 5.5 kb to 3.6 kb.
JavaScript Unit Tests with Jasmine
Test-driven development (TDD) is a formal methodology where you first write a test that describes a unit of functionality—ideally, the smallest piece of testable functionality—and then you write the functionality described by that test. These tests you write are called unit tests.
Your suite of unit tests for your application serves to describe its functionality to new developers coming onto a project. These tests also assure quality by throwing an error if any update changes the app’s functionality, and they generally instill good programming practices by ensuring that you write code in small, modular—hence, testable—pieces.
With the release of unit testing frameworks, the idea of test-driven development is finally emerging in the JavaScript community. There are several frameworks available, but we’ll focus on Jasmine, which is developed by Pivotal Labs and is available for download at http://pivotal.github.com/jasmine/.
For our example, we’ll download the latest version of the standalone release, available here: http://pivotal.github.com/jasmine/download.html. The standalone release is a ZIP file that, when expanded, contains three folders (lib, spec, and src), as well as a single HTML file (SpecRunner.html).
SpecRunner is going to be our test harness. Traditionally, the test harness is the software that runs our tests and generates the report of their results. Viewing the source code of SpecRunner reveals that Pivotal was nice enough to include its own demonstration data—specifically, it included references to Player.js, Song.js, SpecHelper.js, and PlayerSpec.js. These files demonstrate how we will use SpecRunner; that is, we’ll include our own external JavaScript file and craft a series of unit tests in a new file that we’ll call SummerSlamSpec.js. But first, let’s clear out all of the Pivotal data, so we can start fresh.
The source code of our test harness should now look like this:
<!DOCTYPE>
<html>
<head>
<title>Jasmine Test Runner</title>
<link rel="stylesheet" type="text/css" href="lib/jasmine-1.0.0/jasmine.css">
<script type="text/javascript" src="lib/jasmine-1.0.0/jasmine.js"></script>
<script type="text/javascript" src="lib/jasmine-1.0.0/jasmine-html.js"></script>
<!—The below script tag should link out to our external js file .. -->
<script type="text/javascript" src="chapterexample.js"></script>
<!-- include spec files here… -->
<script type="text/javascript" src="spec/SummerSlamSpec.js"></script>
</head>
<body>
<script type="text/javascript">
jasmine.getEnv().addReporter(new jasmine.TrivialReporter());
jasmine.getEnv().execute();
</script>
</body>
</html>
Now let’s add some tests to our spec file!
At a high level, each test we will write is called a spec, and specs are grouped together into suites. We define suites using the describe() function, which takes two parameters:
- A string describing what the suite is for
- A function that returns the specs
The following snippet defines a suite for the Summer Slam website:
describe("summerSlam", function(){});
We add specs inside the function passed as the second parameter. Specs are calls to the it() function; these have the same signature as the describe() function:
- The first parameter is a string that describes what the spec will be testing.
- The second parameter is a function that can contain functionality, as well as a matcher.
And this code snippet shows the it() function in action:
describe("summerSlam", function(){
it("checks fields", function(){});
});
Matchers are functions that represent conditional logic with plain English descriptions. They are used to test the results of the functions that we are testing. A list of current native Jasmine matchers can be found here: https://github.com/pivotal/jasmine/wiki/Matchers.
OK, we have the preliminary concepts out of the way, so let’s begin to write some tests for our summerSlam namespace object.
As noted previously, in actual professional development, you start out by writing tests that describe what you expect your application to do. It is not until you’ve written these tests that you begin to write the code to satisfy those expectations. You can even review your tests ahead of time with your business owner and QA team to make sure that everyone shares the same expectations for the app’s functionality.
One of the nice things about following this workflow is that it encourages us to build our applications to be more modular from the get-go—if functionality is tightly coupled, we won’t be able to test it. Since we are going back and adding tests for code that we’ve already written, we may need to refactor a little to make it more modular, so we can test efficiently.
Let’s look at our form validation function. The first thing that should jump out is that it is coupled to the DOM for the validation part. Let’s refactor that a little to abstract that and to make what we are doing a little more readable.
We’ll pull out the code that checks whether a form element is required and put it into its own function called isRequired(). We will also pull out the code that checks whether an element has a value and move it to its own function called hasValue(). So that we aren’t referencing the passed in form variable directly, we’ll store the name of the form and its value to local variables and pass them into the new functions:
isRequired: function(name, requiredList){
if(requiredList.indexOf(name)>-1){
return true;
}else{
return false;
}
},
hasValue: function(data){
if((data.length<=0) || (data == " ")) {
return false;
}else{
return true;
}
},
formValidate: function(form){
var requiredFields=["name", "email", "party" ]
for(var x=0; x<form.elements.length; x++){
var currentElementName=form.elements[x].id
var currentElementValue=form.elements[x].value
if(this.isRequired(currentElementName, requiredFields)){
if(!this.hasValue(currentElementValue)){
form.elements[x].focus()
alert("please complete all required fields")
return false;
}
}
}
this.saveData(form)
return false;
}
The resulting code is much more readable; it’s obvious that the conditionals in formValidate() are now checking whether something is required and whether that something has a value.
Also, we have now exposed bits of functionality that we can create unit tests around, without tying directly to the DOM. Let’s go back to our spec file and start a suite around our form validation.
Our first suite will test the isRequired() function:
describe("Summer Slam Check isRequired Function", function(){
});
We will add a spec to the suite that checks whether a name passed in is on the required list; if so, the function returns true:
it("given a list of required fields, returns true if the name passed in is in the list", function(){
expect(summerSlam.isRequired("name", ["name", "email", "party" ])).toEqual(true);
});
Next, let’s add a spec that makes sure our isRequired() function returns false if the name passed in is not on the required list:
it("given a list of required fields, returns false if the name passed in is not in the list", function(){
expect(summerSlam.isRequired("first_name", ["name", "email", "party" ])).toEqual(false);
});
We can see our results by refreshing our test harness. If all of our tests pass, we see a screen like the one shown in Figure 10-10.

Figure 10-10. All our tests passed!
The beauty of unit testing our code is that, if our tests don’t pass, we get a very explicit error message that tells us exactly why our code failed. To test this, we can change the value passed into the second spec to be one of the items in the required list; that should give us the result shown in Figure 10-11.

Figure 10-11. The unit test failed!
Now let’s create a suite for hasValue(). We’ll add a spec that tests passing in a string, passing in an empty string, and passing in null:
describe("Summer Slam Check hasValue Function", function(){
it("given a parameter, returns true if the argument passed in has value",
function(){
expect(summerSlam.hasValue("test")).toEqual(true);
});
it("given a parameter, returns false if the argument passed in is an empty string",
function(){
expect(summerSlam.hasValue(" ")).toEqual(false);
});
it("given a parameter, returns false if the argument passed in is null",
function(){
expect(summerSlam.hasValue(null)).toEqual(false);
});
});
Uh oh, what’s this? When we run the preceding suite, we see that our spec to test null values fails, as shown in Figure 10-12.

Figure 10-12. Our unit test for hasValue fails
Writing a test for this use case has uncovered an oversight in our logic; we never bothered to test whether anything is passed into the function at all. To address this, let’s refactor the hasValue() function. We’ll wrap the main logic in an if statement that tests whether the data variable has been initialized. While we’re at it, let’s refactor to use our own best practice of only having a single return in a function. Our new hasValue() function should now look like this:
hasValue: function(data){
retVal=false
if(data){
if((data.length>0) && (data !=" ")) {
retVal=true;
}
}
return retVal
}
And our full test suite should look like this:
describe("Summer Slam Check isRequired Function", function(){
it("given a list of required fields, returns true if the name passed in is in the list",
function(){
expect(summerSlam.isRequired("name", ["name", "email", "party" ])).toEqual(true);
});
it("given a list of required fields, returns false if the name passed in is not in the list",
function(){
expect(summerSlam.isRequired("nme", ["name", "email", "party" ])).toEqual(false);
});
});
describe("Summer Slam Check hasValue Function", function(){
it("given a parameter, returns true if the argument passed in has value",
function(){
expect(summerSlam.hasValue("test")).toEqual(true);
});
it("given a parameter, returns false if the argument passed in is an empty string",
function(){
expect(summerSlam.hasValue(" ")).toEqual(false);
});
it("given a parameter, returns false if the argument passed in is null",
function(){
expect(summerSlam.hasValue(null)).toEqual(false);
});
});
Following this methodology, we can create a full suite of automated tests for our JavaScript functionality, so that we are confident our code works as we expect it to. And if we do make any changes that break functionality, our tests will alert us to that immediately, so that we can fix it.
This is just the tip of the iceberg for what is possible with unit testing. Once you are comfortable thinking about how you develop your code in this way, there are even more concepts to explore, from mocking up functionality to expand what you can test to using plug-ins that expose DOM-level interaction!
Summary
In this chapter, we created a framework for saving data on the client side. We took advantage of the new web storage capabilities of HTML5, but we also implemented fallback functionality to use an HTTP cookie if web storage was not supported. We also looked at Ajax and how to load data from remote data sources.
Next, we evaluated some tools available that have really raised the bar in the world of JavaScript development. For example, we looked at a tool that actually lets us debug our scripts in the browser and another that lets us use minification to optimize the delivery of our code. Finally, we learned how to do honest-to-goodness real unit testing with JavaScript!