
![]()
Stateful WCF Services Using Workflow
Some service calls initiated from a client are intended to be quick transactions. A client application calls the service, receives a response, and the transaction between the client and the service is completed. However, there are also scenarios when a service needs to maintain state, even after it has been called from a client application. This chapter will explain the importance of building services that maintain state by using WF workflows to create services. But first let’s talk about what services are and the history of extending services through .NET.
“Services” is a common term in software development, and it can have different meanings depending on the context in which it is used. When I think of services, I try to think in everyday terms. If a business provides a service, it is offering either a capability, or goods, that someone else wants. The same principles apply to building services in software. An application offers services that another application needs to use. Software services can be provided to other applications within the same development domain, but the capability of extending services over network boundaries was first introduced within Microsoft.NET through ASP.NET Web Services.
ASP.NET Web Services allow applications to extend their functionality to other applications outside of their development domain and network without having to integrate with them directly. Instead, services are exposed over HTTP, so no matter where a service is hosted, a client can interact with the service over the Internet.
Some benefits of extending external services include the following:
- Less infrastructure to implement, reducing the overhead of doing business.
- Ease of subscribing and delivering clients business services.
- Availability to more clients outside of a network.
Windows Communication Foundation (WCF)
However, as service technology evolved, some limitations for web services quickly became apparent. There was only one messaging structure, SOAP,1 required for exchanging messages, Microsoft .NET services had to be hosted within Internet Information Services (IIS), and a web service could only be delivered over HTTP.
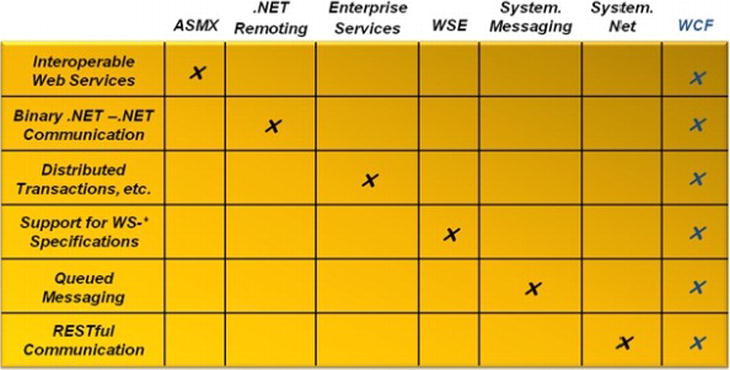
Figure 11-1. Web services and WCF capabilities
When information about the extensions for Microsoft .NET 2.0 Framework became public, a new framework for extending services called Windows Communication Services (WCF) (pronounced “Dub C F”) was introduced. Out of the box, WCF eliminated many of the shortcomings of web services (see Figure 11-1). On top of improved performance, other benefits of using WCF include
- Services can be hosted outside of IIS.
- Other network protocols such as TCP and named pipe could be used instead of HTTP.
- Messaging structures other than SOAP can be used for communication.
- Support for distributed transactions.
WCF Fundamentals
A WCF service requires certain components called the ABC’s for implementation (Figure 11-2).

Figure 11-2. An endpoint consists of address, binding, and contract
- Address: Service endpoints designated for communicating with a service.
- Binding: Network protocol that a service will use for communicating with clients.
- Contract: Agreed upon functionality that the service will provide for supporting clients even after modifications are done to an existing service.
Each of these components works independently of the others, and that is what makes the model for implementing services with WCF so powerful. A service contract can have many different bindings and addresses for accessing a service.
Address
An endpoint is specified by an address that indicates the location of a service through a Uniform Resource Identifier (URI). A URL consists of four unique parts:
- Scheme: Used to indicate the transport protocol like HTTP or TCP.
- Machine: Name like www.bing.com.
- Port: Such as 8080 (Optional)
- Path: Such as /localhost/myservice.svc.
An address is either defined though code or configured. Listing 11-1 shows how an endpoint address can be defined using C# for a service contract IService and a binding using basicHttpBinding indicating that the transport protocol used will be over HTTP. The endpoint is added to a ServiceHost object, which is used to host a WCF service within a Microsoft .NET executable.
Listing 11-1. Defining a Services Endpoint Address
var serviceHost = new ServiceHost();
serviceHost.AddServiceEndPoint(typeof(IService),new BasicHttpBinding(),"http://localhost:8080/MyService");
Listing 11-2 indicates an endpoint address being configured using an endpoint element and setting the address attribute. The binding is using basicHttpBinding, which also indicates that the transport protocol used will be HTTP. Endpoints can be specified in two ways, either an absolute address can be used as indicated in Listing 11-1 or a base address can be used for the ServiceHost object, and then an address can be specified for the endpoints.
Listing 11-2. Configuring a Service Endpoint Address
<endpoint address="http://localhost:8080/MyService"
        Binding="basicHttpBinding"
        Contract="IService" />
Binding
One of the major features of WCF is separating out the transport protocol from the service. This allows the same service to expose different bindings. Bindings are used to represent the transport protocol so clients can interact with a service. Listing 11-1 and Listing 11-2 also illustrate how bindings can be added either through code or configured by specifying BasicHttpBinding. The purpose of separating the binding from the service is so a binding can be selected based on the requirements needed for exposing a WCF service. Some of the more common transport protocols that are used with WCF services are
- basicHttpBinding: This binding supports clients that need continual support for ASP.NET Web Services. The binding also supports communication with existing ASP.NET Web Services. Transport security can be configured on the binding and the transport protocol used is HTTP.
- wsHttpBinding: If ASP.NET Web services do not need to be supported and other WCF services will be calling a service over the Internet, then wsHttpBinding can be used as a binding for transporting messages over HTTP.
- netTcpBinding: Clients can expect better performance through the intranet by specifying netTcpBinding. This binding cannot be hosted within IIS 5 and 6, but is supported to be hosted within IIS 7.
- netNamedPipeBinding: Supports clients that are on the same machine as a hosted service and establishes a secure environment for communication. This binding cannot be hosted within IIS 5 and 6, but is supported to be hosted within IIS 7.
- netMsmqBinding: Supports queuing functionality that is provided through Microsoft Message Queuing (MSMQ) for supporting reliable transactions. netMsmqBinding allows for disconnected scenarios where a client and service both do not have to be online at the same time. This binding cannot be hosted within IIS 5 and 6, but is supported to be hosted within IIS 7.
- wsDualHttpBinding: Supports duplex communication between a client and hosted service, so a service can communicate to a client through callback messages. This binding cannot be hosted within IIS 5 and 6, but is supported to be hosted within IIS 7.
Service and Data Contracts
A contract for a service is implemented through an interface object. An interface provides a contract that a class must agree to if the class decides to implement the interface. Listing 11-3 indicates how to build a simple contract for a job application approval process.
Listing 11-3. Job Application Approval Interface
[ServiceContract]
public interface IJobApplication
{
   [OperationContract(IsOneWay=true)]
   void ApplyForJob(JobApplication application);
   [OperationContract]
   bool PerformBackgroundCheck(BackgroundCheck CandidateBackground);
   [OperationContract]
   bool EmailCandidateFeedBackFeedback feedback)
   [OperationContract]
   bool InterviewCandidate(Manager manager,Candidate candidate);
   [OperationContract]
   bool HireEmployee(JobApplicationapplication);
}
Notice that the there are attributes identified as ServiceContract and OperationContract. ServiceContract indicates that the interface supports a WCF service and that the interface is the contract for how the service is set up. OperationContract indicates each of the methods that will be used within the service. Other attribute information can be included for each of the operations for different results. For instance, if a method is not expected to return a result, like ApplyForJob represented in Listing 11-3, then IsOneWay=true can be used to decorate the operation contract, indicating that there should not be a response returned back to the client.
Once a service contract is built, a class represented as the actual service that will perform the business logic can be written to implement a service contract. Listing 11-4 represents the service that implements the service contract represented in Listing 11-3.
Listing 11-4. JobApplication Service
public class JobApplication:IJobApplication
{
   void ApplyForJob(JobApplication application) {...}
   bool PerformBackgroundCheck(BackgroundCheck CandidateBackground) {...}
   bool EmailCandidateFeedBack(Feedback feedback) {...}
   bool InterviewCandidate(Manager manager,Candidate candidate) {...}
   bool HireEmployee(JobApplication application){...}
}
WCF services can also share data among the service and clients just as the service implementation in Listing 11-4 illustrates, using parameters and data returned from called functions. A DataContract is required in order for data to be communicated back and forth from service to host. A DataContract defines the data structure to be used and is represented as nothing more than a class defining an object (see Listing 11-5).
Listing 11-5. Data Contracts for BackgroundCheck
[DataContract]
public class CandidateBackground
{
   [DataMember]
   public int BackgroundId{ get; set;}
   [DataMember]
   public int CandidateId{ get; set;}
   [DataMember]
   public bool PassedBackground{ get; set;}
   [DataMember]
   public string Comments{ get; set;}
}
Listing 11-5 shows that the CandidateBackground class uses the DataContract attribute to indicate that it can be used between the service and its clients; however, additional data contracts would need to be created for Manager, JobApplication, and Feedback. Each of the properties uses the DataMember attribute to indicate that the property is a member of the DataContract and used within clients.
Combining WCF and WF
When WCF and WF were first introduced within Microsoft .NET Framework 2.0 extensions, there was no support for the two frameworks to work together. There were no WF activities that supported WCF, nor were there any integration points to allow WF to easily implement WCF. However, the capabilities that each of the two technologies introduced to the software industry created the chemistry for a passionate relationship and eventual marriage of WCF and WF. WCF and WF were finally united with the release of Microsoft .NET Framework 3.5.
Listing 11-4 indicates a service that a client can use and communicate with for managing the functionality for applying for a job. Figure 11-3 illustrates the logic that can be used for building the service.
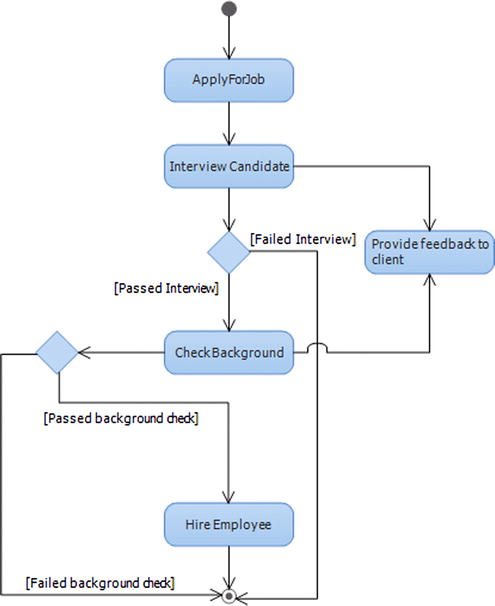
Figure 11-3. Job application process
Each of the blue boxes in Figure 11-3 represents a process that is defined within the contract IJobApplication, illustrated in Listing 11-3.IJobApplication is implemented by the service defined in Figure 11-4; however, there are some limitations with this approach. WCF does not manage state between service calls, so each time a service is called, a client request is sent to the service through a service method, and sometimes the service method may respond with information regarding the initial call back to the client. Throughout a service call transaction, state is not maintained between service calls. WF provides the framework for building long-running business processes that can be executed effectively over long periods of time. A better solution for building a WCF service would be to model the business process within WF using a workflow, while at the same time configuring the workflow to provide the same functionality as the code represented in Listing 11-4 and exposing it as a service.
With the release of Microsoft .NET 3.5, Microsoft decided to provide the tools necessary for easily integrating WCF and WF so services could expose business logic that was built using workflows. WF has its own project templates within Visual Studio for building workflows that can be configured for extending business logic just as a WCF service and can provide the same features for exposing services over the Internet and intranet the same way a WCF service can. However, the real magic other than being able to declaratively build services using WF is breathing the breath of life into a service and allowing it to live longer than just a simple transaction.
Workflow-First
There are a couple of features that are difficult to address when developing a straight WCF service for managing job applications (Figure 11-3). After a candidate applies for a job the candidate needs to be interviewed. The interview is a human process and cannot be handled automatically. A person must evaluate the candidate and then make a hiring decision. A pure implementation of a WCF service cannot handle long-running business logic from when a candidate is interviewed until a decision is made to hire the candidate, or between doing a background check and hiring the candidate as an employee if the check turns out successful. A simple solution for managing logic within a service that requires more time, would be building a workflow service that can manage state for the service.
Defining a workflow as a WCF service is a common pattern called “workflow-first.” When following a workflow-first approach, a workflow service that is authored automatically defines the service contract that will be used to define the WCF service. Figure 11-43, later in this chapter, uses the WCF Test Client for hosting the job application workflow service and shows that the workflow has generated the service contract IJobApplication, which implements service operations. WF 4.5 introduces a new pattern called “contract-first,” which generates WF activities based on an existing service contract. The contract-first pattern will be covered later in the chapter after demonstrating the workflow-first pattern.
Let’s take a look at how this can be accomplished. Figure 11-4 illustrates a workflow that models the business process indicated in Figure 11-3; however, it provides a different approach for exposing a WCF service compared to Listing 11-4. You will quickly notice that the workflow has been implemented using a flowchart flow control, which is covered in Chapter 5.
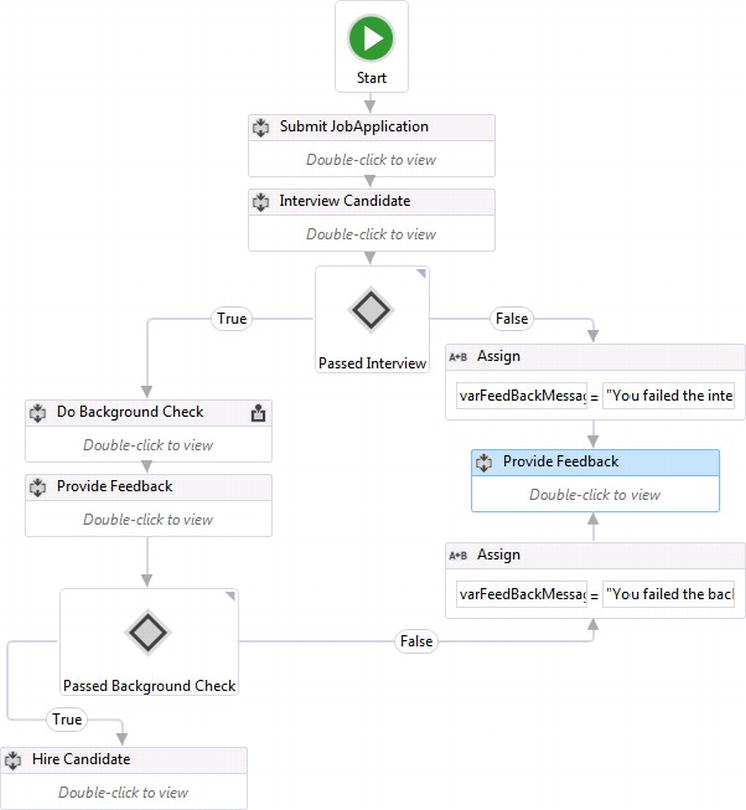
Figure 11-4. WF workflow for handling job applications
Figure 11-4 just uses three different WCF calls for managing a job application through a client application compared to the WCF service in Listing 11-4. The workflow first exposes a service method called ApplyForJob that initiates the workflow instance for a job application. The service then waits for the InterviewCandidate service method to be called so the interview of the candidate can begin. Once the results are back from interviewing the candidate, a decision based on the interview can determine that the candidate is not a good fit for the job that the candidate was applying for. In this case, the candidate does not pass the interview and the workflow simply completes its execution; however, if the candidate interviewed well, then the business logic must perform a background check that is exposed as the WCF service method called DoBackgroundCheck, which is the last method to be called within the process. If the candidate passes a background check, then the workflow completes when the candidate becomes an employee by being hired for the job through the HireCandidate activity.
There is also business logic represented in Figure 11-5 for providing feedback to a candidate. The InterviewCandidate and DoBackgroundCheck service calls also provide a custom ProvideFeedbackToCandidate activity that is used to notify a candidate of results after interviewing and having a background check processed.
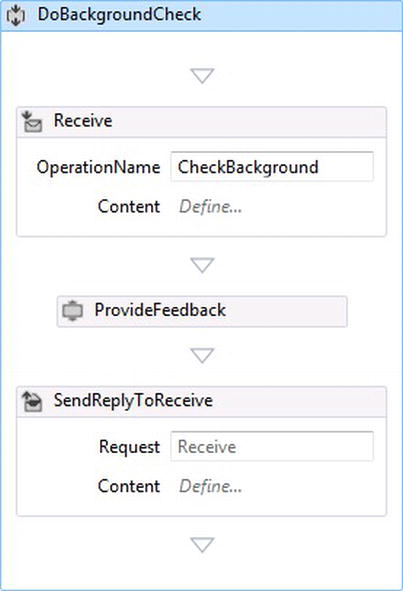
Figure 11-5. Providing feedback to a candidate
Stateful Services
Combining WCF and WF promotes stateful services, which means a service can actually live for as long as the service needs to maintain state based on interaction with the clients who subscribe to the service. Stateful WCF services leverage the capabilities of workflows that are extended as services but provide a way for managing workflow instances that become idle and storing them rather than keeping them within memory. WF is considered the internal part of the service, which contains all of the internals for controlling the business logic and behavior for a service. WCF is considered the exposed or external part of the service that communicates with clients and WF.
Visual Studio provides a first class experience for integrating WCF with WF, and the easiest way to build and test workflows built to run as WCF services is the WCF Workflow Service Application project template (see Figure 11-6). The template is primarily used for building workflow services that are intended to be hosted within IIS and managed using Windows Server AppFabric. To learn more about AppFabric, check out Chapter 13.
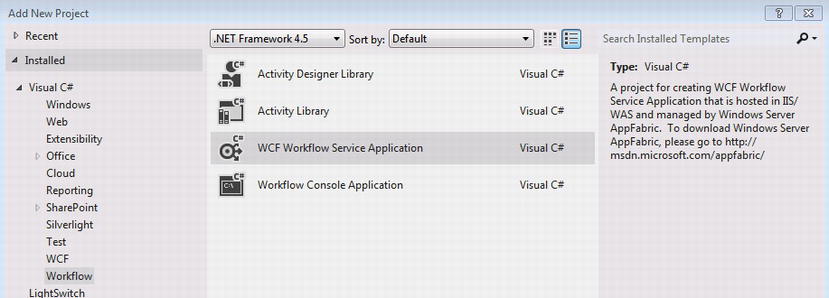
Figure 11-6. WCF Workflow Service Application project template
When a WCF Workflow Service Application is used to build workflow services, the workflow extension is .xamlx, which indicates that the workflow is intended to be hosted within IIS, and when the project is run, the workflow service is loaded within the WCF test client so it can be debugged.
Correlation
Just because WCF and WF are combined does not necessarily mean that the service implemented will maintain state. A workflow can expose service calls the same way a normal WCF service would: a workflow instance is created with each call to the service and is completed soon after. Although a service can still take advantage of building complex business logic by modeling it as a workflow, a service must handle correlation for managing the same workflow instance that was created from an earlier WCF call.
Correlation is how a workflow service instance is identified from the other workflow service instances that are being managed within the WF runtime. In the case of the workflow in Figure 11-4, a unique property like a JobApplicationId can be used. In order to start a workflow service instance, the first service method that needs to be called is ApplyForJob.
Since no other service calls for the workflow service can create a workflow service instance, the CanCreateInstance property for the ReceiveAndSendReply activity needs to be checked, as illustrated in Figure 11-7, to indicate that it is the service call that can create the workflow service instance. The ServiceContractName property is also set to IJobApplication to identify the contract name that will be used to implement the WCF service.
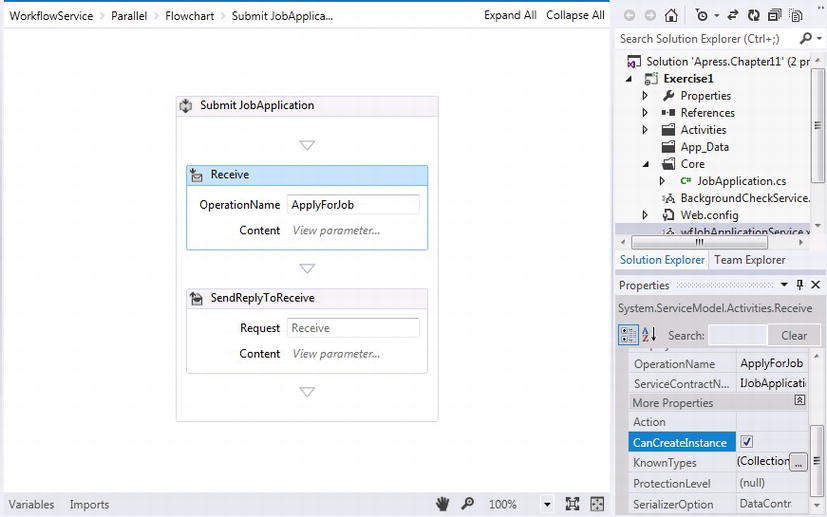
Figure 11-7. Setting the CanCreateInstance property
Figure 11-7 also indicates within the Variables section a default CorrelationHandler, _handle1. This CorrelationHandler is automatically created for a ReceiveAndSendReply activity. The name _handle1 can be changed to something more meaningful for the unique data that will be used to correlate the workflow service instance, and since it will be used for other service calls, its scope can be changed to the Flowchart so that other service calls within the flowchart workflow can also use it as a correlation handler (see Figure 11-8).
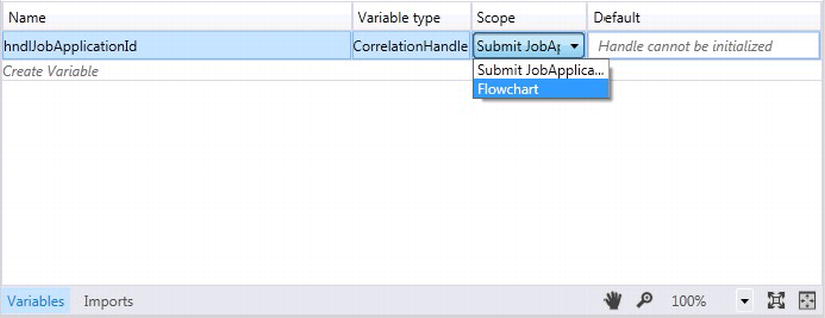
Figure 11-8. Renaming the default CorrelationHandle and setting its scope
The service call ApplyForJob, in Listing 11-4, indicates that a JobApplication object needs to be passed with the ApplyForJob service call. Correlation can be configured for the workflow to use the JobApplicationId value that is assigned within the workflow service. The entities that make up the data for the JobApplication object are indicated in Listing 11-6.
How the business entities are defined can really make a difference in making a workflow easy or complicated. If the entity objects are not well thought out, additional workflow variables and workflow activities like the assign activity and custom code activities could be needed to set values for business entities that could be unnecessarily required and can complicate workflow orchestration.
Listing 11-6. Job Application-Related Classes
using System;
using System.Collections.Generic;
using System.Linq;
using System.Web;

namespace Exercise1.Core
{
    public class JobApplicationStatus
    {
        public Guid JobApplicationId { get; set; }
        public JobApplication SubmittedApplication { get; set; }
        public bool PassedInterview { get; set; }
        public bool PassedBackgroundCheck { get; set; }
        public JobPosting JobAppliedTo { get; set; }
        public Candidate ApplyingCandidate { get; set; }
    }

    public class JobApplication
    {
        public Candidate ApplyingCandidate { get; set; }
        public int JobPostingId { get; set; }
    }

    public class Candidate
    {
        public int CandidateId { get; set; }
        public string FirstName { get; set; }
        public string LastName { get; set; }
        public string EmailAddress { get; set; }
        public string SSN { get; set; }
    }

    public class JobPosting
    {
        public int JobPostingId { get; set; }
        public string PositionName { get; set; }
        public DateTime PostingDate { get; set; }
        public ContactManager HiringManager { get; set; }
    }

    public class ContactManager
    {
        public int ManagerId { get; set; }
        public string FirstName { get; set; }
        public string LastName { get; set; }
        public string EmailAddress { get; set; }
    }
}
The JobApplication object that is passed in with the ApplyForJob service call will initiate the workflow service instance with the data it needs throughout the lifecycle of the workflow. Therefore, a new variable of type JobApplicationStatus needs to be created for holding the JobApplication object that is passed in (see Figure 11-9).
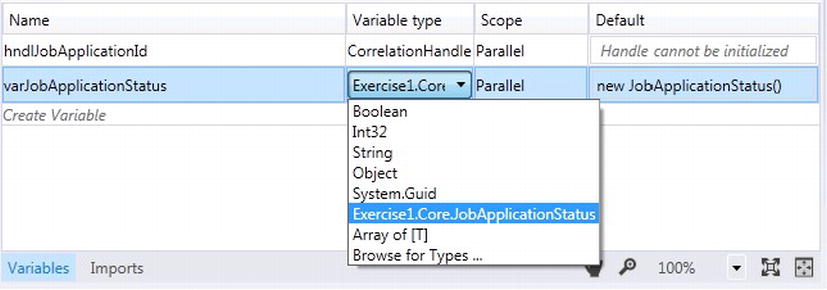
Figure 11-9. Creating a new JobApplication and JobApplicationStatus variables
The Variable type is set to the type of JobApplicationStatus for the variable varJobApplicationStatus object. If it is not listed as illustrated in Figure 11-9 within the dropdown box, Browse for Types can be selected for browsing for the JobApplicationStatus type within the solution (see Figure 11-10).
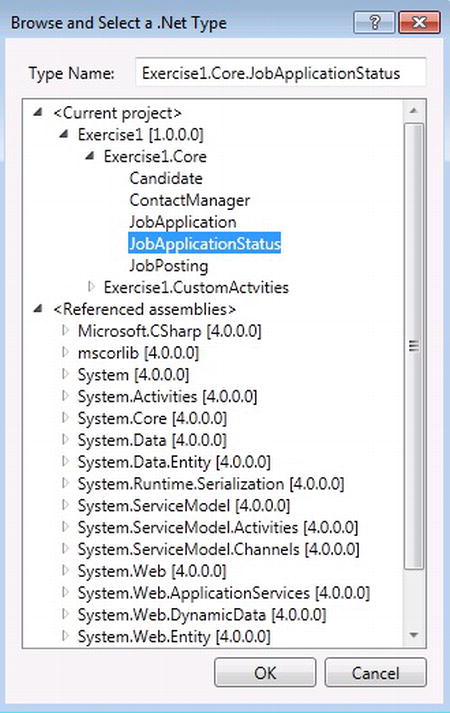
Figure 11-10. Browsing for the .NET type JobApplication
The JobApplication parameter needs to be set for the service call ApplyForJob. There is a Content property on the ReceiveAndSendReply activity. Clicking on Define allows for the content definition to be either a message or parameters. A content definition for a Message contains a message data and message type property. The message data property can be set to an existing variable within the workflow that will hold the data that is received from a client; its type is the data type, which is usually the type for the variable being set. Adding Parameter content definitions expect data contracts. Figure 11-11 illustrates adding an application parameter as indicated for the service call ApplyForJob in Listing 11-4. The parameter is of type JobApplication and it will be assigned to the variable varJobApplicationStatus.SubmittedApplication that was created in Figure 11-9. When a client references the workflow service, a JobApplication parameter will be required for making the service call.
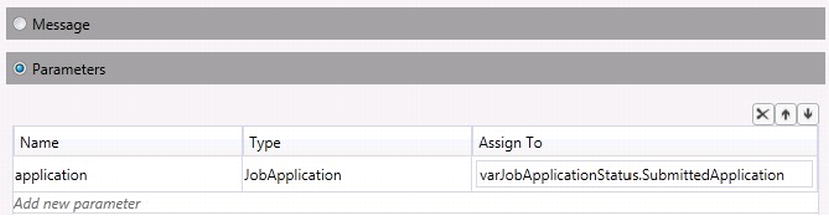
Figure 11-11. Creating a JobApplication service parameter
After creating the JobApplication parameter that will be passed in for the ApplyForJob service call, the JobApplicationStatus variable property SubmittedApplication will be set that corresponds with the JobApplication object that was passed. Figure 11-12 illustrates how an Assign activity is being used to initialize the JobApplicationId that needs to be set within the service rather than from the client.
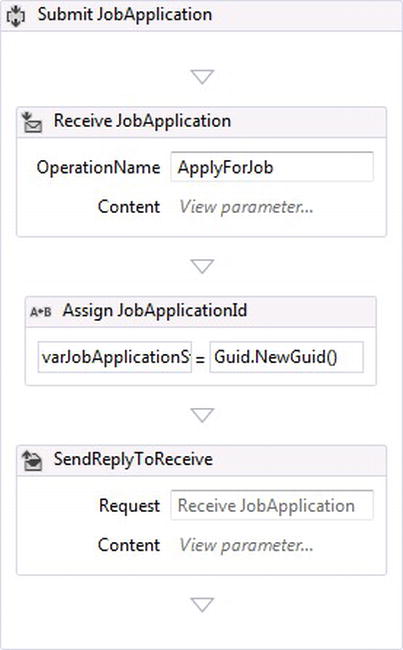
Figure 11-12. Assigning the JobApplicationId to be referenced by clients
Figure 11-13 illustrates the Assign activity properties for setting the job application ID to the varJobApplicationStatus variable.
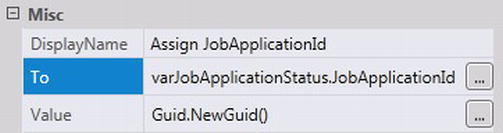
Figure 11-13. Setting the JobApplicationId
Correlation is now ready to be set up for the ApplyForJob service call that is defined with a ReceiveAndSendReply activity, but first there are two things to consider. Will the value for the correlation handler be set from the client or inside the workflow? In the case of a job application, the JobApplicationID will be set within the workflow, so a CorrelationInitializer will need to be set up within the SendResponse activity. The CorrelationInitializer initializes the correlation handler with a data value that will be used for correlating workflow service instances. Clicking on the SendReplyToReceive template designer, pre-defined Send and Receive activities housed within a parent Sequence activity are defined, and selecting Content, a parameter can be created that will be returned to a client (see Figure 11-14).
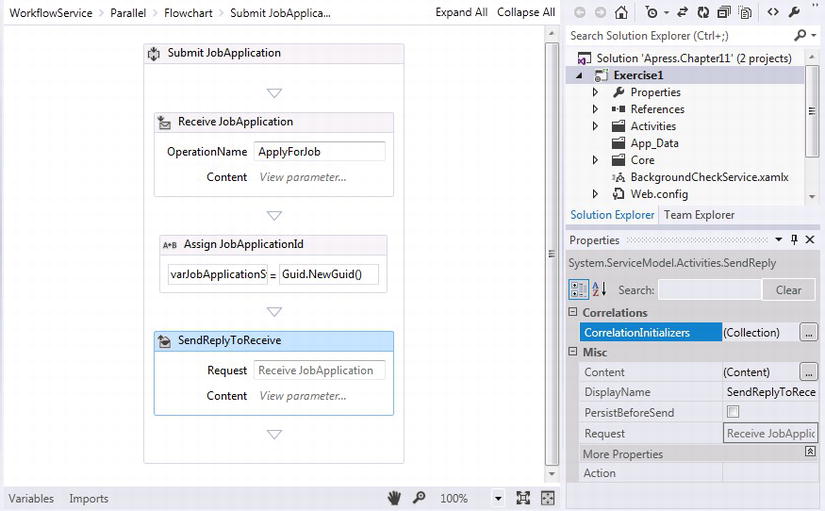
Figure 11-14. Setting CorrelationInitializers
The ApplicationId that is set will be a type System.Guid and can be used by the client for referencing the job application with other service calls within the workflow. Figure 11-15 illustrates how to add a parameter called applicationId, which has a type System.Guid and sets the value for the parameter to varJobApplicationStatus.JobApplicationId, which will be used for correlating workflow service instances.
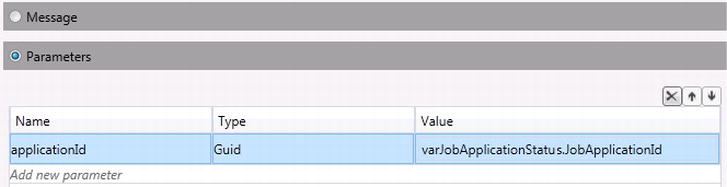
Figure 11-15. Setting the parameter that will be returned for a service call
A CorrelationInitializer can now be added for the correlation handler, hndJobApplicationId, that was created earlier. Figure 11-16 illustrates that the applicationId parameter that is returned to the client will be initialized to the handler hndJobApplicationId.
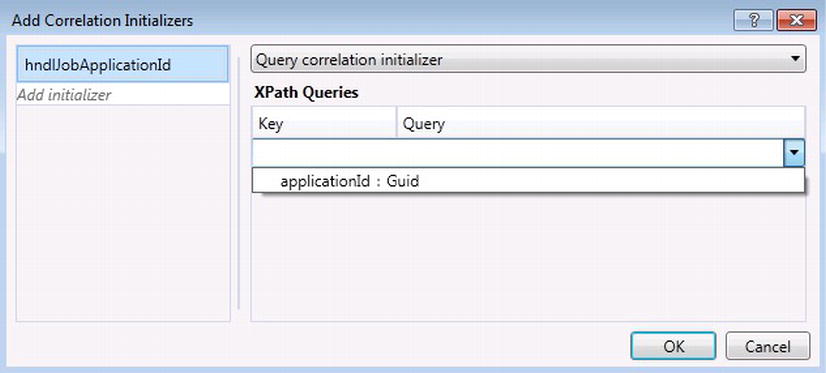
Figure 11-16. Adding a correlation initializer
Luckily the XPath query can be selected, and once it is selected, the Key value is set to JobApplicationId (see Figure 11-17).
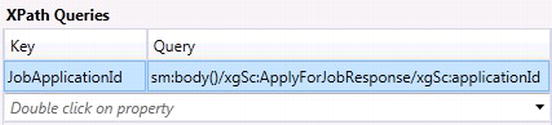
Figure 11-17. Setting the Key value
Testing Correlation
Correlation for workflow service instances is now set up, and the job application ID value that the workflow will use for correlating workflow service instances is defined within the workflow itself; however, correlation data can be set externally by the client instead. The next step is to provide a way for client applications to check the status of a job application. A parallel activity is required so that the job application process can continue, while at the same time a job application status can be checked to see the current status for an application. The word “while” in the previous sentence is appropriate because a While activity is also needed so the GetJobApplicationStatus service call can continue to be called. Finally, a Pick activity is needed so the GetJobApplicationStatus service method can be called continuously while the condition for the While activity is met (see Figure 11-18).
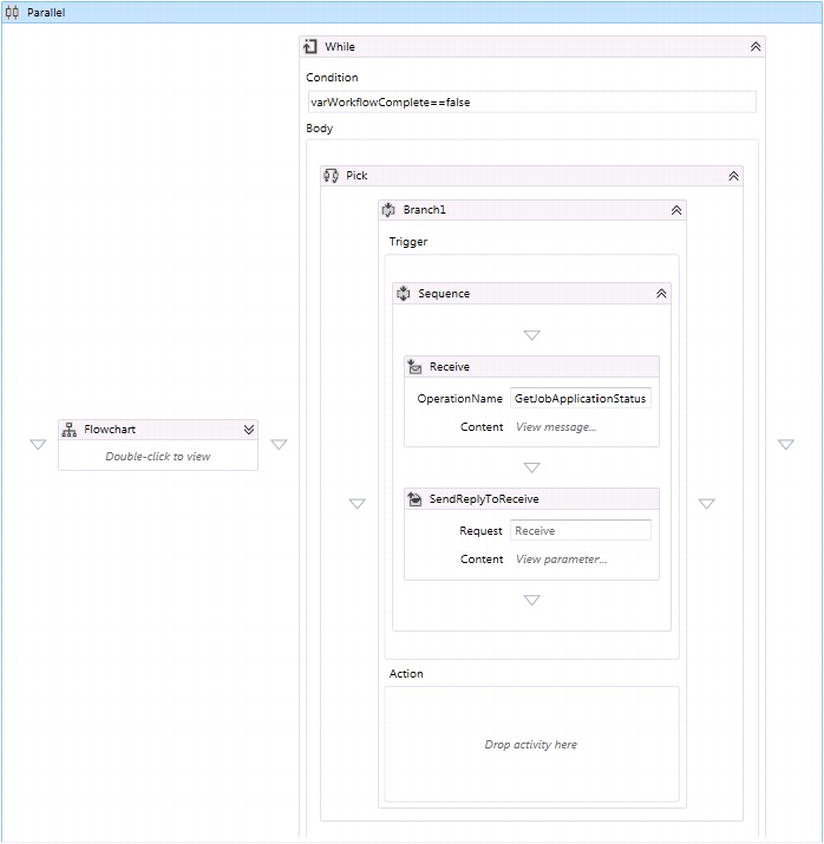
Figure 11-18. Checking a job application status while a job application business process is running
Add another variable called varWorkflowComplete, which has its scope set to the parallel activity and is a Boolean type with a default value of false. The new variable sets the condition property of the While activity, so it will keep running while the condition is met. Figure 11-18 illustrates a ReceiveAndSendReply activity being dragged to the designer fabric and added within Branch1 of the Pick activity. The OperationName property that identifies the service call is set to GetJobApplicationStatus and the ServiceContractName property is set to IJobApplication, which is the same contract name the service call ApplyForJob implements. This is a new service call that is not part of the original service contract defined in Listing 11-3; however, it demonstrates that the service contract can be defined on the fly by declaratively building a workflow. The GetJobApplicationStatus service call needs to pass in the job application ID that was returned as a reference ID when originally calling the ApplyForJob service call. Clicking on the Content property for the new Receive activity, a message content definition is used this time instead of building listing a parameter, just to demonstrate how it works; however, a parameter could be used as well. To accept the Guid formatted job application ID that will be passed in with the service call, a new variable called varJobApplicationId is created with a variable type of Guid. Its scope can stay within the Sequence activity, which serves as the parent activity of the Receive activity. Since the hndJobApplicationId and the varJobApplicationStatus variables will be used across the Parallel activity, the variable's scope needs to be changed to Parallel for both the hndJobApplicationId and varJobApplication variables (see Figure 11-19).
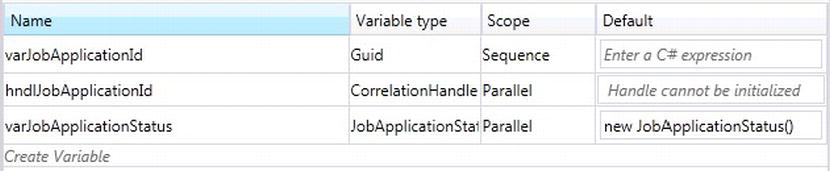
Figure 11-19. Creating the varJobApplication and changing scope for the other two variables
Clicking on the Content property of the Receive activity brings up the Content Definition indicated in Figure 11-20, so a message or parameters can be added for the GetJobApplicationStatus service call. Selecting Message, the message data can be set to varJobApplicationId, and System.Guid can be added as the message type.
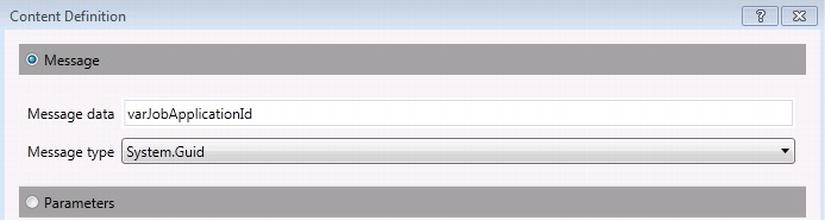
Figure 11-20. Setting a message content definition
Next, correlation for the GetJobApplicationStatus service method needs to be created for the job application ID that will be passed in, and correlated with hndJobApplicationId. Figure 11-21 illustrates the CorrelatesWith property being set to hndJobApplicationId and an XPath query being created. Remember that the Key value needs to be set to JobApplicationId, as discussed earlier when setting up correlation in Figure 11-16.
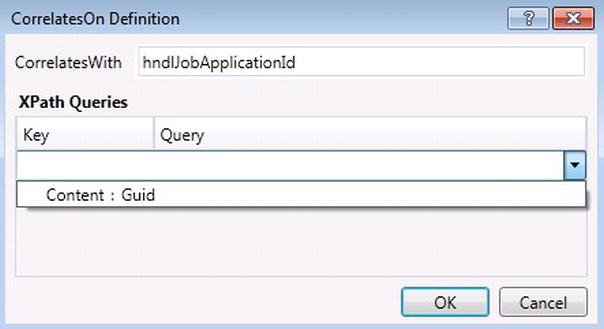
Figure 11-21. Creating correlation with a service call parameter Job
The final step before correlation can be tested is setting the Content property for the SendReply activity used to send information back to the client when the GetJobApplicationStatus service call is called. Figure 11-22 illustrates creating a return type of JobApplicationStatus for the service call. The variable varJobApplicationStatus, which is set after calling the ApplyForJob service call, is set as the return value.
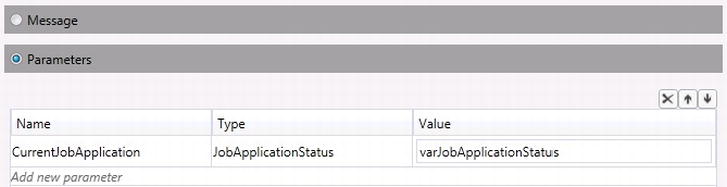
Figure 11-22. Setting the JobApplication object returned from the service call
Figure 11-23 illustrates the WCF test client automatically hosting the Job application service.
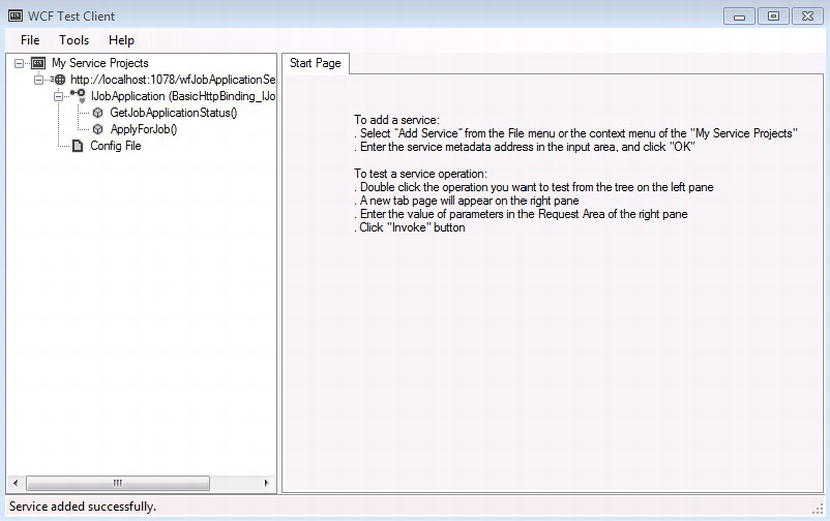
Figure 11-23. WCF Test Client hosting the Job application service
Building the Service Client
Building the service client by adding a service reference to the workflow service is no different than adding a regular WCF service. Any application that can reference and consume a WCF service is capable of working with Job application service, however to make sure correlation is working correctly, I will show you a simple windows form application that is built to test the functionality for the service. Buttons are used to test each of the service calls for the service so at this only two are needed. One button is added to create a new job application and another for checking the status of a job application (see Figure 11-24).
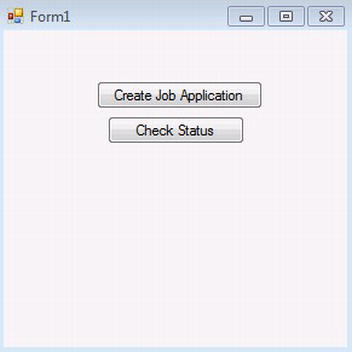
Figure 11-24. Buttons for creating and checking a job applications
A service reference can be made to the JobApplicationService while it is being hosted within the WCF test client, by right-clicking on the Service References folder within the windows form project.
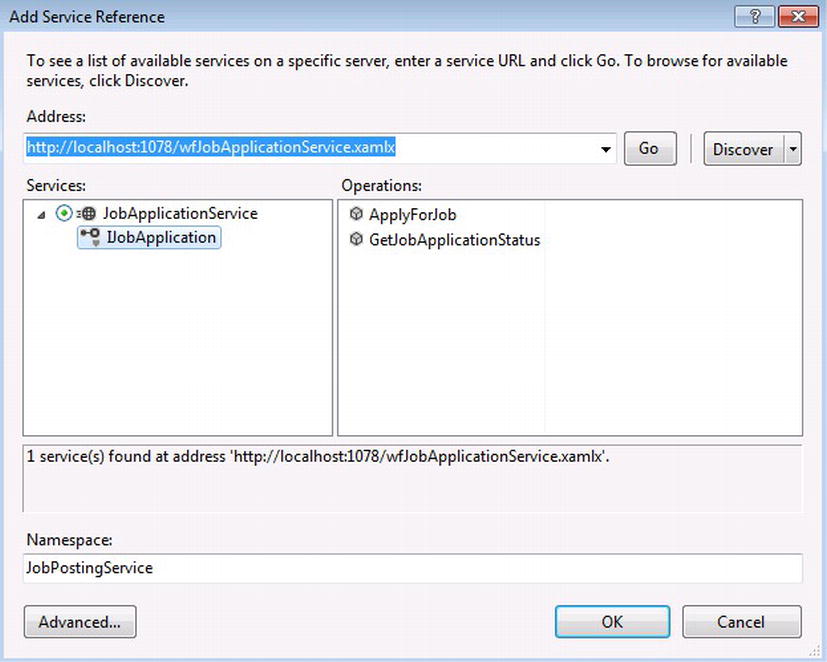
Figure 11-25. Adding a service reference to the JobApplicationService
Figure 11-25 indicates the service reference and the two service calls, ApplyForJob and GetJobApplicationStatus, that are implemented for the IJobApplication contract. The code in Listing 11-7 shows how the service is instantiated so the two service calls can be made.
Listing 11-7. Windows Form Code for Implementing the JobApplicationService Service
using System;
using System.Collections.Generic;
using System.ComponentModel;
using System.Data;
using System.Drawing;
using System.Linq;
using System.Text;
using System.Threading.Tasks;
using System.Windows.Forms;

namespace JobPostingClient
{
    public partial class Form1 : Form
    {
        private JobPostingService.JobApplicationClient jobApplicationService = null;

        private string JobApplicationRef = string.Empty;

        public Form1()
        {
            InitializeComponent();
            jobApplicationService = new JobPostingService.JobApplicationClient();
        }

        private void cmdCreateApplication_Click(object sender, EventArgs e)
        {
            var application =
                new JobPostingService.JobApplication()
            {
                ApplyingCandidate = new JobPostingService.Candidate
                {
                    FirstName = "Jim",
                    LastName = "Smith",
                    EmailAddress = "[email protected]",
                    SSN = "555-45-4444"
                },
                JobPostingId = 5
            };
            JobApplicationRef = jobApplicationService.ApplyForJob(application);
        }

        private void cmdCheckStatus_Click(object sender, EventArgs e)
        {
            var application = jobApplicationService.GetJobApplicationStatus(JobApplicationRef);
        }
    }
}
Setting breakpoints within the code on the code brackets after each of the two service calls indicates if the service is working correctly. Running the Windows form and clicking the cmdCreateApplication button that calls the ApplyForJob service call returns a string instead of the System.Guid return type that was set within the workflow. Figure 11-26 indicates within the LOCALS (VS2012 going for the “Metro” look with capital headings) window that the JobApplicationRef variable set by the service call ApplyForJob returns a string that indicates the service call works.

Figure 11-26. AppForJob service call returns a Job application ID
Clicking on the cmdCheckStatus button calls the GetJobApplicationStatus service call and returns a JobApplicationStatus object that correlates with the job application ID returned from the ApplyForJob service call that was called in Figure 11-26.

Figure 11-27. GetJobApplicationStatus returned an active job application
The results in Figure 11-27 illustrate that the job application ID that was passed in as a parameter to the GetJobApplicationStatus service call returned a JobApplicationStatus object, with the correct information pertaining to the candidate that applied to the job highlighted in blue.
The results returned in Figure 11-27 indicate that the service is maintaining state of the workflow service instance and not retrieving data from external data stores. This means that all processing has been consolidated and is being handled within the workflow rather than relying on external processes for handling business logic for a candidate posting for a job.
![]() Note System.Guid is the type for the parameter that is set within the workflow; however, the client will receive a string value type instead.
Note System.Guid is the type for the parameter that is set within the workflow; however, the client will receive a string value type instead.
Persisting workflow instances is the main ingredient that allows for stateful services to maintain state. Out of the box, WF persistence uses SQL Server scripts that are provided for building a database and the logic for managing the state of a workflow instances. Workflow instances are managed as clients interact through a WCF service, which then creates a WF instance. A workflow instance represents an instance of a workflow that is created as a client call is made from a client through a WCF service. After a workflow instance is created, the state of the workflow instance is managed through persistence until the workflow completes. So far, the workflow allows clients to apply for jobs and check on the status of a job application, but what happens if the service goes down or a server failure causes the entire computer to go down. This scenario is demonstrated by creating a new job application and then simulating a server failure by bringing down the hosted service. The client application will still continue to run. Once the service is restarted, the results hold for the client application. Once the service is running again, the status of the job application can be checked to make sure it was created before the service went down. Figure 11-28 shows that the correlated workflow service instance is no longer in memory because of the service restarting.
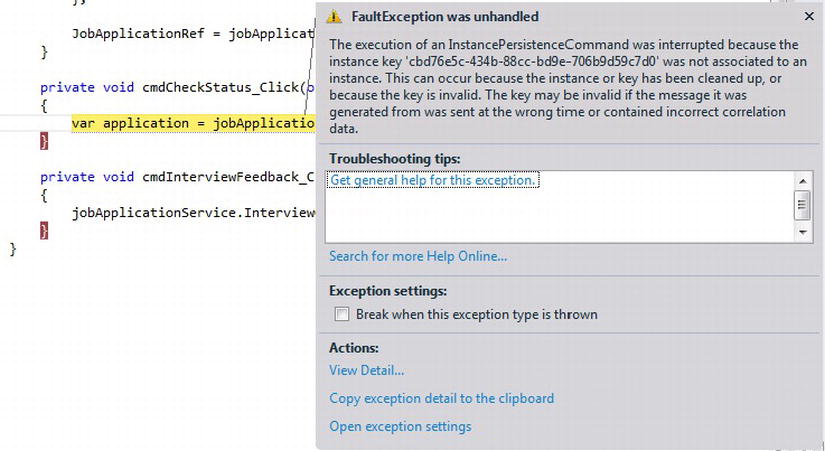
Figure 11-28. Service is no longer aware of the workflow service instance after restarting
![]() Tip Chapter8 is entirely focused on persisting workflows so use it as a reference for this section to further your understanding around persisting workflows.
Tip Chapter8 is entirely focused on persisting workflows so use it as a reference for this section to further your understanding around persisting workflows.
The solution to this problem is simply adding persistence, which comes out of the box. In Chapter 8, you went through running the scripts for building the persistence store within SQL Server. You can now simply configure the workflow to use persistence, so you no longer have to worry about the service going down and not have a persisted snapshot of the last step for the workflow. Listing 11-8 shows the web.config and how persistence is added within the service behavior element.
Listing 11-8. Workflow Service Web.config
<?xml version="1.0" encoding="utf-8" ?>
<configuration>
  <system.web>
    <compilation debug="true" strict="false" explicit="true" targetFramework="4.5">
    </compilation>
  </system.web>
  <system.serviceModel>
    <behaviors>
      <serviceBehaviors>
        <behavior>
          <!--<sqlWorkflowInstanceStore
            connectionString="Server=HYPERVWINSEVEN2;Database=WFPersist;Trusted_Connection=yes"
            hostLockRenewalPeriod="00:00:30"
            runnableInstancesDetectionPeriod="00:02:00"
            instanceCompletionAction="DeleteAll"
            instanceLockedExceptionAction="AggressiveRetry"
            instanceEncodingOption="GZip"
            />−−>
          <workflowIdle timeToPersist="00:00:05" timeToUnload="00:00:30"/>
          <!-- To avoid disclosing metadata information, set the values below to false before deployment -->
          <serviceMetadata httpGetEnabled="true" httpsGetEnabled="true"/>
          <!-- To receive exception details in faults for debugging purposes, set the value below to true.  Set to false before deployment to avoid disclosing exception information -->
          <serviceDebug includeExceptionDetailInFaults="false"/>
        </behavior>
      </serviceBehaviors>
    </behaviors>
    <serviceHostingEnvironment aspNetCompatibilityEnabled="true"
        multipleSiteBindingsEnabled="true" />
  </system.serviceModel>
  <system.webServer>
    <modules runAllManagedModulesForAllRequests="true"/>
  </system.webServer>
</configuration>
Uncommenting the WorkflowInstanceStore section, which is bold within Listing 11-8, will cause the service to use the pre-existing persistence store that was created in Chapter 8. Persistence has now been configured so now the workflow can continue to grow and additional functionality required for implementing the job application business process can be added.
The next step for the workflow is providing feedback based on the interview for a candidate who has applied to a job posting. A new Receive activity is used to indicate that an interview has been done and the results for the interview are provided as a simple true or false indicating the candidate passed or failed the interview for the job application. Feedback is not required in response to the person rating the interview with the candidate, therefore the Send activity is not required. The content definition adds the two parameters indicated in Figure 11-29.
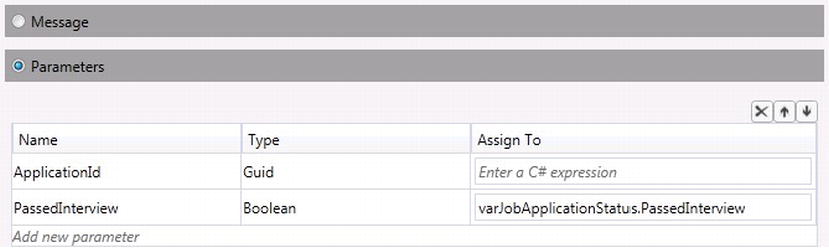
Figure 11-29. Two parameters added for providing interview feedback
The first parameter, ApplicationId, is used to correlate the right job application with the right workflow service instance, and the second parameter, PassedInterview, simply gives thumbs up or down and sets the current job application status variable’s property, PassedInterview for varJobApplicationStatus. Figure 11-30 shows how correlation is built based on the ApplicationId parameter that is passed with the InterviewCandidate service call.
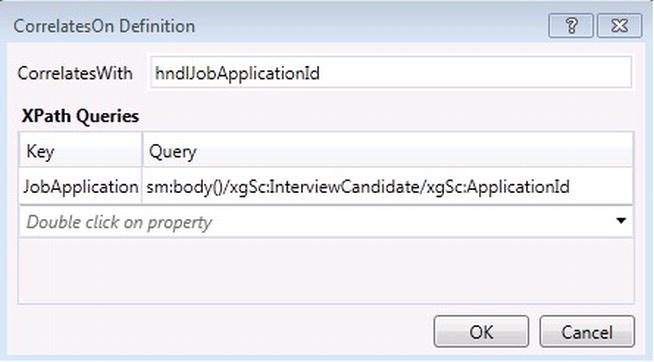
Figure 11-30. Correlation based on the ApplicationId parameter passed in for the service call
Workflow Termination
Figure 11-4 shows that the workflow completes in regards to the candidate’s interview or background check failing, and provides feedback to a candidate. Ending the workflow this way provides a natural way to complete the job application process; however I also want to show how this can also be done using a TerminateWorkflow activity. Based on the results for the interview that was set for the PassedInterview property of the varJobApplicationStatus variable, a FlowDecision activity is used to control flow for either terminating the workflow or continuing on and performing a background check for the candidate. After dragging a FlowDecision activity on to the designer canvas, set its DisplayName property to Passed Interview, and its Condition property to varJobApplication.PassedInterview property that was set in Figure 11-29. A TerminateWorkflow activity can also be added to the workflow and connected to the false node for the FlowDecision activity. The TerminateWorkflow activity's Exception property is set to a new ApplicationException object and the Reason property is set to a string that indicates why the workflow is being terminated (see Figure 11-31).
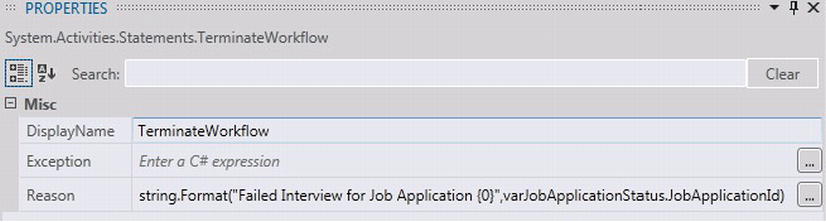
Figure 11-31. Setting the Exception and Reason properties for the TerminateWorkflow activity
Figure 11-32 illustrates an updated workflow after adding and configuring the FlowDecision and TerminateWorkflow activities. The client code can now be updated to make a call to the InterviewCandidate service call by updating the service reference for the Windows form application; adding a new button and event for when the button is clicked; adding the service call InterviewCandidate; and passing in a valid job application ID and a Boolean value indicating if the interview was successful or not within the click event.
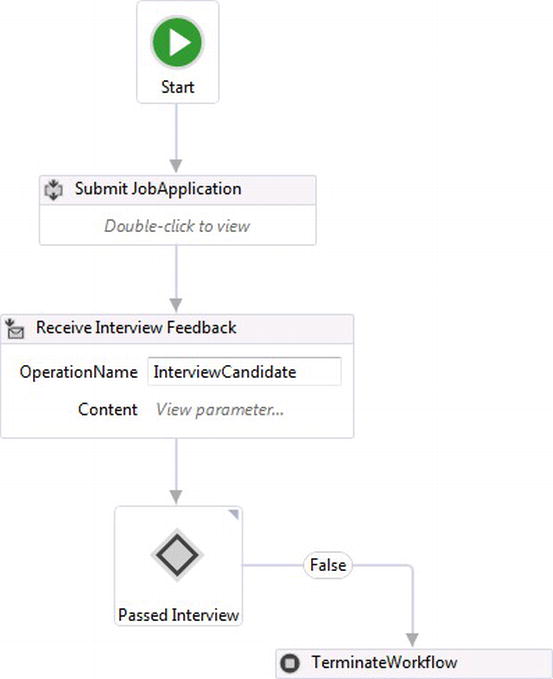
Figure 11-32. Making a decision to terminate the workflow
![]() Tip Because the TerminateWorkflow activity is used for throwing an exception, it does not provide a graceful way to end a workflow, because the exception thrown by the activity has to be accounted for. The best practice for using the TerminateWorkflow activity is when an exception has occurred within the workflow. Letting a workflow complete is the natural way to end its process.
Tip Because the TerminateWorkflow activity is used for throwing an exception, it does not provide a graceful way to end a workflow, because the exception thrown by the activity has to be accounted for. The best practice for using the TerminateWorkflow activity is when an exception has occurred within the workflow. Letting a workflow complete is the natural way to end its process.
Workflows Calling other Workflows
The job application workflow now needs to handle performing a background check for the candidate after they have passed the interview screening, but first a separate workflow needs to be built to simulate the logic of performing a background check on a person by adding a new WCF Workflow Service to the project called BackgroundCheckService.xamlx. Figure 11-33 illustrates the BackgroundCheckService and uses a Delay activity to delay the background check workflow 10 seconds. This amount of time simulates the possible human interaction where a background check could take a little longer than just a simple computed transaction.
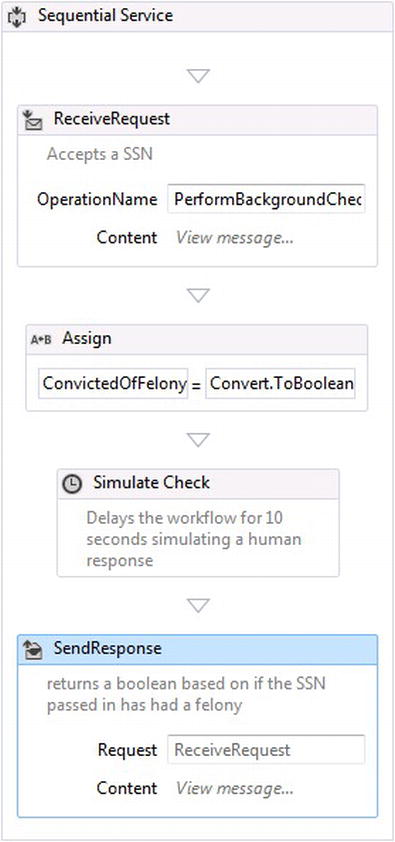
Figure 11-33. BackgroundCheck workflow service
The Receive activity defines the service call PerformBackgroundCheck and implements IBackgroundCheck. The service will accept a string that represents a SSN and returns a Boolean showing whether or not a SSN has a felony record. Figure 11-34 shows two variables that are created for holding the SSN and returning the results for the service.

Figure 11-34. Variables for holding and returning results from the service
The assign activity uses a random number generator to generate a value for the ConvictedOfFelony by setting it to Convert.ToBoolean(new Random().Next(0,2)).
Content for the activity has been set up as a message that accepts an SSN of type string. A parameter could have been used as well but since all the service needs is the SSN, a message was used instead (see Figure 11-35).
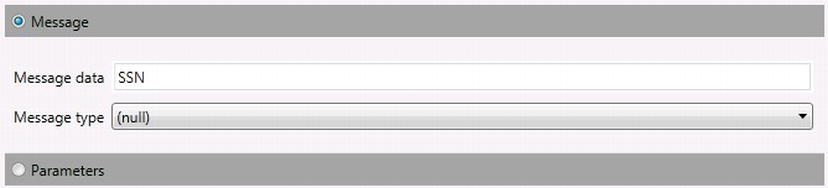
Figure 11-35. Setting the message data
The Reply activity just returns the value for the variable ConvictedOfFelony that is set in Figure 11-36.
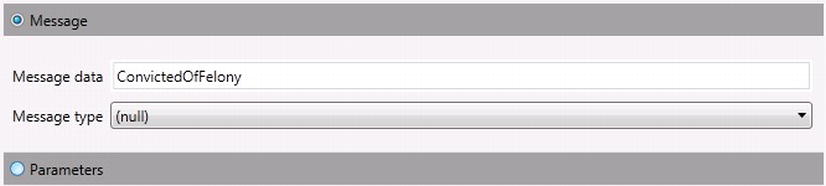
Figure 11-36. Setting the message data that will be returned from the service
Now that the Background check service has been created, the Job application service needs to communicate to the Background check service and request a background check for a candidate. A SendAndReceiveReply activity is required for a workflow to communicate to another WCF service and receive a reply. Sometimes a service may not respond instantly and that has to be considered while building the workflow. When a SendAndReceiveReply activity is added to the designer canvas, a Send and Receive activity are automatically added to the workflow. Figure 11-37 illustrates the Send activity’s OperationName property being set to PerformBackgroundCheck, which is the service call with in the Background check workflow service. The System.ServiceModel.Endpoint property for the Send activity has two properties: AddressUri, which identifies the endpoint address where the background check service is located, and Binding, which indicates the type of binding to use over the selected transport protocol for communicating with the background check service.
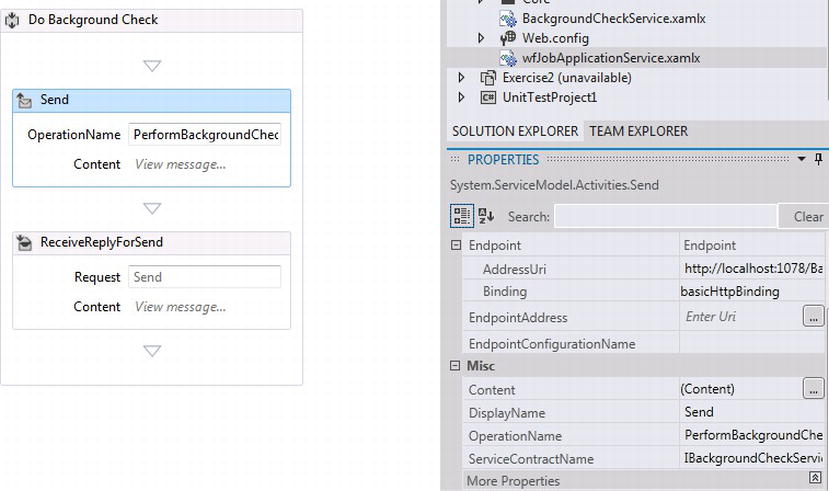
Figure 11-37. Adding a SendAndReceiveReply activity
The message is added as the content definition for the Send activity and the message data that is sent is the SSN value stored in the variable varJobApplicationStatus.SubmittedApplication.ApplyingCandidate.SSN (see Figure 11-38).
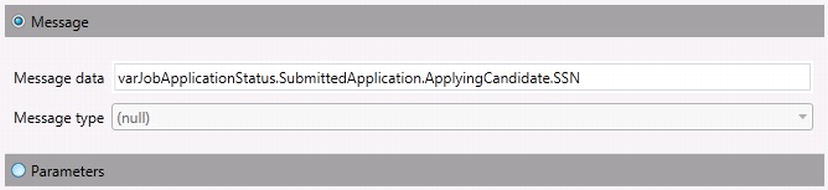
Figure 11-38. Setting the data sent from the send activity
After the Send activity sends a request for a background check for a SSN, the ReceiveReplyForSend activity will wait until it receives a response back from the background check service, and once the response is received the message content definition that was created, will set the results of the background check to the variable varJobApplicationStatus.PassedBackgroundCheck (see Figure 11-39).
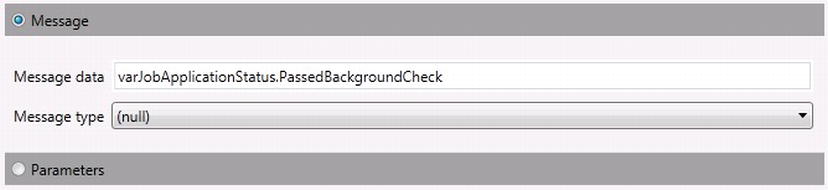
Figure 11-39. Message content definition for the ReceiveReplyForSend activity
Based on the results from the background check, a candidate will be hired; however, if the candidate does not pass the background check, the candidate is not hired and the job application process completes. To help make the decision from the results of the background check, another Decision activity is used for controlling the flow of the workflow based on the background check results stored within the JobApplicationStatus.PassedBackgroundCheck property illustrated in Figure 11-40.

Figure 11-40. Setting the FlowDecision condition property
After setting the FlowDecision, which will decide whether or not to perform a background check on the candidate, the FlowDecision node that flows for a false condition should flow to the Assign activity, indicating to the candidate that they did not pass the job application process. The FlowDecision node that flows for a result of true based on its flow results should flow into a custom HireCandidate activity. Listing 11-9 shows the basic code used to simulate hiring a candidate as a JobApplicationStatus object is passed into the HireCandidate activity with the appropriate data for adding custom business logic for adding an employee.
Listing 11-9. Custom HireCandidate Activity
using System;
using System.Activities;
using System.Collections.Generic;
using System.Linq;
using System.Text;
using System.Threading.Tasks;
using Excercise1.Core;

namespace Exercise1.CustomActvities
{
   public class HireCandidate:CodeActivity
    {
       [RequiredArgument]
       public InArgument<JobApplicationStatus> ApplicationStatus { get; set; }

       protected override void Execute(CodeActivityContext context)
       {
           var status = context.GetValue(ApplicationStatus);
            //Custom logic for creating a new employee
       }
    }
}
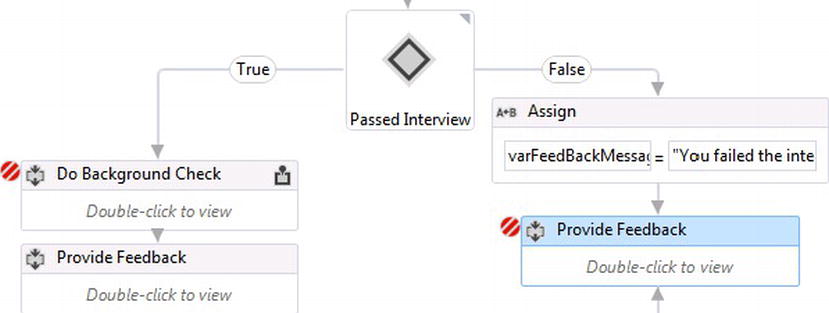
Figure 11-41. Adding the condition for hiring a candidate for the job
Figure 11-41 shows the two breakpoints that will stop workflow execution while running the workflow in debug mode. A checkbox control was added to the client to indicate a passed or failed interview (see Figure 11-42).
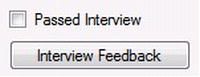
Figure 11-42. Checkbox for setting feedback for an interview
To test the workflows and how they work together, right click on the wfJobApplicationService.xamlx workflow and click “Set As Start Page.” Running the project will automatically load the WCF Test Client. Clicking “File Add Service” pops open the dialog box for starting more services. Figure 11-43 shows how the background check service has been started within the WCF Test Client.
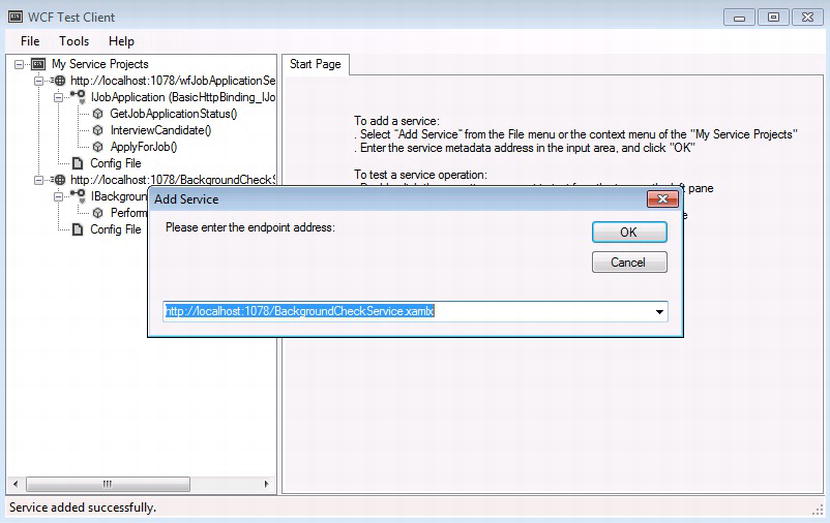
Figure 11-43. Hosting the Background check service
After the services have started, the service reference to the job application service needs to be updated by right-clicking the service reference and selecting Update Service Reference. After the service has been updated, the client application can be started. Clicking the Create Job Application button will kick off a new job application. After the job application is created, checking the checkbox will indicate to the workflow that the interview passed and leaving it unchecked indicates that interview failed; the behavior within the workflow will mimic the same logic indicated by the activity breakpoints set in Figure 11-41. If a candidate passed an interview, the job application calls the Background check workflow and passes the SSN of the candidate. After the Background check workflow waits and then replies with a random true or false value indicating the success of the background check. If the Background check fails, then the workflow completes, but if the candidate passes the background check, then the workflow executes the custom HireCandidate activity (see Figure 11-44).
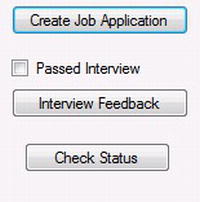
Figure 11-44. Client functionality
Almost all of the requirements have been modeled within the workflow for handing the job application process except communicating results back to the candidate for both the interview and the background check. Listing 11-10 indicates the code used to simulate e-mailing feedback to a candidate for the results of both an interview and background check.
Listing 11-10. ProvideFeedbackToCandidate Activity
using System;
using System.Activities;
using System.Collections.Generic;
using System.Linq;
using System.Text;
using System.Threading.Tasks;

namespace Exercise1.CustomActvities
{
   public class ProvideFeedbackToCandidate:CodeActivity
    {
       [RequiredArgument]
       public InArgument<string> MessageToCandidate { get; set; }
       [RequiredArgument]
       public InArgument<string> EmailAddress { get; set; }

       protected override void Execute(CodeActivityContext context)
       {
           var message = context.GetValue(MessageToCandidate);
           var address = context.GetValue(EmailAddress);
           //Custom logic for creating a new employee
       }
    }
}
To implement the candidate feedback logic, a Sequence activity needs to be added before each of the FlowDecision activities (see Figure 11-45).
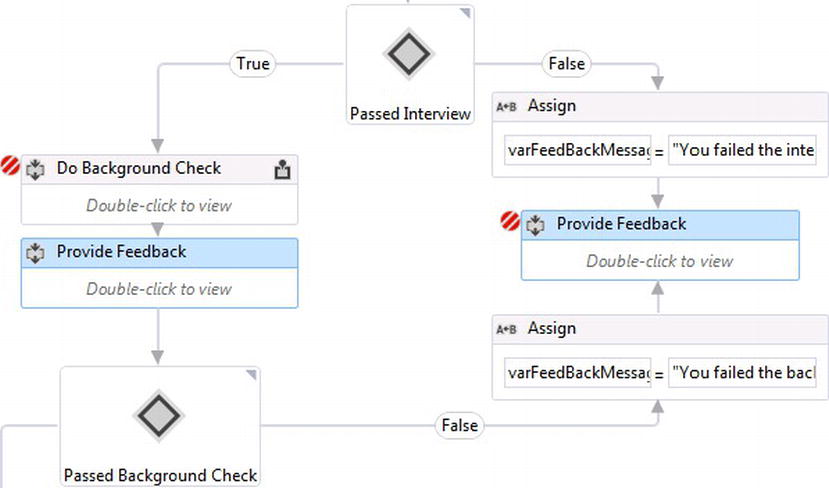
Figure 11-45. Sequence activities as the parents for holding the feedback logic to candidates
The ProvideFeedbackToCandidate activity takes two arguments, an EmailAddress property which is set to varJobApplicationStatus.SubmittedApplication.ApplyingCandidate.EmailAddress (which is the candidates e-mail address that was provided when the job application was submitted), and a MessageToCandidate property indicating the message text that will be shared with the client. An If activity determines the message that is sent to the candidate, so for the interview feedback, varJobApplicationStatus.PassedInterview is used to determine the verbiage for the message sent to the candidate. Figure 11-46 shows the interview feedback business logic.
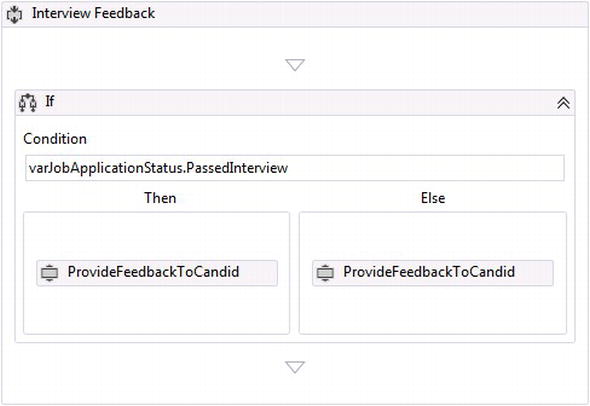
Figure 11-46. Interview Feedback composite activity
Figure 11-47 shows the background check business logic.
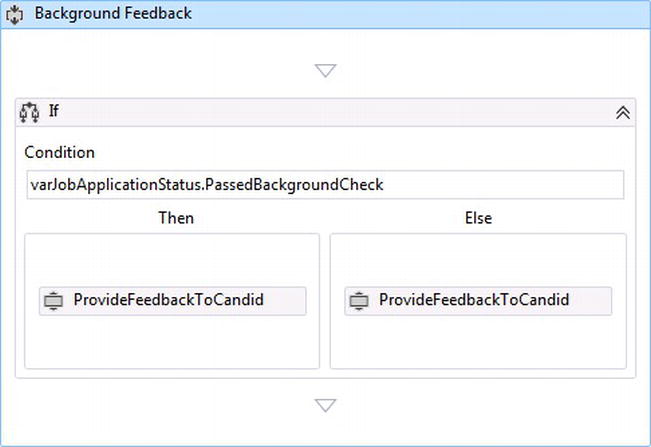
Figure 11-47. Interview Feedback composite activity
Figure 11-48 illustrates setting the ProvideFeedbackToCandidate properties.
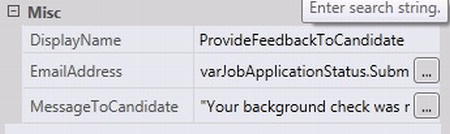
Figure 11-48. Setting the EmailAddress and MessageToCandidate properties
The workflow is now complete based on the requirements defined earlier in the chapter for managing a job application process. Adding additional breakpoints within the HireCandidate and ProvideFeedbacktoCandidate custom code activities adds additional debugging capabilities for stepping through the code. Adding a tracking profile will also provide transparency for monitoring the flow of the workflow as well. Running the job application and background check workflows within the WCF Test Client allows the process to be tested against a client. After clicking the Create Job Application button illustrated in Figure 11-44, checking the Passed Interview checkbox, and then providing the feedback about the interview by clicking on the Interview Feedback button, the first breakpoint is hit within the ProvideFeedbackToCandidate custom activity with a message to the candidate and their e-mail address (see Figure 11-49).
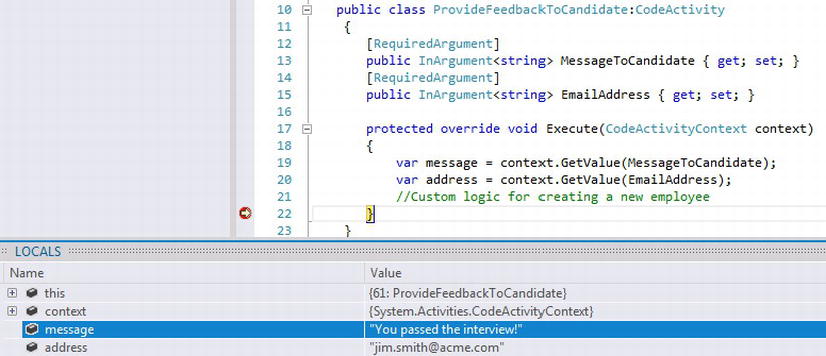
Figure 11-49. Notifying the candidate the interview went well
After notifying the candidate that they have passed the interview, the workflow hits the next breakpoint on the Sequence activity with the description Do Background Check (see Figure 11-50).
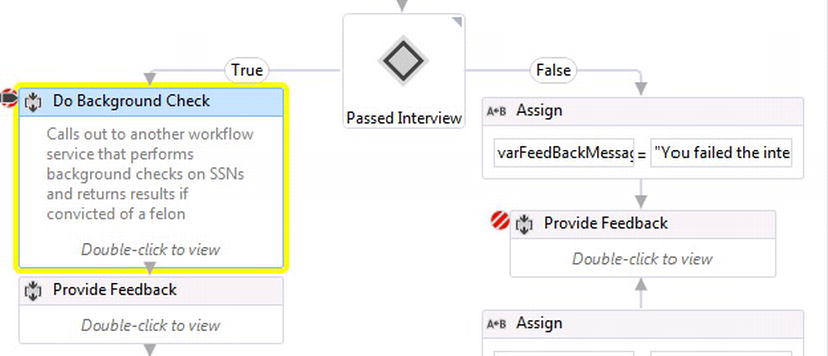
Figure 11-50. Performing background check
The background check takes ten seconds, simulating a human decision for checking background information. The next breakpoint is on the ProvideFeedbackToCandidate activity, again for notifying the candidate about the background check, which is simulated by a random number that generates a true or false from the Background check service. Figure 11-51 indicates that the background check passed and that the candidate is on his or her way to getting hired for the job.
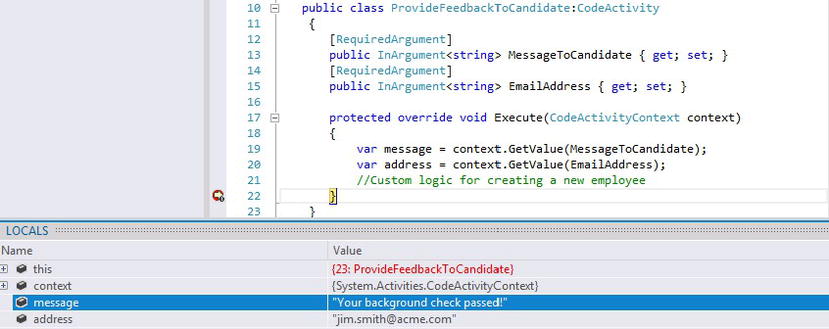
Figure 11-51. Notifying the candidate of a successful background check
Finally the candidate is officially hired when the HireCandidate activity executes, indicating that the candidate has passed both the interview and the background check, and provides information about the candidate so it can be added within an HR system (see Figure 11-52).

Figure 11-52. HireCandidate activity execution
Clicking the Check Status button illustrated in Figure 11-44 for the client application shows the results within the client application the status of the job application (see Figure 11-53).
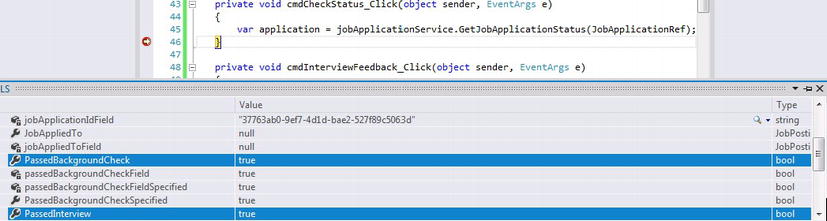
Figure 11-53. Job application status returned to client
Completed Workflow Instances
It is important to have control over a workflow service instance by providing clients the ability to terminate the workflow at any time of the job application process. When the workflow is terminated, the workflow service instance is no longer available, so the message in Figure 11-54 will be received from the workflow.

Figure 11-54. Error returned when calling completed workflow instance
One way to terminate the job application process is to add another PickBranch activity to the Pick activity within the While activity, and drop just a Receive activity within it. The OperationName is TerminateJobApplication and the ServiceContractName property needs to be IJobApplication. The Receive activity's content definition can be the same as the GetJobApplicationStatus, which has the message data set to varJobApplicationId and the message type to System.Guid. Correlation can also be set up to correlate the value passed in with the hndJobApplicationId CorrelationHandle. A TerminateWorkflow activity is added within the Action section of the PickBranch activity and its Exception property will be set to new ApplicationException() and the Reason is set to "Client terminated the workflow" (see Figure 11-55).

Figure 11-55. Terminating the workflow during the job application process
The Flowchart activity also needs to be modified to indicate to the While activity that it no longer needs to process the GetJobApplicationStatus service call. Since the varWorkflowComplete has scope within the Parallel activity, it can be set within the Flowchart activity by using an Assign activity, which is connected to the HireCandidate activity illustrated in Figure 11-56.

Figure 11-56. Setting the varWorkflowComplete variable to true
During the process of job application, the results can be checked throughout the process. If the client decides to terminate the workflow during the process, the workflow will be terminated. When the workflow completes and a candidate is hired, the varWorkflowComplete variable is changed to true and the status of the workflow can be checked one more time. Checking the status after the final check will result in the returned message in Figure 11-54.
Workflow Management Service (WMS)
The logic for managing workflow persistence as demonstrated within the job application workflow is handled by the Workflow Management Service (WMS). WMS is a Windows service that handles the activation for workflow instances that are hosted by the WorkflowServiceHost and use the SQL Workflow Instance Store for persisting workflow service instances. WMS manages workflow service instances that use expired timers usually caused when a workflow uses a Delay activity. These workflow instances become idle when the Delay activity executes within a workflow and are then persisted. While workflow instances are persisted, the WMS polls the persistence store at a preconfigured time interval for expiring timers on workflow instances that will need to be executed. If a workflow instance needs to wait more time before performing additional work by executing another Delay activity, the WMS will simply persist the workflow instance again and wait for timer to expire again.
Contract-First
So far, this chapter has demonstrated how workflows can be built first (workflow-first) for defining a service contract and operations a WCF service will implement. But there is another scenario in which a service contract already exists. For instance, there could be an existing WCF service contract that needs to be converted into a workflow. This way a generic WCF service can take advantage of running as long-running service that maintains state between service calls. It would be counterproductive to build workflows that comply with existing service contracts, which is why WF4.5 introduces the new contract-first feature.
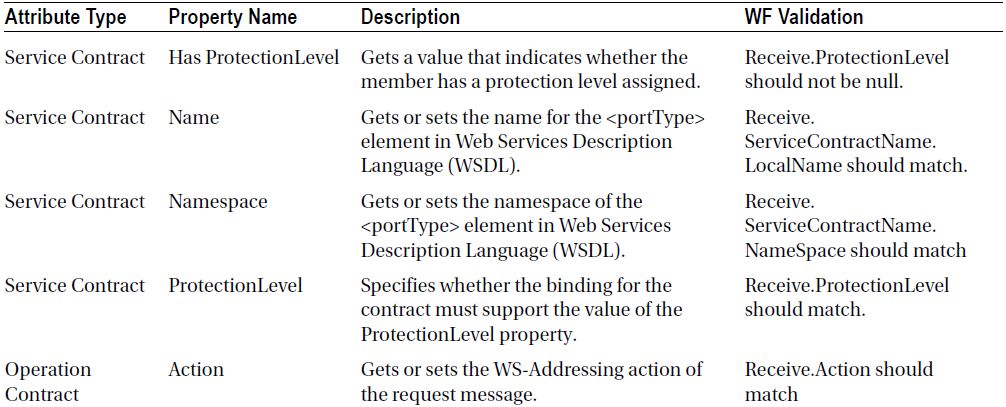
A contract-first workflow relies on an existing service contract, so it can generate WF activities that can be used to build a custom workflow service. Table 11-1 indicates the WCF attributes and how they map to contract-first.
Table 11-1. Mapped WCF Attributes that Apply to Contract-First Workflows
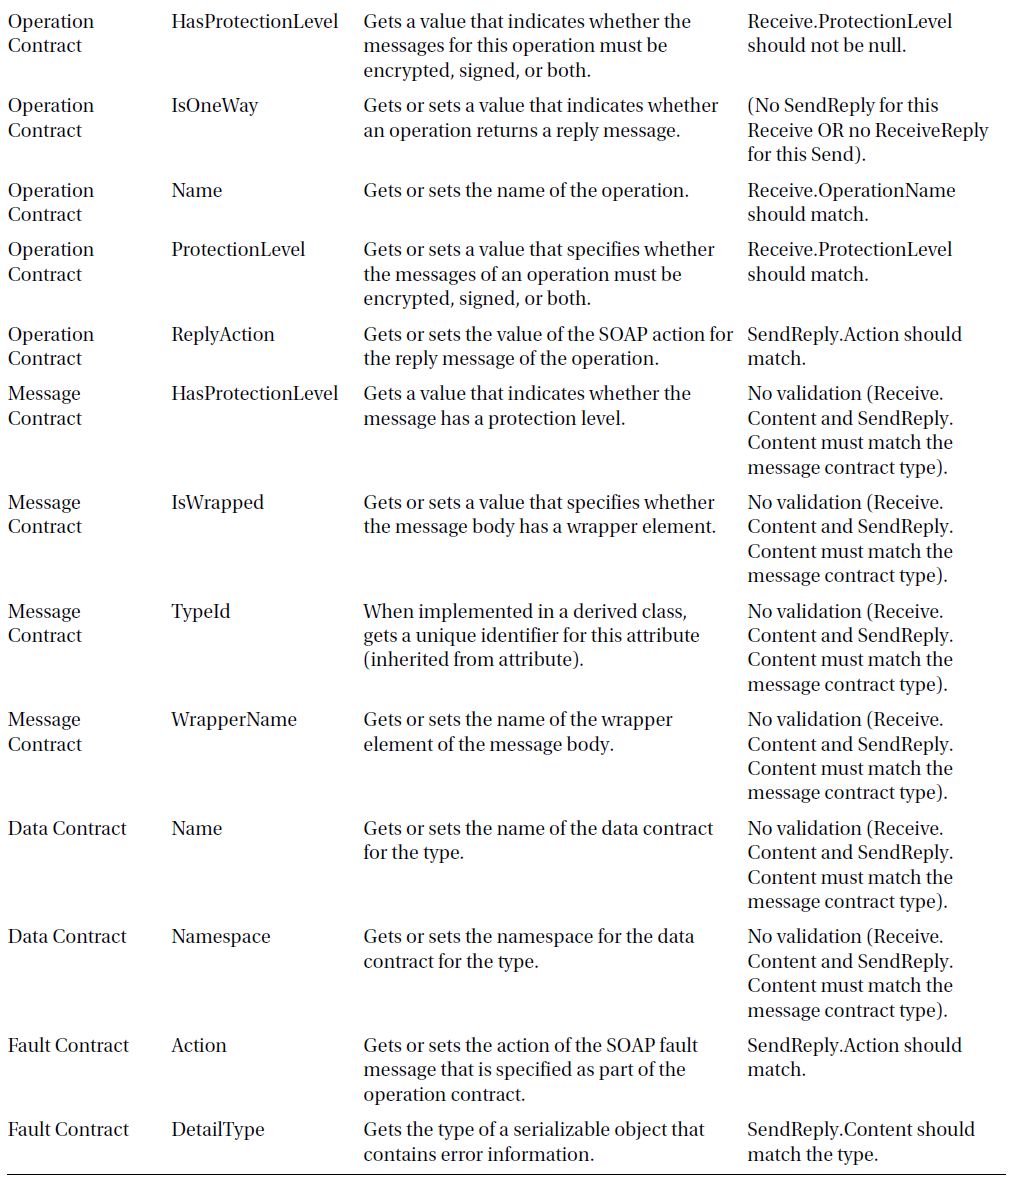
To demonstrate how contract-first works, I will use the same service contract defined in Listing 11-3 earlier in the chapter. The first step is to create a new WCF Workflow Service Application project within VS2012 (see Figure 11-6). Best practices for building WCF services calls for a separate project for segregating WCF service contracts, so a reference to another project where the service contract resides can be made. To keep things simple, though, the IJobApplicationService service contract can be added to the new workflow service project, so the project can import the service contract. Figure 11-57 shows how right-clicking on the project provides a menu option called “Import Service Contract”.
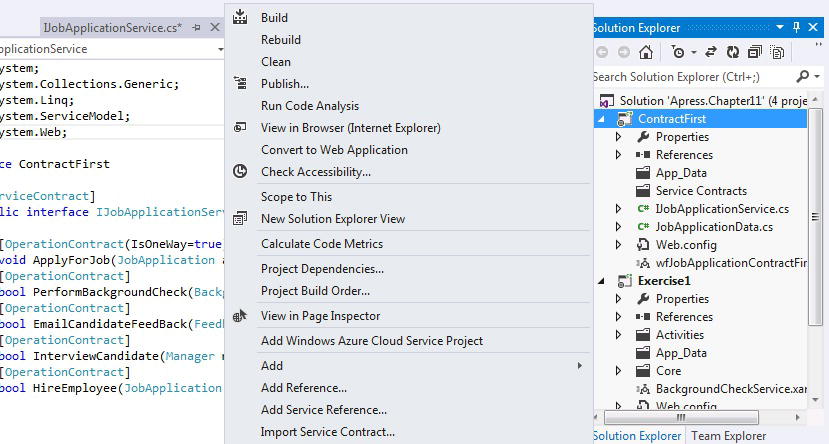
Figure 11-57. Importing an existing service contract
Clicking “Import Service Contract” tells VS2012 to filter all references to service contracts that are either local to the project or referenced within other projects. IJobApplicationService is located within the same project (see Figure 11-58).
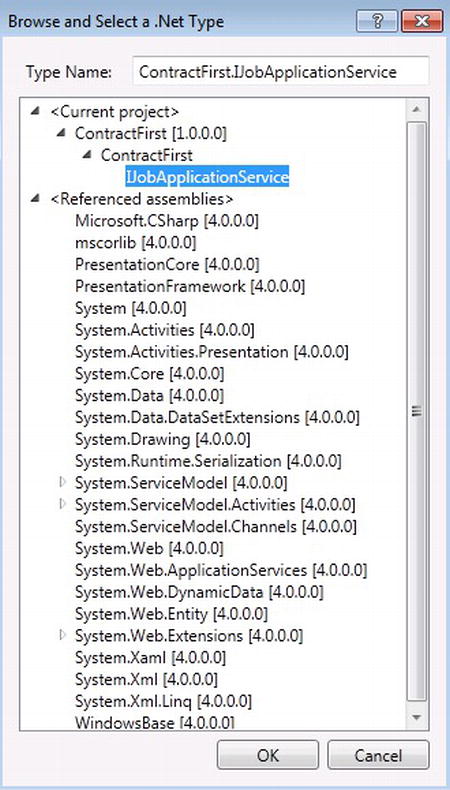
Figure 11-58. Browsing for a service contract
Once a service contract is selected, VS2012 lets you know that something wonderful has happened and that generated activities based on the service contract will appear within the WF toolbox the next time the project is rebuilt (see Figure 11-59). Rebuilding the project will show the new activities, which align to each of the operation contracts of the service contract.
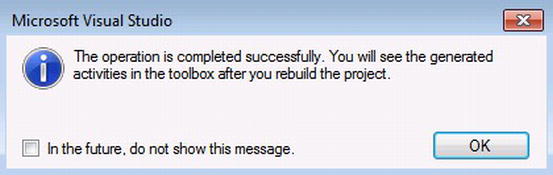
Figure 11-59. Feedback that the service contract was imported
The WF toolbox will contain the generated activities that can be used to define a workflow for a job application process after rebuilding the project (see Figure 11-60).
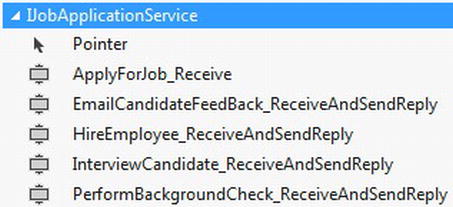
Figure 11-60. Generated WF activities based on the service contract
Once one of the generated WF activities is added to the WF designer, you will notice that the parameters have also been added to each of the activities, according to the parameter signature for each of the operation contracts. For instance, the operation contract ApplyForJob (JobApplication application) generates a Receive activity and already defines the parameter application as type JobApplication (see Figure 11-61).

Figure 11-61. Already defined application parameter based on the operation contract “ApplyForJob”
The premise for defining a service contract is, of course, creating a service that implements it, but by default there is no validation that additional changes to the generated activities will reflect the implementation of the existing service contract. For example, Figure 11-21 shows that the ApplyForJob_Receive activity has only one parameter called “application,” but you can add another parameter and still have the workflow service compile. In order to validate that the workflow service continues to implement the service contract, even as the workflow is being authored, a new property on the workflow service root called “ImplementContracts” must be set to the service contract that the workflow should implement (see Figure 11-62).
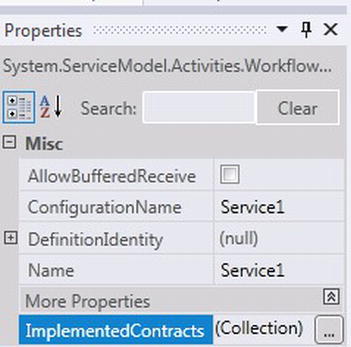
Figure 11-62. ImplementedContracts property for validating a workflow service implements a service contract
Clicking the ImplementedContracts property brings up an editor so the service contract can be searched. Figure 11-63 shows that IJobApplicationService has been selected, validating that the workflow service should implement that contract.

Figure 11-63. Setting the ImplementedContracts property for validating the workflow service implements the service contract
Now when the ApplyForJob_Receive activity is modified by adding a new parameter called “SSN,” the workflow designer indicates that the workflow service no longer implements the contract (see Figure 11-64).
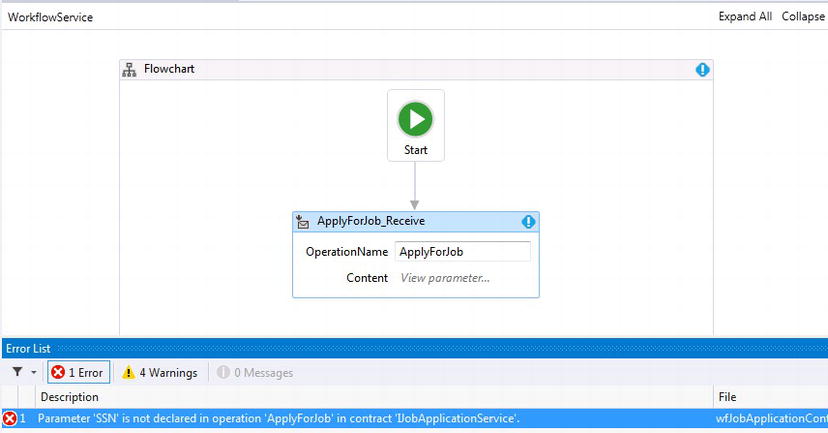
Figure 11-64. Workflow error validating the contract is not being implemented because of a new SSN parameter
By removing the new “SSN” parameter, the error goes away; however, the workflow is still throwing errors because all of the operations have not been added to the workflow (see Figure 11-65). These errors will disappear by simply by making sure the workflow service uses the rest of the WF activities that were generated based on the service contract.
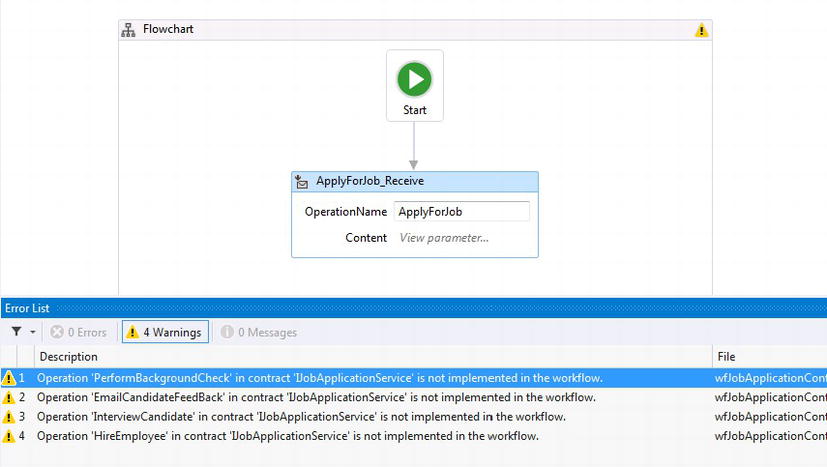
Figure 11-65. The workflow is still throwing errors because all the operations have not been added to the workflow
![]() Tip The contract-first pattern is a great new feature that can kick-start authoring workflows and should be primarily used while converting WCF services to workflows. Following a workflow-first pattern provides a more natural way to author workflows when a service contract does not already exist. When WF activities are generated around a service contract, depending on how the service contract is defined, the generated WF activities could require modification. This is because existing WCF services are primarily authored around receiving and sending data, with minimal consideration of implementation as an executing business process.
Tip The contract-first pattern is a great new feature that can kick-start authoring workflows and should be primarily used while converting WCF services to workflows. Following a workflow-first pattern provides a more natural way to author workflows when a service contract does not already exist. When WF activities are generated around a service contract, depending on how the service contract is defined, the generated WF activities could require modification. This is because existing WCF services are primarily authored around receiving and sending data, with minimal consideration of implementation as an executing business process.
Summary
WCF services pick up on the shortcomings that became apparent with using ASP.NET Web Services and provide a framework that allows developers to build services that can be used over additional network protocols, provide message reliability, and support distributed transactions. However, the real power of extending services to clients combines the rich features of WCF along with key features from WF. WF introduces to WCF services the ability to provide transparency for service business logic by modeling business processes and maintaining state for the business logic a service provides.
This chapter walked through the steps and key points of building a workflow that maintains state throughout the lifecycle of job applications. It also demonstrated that a workflow service can be built and then tested to validate that it is working correctly. Then it showed how a workflow can call another workflow and wait for its response.
A new feature in WF4.5, called contract-first, was also introduced by showing how custom workflow activities can be generated through WF4.5 by using an existing WCF contract. Once WF activities are generated from a service contract, a custom workflow can be authored quickly by using the new activities. The workflow can also be validated against a service contract to make sure it is implementing the contract correctly.
This chapter has laid some of the groundwork for the next chapter, which will show how workflows can be hosted within Azure, optionally as WCF services.
1 Originally short for “Simple Object Access Protocol,” but latterly redefined as just a name. See http://www.w3.org/TR/soap/