
![]()
Autotiles
Tile-based maps are the easiest way to construct dynamic worlds for 2D games. Such maps are described by a grid, where each cell belongs to one possible type. Most map formats allow the concept of layers in their rendering engine. A single cell can have multiple graphics that render to the same location of the map. In this chapter, I will discuss and solve the following common problems:
- Visually, there are types of tiles that quickly become redundant and an eyesore. An entire screen painted with the same grass tile quickly becomes boring. Artists often have to produce additional artwork and layers in order to hide such repetitive visuals.
- Memory usage is another problem. If a map is big, you can’t create objects for each cell without significant memory loss. A number must describe most cells, which is an index of their tile. If you store only the numbers of tiles instead of objects, then any change in the list of possible tiles can ruin an already-drawn map.
- For large, complex worlds, the asset creation pipeline can quickly become an issue. Problems with graphics files and tile organization quickly present themselves as technical problems for large team 3D voxel games. If you want to make a Minecraft clone, this tutorial has to be in your favorites list.
The first problem is solved with an autotiles technique, where an algorithm, depending on the types of all surrounding tiles, generates each rendering sprite for a tile.
This chapter is based on the editor code from Chapter 11, where the basic functionality for editing maps is created. In this chapter, you will do something serious that extends your epic engine.
Let’s create a separate type of object tiles: a solid. Solids are necessary to create closed spaces; the characters can’t go through them. Solids can be of different types: some are destroyed easily, and some are indestructible. The configuration to accomplish this is shown in Listing 6-1.
Listing 6-1. Solids
var ShadowConfig = {
init: function(game) {
        var tiles = game.tiles, sprites = game.sprites
        tiles.addMany(SolidTile, ["brick", "wall", "bush", "block", "metal"])
} }
Every solid can have two sprites to describe it: with wall and without wall. The magic number will be 0 or 1, depending on if there is a solid at the bottom (see Listing 6-2).
Listing 6-2. Solids and Sprites
var SolidTile = extendTile(Tile, {
        type:3, layer: 1,
        auto: function(map, i, j) {
                return map.getObject(i, j+1).type == 3
        },
        render: function(renderer, hasBottom, x, y) {
                var sprite = hasBottom?this.sprite2:this.sprite;
                var context = renderer.context;
                if (sprite)
                        context.drawImage(sprite.source, sprite.x, sprite.y, TILE_SIZE, TILE_SIZE,
                        x, y, TILE_SIZE, TILE_SIZE);
        },
        bind: function(sprites) {
                this.sprite = sprites.get(this.name);
                this.sprite2 = sprites.get(this.name+"-plain") || this.sprite;
        }
})
The height of each solid object will be the same, so there will be no shadows between them. You should draw a thin 1-px shadow around every solid, except in places that separate two solids. Put the light source at the left-bottom corner, and an extra shadow will appear at the right of each solid. If there is no solid below, the shadow won’t be a rectangle.
For each cell that has an object tile, you have to calculate mask of its neighbors. The i-th bit will be ON if the neighboring cell at the i-th direction contains a solid tile. Since objects can store something else in a magic number, let’s use its last 8 bits (from 24 to 31) to store it (see Listing 6-3).
Listing 6-3. Calculating the mask of the neighbors for each cell with an object tile
var dx = [1, 1, 0, -1, -1, -1, 0, 1], dy = [0, 1, 1, 1, 0, -1, -1, -1];

function getTileShadow(map, i, j) {
        var shadow = 0
        for (var bit=0;bit<8;bit++)
                if (map.getObject(i + dx[bit], j+dy[bit]).type == 3) shadow |= (1<<bit)
        return shadow<<24
}

function drawTileShadow(renderer, mask, x1, y1) {
        var shadow = (mask >> 24)&0xff;
        if (shadow == 0) return;
        var context = renderer.context;
        context.strokeStyle = "rgba(0,0,0,0.4)"
        context.beginPath();
        var x2 = x1 + TILE_SIZE, y2 = y1 + TILE_SIZE
        if ((shadow&1)!=0) {
                context.moveTo(x2-0.5, y1); context.lineTo(x2-0.5, y2);
        }
        if ((shadow&4)!=0) {
                context.moveTo(x1, y2-0.5); context.lineTo(x2, y2-0.5);
        }
        if ((shadow&16)!=0) {
                context.moveTo(x1+0.5, y1); context.lineTo(x1+0.5, y2);
        }
        if ((shadow&64)!=0) {
                context.moveTo(x1, y1+0.5); context.lineTo(x2, y1+0.5);
        }
        context.stroke();

        if ((shadow&24) != 0) {
                var t = 4;
                context.fillStyle = "rgba(0,0,0,0.3)"
                context.beginPath();
                if ((shadow&24) == 24) { // rectangle shadow
                        context.rect(x1, y1, t, TILE_SIZE); //rectangle + triangle
                } else if ((shadow&24) == 16) {
                        context.moveTo(x1 + t, y1);
                        context.lineTo(x1, y1);
                        context.lineTo(x1, y2);
                        context.lineTo(x1 + t, y2 - t);
                        context.lineTo(x1 + t, y1);
                }
                context.fill();
        }
}

ObjectTile.prototype.auto = getTileShadow

ObjectTile.prototype.render = function(renderer, mask, x1, y1) {
        Tile.prototype.render.call(this, renderer, mask, x1, y1);
        drawTileShadow(renderer, mask, x1, y1);
}
<!-- MODS -->
        <script src="mods/mod-shadows.js"></script>
        <!-- CONFIGURATION -->
        <script src="cfg/basic.js"></script>
        <script src="cfg/shadows.js"></script>
...
window.app = new App([BasicConfig, ShadowConfig])
Save the code in Listing 6-3 into the configuration and modification files, respectively; then add ShadowConfig in the App constructor, and you will see the results shown in Figure 6-1.
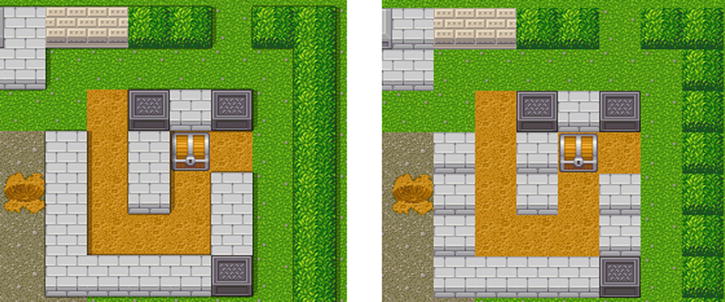
Figure 6-1. Shadows and walls
The abyss is an endless pit for those who don’t watch their step. You have to describe the wall of the pit by a magic number. Let’s add all possible walls to new TileList and call it deep, binding sprites to them. The magic number will be equal to the index of a tile in this list, depending on what tile you have above the pit. Since the abyss is a surface and you can modify surfaceTile later, you have to call its renderer after you draw the wall of the pit.
Listing 6-4 contains the code to perform the abyss modification.
Listing 6-4. Abyss Modification
var AbyssTile = extendTile(SurfaceTile, {
        type:4, layer: 0,
        auto: function(map, i, j) {
                var mask = SurfaceTile.prototype.auto.call(this, map, i, j);
                var id = map.getSurface(i, j-1).type != 4 ?    map.getObject(i, j-1).deepTile.id : 0xff;
                return mask | id;
        },
        render: function(renderer, mask, x, y) {
                var id = mask&0xff;
                if (id != 0xff) {
                        renderer.tiles.deep.byId[id].render(renderer, 0, x, y);
                }
                SurfaceTile.prototype.render.call(this, renderer, mask, x, y);
        }
})
The configuration code is as follows:
var AbyssConfig = {
init: function(game) {
        var tiles = game.tiles
        tiles.deep = new TileList();
        Tile.prototype.deepTile = tiles.deep.add( new Tile("deep_default"));
        tiles.addMany(ObjectTile, ["bridge_v", "bridge_h"], {
                deepTile: tiles.deep.add(new Tile("deep_bridge"))
        })
        tiles.add(new AbyssTile("abyss"));
},
afterInit:  function(game) {
        var tiles = game.tiles, sprites = game.sprites
        tiles.deep.bind(sprites);
}}
Add new script tags to the HTML file, and view the result, as seen in Figure 6-2.
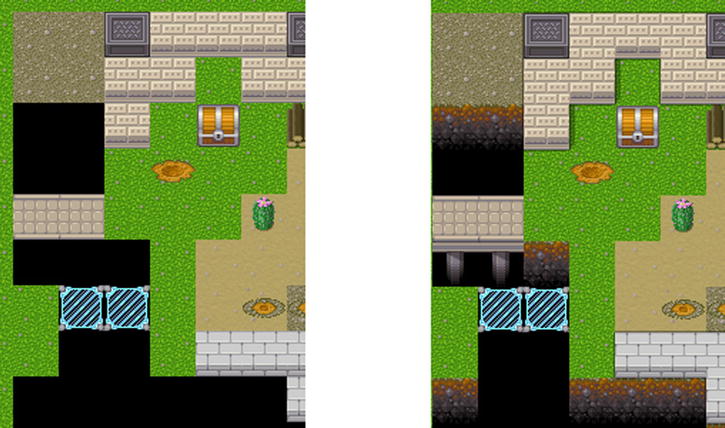
Figure 6-2. Endless pit
Smooth Transitions
This is the most interesting part of this chapter: how to make smooth transitions between surfaces (see Figure 6-3).
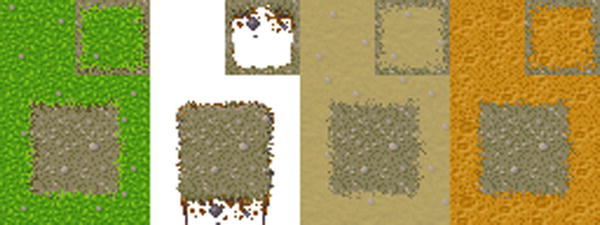
Figure 6-3. Surfaces
Here’s an explanation of how to make such sprites in the simplest way. This method yields a decent result if you have no professional artists on your team. Additionally, these bundles are stored in an easy way for browsing and editing.
First, make sure you have turned on a grid that fits the tile size. In Photoshop, it’s in the Edit ![]() Preferences
Preferences ![]() Guides
Guides ![]() Grid&Slices menu. Set the Gridline Every parameter of the tile size (32 in your case) and the Subdivisions parameter to 2. Close the window, and turn on the grid (View
Grid&Slices menu. Set the Gridline Every parameter of the tile size (32 in your case) and the Subdivisions parameter to 2. Close the window, and turn on the grid (View ![]() Show
Show ![]() Grid).
Grid).
Now you must choose a ligament, which is a kind of tile that links other tiles among themselves. In your case, it’s gravel. Make the canvas 3*4 tiles, and fill it with a linking basis. Next, select the surface that you want to smooth.
Make two upper tiles on separate layers, and four bottom links in one layer. Now you need to cut the useless elements from the grass layer including the large empty space in the center of the bottom four tiles and the edging in the upper-right tile. Then cut the second tile in the third row. It has to be filled with gravel. Erase a narrow line around central square (expand it a bit). After that, erase a narrow frame around the upper-right tile. Your result should look like Figure 6-4.

Figure 6-4. Surface step 1
Now let’s see how the future image is constructed. You construct the resulting sprite from quarters. As an example, let’s take the upper-left quarter. Depending on the neighbors of that corner, it can take up five positions of the texture. In Figure 6-5, neighbors are schematically shown; a dot corresponds to your tile, V are tiles that are equal to yours, X are different tiles, and a ? can be any tile.
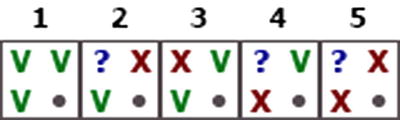
Figure 6-5. Neighbors of a corner. V means equals your tile, X means different than your tile, and a dot is your tile
All possible positions of the upper-left corner are matched in Figure 6-6.

Figure 6-6. Five possible positions for the upper-left corner of the tile
Other corners will be drawn following the same principle, as shown in Figure 6-7.

Figure 6-7. Surface symmetry
In the end, you have the variant shown in Figure 6-8, where you can see that some corners are not used.

Figure 6-8. Surface useless corners
If corners are not used, then they are not worth of storing (see Figure 6-9).

Figure 6-9. Surface resulting tile unprocessed
This is the compact variant that you are going to use. It’s better to give it to an artist, but there are ways to make it viable with simple tools. Use a 1-pixel eraser on the edges to achieve simulated grass. If you are familiar with Photoshop, it’s more convenient to apply a raggy eraser. After that, you perform the same process on the upper tile.
The final step is to add some shadows. Click twice on the grass layer, and select drop shadow. Set Size and Spread to 0 and Distance to 1. Tune the opacity to make it not very sharp. Repeat these steps on the upper tile (see Figure 6-10).
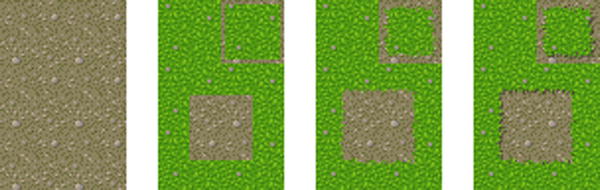
Figure 6-10. Surface production in four steps
Obviously, you shouldn’t repeat this procedure each time using a 3×4 tiles set, because you can do it on a 2×3 tiles set from the beginning. Also, don’t forget that in the 2×3 variant, the bottom 2×2 square is constructed from sprites shifted by 16 pixels in each direction.
If an object tile is allowed to create a smooth edge (noSurface is equal to false), and a surface tile has a special spritesheet for it (autoSurface is equal to true), then the magic number will describe which 16 × 16 parts of the spritesheet you have to render in each of the quarters of tile on the canvas. Since there are 4 * 6 = 24 possible indices, you store each of them in 6 bits (see Figure 6-11). First, you need 24 bits of the magic number (see Listing 6-5).
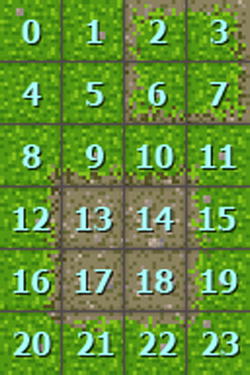
Figure 6-11. Indices for quarter of tile
Listing 6-5. Determining the 24 bits of the magic number
var test = [0, 0, 0, 0, 0, 0, 0, 0, 0];
Tile.prototype.noSurface = false
SurfaceTile.prototype.autoSurface = false
SolidTile.prototype.noSurface = true

SurfaceTile.prototype.auto = function(map, i, j) {
        //AUTOTILE #1
        if (!this.autoSurface || map.getObject(i, j).noSurface) return 0;
        var noEdges = true;
        for (var dx = -1; dx<=1; dx++)
                 for (var dy = -1; dy<=1; dy++) {
                        var v = test[dx+ 3*dy+4] = map.getSurface(i+dx, j+dy) != this
                                && !map.getObject(i+dx, j+dy).noSurface
                        if (v) noEdges = false;
                }
        if (noEdges) return 0;
        var res = 0;
        for (var i=0;i<4; i++) { // THIS IS THE MAGIC WITH INDICES
                var dx = i&1, dy = i>>1;
                var dx2 = dx*2-1, dy2 = dy*2-1;
                var r;
                if (test[4+dx2]) {
                        if (test[4+dy2*3]) {
                                r = 2; // position 5
                        } else r = 13 - dx2*2; // position 2
                } else if (test[4+dy2*3]) {
                        r = 13 - dy2*8; // position 4
                } else if (test[4 + dx2 + dy2*3]) {
                        r = 13 - dx2*2 - dy2*8; // position 3
                } else r = 0; // position 1
                r+= dx + dy*4;
                res |= (r<<(8+i*6));
        }
        return res;
}

SurfaceTile.prototype.render = function(renderer, mask, x, y) {
        var sprite = this.sprite
        var context = renderer.context
        if (!sprite) return
        var dx, dy;
        mask>>>=8;
        var T2 = TILE_SIZE/2; // 16 pixels
        if (mask!=0) {
                dx = (mask&3)*T2;          // 2 bits – X coordinate of quarter
                dy = ((mask&63)>>2)*T2; // then 4 bits – Y coordinate of quarter
                context.drawImage(sprite.source, dx+sprite.x, dy+sprite.y, T2, T2, x, y, T2, T2);
                mask>>>=6;
                dx = (mask&3)*T2;
                dy = ((mask&63)>>2)*T2;
                context.drawImage(sprite.source, dx+sprite.x, dy+sprite.y, T2, T2, x+T2, y, T2, T2);
                mask>>>=6;
                dx = (mask&3)*T2;
                dy = ((mask&63)>>2)*T2;
                context.drawImage(sprite.source, dx+sprite.x, dy+sprite.y, T2, T2, x, y+T2, T2, T2);
                mask>>>=6;
                dx = (mask&3)*T2;
                dy = ((mask&63)>>2)*T2;
                context.drawImage(sprite.source, dx+sprite.x, dy+sprite.y, T2, T2, x+T2, y+T2, T2, T2);
        } else context.drawImage(sprite.source, sprite.x, sprite.y, TILE_SIZE, TILE_SIZE, x, y, TILE_SIZE, TILE_SIZE);
}
The configuration here is easy. Add a new tileset, separating surface spritesheets by empty lines because they are twice as wide as single tiles. You don’t want smooth transitions between the bridge and the abyss (it looks awful), so let’s mark them by the noSurface flag, as shown in Listing 6-6.
Listing 6-6. Smooth Transitions
var SurfaceConfig = {
init: function(game) {
        var tiles = game.tiles, sprites = game.sprites
        tiles.apply(["grass", "sand", "dirt", "abyss"], {autoSurface: true});
        tiles.apply(["bridge_v", "bridge_h"], { noSurface: true});
        sprites.addSpriteSheet("img/surfaces.png", [
                ["grass", "", "abyss", "", "sand", "", "dirt"]
        ]);
} }
Now add files to index.html, and note the difference, as seen in Figure 6-12.

Figure 6-12. Perfection!
You can further enhance this tiny autotile engine to serve your design purposes as follows:
- Add irregular tiles and supplementary patterns.
- Create tile transitions that can be fully automated if there’s no need for pixel-perfect art on each tile.
So take this approach and try some tiling! You’ll be revisiting the techniques learned in this chapter in Chapter 22.