
Project 2: Kitten
One day in a field on the back part of our farm, I heard a faint mewing. I followed the sound and eventually came upon this tiny kitten, all by herself in the grass. I took her home and named her Peanut.


Reference Photo
Materials
Paints
Burnt Umber
Cadmium Red Medium
Cadmium Yellow Light
Payne’s Gray
Raw Sienna
Titanium White
Ultramarine Blue
Yellow Oxide
Brushes
no. 3, 5 and 7 rounds
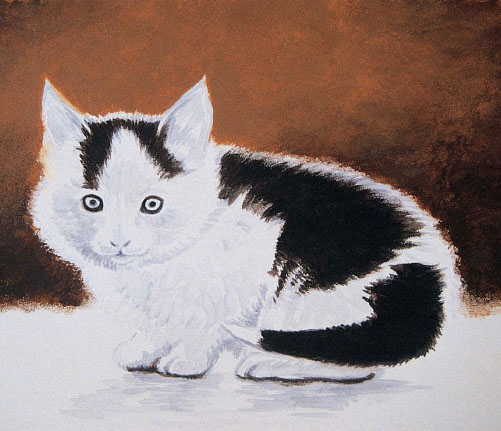
1 Establish the Form and the Dark Values
With a pencil, lightly draw the kitten onto your panel, using a kneaded eraser to make corrections. Thin Payne’s Gray with water, then paint the main lines, lights and darks of the kitten with a no. 5 round. Switch to a no. 3 round for the eyes, nose and mouth.
Mix the black for the kitten with Burnt Umber and Ultramarine Blue. Paint with a no. 7 round, following the hair pattern. Use a no. 3 round to paint the outline of the eyes and the pupils.
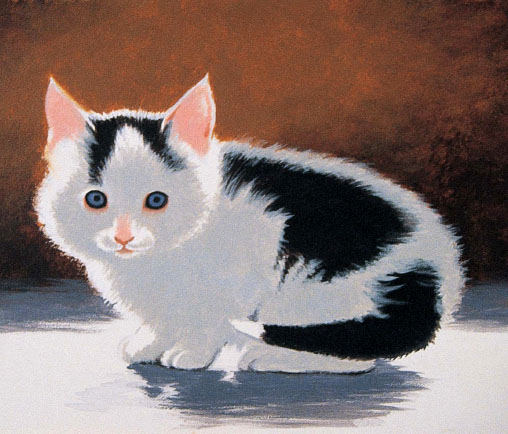
2 Paint the Middle Values
For the shadow on the white fur, create a gray mixture of Titanium White, Ultramarine Blue and a small amount of Raw Sienna. Paint with a no. 7 round, following the hair pattern with parallel strokes.
Mix a light pink color for the nose and inside the ears with Titanium White, Cadmium Red Medium, Yellow Oxide and a touch of Raw Sienna. Paint with a no. 7 round. Mix a darker pink for the nostrils, mouth and around the eyes by adding a little more Raw Sienna, Cadmium Red Medium and a touch of Burnt Umber. Paint with a no. 3 round.
Mix the blue eye color with Titanium White, Ultramarine Blue and a small amount of Burnt Umber. Paint with a no. 3 round, correcting the eye shape as needed.
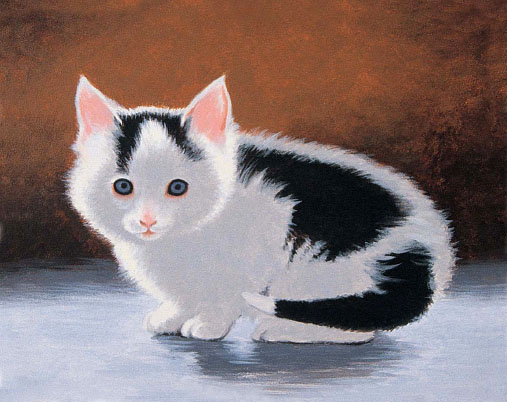
3 Paint the Light Values
Mix a warm white for the highlighted parts of the kitten with Titanium White and a touch of Cadmium Yellow Light. Paint with a no. 7 round, following the hair pattern. Switch to a no. 3 round for the muzzle and ears. For the slightly darker tail tip, mix a portion of the warm white and a bit of the gray from Step 2.
4 Add Detail
Mix a gray-brown detail color for the shadowed parts of the coat. Take a portion of the gray from Step 2 and mix in some Ultramarine Blue and Burnt Umber. Lightly paint the detail with a no. 5 round, then blend and soften with a separate no. 5 round and the adjacent color—the gray or black. Use a no. 3 round for smaller detail, such as the muzzle.
Darken the nose and inside the ears with the darker pink and a no. 3 round, blending with a separate no. 3 round and the light pink.
Paint hairs overlapping the black parts of the kitten with a no. 3 round and the gray. With a small amount of paint and light, feathery strokes, follow the fur pattern.

5 Refine and Add More Detail
With a no. 3 round and the gray-brown from Step 4, drybrush parallel strokes to soften the hairline along the kitten’s back, stroking into and overlapping the black area.
Continue to paint hairs overlapping the black areas with a no. 3 round and the gray. Soften, darken or correct as needed with a no. 3 round and black. Use black to paint fuzzy hair along the outline of the tail and the black forehead patches, with curved strokes overlapping the neighboring color.
For darker shadows around the eyes and muzzle, mix a bit of the gray shadow color with black and paint with a no. 3 round. Blend with a separate no. 3 round and the gray.
Paint tufts of hair from the head and chest with a no. 3 round and the warm white from Step 3.

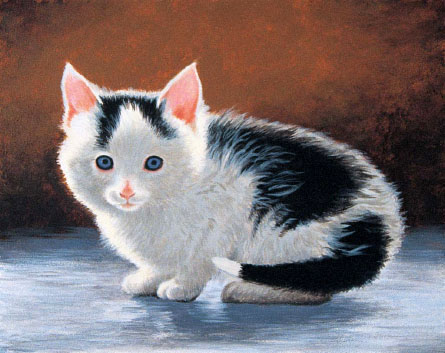
PEANUT
Acrylic on Gessobord
8” × 10” (20cm × 25cm)
6 Paint the Finishing Details
Paint the fuzzy white hair at the outline of the ears and inside the ears with a no. 3 round and the warm white.
Mix a little of the blue eye color with some black, then use a no. 3 round to darken the blue part of the eye under the top lid, shading down into the blue. Use the same color to soften the black line around the eyes where it meets the blue. Paint small highlights in the eyes with the gray and a no. 3 round.
Warm up the shadowed areas with a very thin glaze of Raw Sienna. Using a no. 5 round, first dip the brush into the glaze, then blot quickly on a paper towel. Apply the glaze with quick, light strokes that follow the hair pattern.
Paint the whiskers, both above the eyes and around the muzzle, with a no. 3 round and the warm white. Paint thin, light strokes with just enough water so the paint flows. Make corrections with a no. 3 round and the neighboring color.
TIP
If, while you are applying it, a glaze appears too heavy, immediately use your finger to rub the surface in a circular motion. This will ensure that the glaze will not dry before you can spread it out.