
Project 42: Chipmunk
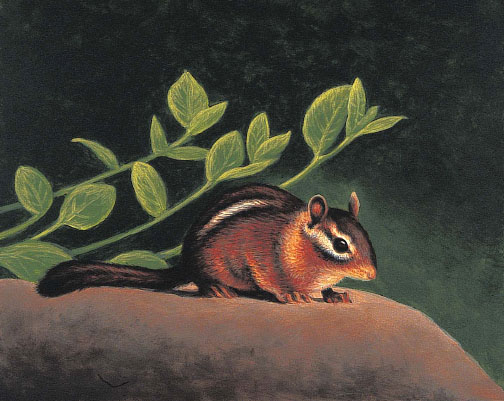
Chipmunks are delightful creatures. They are also very difficult to photograph! I saw this chipmunk at the University of Kentucky campus where they are used to people feeding them and walking close by. It took a great deal of patience to get close enough to capture the elusive little animal on film.


Reference Photo
Materials
Paints
Burnt Sienna
Burnt Umber
Cadmium Orange
Hansa Yellow Light
Hooker’s Green Permanent
Naples Yellow
Raw Sienna
Titanium White
Ultramarine Blue
Brushes
no. 3 and 10 rounds
no. 2, 6 and 10 brights

1 Establish the Form
Use a pencil to lightly draw the chipmunk, rock and plants onto the panel, using a kneaded eraser for corrections or to lighten lines. Use a no. 10 round and diluted Burnt Umber to paint the main lines. Switch to a no. 3 round for the smaller details.

2 Paint the Dark Values
Mix warm black with Burnt Umber and Ultramarine Blue. Paint the back, tail and shadows of the chipmunk with a no. 10 round. Use a no. 3 round to paint the eyes, ears and other small details.

3 Paint the Middle Values
Mix a reddish coat color with Burnt Sienna, Cadmium Orange and Burnt Umber. Paint with a no. 10 round, blending with warm black and a separate no. 10 round. Use strokes that follow the fur pattern.
Mix a green plant color with Hooker’s Green Permanent, Cadmium Orange, Hansa Yellow Light and Titanium White. Paint the plants with a no. 10 round.
Mix a rock color with Titanium White, Raw Sienna and Burnt Umber. Paint the rock with dabbing strokes, using a no. 10 bright. Switch to a no. 10 round for around the chipmunk’s feet and tail.

4 Paint the Light Values and the Background Color and Add Detail
Mix a dark green background color with Hooker’s Green Permanent, Burnt Umber, Cadmium Orange and Ultramarine Blue. Mix a lighter green for the lower part of the painting by adding Titanium White to a portion of dark green. Paint with no. 10 brights, blending where one color meets the other and using dabbing strokes. Use no. 10 rounds for painting around the chipmunk and plants.
Mix a buff color for the lighter parts of the chipmunk’s coat with Titanium White, Naples Yellow, Cadmium Orange and Raw Sienna. Using a no. 10 round, paint strokes that follow the fur pattern, then switch to a no. 3 round for the smaller details.
Mix a cream color for the lightest parts of the chipmunk with a portion of the buff color and Titanium White. Paint the white stripes on the body’s side and around the eye with a no. 3 round.
Mix yellow-green for the highlights on the plants with some of the green plant color mixed with Titanium White, Hansa Yellow Light and a touch of Cadmium Orange. Using a no. 10 round, paint highlights and details with smooth strokes, blending with the green plant color.
5 Add Detail to the Rock and Fur
Mix a medium rock shadow color with Titanium White, Raw Sienna and Burnt Umber. With dabbing strokes and a no. 10 bright, paint the lower part of the rock, leaving the upper part and the right edge the original color. Use a separate no. 10 bright and the rock color to blend where the two colors meet.
Mix a dark rock shadow color with a portion of the medium rock shadow color, Burnt Umber and Ultramarine Blue. Paint the lower edge of the rock with a no. 10 bright, blending up into the medium rock shadow color. Re-establish the rock color where needed, blending into the adjacent color with the dry-brush technique.
Using no. 3 rounds, add detail to the fur with warm black and the reddish and buff colors, blending with the adjacent color.

CHIPPER
Acrylic on Gessobord
8” × 10” (20cm × 25cm)
6 Paint the Finishing Details
Paint a thin glaze of the reddish color mixed with water over the plants with a no. 10 round. This will help integrate the chipmunk and background.
Use a no. 10 round to paint a glaze of dark green and water over the plants farthest in the background. Smooth the plants out by lightly painting over them with the lighter green and a no. 10 round. Re-establish highlights as needed with yellow-green.
Mix a rock detail color with some of the rock shadow and reddish colors. With a small amount of semi-dry paint on a no. 6 bright, use broken, dabbing strokes to create texture and shadow detail. With a no. 2 bright and the rock color, paint highlights using the same technique.
Paint the whiskers with very thin, slightly curving strokes, using a small amount of buff and a no. 3 round. For the portion of the whiskers that overlap the muzzle, use the rock detail color.