
![]()
Introduction
In this book, you will learn how to develop an e-commerce site. Electronic commerce, also known as e-commerce, involves purchasing and selling products or services through computers/smart phones using the Internet. Today, almost all businesses need an e-commerce site. Why? Here are a few reasons:
- Selling online does not require office space or any product display space.
- You can sell 24/7/365; no store time constraints.
- Consumers can purchase when it’s convenient from their home and at any time. They can save a lot of time wasted in travelling to the store in traffic.
- You can sell your products globally.
- Quick, convenient, and user-friendly transfer of funds online.
Hence, most companies are showing their presence on the Internet by developing e-commerce sites. The e-commerce site that you will be learning to develop in this book will sell almost everything, including books, smart phones, laptops, and so on. The site will display different product categories via a drop-down menu along with a search box at the top. Users can select the products and can pay online. The site will store all the products, orders, and customer information in the database.
Although you can create a web site quite easily through the free e-commerce web design tools provided by different web site hosting providers, doing so has the following limitations:
- The design tool may not be that flexible. The menu, table, and other interfaces might not suit your requirements.
- You might face issues like database connectivity and other authentication processes.
- You might not get support to fetch information for web site administrative tasks.
- It will be very difficult for you to change your web host if you get the site built through its patented tools.
Hence, you will be developing this e-commerce site from scratch in PHP.
In this chapter, you will learn:
- The outline of the e-commerce web site that will be made throughout the book
- The software required for developing the site
- Installing the WampServer
- Configuring MySQL
- Details of the database tables that will be required in web site
Why PHP?
PHP stands for “PHP Hypertext Preprocessor” and is one of the most popular web scripting engines among developers. The question is, why is it so popular?
The reasons are many, but the first one is that it is a server-side scripting language, so all PHP scripts are executed on the server instead of the client’s machine. Consequently, the script execution does not consume the client’s resources but the server’s. You will see some client-side JavaScript code in this book also, where it’s appropriate and makes sense to use it.
The PHP script runs on the server and its output is sent to the client as plain HTML, which makes it very secure. The visitor of your web site can never see the PHP source code by selecting the View Source option in the browser. The visitor can only view the output from the PHP script, which is plain HTML.
Besides this, PHP supports many databases (MySQL, Informix, Oracle, Sybase, Solid, PostgreSQL, Generic ODBC, etc.). So you can store the customer’s information, visitor’s information, and your service and product information into the database and then retrieve them whenever required.
PHP is open source software (OSS) and so is freely available. You don’t have to pay for using PHP. Moreover, a mass community is involved in developing and enhancing PHP features. This ensures faster bug fixing and availability of enhanced features.
PHP commonly runs on an open source platform, called LAMP. The full form of LAMP is Linux, Apache, MySQL, and PHP. Again, being open source, you get the continuous support of developers around the world for the platform.
PHP can be easily embedded with HTML tags and scripts. So, the code that’s not very important can be written in HTML and the crucial code can be written in PHP. The combination runs faster than code that is written purely in PHP.
PHP runs on any platform—Linux, Unix, Mac OS X, and Windows. Besides this, PHP has a garbage collector and an efficient memory manager that optimizes the memory consumption of any site.
How the E-Commerce Site Will Appear
Let’s have a quick look at the final result of this book. The e-commerce site that you will be developing throughout this book will appear as shown in the following figures.
The first screen on execution of the shopping cart site that you’ll see is shown in Figure 1-1.

Figure 1-1. The first screen upon launching the e-commerce site
You can see that at the top is a header that contains the title of the web site and a Cart icon at the top-right corner (a handy tool for users to know what they have selected in their carts). Below the header is a drop-down menu that displays the list of product categories that are available on the site (see Figure 1-2).

Figure 1-2. Drop-down menu showing different product categories
If you select a category, say Laptops, to see all the products in the category, you get the output shown in Figure 1-3.

Figure 1-3. Page showing different laptops available for sale
The product image and its name include a link that, when clicked, will display detailed information on the selected product. For example, on clicking the Asus X200CA-KX219D laptop, its detailed information will be displayed, as shown in Figure 1-4.

Figure 1-4. Page showing detailed information of the selected laptop
The Quantity text box is where you enter how many of the selected product you want. If you leave it blank and click the Add To Cart button, the default quantity is 1. Suppose you want to purchase one selected laptop, you can either enter the value 1 in the Quantity text box, followed by clicking the Add To Cart button, or you can also directly click the Add To Cart button because the default quantity is always 1.
The selected item, along with the entered quantity, is added to the cart as shown in Figure 1-5.
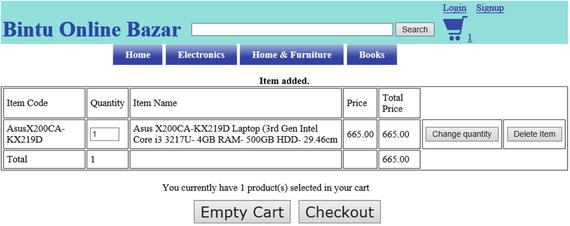
Figure 1-5. Items selected in the cart
You can always change the quantity of the product selected in the cart. Also, you can delete any item from the cart. To change the quantity of the Asus laptop in the cart to 2, modify its value in the Quantity column and click the Change Quantity button. The quantity and the total price will change in the cart, as shown in Figure 1-6.

Figure 1-6. Quantity of the item in cart has changed
You can even purchase more items belonging to another category. Suppose you need to see all the items under the Smartphone category, you select the category from the drop-down menu on the top. All the products in the Smartphone category will be displayed, as shown in Figure 1-7.

Figure 1-7. Page showing different smart phones available for sale
Again, each product’s image and name includes a link which, when clicked, displays detailed information about the selected product.
If you click on the Micromax-Canvas-Knight-2-E471 smart phone, its detailed information will appear as shown in Figure 1-8.
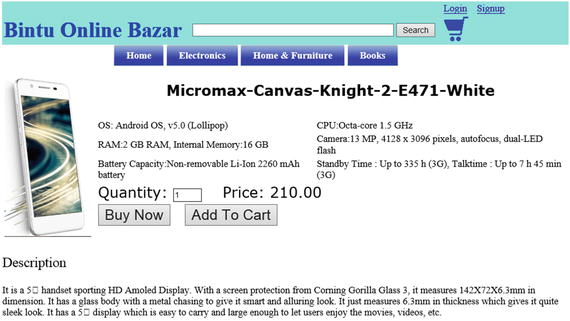
Figure 1-8. Page showing detailed information about the selected smart phone
Again, the Quantity text box specifies how many of the item you want to purchase (the default value is 1). Assuming you want one of the selected products, click the Add To Cart button. On clicking the Add To Cart button, all the products selected in the cart will be displayed, as shown in Figure 1-9.

Figure 1-9. Items selected in the cart
As mentioned, not only can you update the quantity of any product that is selected in the cart, but you also can delete any item from the cart if it is not required. Assume you don’t want the Micromax smart phone anymore, for example. To delete it from the cart, click the Delete Item button in that product’s row. The Micromax smart phone will be removed from the cart, leaving the two Asus laptops in the cart (see Figure 1-10).

Figure 1-10. An item deleted from the cart
![]() Note Clicking the Empty Cart button will remove all the products currently in the cart.
Note Clicking the Empty Cart button will remove all the products currently in the cart.
If you are ready to purchase your items, you can click the Checkout button. If before you began shopping, you created an account and logged in, your user details like your name, address, contact number, and so on, will be automatically displayed. The app will just ask for shipping information. But If you are not logged in yet, you will get the message shown in the Figure 1-11.

Figure 1-11. Page informing the login status of the customer
If you have not yet created an account, you’re prompted to do that first. If you have an account, you will be prompted to log in. If you select the create account link (“click here to login”), you get a screen to fill in user details, as shown in Figure 1-12.

Figure 1-12. Page for creating account of the customer
While you’re filling in the form, be careful to fill in the two fields, Password and ReType Password. These fields must be exactly the same. If the content of these fields don’t match, you will be asked to enter them again.
After entering the required information, you are required to click the Submit button. If the supplied information is correct, you’ll be registered and asked to provide shipping information (the address where product(s) have to be delivered) if purchasing is over, as shown in Figure 1-13.

Figure 1-13. Welcome message for the signed-in customer
When you select the link for supplying shipping information, you get a few text boxes to indicate where your products should be delivered, as shown in Figure 1-14.

Figure 1-14. Page for supplying shipping information
After filling in the shipping information, you click the Supply Payment Information button. You will be taken to a page that asks you to enter payment information, as shown in Figure 1-15.

Figure 1-15. Page for entering payment information
On clicking the Submit button, the order details will be stored in the database along with a unique order number. This order number is displayed to the users for future communication.
Software Required for Developing the Site
Because you will be developing this e-commerce site in PHP, you need the following three software products to run a PHP script:
- Apache web server—A local web server to run and debug PHP scripts on the local machine.
- PHP interpreter—To interpret PHP code. The Apache web server uses the PHP interpreter to interpret PHP code and generate HTML code.
- MySQL—The most popular database system used with PHP to store data entered by the users for future reference.
Instead of installing these products individually, you can install the WampServer or XAMPP server. These servers install all three products—Apache, PHP, and MySQL—simultaneously on your machine. Next, you learn how to install the WampServer.
![]() Note The WampServer provides a Windows web development environment for Apache, MySQL, and PHP databases.
Note The WampServer provides a Windows web development environment for Apache, MySQL, and PHP databases.
To check and debug your PHP scripts locally before uploading to the actual server, you need to install the WampServer on the local machine. So, download a free copy of WampServer from http://www.wampserver.com/en. The latest version of WampServer available at the time of this writing is 2.5. After downloading WampServer, double-click on its .exe file and select Run.
![]() Note WampServer is an open source, easy-to-use server. It includes a great graphical tool, phpMyAdmin, that makes administering MySQL quite easy. It’s very easy to use WampServer tools and you don’t need any prior knowledge. Later in this chapter, you will learn how to use WampServer and its tools.
Note WampServer is an open source, easy-to-use server. It includes a great graphical tool, phpMyAdmin, that makes administering MySQL quite easy. It’s very easy to use WampServer tools and you don’t need any prior knowledge. Later in this chapter, you will learn how to use WampServer and its tools.
The first screen is a welcome screen that indicates which WampServer version will be installed, as shown in Figure 1-16. Click on the Next button.

Figure 1-16. Welcome screen of WampServer setup wizard
The next window shows the license and terms and conditions of using the WampServer (see Figure 1-17). Accept the license agreement and click Next.

Figure 1-17. Screen showing the license agreement
Select the folder to install WampServer (see Figure 1-18). It’s best to keep the default folder location. Click the Next button.
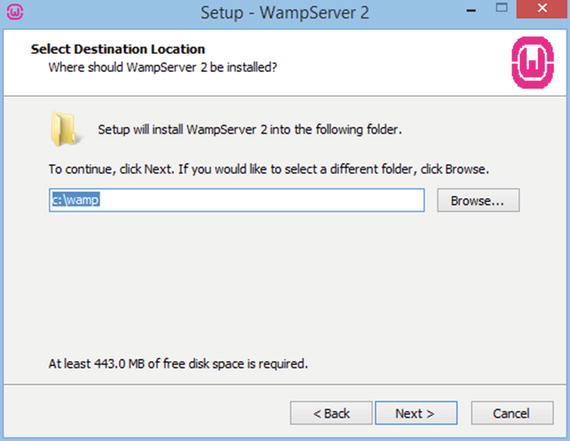
Figure 1-18. Screen prompting for the installation folder
Check boxes will be displayed (see Figure 1-19) prompting whether you want to have WampServer icons added to your desktop and to Quick Launch. Check the check boxes. Click Next to move further.

Figure 1-19. Screen prompting whether to show quick launch and desktop icons
The next window shows the items for review that you have chosen up until now. You can click the Back button to make any changes. Let’s click the Install button to initiate the installation procedure (see Figure 1-20).

Figure 1-20. Final screen before installing WampServer files
If you have Linux installed on your machine, you can download and install the LAMP server.
LAMP stands for Linux, Apache, MySQL, and PHP. It is a group of open source software products used to run a web server on a Linux machine. The following are the steps to install LAMP:
- Install Apache. To install Apache, open a terminal and type the following commands:
sudo apt-get install apache2To check if Apache is installed, open the browser and point at the address http://localhost/. If the page displays the text, “It works!", Apache was installed successfully.
- Install MySQL. To install MySQL, open a terminal and type the following commands:
sudo apt-get install mysql-serverYou will be prompted to set the root’s password. If your computer does not prompt you, type the following commands to set the root’s password:
mysql -u root
mysql> SET PASSWORD FOR 'root'@'localhost' = PASSWORD('yourpassword');
To install the phpMyAdmin tool, type the following command into the terminal:
sudo apt-get install libapache2-mod-auth-mysql php5-mysql phpmyadminOnce MySQL is installed, you can activate it with the following command:
sudo mysql_install_db - Install PHP. To install PHP, open a terminal and type the following commands:
sudo apt-get install php5 libapache2-mod-php5 php5-mcrypt
Answer, "yes" to the prompted questions and PHP will install itself.
After successful installation of WampServer or LAMP, you can go ahead and start either of them. I am using WampServer in this book, but the procedure is common for both the servers.
To use the WampServer, you need to start it. So, either double-click its icon from the desktop or follow these steps:
- Open the Start screen.
- From the list of tiles displayed on the Start screen, locate WampServer. If you don't find the WampServer in the list of apps and programs, type the text, WAMP, on the blank space of the screen.
- A search box will appear and will list all the apps matching the typed text.
- Click on the WampServer icon shown in the resulting list.
After starting the WampServer, an icon appears in the task bar, as shown in Figure 1-21.

Figure 1-21. WampServer icon displayed in task bar
When the WampServer icon is red, it means no services on it are currently running. When it is orange, it means the WampServer is started, but not all of its services are running. When it’s green, that means the WampServer is started and all its services are running correctly. To start the server, click on its icon and select the Start All Services option from the menu that pops up (see Figure 1-22).
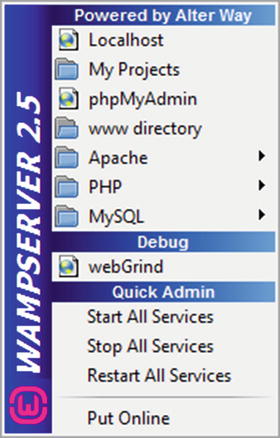
Figure 1-22. WampServer popup menu
As the server starts up, it will go from red to orange to green. The WampServer can conflict with the default Skype settings, IIS server, and other servers. If you see that all of the WampServer services are not running, i.e. its icon remains orange even after starting it, you need to stop your IIS server, quit Skype, and then restart your WampServer.
If the WampServer icon changes to green, it means the server is successfully set up and is fully functioning. You can also verify this by launching a browser and pointing it at the http://localhost address. If you get the screen that shows the server configuration, Apache version, PHP version, etc. (see Figure 1-23), along with the loaded extensions, it means the WampServer is successfully installed and is running.

Figure 1-23. Browser showing server configuration on successful installation of WampServer
Congratulations, your WampServer is installed successfully. It also means that Apache, MySQL, and PHP are successfully installed on your machine.
By default, WampServer does not set a password for MySQL’s root user. To implement security and to avoid unauthorized access, you need to set a password for MySQL’s root user and create other users if required. So, let’s proceed to configure the MySQL server.
You will be using phpMyAdmin for configuring the MySQL server. phpMyAdmin is a software tool written in PHP, used to administer MySQL over the web. You can easily manage MySQL databases, tables, indexes, users, etc. through phpMyAdmin’s graphical user interface. To invoke phpMyAdmin, click the WampServer icon and select the phpMyAdmin option.
phpMyAdmin will open up, as shown in Figure 1-24. The screen shows recent databases in the left pane. At the top right, you will find buttons to manage databases, SQL, users, etc. The middle pane shows the drop-down list that enables you to define the MySQL connection. You will also find the drop-down lists to change the default language, theme, font size, and other settings.

Figure 1-24. First screen on launching the phpMyAdmin tool
To configure root’s password, you need to access the user table that is found in the mysql database found in the left pane. The + (plus symbol) on the mysql database node indicates that currently it is in collapsed mode. To expand the node, click on its + symbol. The mysql database node will expand showing all the tables that exist inside it. Click the user table to display the number of rows within it (see Figure 1-25). You can see that the user table contains the following four users by default:
- User root for Host, 127.0.0.1—Represents the root user for localhost without resolved IP for IPv4.
- User root for Host, ::1—Represents the root user for localhost without resolved IP for IPv6.
- User root for Host, localhost—Represents the root user for localhost with resolved IP.
- User anonymous for host, localhost—Represents the anonymous user with resolved IP.
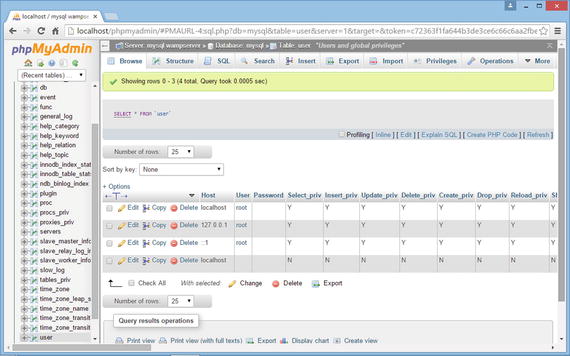
Figure 1-25. Screen showing rows of user table
These users have empty passwords by default. The root usernames are superuser accounts that have all privileges but having empty passwords makes the MySQL server quite vulnerable to unauthorized access. So, the first task is to provide passwords to all these root accounts and either delete the anonymous user or provide a password for that user account too.
To provide passwords to the root users, click on the Edit icon on the respective row to edit its content. The row will open and show the three text boxes—Host, User, and Password. Enter the password in the Password column (see Figure 1-26). If you want to encrypt the password (instead of saving it in the plain text format), select the PASSWORD option from the Function combo box. After entering the password, click the Go button at the bottom to save the changes.
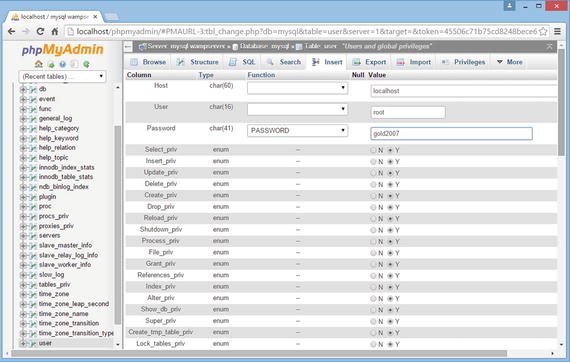
Figure 1-26. Changing the root password of MySQL server
Once the password is set for all the root users, your MySQL server becomes quite secure from unauthorized access. Let’s learn about the different database tables that will be required in your e-commerce site next.
Required Database Tables
In all there will be seven tables created for our e-commerce site with the following names:
- products—Stores information about the product that includes product name, weight, price, description, etc.
- productfeatures—Stores features of the products.
- cart—Stores information of the products selected in the cart.
- customers—Stores information about the registered customers.
- orders—Stores order numbers, order data, and shipping information of the customer who placed the order.
- orders_details—Stores the information about all the products that are purchased in a given order.
- payment_details—Stores the card number and other information about the payment mode selected to pay for any order.
You will be creating these tables in a database called shopping. The structure of these mentioned tables is explained in Tables 1-1 to 1-7.
Table 1-1. Brief Description of Structure of the Products Table
|
Column |
Type |
Description |
|---|---|---|
|
item_code |
varchar(20) |
Stores unique codes for a product. |
|
item_name |
varchar(150) |
Stores the product's name. |
|
brand_name |
varchar(50) |
Stores the brand name of the product. |
|
model_number |
varchar(30) |
Stores the model number of the product. |
|
weight |
varchar(20) |
Stores the weight of the product. |
|
dimension |
varchar(50) |
Stores the dimension of the product. |
|
description |
text |
Stores the description of the product. |
|
category |
varchar(50) |
Stores the product category, i.e., whether the product belongs to the Smartphone, Laptop, or Books category. |
|
quantity |
SMALLINT |
Stores the quantity in hand of the product. That is, the quantity of the product currently in the warehouse. |
|
price |
DECIMAL(7,2) |
Stores the price of the product. |
|
imagename |
varchar(50) |
Stores the path and name of the product image. |
Table 1-2. Brief Description of the Structure of the productfeatures Table
|
Column |
Type |
Description |
|---|---|---|
|
item_code |
varchar(20) |
Stores a unique code for each product. |
|
feature1/ feature2/ feature3/ feature4/ feature5/ feature6 |
varchar(255) |
Stores the features of the product |
Table 1-3. Brief Description of the Structure of the Cart Table
|
Column |
Type |
Description |
|---|---|---|
|
cart_sess |
char(50) |
Stores the session ID of the customer. |
|
cart_itemcode |
varchar(20) |
Stores a unique code of the product selected by the customer in the cart. |
|
cart_quantity |
SMALLINT |
Stores a quantity of the product selected in the cart. |
|
cart_item_name |
varchar(100) |
Stores the name of the product that is selected in the cart. |
|
cart_price |
DECIMAL(7,2) |
Stores the price of the product that is selected in the cart. |
Table 1-4. Brief Description of theb Structure of the Customers Table
|
Column |
Type |
Description |
|---|---|---|
|
email_address |
varchar(50) |
Stores the e-mail address of the registered customer. The e-mail address is considered to be unique for each customer |
|
password |
varchar(50) |
Stores the password of the registered customer. |
|
complete_name |
varchar(50) |
Stores the complete name of the registered customer. |
|
address_line1 |
varchar(255) |
Assuming the customer's address is big, this field stores the first address line of the registered customer. |
|
address_line2 |
varchar(255) |
Stores the second address line of the registered customer. |
|
city |
varchar(50) |
Stores the city name to which the customer belongs. |
|
state |
varchar(50) |
Stores the state to which the customer belongs. |
|
zipcode |
varchar(10) |
Stores the ZIP code of the city to which the customer belongs. |
|
country |
varchar(50) |
Stores the country name of the customer. |
|
cellphone_no |
varchar(15) |
Stores the cell phone number of the registered customer. |
Table 1-5. Brief Description of the Structure of the Orders Table
|
Column |
Type |
Description |
|---|---|---|
|
order_no |
int(6) |
Keeps the order number of the order placed by the customer. The order number is auto generated and is 1 plus the previous order number. |
|
order_date |
date |
Stores the date on which the customer placed the order. |
|
email_address |
varchar(50) |
Stores the e-mail address of the customer placing the order. |
|
customer_name |
varchar(50) |
Stores the complete name of the customer placing the order. |
|
shipping_address_line1 |
varchar(255) |
Stores the first shipping address line where products have to be delivered. |
|
shipping_address_line2 |
varchar(255) |
Stores the second shipping address line where products have to be delivered. |
|
shipping_city |
varchar(50) |
Stores the city name where products have to be delivered. |
|
shipping_state |
varchar(50) |
Stores the shipping state. |
|
shipping_country |
varchar(50) |
Stores the shipping country. |
|
shipping_zipcode |
varchar(10) |
Stores the ZIP code of the region where products have to be delivered. |
Table 1-6. Brief Description of the structure of orders_details Table
|
Column |
Type |
Description |
|---|---|---|
|
order_no |
int(6) |
Keeps the order number of the order placed by the customer. |
|
item_code |
varchar(20) |
Stores the product code that is selected in the order. |
|
item_name |
varchar(100) |
Stores the product name that is selected in the order. |
|
quantity |
SMALLINT |
Stores the quantity of the product that is selected in the order. |
|
price |
DECIMAL(7,2) |
Stores the price of the product that is selected in the order. |
Table 1-7. Brief Description of the Structure of the payment_details Table
Don’t worry; you don’t have to create these database tables and the shopping database manually. I have provided a SQL script called creatingtables.sql with this book. The SQL script is shown in Listing 1-1.
You need to just run this script to create the database and tables. Follow the next steps to do so.
To run the SQL script, you need to open the MySQL console. So, click the WampServer icon in the task bar and select the MySQL->MySQL console option from the menu that pops up.
You will be asked to enter the user root’s password. After entering the password, you will be greeted with the mysql> prompt in the MySQL console window, as shown in Figure 1-27.

Figure 1-27. MySQL console window for running SQL commands/scripts
To execute a SQL script, you need to use the source command. The syntax for the source command is:
source [path] sqlscript.sql
Assuming the creatingtables.sql file is placed in the D: drive, you can execute it using the following command:
source D:\creatingtables.sql
The SQL commands in the creatingtables.sql file will execute and will create the shopping database and the tables discussed previously. For each successful execution of SQL command, you get the Query OK output, as shown in Figure 1-28.

Figure 1-28. Executing SQL script for creating the shopping database and its tables
- The showdatabases command, when executed, displays the existing databases in the MySQL server. The shopping database confirms that the shopping database is successfully created.
- The use command makes the specified database the active or current database. The use shopping SQL command makes the shopping database active.
- The show tables command, when executed, displays all the tables that exist in the currently active database. You can see that all the seven database tables are successfully created in the shopping database.
After the successful creation of database and its tables, you need to fill in some dummy product information in the products and productsfeatures tables. To do so, you need to execute another SQL script provided with this book, called insertingrows.sql. This is done in exactly the same was as for the creatingtables.sql script.
Summary
In this chapter, you learned how the final e-commerce web site will appear when it’s complete. Also, you saw how to install WampServer, which is required for creating and testing this site. You also learned how to configure MySQL server via the phpMyAdmin software tool. Finally, you saw the database structure of the different tables that are required for saving information about the products, orders, and customers for this web site.
In the next chapter, you will learn how to write your first PHP script. Also, you will learn to pass information from one PHP script to another. Using this knowledge, you will learn to create a sign-in form for creating new user accounts.