
![]()
Implementing an AlwaysOn Failover Clustered Instance
Once the cluster has been built and configured, it is time to install the AlwaysOn failover cluster instance of SQL Server. This chapter will discuss how to create an AlwaysOn Failover Clustered Instance and also demonstrate how to add a node to the cluster.
Building the Instance
To build an AlwaysOn Failover Clustered Instance, select the New SQL Server Failover Cluster Installation option from the Installation tab of the SQL Server Installation Center.
When you select this option, you invoke the Install A SQL Server Failover Cluster Wizard. The majority of the pages in this wizard are identical to the pages in the SQL Server 2014 Setup Wizard.
The first deviation from a stand-alone installation of SQL Server is the Instance Configuration page, which is illustrated in Figure 4-1. On this screen, you are prompted to enter the SQL Server Network Name as well as choose between a default instance and a named instance. The SQL Server Network Name is the virtual name, which is configured as a resource in the role. This allows client applications to connect to a server with a consistent name, regardless of the node that owns the instance.
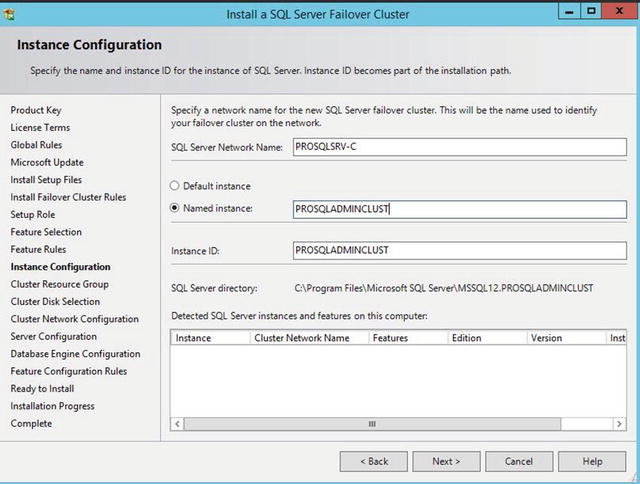
Figure 4-1. The Instance Configuration page
![]() Tip If you do not have permissions to create AD objects in the OU that contains your cluster, then the VCO for the instance must already exist, and you must have the Full Control permission assigned.
Tip If you do not have permissions to create AD objects in the OU that contains your cluster, then the VCO for the instance must already exist, and you must have the Full Control permission assigned.
On the Cluster Resource Group page, displayed in Figure 4-2, a list of roles on the local cluster is displayed. It is possible to create an empty role prior to running the installation of the instance, and if you have done so, then you can select it from the list. Alternatively, you can modify the default name supplied in the SQL Server cluster resource group name box to create a new resource group. In this demonstration, we leave the default name.

Figure 4-2. The Cluster Resource Group page
On the Cluster Disk Selection page of the wizard, shown in Figure 4-3, a list of cluster disks displays in the lower pane, with warnings next to any disks that you cannot select. In the top pane, you can check the disks that you want to add to the role. In our case, we select all of them, since there is one for data, one for logs, and one for TempDB.

Figure 4-3. The Cluster Disk Selection page
On the Cluster Network Configuration page, we add an IP address for the role. In a multi-subnet cluster, we would add multiple IP addresses, one for each subnet. The Cluster Network Configuration page is illustrated in Figure 4-4.

Figure 4-4. The Cluster Network Configuration page
On the Service Accounts tab of the Server Configuration page, the startup type for the SQL Server service and the Server Agent service can only be configured as manual, since startup is controlled by the cluster during failover. The other required service accounts are in a read-only display and cannot be configured, as shown in Figure 4-5.

Figure 4-5. The Sevice Account tab
After instance installation is complete, the role is brought online and the instance is visible in Failover Cluster Manager, as shown in Figure 4-6.

Figure 4-6. The SQL Server role in Failover Cluster Manager
Installing the Instance with PowerShell
Of course, we can use PowerShell to install the AlwaysOn failover cluster instance instead of using the GUI. To install an AlwaysOn failover cluster instance from PowerShell, we can use SQL Server’s setup.exe application with the InstallFailoverCluster action specified.
When you perform a command-line installation of a clustered instance, you need the parameters in Table 4-1, in addition to the parameters that are mandatory when you install a stand-alone instance of SQL Server.
Table 4-1. Required Parameters for the Installation of a Clustered Instance
Parameter | Usage |
|---|---|
/FAILOVERCLUSTERIPADDRESSES | Specifies the IP address(s) to use for the instance in the format <IP Type>;<address>;<network name>;<subnet mask>. For multi-subnet clusters, the IP addresses are space delimited. |
/FAILOVERCLUSTERNETWORKNAME | The virtual name of the clustered instance. |
/INSTALLSQLDATADIR | The folder in which to place SQL Server data files. This must be a cluster disk. |
The script in Listing 4-1 performs the same installation that has just been demonstrated when you run it from the root directory of the installation media.
Adding a Node
The next step you should take when installing the cluster is to add the second node. Failure to add the second node results in the instance staying online, but with no high availability, since the second node is unable to take ownership of the role. To configure the second node, you need to log in to the passive cluster node and select the Add Node To SQL Server Failover Cluster option from the Installation tab of SQL Server Installation Center. This invokes the Add A Failover Cluster Node Wizard. The first page of this wizard is the Product Key page. Just like when you install an instance, you need to use this screen to provide the product key for SQL Server. Not specifying a product key only leaves you the option of installing the Evaluation Edition, and since this expires after 180 days, it’s probably not the wisest choice for high availability.
The following License Terms page of the wizard asks you to read and accept the license terms of SQL Server. Additionally, you need to specify if you wish to participate in Microsoft’s Customer Experience Improvement Program. If you select this option, then error reporting is captured and sent to Microsoft.
After you accept the license terms, a rules check runs to ensure that all of the conditions are met so you can continue with the installation. After the wizard checks for Microsoft updates and installing the setup files required for installation, another rules check is carried out to ensure that the rules for adding the node to the cluster are met.
On the Cluster Node Configuration page, illustrated in Figure 4-7, you are asked to confirm the instance name to which you are adding a node. If you have multiple instances on the cluster, then you can use the drop-down box to select the appropriate instance.

Figure 4-7. The Cluster Node Configuration page
On the Cluster Network Configuration page, shown in Figure 4-8, you confirm the network details. These should be identical to the first node in the cluster, including the same IP address, since this is, of course, shared between the two nodes.

Figure 4-8. The Cluster Network Configuration page
On the Service Accounts page of the wizard, most of the information is in read-only mode and you are not able to modify it. This is because the service accounts you use must be the same for each node of the cluster. You need to re-enter the service account passwords, however. This page is shown in Figure 4-9.

Figure 4-9. The Service Accounts page
Now that the wizard has all of the required information, an additional rules check is carried out before the summary page displays. The summary page, known as the Ready To Add Node page, is illustrated in Figure 4-10. It provides a summary of the activities that take place during the installation.

Figure 4-10. The Read To Add Node page
Adding a Node Using PowerShell
To add a node using PowerShell instead of the GUI, you can run SQL Server’s setup.exe application with an AddNode action. When you add a node from the command line, the parameters detailed in Table 4-2 are mandatory.
Table 4-2. Mandatory Parameters for the AddNode Action
Parameter | Usage |
|---|---|
/ACTION | Must be configured as AddNode. |
/IACCEPTSQLSERVERLICENSETERMS | Mandatory when installing on Windows Server Core, since the /qs switch must be specified on Windows Server Core. |
/INSTANCENAME | The instance that you are adding the extra node to support. |
/CONFIRMIPDEPENDENCYCHANGE | Allows multiple IP addresses to be specified for multi-subnet clusters. Pass in a value of 1 for True or 0 for False. |
/FAILOVERCLUSTERIPADDRESSES | Specifies the IP address(es) to use for the instance in the format <IP Type>;<address>;<network name>;<subnet mask>. For multi-subnet clusters, the IP addresses are space delimited. |
/FAILOVERCLUSTERNETWORKNAME | The virtual name of the clustered instance. |
/INSTALLSQLDATADIR | The folder in which to place SQL Server data files. This must be a cluster disk. |
/SQLSVCACCOUNT | The service account that is used to run the Database Engine. |
/SQLSVCPASSWORD | The password of the service account that is used to run the Database Engine. |
/AGTSVCACCOUNT | The service account that issued to run SQL Server Agent. |
/AGTSVCPASSWORD | The password of the service account that is used to run SQL Server Agent. |
The script in Listing 4-2 adds ClusterNode2 to the role when you run it from the root folder of the install media.
Summary
An AlwaysOn Failover Clustered Instance can be installed using SQL Server Installation Center or via PowerShell. When using the SQL Server Installation Center, the process is very similar to the installation of a stand-alone instance, however you will need to specify additional details, such as the network name, IP Address and resource group configuration.
When using Powershell to install the Instance, you will InstalFailoverCluster action, specifying the /FAILOVERCLUSTERIPADDRESSES, /FAILOVERCLUSTERNETWORKNAME, and /INSTALLSQLDATADIR parameters, in addition the parameters required for a stand-alone instance build.