Chapter 14. Operationalizing Your Image Workflow
Now that you know all about what makes fast, responsive images, let’s figure out how we can get them into your workflow and onto your site.
If there’s one thing that’s consistent about nearly all imagery that exists on the Internet, it’s that each image started as something completely inappropriate to display on the Web. We call these images our master images, and they’re the reference image each derivative image—the image that actually shows up on your site—is generated from. How one gets from the master to derivative image varies from one site to the next, but there are often common workflows that exist, usually within certain market verticals.
Some Use Cases
To expand on the concepts of master and derivative images further, let’s dig into a couple of use cases to see how master images are created, and how they can sometimes be a huge (in more than one sense of the word) problem for your high-performance image workflow.
The e-Commerce Site
Let’s start by imagining an e-commerce site, filled with a catalog of thousands of products, each product containing shots from multiple angles with numerous color variations. We can also imagine our fictitious e-commerce site has large hero imagery that serves as a section heading, and might contain photos of the products being worn or sale items.
It’s safe to assume that each and every one of these photographs was taken at a studio, with a high-end DSLR camera. While the images leaving the studio may be beautiful, high-resolution photos, they are almost certainly not the images you want on your site. The files can weigh in at tens to hundreds of megabytes in size, and they are often at 300 DPI resolution since the same imagery is frequently used for both web and print. Often, these images are processed lightly by the studios themselves before being sent off to the site’s creative team for further touch-up work. The images leaving the studio are typically in a non-web format, like Photoshop PSD, Tagged Image File Format (TIFF), or occasionally RAW format. The output from the studio to the creative team will usually be well specified in terms of shot angles, background colors, output format, and any touch-up work required prior to the handoff to creative.
Once the images are received from the studio and processed by the creative team using a digital photo editing tool like Photoshop, they are saved in a format suitable for use on the site itself, like JPEG. At this stage the images are often loaded into a digital asset manager (DAM) for cataloging prior to publishing to a content management system (CMS) for presentation. Once we’ve made it to this point, we have arrived at the master image, but we still don’t have our derivative images yet. Before we get there, let’s look at another use case.
The Social Media Site
Another class of website that tends to be extremely image-heavy is social media sites. These sites are a nice contrast to the e-commerce use case, because the images on them are almost never shot by professionals, let alone in a studio using a fancy camera.
Let’s imagine a social media site that allows users to connect with friends and share photos with them. Since the images for our social media site are user-generated, it’s the wild west: some are coming from digital point-and-shoots, others are taken with a smartphone, and still others are scans of photographs. Each of these sources could be problematic for different reasons. The point-and-shoot, depending on vintage, could output very low-quality JPEGs that require sharpening to look good; the smartphone could output JPEGs with sensitive GPS data stored in the image metadata; and the scanner could save images as BMPs. And each of these could span a wide range of file sizes, ranging from tens of kilobytes to tens of megabytes.
Malicious JPEGs!
As with just about anything else on the Internet, you should never trust user-submitted input. This holds true with user-submitted images, which could contain malware that could infect your back-end processing systems, or worse, your end users. We discussed the importance of security with images in “Secure Image Delivery”, and it’s worth reviewing that section to understand the risks user-generated image content can present to your imaging workflow.
To get these images from the chaotic state they are in to a master image, we can imagine a process that runs upon user upload and normalizes the images to a standard set of dimensions, format, visual quality, and metadata to protect our users’ privacy.
But wait! Due to the nonuniform nature of these images, it’s very likely that the offline process will run unpredictably, since some images can be processed quickly due to their file size (small) and image format (JPEG), while others will take considerably longer due to factors like format, file size, and resolution (in terms of pixel density and dimension), and image metadata. These factors will be covered a little later in this chapter when we discuss the factors that influence how long it takes to process an image.
Once our image processor has completed its work of taming the user-generated content beast, we have once again arrived at our master image.
The News Site
While both e-commerce and social media sites have always been image-first in terms of content, news organizations haven’t always been. Now they are moving in that direction, and one might find that their use cases are a bit different. For one, they often act as a hybrid of the formal Photo Shoot→Creative→Upload to DAM process we saw in the e-commerce example, and the “take a picture with your smartphone” we saw in the social media example. Let’s put ourselves in the hypothetical newsroom of our news site.
While much of our site’s content is going to be text, more and more frequently, news media is leading stories with large images. For featured content, it’s not uncommon to see accompanying galleries of high-resolution, beautiful images. This content typically comes from many different sources: syndicated content providers, photojournalists who work for the site, freelance photographers, and social media for “eyes on the ground” coverage.
To get it on our site, we will definitely need an intermediate processing step. While occasionally less meticulous than an e-commerce store’s creative department would be as far as retouching, there is often a very heavy amount of photo editing in terms of cropping images coming in from the field. In fact, cropping might be the second-most popular image transformation performed next to resizing, because the story might require particular focus on a specific part of an image to tell the story.
In a news site, since images are often catalogued for possible later use in a story that might require similar imagery, some sort of centralized DAM is required in order to facilitate image indexing. Once the final, visually correct version of the image with all of the relevant cropping has been generated, both it and the original image are uploaded to the DAM. And again, we have arrived at our master image.
Business Logic and Watermarking
Before we get to the fun part—making the images that will be displayed on your site—it’s also important to discuss business logic.
In some cases, business logic for web imagery boils down to ensuring that each image displayed contains a watermark—usually a company logo—on each image delivered from the site. While this sounds easy enough, it often comes with pitfalls. For example:
-
Do you want the logo to always remain the same size? If so, then you’ll need to make sure that you apply it after you have resized the master image to the final dimensions of your derivative image.
-
Do you need it to be semitransparent? Then your image toolchain would ideally support file formats that have an alpha channel, like GIF and PNG, and your imaging software would support an operation that alters the opacity of the watermark.
In the next section, we will discuss a method to watermark an image by performing a composition of two images using some of the great open source image tools that are available freely online.
In addition to watermarking, companies occasionally have a requirement that each image delivered on the site contains copyright or other information embedded in the image file’s metadata. While invisible to end users, this information can be useful to content producers who want to demonstrate ownership of the image. Usually, this data is encoded into the IPTC (a standard created by the International Press Telecommunications Council) metadata segment of the file, but it’s not uncommon to also have the data encoded into the Exif segment of the file. If it’s important for your use case, most graphics libraries will copy these segments from the master image to any derivative images, but it’s worth making sure yours does. In some cases, image optimizing software strips out these segments since they often add unseen “bloat” to the image; however, this might not be bloat at all for you!
Another important aspect of business logic is the dimensions of the images used on a site, since there is often a central UX department that sets standards to define what the site layout will be. Often, a single master image may need to be generated in a number of different sizes to accommodate the various uses throughout a site—for example, thumbnail, large, and high-resolution used for a zoomed-in view.
Revisiting each of the use cases described earlier, we can see where each might need one or many of these types of business logic:
-
The e-commerce site almost certainly has a very specific set of sizes each product image must adhere to, to ensure visual consistency of products when they are displayed in various contexts (search page, product detail, etc.) across the site.
-
The social media site will probably want some sort of unobtrusive watermark on the image to show provenance of the image in the event it’s shared elsewhere on the Internet.
-
The news site may have contractual obligations to its freelance photographers stipulating that their images contain embedded copyright information.
Now, with some of this business background in mind, let’s make some derivative images!
Hello, Images
Now that you know what it takes to get a master image into your system and some of the things you’ll need to keep in mind to ensure your images meet your business goals, let’s figure out what it takes to get the derivative images created from it. The following steps are relevant regardless of whether you run an e-commerce, social media, or news site—in each of those cases, we rarely if ever want to deliver our master image to an end user.
Getting Started with a Derivative Image Workflow
At its most basic, just about every operating system nowadays comes with an image viewer that contains basic editing capability allowing one to resize, crop, and even do minor color and sharpness corrections. Adobe Photoshop is an incredibly common tool for graphic designers to use for this very purpose, and comes with even more bells and whistles than the built-in photo editor on your computer. If you have a lot of time on your hands and a small number of master images to read and a small number of derivative images to create, then this method might be fine for you. Once you get past the point of a few dozen master images, however, it would be wise to move beyond this laborious work and into a fully automated workflow.
The easiest workflow you can start out with also has a nice ability to scale quite well as your image library grows: simple scripts that orchestrate command-line programs that read in your master images and output your derivative images. Let’s dig in and see how we can take a library of master images, resize them to a small number of preset sizes, and convert them to some of the new formats supported by browsers.
ImageMagick
Next to Adobe Photoshop, ImageMagick is one of the most well-known image manipulation software suites, and also one of the most versatile. It’s an open source, Apache-licensed tool that runs on just about every operating system (Windows, MacOS, and Linux, to name a few), has interfaces for just about every programming language (Python, Ruby, Perl, C/C++, Java, among many others), and allows you to do a huge number of transformations on an input image. Covering all of its capabilities would require a book of its own, but suffice it to say, it can handle our most basic use cases of resizing and converting to different image formats quite well.
Note
This chapter will spend a good amount of time diving into ImageMagick’s command-line utilities, but you can find a list of tools, both command-line and GUI, to suit many different image-related use cases in Appendix B.
To begin, visit the ImageMagick website and download and install the binary version that’s appropriate for your operating system. The binaries on the ImageMagick website are a good starting point, because they offer built-in support for high performance output formats like progressive JPEG and WebP, but they do have some limitations in that they don’t support other high performance formats like JPEG 2000 and JPEG XR. A word to the wise: any time you download binaries from the Internet, it’s worth spending some time making sure that what you downloaded is what the developer uploaded. The ImageMagick site offers a message digest file that allows you to compare the SHA256 hash of your local file with the one that should exist on the server. If they don’t match, don’t use it!
Compiling ImageMagick
Support for JPEG 2000 in ImageMagick requires manually compiling the software. The steps for doing so are covered here. In general, it’s useful to have all of your supporting libraries and binaries in place before beginning the process. In particular, installing OpenJPEG for JPEG 2000 support, libwebp for WebP support, and the JxrDecApp and JxrEncApp located somewhere in your path for JPEG XR support would be required at a minimum to add support for these formats. There are also some optimizations you can make by compiling ImageMagick with OpenMP to improve parallelization, libjpeg-turbo to speed up JPEG decoding and encoding, and OpenCL to leverage GPU processing for certain operations. Luckily, the configure script that comes with ImageMagick is well documented and very verbose about its operations, so you can quickly tell when you’re missing a dependency, or if the script isn’t able to locate it.
Let’s start by creating a project directory and populating it with some sample master images. We’ll use this freely licensed image to start with, since it’s a good representation of a high-quality master image we might see in some of the use cases we covered earlier in this chapter:
$mkdir -p images/master images/derivative$wget"http://bit.ly/hpi-ops-sample"-O images/master/master1.jpg
Now we’re ready to take ImageMagick for a spin. Here, we’ll have ImageMagick read in our master image using the convert command and change the output format to a lossless WebP. We’ll also have ImageMagick convert the same image to a PNG, so we can compare. We’ll then use ImageMagick’s identify command to tell us a little about the images we created:
$convert images/master/master1.jpg-define webp:lossless=trueimages/derivative/master1.webp$convert images/master/master1.jpg images/derivative/master1.png
We now have a WebP and PNG version of our master image. Easy, right?
The identify command that ships with ImageMagick is an indispensable tool for anyone working on images. Without any command-line arguments, it outputs basic information about an image. Let’s take a look at its output for the PNG:
$ identify master1.png
master1.png PNG 4000x2670 4000x2670+0+0 8-bit sRGB 22.12MB 0.030u 0:00.030
We can see some useful information, such as its format (PNG), dimensions (4000x2670), colorspace and depth (8-bit sRBG), size (22.12MB), and how long it took to read the file (0.030u 0:00.030).
Doing the same for our WebP image, we see the following:
$identify master1.webp Decoded /var/tmp/magick-62187w4ZOgPPXPHwt. Dimensions:4000x2670. Format: lossy. Now saving... Saved file /var/tmp/magick-62187MoIDfyfUBubq master1.webp PAM 4000x2670 4000x2670+0+0 8-bit TrueColor sRGB 42.72MB 0.000u 0:00.000
While largely similar to the output we saw for PNG, one interesting thing about the preceding output for the WebP is that ImageMagick doesn’t support extracting this information natively from WebP images, and therefore needs to extract it to a temporary format that has a significantly larger size in bytes (42.72 MB) than the WebP it was derived from, which was about 6.1 MB on disk.
So why do we care about identify? Well, first and foremost, it’s an indispensable tool when you’re debugging issues with an image, such as corrupt file metadata, or for understanding the actual contents of the image and its metadata segments without opening up a hex editor. While the previous output shows identify at its most basic, there are a huge number of command-line options available to the identify command, all of which are worth exploring. One of the most valuable is the -verbose option, which dumps a large amount of information about an image. Running it on the master image, we get a mouthful of interesting data:
$identify -verbose images/master/master1.jpg Image: images/master/master1.jpg Format: JPEG(Joint Photographic Experts Group JFIF format)Mimetype: image/jpeg Class: DirectClass Geometry: 4000x2670+0+0 Resolution: 300x300 Print size: 13.3333x8.9 Units: PixelsPerInch Type: TrueColor Endianess: Undefined Colorspace: sRGB Depth: 8-bit Channel depth: red: 8-bit green: 8-bit blue: 8-bit Channel statistics: Pixels: 10680000 Red: min:0(0)max:255(1)mean: 97.7792(0.383448)standard deviation: 72.505(0.284333)kurtosis: -0.979603 skewness: 0.609351 entropy: 0.97042 Green: min:0(0)max:255(1)mean: 112.28(0.440314)standard deviation: 66.938(0.262502)kurtosis: -0.934222 skewness: 0.400476 entropy: 0.983699 Blue: min:0(0)max:255(1)mean: 120.169(0.471252)standard deviation: 64.9808(0.254827)kurtosis: -1.05091 skewness: 0.0985773 entropy: 0.985951 Image statistics: Overall: min:0(0)max:255(1)mean: 110.076(0.431671)standard deviation: 68.2158(0.267513)kurtosis: -0.994197 skewness: 0.359281 entropy: 0.980024 Rendering intent: Perceptual Gamma: 0.454545 Chromaticity: red primary:(0.64,0.33)green primary:(0.3,0.6)blue primary:(0.15,0.06)white point:(0.3127,0.329)Background color: white Border color: srgb(223,223,223)Matte color: grey74 Transparent color: black Interlace: None Intensity: Undefined Compose: Over Page geometry: 4000x2670+0+0 Dispose: Undefined Iterations: 0 Compression: JPEG Quality: 96 Orientation: Undefined Properties: date:create: 2016-04-21T10:03:16-04:00 date:modify: 2015-06-05T17:01:42-04:00 exif:ApertureValue: 4970854/1000000 exif:CFAPattern: 2, 0, 2, 0, 0, 1, 1, 2 exif:Contrast: 0 exif:Copyright: gowildimages.com exif:CustomRendered: 0 exif:DateTime: 2013:06:20 18:14:25 exif:DateTimeDigitized: 2013:03:11 09:31:34 exif:DateTimeOriginal: 2013:03:11 09:31:34 exif:DigitalZoomRatio: 1/1 exif:ExifOffset: 484 exif:ExifVersion: 48, 50, 51, 48 exif:ExposureBiasValue: 0/6 exif:ExposureMode: 1 exif:ExposureProgram: 1 exif:ExposureTime: 1/500 exif:FileSource: 3 exif:Flash: 16 exif:FNumber: 56/10 exif:FocalLength: 500/10 exif:FocalLengthIn35mmFilm: 50 exif:FocalPlaneResolutionUnit: 4 exif:FocalPlaneXResolution: 5488689/32768 exif:FocalPlaneYResolution: 5488689/32768 exif:GainControl: 0 exif:GPSInfo: 1140 exif:GPSLatitude: 27/1, 485473/10000, 0/1 exif:GPSLatitudeRef: N exif:GPSLongitude: 86/1, 433530/10000, 0/1 exif:GPSLongitudeRef: E exif:GPSVersionID: 2, 2, 0, 0 exif:ImageDescription: A stupa under snow(left)on the trail to Tengboche monastery(centre). Mt Everest(8850m)is making clouds just left of centre, with Lhotse(8498m)partly obscured just to the right. Far right is Ama Dablam peak. exif:ISOSpeedRatings: 100 exif:LightSource: 0 exif:Make: NIKON CORPORATION exif:MaxApertureValue: 10/10 exif:MeteringMode: 5 exif:Model: NIKON D600 exif:ResolutionUnit: 2 exif:Saturation: 0 exif:SceneCaptureType: 0 exif:SceneType: 1 exif:SensingMethod: 2 exif:Sharpness: 0 exif:ShutterSpeedValue: 8965784/1000000 exif:Software: Adobe Photoshop Lightroom 4.4(Windows)exif:SubjectDistanceRange: 0 exif:SubSecTimeDigitized: 40 exif:SubSecTimeOriginal: 40 exif:thumbnail:Compression: 6 exif:thumbnail:JPEGInterchangeFormat: 1348 exif:thumbnail:JPEGInterchangeFormatLength: 19066 exif:thumbnail:ResolutionUnit: 2 exif:thumbnail:XResolution: 72/1 exif:thumbnail:YResolution: 72/1 exif:WhiteBalance: 0 exif:XResolution: 300/1 exif:YResolution: 300/1 jpeg:colorspace: 2 jpeg:sampling-factor: 1x1,1x1,1x1 signature: 23a119d052552e6cc10619e2737aceaf6d455d4382eb057df4740fb6 unknown: 2 Profiles: Profile-8bim:19680bytes Profile-exif:20420bytes Profile-icc:3144bytes Profile-iptc:505bytes City[1,90]: 0x00000000:254700-% unknown[2,0]: Keyword[2,25]: Ama Dablam Keyword[2,25]: Lhotse Keyword[2,25]: Mount Everest Keyword[2,25]: Tengboche Keyword[2,25]: blue sky Keyword[2,25]: clouds Keyword[2,25]: forest Keyword[2,25]: monastery Keyword[2,25]: mountain Keyword[2,25]: peak Keyword[2,25]: ridge Keyword[2,25]: snow Keyword[2,25]: stupa Keyword[2,25]: summit Keyword[2,25]: trail Keyword[2,25]: trekking Keyword[2,25]: valley Created Date[2,55]: 20130311 Created Time[2,60]: 093134 unknown[2,62]: 20130311 unknown[2,63]: 093134 Copyright String[2,116]: gowildimages.com Caption[2,120]: A stupa under snow(left)on the trail to Tengboche monastery(centre). Mt Everest(8850m)is making clouds just left of centre, with Lhotse(8498m)partly obscured just to the right. Far right is Ama Dablam peak. Profile-xmp:11162bytes Artifacts: filename: images/master/master1.jpg verbose:trueTainted: False Filesize: 7.676MB Number pixels: 10.68M Pixels per second: 381.43GB Usertime: 0.000u Elapsedtime: 0:01.000 Version: ImageMagick 6.9.3-0 Q16 x86_64 2016-02-10 http://www.imagemagick.org
Many of these fields are self-explanatory and some are wildly esoteric, but there are a number of key fields we want to pay attention to because they provide us with important information that could influence how we optimize or manipulate the images.
- Resolution
-
First, we can see that the master image has a resolution of 300 DPI. This is important, because while it may be a visually beautiful image suitable for print in a magazine, it’s certainly too high for publishing on the Web, where images are often at most 72 DPI or less. Since 300 DPI images are much more dense, data-wise, than their 72 DPI brethren, they could take significantly longer to process into a derivative image, so be sure to factor that in when building your high performance image workflow if you have many 300 DPI images in your master image catalog.
- Interlace
-
Looking next at the
Interlacefield, we can see it is set toNone, which means it’s a baseline JPEG. If the image were a progressive JPEG, which was discussed earlier in Chapter 4, this value would be set toJPEG. - Quality
-
Another important field is
Quality, which can be somewhat misleading. The quality of the JPEG is unfortunately not deterministic since it’s not encoded anywhere in file metadata or anywhere else at creation time, and so tools likeidentifyhave to make a best guess by looking at the image’s quantization tables. They’re generally pretty close to what was input when the image was initially created, but not always. In the case of this image, we can see that theQualitywas determined to be 96. Again, that’s great for print, but almost certainly too high for delivering over the Web, as discussed in Chapter 13. - Properties
-
Farther down in the output, we see the contents of the Exif metadata within the
Propertiesfield. In the case of our master image, there is a lot of it, containing information ranging from when and where the photo was taken, the f-stop settings used for the photo, and even the make and model of the camera. There’s also a little stowaway—an Exif thumbnail image, which is nearly 19 KB in size. Our image’s Exif segment also contains GPS coordinates of where the photo was taken, which, as we discussed in our social media use case, means that you might inadvertently leak sensitive data if you didn’t strip it. - Profiles
-
The
Profilesfield displays information about the various profiles embedded in the image. In particular, we can see that our sample file contains a Photoshop-proprietary 8 BIM profile that’s nearly 20 KB; a 20 KB Exif profile; a 3 KB ICC color profile; a 500-byte IPTC profile containing scene, keyword, and copyright data; and an 11 KB XMP embedded into it. Just think, if this image were delivered over the Web, not only would it be sent at too high of a resolution and JPEG encoding quality, it would also have over 50 KB of extra metadata baggage that would be invisible and largely useless to the casual end user.
A Simple Derivative Image Workflow Using Bash
We’ve covered ImageMagick and two of its utilities, convert and identify. Now we’re going to put them into action as part of a simple high performance images workflow.
Let’s start with the project folder structure we laid out earlier:
images|-> derivative|-> master
Imagine that we had a number of our source images in the master folder, and that we wanted to convert all of them into three different sizes for our responsive website, with a progressive JPEG version and a WebP version. We could write a simple bash script that takes convert through its paces to generate our derivative images:
#!/bin/bashINPUT=images/master/*.jpgOUTPUT=images/derivativeQ=75 mkdir -p$OUTPUT/{100,300,800}forf in$INPUTdoecho"Processing:$f"fn_ext=$(basename"$f")fn="${fn_ext%.*}"convert$f-resize 100x100 -interlace Plane-quality$Q$OUTPUT/100/$fn.jpg convert$f-resize 100x100-define webp:lossless=false-quality$Q$OUTPUT/100/$fn.webp convert$f-resize 300x300 -interlace Plane-quality$Q$OUTPUT/300/$fn.jpg convert$f-resize 300x300-define webp:lossless=false-quality$Q$OUTPUT/300/$fn.webp convert$f-resize 800x800 -interlace Plane-quality$Q$OUTPUT/800/$fn.jpg convert$f-resize 800x800-define webp:lossless=false-quality$Q$OUTPUT/800/$fn.webpdone
Let’s examine the output of our script:
images/derivative/100:
56K  master1.jpg
2.1K master1.webp

images/derivative/300:
72K master1.jpg
16K master1.webp

images/derivative/800:
total 600
183K master1.jpg
114K master1.webp
One thing you may notice in this output is that the JPEGs are much larger than the equivalent WebP. For example, the 100-pixel version of the image is 56 KB in JPEG format, while only 2.1 KB as a WebP. What gives? As mentioned in “Business Logic and Watermarking”, ImageMagick copies over the metadata from the original image. That means these tiny images have many times more metadata than actual image content! In the next section, we’ll make sure we strip it out, as we don’t need that extra weight on our sites for this particular image.
So there we have it: a very simple workflow using ImageMagick and bash. Clearly, there is a lot of room to improve the script, but it’s a start, and perhaps good enough to work for sites that have a small number of images. One possible improvement to this script would be to incorporate business logic into it as we discussed earlier, for example, by adding a watermark to each image. We can easily do this by adding a composite command, like so:
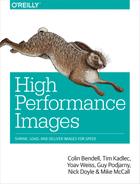
convert images/master/master1.jpg -resize 1000x1000-interlace Plane -quality75images/master/logo.gif-gravity NorthWest -geometry 250x250+10-composite images/derivative/master1_watermark.jpg
The result of this command should look something like Figure 14-1.

Figure 14-1. Image with watermark
We now have a set of derivative images that meet our responsive website layout requirements, follow some of the best practices in terms of image format, and meet our business requirements. Not bad for a few lines of bash.
Now that we’ve created a simple script to generate offline derivatives, it’s time to kick things up a notch. First, one thing that’s seriously lacking in the previous example is that everything is done serially. Image processing is an extremely computationally expensive operation. In this day and age, even the most basic machines have many CPU cores, so it makes sense that we’d want to leverage all of the horsepower we have at our fingertips to process our image catalog. One incredibly simple way of adding a little parallelism is to add a simple function to our script and have it run in parallel by backgrounding the function, then waiting until all tasks are complete before starting on the next. At the same time, let’s also give it a couple more output sizes to crunch to accommodate high-resolution displays:
#!/bin/bashINPUT=images/master/*.jpgOUTPUT=images/derivativeQ=75 mkdir -p$OUTPUT/{100,300,800,1000,2000}process_image(){# $1 - input# $2 - size# $3 - filenameconvert$1-resize$2x$2-interlace Plane-quality$Q$OUTPUT/$2/$3.jpg convert$1-resize$2x$2-define webp:lossless=false-quality$Q$OUTPUT/$2/$3.webp}forinfile in$INPUTdoecho"Processing:$infile"fn_ext=$(basename"$infile")outfile="${fn_ext%.*}"forsize in10030080010002000doprocess_image$infile$size$outfile&donewaitdone
On my system, that small change improved performance by more than 30% even while adding two extra sizes—not too bad for a quick and dirty script. While there are clearly improvements that can be made here, the point is that it doesn’t take much to get a little more performance out of your system. Of course, scripts like this can be quickly outgrown, which leads us to the concept of build systems.
An Image Build System
As we saw with the simple bash script examples, it’s not difficult to write a bare-bones system for image processing. However, as many web developers have discovered over the years, there is a lot of complexity and repetition that comes with creating a site, so it makes sense to have a system in place that helps assemble all of the pieces into one coherent build. In fact, the concept of a build system that helps get all of the right pieces in place is almost as old as software—as old hands in C or C++ development know, a Makefile is often a source of amazement (and frustration, when it doesn’t work well) at its ability to orchestrate a number of complex tasks to build a piece of software.
Some of the most popular systems to do this today in the web development world are task runners, which are often written in JavaScript and leverage the amazing infrastructure behind the Node.js project. The two most popular are Grunt and Gulp. Both of these systems are incredibly simple to use, as well as roughly similar to one another in function and syntax. Take a look at the landscape of these build systems, and choose the one that works best for you and your project.
Taking the bare-bones bash system as a reference, we can translate and improve upon it using a Gulp task. To get started, you first need to install Node. The instructions to do so are well documented on the Node site, and there are installers for just about every major platform. From there, it should be as simple as invoking npm, Node’s package manager, to install Gulp:
$npm install --global gulp-cli$npm install --save-dev gulp
At this point, you should have Gulp installed on your machine. Now it’s time to get a couple of plug-ins that will allow us to resize images, as well as optimize them. Before you do so, make sure that you have ImageMagick installed, since the gulp-image-resize plug-in uses it to modify the images. If you followed the steps earlier in this chapter, you should be good to go:
$npm install --save-dev gulp-image-resize$npm install --save-dev gulp-imagemin$npm install --save mozjpeg$npm install --save imagemin-mozjpeg$npm install --global cwebp-bin$npm install --save imagemin-webp$npm install --save-dev gulp-pipes
Let’s explore a few interesting bits about these commands.
First, two of them install binaries (mozjpeg and cwebp-bin) for mozjpeg and WebP image encoding. As mentioned earlier, there are some security implications to using binaries from nontrusted sources. However, both of these Node packages build the files from source, which is good, but much of it is done out of sight from the end user. It’s up to you to trust that the binaries they create do what you expect them to. If you don’t want to use them, and if there is a system-wide version of the mozjpeg and WebP tool sets already available on your machine, then you don’t need to install either package.
Another thing that might stick out to those not familiar with Node is the different save commands, particularly --save-dev, --save, and --global. Described most simply, they are different ways you can manage package dependencies for your project. The commands listed are recommended by the developers of each package, so they should be fine defaults to start. Your Gulp workflow might require them to be different, however, so take some time to understand the various options available to you.
Let’s look at our Gulp file, and see what it does:
vargulp=require('gulp');varimagemin=require('gulp-imagemin');varmozjpeg=require('imagemin-mozjpeg');varpipes=require('gulp-pipes');varresize=require('gulp-image-resize');varwebp=require('imagemin-webp');gulp.task('highperf_images',function(){varsizes=[100,300,800,1000,2000];varstream;for(sizeinsizes){stream=gulp.src('images/master/**/*.{jpg,png,tiff}').pipe(resize({width:sizes[size],height:sizes[size],upscale:false,format:'jpg'})).pipe(imagemin({use:[mozjpeg({quality:75,progressive:true,tune:'ms-ssim'})]})).pipe(gulp.dest('images/derivative/'+sizes[size]+'/')).pipe(webp({quality:75})()).pipe(gulp.dest('images/derivative/'+sizes[size]+'/'))}returnstream;});
As you can see, there aren’t many more lines of code here than in our simple bash version of the script. If we look at it line by line, however, we can see some subtle but important differences. For instance, at the beginning of the file, you must reference the packages that actually do the heavy lifting—remember, Gulp (and the others) are just task runners, and rely on modules or plug-ins to do work. Next, we create a Gulp task. If you’re familiar with JavaScript, this is just a simple JavaScript function that Gulp knows how to turn into tasks it can perform. Within the task, we create an array of output sizes, and then loop through each to create derivative images for each master. The nice thing about Gulp is that it has a lot of built-in parallelization, whereas our bash solution didn’t without a little work (and even then, it left a lot to be desired), so each input and output image is processed in parallel, greatly reducing processing time and keeping all CPUs on the machine nicely busy.
Within the task, the real work is being performed by three different pipes: one to resize the master images to our desired derivative output size and convert any non-JPEG master files to JPEG (by default, the resizer will use the input format as the output); another to optimize the JPEG output using the mozjpeg encoder; and lastly another to create a WebP version of the file as we’d done with the bash script.
To execute the Gulp task, first make sure your Gulp file is saved as gulpfile.js to the root of your project, so that the images directory is immediately above it. Then, it’s as simple as:
$gulp highperf_images[17:21:13]Using gulpfile ~/Desktop/tmp/book/gulpfile.js[17:21:13]Starting'highperf_images'...[17:21:14]gulp-imagemin: Minified1image(saved 55.05 kB - 96.4%)[17:21:14]gulp-imagemin: Minified1image(saved 59.8 kB - 82.4%)[17:21:14]gulp-imagemin: Minified1image(saved 95.83 kB - 52.6%)[17:21:14]gulp-imagemin: Minified1image(saved 120.84 kB - 47.4%)[17:21:15]gulp-imagemin: Minified1image(saved 320.43 kB - 37.8%)[17:21:16]Finished'highperf_images'after 2.53 s
With that, we now have a very nice build system to use for creating high performance images for your site. What next? There are some Gulp plug-ins that allow you to process only files that have changed, which could be worth investigating if you frequently add new images to your site, since the current task will reprocess every image each time it’s run. There are also a number of other plug-ins to imagemin that do things like optimize PNGs, animated GIFs, and SVGs. You may want to investigate these if you find that these plug-ins add value to the images you serve on your site.
A Build System Checklist
A system like this is particularly useful if you:
-
Have a small-to-medium image catalog that is fairly static
-
Have a small-to-medium number of image transformations that need to be performed on each image
-
Don’t mind writing a little JavaScript to orchestrate your image creation workflow
-
Have a business or other requirement that all images are generated in advance:
-
There is a manual review process for each image
-
It is not cost-effective to transform the original images in any other way because they are so large (in terms of files or size), have a high information density (300 DPI), or leverage a nonstandard format (PSD, TIFF, RAW)
-
-
Are not yet ready to build and scale a service that can convert images dynamically
If you have a large number of images on your site, or if the images on your site change frequently, then it may be worth looking into a dynamic image optimizer.
High Volume, High Performance Images
In the last couple of sections we’ve discussed using shell-based tools to resize and optimize images. In general, these methods can scale very nicely to an image library sized on the order of thousands of master images, and require a very low level of effort to get started. However, relying only on shell commands and task runners for your image build system has some pitfalls.
First and foremost, the tools we’ve discussed so far don’t easily scale horizontally: the larger your image library and number of output images you create, the longer the tasks will take to run on a single machine. You can certainly speed things up by adding more CPU, memory, and disk, but there could come a time when you will outgrow the solution.
Second, there is a lot of hardcoding of attributes like image sizes—what happens if you want to change them? You’d need to reprocess your entire image library. What happens if you want to change the encoding quality of your images? You’d need to reprocess your entire image library. As the number of master and derivative images grows, the amount of storage and management overhead grows as well. For example, if you had to ensure each image had to be copied to every web server in your cluster, you might quickly run into a huge management nightmare trying to keep everything in sync. Thus, it makes sense to discuss what it would take to create a dynamic image server that processes images on demand.
A Dynamic Image Server
Before we begin this section, it’s worth pointing out that actually implementing a dynamic image resizing and optimizing server is a large topic to cover, and the design or code for one would not be possible to cover in a chapter. However, we can discuss some of the key attributes you should consider when designing and implementing your own, or choosing one from a third party.
At a very high level, the typical request flow through a dynamic image server is as follows:
-
Receive request
-
Parse request parameters
-
Download master image
-
Decode master image
-
Perform transformation
-
Encode derivative image
Let’s break each of these steps down further, starting with Step 2
Parsing the request
Typically, dynamic image servers are invoked via an HTTP-based API. This API is often based on adding query string parameters, or as a RESTful path-based approach. For example, it could look something like this for a query string-based API:
http://dynamic.example.com/?w=300&h=300&format=webp&src=http://yoursite.com/master.jpg
Or like this for a RESTful API:
http://dynamic.example.com/resize/300x300/format/webp/http://yoursite.com/master.jpg
One great thing about a dynamic image server is that you can reference these URLs directly in your HTML, and only have to manage the master image. From there, your CDN or caching infrastructure would be responsible for storing and serving the derivative images. In contrast to the approach outlined in the previous sections, where all images are created out-of-band once and stored and served from disk, with a dynamic server, the images are often ephemeral.
Downloading the master image
Once the request has been received and parsed, the dynamic image server would then download the master image from the origin web server. There are a number of things to keep in mind for this step, since it will help you understand where performance can be improved.
-
The request to fetch the image will nearly always happen over HTTP if the file isn’t available via a local filesystem, or a remote one that presents locally, like NFS or SMB. When this happens, latency and bandwidth to the origin web server is incredibly important, since no work can be done until the master image is downloaded. It is worth spending time ensuring this part of the request happens quickly and is tuned well, and caching is leveraged as much as possible where relevant.
-
The size of the master image should be taken into consideration. In the beginning of this chapter, we discussed some of the use cases where we might see large master images. If your master images are larger than several hundred kilobytes, it could be worthwhile to convert them to a more reasonable size; often it makes sense to convert them to the largest size you will ever deliver over the Web. This will not only help when downloading the original image, but also when decoding it for further processing.
Decoding the master image
Next, the dynamic image server will decode the image into memory. We’ll break this down a bit, since some of it isn’t exactly intuitive.
One thing in particular that’s not immediately obvious is that an image’s size in terms of bytes is not entirely reflective of how large the image will be in memory. Unless your master images are raw bitmaps (which I hope they aren’t!), they are often compressed in one way or another. However, the dynamic image server needs to work with the images on a pixel-by-pixel basis to perform operations like resizing and chroma subsampling, which means it must first expand the image to its full size in terms of pixels in memory, and then do work on it. The more images worked on simultaneously, the more memory needed to process the image.
The other part that may not be entirely obvious is that the amount of CPU time spent on decoding the images can be a scaling factor. Again, something highly compressed, like a JPEG or WebP, will certainly take longer to decode than a simple format like bitmap. So it’s worth keeping these things in mind, especially when it comes to scaling a service like a dynamic image server.
Transform!
When all of the work to decode the image has been completed, the dynamic image server next needs to perform whichever transformations were requested. Oftentimes, this work is not particularly CPU-intensive, like resizing (since much of the time is spent getting the pixel-by-pixel representation of the image), but there are some convolutional effects that could be more intensive to process, thereby affecting scalability and/or latency of the service.
Encoding the derivative image
Finally, once the image is visually correct from a transformation perspective, the last thing the dynamic image server needs to do is encode and deliver the image. Here again is a potentially CPU-intensive operation, since many of the new high performance encoders are often extremely intensive in their efforts to squeeze every last byte out of the file. In general, JPEG is one of the fastest formats to encode, mostly because it has been around for a while and there are good encoders out there, like libjpeg-turbo, which leverage CPU instructions that are optimized for doing vector operations very quickly. However, some new optimizing encoders, like MozJPEG, are actually not great candidates for real-time image manipulation, because they are much slower to encode than libjpeg-turbo. It’s a good idea to benchmark a few of these yourself to understand the performance characteristics of each, and how they affect the scalability of your dynamic image resizing service. In the end, it may be worth getting slightly more hardware in order to serve and deliver smaller and more optimized images.