
INTRODUCTION

Hacking is the most important skill set of the 21st century! I don’t make that statement lightly. Events in recent years seem to reaffirm this statement with every morning’s headline. Nations are spying on each other to gain secrets, cyber criminals are stealing billions of dollars, digital worms demanding ransoms are being released, adversaries are influencing each other’s elections, and combatants are taking down each other’s utilities. These are all the work of hackers, and their influence over our increasingly digital world is just beginning to be felt.
I decided to write this book after working with tens of thousands of aspiring hackers through Null-Byte, https://www.hackers-arise.com/, and nearly every branch of the US military and intelligence agencies (NSA, DIA, CIA, and FBI). These experiences have taught me that many aspiring hackers have had little or no experience with Linux, and this lack of experience is the primary barrier to their starting the journey to becoming professional hackers. Almost all the best hacker tools are written in Linux, so some basic Linux skills are a prerequisite to becoming a professional hacker. I have written this book to help aspiring hackers get over this barrier.
Hacking is an elite profession within the IT field. As such, it requires an extensive and detailed understanding of IT concepts and technologies. At the most fundamental level, Linux is a requirement. I strongly suggest you invest time and energy into using and understanding it if you want to make hacking and information security your career.
This book is not intended for the experienced hacker or the experienced Linux admin. Instead, it is intended for those who want to get started along the exciting path of hacking, cybersecurity, and pentesting. It is also intended not as a complete treatise on Linux or hacking but rather a starting point into these worlds. It begins with the essentials of Linux and extends into some basic scripting in both bash and Python. Wherever appropriate, I have tried to use examples from the world of hacking to teach Linux principles.
In this introduction, we’ll look at the growth of ethical hacking for information security, and I’ll take you through the process of installing a virtual machine so you can install Kali Linux on your system without disturbing the operating system you are already running.
What’s in This Book
In the first set of chapters you’ll get comfortable with the fundamentals of Linux; Chapter 1 will get you used to the file system and the terminal, and give you some basic commands. Chapter 2 shows you how to manipulate text to find, examine, and alter software and files.
In Chapter 3 you’ll manage networks. You’ll scan for networks, find information on connections, and disguise yourself by masking your network and DNS information.
Chapter 4 teaches you to add, remove, and update software, and how to keep your system streamlined. In Chapter 5, you’ll manipulate file and directory permissions to control who can access what. You’ll also learn some privilege escalation techniques.
Chapter 6 teaches you how to manage services, including starting and stopping processes and allocating resources to give you greater control. In Chapter 7 you’ll manage environment variables for optimal performance, convenience, and even stealth. You’ll find and filter variables, change your PATH variable, and create new environment variables.
Chapter 8 introduces you to bash scripting, a staple for any serious hacker. You’ll learn the basics of bash and build a script to scan for target ports that you might later infiltrate.
Chapters 9 and 10 give you some essential file system management skills, showing you how to compress and archive files to keep your system clean, copy entire storage devices, and get information on files and connected disks.
The latter chapters dig deeper into hacking topics. In Chapter 11 you’ll use and manipulate the logging system to get information on a target’s activity and cover your own tracks. Chapter 12 shows you how to use and abuse three core Linux services: Apache web server, OpenSSH, and MySQL. You’ll create a web server, build a remote video spy, and learn about databases and their vulnerabilities. Chapter 13 will show you how to stay secure and anonymous with proxy servers, the Tor network, VPNs, and encrypted email.
Chapter 14 deals with wireless networks. You’ll learn basic networking commands, then crack Wi-Fi access points and detect and connect to Bluetooth signals.
Chapter 15 dives deeper into Linux itself with a high level view of how the kernel works and how its drivers can be abused to deliver malicious software. In Chapter 16 you’ll learn essential scheduling skills in order to automate your hacking scripts. Chapter 17 will teach you core Python concepts, and you’ll script two hacking tools: a scanner to spy on TCP/IP connections, and a simple password cracker.
What Is Ethical Hacking?
With the growth of the information security field in recent years has come dramatic growth in the field of ethical hacking, also known as white hat (good guy) hacking. Ethical hacking is the practice of attempting to infiltrate and exploit a system in order to find out its weaknesses and better secure it. I segment the field of ethical hacking into two primary components: penetration testing for a legitimate information security firm and working for your nation’s military or intelligence agencies. Both are rapidly growing areas, and demand is strong.
Penetration Testing
As organizations become increasingly security conscious and the cost of security breaches rises exponentially, many large organizations are beginning to contract out security services. One of these key security services is penetration testing. A penetration test is essentially a legal, commissioned hack to demonstrate the vulnerability of a firm’s network and systems.
Generally, organizations conduct a vulnerability assessment first to find potential vulnerabilities in their network, operating systems, and services. I emphasize potential, as this vulnerability scan includes a significant number of false positives (things identified as vulnerabilities that really are not). It is the role of the penetration tester to attempt to hack, or penetrate, these vulnerabilities. Only then can the organization know whether the vulnerability is real and decide to invest time and money to close the vulnerability.
Military and Espionage
Nearly every nation on earth now engages in cyber espionage and cyber warfare. One only needs to scan the headlines to see that cyber activities are the chosen method for spying on and attacking military and industrial systems.
Hacking plays a crucial part in these military and intelligence-gathering activities, and that will only be more true as time goes by. Imagine a war of the future where hackers can gain access to their adversary’s war plans and knock out their electric grid, oil refineries, and water systems. These activities are taking place every day now. The hacker thus becomes a key component of their nation’s defense.
Why Hackers Use Linux
So why do hackers use Linux over other operating systems? Mostly because Linux offers a far higher level of control via a few different methods.
Linux Is Open Source
Unlike Windows, Linux is open source, meaning that the source code of the operating system is available to you. As such, you can change and manipulate it as you please. If you are trying to make a system operate in ways it was not intended to, being able to manipulate the source code is essential.
Linux Is Transparent
To hack effectively, you must know and understand your operating system and, to a large extent, the operating system you are attacking. Linux is totally transparent, meaning we can see and manipulate all its working parts.
Not so with Windows. Microsoft tries hard to make it as difficult as possible to know the inner workings of its operating systems, so you never really know what’s going on “under the hood,” whereas in Linux, you have a spotlight shining directly on each and every component of the operating system. This makes working with Linux more effective.
Linux Offers Granular Control
Linux is granular. That means that you have an almost infinite amount of control over the system. In Windows, you can control only what Microsoft allows you to control. In Linux, everything can be controlled by the terminal, at the most miniscule level or the most macro level. In addition, Linux makes scripting in any of the scripting languages simple and effective.
Most Hacking Tools Are Written for Linux
Well over 90 percent of all hacking tools are written for Linux. There are exceptions, of course, such as Cain and Abel and Wikto, but those exceptions prove the rule. Even when hacking tools such as Metasploit or nmap are ported for Windows, not all the capabilities transfer from Linux.
The Future Belongs to Linux/Unix
This might seem like a radical statement, but I firmly believe that the future of information technology belongs to Linux and Unix systems. Microsoft had its day in the 1980s and 1990s, but its growth is slowing and stagnating.
Since the internet began, Linux/Unix has been the operating system of choice for web servers due to its stability, reliability, and robustness. Even today, Linux/Unix is used in two-thirds of web servers and dominates the market. Embedded systems in routers, switches, and other devices almost always use a Linux kernel, and the world of virtualization is dominated by Linux, with both VMware and Citrix built on the Linux kernel.
Over 80 percent of mobile devices run Unix or Linux (iOS is Unix, and Android is Linux), so if you believe that the future of computing lies in mobile devices such as tablets and phones (it would be hard to argue otherwise), then the future is Unix/Linux. Microsoft Windows has just 7 percent of the mobile devices market. Is that the wagon you want to be hitched to?
Downloading Kali Linux
Before getting started, you need to download and install Kali Linux on your computer. This is the Linux distribution we will be working with throughout this book. Linux was first developed by Linus Torvalds in 1991 as an open source alternative to Unix. Since it is open source, volunteer developers code the kernel, the utilities, and the applications. This means that there is no overriding corporate entity overseeing development, and as a result, conventions and standardization are often lacking.
Kali Linux was developed by Offensive Security as a hacking operating system built on a distribution of Linux called Debian. There are many distributions of Linux, and Debian is one of the best. You are probably most familiar with Ubuntu as a popular desktop distribution of Linux. Ubuntu is also built on Debian. Other distributions include Red Hat, CentOS, Mint, Arch, and SUSE. Although they all share the same Linux kernel (the heart of the operating system that controls the CPU, RAM, and so on), each has its own utilities, applications, and choice of graphical interface (GNOME, KDE, and others) for different purposes. As a result, each of these distributions of Linux looks and feels slightly different. Kali was designed for penetration testers and hackers and comes with a significant complement of hacking tools.
I strongly recommend that you use Kali for this book. Although you can use another distribution, you will likely have to download and install the various tools we will be using, which could mean many hours downloading and installing tools. In addition, if that distribution is not built on Debian, there may be other minor differences. You can download and install Kali from https://www.kali.org/.
From the home page, hover over the Downloads link at the top of the page and click Download Kali Linux. On the Downloads page you’ll be faced with multiple download choices. It’s important to choose the right download. Along the left side of the table, you will see the image name, which is the name of the version that the link downloads. For instance, you may see an image name called Kali Linux 64 Bit, meaning it’s the full Kali Linux and is suitable for 64-bit systems—most modern systems use a 64-bit Intel or AMD CPU. To determine what type of CPU is on your system, go to Control Panel ▸ System and Security ▸ System, and it should be listed. If your system is 64-bit, download and install the 64-bit version of the full Kali (not Light or Lxde, or any of the other alternatives).
If you are running an older computer with a 32-bit CPU, you will need to install the 32-bit version, which appears lower on the page.
You have a choice of downloading via HTTP or Torrent. If you choose HTTP, Kali will download directly to your system just like any download, and it will be placed in your Downloads folder. The torrent download is the peer-to-peer download used by many file-sharing sites. You will need a torrenting application like BitTorrent to do this. The Kali file will then download to the folder in which the torrenting application stores its downloads.
There are other versions for other types of CPUs, such as the commonly used ARM architecture found in so many mobile devices. If you are using a Raspberry Pi, tablet, or other mobile device (phone users will likely prefer Kali NetHunter), make certain you download and install the ARM architecture version of Kali by scrolling down to Download ARM images and clicking Kali ARM Images.
You have Kali downloaded, but before you install anything, I want to talk a bit about virtual machines. Generally, for the beginner, installing Kali into a virtual machine is the best solution for learning and practicing.
Virtual Machines
Virtual machine (VM) technology allows you to run multiple operating systems from one piece of hardware like your laptop or desktop. This means that you can continue to run the Windows or MacOS operating system you are familiar with and run a virtual machine of Kali Linux inside that operating system. You don’t need to overwrite your existing OS to learn Linux.
Numerous virtual machine applications are available from VMware, Oracle, Microsoft, and other vendors. All are excellent, but here I will be showing you how to download and install Oracle’s free VirtualBox.
Installing VirtualBox
You can download VirtualBox at https://www.virtualbox.org/, as shown in Figure 1. Click the Downloads link in the left menu, and select the VirtualBox package for your computer’s current operating system, which will host VirtualBox VM. Make sure to download the latest version.

Figure 1: VirtualBox home page
NOTE These instructions were written with Windows in mind. If you’re using a Mac, the process may be a little different, but you still should be able to follow along.
When the download has completed, click the setup file, and you will be greeted by a familiar Setup Wizard, shown in Figure 2.

Figure 2: The Setup Wizard dialog
Click Next, and you should be greeted with the Custom Setup screen, as in Figure 3.

Figure 3: The Custom Setup dialog
From this screen, simply click Next. Keep clicking Next until you get to the Network Interfaces warning screen and then click Yes.
Click Install to begin the process. During this process, you will likely be prompted several times about installing device software. These are the virtual networking devices necessary for your virtual machines to communicate. Click Install for each one.
When the installation is complete, click Finish.
Setting Up Your Virtual Machine
Now let’s get you started with your virtual machine. VirtualBox should open once it has installed—if not, open it—and you should be greeted by the VirtualBox Manager, as seen in Figure 4.
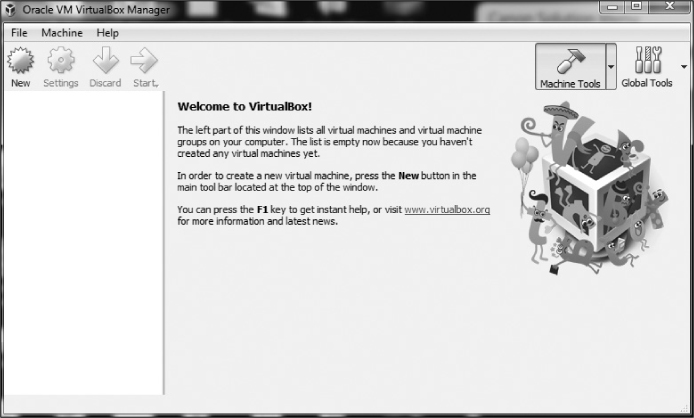
Figure 4: The VirtualBox Manager
Since we will be creating a new virtual machine with Kali Linux, click New in the upper-left corner. This opens the Create Virtual Machine dialog shown in Figure 5.
Give your machine a name (any name is okay, but I simply used Kali) and then select Linux from the Type drop-down menu. Finally, select Debian (64-bit) from the third drop-down menu (unless you are using the 32-bit version of Kali, in which case select the Debian 32-bit version). Click Next, and you’ll see a screen like Figure 6. Here, you need to select how much RAM you want to allocate to this new virtual machine.

Figure 5: The Create Virtual Machine dialog

Figure 6: Allocating memory
As a rule of thumb, I don’t recommend using more than 25 percent of your total system RAM. That means if you have installed 4GB (or 4096MB) on your physical or host system, then select just 1GB for your virtual machine, and if you have 16GB on your physical system, then select 4GB. The more RAM you give your virtual machine, the better and faster it will run, but you must also leave enough RAM for your host operating system and any other virtual machines you might want to run simultaneously. Your virtual machines will not use any RAM when you are not using them, but they will use hard drive space.
Click Next, and you’ll get to the Hard Disk screen. Choose Create Virtual Hard Disk and click Create. You should be asked which hard disk file type to use. Select the suggested default of VDI.
In the next screen, you can decide whether you want the hard drive you are creating to be allocated dynamically or at a fixed size. If you choose Dynamically Allocated, the system will not take the entire maximum size you allocate for the virtual hard disk until you need it, saving more unused hard disk space for your host system. I suggest you select dynamically allocated.
Click Next, and you’ll choose the amount of hard drive space to allocate to the VM and the location of the VM (see Figure 7).
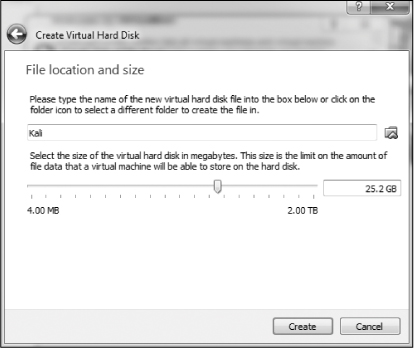
Figure 7: Allocating hard drive space
The default is 8GB. I usually find that to be a bit small and recommend that you allocate 20–25GB at a minimum. Remember, if you chose to dynamically allocate hard drive space, it won’t use the space until you need it, and expanding your hard drive after it has already been allocated can be tricky, so better to err on the high side.
Click Create, and you’re ready to go!
Installing Kali on the VM
At this point, you should see a screen like Figure 8. Now you’ll need to install Kali. Note that on the left of the VirtualBox Manager, you should see an indication that Kali VM is powered off. Click the Start button (green arrow icon).

Figure 8: The VirtualBox welcome screen
The VirtualBox Manager will then ask where to find the startup disk. You’ve already downloaded a disk image with the extension .iso, which should be in your Downloads folder (if you used a torrent to download Kali, the .iso file will be in the Downloads folder of your torrenting application). Click the folder icon to the right, navigate to the Downloads folder, and select the Kali image file (see Figure 9).
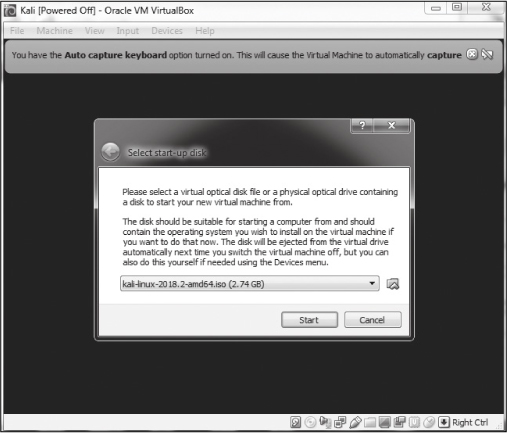
Figure 9: Selecting your startup disk
Then click Start. Congratulations, you’ve just installed Kali Linux on a virtual machine!
Setting Up Kali
Kali will now open a screen like Figure 10, offering you several startup choices. I suggest using the graphical install for beginners. Use your keyboard keys to navigate the menu.
If you get an error when you’re installing Kali into your VirtualBox, it’s likely because you don’t have virtualization enabled within your system’s BIOS. Each system and its BIOS is slightly different, so check with your manufacturer or search online for solutions for your system and BIOS. In addition, on Windows systems, you will likely need to disable any competing virtualization software such as Hyper-V. Again, an internet search for your system should guide you in doing so.

Figure 10: Selecting the install method
You will next be asked to select your language. Make certain you select the language you are most comfortable working in and then click Continue. Next, select your location, click Continue, and then select your keyboard layout.
When you click Continue, VirtualBox will go through a process of detecting your hardware and network adapters. Just wait patiently as it does so. Eventually, you will be greeted by a screen asking you to configure your network, as in Figure 11.

Figure 11: Entering a hostname
The first item it asks for is the name of your host. You can name it anything you please, but I left mine with the default “kali.”
Next, you will be asked for the domain name. It’s not necessary to enter anything here. Click Continue. The next screen, shown in Figure 12, is very important. Here, you are asked for the password you want to use for the root user.

Figure 12: Choosing a password
The root user in Linux is the all-powerful system administrator. You can use any password you feel secure with. If this were a physical system that we were using on the internet, I would suggest that you use a very long and complex password to limit the ability of an attacker to crack it. Since this is a virtual machine that people can’t access without first accessing your host operating system, password authentication on this virtual machine is less important, but you should still choose wisely.
Click Continue, and you will be asked to set your time zone. Do so and then continue.
The next screen asks about partition disks (a partition is just what it sounds like—a portion or segment of your hard drive). Choose Guided – use entire disk, and Kali will detect your hard drives and set up a partitioner automatically.
Kali will then warn you that all data on the disk you select will be erased . . . but don’t worry! This is a virtual disk, and the disk is new and empty, so this won’t actually do anything. Click Continue.
Kali will now ask whether you want all files in one partition or if you want to have separate partitions. If this were a production system, you probably would select separate partitions for /home, /var, and /tmp, but considering that we will be using this as a learning system in a virtual environment, it is safe for you to simply select All files in one partition.
Now you be will be asked whether to write your changes to disk. Select Finish partitioning and write changes to disk. Kali will prompt you once more to see if you want to write the changes to disk; select Yes and click Continue (see Figure 13).

Figure 13: Writing changes to disk
Kali will now begin to install the operating system. This could take a while, so be patient. Now is the time to take your bathroom break and get your favorite beverage.
Once the installation is complete, you will be prompted as to whether you want to use a network mirror. This really is not necessary, so click No.
Then Kali will prompt you as to whether you want to install GRUB (Grand Unified Bootloader), shown in Figure 14. A bootloader enables you to select different operating systems to boot into, which means when you boot your virtual machine, you can boot into either Kali or another operating system. Select Yes and click Continue.

Figure 14: Installing GRUB
On the next screen, you will be prompted as to whether you want to install the GRUB bootloader automatically or manually. For reasons as yet unclear, if you choose the second option, Kali will tend to hang and display a blank screen after installation. Select Enter device manually, as shown in Figure 15.

Figure 15: Entering your device manually
On the following screen, select the drive where the GRUB bootloader should be installed (it will likely be something like /dev/sda). Click through to the next screen, which should tell you that the installation is complete.
Congratulations! You’ve installed Kali. Click Continue. Kali will attempt to reboot, and you will see a number of lines of code go across a blank, black screen before you are eventually greeted with Kali 2018’s login screen, as shown in Figure 16.

Figure 16: The Kali login screen
Log in as root, and you will be asked for your password. Enter whatever password you selected for your root user.
After logging in as root, you will be greeted with the Kali Linux desktop, as in Figure 17.

Figure 17: The Kali home screen
You are now ready to begin your journey into the exciting field of hacking! Welcome!