
HEISLER PARK, LAGUNA BEACH, CALIFORNIA • APRIL, 2016 DJI PHANTOM 4
115-image HDR Panorama. Pano and HDR performed in Lightroom CC. Processed in Photoshop CC.
CHAPTER 3FLIGHT SCHOOL
IF YOU WERE TO FLY A FULL-SCALE AIRCRAFT, you would be expected to attend flight school, where you would learn about the capabilities of an aircraft and how to control it. You would also learn about how things like temperature and altitude affect your aircraft. You would practice some different maneuvers, such as banking and climbing and, most importantly, you’d learn how to land safely. Once you completed these tasks, you would also have the option to become instrument rated, where you could fly based on the instruments. This requires a deep understanding of what all the needles and numbers in the cockpit mean and how to use them.
We are going to take a similar approach with this chapter. Read it carefully and apply what you learn, and you’ll become a proficient pilot. We are not going to talk about the camera and how to frame shots; that will come later. I want you to concentrate on becoming a solid pilot first. Before you begin shooting, you need to have full control of your aircraft and be confident that you understand its capabilities. This is a “wax on, wax off” chapter, because you will build solid skills that will make your photography and video better than someone who starts flying without building any solid skills.
PRE-FLIGHT CHECK
BEFORE WE TAKE TO THE SKIES, we need to check some things; otherwise, our flight might be a little shorter than we hoped.
- Location: You need a nice clear level area for takeoff. Don’t just think about takeoff, but also make sure there is a large enough area for you to safely land—one clear of people, animal, trees, and metal objects that could cause compass interference. Your takeoff point will be the return to home failsafe point. Here’s a good rule of thumb: If your controller were to suddenly stop working, would the area be clear enough for an automated return and landing? Or would your drone hit a tree or power lines on the way in?
- Conditions: Make sure it’s not too windy for safe flying. I advise against flying in rain or heavy fog. Water isn’t good for electronics. It’s also important that you have good visibility to keep your drone within your line of sight. Check your app to make sure you aren’t too close to an airport or restricted airspace.
- Batteries: Make sure they are fully charged. This includes the batteries on the controller, your monitor/mobile device, and your aircraft. Also make sure your batteries are in good condition. Check them for any swelling or damage. If the batteries aren’t in top condition, don’t use them. Batteries are expensive, but not as expensive as replacing your entire aircraft.
- Damage: Make sure there is no visible damage to your gear, including chipped propellers and fine cracks on the shell of your aircraft. If your props are chipped or bent, it will affect the balance and possibly cause vibrations that will result in camera shake, blurry photos, and video that has a “Jello” effect (video that visibly wobbles and warps like a wiggling lump of Jello).
- Make sure everything is nice and tight, especially the props. Make sure there are no loose parts that could fall off. If they fall, they could hurt someone.
- Do you have the latest firmware? The DJI products and 3DR Solo will tell you on your display if there is a newer firmware version available. The firmware is how the internal computer in your drone communicates with the hardware.
- Are the IMU and compass working correctly? You will see a warning if they aren’t, and you can run a calibration from your software app. Generally, you will see a nice green “Safe to fly” message on your display (Figure 3.1).

3.1
You are ready for compass calibration. See the “Compass Calibration Dance” sidebar.
Check the following during each battery change:
- You have a good solid satellite lock if flying in GPS mode, indicated by slow-blinking green lights. If you are flying indoors, then change the settings to Attitude mode.
- Make sure there is a card in your camera and it’s fully inserted. It’s a little bit embarrassing and annoying to fly to your shooting location to discover there is no card or an improperly inserted card in your camera. As a rule, I keep a number of cards with me. I change the card each time I change the battery, and I format it. This ensures that the card is working and ready to shoot. By changing the card, I also minimize my risk of losing an entire day’s shooting should something go wrong.
FPV APP
THERE ARE USUALLY TWO COMPONENTS TO A CAMERA DRONE. The first is the hardware: the drone and the controller. Some have built-in screens such as the smart controller or controller pro, but most are BYOD (bring your own device), and you plug in your phone or tablet. You’ll see the app running on the screen. This is the software that enables you to see what the drone is seeing. This is called FPV (first-person view).
You will also see telemetry overlaid on the screen. This is important information, such as your height and airspeed. Some equipment shows interactive maps that help you know where you’re flying. Another important piece of telemetry is your fuel gauge, a.k.a. your battery meter. It’s vital that you keep your eye on this and come in to land at around 30 percent of battery level.
Different apps have additional information and menus for things like calibration and settings.
Because there are so many different types of drones and the mobile apps are updated so often, I’m not going to go into detail on any specific app. Check out the manufacturer’s user manual, onboard tutorials, and website for information on their specific app. Learn the features and how they work. Also check out the videos at PhotoshopCAFE.com for specific tutorials.
CONTROL BASICS
Controllers
While there are many different kinds of controllers available, they all share the same basic controls. Typically, there will be two joysticks. Most controllers are configurable, so you can set them up to work in a way that suits you.
There are some aerial terms that you should know:
- Yaw: Rotate or spin
- Roll: Side-to-side movement
- Pitch: Forward or backward movement

3.3A Yaw
The left stick (from now on, designated LS) controls altitude and yaw. The right stick (from now on, designated RS) controls movement in horizontal space: pitch and roll. Let’s examine them now.
The first thing you need to do is ascend to your desired altitude by pushing the LS forward. The more you push, the faster the drone will move. It’s usually a good idea to take it nice and slow when you first begin. Some drones have an auto takeoff. Before using this feature make sure the area is clear of obstacles such as trees and powerlines.

3.3B Roll

3.3C Pitch
Once you have reached a safe altitude, above people’s heads and obstacles but not too high, you can practice moving your drone around. A good suggestion is focusing on the RS first. Use the LS to reach your desired altitude, and then take your hand off it and practice moving forward, backward, left, and right using the RS.
I suggest not yawing just yet. The reason for this is that your direction of movement is based on the nose of the aircraft and not on the position where you are standing. So if you have rotated 180 degrees, the controls will be opposite. Don’t be alarmed, though, you will get used to this in time.
Here are some exercises to help you become a solid pilot. Once you’re able to perform all these maneuvers with ease with the nose away from you, flip your copter around so that the nose is facing you and practice them again. If you can do all of these with precision both ways, then you are in good control of your aircraft and you’re ready for anything. You won’t master these in an afternoon. It takes months of practice to become truly proficient, so be patient and take it nice and slow. Even though many of these movements can be automated with different flight and shot modes, it’s good idea to master manual flight controls. There are two good reasons for this suggestion. The first is safety. If something goes wrong, you should possess the skill to take over control at any time. The second reason is getting the perfect shot. There is only so much an automated shot can do. If you have the ability to read your subject and make the perfect movements at just the right time and find just the perfect angles, your shots will stand out from the rest.

3.4 Movement
A DOZEN EXERCISE PATTERNS TO FLY LIKE A MASTER
THIS IS WHERE WE GET INTO THE GOOD STUFF. These are exercises designed to make you a ninja pilot, in full control of your craft and able to fly anywhere with confidence. Take these slowly, one at a time. Don’t move ahead until you are comfortable with the current lesson. The skills build on each other. Find a large, flat open area to perform these exercises.
1. UP, HOVER, LAND
This one lets you get a feel for the joysticks and your aircraft. Make sure you are standing upwind; if a breeze blows over your drone, it will tumble away from you. Start up the motors. Climb slowly to a low height. Let the drone hover for a little bit. Change altitude a few times and then gently land. Congratulations on your first flight (Figure 3.5).
2. STRAIGHT LINE
Fly in a straight line away from you by pushing away on the RS. Hover in position, and fly back in as straight a line as you can by bringing the RS toward you. Land (Figure 3.6).
3. BOX PATTERN
Fly in a square pattern using just the right stick.
Fly away from yourself in a straight line, just like the previous exercise. Pause and hover. Push the RS to the left and fly a straight line parallel to yourself. Pause, fly back toward yourself in a straight line, and then push the RS to the right to complete a square shape (Figure 3.7). This will give you a good feel for moving around in different directions. If your drone starts to rotate little bit, compensate on the RS. Resist the urge to yaw just yet.
4. CIRCLE
Now you are going to get a feel for the RS in a more freeform way. Rather than a box, this time fly in a counterclockwise circle in front of you, using the RS. Take it nice and slow. If you get in trouble, let the stick go back to the neutral position and hover until you are ready to continue (Figure 3.8). This will really start to give you a feel for your drone, and it may take some practice to get a nice even circle. Try small circles and larger ones.
5. FIGURE 8
Now this one is going to be a bit of a challenge at first, but if you are this far, you are beginning to gain some basic skills. Fly away from yourself in a nice slow counterclockwise circle; when you have completed half a circle, change direction as if you are creating a letter S. When you have completed the S shape, continue in a full circle and then switch to perform a figure 8 shape (Figure 3.9). Keep practicing figure 8s until you are very comfortable and can make them both tight and loose and nice and even. You are developing some real skills now.

3.5 Up, Hover, Land

3.6 Straight Line

3.7 Box Pattern

3.8 Circle
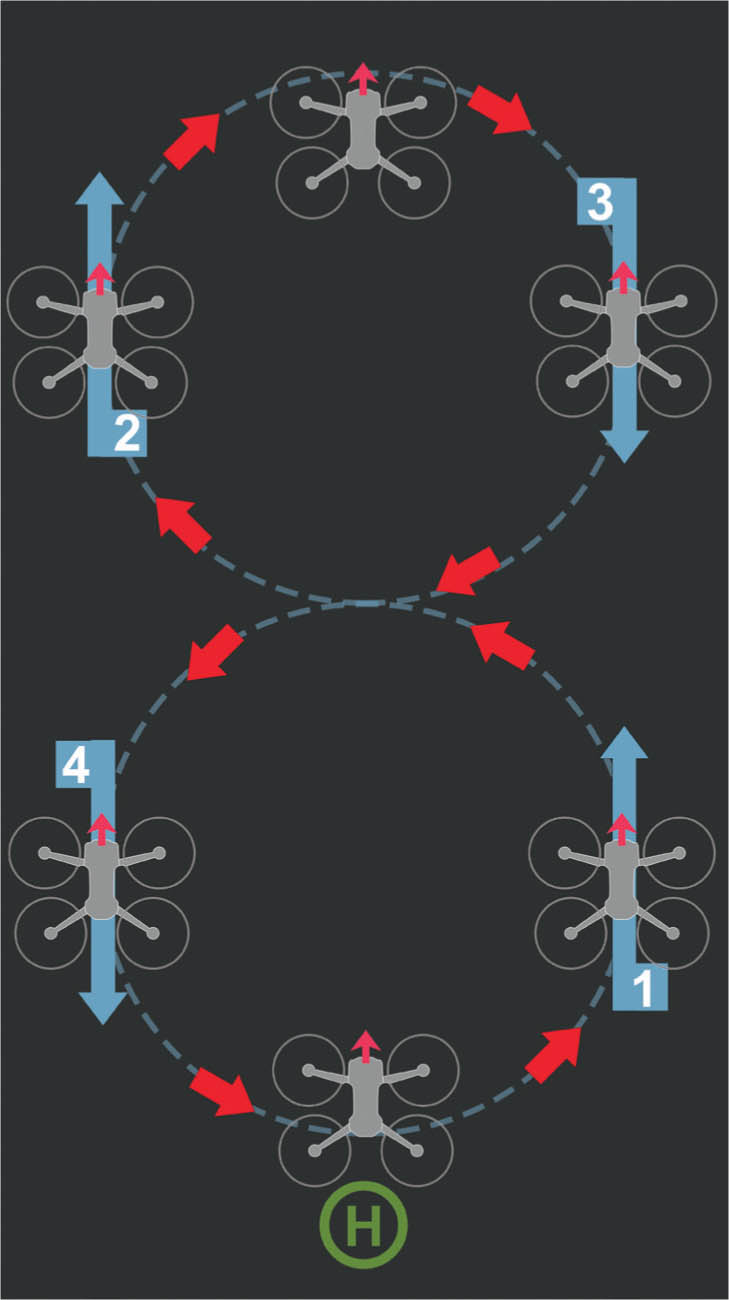
3.9 Figure 8
Time to Yaw
Once you are comfortable moving around and can do it easily, you can start experimenting with the yaw controls of the left joystick (LS). This is a little bit like learning how to play drums; it requires coordination. You first learn how to hit the drums with your sticks (RS), then you add the kick drum (LS).
You can fly your aircraft anywhere you like without yawing, but the yaw will be important for camera orientation. It’s easy to stay oriented when looking through an FPV screen or goggles, especially if you have experience playing video games. When you are flying line of sight (which I suggest at this stage), try to imagine looking out the nose of the drone, and always steer from that perspective; it’s muscle memory that will come in time.
Hover a few feet in front of you and practice moving the LS to the left and right. As you push it left, the drone will rotate (yaw) to the left (counterclockwise). Move the LS to the right and the drone will rotate to the right (clockwise). Spin it around until you are comfortable with controlling which direction your copter is turning.
6. NOSE FORWARD BOX
We are going to fly in a box again, just like in exercise 3. However, this time we are going to keep the nose (and the camera) forward at all times. Fly away like normal; now when you are hovering away from you, yaw the copter 90 degrees to the left. Fly in a straight line by moving the RS to the left. This is your first time flying in a different orientation, so it may feel weird at first. Stop, hover, and rotate another 90 degrees until the nose is pointing toward you. Now you are facing the opposite direction and you need to push forward on your RS. You want the copter to go forward and the RS will always move the drone nose forward, no matter what direction the nose is pointing. This may come naturally to you, or it may seem impossible. Don’t give up; keep your movements slow and small and you will get the hang of it with practice. Rotate 90 degrees again and move forward to complete your box (Figure 3.10).

3.10 Nose Forward Box
7. NOSE FORWARD CIRCLE
Time to fly in a circle again. This time, we want to keep the nose pointing forward all the time. You will essentially be pushing forward on the RS for your forward movement and steering by going left and right with your LS. Fly a full counterclockwise circle (Figure 3.11). Try to keep a constant speed with the RS and gently hold the LS a bit to the left. Practice a few circles of different sizes at different speeds.
8. NOSE FORWARD FIGURE 8
This is similar to the previous exercise, but you are going to change direction with the LS halfway through and fly a figure 8 with the nose pointing forward continually (Figure 3.12). This is really going to build up your yaw skills on your LS. Congratulations for getting this far. You are getting the hang of things. Keep practicing until you are fluent with these exercises.

3.11 Nose Forward Circle

3.12 Nose Forward Figure 8
9. LAND IN THE CIRCLE
This is a great exercise for learning how to judge distance. This is not as easy as you think. You will realize it’s really difficult to judge how far away your drone is and exactly where it is in relation to the ground. When it’s up against the sky, there is no sense of scale and distance. Here is a fun exercise to help you better judge where your drone is in 3D space. Take a hula-hoop or a piece of rope and make a circle. Walk a distance from the circle, and then fly over to it with your copter and try to land in it. Take off and fly back. If you can, make several circles and see if you can land in each of them in turn (Figure 3.13).

3.13 Land in the Circle
Framing Exercise
One of the skills you are going to need is keeping your subjects framed (for still photography) or in the frame (while filming). It’s pointless to make a nice smooth sweeping movement with your drone if you can’t keep your subject in the shot.
10. ORBIT
This exercise is very much like the circle, with one difference. Place an object in the center of your desired circle. Now, practice flying around the object (orbiting) while keeping the camera pointed at the object at all times. You are going to control your speed and sideways movement with the RS by going left or right. Use the LS to steer. If you keep the subject in the center of the frame, you can fly around it in full circles (Figure 3.14). Try to make the movements as smooth as possible by making tiny corrections. The smoother the moves, the better your video will look.
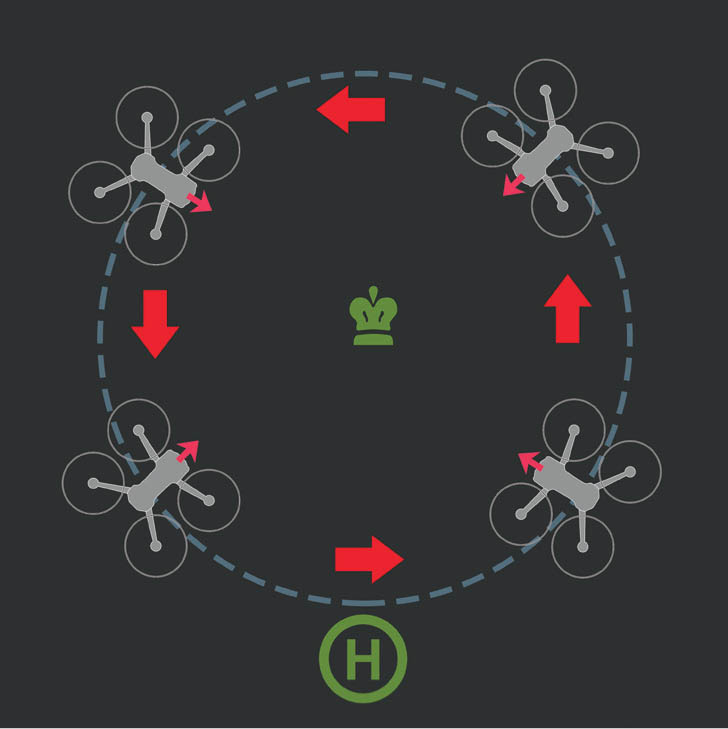
3.14 Orbit
11. MOVING TARGET
Now we are getting into some very advanced flying. Try orbits and flying with a moving target. Maybe use a friend’s copter as the target or follow a slow-moving object (with permission) in a large open space. Don’t try to learn this with a moving person, as you will hurt them if you crash into them. While following a moving target, make sure that you are quite far away from the object so that you don’t collide with it. Remember that the goal here is to keep the subject in frame; it’s not to see how close you can get (Figure 3.15).
12. RISE AND TILT
This exercise will apply only to drones that have a camera tilt option, which is most of them these days. The goal of this exercise is to lift the drone slowly while tilting the gimbal at the same time to keep the subject in the center of the frame. The goal is to have a smooth, even speed on the copter and a smooth, even speed on the gimbal tilt at the same time.
3.15 Moving Target
This isn’t as easy as it may sound, and it requires a lot of practice to keep everything smooth enough that you see the subject in the center of the frame the entire time and don’t notice the movements. This also requires a bit of coordination. I usually keep my palms firmly flat on the controller while barely nudging up on the LS with my thumb. I then place my ring finger or middle finger of the same hand on the gimbal control lever. At this point, it’s a balancing act and an exercise of micro-movements. If you want to add to the challenge, try moving into or away from the subject at the same time with the RS. This exercise will help you to create a bond with your copter and really “feel” its movements (Figure 3.16).

3.16 Rise and Tilt
Master of Movement
Once you have completed all these exercises and you are really comfortable with them, you will have achieved master-of-movement status. Understand that going through this list and doing each exercise once or twice doesn’t get you there. You need to do these as drills, over and over again until they become second nature. Once you have accomplished this, and you can fly smoothly without thinking, you are ready to tackle almost any shooting challenge with confidence. Remember to take it nice and slow; you don’t need to fly fast—most shots will require slow and smooth flying.
ADVANCED FLIGHT MODES
So far we have been flying in standard flight modes, where the nose of the aircraft is always the front, no matter what direction that nose is facing. Now we are going to look at changing all of that. Some drones have advanced flight modes, which are designed to help you fly more easily and allow you to do different things. Don’t even attempt these until you are comfortable with standard flight modes. Let’s examine some of the different flight modes now.
GNSS (Global Navigation Satellite Systems) Assist
Sometimes just called GPS (Global Positioning System) mode, this is the mode you will use most often. In GPS mode, you are using satellites to assist in stability and positioning. This is why these little drones are so easy to fly. You start by getting a lock on multiple GPS satellites, operated by the U.S. Other Satellite positioning systems (GNSS constellations) used are Galileo (EU System), BeiDou (China), and GLONASS (Russia). Modern drones have evolved to take advantage of multiple systems at once.
You need to connect to at least four satellites to establish an accurate position.
GNSS satellites help with flying because they help you hover in place and fly while counteracting other forces, such as wind; they also reduce drift. If you let go of your controls, GNSS provides air braking. Without GNSS, you will get a “pool ball” effect, where you slowly come to a rest rather than stopping right away. The GNSS holds your drone nice and steady while you are shooting photos or filming video from a stationary position.
GNSS also establishes a home point. This is useful for return to home (RTH) failsafes. If the connection between the drone and your controller is broken, the aircraft will return to the home point automatically. This might be because your battery ran out, your equipment failed, or you tripped and sent your controller flying into the ocean. There is peace of mind knowing that there is an RTH option.
RTH is also tied to battery usage. Rather than just falling out of the sky when battery power gets low, many aircraft initiate emergency RTH or even assisted landing.
Tripod mode and Sport Mode
Some aircraft have tripod mode and sport mode (and may use other names too). These are essentially the opposite of each other. Tripod mode slows down the movement, reduces top speed, and lowers the sensitivity of the controllers. This enables the user to fly slow and steady. This is great for nice, smooth cinematic shots.
Sport mode unleashes the beast. This enables you to fly much faster than normal. This is great for filming the effects of fast motion and excitement. Another use is to use sport mode to quickly get to your shooting location, and then kick it back to normal or tripod mode for shooting once you are in position. Be aware that your obstacle avoidance and tracking sensors are usually disabled in sport mode, so be careful.
ATTI
Attitude mode, or ATTI mode, relies on the drone’s built-in IMU (Inertial Measurement Unit) sensors rather than GNSS. The IMU uses accelerometers (which detect movement) and gyroscopes (which keep you upright). When flying indoors or in extremely sheltered outdoor locations, it’s best to use ATTI mode because you can’t get clear satellite signals, and picking up a rogue signal could actually cause erratic flight and crashes. Many drones are equipped with sensors, which detect the ground and obstacles, and also help with stability while flying in ATTI mode. If you are flying low over water, disable downward facing sensors, as they cause the aircraft to move with the swell of the water.
Some video shooters prefer to fly in ATTI mode because of the smoothness of the drifting, since GPS corrections can sometimes cause less fluid movements. Some people like to switch to ATTI mode for fast flying when just having fun. Without the satellite braking, it is possible to reach faster speeds in ATTI mode.
These next two flight control modes were common on earlier drones, but are becoming less common on newer systems.
Course Lock
Course Lock is an interesting feature. It treats the direction of travel as a straight line, regardless of the nose orientation. You set the home point and initial direction. As you fly forward, the drone maintains that line as the forward direction. If you rotate your drone, the forward direction is still the straight line. As long as your RS is pointing forward, the drone will continue on that line, no matter what direction the nose is pointed. This is ideal for flyby shots. You fly in a straight line parallel to your target. As you fly by the target, you can yaw and keep the camera pointed at the subject the entire time without arcing around (Figure 3.17).

3.17
Home Lock
In Home Lock, when you pull the RS toward you, your drone will fly toward you, no matter what direction it’s traveling. Push the RS away and it will fly away from you. Home Lock is great because you can yaw the camera around as the drone is flying back toward you, and it has the effect of looking out the window of a moving aircraft. It also has the added advantage of bringing your drone back to you in the event that you don’t know where it is. Just pull the stick toward you and wait for the sweet sound of spinning props as your lost child returns home (Figure 3.18).

3.18
SELF-FLYING, ROBOTIC FLYING
MANY OF THE NEWER DRONES have functions that allow you to program them to fly themselves. What makes these really useful is smoothness and consistency of motion. When you program your drone to fly a predetermined course and speed, the speed will be more consistent than a human pilot could manage; humans make quick corrections midcourse, which show up on the video, especially if the video is sped up. I’ll list the popular program modes right now, but there will be more coming out all the time.
Almost all of the latest drones including the Mini 3 have forward-facing sensors. Many also have downward facing sensors. Upward and rear sensors are also ubiquitous. The addition of lateral sensors (sides) provides for 360 degrees of sensors. These sensing arrays are becoming very sophisticated and provide functionality beyond obstacle avoidance. These sensors help them avoid crashing into objects, and it enables them to stop or fly over or around objects they see in their flight path.
This makes autonomous flight much safer. The sensors are also used for object tracking. This enables the aircraft to detect and follow a moving object and film it. Action sports fans will find this functionality valuable. The newer object tracking is good enough to predict where an object is heading, even if it is obstructed by a tree or other object.
These sensors are getting very good. Paired with AI, they are used for operations such as Smart Return to Home on the Mavic 3. Smart RTH analyzes the environment (builds a real-time 3D point cloud) and plots the best course to return to home in the most efficient and safest way, even if it’s different than the course you initially flew.
Sensors coupled with smart programming allow for all kinds of autonomous flight modes, and I’ll list the popular ones. Bear in mind, different brands will use different names for these smart modes.
POI/Orbit
This is the same as the orbit exercise that we practiced in the previous section. You find a point of interest and then set the distance from POI and height. Then you tell the drone what speed to fly in a circle, either clockwise or counterclockwise, with the camera continually pointing at the target. You can often change direction, speed, distance from subject, and altitude by moving the control sticks
Dronie/Selfie
The camera is pointed at you while the drone flies away, keeping you in the center of the frame. This is a great reveal shot, starting on the person and then going out wide to reveal the location. Also try the reverse, where the camera flies toward the person.
Cable Cam/Waypoints
You fly a predetermined path and record each of the points along the way. You can then play this back and the drone will follow this path by itself.
Follow Me/Tracking
As the name implies, the drone and camera will follow the operator or some other moving object. This is useful for sports or chase cam shots. In this mode, on the screen, you draw a rectangle over the object you want to track. You will see a box around the object. When you press go, the drone will follow the object until you cancel or it loses tracking. Here is a tip for better tracking: When you draw the box around the object (painting the target), fly around the object a little bit and let the sensors and AI have a look at the sides before starting. This will make it easier for the tracking to recognize the subject if it turns.
Novelty Modes
There are a number of other modes available, called quickshots by DJI, that I’ll group into what we will call novelty modes. This doesn’t imply these aren’t useful modes, because they are, it just leaves room for lots of new ones. Some of these modes include rocket (the drone flies up with the camera facing down and locked into a target); Helix (the drone orbits with a circle of increasing size); and Asteroid (the drone flies up and away, shoots a panorama, and turns it into a tiny planet).
Autonomous flying is also useful for shooting automatic panoramas. The camera will tilt, and the drone will yaw to automatically capture all kinds of panoramas including a full 360. These are great because they make it very easy to quickly shoot panoramas and they have the ability to separately save out the images. While I’ll often use this mode, I usually shoot manual panoramas when I want to make my high-end work. The reason for manual shooting is more control of the area captured, as well as the ability to shoot bracketed. At the time of this writing, autonomous bracketed HDR panorama shooting isn’t widely supported. This doesn’t mean it won’t be soon, because it’s just a matter of someone programming this functionality.
TOAL: TAKEOFF AND LANDING
IN ORDER TO GET YOUR DRONE INTO THE AIR, you have to take off; to retrieve it, you have to land it. There are three ways of doing this.
Auto Takeoff and Land
Many controllers and drones allow you to initiate a self-takeoff, where the drone will rise to a predetermined altitude, and hover, waiting for your instructions. They also have an auto land, where you bring the drone to a landing spot and it will land itself and shut off the motors. This is a great method for beginners because it does it all for you and minimizes the risk of a tip-over.
Manual Takeoff and Land
Here, you arm the motors (spin them up) and then press forward on the LS to take off. Upon landing, you will slowly descend using the LS (make sure the landing gear is lowered on the Inspire 1). You will notice a little ground effect when you are low enough that the wind from the props bounces off the ground and tries to push the drone upward. Gently bring it in for a landing and shut the motors off. On the DJI Phantom, hold the LS down until the props stop spinning. This method will avoid a tip-over, which can happen when you pull both sticks into the middle-bottom position because the drone will rev up a little before shutting off.
3.19 Manual takeoff and landing, large flat clean space
Handheld Launch/Catch Landing
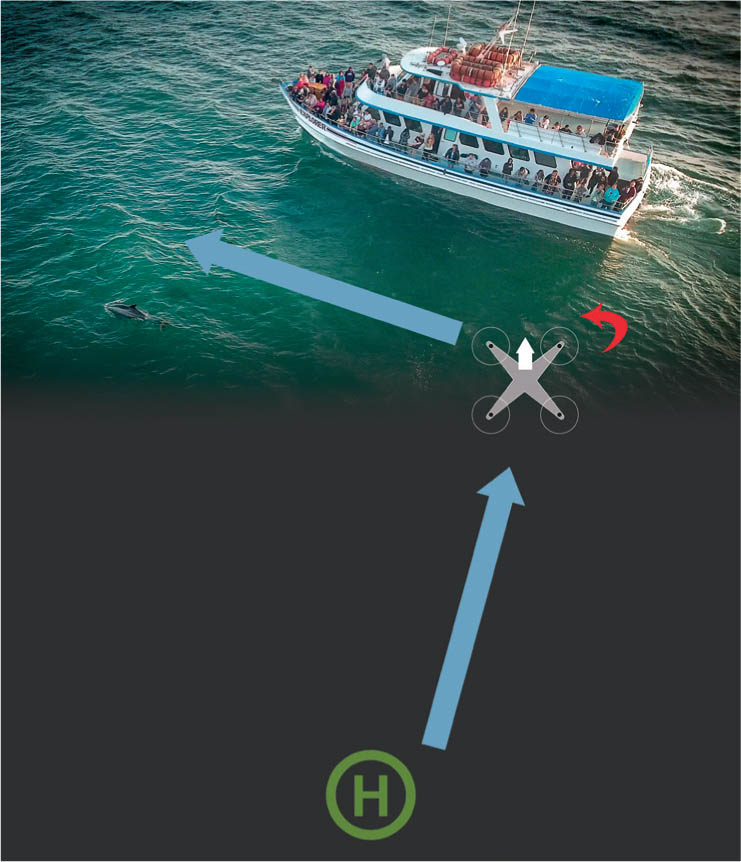
Disclaimer: This is an advanced move and not recommended for beginners. Extreme caution must be taken when doing this, because it is dangerous. Do this at your own risk. In situations where it’s not possible to find a flat takeoff and landing spot—such as on slippery rocks, up mountains, on sand, on moving boats, and so on—a handheld launch/landing is possible.
This is a method I frequently use while flying at beaches and flying off boats. I do this for small drones only; do not attempt this with an Inspire. Hold the drone firmly on the sides, with your hands well clear of the propellors, or by the side of the skid on Phantoms and above your head. With your hand well clear of the propellers, spin up the motors. Move your hand upward while holding the drone. When you feel it pulling up from your hand, open your grip and it will fly. I do far fewer handheld launches than I do landings, because launches are more difficult—also, it’s easier to find large enough areas to launch, which is not always the case for landings. I often launch from the top of my closed GPC hardshell case, which makes a great launch platform. If you have someone with you, have them hold the drone far above their head, and launch that way.
The handheld landing is quite easy to do compared to the launch. Make sure you are well clear of other people, and then come in and hover a few feet in front of you, just above eye level. When the drone is completely stationary, keeping your left hand on the controller and the LS, crouch down a little bit, extend your right arm fully, and slowly step in to securely grab the sides near the bottom or the skid by the side on a phantom drone, being very careful to stay well clear of the props. When you have a firm grip, pull down on the LS and wait until the props have stopped spinning before bringing the drone closer to you. With the
Mavic drones, simply flip the drone over and the motors should stop. After some practice, this maneuver gets quite easy, but don’t become overconfident and rush it. I have only ever done this with the DJI Phantom and Mavic drones, so I can’t attest to the safety of this maneuver with other types of drones. I recommend practicing gripping the drone with the power off to get the feel of how to firmly grasp it. Turn the propellors by hand to see where they are and how much clearance you will have from your fingers. If there is any risk or doubt, don’t attempt a handheld takeoff or landing.
One last thing: If it’s windy and the drone is blowing around, DO NOT attempt to catch land or do a handheld takeoff. It’s not worth the risk. No shot is worth risking your safety.
Which Landing Style?
I have seen people get into heated arguments over the proper way to take off and land. Should you land on the ground or catch land? It all depends. If you are in a nice open flat area with concrete, there is no reason you shouldn’t do a manual launch and landing. If you are concerned about getting sand in the motors, then catch land. If you are in an area where there is no choice other than to catch land, such as on the rocks at the beach, then do a handheld landing (experienced fliers only). There is no right or wrong method. Just don’t try to show off; that’s how people get hurt.
At this point you have finished flight school. This doesn’t mean you have finished learning and improving, but you have some good flying skills under your belt. Now that you can confidently control your drone, it’s time to take to the skies and make some beautiful videos and photos.

3.20 A handheld landing, used in cases when you can’t find a large, flat clean surface to land on