
At this stage, you must be aware that we will need to define the database connections in Workflow Manager before we can define the connection in the workflow. Defining the connection is necessary in order to make the data flow from the actual database table to Informatica.
If we use File for Source or Target, we need to define the path location for the source or file. However, if we are using the database table as our source, target, or lookup transformation, we will need to define the database connection that we discussed in the Working with session task section of this chapter. Before you can assign the connection in the session task, you need to configure the connection object in the workflow. This is similar to adding the database connection object in the PowerCenter Designer.
There are various types of connection objects that Informatica PowerCenter supports:
- Relation connection: As mentioned previously, before you can define connection values in a session task, you need to add the connection under Workflow Manager. You can create a connection for any type of relational database, such as Oracle, SQL, DB2, and so on.
- FTP connection: You can create a File Transfer Protocol connection to transfer the files.
- External loader connection: Informatica supports an external loader that directly loads the data from files to database tables. The external loader eliminates the need to run SQL commands to insert data into the table.
- Queue connection: These connections enable the processing of message queues.
- Application connection: You can create connections to enable session tasks and extract the data from or load the data into applications such as Salesforce, PeopleSoft, Siebel, and TIBCO.
Note that apart from the relational connection, all other connection objects are rarely required based on your project requirements. So, you might be more interested in learning relational database first.
To create a new connection object in Workflow Manager, click on Connections in Workflow Manager and select the type of connection you wish to create.

To create a new relational database connection, perform the following steps:
- In Workflow Manager, navigate to Connections | Relational, as shown in the preceding screenshot.
- On the next screen, click on New to add a new connection.
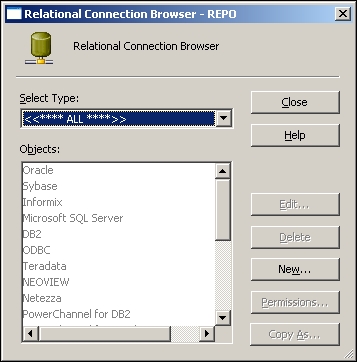
- Select the database subtype and click on OK. For our reference, we are selecting Oracle.

- On the next screen, you can define all the properties. Define the properties and click on OK, and then click on the close button to get the connection added to your repository.
Note that you need to have all the details available with you before you can configure the relational database connection object:
- Database name: This specifies the name of the database, for example, Oracle, SQL Server, and so on. In our case, we are using Oracle.
- Database type: This specifies the type of the database, for example, Oracle, SQL Server, and so on. In our case, we are using Oracle.
- Database user name: This mentions the name of the database user who has proper authentication to read from and write into the database table. We are using
HRas the username for our reference. - Password: This mentions the password for the user you mentioned under the database username. We are using the password as
HRfor our reference. - Connect string: This mentions the connection string that transfers the data to the table. For our reference, we are using
XEas the connection string. - Database code page: This selects the code page associated with your database.
The details that need to be filled in are shown in the following screenshot:

This will add the connection to your Workflow Manager screen in the repository. Now, you can use the connection in your session task.