It is always a best practice of coding that you should never hardcode the values. The same applies to Informatica as well. It is always better to pass the values using parameters or variables instead of hardcoding them. When you define parameters or variables in the code, you need to pass the values to those parameters and variables. Parameter files serve this purpose. Any value that you hardcode can be passed through a parameter file. You can define the parameter file at the session level and the workflow level.
You must have noticed the system defined $PMSourceFileDir or $PMTargetFileDir variables. Similar to them, we can define the user-defined variables. You can define the variable at both the mapping level and the workflow level.
Let's take a look at an example to understand the parameter file. You are aware that Informatica has three different repositories to cater to the need of three regions. Let's say we have three repositories—REPO_DEV, REPO_TEST, and REPO_PROD—that serve development, testing, and production regions, respectively. Also, we have three Oracle databases corresponding to three regions, which are ORACLE_DEV, ORACLE_TEST, and ORACLE_PROD, respectively. When you start the coding in the development region under REPO_DEV, you will hardcode the database connection value to ORACLE_DEV. Your code is working successfully, and when you want to deploy the code to the test region, you will need to manually replace the database connection value with ORACLE_TEST. Changing the code after the testing is not allowed. The same case applies when you wish to deploy the code from the test to the production.
The solution comes as a parameter file. Parameter files serve the purpose of passing the value based on the region in which you are running the code. We are defining the parameter file to pass the value for the source database connection ($DBCONNECTION1), target file name ($TGTFILENAME), e-mail recipient ($EMAILUSER), and a mapping-level variable for location ($$LOCATION). We are using examples of a session-level variable, workflow-level variable, and mapping-level variable so that you understand clearly how they work.
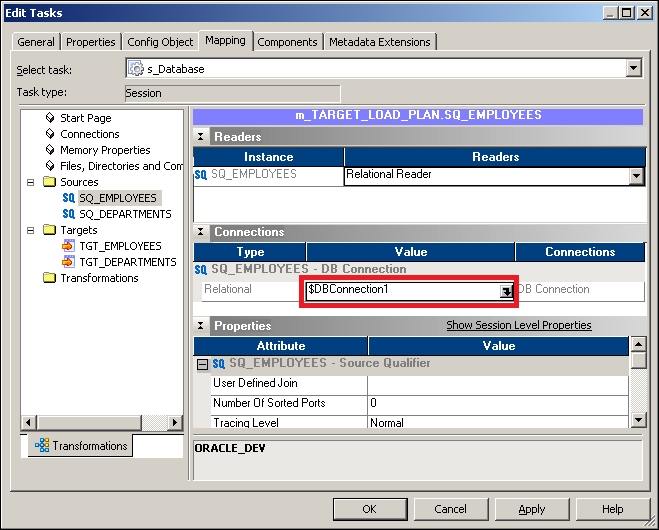
The variables that are defined under the session task are called session-level variables. There are various values that can be passed via variables, such as the source, target database connection value, source/target filename, source/target file path, session log file name/path, and so on. The session task does most of the work in the Workflow Manager screen and hence has been assigned special privileges. To pass the value through a variable, simply replace the hardcoded value with a variable of your choice. As shown in the following screenshot, we are using a database connection variable as $DBCONNECTION1:
Similarly, assign the value to the target filename ($TGTFILENAME). As we define the target filename under the session task, it will be referred to as a session-level variable.
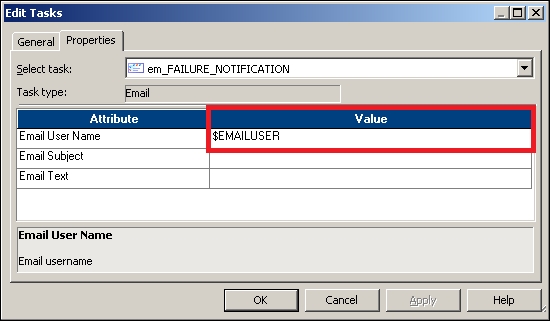
The variables that are defined under various tasks are called workflow-level variables. Note that you can define the session-level variables under the workflow as well as in the parameter file. In our case, we are passing the e-mail user value as variable. To assign the value, simply replace the hardcoded value with the variable in the Email task, as shown in the following screenshot:
As mentioned earlier, you can define variables for the hardcoded values in the mapping inside transformations as well. You need to define parameters or variables under Mapping before you can use them in transformations, otherwise the mapping will become invalid. To add the value, perform the following steps:
- Open the mapping for which you wish to add variables in Mapping Designer, and navigate to Mappings | Parameters and Variables.

- In the next screen, click on Add a new variable to this table. Define the variable as select the type as Parameter and Variable based on your requirement. Now, click on OK.

As you can see, the mapping-level variables are always defined as
$$. - Open the transformation for which you wish to assign a variable or parameter. We are using filter transformations to pass the value.

As you can see, we have assigned $$LOCATION to filter the condition.
With this, we are done with defining the variable or parameters. Next, we will see how to pass the values to them using the parameter file.
A parameter file is nothing but a simple .txt file that contains the value of the variable to be passed to variables. A sample parameter file for the variable defined in the preceding steps is as follows:

As you can see, the parameter file contains the values of the variables to be replaced in the three regions. Informatica matches the repository name against the name of the repository defined in the parameter file and replaces the values of the variables internally before it runs the workflow. The name of workflow for which you defined the parameter file is wf_EMP. So, if you are running workflow in the production region, Informatica will match the REPO_PROD repository name with the same name in the parameter file and internally replace the variables with the value and execute the workflow with the replaced values.
To define the parameter file at the workflow level, open Workflow Manager and navigate to Workflow | Edit | Properties. Specify the path and name of the parameter file for the attribute, as indicated in the following screenshot:

To define the parameter file at the session level, open the session in Workflow Manager, double-click on the session task, and click on Properties. Specify the path and name of the parameter file for the attribute, as indicated in the following screenshot:

We have learned how to use the parameters and variables, create the parameter file, and define the parameter file. Another importance of the parameter file is that if the value of any variable is changing, you need not modify the code; simply change the value in the parameter file, and the changed value will take effect the next time you run the code.
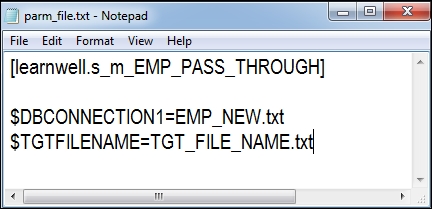
Also, note that parameter files can also be used to replace the value for an individual session run. Parameter files can also be defined at the folder level as against at the repository level, as seen earlier. It is not mandatory that you define the workflow for all three regions. A sample parameter file for an individual session run (s_m_EMP_PASS_THROUGH) defined at the folder level (learnwell) is shown in the following screenshot: