
Before you can start writing any application or game with LibGDX, you need to download and install the library and some additional software.
To target Windows, Linux, Mac OS X, Android, and HTML5, you will need to install the following software:
- Java Development Kit 7+ (JDK) (v6 will not work!).
- Eclipse (the Eclipse IDE for Java developers is usually sufficient).
- Android SDK; you only need the SDK, not the ADT bundle, which includes Eclipse. Install all platforms via the SDK Manager.
- Android Development Tools for Eclipse, also known as ADT Plugin. Use this updated site (https://dl-ssl.google.com/android/eclipse/).
- Eclipse Integration Gradle, use this updated site (http://dist.springsource.com/release/TOOLS/gradle).
To additionally target iOS, you will also need:
- Mac, as iOS Development does not work on Windows/Linux, thanks to Apple
- The latest Xcode, which you can get from the Mac OS X App Store for free
- The RoboVM plugin
Due to the fact that LibGDX is a framework based on Java, it is necessary to download Java Development Kit (JDK). To install it, follow these steps:
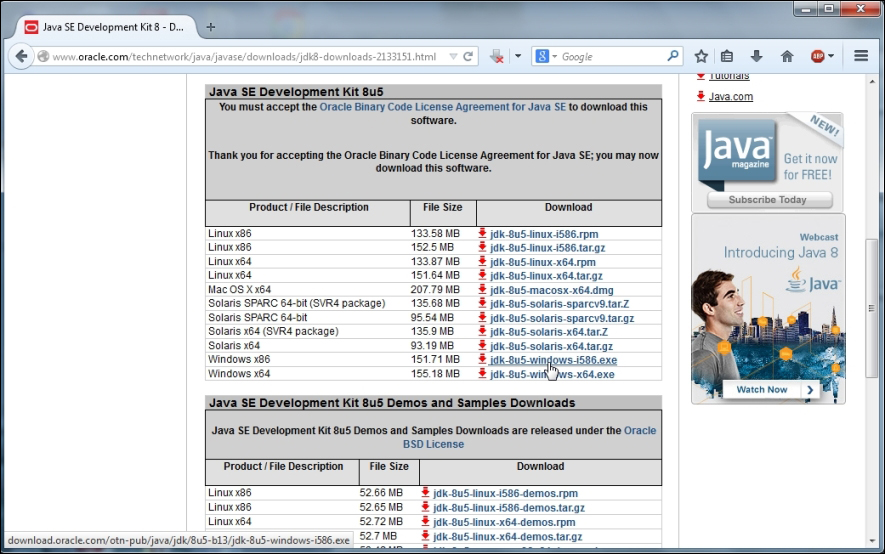
- The software is freely available on Oracle's website: http://www.oracle.com/technetwork/java/javase/downloads/index.html. Enter this address and you will see the following page:

- Click on the DOWNLOAD button to start downloading the latest JDK.
You will have to accept the license agreement and choose the version that is appropriate for your platform. For example, if you are using a 64-bit version of Windows, choose the download labeled as Windows x64. Here, we are using the 32-bit version that is labeled window-i586:
- To install the JDK, simply run the downloaded installer file (for example,
jdk-8u5-windows-i586.exe) and follow the instructions on the screen: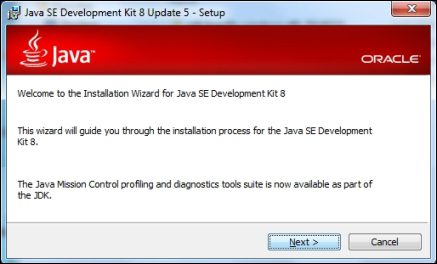
- On the welcome screen of the installer, click on Next to continue:

- Then, keep all the features selected to be installed, and click on Next again to continue, as shown in the following screenshot:
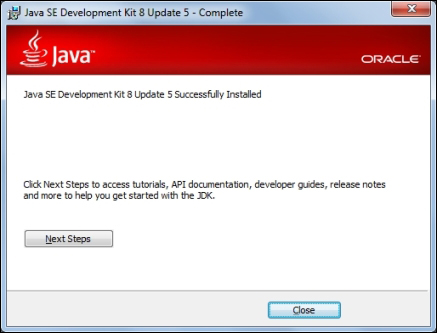
- Once the installation is complete, click on the Close button to exit the installer.
The next step is to download and install Eclipse, a freely available and open source Integrated Development Environment (IDE) in order to develop applications in Java. Go to http://www.eclipse.org/downloads/ and choose Eclipse IDE for Java Developers, as shown in the following screenshot, to download for the platform you are using:

Once the download is finished, extract the archive to C:eclipse.
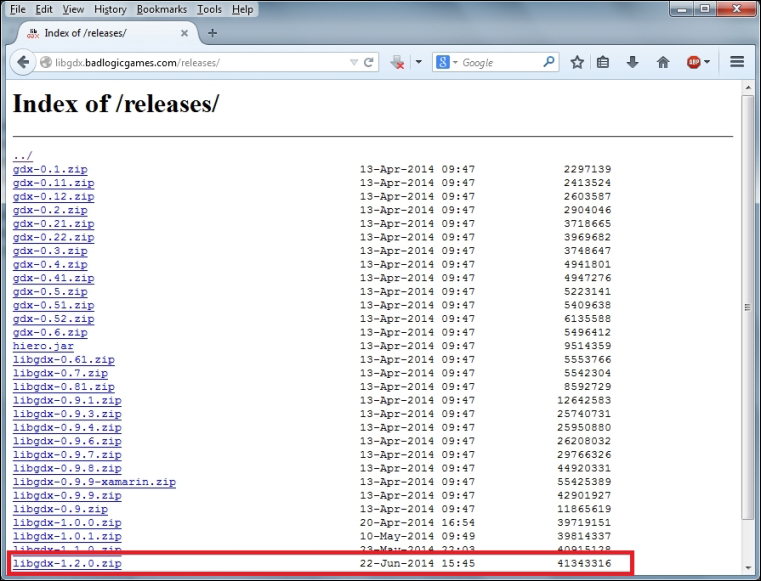
Go to http://libgdx.badlogicgames.com/releases/ and choose the libgdx-1.2.0.zip file to download LibGDX.
The following screenshot shows a list of all the available files:
In the meantime, create a new folder inside the root folder of your C drive with the name libgdx. Once the download is finished, move the archive to C:libgdx.
The Android mobile OS is one of LibGDX's supported target platforms. Before you can create Android applications, you have to download and install the Android SDK.
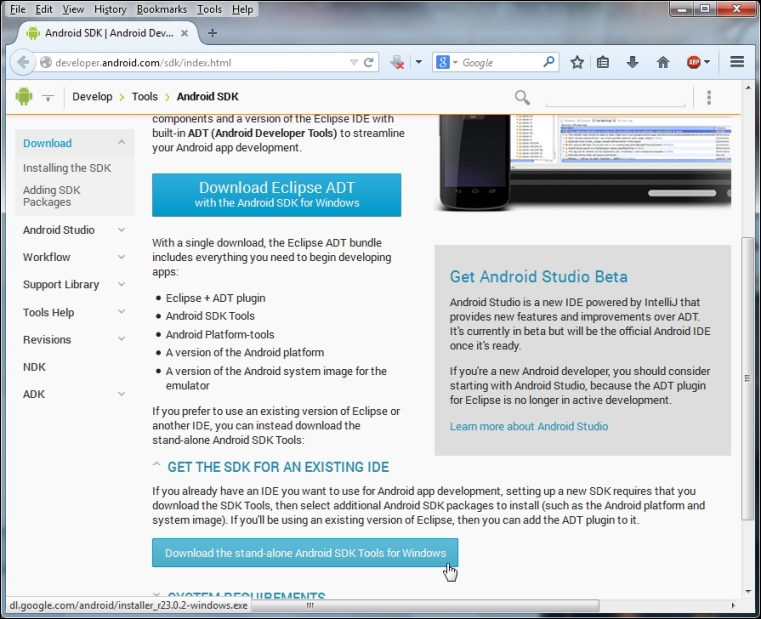
- Go to http://developer.android.com/sdk/index.html and click on the Download the stand-alone Android SDK Tools for Windows button, as shown in the following screenshot. In case you are using an OS other than Windows, you will have to scroll down a bit further, click on Download for other platforms and choose the appropriate platform.
- Once the download is finished, run the installer (for example,
installer_r22.0.4-windows.exe) and follow the instructions on the screen.
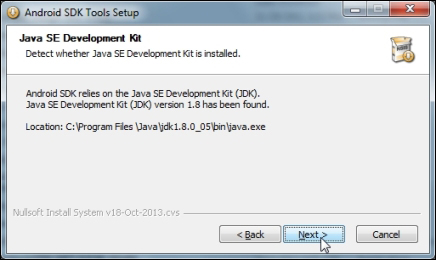
- You will see the following screen when you try to install the Android SDK. This is because the installer cannot find the JDK although you have already installed it.

- You need to set the value of the environment variable
JAVA_HOMEto the installation path of the JDK. To find the correct path, go toC:Program FilesJava. You will see a folder starting withjdk. Take the full name of this folder (here, it isjdk1.8.0_05) and append it to its path, as shown in the following screenshot:
- The complete path will now look like
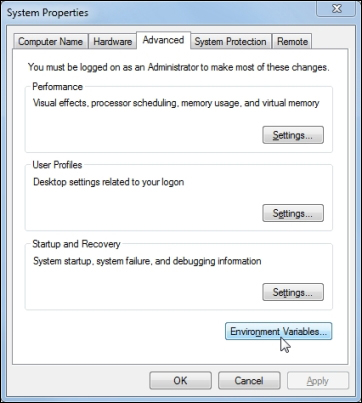
C:Program FilesJavajdk1.8.0_05. Now you have to set the environment variable. Click on the Windows Start button and right-click on Computer. Then click on Properties to open the control panel system window, as shown in the following screenshot:
- Click on Advanced system settings on the left-hand side of the window, as shown here:

- The System Properties window will appear. Click on the Environment Variables button:
- The Environment Variables window will appear. Click on the New button (at the top) that corresponds to User variables for <USERNAME> (the username in this case is andreas), as shown here:

- A window with the title New User Variable will appear. Now, fill in the two text fields. Enter
JAVA_HOMEin the Variable name field and the JDK's path you found earlier in the Variable value field, as shown in the following screenshot:
Great! Now your system is prepared for the Android SDK installer. Make sure to exit the Android SDK installer if it is still running to let the change take effect. You will be presented with the next screen after the installer has restarted.
- Now, back in the Android SDK setup, click on Next to continue the installation, as shown here:
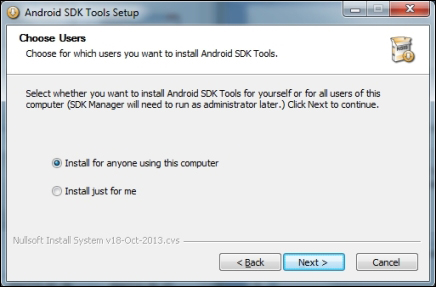
- The following screenshot will ask you to choose the users for which the Android SDK should be installed. Usually, the suggested Install for anyone using this computer selection is perfectly fine, so just click on Next to continue.
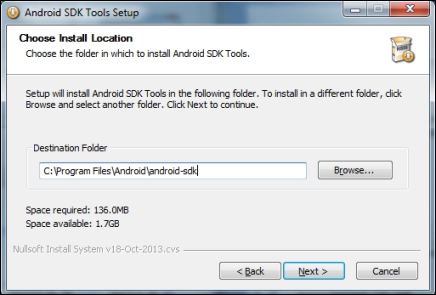
- Now, choose the installation location on your computer. You can safely keep the suggested location and click on Next to continue:
- After this, you will be asked to choose a start menu folder. Again, you can safely keep the suggestion and click on Install to start the installation process:

- After the installation is complete, click on Next to continue:

- Once the installation is finished, you can choose to start the Android SDK Manager. Leave the Start SDK Manager (to download system images, etc.) checkbox enabled and click on Finish to start the manager:

The Android SDK Manager enables you to download system images for the specific API levels you want to develop applications for. For up-to-date and detailed information about Android API levels, check out the link http://developer.android.com/guide/topics/manifest/uses-sdk-element.html#ApiLevels.
- Now, choose at least Android 2.2 (API 8) and/or any other higher API levels that you might need and click on the Install 7 packages button to automatically download and install all the relevant files, as shown in the following screenshot. The reason why we want to use at least API level 8 is that the earlier versions before Android 2.2 do not support OpenGL ES 2.0, which we will need in later chapters. Using a certain API level also allows you to control the range of devices that you will be able to see and install on your application via the Google Play Store.

- Once the download and installation process is finished, close the Android SDK Manager window.
Great! You are almost done setting everything up. The remaining steps involve running Eclipse for the first time and installing important plugins, which are required to develop applications for Android, iOS, and HTML5/GWT with Eclipse.
Open Windows Explorer, and go to the location where you extracted Eclipse (here, C:eclipse), and simply run the program by double-clicking on the executable called eclipse.
Eclipse will ask you to select a so-called workspace. This is the folder where all your projects will be saved. We want to use the C:libgdx folder we created a bit earlier:

Select the Use this as the default and do not ask again checkbox if you don't want to see this dialog box every time you start Eclipse. To proceed, confirm the dialog box by clicking on the OK button.
The first time Eclipse is started with a new workspace, it will greet you with a welcome screen. Simply click on the small cross (x) of the Welcome tab to close it:

You should now see the standard view of Eclipse, which is also called the Java Perspective. On the left-hand side, you can see the Package Explorer section, as shown in the following screenshot. This is where you will see and manage your different projects. This is all you need to know about Eclipse for the moment.

If you have never worked with Eclipse before, it might seem quite overwhelming with all these windows, toolbars, huge context menus, and so on. However, be rest assured that all the steps will be discussed in detail as required to make it easy for you to follow.
To install new plugins, go to the menu bar, and click on Help, and then click on Install New Software. This will open the Install window, where you can type the special repository URLs to browse for new plugins. Google provides a list of such URLs at https://developers.google.com/eclipse/docs/getting_started. You have to choose the correct URL that corresponds with your Eclipse installation.
At the time of writing this book, Eclipse 4.3.2 (Kepler) was the most current version available. According to Google's website, the suggested URL for our version is http://dl.google.com/eclipse/plugin/4.3.
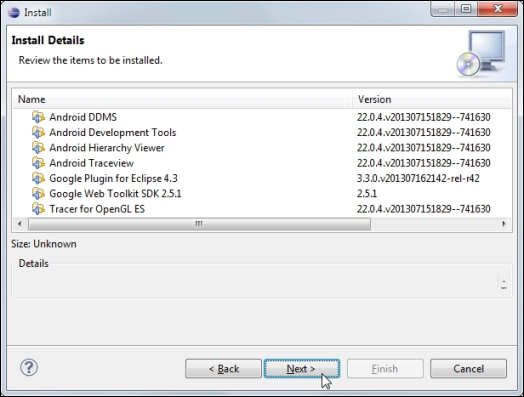
Type the URL in the text field that is labeled Work with and press return to let Eclipse request a list of available downloads. Select everything in the list that is shown in Developer Tools to add support for Android applications. Then, select everything in Google Plugin for Eclipse (required) to install the required Eclipse plugin. Lastly, select Google Web Toolkit SDK 2.5.1 in SDKs to add support for HTML5/GWT applications and click on Next to continue:

Now, click on Next to start the installation:
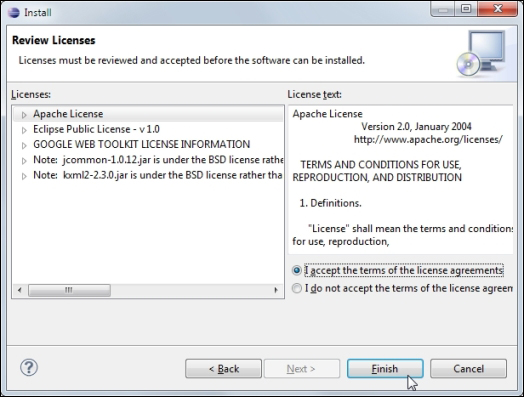
You will now be prompted to accept the terms of the license agreements by selecting the I accept the terms of the license agreements option. You have to do this before you can click on Finish to continue, as shown in the following screenshot:
The download process should only take a couple of minutes, depending on the speed of your network connection. When downloading is finished, Eclipse will show a security warning that you are about to install unsigned content and wants to know whether it should continue or abort. There is always a potential risk of installing malicious software. However, in this case, the download is provided by Google, a well-known company, which is trustworthy enough. Click on the OK button to accept the warning and continue the installation, as shown in the following screenshot:

After the installation is finished, a final restart of Eclipse is required. Click on the Yes button to confirm the restart:

Now, let's install the Gradle plugin for Eclipse so that we can import the project into Eclipse via Gradle. For this, let's perform the previous steps again. Go to the Install New Software option in the Help menu.
Enter the URL http://dist.springsource.com/release/TOOLS/gradle in the Work with field:

Select Gradle IDE under Extensions / Gradle Integration and click on Next. Continue as you did while installing Eclipse plugins to finish the process.
Additionally, in order to enable the iOS development, you need to install the RoboVM plugin in Eclipse. RoboVM for Eclipse integrates the RoboVM AOT (ahead-of-time) compiler with the Eclipse Java IDE. With this plugin, you will be able to develop native iOS apps in Java and launch them on the iOS simulator and iOS devices from within Eclipse.
To download and install the latest RoboVM plugin, we will perform the same steps that we did to install Eclipse plugins earlier. Go to the Install New Software option in the Help menu.
Enter the URL http://download.robovm.org/eclipse/ and continue, as shown in the following screenshot:

The latest RoboVM release while writing the book was v0.0.13.
Congratulations! You have just finished the installation of everything that you will need to develop and build your own games with LibGDX.