In this section, we will take a closer look at the actual code of the demo project. Thereafter, we will do some simple modifications to the code and also use the debugger.
Let's take a first look at the generated code of MyDemo.java from the demo project.
The following code snippet shows the class definition:
public class MyDemo implements ApplicationListener {
  // ...
}
As you can see, the MyDemo class implements the ApplicationListener interface. The MyDemo class from Gradle project (demo-core) produces a quite different code as follows:
public class MyDemo extends ApplicationAdapter {
   //...
}
Here, the ApplicationAdapter is an abstract class that implements the ApplicationListener interface. Before we move on to the implementation details of the interface, we will spend some time on the remaining part of this class.
You will find a definition of the four member variables, each with a class provided by LibGDX:
Private OrthographicCamera camera;
Private SpriteBatch batch;
private Texture texture;
private Sprite sprite;
Here is a brief explanation of the classes from the preceding code listing to give you the basic background knowledge for the code inspection that will follow shortly.
The camera variable is of the class type OrthographicCamera. We will use the orthographic camera to display our 2D scenes. The camera is the player's view of the actual scene in the game, which is defined by a certain width and height (also called viewport).
For more information about projections, check out the great article orthographic versus perspective by Jeff Lamarche at http://iphonedevelopment.blogspot.de/2009/04/opengl-es-from-ground-up-part-3.html.
The batch variable is of the class type SpriteBatch. This is where you send all your drawing commands to LibGDX. Beyond the ability of this class to draw images, it is also capable of optimizing the drawing performance under certain circumstances.
The texture variable is of the class type Texture. It holds a reference to the actual image; the texture data that is stored in memory at runtime.
The sprite variable is of the class type Sprite. It is a complex data type that contains lots of attributes to represent a graphical object that has a position in 2D space, width, and height. It can also be rotated and scaled. Internally, it holds a reference to a TextureRegion class that in turn is a means to cut out a certain portion of a texture.
Now that we have a basic knowledge of the involved data types, we can advance to the implementation details of the ApplicationListener interface.
In the MyDemo class, the only methods containing code are create(), render(), and dispose(). The remaining three methods are left empty, which is just fine.
The create() method contains the initialization code to prepare the application on startup, as shown in the following code snippet:
@Override
public void create() {


    float w = Gdx.graphics.getWidth();
    float h = Gdx.graphics.getHeight();

    camera = new OrthographicCamera(1, h/w);
    batch = new SpriteBatch();

    texture = new Texture(Gdx.files.internal("data/libgdx.png"));
    texture.setFilter(TextureFilter.Linear, TextureFilter.Linear);

    TextureRegion region =newTextureRegion(texture, 0, 0, 512, 275);

    sprite = new Sprite(region);
    sprite.setSize(0.9f, 0.9f * sprite.getHeight() / sprite.getWidth());
    sprite.setOrigin(sprite.getWidth()/2,sprite.getHeight()/2);
    sprite.setPosition(-sprite.getWidth()/2,-sprite.getHeight()/2);
}
At first, the graphics module is queried to return the width and height of the display (for example, a desktop window or the screen of an Android device) and calculate an appropriate width and height for the field of view of the camera. Then, a new instance of SpriteBatch is created so that images can be drawn and made visible with the camera. The next step is to load a texture using the files module to get a file handle to data/libgdx.png.
Note
Gradle users will find only two lines of code in the create() method and only four lines of code in the render() method. The assets folder in the demo-android project will contain only an image labeled badlogic.jpg. Read and understand this code; the complete code is given at the end of this section.
The loaded texture looks like the following screenshot:

As you can see, there is a lot of empty space in this screenshot. In order to be able to use the filled part of this screenshot only, a new instance of TextureRegion is created. It references the previously loaded texture that contains the full image and has the additional information to cut all the pixels starting from (0, 0) to (512, 275). These two points describe a rectangle starting at the top-left corner of the image with a width and height of 512 by 275 pixels. Finally, a sprite is created using the information of the previously created texture region. The sprite's size is set to 90 percent of its original size. The sprite's origin is set to half of its width and height to move the origin to its center. Eventually, the position is set to the negative half of the sprite's width and height so that the sprite moves to the center of the scene.
The render() method contains the commands to render a scene on screen, as shown here:
@Override
public void render() {
    Gdx.gl.glClearColor(1, 1, 1, 1);
    Gdx.gl.glClear(GL20.GL_COLOR_BUFFER_BIT);

    batch.setProjectionMatrix(camera.combined);
    batch.begin();
    sprite.draw(batch);
    batch.end();
}
The first two lines call the low-level OpenGL methods to set the clear color to a solid white, and then execute the clear screen command.
Next, the projection matrix of the sprite batch is set to the camera's combined projection and view matrix. You do not have to understand what this means in detail at the moment. It basically just means that every following drawing command will behave according to the rules of an orthographic projection, or simply put, drawing will be done in 2D space using the position and bounds of the given camera.
The begin() and end()methods will always have to appear in pairs and should not be nested or there will be errors. The actual drawing of the sprite is accomplished by calling the draw() method of the sprite to draw and pass the instance of the sprite batch.
The dispose() method is the place where you clean up and free all resources that are still in use by an application, as shown here:
@Override
public void dispose() {
    batch.dispose();
    texture.dispose();
}
There is an interface called Disposable that is implemented by every LibGDX class that allocates resources (that is, memory) and can be easily deallocated by calling the corresponding dispose method. In the preceding code, this is done for the sprite batch and the loaded texture.
The following is a complete listing of the MyDemo.java source file from the demo project:
package com.packtpub.libgdx.demo;

import com.badlogic.gdx.ApplicationListener;
import com.badlogic.gdx.Gdx;
import com.badlogic.gdx.Net.HttpRequest;
import com.badlogic.gdx.Net.HttpResponseListener;
import com.badlogic.gdx.graphics.GL20;
import com.badlogic.gdx.graphics.OrthographicCamera;
import com.badlogic.gdx.graphics.Texture;
import com.badlogic.gdx.graphics.Texture.TextureFilter;
import com.badlogic.gdx.graphics.g2d.Sprite;
import com.badlogic.gdx.graphics.g2d.SpriteBatch;
import com.badlogic.gdx.graphics.g2d.TextureRegion;

public class MyDemo implements ApplicationListener {
    private OrthographicCamera camera;
    private SpriteBatch batch;
    private Texture texture;
    private Sprite sprite;

    @Override
    public void create() {


        float w = Gdx.graphics.getWidth();
        float h = Gdx.graphics.getHeight();

        camera = new OrthographicCamera(1, h/w);
        batch = new SpriteBatch();

        texture = new Texture(Gdx.files.internal("data/libgdx.png"));
        texture.setFilter(TextureFilter.Linear, TextureFilter.Linear);

        TextureRegion region = new TextureRegion(texture, 0, 0, 512, 275);

        sprite = new Sprite(region);
        sprite.setSize(0.9f, 0.9f * sprite.getHeight() / sprite.getWidth());
        sprite.setOrigin(sprite.getWidth()/2, sprite.getHeight()/2);
        sprite.setPosition(-sprite.getWidth()/2, -sprite.getHeight()/2);
    }

    @Override
    public void dispose() {
        batch.dispose();
        texture.dispose();
    }

    @Override
    public void render() {
        Gdx.gl.glClearColor(1, 1, 1, 1);
        Gdx.gl.glClear(GL20.GL_COLOR_BUFFER_BIT);

        batch.setProjectionMatrix(camera.combined);
        batch.begin();
        sprite.draw(batch);
        batch.end();
    }

    @Override
    public void resize(int width, int height) {
    }

    @Override
    public void pause() {
    }

    @Override
    public void resume() {
    }
}
Note
Gradle users should copy this code to the MyDemo class. We need this code to do a simple experimentation with code hot swapping, which is coming in the next section. Although you don't have the libgdx.png file, you can use any standard paint tools to create a placeholder image of size 512 x 512, or download the libgdx.png file from the example project in the provided code bundle. Then, go to the assets directory in the demo-android project, create a data folder, and save the libgdx.png file in it.
In this section, we are going to use the debugger to take a look inside the demo project at runtime. To do this, we first set a breakpoint where the execution of the application should be halted so that we can easily inspect the current state. Open the MyDemo.java source file in Eclipse and set a breakpoint at the line where a new instance of SpriteBatch is created, as shown here:

Next, right-click on the demo-desktop project in Project Explorer in Eclipse, and then select the Java Application option from the Debug As menu, or press the F11 key on your keyboard. The application should be halted almost directly after the application window becomes visible. Eclipse should have automatically changed to the debugging perspective, which shows lots of extra information about an application running in the debug mode, as shown here:

In the Variables tab, you can now inspect every variable that is within the current scope of execution, for example, the two floating-point variables, w and h, have already been set. You can check this by looking for them in the Variables tab. The correct values of the variables are displayed as 480.0 for w and 320.0 for h. To step through, resume or stop the execution of the application; you can go to the Run menu and choose the appropriate menu item. Choose to resume the application for now.
Let's try to do code hot swapping now. Make sure that the demo application is currently running and is being executed right now. The following code listing is a modified version of the render() method; the modification is highlighted:
@Override
public void render() {
    Gdx.gl.glClearColor(1, 1, 1, 1);
    Gdx.gl.glClear(GL20.GL_COLOR_BUFFER_BIT);

    batch.setProjectionMatrix(camera.combined);
    batch.begin();
    sprite.setRotation(45);
    sprite.draw(batch);
    batch.end();
}
As a result, the following line to your code inside the MyDemo.java source file right before sprite.draw() is called:
sprite.setRotation(45);
It will make the sprite rotate by 45 degrees in a counter-clockwise direction, as shown in the following screenshot. The next step is to save your changes to the source file. What you should see now is that the change you have just made to the code is immediately reflected in the still running application!

For code hot swapping to work, it is necessary that the automatic (re)build feature is enabled. You can quickly check this by going to the Project menu and making sure that the menu item Build Automatically is checked.
You might already sense the possibilities that this great feature enables a developer to do. Just think of a somewhat more complex scene where you are trying to find the best-looking positions for your objects, or you just want to see how it would look with a couple of different settings. It's a piece of cake with a tool like code hot swapping at your disposal.
Let's take the preceding example a bit further and make the image rotate continuously.
We will need a variable to store the current rotation value. This value is going to be increased over a period of time. To avoid a possible overflow in rot, we calculate the remainder of the new rotation value divided by 360 degrees. This can be done in an easy way using the modulo operator (%) to wrap around a certain value.
The rotation is calculated in degrees per second. Afterwards, we set the new rotation value of the sprite and draw it while the rotation value is advanced step by step.
The following listing is the modified code for the rotating image:
private float rot;

@Override
public void render() {
    Gdx.gl.glClearColor(1, 1, 1, 1);
    Gdx.gl.glClear(GL20.GL_COLOR_BUFFER_BIT);

    batch.setProjectionMatrix(camera.combined);
    batch.begin();
    final float degreesPerSecond = 10.0f;
    rot = (rot + Gdx.graphics.getDeltaTime() * degreesPerSecond) % 360;
    sprite.setRotation(rot);
    sprite.draw(batch);
    batch.end();
}
Note
Note that some changes cannot be hot swapped into a running application, such as changing method names and introducing new variables in class. In order to reflect these changes, you have to rerun the program. However, in such situations, Eclipse will issue a warning when the code cannot be hot swapped.
Now that we have a changing value for the rotation, let's have some more fun with it and turn the continuous rotation effect into a shake effect.
As the sine (or cosine) function has an oscillating behavior, we can make perfect use of it to make the image shake by a certain amount to the left and right. The amount (amplitude) can be increased and decreased by multiplying it with the answer of the sine function.
The following listing is the modified code for the shaking image:
@Override
public void render() {
Gdx.gl.glClearColor(1, 1, 1, 1);
Gdx.gl.glClear(GL20.GL_COLOR_BUFFER_BIT);
batch.setProjectionMatrix(camera.combined);
batch.begin();
float degreesPerSecond = 10.0f;
rot = (rot + Gdx.graphics.getDeltaTime() * degreesPerSecond) % 360;
final float shakeAmplitudeInDegrees = 5.0f;
float shake = MathUtils.sin(rot) * shakeAmplitudeInDegrees;
sprite.setRotation(shake);
sprite.draw(batch);
batch.end();
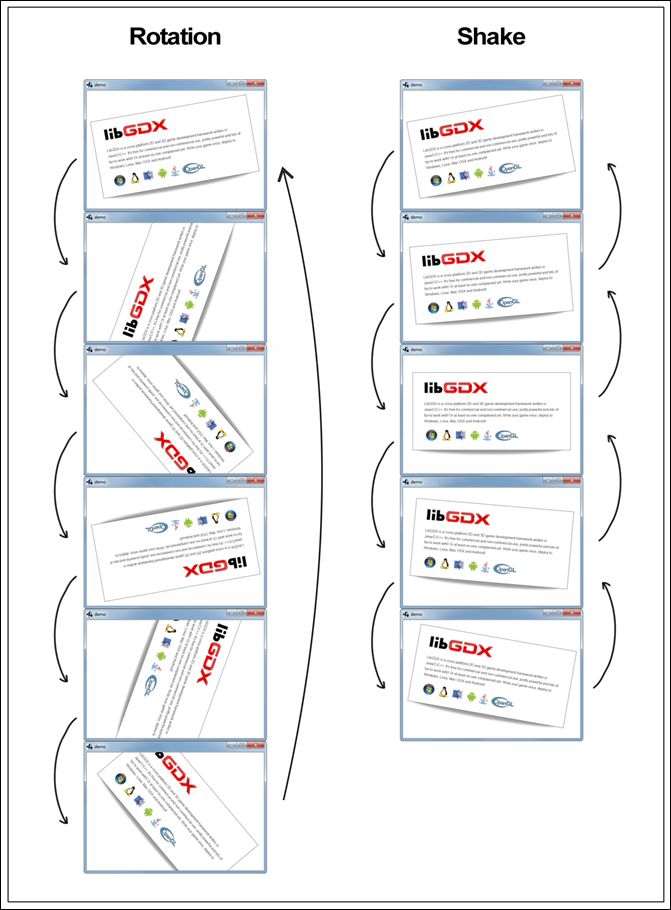
}The following diagram visualizes the effect of both the rotation and the shake: