
In this chapter, we will implement the remaining game objects that represent our actors in the game world. These are the player character bunny head and both the collectible items: the gold coin and the feather power-up. We will complete the level loader by adding support for the actor game objects so that these are handled properly when a level is loaded.
The game will be extended to feature a simple physics simulation that allows any game object to be moved using physical properties, such as velocity, acceleration, and friction. In addition, the game logic will also need to detect collisions of the game objects to trigger certain events. For example, we want the player character to be able to jump, stand, and walk on a rock (platform), collect items by walking over them, and lose a life when it falls into the water. The game logic will also include a check to find out whether the game over condition is met so that the game immediately ends and a GAME OVER text message is displayed.
In this chapter, we will:
- Implement our game actors
- Create logic for collision detection
- Finish the GUI
The gold coin, feather, and bunny head are some of our game objects. Each of our game objects inherits the AbstractGameObject class. The AbstractGameObject holds the attributes and functionalities for physics and collision detection.
First, let's make some preparations in AbstractGameObject and add a few functionalities for our upcoming physics and collision detection code.
Add the following import to AbstractGameObject:
import com.badlogic.gdx.math.Rectangle;
Then, add the following member variables and initialization code to the same class:
public Vector2 velocity;
public Vector2 terminalVelocity;
public Vector2 friction;

public Vector2 acceleration;
public Rectangle bounds;

public AbstractGameObject () {
  position = new Vector2();
  dimension = new Vector2(1, 1);
  origin = new Vector2();
  scale = new Vector2(1, 1);
  rotation = 0;
  velocity = new Vector2();
  terminalVelocity = new Vector2(1, 1);
  friction = new Vector2();
  acceleration = new Vector2();
  bounds = new Rectangle();
}
The following list contains a brief description of the purpose of each variable:
velocity: This is the object's current speed in m/s.terminalVelocity: This is the object's positive and negative maximum speed in m/s.friction: This is an opposing force that slows down the object until its velocity equals zero. This value is given as a coefficient that is dimensionless. A value of zero means no friction, and thus the object's velocity will not decrease.acceleration: This is the object's constant acceleration in m/s².bounds: The object's bounding box describes the physical body that will be used for collision detection with other objects. The bounding box can be set to any size and is completely independent of the actual dimension of the object in the game world.
We will now add simple physics simulation code that makes use of the new physics attributes, namely, velocity, terminalVelocity, friction, and acceleration:
- Add the following import to
AbstractGameObject:import com.badlogic.gdx.math.MathUtils;
- Furthermore, add the following code to the same class:
protected void updateMotionX (float deltaTime) { if (velocity.x != 0) { // Apply friction if (velocity.x > 0) { velocity.x = Math.max(velocity.x - friction.x * deltaTime, 0); } else { velocity.x = Math.min(velocity.x + friction.x * deltaTime, 0); } } // Apply acceleration velocity.x += acceleration.x * deltaTime; // Make sure the object's velocity does not exceed the // positive or negative terminal velocity velocity.x = MathUtils.clamp(velocity.x, -terminalVelocity.x, terminalVelocity.x); } protected void updateMotionY (float deltaTime) { if (velocity.y != 0) { // Apply friction if (velocity.y > 0) { velocity.y = Math.max(velocity.y - friction.y * deltaTime, 0); } else { velocity.y = Math.min(velocity.y + friction.y * deltaTime, 0); } } // Apply accelerationvelocity.y += acceleration.y * deltaTime; // Make sure the object's velocity does not exceed the // positive or negative terminal velocity velocity.y = MathUtils.clamp(velocity.y, -terminalVelocity.y, terminalVelocity.y); } - Finally, make the following change to the already existing
update()method:public void update (float deltaTime) { updateMotionX(deltaTime); updateMotionY(deltaTime); // Move to new position position.x += velocity.x * deltaTime; position.y += velocity.y * deltaTime; }
The two new methods updateMotionX() and updateMotionY() are called on every update cycle to calculate the next x and y components of the object's velocity in terms of the given delta time. The calculation is done in the following three steps:
- If the object's velocity is not equal to zero, the object must be in motion. Therefore, friction needs to be applied on the velocity to slow it down. As the property of friction is meant to decrease velocity, the friction coefficient needs to be either subtracted from positive or only added to negative velocity values. The velocity is directly set to zero as soon as the algebraic sign changes to fully stop the ongoing motion using the
Math.maxandMath.minfunctions. - Next, acceleration is applied to the current velocity.
- Finally, it is made sure that the new velocity value will always be inside the range of the positive and negative terminal velocity.
After both the velocity components have been updated, the displacement that simulates the actual motion of an object is done by simply adding the new velocity vector to the position vector that holds the last position.
The gold coin game object consists of only one image. It is a collectible item, which means that it can be collected by the player's character by simply walking over it. As a result of the gold coin being collected, the object will turn invisible for the rest of the game, as shown here:

Create a new file for the GoldCoin class and add the following code to it:
package com.packtpub.libgdx.canyonbunny.game.objects;

import com.badlogic.gdx.graphics.g2d.SpriteBatch;
import com.badlogic.gdx.graphics.g2d.TextureRegion;
import com.packtpub.libgdx.canyonbunny.game.Assets;

public class GoldCoin extends AbstractGameObject {

  private TextureRegion regGoldCoin;

  public boolean collected;

  public GoldCoin () {
    init();
  }

  private void init () {
    dimension.set(0.5f, 0.5f);

    regGoldCoin = Assets.instance.goldCoin.goldCoin;

    // Set bounding box for collision detection
    bounds.set(0, 0, dimension.x, dimension.y);

    collected = false;
  }

  public void render (SpriteBatch batch) {
    if (collected) return;

    TextureRegion reg = null;
    reg = regGoldCoin;
    batch.draw(reg.getTexture(), position.x, position.y, origin.x, origin.y, dimension.x, dimension.y, scale.x, scale.y, rotation, reg.getRegionX(), reg.getRegionY(), reg.getRegionWidth(), reg.getRegionHeight(), false, false);
  }

  public int getScore() {
    return 100;
  }
}
The gold coin uses the collected variable to store its current state of visibility. The render() method will always check the collected state to decide whether the object should be rendered or not. The getScore() method returns the item's score that the player will receive to collect it. The bounding box bounds are set to the exact same size as its dimension inside the game world.
The feather game object is very similar to the gold coin. It consists of only one image and is a collectible item that will turn invisible when it is collected by the player's character.
Create a new file for the Feather class and add the following code:
package com.packtpub.libgdx.canyonbunny.game.objects;

import com.badlogic.gdx.graphics.g2d.SpriteBatch;
import com.badlogic.gdx.graphics.g2d.TextureRegion;
import com.packtpub.libgdx.canyonbunny.game.Assets;

public class Feather extends AbstractGameObject {

  private TextureRegion regFeather;

  public boolean collected;

  public Feather () {
    init();
  }

  private void init () {
    dimension.set(0.5f, 0.5f);

    regFeather = Assets.instance.feather.feather;

    // Set bounding box for collision detection
    bounds.set(0, 0, dimension.x, dimension.y);

    collected = false;
  }

  public void render (SpriteBatch batch) {
    if (collected) return;

    TextureRegion reg = null;
    reg = regFeather;
    batch.draw(reg.getTexture(), position.x, position.y, origin.x, origin.y, dimension.x, dimension.y, scale.x, scale.y, rotation, reg.getRegionX(), reg.getRegionY(), reg.getRegionWidth(), reg.getRegionHeight(), false, false);
  }

  public int getScore() {
    return 250;
  }
}
Obviously, this code is almost similar to the code of the gold coin. The only difference between them is the image used and that the getScore() method returns a slightly higher score.
The bunny head or player's character is the most complex game object that we will create in this project. It consists of only one image, but involves quite a lot of code to enable jumping and falling as well as handling the feather power-up effect.

Create a new file for the BunnyHead class and add the following code:
package com.packtpub.libgdx.canyonbunny.game.objects;

import com.badlogic.gdx.Gdx;
import com.badlogic.gdx.graphics.g2d.SpriteBatch;
import com.badlogic.gdx.graphics.g2d.TextureRegion;
import com.packtpub.libgdx.canyonbunny.game.Assets;
import com.packtpub.libgdx.canyonbunny.util.Constants;

public class BunnyHead extends AbstractGameObject {

  public static final String TAG = BunnyHead.class.getName();

  private final float JUMP_TIME_MAX = 0.3f;
  private final float JUMP_TIME_MIN = 0.1f;
  private final float JUMP_TIME_OFFSET_FLYING = JUMP_TIME_MAX - 0.018f;

  public enum VIEW_DIRECTION { LEFT, RIGHT }

  public enum JUMP_STATE {
    GROUNDED, FALLING, JUMP_RISING, JUMP_FALLING
  }

  private TextureRegion regHead;

  public VIEW_DIRECTION viewDirection;
  public float timeJumping;
  public JUMP_STATE jumpState;
  public boolean hasFeatherPowerup;
  public float timeLeftFeatherPowerup;

  public BunnyHead () {
    init();
  }

  public void init () {};
  public void setJumping (boolean jumpKeyPressed) {};
  public void setFeatherPowerup (boolean pickedUp) {};
  public boolean hasFeatherPowerup () {};
}
Now that we have defined the viewing direction—a state for jumping and another state for the feather power-up—we can go on and fill in the specific implementation details of the still empty methods.
Now, add the following code to the init() method:
public void init () {
  dimension.set(1, 1);
  regHead = Assets.instance.bunny.head;
  // Center image on game object
  origin.set(dimension.x / 2, dimension.y / 2);
  // Bounding box for collision detection
  bounds.set(0, 0, dimension.x, dimension.y);
  // Set physics values
  terminalVelocity.set(3.0f, 4.0f);
  friction.set(12.0f, 0.0f);
  acceleration.set(0.0f, -25.0f);
  // View direction
  viewDirection = VIEW_DIRECTION.RIGHT;
  // Jump state
  jumpState = JUMP_STATE.FALLING;
  timeJumping = 0;
  // Power-ups
  hasFeatherPowerup = false;
  timeLeftFeatherPowerup = 0;
}
The preceding code initializes the bunny head game object by setting its physics values, a starting view direction, and jump state. It also deactivates the feather power-up effect.
Next, add the following code to the setJumping() method:
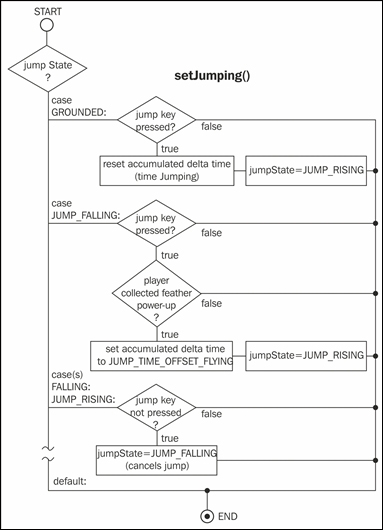
public void setJumping (boolean jumpKeyPressed) {
  switch (jumpState) {
    case GROUNDED: // Character is standing on a platform
      if (jumpKeyPressed) {
        // Start counting jump time from the beginning
        timeJumping = 0;
        jumpState = JUMP_STATE.JUMP_RISING;
      }
      break;
    case JUMP_RISING: // Rising in the air
      if (!jumpKeyPressed)
      jumpState = JUMP_STATE.JUMP_FALLING;
      break;
    case FALLING:// Falling down
    case JUMP_FALLING: // Falling down after jump
      if (jumpKeyPressed && hasFeatherPowerup) {
        timeJumping = JUMP_TIME_OFFSET_FLYING;
        jumpState = JUMP_STATE.JUMP_RISING;
      }
      break;
  }
}
The preceding code allows us to make the bunny jump. The state handling in the code will decide whether jumping is currently possible and whether it is a single or a multi jump.
Next, add the following code to the setFeatherPowerup() method:
public void setFeatherPowerup (boolean pickedUp) {
  hasFeatherPowerup = pickedUp;
  if (pickedUp) {
    timeLeftFeatherPowerup = Constants.ITEM_FEATHER_POWERUP_DURATION;
  }
}

public boolean hasFeatherPowerup () {
  return hasFeatherPowerup && timeLeftFeatherPowerup > 0;
}
The preceding code allows us to toggle the feather power-up effect via the setFeatherPowerup() method. The hasFeatherPowerup() method can be used to find out whether the power-up is still active.
Next, add the following code to override the update() method:
@Override
public void update (float deltaTime) {
  super.update(deltaTime);
  if (velocity.x != 0) {
    viewDirection = velocity.x < 0 ? VIEW_DIRECTION.LEFT : VIEW_DIRECTION.RIGHT;
  }
  if (timeLeftFeatherPowerup > 0) {
    timeLeftFeatherPowerup -= deltaTime;
    if (timeLeftFeatherPowerup < 0) {
      // disable power-up
      timeLeftFeatherPowerup = 0;
      setFeatherPowerup(false);
    }
  }
}
The preceding code handles the switching of the viewing direction according to the current move direction. Also, the time remaining of the power-up effect is checked. If the time is up, the feather power-up effect is disabled.
Next, add the following code to override the updateMotionY() method:
@Override
protected void updateMotionY (float deltaTime) {
  switch (jumpState) {
    case GROUNDED:
      jumpState = JUMP_STATE.FALLING;
      break;
    case JUMP_RISING:
      // Keep track of jump time
      timeJumping += deltaTime;
      // Jump time left?
      if (timeJumping <= JUMP_TIME_MAX) {
        // Still jumping
        velocity.y = terminalVelocity.y;
      }
      break;
    case FALLING:
      break;
    case JUMP_FALLING:
      // Add delta times to track jump time
      timeJumping += deltaTime;
      // Jump to minimal height if jump key was pressed too short
      if (timeJumping > 0 && timeJumping <= JUMP_TIME_MIN) {
        // Still jumping
        velocity.y = terminalVelocity.y;
      }
  }
  if (jumpState != JUMP_STATE.GROUNDED)
  super.updateMotionY(deltaTime);
}
The preceding code handles the calculations and switching of states that is needed to enable jumping and falling.
Next, add the following code to override the render() method:
@Override
public void render (SpriteBatch batch) {
  TextureRegion reg = null;

  // Set special color when game object has a feather power-up
  if (hasFeatherPowerup) {
  batch.setColor(1.0f, 0.8f, 0.0f, 1.0f);
}
  // Draw image
  reg = regHead;
  batch.draw(reg.getTexture(), position.x, position.y, origin.x, origin.y, dimension.x, dimension.y, scale.x, scale.y, rotation, reg.getRegionX(), reg.getRegionY(), reg.getRegionWidth(), reg.getRegionHeight(), viewDirection == VIEW_DIRECTION.LEFT, false);

  // Reset color to white
  batch.setColor(1, 1, 1, 1);
}
The preceding code handles the drawing of the image for the bunny head game object. The image will be tinted orange if the feather power-up effect is active.
Furthermore, add the following code to Constants:
// Duration of feather power-up in seconds
public static final float ITEM_FEATHER_POWERUP_DURATION = 9;
The viewing direction, viewDirection, will change according to the object's velocity as long as it is unequal to zero. It will be set to VIEW_DIRECTION.LEFT when the horizontal velocity is negative; otherwise, it will be set to VIEW_DIRECTION.RIGHT. This simply means that the player's character will always look in the direction it is moving.
There are four different states to jump, as follows:
GROUNDED: In this state, the player is standing on a platform.FALLING: In this state, the player is falling down.JUMP_RISING: In this state, the player has initiated a jump and is still rising. The maximum jump height has not been reached.JUMP_FALLING: In this state, the player is falling down after a previously initiated jump. This state is reached either by jumping as long as possible or by releasing the jump key earlier than that.
The state to jump is stored in jumpState. There is a minimum and maximum jump time defined by the constants JUMP_TIME_MIN and JUMP_TIME_MAX. These time limits and the jump power affects the resulting possible minimum and maximum jump heights. A minimum jump is enforced on the player whenever the jump key is released before the time defined in JUMP_TIME_MIN.
The currently elapsed jump time is accumulated in timeJumping and is reset on every new jump. There is a third constant JUMP_TIME_OFFSET_FLYING that is used to let the elapsed jump time start at a certain time, which effectively shortens the overall height of such jumps. This is used for the multijump power-up effect of the feather item. It allows the bunny head to fly by rapidly jumping repeatedly. A multijump can only be executed when the bunny head is in midair. A shorter jump time for multijumps makes it more difficult for the player to handle them, which adds a neat detail to the gameplay feeling.
This is all done inside the overridden updateMotionY() method. Notice that the original method of updateMotionY() from AbstractGameObject is also called whenever an actual motion needs to happen, which is always the case when the player is not in the GROUNDED jump state.
The following diagram visualizes the flow of the preceding method:

As you can see, the jump state will always change to FALLING whenever it is set to GROUNDED. The reason for this is that we want grounded objects like the player's character to fall down from platforms where they end. There must be a trigger that tests this event so that the jump state will be in fact permanently changed from GROUNDED to FALLING as long as there is a collision detected that resets the jump state back to GROUNDED. Otherwise, the player's character will start to fall down as intended.
A new jump is triggered by calling the setJumping() method. A true value can be passed as an argument to denote that the jump key has been pressed. So this method checks the current jump state of the bunny and also tests whether the jump key is currently pressed by the player to perform the appropriate actions. These actions can be to start a new jump, cancel an ongoing jump, or allow multijumps with the help of the feather power-up.
The following diagram visualizes the flow of this method:
The hasFeatherPowerup and timeLeftFeatherPowerup variables describe whether the player has collected the feather power-up or not and how much time the effect will last. The power-up effect can be enabled and disabled by calling setFeatherPowerup(). The hasFeatherPowerup() method is used as a combined test to find out whether the power-up has been collected and if the effect is still lasting.
The render() method will tint the image of the player character orange if the feather power-up has been collected. The viewing direction viewDirection is used to decide whether the image needs to be flipped on the x axis.
Last but not least, change the setLength() method of Rock to the following listings:
public void setLength (int length) {
  this.length = length;
  // Update bounding box for collision detection
  bounds.set(0, 0, dimension.x * length, dimension.y);
}
This will make sure that the size of the bounding box is adjusted whenever the length of a rock is changed.