
Make the following changes in MenuScreen to add the Options window layer:
import com.packtpub.libgdx.canyonbunny.util.CharacterSkin;
import com.packtpub.libgdx.canyonbunny.util.GamePreferences;

private Skin skinLibgdx;

private void loadSettings() {
  GamePreferences prefs = GamePreferences.instance;
  prefs.load();
  chkSound.setChecked(prefs.sound);
  sldSound.setValue(prefs.volSound);
  chkMusic.setChecked(prefs.music);
  sldMusic.setValue(prefs.volMusic);
  selCharSkin.setSelectedIndex(prefs.charSkin);
  onCharSkinSelected(prefs.charSkin);
  chkShowFpsCounter.setChecked(prefs.showFpsCounter);
}

private void saveSettings() {
  GamePreferences prefs = GamePreferences.instance;
  prefs.sound = chkSound.isChecked();
  prefs.volSound = sldSound.getValue();
  prefs.music = chkMusic.isChecked();
  prefs.volMusic = sldMusic.getValue();
  prefs.charSkin = selCharSkin.getSelectedIndex();
  prefs.showFpsCounter = chkShowFpsCounter.isChecked();
  prefs.save();
}

private void onCharSkinSelected(int index) {
  CharacterSkin skin = CharacterSkin.values()[index];
  imgCharSkin.setColor(skin.getColor());
}

private void onSaveClicked() {
  saveSettings();
  onCancelClicked();
}

private void onCancelClicked() {
  btnMenuPlay.setVisible(true);
  btnMenuOptions.setVisible(true);
  winOptions.setVisible(false);
}
The loadSettings() and saveSettings() methods are used to translate back and forth between the values stored in the widgets and the instance of the GamePreferences class. The methods starting with on in their name contain code that we want to be executed at certain events. The onCharSkinSelected() method will update the preview image. The onSaveClicked() method saves the current settings of the Options window and swaps the Options window for the menu controls. The onCancelClicked() method only swaps the widgets, which also means that any changed settings will be discarded. The visibility of the menu controls and the Options window is simply toggled by calling setVisible() on the respective widgets.
Next, make the following changes to the same class:
private void rebuildStage() {
  skinCanyonBunny = new Skin(Gdx.files.internal(Constants.SKIN_CANYONBUNNY_UI), new TextureAtlas(Constants.TEXTURE_ATLAS_UI));
  skinLibgdx = new Skin(Gdx.files.internal(Constants.SKIN_LIBGDX_UI), new TextureAtlas(Constants.TEXTURE_ATLAS_LIBGDX_UI));

  // build all layers
  ...
}

@Override
public void hide() {
  stage.dispose();
  skinCanyonBunny.dispose();
  skinLibgdx.dispose();
}
These changes enable us to use and add widgets defined in the LibGDX skin. As the creation of all the widgets for the Options menu involves quite a lot of code, we split it up into four separate build methods.
Now, add the buildOptWinAudioSettings() method to the same class:
private Table buildOptWinAudioSettings () {
  Table tbl = new Table();
  // + Title: "Audio"
  tbl.pad(10, 10, 0, 10);
  tbl.add(new Label("Audio", skinLibgdx, "default-font", Color.ORANGE)).colspan(3);
  tbl.row();
  tbl.columnDefaults(0).padRight(10);
  tbl.columnDefaults(1).padRight(10);
  // + Checkbox, "Sound" label, sound volume slider
  chkSound = new CheckBox("", skinLibgdx);
  tbl.add(chkSound);
  tbl.add(new Label("Sound", skinLibgdx));
  sldSound = new Slider(0.0f, 1.0f, 0.1f, false, skinLibgdx);
  tbl.add(sldSound);
  tbl.row();
  // + Checkbox, "Music" label, music volume slider
  chkMusic = new CheckBox("", skinLibgdx);
  tbl.add(chkMusic);
  tbl.add(new Label("Music", skinLibgdx));
  sldMusic = new Slider(0.0f, 1.0f, 0.1f, false, skinLibgdx);
  tbl.add(sldMusic);
  tbl.row();
  return tbl;
}
This method builds a table containing the audio settings. First, a label showing the text Audio in an orange color is added. Then, a checkbox (another label showing the text Sound) and a slider are added in the next row for the sound settings. This is also done for the music settings in the same way.
Next, add the buildOptWinSkinSelection() method to the same class:
private Table buildOptWinSkinSelection () {
  Table tbl = new Table();
  // + Title: "Character Skin"
  tbl.pad(10, 10, 0, 10);
  tbl.add(new Label("Character Skin", skinLibgdx,
  "default-font", Color.ORANGE)).colspan(2);
  tbl.row();
  // + Drop down box filled with skin items
   selCharSkin = new SelectBox<CharacterSkin>(skinLibgdx);

selCharSkin.setItems(CharacterSkin.values());

   selCharSkin.addListener(new ChangeListener() {
         @Override
         public void changed(ChangeEvent event, Actor actor) {
                onCharSkinSelected(((SelectBox<CharacterSkin>) actor).getSelectedIndex());
          }
   });
  tbl.add(selCharSkin).width(120).padRight(20);
  // + Skin preview image
  imgCharSkin = new Image(Assets.instance.bunny.head);
  tbl.add(imgCharSkin).width(50).height(50);
  return tbl;
}
This method builds a table that contains the character skin selection via a drop-down box and a preview image next to it. A ChangeListener method is added to the drop-down widget selCharSkin so that the setting and preview image is updated by calling onCharSkinSelected() whenever a new selection occurs.
Note
Observe the highlighted code. This code will work in Android, iOS, and desktop, but might not work in an HTML project and will show ArrayStoreException. This is due to the GWT reflection. Alternately, we can substitute this part with the following code:
Array<CharacterSkin> items = new Array<CharacterSkin>();
CharacterSkin[] arr = CharacterSkin.values();
for (int i = 0; i < arr.length; i++) {
      items.add(arr[i]);
}
selCharSkin.setItems(items);
Next, add the buildOptWinDebug() method to the same class:
private Table buildOptWinDebug () {
  Table tbl = new Table();
  // + Title: "Debug"
  tbl.pad(10, 10, 0, 10);
  tbl.add(new Label("Debug", skinLibgdx, "default-font", Color.RED)).colspan(3);
  tbl.row();
  tbl.columnDefaults(0).padRight(10);
  tbl.columnDefaults(1).padRight(10);
  // + Checkbox, "Show FPS Counter" label
  chkShowFpsCounter = new CheckBox("", skinLibgdx);
  tbl.add(new Label("Show FPS Counter", skinLibgdx));
  tbl.add(chkShowFpsCounter);
  tbl.row();
  return tbl;
}
This method builds a table that contains the debug settings. At the moment, we only have one checkbox here that allows the player to toggle and checks whether the FPS Counter is shown or not.
Next, add the buildOptWinButtons() method to the same class:
private Table buildOptWinButtons () {
  Table tbl = new Table();
  // + Separator
  Label lbl = null;
  lbl = new Label("", skinLibgdx);
  lbl.setColor(0.75f, 0.75f, 0.75f, 1);
  lbl.setStyle(new LabelStyle(lbl.getStyle()));
  lbl.getStyle().background = skinLibgdx.newDrawable("white");
  tbl.add(lbl).colspan(2).height(1).width(220).pad(0, 0, 0, 1);
  tbl.row();
  lbl = new Label("", skinLibgdx);
  lbl.setColor(0.5f, 0.5f, 0.5f, 1);
  lbl.setStyle(new LabelStyle(lbl.getStyle()));
  lbl.getStyle().background = skinLibgdx.newDrawable("white");
  tbl.add(lbl).colspan(2).height(1).width(220).pad(0, 1, 5, 0);
  tbl.row();
  // + Save Button with event handler
  btnWinOptSave = new TextButton("Save", skinLibgdx);
  tbl.add(btnWinOptSave).padRight(30);
  btnWinOptSave.addListener(new ChangeListener() {
    @Override
    public void changed (ChangeEvent event, Actor actor) {
      onSaveClicked();
    }
  });
  // + Cancel Button with event handler
  btnWinOptCancel = new TextButton("Cancel", skinLibgdx);
  tbl.add(btnWinOptCancel);
  btnWinOptCancel.addListener(new ChangeListener() {
    @Override
    public void changed (ChangeEvent event, Actor actor) {
      onCancelClicked();
    }
  });
  return tbl;
}
This method builds a table that contains a separator, and the Save and Cancel buttons at the bottom of the Options window. The Save and Cancel buttons use ChangeListener, which will call the onSaveClicked() and onCancelClicked() methods, respectively, whenever a click is detected.
Next, make the following changes to the buildOptionsWindowLayer() method:
private Table buildOptionsWindowLayer() {
  winOptions = new Window("Options", skinLibgdx);
  // + Audio Settings: Sound/Music CheckBox and Volume Slider
  winOptions.add(buildOptWinAudioSettings()).row();
  // + Character Skin: Selection Box (White, Gray, Brown)
  winOptions.add(buildOptWinSkinSelection()).row();
  // + Debug: Show FPS Counter
  winOptions.add(buildOptWinDebug()).row();
  // + Separator and Buttons (Save, Cancel)
  winOptions.add(buildOptWinButtons()).pad(10, 0, 10, 0);

  // Make options window slightly transparent
  winOptions.setColor(1, 1, 1, 0.8f);
  // Hide options window by default
  winOptions.setVisible(false);
  if (debugEnabled) winOptions.debug();
  // Let TableLayout recalculate widget sizes and positions
  winOptions.pack();
  // Move options window to bottom right corner
  winOptions.setPosition(Constants.VIEWPORT_GUI_WIDTH - winOptions.getWidth() - 50, 50);
  return winOptions;
}
This method contains the code that initializes the Options window. It builds each part of the menu using the build methods that we just implemented before this one. The Options window is set to an opacity value of 80 percent. This makes the window appear slightly transparent, which adds a nice visual detail to it. The call of the pack() method of the Window widget makes sure that TableLayout recalculates the widget sizes and positions them so that all added widgets will correctly fit into the window. After this, the window is moved to the bottom-right corner of the screen.
Last but not least, make the following changes to the onOptionsClicked() method:
private void onOptionsClicked() {
  loadSettings();
  btnMenuPlay.setVisible(false);
  btnMenuOptions.setVisible(false);
  winOptions.setVisible(true);
}
Finally, the added code allows the Options window to be opened. The settings are loaded before the Options window is shown so that the widgets will always be correctly initialized.
Here is a screenshot of the final Options window, menu screen, and the opened Options window:
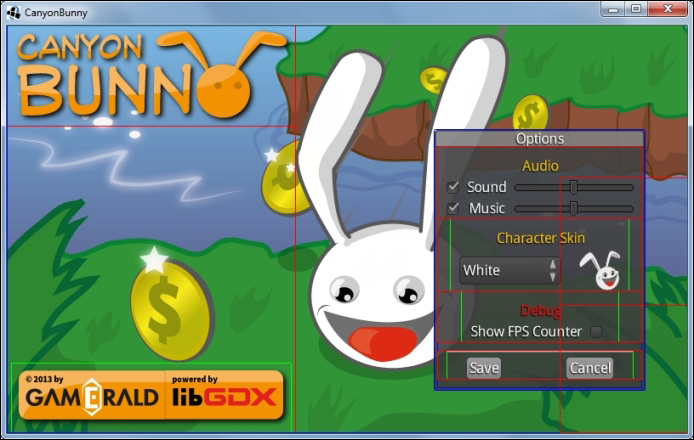
The thin pixel lines that are drawn all over the widgets are the enabled debug visuals of TableLayout.
The Options window is now fully functional. It shows up when the Options button is clicked and hides when the Save or Cancel button is clicked. The settings are only applied and saved with a click on the Save button.
A lot of work went into the creation of our menu screen and also into the Options window in order to allow the change of certain game settings. What is still missing is the actual usage of the set values in our game. Luckily, this can be achieved very easily now with just a couple of additional lines of code.
Add the following import line to GameScreen:
import com.packtpub.libgdx.canyonbunny.util.GamePreferences;
After this, make the following changes to the same class:
@Override
public void show () {
  GamePreferences.instance.load();
  worldController = new WorldController(game);
  worldRenderer = new WorldRenderer(worldController);
  Gdx.input.setCatchBackKey(true);
}
The added code ensures that the game screen will always work with the latest game settings. Next, add the following import lines to BunnyHead:
import com.packtpub.libgdx.canyonbunny.util.CharacterSkin;
import com.packtpub.libgdx.canyonbunny.util.GamePreferences;
After this, make the following change to the same class:
@Override
public void render (SpriteBatch batch) {
  TextureRegion reg = null;

  // Apply Skin Color
  batch.setColor(CharacterSkin.values()[GamePreferences.instance.charSkin] .getColor());

  // Set special color when game object has a feather power-up
  if (hasFeatherPowerup)
  batch.setColor(1.0f, 0.8f, 0.0f, 1.0f);

  // Draw image
  reg = regHead;
  batch.draw(reg.getTexture(),
    position.x, position.y,
    origin.x, origin.y,
    dimension.x, dimension.y,
    scale.x, scale.y,
    rotation,
    reg.getRegionX(), reg.getRegionY(),
    reg.getRegionWidth(), reg.getRegionHeight(),
    viewDirection == VIEW_DIRECTION.LEFT, false);

  // Reset color to white
  batch.setColor(1, 1, 1, 1);
}
This will apply the correct skin color by tinting the image of the bunny head. Next, add the following import line to WorldRenderer:
import com.packtpub.libgdx.canyonbunny.util.GamePreferences;
After this, make the following change to the same class:
private void renderGui (SpriteBatch batch) {
  batch.setProjectionMatrix(cameraGUI.combined);
  batch.begin();

  // draw collected gold coins icon + text
  // (anchored to top left edge)
  renderGuiScore(batch);
  // draw collected feather icon (anchored to top left edge)
  renderGuiFeatherPowerup(batch);
  // draw extra lives icon + text (anchored to top right edge)
  renderGuiExtraLive(batch);
  // draw FPS text (anchored to bottom right edge)
  if (GamePreferences.instance.showFpsCounter)
  renderGuiFpsCounter(batch);
  // draw game over text
  renderGuiGameOverMessage(batch);

  batch.end();
}
This change will make the FPS counter appear only if the checkbox has been ticked in the Options window. Otherwise, the FPS counter will not be drawn to the scene.