
Functional tests are used to test whether several components of an app work together as expected. For example, you can create a functional test to confirm that tapping a certain button opens a new Activity. There are several functional testing frameworks for Android, but the easiest way to get started with functional testing is using the Espresso framework.
Google created Espresso to make it easier for developers to write functional tests. The library is provided through the Android support repository, so you can install it using the SDK Manager.
In order to run tests on a device, you need to define a test runner. Through the testing support library, Google provides the AndroidJUnitRunner test runner, which helps you run JUnit test classes on Android devices. The test runner will load the app APK and the test APK to a device, run all the tests, and then build the reports with the test results.
Provided you have downloaded the testing support library, this is how you should set up the test runner:
defaultConfig {
    testInstrumentationRunner "android.support.test.runner.AndroidJUnitRunner"
}
You also need to set up a few dependencies before you can start using Espresso:
dependencies {
    compile fileTree(dir: 'libs', include: ['*.jar'])
    compile 'com.android.support:appcompat-v7:22.2.0'

    androidTestCompile 'com.android.support.test:runner:0.3'
    androidTestCompile 'com.android.support.test:rules:0.3'
    androidTestCompile 'com.android.support.test.espresso:espresso-core:2.2'
    androidTestCompile 'com.android.support.test.espresso:espresso-contrib:2.2'
}
You need to reference the testing support library and espresso-core to get started with Espresso. The last dependency, espresso-contrib, is a library with features that supplement Espresso, but are not part of the core library.
Notice that these dependencies use the androidTestCompile configuration, instead of the testCompile configuration we used earlier. This is to make a distinction between unit tests and functional tests.
If you were to try to run the test build at this point, you would run into this error:
Error: duplicate files during packaging of APK app-androidTest.apk
  Path in archive: LICENSE.txt
  Origin 1: ...hamcrest-library-1.1.jar
  Origin 2: ...junit-dep-4.10.jar
The error itself is very descriptive. Gradle cannot complete the build because of a duplicate file. Luckily, it is just a license description, so we can strip it out of the build. The error itself contains information on how to do that as well:
You can ignore those files in your build.gradle:
  android {
  packagingOptions {
      exclude 'LICENSE.txt'
    }
  }
Once the build file is set up, you can start adding tests. Functional tests are placed in a different directory than the regular unit tests. Just like with the dependency configurations, you need to use androidTest instead of just test, so the correct directory for functional tests is src/androidTest/java/com.example.app. Here is an example of a test class that checks whether the text of TextView in MainActivity is correct:
@RunWith(AndroidJUnit4.class)
@SmallTest
public class TestingEspressoMainActivityTest {
    @Rule
    public ActivityTestRule<MainActivity> mActivityRule = new ActivityTestRule<>(MainActivity.class);

    @Test
    public void testHelloWorldIsShown() {
        onView(withText("Hello world!")).check(matches(isDisplayed()));
    }
}
Before you can run Espresso tests, you need to make sure you have a device or emulator. If you forget to connect a device, trying to execute the test task will throw this exception:
Execution failed for task ':app:connectedAndroidTest'.
>com.android.builder.testing.api.DeviceException: java.lang.RuntimeException: No connected devices!
Once you have connected a device or started an emulator, you can run your Espresso tests using gradlewconnectedCheck. This task will execute both connectedAndroidTest to run all tests for the debug build on all the connected devices, and createDebugCoverageReport to create a test report.
You can find the generated test reports in the app directory under build/outputs/reports/androidTests/connected. Open index.html to view the report, which looks like this:
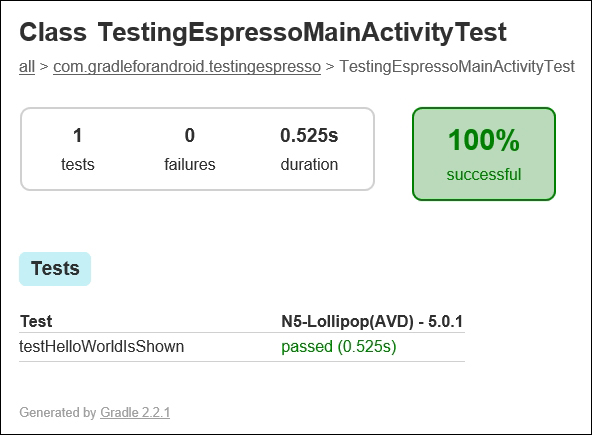
The functional test report shows which device and Android version the tests are run on. You can run these tests on multiple devices at the same time, so the device information makes it easier to find device- or version-specific bugs.
If you want to get feedback on your tests within Android Studio, set up a run/debug configuration to run the tests directly from the IDE. A run/debug configuration represents a set of run/debug startup properties. The Android Studio toolbar has a configuration picker, where you can select the run/debug configuration that you want to use.
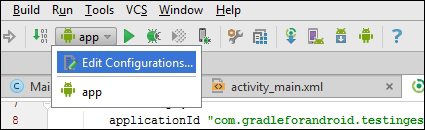
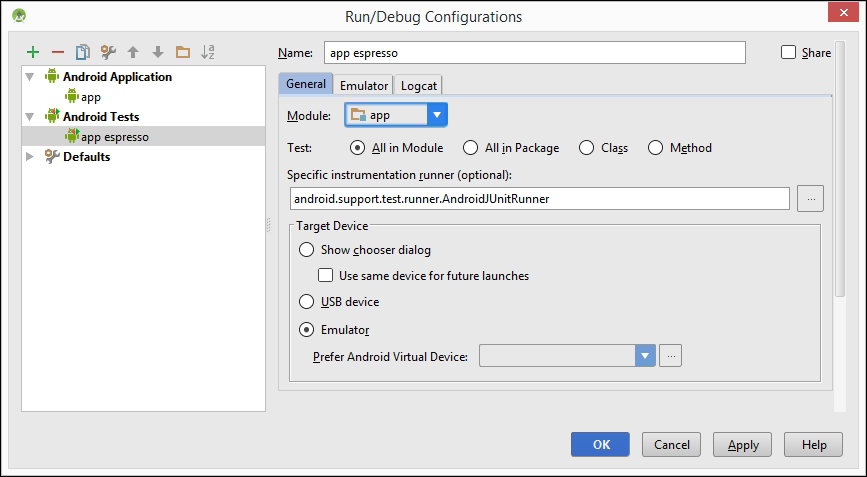
To set up a new configuration, open the configuration editor by clicking on Edit Configurations… and then create a new Android tests configuration. Select the module and specify the instrumentation runner to be AndroidJUnitRunner, as shown in the following screenshot:
Once you save this new configuration, you can select it in the configuration picker and click on the Run button to run all tests.