
Chapter 5: Menus and Menu Links
Navigation is an important part of any web application. The ability to create menus and links easily in order to connect pages together is a core aspect of any content management system. Drupal is fully equipped with both the site-building capabilities and developer API to easily build and manipulate menus and links.
In this chapter, we will discuss menus and menu links from a Drupal 9 module developer perspective. In doing so, we will touch upon a few key aspects:
- The general architecture of the menu system in Drupal
- Manipulating and rendering menus
- Defining various types of menu links
By the end of this chapter, you should be able to understand what menus and menu links are, how to use them in your code and how to define menu links in your module. So let's get started.
The menu system
Before we get our hands dirty with menus and menu links, let's talk a bit about the general architecture behind the menu system. To this end, I want to see its main components, what some of its key players are and what classes you should be looking at. As always, no great developer has ever relied solely on a book or documentation to figure out complex systems.
Menus
Menus are configuration entities represented by the following class: DrupalsystemEntityMenu. I mentioned in Chapter 1, Developing for Drupal 9, that we have something called configuration entities in Drupal, which we will explore in detail later in this book. However, for now, it's enough to understand that menus can be created through the UI and become an exportable configuration. Additionally, this exported configuration can also be included inside a module so that it gets imported when the module is first installed. This way, a module can ship with its own menus. We will see how this latter aspect works when we talk about the different kinds of storage in Drupal. For now, we will work with the menus that come with Drupal core.
Each menu can have multiple menu links, structured hierarchically in a tree with a maximum depth of 9 links. The ordering of the menu links can be done easily through the UI or via the weighting of the menu links, if defined in code.
Menu links
At their most basic level, menu links are YAML-based plugins (like the Layout plugins we saw in the previous chapter). To this end, regular menu links are defined inside a module_name.links.menu.yml file and can be altered by other modules by implementing hook_menu_links_discovered_alter(). When I say regular, I mean those links that go into menus. We will see shortly that there are also a few other types.
There are a number of important classes you should check out in this architecture though: MenuLinkManager (the plugin manager) and MenuLinkBase (the menu link plugins base class that implements MenuLinkInterface).
Menu links can, however, also be content entities. The links created via the UI are stored as entities because they are considered content. The way this works is that for each created MenuLinkContent entity, a plugin derivative is created. We are getting dangerously close to advanced topics that are too early to cover. But in a nutshell, via these derivatives, it's as if a new menu link plugin is created for each MenuLinkContent entity, making the latter behave as any other menu link plugin. This is a very powerful system in Drupal.
Menu links have a number of properties, among which is a path or route. When created via the UI, the path can be external or internal or can reference an existing resource (such as a user or piece of content). When created programmatically, you'll typically use a route.
Multiple types of menu links
The menu links we've been talking about so far are the links that show up in menus. There are also a few different kinds of links that show up elsewhere but are still considered menu links and work similarly.
Local tasks
Local tasks, otherwise known as tabs, are grouped links that usually show up above the main content of a page (depending on the region where the tabs block is placed). They are usually used to group together related links that have to deal with the current page. For example, on an entity page, such as the node detail page, you can have two tabs—one for viewing the node and one for editing it (and maybe one for deleting it); in other words, local tasks:

Figure 5.1: Local tasks
Local tasks take access rules into account, so if the current user does not have access to the route of a given tab, the link is not rendered. Moreover, if that means only one link in the set remains accessible, that link doesn't get rendered as there is no point. So, for tabs, a minimum of two links are needed for them to show up.
Modules can define local task links inside a module_name.links.task.yml file, whereas other modules can alter them by implementing hook_menu_local_tasks_alter().
Local actions
Local actions are links that relate to a given route and are typically used for operations. For example, on a list page, you might have a local action link to create a new list item, which will take you to the relevant form page.
In the following screenshot, we can see a local action link used to create a new user on the main user management page:
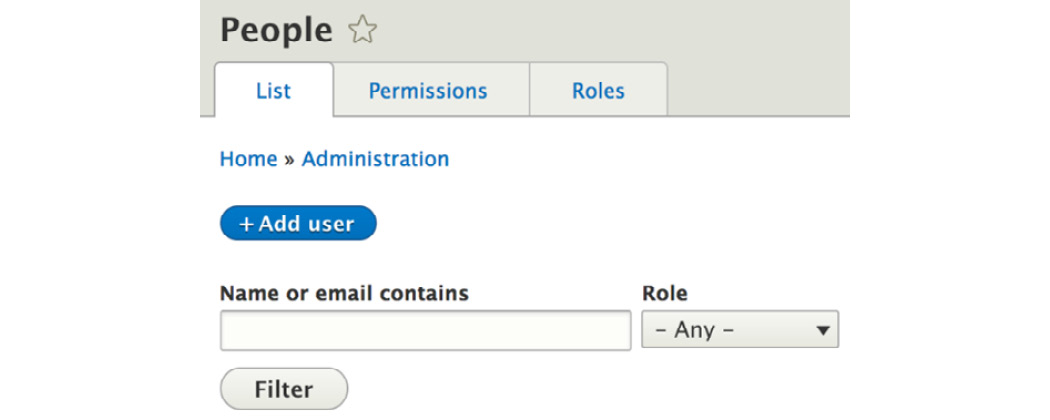
Figure 5.2: Local actions
Modules can define local action links inside a module_name.links.action.yml file, whereas other modules can alter them by implementing hook_menu_local_actions_alter().
Contextual links
Contextual links are used by the Contextual module to provide handy links next to a given component (a render array). You probably encountered this when hovering over a block, for example, and getting that little icon with a dropdown that has the Configure block link:

Figure 5.3: Contextual links
Contextual links are tied to render arrays. In fact, any render array can show a group of contextual links that have previously been defined.
Modules can define contextual links inside a module_name.links.contextual.yml file, whereas other modules can alter them by implementing hook_contextual_links_alter().
MenuLink trees
As I mentioned in the section about menus, menu links are stored hierarchically inside a menu. This hierarchy is represented via a menu link tree. There are a number of key players here we should go over.
We have the MenuLinkTree service, which is the interface used to load and prepare the tree of a certain menu. The loading is deferred to the MenuTreeStorage service, which does so on the basis of a MenuTreeParameters object that contains metadata on certain restrictions to be applied on the menu links that are loaded. We will see some examples of this a bit later.
What comes out of the MenuLinkTree service is an array of MenuLinkTreeElement objects. These are essentially value objects that wrap the MenuLinkInterface plugins and that provide some extra data about their placement in the tree they are loaded in. One such important piece of information is the subtree (the array of MenuLinkTreeElement objects that are below it).
Menu link tree manipulators
When loading a menu link tree, you get the entire tree that fits the specified parameters. However, when using that tree, you probably want to perform some checks and remove certain items. A common example is to remove the menu links to which the user doesn't have access. This is where manipulators come into place.
The MenuLinkTree service has a transform() method that alters a tree based on an array of manipulators. The latter take the form of callables, typically service names with specific methods. So, the actual manipulators are services that traverse the tree and make alterations to the tree items, their order, and so on.
Menu active trail
A menu trail is a list (array) of menu link plugins that are parents of a menu link. For the active trail, that specific menu link represents the current route (if there is a menu link for that route).
The Drupal menu system also has a service that can be used to determine the active trail of the current route if used by a menu link. By passing a menu name to look inside of, the MenuActiveTrail service returns an array of plugin IDs of the parents all the way up to the menu root, if the current route is in fact an active link. There is also a method that can be used to check that: getActiveLink().
Now that we have covered some theory about the menu system, it's time to get our hands dirty with some code.
Rendering menus
The first thing we will look at is how to work with menus programmatically with the view of rendering them in our module. For this, we will work with the default Administration menu that comes with Drupal core and has many links in it, at various levels. Note that the code we write in this section will not be included in the code repository.
Drupal core provides a block, called SystemMenuBlock, which can be used to render any menu inside a block. However, let's take a look at how we can do this ourselves instead.
The first thing we will need to do is get the MenuLinkTree service. We can inject it, or, if that's not possible, get it statically via the helper Drupal class:
$menu_link_tree = Drupal::menuTree();
Next, we will need to create a MenuTreeParameters object so that we can use it to load our menu tree. There are two ways we can do this. We can either create it ourselves and set our own options on it or we can get a default one based on the current route:
$parameters = $menu_link_tree->getCurrentRouteMenuTreeParameters('admin');
Providing the name of a menu (in our case, admin), this method gives us a MenuTreeParameters instance with the following options set on it:
- The links in the active trail of the current route are marked as expanded, that is, they will show up in the resulting tree that we load.
- The children of the links in the active trail that have the "expanded" property set are also included in the resulting tree.
Essentially, this set of parameters gives us a tree within the context of the current route we are on. In other words, it will load all the root links in the menu and all the children of the root link that are in the active trail of the current route. It will leave out the children of the other root links.
You can, of course, further customize this set of parameters or create one from scratch. For example, if we want to load only the tree of a root link inside a menu, we could do it as follows:
$parameters = new MenuTreeParameters();
$parameters->setRoot($plugin_id);
In this example, $plugin_id is the ID of the menu link that should be at the root of the tree (defined in the YAML file or derived through a derivative).
I encourage you to look inside the MenuTreeParameters class and explore the other options you have for loading a tree.
For our example, we want to work with the entire menu tree of the Administration menu, so just instantiating a new MenuTreeParameters object will be enough, as we want to load all links in the menu. We can do this as follows:
$tree = $menu_link_tree->load('admin', $parameters);
Now, we have an array of MenuLinkTreeElement objects inside the $tree variable, which contain, among others, the following:
- The link property, which is the menu link plugin
- The subtree property, which is an array of MenuLinkTreeElement objects going down the tree
- Various metadata about the link within the tree (depth, whether in the active trail, whether it has children, access, and so on)
However, it is important to note that notwithstanding any MenuTreeParameters we may have had, we are now sitting on top of all menu links in that menu, regardless of any access check. It is our responsibility to make sure that we don't render links to pages the user has no access to (as they will get a 403 error when they get there). To do this, we use the manipulators we discussed earlier, which are simple methods on a service.
The Drupal menu system comes with a few default manipulators that can be found inside the DefaultMenuLinkTreeManipulators service. Most of the time, these will be sufficient for you:
- Access (handled by the checkAccess() method): Checks whether the user has access to the links in the tree. If they don't, the link becomes an instance of InaccessibleMenuLink and any links in its subtree are cleared out.
- Node Access (handled by the checkNodeAccess() method): Checks whether the user has access to the Node entity linked to by the menu link. If you know that the menu has links to Nodes, you can use this before the regular access check because it's a bit more performant.
- Index and Sort (handled by the generateIndexAndSort() method): Creates unique indexes in the tree and sorts it by them.
- Flatten (handled by the flatten() method): Flattens the menu tree to one level.
If these are not enough, you can add your own manipulators as needed. All you have to do is define a service that has a public method and then reference it when transforming the tree. However, speaking of transforming, let's go ahead and use the access check manipulator to ensure that the current user has access to our tree links:
$manipulators = [
['callable' => 'menu.default_tree_manipulators:checkAccess']
];
$tree = $menu_link_tree->transform($tree, $manipulators);
As I mentioned earlier, we use the transform() method on the service and pass an array of callables. The latter are nothing more than the service name, followed by : and the method name to be used (as shown in the code above). So if you create your own service, you can reference it the same way.
Now, each MenuLinkTreeElement that remains in the tree has its access property filled with an instance of AccessResultInterface (a system of denoting access that we will talk more about in Chapter 10, Access Control). If the link is not accessible, it becomes an instance of InaccessibleMenuLink, so we know that we cannot render it, and even if we did render it, it would go to the home page rather than the 403.
Now, to render the tree, all we have to do is turn this tree into a render array:
$menu = $menu_link_tree->build($tree);
Inside $menu, we now have a render array that uses the menu theme hook with a theme hook suggestion based on the menu name. So, in our case, it is menu__admin. Remember what these are from the previous chapter?
The menu theme hook will use the menu.html.twig (or menu--admin.html.twig if it exists inside a theme) file to render the menu links inside a simple, albeit hierarchical, HTML list.
As a quick recap from Chapter 4, Theming, at this point you have a few options for gaining full control over the output of the menu:
- Creating a new theme hook and mimicking what the build() method does to build the render array
- Altering the theme registry to switch out the template with your own
- Overriding the template inside a theme
- Implementing a preprocessor for the theme hook and altering variables there
So, as you can see, you have many options. The choice you make depends on what you need to achieve, how happy you are with what the default markup is, and so on.
Working with menu links
Now that we know how to load and manipulate trees of menu links, let's talk a bit more about the regular menu links. In this section, we will look at how our module can define menu links and how we can work with them programmatically once we get our hands on them from a tree or somewhere else.
Defining menu links
In our Hello World module, we defined a couple of routes, one of which maps to the /hello path. Let's now create a link to that path that goes inside the main menu that is shipped with Drupal core.
As I mentioned, menu links are defined inside a *.links.menu.yml file. So, let's create that file for our module and add our menu link definition in it:
hello_world.hello:
title: 'Hello'
description: 'Get your dynamic salutation.'
route_name: hello_world.hello
menu_name: main
weight: 0
In a typical YAML notation, we have the machine name (in this case, also the plugin ID) hello_world.hello, followed by the relevant information below it. These are the most common things you will define for a menu link:
- The title is the menu link title whereas the description is, by default, set as the title attribute on the resulting link tag.
- The route_name indicates the route to be used behind this link.
- The menu_name indicates the menu that it should be in; this is the machine name of the menu.
- The weight can be used to order links within the menu.
- parent can be used to indicate another menu link the current one should be a child of (as such, you can build the hierarchy).
Once this is in, you should clear the cache and check out the links in the menu. You'll note that you can edit it, but some things cannot be changed through the UI due to them being defined in code.
Note that links that are created as a result of plugin derivatives, such as the ones created in the UI, have machine names (plugin IDs) in the following format:
main_plugin_id:plugin_derivative_id
The main_plugin_id is the ID of the menu link plugin that is responsible for deriving multiple links, whereas the plugin_derivative_id is the ID given to each individual derivative. For example, in the case of MenuLinkContent entities, the format is like this:
menu_link_content:867c544e-f1f7-43aa-8bf7-22fcb08a4b50
The UUID in this example is actually the UUID of the menu link content entity, which happens to be the plugin derivative ID.
Manipulating menu links
I mentioned earlier that MenuLinkTreeElement objects wrap individual menu links, but what can you do with these programmatically if you choose to work with this data yourself and not rely on the menu theme hook? Let's cover a few common things you can do.
First of all, the most important thing to do is to access the menu link plugin. You can do so directly, as it is a public property on the MenuLinkTreeElement:
$link = $data->link;
Now, you can work with the $link variable, which is an instance of MenuLinkInterface, and more often than not, an actual MenuLinkDefault instance that extends the MenuLinkBase class.
So if we inspect that interface, we can see a number of handy methods. The most common of these will be the getters for the menu link definition we saw earlier when defining the plugins. The getUrlObject() is also an important method that transforms the route of the menu link into a Url object that we already know how to use. If the menu link is created in the UI, it could be that it has no route but only a path, in which case, this method will still be able to construct a common Url object based on that path.
If you have your hands on a menu link that is not from a tree where you have already handled access, you can ask the Url object to check access before actually using it:
$access = $url->access();
If the link is not routed, the access will always return TRUE because it means that the link is external, or, in any case, no access check can be done. We will talk more about the access system in Chapter 10, Access Control.
Defining local tasks
Let's now take a look at an example of how we can define local task links by heading back to our Hello World module. On the /hello page, let's add two local tasks—one for the regular /hello page, and the other for the configuration form where the salutation can be changed. This is a good example of using local tasks (tabs), as the configuration form is strictly related to what is on the page and is used to make changes to it.
As I mentioned, local tasks go inside a *.links.task.yml file. So, let's create one for our module with two links in it:
hello_world.page:
route_name: hello_world.hello
title: 'Hello World'
base_route: hello_world.hello
hello_world.config:
route_name: hello_world.greeting_form
title: 'Configuration'
base_route: hello_world.hello
weight: 100
As usual, the topmost lines are the machine name (plugin IDs) of the links and we have the definitions under them. We have a route_name property again to specify what route these links should go to, a title for the link title, and a base_route. The latter is the route the local task should show up on. As you can see, both our links will show up on the /hello page. The weight property can be used to order the tabs.
If you clear the cache and go to that page (as a user who has access to both routes), you'll be able to see the following two tabs:
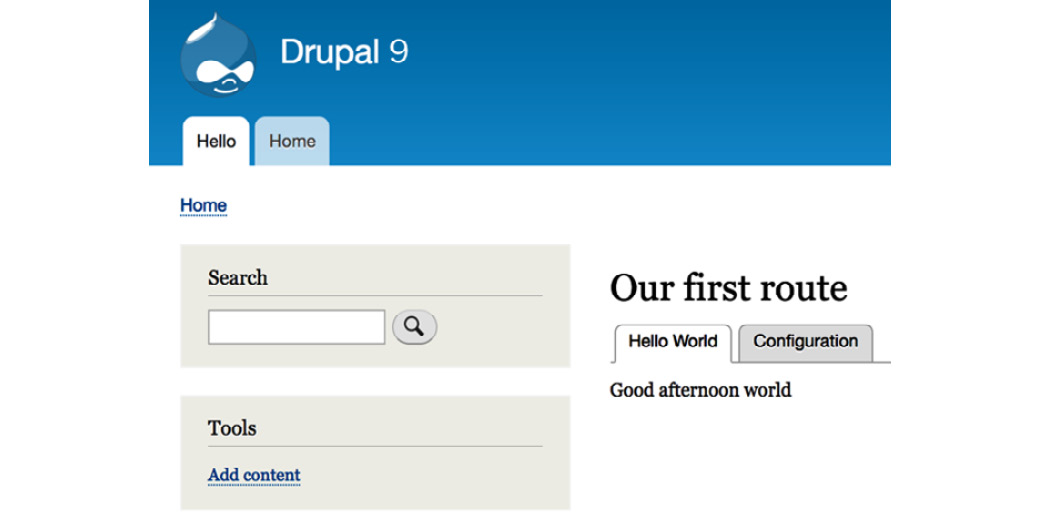
Figure 5.4: Hello World local tasks
If you visit as an anonymous user, neither will show up for the reason I mentioned earlier.
Defining local actions
Nothing about our Hello World module calls for defining a local action link. So instead of doing that, let's check out one that actually makes sense. If you navigate to the admin/content screen, you'll see the + Add content button. It looks exactly the same as the example we saw earlier on the user management page. That is a local action link for this route. The + styling indicates that these links are primarily used to add or create new items relevant to the current route.
This particular local action link is defined in the node module inside the node.links.action.yml file, and it looks like this:
node.add_page:
route_name: node.add_page
title: 'Add content'
appears_on:
- system.admin_content
Again, we have the machine name (plugin ID) and the definition. I hope that route_name and title are, by now, clear to you. A new thing here, though, is the appears_on key that is used to indicate the routes (plural) on which this action link should show up. So, a key feature is that one action link can exist on multiple pages.
Defining contextual links
Contextual links are a bit more complicated than the other types of links we've seen before, but nothing is too challenging for us. Let's take a look at how we can add contextual links to our salutation component so that users can navigate to the configuration form via a contextual link.
First, we will need to create the *.links.contextual.yml file and define the link:
hello_world.override:
title: 'Override'
route_name: hello_world.greeting_form
group: hello_world
Nothing too complicated here. Again, we have a title link and a route_name. Additionally, we have a group key, which indicates the group name that this link will be a part of. We will reference this later.
Next, we will need to alter our theme hook template file because the contextual links are printed in a title_suffix variable that is available in all theme hooks and is used by various modules to add miscellaneous data to templates. The Contextual module is one such example. So, we will need to get that printed. This is what it will look like now:
<div {{ attributes }}>
{{ title_prefix }}
{{ salutation }}
{% if target %}
<span class="salutation--target">{{ target }}</span>
{% endif %}
{{ title_suffix }}
</div>
You'll note that we included the title_prefix variable to keep things nice and consistent. Usually, these will be empty, so no need to worry.
Our hello_world_salutation theme hook defines individual variables rather than a render element. In such cases, inside a general preprocessor, the Contextual module looks at the first defined variable to check whether there are any contextual links defined. In the case of theme hooks that use render elements, it checks that element instead.
This is what the contextual links definition looks like inside a render array and also what we need to add for our use case:
'#contextual_links' => [
'hello_world' => [
'route_parameters' => []
],
]
Here, we defined that the hello_world group of contextual links should be rendered here. Also, we specified an array of route parameters, which, in our case, is empty. This is because, typically, the contextual links are just that—contextual, meaning that they usually work with an entity or something that has an ID, and its route requires a parameter. So, here is where we can supply that because as we've seen, the *.links.contextual.yml definition is static and generic.
Note
The #contextual_links property is, in fact, a render element itself that gets replaced with another render element (contextual_links_placeholder). The latter outputs a simple text placeholder in the HTML, which gets replaced with the correct links via JavaScript.
So, now that we know how to make use of the contextual links, let's alter our Hello World salutation component to make use of this. This is what it looks like now:
public function getSalutationComponent() {
$render = [
'#theme' => 'hello_world_salutation',
'#salutation' => [
'#contextual_links' => [
'hello_world' => [
'route_parameters' => []
],
]
]
];
$config = $this->configFactory->get('hello_world.custom_ salutation');
$salutation = $config->get('salutation');
if ($salutation !== "" && $salutation) {
$event = new SalutationEvent();
$event->setValue($salutation);
$this->eventDispatcher->dispatch(SalutationEvent::EVENT, $event);
$render['#salutation']['#markup'] = $event->getValue();
$render['#overridden'] = TRUE;
return $render;
}
$time = new DateTime();
$render['#target'] = $this->t('world');
if ((int) $time->format('G') >= 00 && (int) $time- >format('G') < 12) {
$render['#salutation']['#markup'] = $this->t('Good morning');
return $render;
}
if ((int) $time->format('G') >= 12 && (int) $time- >format('G') < 18) {
$render['#salutation']['#markup'] = $this->t('Good afternoon');
return $render;
}
if ((int) $time->format('G') >= 18) {
$render['#salutation']['#markup'] = $this->t('Good evening');
return $render;
}
}
The main changes are as follows. First, we have already defined the #salutation variable at the top and made it into a render array. As you remember, these are highly nestable. In this render array, we added our #contextual_links render element. Second, every time we need to set the value for the salutation string below, we do so in a #markup element this time, because, as we saw in the previous chapter, we need a property that defines how the render array gets rendered.
So now if you clear the cache and navigate to the /hello page, you should be able to hover over the salutation and see the contextual links icon pop up and contain our Override link. You should land on the salutation configuration form when you click on the link and also note a destination query parameter in the URL:

Figure 5.5: Hello world contextual links
The destination query parameter is used by Drupal to return the user to the page they previously were on after they submitted a form on that page. This is a handy trick to keep in mind, as it is a very popular UX technique.
Summary
In this chapter, we covered a lot of ground for working with menus and menu links. We started by getting an overview of the architecture of the menu system in Drupal 9. I threw many classes and hooks at you because I am a firm believer that the best way to learn is to dig into the code.
We also saw what types of menu links there are in Drupal. We not only have regular links that belong to actual menus, but all sorts of other utility link systems, such as local tasks, local actions, and contextual links.
Then, we got our hands dirty and started with a practical example of how to load menu links in a tree, manipulate them, and finally turn them into a render array. Right after that, we looked at how we can define all these types of menu links and how to understand them if we need to work with them programmatically.
In the next chapter, we will look at one of the most important aspects of any kind of content management framework—the different types of data storage we can have in Drupal and how we can work with them.