
Chapter 3: Sourcing and Querying Data (from Anywhere!)
In this chapter, you will learn about Gatsby's data layer. You will start by understanding what we mean by data in the context of Gatsby before learning the basics of GraphQL. Once you have this understanding, you will learn how to source and query data from local files. We will then look at sourcing data from a couple of Headless CMSes.
In this chapter, we will cover the following topics:
- Data in Gatsby
- Introducing GraphQL
- Sourcing and querying data from local files
- Sourcing and querying data from a Headless CMS
Technical requirements
To complete this chapter, you will need to have completed Chapter 2, Styling Choices and Creating Reusable Layouts.
The code for this chapter can be found at https://github.com/PacktPublishing/Elevating-React-Web-Development-with-Gatsby-4/tree/main/Chapter03.
Data in Gatsby
Before diving in, I think it's important to establish what we mean by data in the context of this book. When referring to data, we are referring to any medium of static content that is not React code. Up until now, we have been adding text within our React components directly. As a developer, this can be a perfectly acceptable way to build a small site but as things scale up, having content mixed into your markup can make it much harder to develop. It also makes it impossible for colleagues without React experience to update or add new content to the site.
It is a much more common practice to store data that's separate from our pages and components, pulling it in as required. There are two ways in which we can store this data:
- Locally: Files stored alongside our source code in the respective repository, such as JSON, CSV, Markdown, or MDX files.
- Remotely: Files stored in another location that we ingest as part of our build processes, such as content from a Headless CMS, database, or API.
Important Note
You may have noticed the absence of images being referenced when talking about data and might be wondering how to work with them. Due to their complexity, images have a dedicated chapter in this book – Chapter 5, Working with Images.
Now that we understand what we mean by data in Gatsby, let's learn how we can query it within our application so that we can use it on our site pages.
Introducing GraphQL
GraphQL is a specification for querying data – general guidelines on how to query data efficiently. This specification was developed by engineers at Facebook in 2012 while working on their mobile application's REST services. They wanted to use their existing REST service on their mobile platforms, but it was going to require heavy modification and specific logic for mobile platforms in various areas of their APIs. The engineers also noticed that there were lots of data points in the responses to their API requests that they were not using. This meant that people with low network bandwidth were loading data they weren't even using.
So, the team at Facebook started to work on GraphQL to solve these problems and rethink the way they could fetch data for devices. GraphQL shifted the focus from the backend engineers specifying what data is returned by what request, to the frontend developers specifying what they need.
GraphQL for Gatsby
Gatsby always uses GraphQL whenever you want to get data from within it. This is a great feature as we have an efficient way of getting data, regardless of its type. Gatsby can call GraphQL APIs directly if you already have a GraphQL server set up. However, a lot of the data we need to use on the web is not already in GraphQL format.
Luckily, Gatsby's plugin architecture allows you to get non-GraphQL data into Gatsby, then use GraphQL to query it once you have it there. Regardless of whether your data is local or remote, or what format it is in, you can use one of Gatsby's plugins to pull the data. Then, you can use the GraphQL specification to query for that data on our pages.
This is a great architecture that works with all of our content, no matter where it comes from. When it gets into Gatsby, we always query and retrieve that data in the same way.
Let's look at a high-level example of what a GraphQL query contains:
query SampleQuery {
content {
edges {
node {
property
}
}
}
}
Here, you can see that we used the word query, followed by the name of the query, which, in our case, is SampleQuery. Then, inside of the curly braces, we specify what kind of content we want to get – where you see content here, this would change to be the source of content you want. edges refers to a collection of connected items within that content source that have a relationship returned as an array. Then, when we go a level deeper, we have node, which refers to an individual item. Here, you can see that we are querying a single property.
One of the great things about GraphQL is that you can be very specific about the data you need and only get that specific content. As shown in the previous example, we are only querying a single property of the node, but what if it contained a hundred properties instead? By pulling out only exactly what we need, we can create a very specific query that only gets us what we need.
Now, let's look at a Gatsby-specific GraphQL query:
query MySitePages {
allSitePage {
edges {
node {
path
}
}
}
}
Here, we can see that we are naming the query MySitePages. The content we are retrieving is from the allSitePage source, which is a default collection that contains all the pages that have been created within a Gatsby project. edges refers to all the pages, whereas node refers to a specific page we want. Inside each page, we are querying for the path parameter of that page.
When running this query in Gatsby, it is going to return JSON. If you run the preceding query within our site and log the result, you would see the following object:
{
"data": {
"allSitePage": {
"edges": [
{
"node": {
"path": "/404/"
}
},
{
"node": {
"path": "/about/"
}
},
{
"node": {
"path": "/"
}
}
]
}
}
}
As you can see, what we get back is an object with a data property. Within that, you can see our named query and its edges. The edges contain each node and its corresponding path property. Within the result, we can see every page that exists on the site – we have our 404 page, the about page, and the home page.
Now, let's learn about filtering and sorting data within GraphQL.
Filtering in GraphQL
Sometimes, all the nodes of the returned data are not useful. We may occasionally want to filter out nodes based on a particular field. Let's take a look at an example where we are filtering out nodes from our allSitePage source:
query AllSitePagesExcept404 {
allSitePage(filter: {path: {ne: "/404/"}}, limit: 1) {
edges {
node {
path
}
}
}
}
Here is an example in which we get a single page where the path does not equal (ne for short) /404/. Filtering is something we will look at in more detail as we start to develop more complex queries for our pages. Right now, it's important just to recognize that it is possible.
In Gatsby, it is possible to obtain a single node on its own, but it is more common to query a collection. For example, if we wanted to retrieve a single SitePage node, we could use the following query:
query ASingleSitePage {
sitePage {
path
}
}
This query will receive the first node that matches the request and return it as an object instead of a larger array.
Now that we understand how GraphQL queries are constructed, let's take a look at how we can use GraphiQL to explore our data.
Using GraphiQL
When it comes to learning GraphQL, it's fortunate that Gatsby ships with a tool called GraphiQL (https://github.com/graphql/graphiql). This is a web interface that hooks up to all of the GraphQL options in Gatsby and gives us a nice interface for testing and playing around with queries before we embed them into our code.
As we know, when developing our site, Gatsby opens up http://localhost:8000 to preview our site while we are building it. If you navigate to http://localhost:8000/___graphql, you will pull up a GraphiQL interface that is connected to your development Gatsby site. When you open this page, you should be presented with something that looks like this:
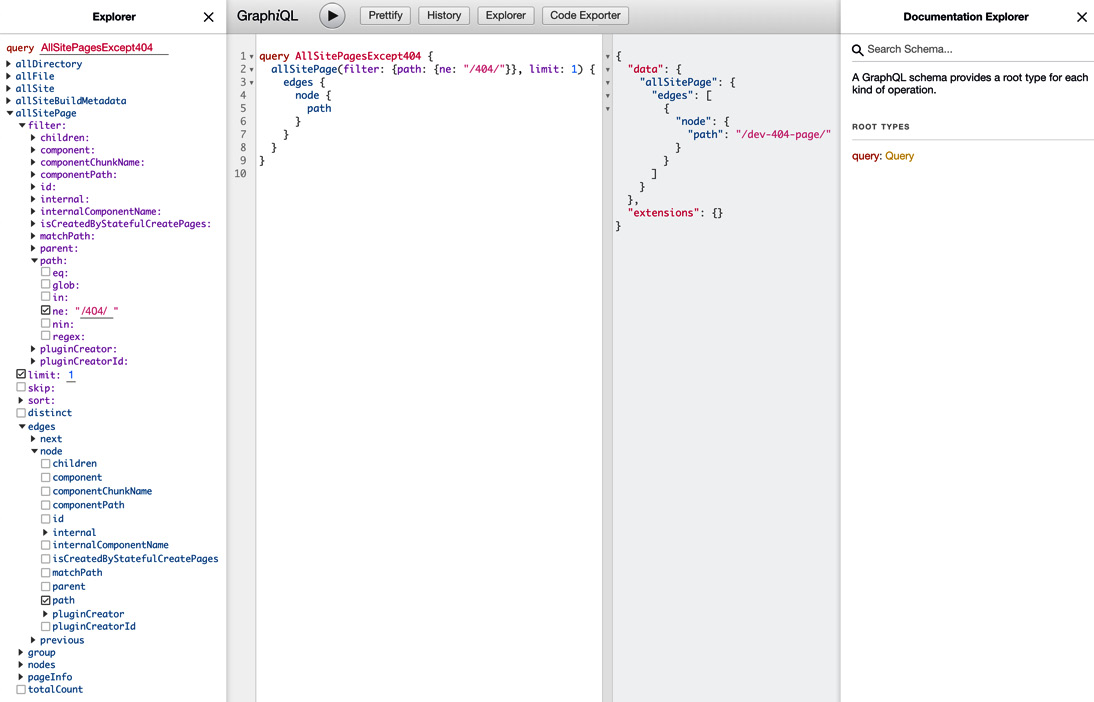
Figure 3.1 – GraphiQL user interface
On the far left, you will see Explorer, which shows all the possible pieces of content we could get using GraphQL inside of Gatsby. You can check the properties within the Explorer area to have GraphiQL automatically build the query for you. In the central left column, we can see the query that we need to use to retrieve the data we want. When you hit the Play button above the query, you will see the result of that query on the central right column, with a JSON object containing the data property and our query's result inside it. On the far right, you will see the Documentation Explorer area, which you can use as an alternative way to explore your data and identify the different types of data you have available.
Now, let's learn where we can use queries to retrieve data within our application.
Using constructed GraphQL queries
There are three main places where you can use a GraphQL query in your Gatsby projects:
- Gatsby-node.js: This file is one of the places we can create pages programmatically based on dynamic data. If we had a list of blog posts in Markdown and we wanted to create a page for each one, we would use a query here to retrieve the data from the posts that we need to dynamically create the pages for.
- Within pages: We can append queries to single instance pages to make data available within that page. This is how we will be testing the data we source within this chapter. We can also query inside page templates, something we haven't discussed yet, but it is a key concept we will look at in detail in Chapter 4, Creating Reusable Templates. A page template could take a slug based on the URL and then run a query based on that URL to work out what page to display. In both single-instance pages and templates, the query is run at build time, so the pages that are created are still static.
- Within any other component: We can also retrieve GraphQL data within any React component we have created. There is a different method to retrieving data outside of page templates because outside of a page template, you cannot get dynamic content using variables. As such, queries run this way are static. We will see examples of static queries in Chapter 5, Working with Images.
Now that you understand the basics of GraphQL in Gatsby, let's start ingesting different kinds of data into our GraphQL layer.
Sourcing data from local files
In this section, we will learn how to source and query data from local files. As we mentioned previously, when we say local files, we are referring to files located alongside the code in our repository.
Site metadata
A great place to store small reusable pieces of data is within the gatsby-config.js file. Gatsby exposes the siteMetadata property to the data layer so that you can retrieve it throughout your application. In the context of our website, I would suggest storing your website address, your name, your role, and a short bio here. If this is implemented consistently, whenever any of these pieces of information change, you can change the field once in siteMetadata and see the change reflected across your whole site.
Tip
gatsby-config.js is a file that you will often find growing quite large as you expand your Gatsby projects. To try and keep things ordered, try and reserve your siteMetadata for a handful of small strings. If you are considering adding a large block of text here, it might be better to add it as a Markdown file.
Let's create some site metadata and ingest it on our home page:
- First, update gatsby-config.js with the following code:
module.exports = {
siteMetadata: {
siteUrl: 'https://your.website',
name: 'Your Name',
role: 'Developer at Company',
bio: 'My short bio that I will use to introduce
myself.'
},
plugins: [
// your plugins
],
};
The siteMetadata key sits next to the plugins we have defined. Here, you can see we have defined the key values I suggested earlier. Keep in mind that these key values are just a suggestion and that if you want to add or remove keys, feel free to do so.
- Use the GraphiQL interface to construct the GraphQL query to retrieve the data. This should look like this:
query BasicInfo {
site {
siteMetadata {
name
role
}
}
}
Your site metadata is available within the site source. In the preceding query, we are only retrieving name and role.
- Embed your constructed query on your index page:
import React from "react";
import { Link, graphql } from "gatsby";
import Layout from "../components/layout/Layout";
export default function Index({ data }) {
const {
site: {
siteMetadata: { name, role },
},
} = data;
return (
<Layout>
<div className="max-w-5xl mx-auto py-16 lg:py-
24">
<h1 className="text-4xl md:text-6xl font-bold
text-black pb-4">
{name}
</h1>
<p className="mb-4">{role}</p>
<Link to="/about" className="btn">
About me
</Link>
</div>
</Layout>
);
}
export const query = graphql'
{
site {
siteMetadata {
name
role
}
}
}
';
Here, you can see we are importing graphql from Gatsby. We are then appending our query from Step 2 to the end of the file, below our page component. The export name isn't important as Gatsby looks for any GraphQL string within your pages, but here, you can see I am calling it query.
When Gatsby builds this page, this query is pulled out of our source code, parsed, and run, and the resultant data is passed into our page component via the data prop you can see on line 5. We can then use the data contained within the query (in our case, name and role from siteMetadata) to populate our site hero.
Important Note
You can only export one query per component. If you ever need more data on the page, instead of exporting another query, extend your existing query.
Now, let's learn about how we can ingest data from sources that are not included with Gatsby out of the box – starting with Markdown.
Markdown
The Markdown syntax is a popular way to write content on a Gatsby site. If you have used GitHub or Bitbucket before, chances are you've already encountered this format as they both make use of it in README files. Markdown is a great format for longer pieces of writing within your site – documentation, blog posts, or even a long bio.
To start using Markdown in Gatsby, you only need to create text files – no additional infrastructure is required to implement it. Gatsby also provides core-plugin (a plugin owned and maintained by the Gatsby team) to process Markdown into content that can be used by our components. Using core-plugin, no code is required to implement Markdown and get set up.
Let's create a short biography in Markdown and add it to our about page:
- Create a folder to store our Markdown called MD at the root of your project.
It's good practice to keep this folder outside of your src directory as it does not contain any source code but instead is text content. This makes it much easier for a developer without React experience to modify site content.
- Create a folder inside /MD to store your bio called bio. As we add more Markdown files that serve up different types of content, it's helpful to keep them separated.
- Create a bio.md file inside our newly created bio folder and add the following code:
---
type: bio
---
This is the first part of the file and contains YAML frontmatter. YAML is a human-readable data-serialization language. Here, we are defining a type. This type will help us query for this exact file in our GraphQL query.
- Create the body of your biography using Markdown syntax:
---
type: bio
---
# A short biography about me
This is a very short biography about ***me***. But it could be as long as I want it to be.
You can use any valid Markdown syntax here; I have kept this example brief by just including one heading and a paragraph, but feel free to add as much as you like.
- Install gatsby-source-filesystem:
npm install gatsby-source-filesystem
As its name might suggest, this plugin allows Gatsby to read local files.
- Install gatsby-transformer-remark:
npm install gatsby-transformer-remark
We can use this plugin to recognize Markdown files and read their content. This plugin will read in the syntax and convert it into HTML that we can then embed in our components.
- Next, let's configure our new dependencies in gatsby-config.js:
module.exports = {
siteMetadata: {
siteUrl: 'https://your.website',
name: 'Your Name',
role: 'Developer at Company',
bio: 'My short bio that I will use to introduce
myself.',
},
plugins: [
{
resolve: 'gatsby-source-filesystem',
options: {
name: 'markdown-bio',
path: '${__dirname}/MD ',
},
},
'gatsby-transformer-remark',
'gatsby-plugin-postcss',
],
};
Here, we are introducing Gatsby to our new plugins. We are using gatsby-source-filesystem to tell Gatsby to read files from the Markdown folder we created previously.
We also added gatsby-transformer-remark so that Gatsby can read Markdown files into its GraphQL layer.
- Start your development server and navigate to your GraphiQL interface. Construct and run the query to retrieve just the bio information:
query Biography {
markdownRemark(frontmatter: {type: {eq: "bio"}}) {
html
}
}
Here, we have constructed a query where we are retrieving the HTML from markdownRemark. We are filtering the Markdown where the frontmatter type is equal to bio and since there is only one such file, we will always retrieve the correct file. By running this query in the GraphiQL interface, you should see something that looks like this:
{
"data": {
"markdownRemark": {
"html": "<h1>A short biography about
me</h1> <p>This is a very short biography
about <em><strong>me</strong></em>. But it
could be as long as I want it to be.</p>"
}
},
"extensions": {}
}
Here, you can see that the Markdown we wrote in the file has been transformed into HTML that we can now use within our pages.
- Embed this query in your about page:
import React from "react";
import { graphql } from "gatsby";
import Layout from "../components/layout/Layout";
export default function About({ data }) {
const {
markdownRemark: { html },
} = data;
return (
<Layout>
<div className="max-w-5xl mx-auto py-16 lg:py-24
text-center">
<div dangerouslySetInnerHTML={{ __html: html
}}></div>
</div>
</Layout>
);
}
export const query = graphql'
{
markdownRemark(frontmatter: { type: { eq: "bio" }
}) {
html
}
}
';
Here, we have appended our query to the bottom of the page and retrieved the resultant data via the data prop. I'd like to draw your attention to the div with the dangerouslySetInnerHTML prop. dangerouslySetInnerHTML is React's replacement for using innerHTML in the browser's DOM.
It's considered dangerous because if the content can be edited by a user, this can expose users to a cross-site scripting attack. A cross-site scripting attack injects malicious code into a vulnerable web application. In our case, however, the content is always static and always defined by us, so we have nothing to worry about.
Markdown can be a great option if you want to write long-form articles, but what if you want to make your articles more interactive? Maybe you want a poll in the middle of your post or a prompt for users to sign up to your email between two paragraphs? There are plenty of scenarios like these that simply cannot be achieved elegantly in Markdown. For functionalities such as these, MDX is the answer.
MDX
MDX is a format that allows you to enhance your Markdown with JSX. You can import components into your Markdown and embed them in your content.
Let's make an enhanced biography on our about page using MDX that contains your employment history:
- Create a folder to store our Markdown called MDX at the root of your project. As with Markdown (and for the same reasons), it's good practice to keep this folder outside of src, even though it can contain React components.
- Create a folder inside /MDX to store your bio called bio (as we did with our Markdown).
- Create a folder called components within your /MDX folder to store React components specifically for use within our MDX files.
- Create an EmploymentHistory component in the components folder that we can embed in our mdx file:
import React from "react";
const employment = [
{
company: "Company One",
role: "UX Engineer",
},
{
company: "Company Two",
role: "Gatsby Developer",
},
];
const EmploymentHistory = () => (
<div className="text-left max-w-xl mx-auto">
<div className="grid grid-cols-2 gap-2 mt-5">
{employment.map(({ role, company }) => (
<>
<div className="flex justify-end font-
bold"><p>{role}</p></div>
<p>{company}</p>
</>
))}
</div>
</div>
);
export default EmploymentHistory;
I am using employment history as an example here, but this can be any valid React component. In this example, we have defined a small array of employment experiences containing objects, each with a company and role. In EmploymentHistory, we map over those roles and lay them out in a grid. We then export the component as normal.
- Create bio.mdx in /MDX/bio:
---
type: bio
---
import EmploymentHistory from
"../components/EmploymentHistory";
# A short biography about me
This is a very short biography about **_me_**. But it could be as long as I want it to be.
### ***My Employment History***
<EmploymentHistory />
Like our Markdown, we can include frontmatter in MDX files. Here, we are once again specifying type as bio. Just below that, you will see we have introduced an import statement pointing to our newly created component. We can then use the imported component wherever we like within the body of our content, much like I have on the last line in the preceding example.
- Install the necessary mdx dependencies:
npm install gatsby-plugin-mdx @mdx-js/mdx @mdx-
js/react
- Configure gatsby-config.js so that it includes the gatsby-plugin-mdx plugin:
module.exports = {
siteMetadata: {
siteUrl: 'https://your.website',
name: 'Your Name',
role: 'Developer at Company',
bio: 'My short bio that I will use to introduce
myself.',
},
plugins: [
{
resolve: 'gatsby-source-filesystem',
options: {
name: 'mdx-bio',
path: '${__dirname}/MDX ',
},
},
'gatsby-plugin-mdx',
'gatsby-plugin-postcss',
],
};
We use gatsby-source-filesystem to tell Gatsby to read files from the MDX folder we created previously. We have also added gatsby-plugin-mdx so that Gatsby can read MDX files into its GraphQL layer.
- Start your development server and navigate to your GraphiQL interface. Construct and run the query to retrieve our updated MDX bio:
query Biography {
mdx(frontmatter: { type: { eq: "bio" } }) {
body
}
}
Here, we have constructed a query where we are retrieving the mdx body from the mdx source, where the frontmatter type is equal to bio.
- Embed the query in your about page:
import React from "react";
import { graphql } from "gatsby";
import Layout from "../components/layout/Layout";
import { MDXRenderer } from "gatsby-plugin-mdx";
export default function About({ data }) {
const {
mdx: { body },
} = data;
return (
<Layout>
<div className="max-w-5xl mx-auto py-16 lg:py-24
text-center">
<MDXRenderer>{body}</MDXRenderer>
</div>
</Layout>
);
}
export const query = graphql'
{
mdx(frontmatter: { type: { eq: "bio" } }) {
body
}
}
';
Here, we have appended our query to the bottom of the page and retrieved the resultant data via the data prop. We then used MDXRenderer from gatsby-plugin-mdx to render the MDX body's content.
Important Note
Using MDXRenderer does increase your bundle size and the time it takes for your JavaScript to be parsed. This is because instead of rendering all the HTML at build time, any pages containing MDX are now being rendered to HTML on the frontend. This is important to keep in mind as it will negatively impact your site's performance.
Now that we understand how to ingest local data, let's look at sourcing data from a remote source – a Content Management System (CMS)!
Sourcing data from a Headless CMS
A Headless CMS is a CMS that purely focuses on the content itself and does not care about how it's presented. Traditional CMSes store content in a database and then use a series of HTML templates to control how content gets presented to viewers. In Headless CMSes, however, instead of returning HTML, we return structured data via an API.
Content creators can still add and edit data via a user interface, but the frontend is stored completely separately. This is perfect for when your content creators are not developers, or when you're out and about and want to write a post on your phone without having to spin up your laptop.
With Gatsby's vast plugin ecosystem, your site can support many different Headless CMSes with very little effort. You could write a book on how to implement every one of them into your project, so, instead, let's focus on two – GraphCMS and Prismic.
Important Note
Only implement one of the Headless CMS choices outlined in this chapter. Not only would having two different sources for the same type of data be confusing, but it would also lead to longer site build times as data will need to be retrieved from two sources instead of one.
GraphCMS
GraphCMS is a fully-hosted SaaS platform that's used by over 30,000 teams of all sizes across the world. Their queries are cached across 190 edge CDN nodes globally, meaning that wherever you're located, pulling data from GraphCMS into your Gatsby projects should be blazingly fast. Let's introduce ourselves to using GraphCMS by creating a list of hobbies within the tool that we can then ingest within our application:
- Navigate to the GraphCMS website (graphcms.com) and log in.
- Create a new blank project and pick the region you want to host your data in.
- Navigate to your project's schema and create a hobby model. The schema is the blueprint for your data graph. Your schema is built from the models you create, the fields they contain, and their relationships. Clicking the add button next to Models will open the following dialog:

Figure 3.2 – Model creation in GraphCMS
Here, you can see I am creating a model called Icebreakers. You'll notice that you need to provide an API ID and its plural form to make it easier to distinguish between when you are querying a single item versus the whole collection. Upon hitting Update Model, you should see that Icebreakers has been added to the model on the left sidebar.
- We can now start to define what type of data is in our Icebreakers model by adding fields. Upon clicking on the Icebreakers model, you will see many field options on the right-hand side. We can use these to explain to GraphCMS what format our data will take. In our case, a hobby consists of one to three words each, so it would be appropriate to use the Single Line Text field option. Selecting this option will open the following dialog:

Figure 3.3 – Field creation in GraphCMS
Enter an appropriate display name and API ID, such as hobbies. Write Collection of hobbies I have as the description. I have also checked Allow multiple values so that we can store a list of hobbies instead of one. Click Update to save this configuration.
- Navigate to the content section of the site. Click Create item at the top right of the page. This will open the following window:

Figure 3.4 – Populating content in GraphCMS
We can now start to fill in our hobbies, adding them to the list as we go. Once you've done this, hit Save at the top right.
- Returning to the content window, you will see that your created icebreaker is in Draft mode. This means that we are not happy with the content yet and that we will not be able to retrieve it from the API yet:

Figure 3.5 – GraphCMS content and its draft status
- To make the content live, we need to publish it by selecting the item and then clicking the Publish button.
- Next, we need to modify the endpoint settings to allow for public API access. By default, your GraphCMS API is not accessible from outside of their platform. You can change the settings for your public API access or create permanent authentication tokens with access permissions. Often, I lean toward keeping my data public as it is still only retrievable if you know the API's URL. Since it can't be edited by default, all of it will be displayed publicly on my site anyway.
Navigate to Settings, then API Access, and modify your public API permissions to the following:

Figure 3.6 – GraphCMS public API settings
You will see that I have checked Content from stage Published. By doing so, we can now retrieve data that has been published via the URL endpoint, located at the top of the API's Access page.
- Scroll to the top of this page and take note of your master URL endpoint. We will now move over to our Gatsby project and start ingesting data using this URL.
- Open a terminal at the root of your project and install the necessary dependencies, the official GraphCMS source plugin, and dot-env:
npm install gatsby-source-graphcms gatsby-plugin-image
dotenv
gatsby-source-graphcms will allow us to source data from GraphCMS within our application, while dotenv is a zero-dependency module that loads environment variables from a .env file. We will be storing our API endpoint in the .env format. This plugin also requires gatsby-plugin-image under the hood, so make sure to install it. We will talk more about gatsby-plugin-image in Chapter 5, Working with Images.
- Create a .env file at the root of your project and add your master URL endpoint for GraphCMS as a variable:
GRAPHCMS_ENDPOINT=Your-master-endpoint-url-here
This .env file is used to house environment variables. Be sure to replace the highlight with your master URL endpoint from Step 6. This file should not be committed to source control and, as such, should be added to your .gitignore.
- Modify your gatsby-config.js file so that it includes gatsby-plugin-image and gatsby-source-graphcms:
require("dotenv").config()
module.exports = {
...
plugins: [
...
'gatsby-plugin-image',
{
resolve: 'gatsby-source-graphcms',
options: {
endpoint: process.env.GRAPHCMS_ENDPOINT,
},
},
...
],
};
Firstly, we use dotenv to load in our create .env file, and then we use that variable within the plugin configuration of gatsby-source-graphcms.
- We can now start our development server. You will notice that when the development server starts, a new folder is created called graphcms-fragments. This folder is maintained by the plugin and contains fragments that explain the structure of our data to the GraphQL data layer.
- At this point, we can query our data as if it were any other source. First, we must construct a query:
query Hobbies {
graphCmsIcebreaker {
hobbies
}
}
Here, I have created a query that extracts our hobbies array from the auto-generated graphCmsIcebreaker source.
- We can now embed this query in our about page:
import React from "react";
import { graphql } from "gatsby";
import Layout from "../components/layout/Layout";
import { MDXRenderer } from "gatsby-plugin-mdx";
export default function About({ data }) {
const {
mdx: { body },
graphCmsIcebreaker: { hobbies },
} = data;
return (
<Layout>
<div className="max-w-5xl mx-auto py-16 lg:py-24
text-center">
<MDXRenderer>{body}</MDXRenderer>
<div>
<h2>Hobbies</h2>
{hobbies.join(", ")}
</div>
</div>
</Layout>
);
}
export const query = graphql'
{
mdx(frontmatter: { type: { eq: "bio" } }) {
body
}
graphCmsIcebreaker {
hobbies
}
}
';
You'll notice that I have just appended the new query to the existing page query, bundled into the same GraphQL string. Gatsby expects to only find one query per page. I then deconstructed the data prop to retrieve the hobbies array.
Now that we understand how GraphCMS works, let's turn our attention to how you would implement one of GraphCMS's competitors, Prismic.
Prismic
Prismic is smaller than GraphCMS, with around 5,000 paying customers. One feature that makes it stand out is they offer dynamic multi-session previews, allowing you to share multiple simultaneous dynamic previews (with shareable links) in Gatsby. This can improve your workflow when you're working with clients and you need to send the client's site content back and forth. Let's learn how to integrate Prismic by adding a list of hobbies within the UI so that we can then ingest them within our Gatsby site:
- Create a folder in /src called schemas. Unlike GraphCMS, Prismic does not automatically create the schemas for us; instead, we will retrieve them using the Prismic UI as we create them.
- Navigate to Prismic's website (prismic.io) and log in. Create a new repository with the free plan (you can always scale up later if you need to).
- Click the Create your first custom type button and select the single type. Name your type Icebreaker and submit.
- Scroll to the bottom of the build-mode sidebar on the right and drag a group into the central page:

Figure 3.7 – Prismic group field options
- Name your field hobbies; the corresponding API ID should populate on its own. Click OK to confirm this.
- Drag a rich text field into this group:

Figure 3.8 – Prismic text field configuration
This will open the side panel shown to the left of the preceding screenshot. We will use the rich text field as the type for a single hobby. First, let's give it a name – hobby seems appropriate. Ensure that API ID matches the assigned name. Uncheck the Allow multiple paragraphs box and then ensure that only the paragraph object is highlighted. By doing so, we can ensure that our hobbies are always single lines that only consist of paragraphs. Submit this using the OK button.
- Save the document.
- Now that we have defined our type, navigate to the JSON editor and copy its contents.
- Create a new file inside your schemas folder called icebreaker.json and paste the JSON you have copied.
- Navigate back home and click on Documents. Then click the pencil icon button to create a new instance of your Icebreaker type:

Figure 3.9 – Prismic collection interface
You can now use your hobbies type to create your data. Once you are happy with your list of hobbies, you can hit Save, followed by Publish.
- Return home, navigate to Settings, and click on API and security. Ensure that your repository security is set to Public API for Master only:

Figure 3.10 – Repository security
This means that anyone with your API URL can access what is currently live but not preview future releases. Make a note of your API entry point, which should be located at the top of this page. Now, let's look at our Gatsby project and start ingesting data using that URL.
- Install the Gatsby Prismic source plugin:
npm install gatsby-source-prismic gatsby-plugin-image
- Modify your gatsby-config.js file:
module.exports = {
...
plugins: [
...
'gatsby-plugin-image',
{
resolve: 'gatsby-source-prismic',
options: {
repositoryName: 'elevating-gatsby',
schemas: {
icebreaker:
require('./src/schemas/icebreaker.json'),
},
}
},
...
],
};
Here, you are adding the source plugin for Prismic to your Gatsby configuration. Be sure to change the repository name to that of your site. If you're unsure what your repository's name is, you can find it in your API URL. We are also directing the plugin to use the schema we have created for our icebreaker. The plugin is also dependent on gatsby-plugin-image, so make sure it has been added to your configuration.
- We can now start our development server and query our data as normal. Upon opening GraphiQL, you should see prismicIcebreaker as a new source that we can use to query for our hobbies:
query Hobbies {
prismicIcebreaker {
data {
hobbies {
hobby {
text
}
}
}
}
}
Here, we are retrieving the text value of every hobby from within the hobbies object.
- We can now embed this query in our about page:
import React from "react";
import { graphql } from "gatsby";
import Layout from "../components/layout/Layout";
import { MDXRenderer } from "gatsby-plugin-mdx";
export default function About({ data }) {
const {
mdx: { body },
prismicIcebreaker: {
data: { hobbies },
},
} = data;
return (
<Layout>
<div className="max-w-5xl mx-auto py-16 lg:py-24
text-center">
<MDXRenderer>{body}</MDXRenderer>
<div>
<h2>Hobbies</h2>
<ul>
{hobbies.map(({ hobby }) => (
<li>{hobby.text}</li>
))}
</ul>
</div>
</div>
</Layout>
);
}
export const query = graphql'
{
mdx(frontmatter: { type: { eq: "bio" } }) {
body
}
prismicIcebreaker {
data {
hobbies {
hobby {
text
}
}
}
}
}
';
As we did when we looked at GraphCMS, I have just appended the new query to the existing page query. Our data is then passed in as the data prop and is available for us to use in whatever way we wish.
You should be starting to see the power of using GraphQL in Gatsby. As soon as we have ingested data, we can use the same format to query it every time. Using these two as examples, you should feel comfortable sourcing data from another CMS using a source plugin.
Summary
In this chapter, you learned how to use Gatsby's data layer. You learned about the basics of how to explore your GraphQL data layer via GraphiQL and should now feel comfortable sourcing and ingesting data into your Gatsby project from a multitude of different sources – siteMetadata, Markdown, MDX, and CMSes using their plugins. If you are interested in how source plugins are created and how to make your own, check out Chapter 10, Creating Gatsby Plugins.
In the next chapter, we will create and use reusable templates for pages that appear more than once, such as blog pages. This is great for when you have multiple pieces of data that you want to make use of while using the same layout.