
6
Using Gestures and Shortcuts
Looking at the interface of Procreate, you’ll realize that it is compact and lightweight, designed to put maximum focus on the work area. Most of the tools are packaged away into menus and sub-menus, most of which we learned about in the preceding chapters. While this design is greatly effective, it might get in the way of speed.
This is where gestures come in. Gestures are simple, easy-to-perform actions that act as shortcuts to perform specific functions. They save you the time and effort of having to go through multiple steps every time you want to do a task. Gestures also play a huge role in making the software intuitive and more natural to use. Having a grasp of Procreate’s various gestures and their functions can greatly speed up your workflow.
We will start this chapter by learning what gestures are, and which ones are the most commonly used. Then we’ll discuss a special set of gestures that makes Procreate accessible for more people. The next topic will introduce specifically layer-related gestures. Finally, we will talk about how to customize gestures to fit your needs.
We’re going to cover the following broad topics in this chapter:
- Understanding basic gestures
- Accessibility gestures
- Layer gestures
- Customizing gestures
Understanding basic gestures
Basic gestures are the ones you will be using most frequently to perform simple fundamental actions. It is crucial to learn these at the earliest stages of using the software for a smooth experience. We will explore these gestures one by one in the following sections.
Pinch
The pinch is an extremely useful gesture. It helps to zoom, rotate, and reposition your canvas. The following are the types of pinch gestures:
- Pinch to zoom: You might already be familiar with this function. With two fingers, pinch out to zoom into your canvas:

Figure 6.1: Pinch out to zoom in
Similarly, you can pinch in to zoom out as shown in the following screenshot:

Figure 6.2: Pinch in to zoom out
- Pinch and twist to rotate: You can pinch your canvas and twist your hand in any direction to rotate the canvas in that direction.
- Quick pinch: Pinch your canvas briefly in a quick motion to resize it to fit the screen, as it was when you opened the canvas.
Double-tap undo
By default, tapping the screen with two fingers performs the undo function:

Figure 6.3: Double-tap to undo
You can also double-tap and hold your fingers to the screen to activate rapid undo. This will undo your actions rapidly in quick succession.
Three-finger tap redo
Similar to the previous section, tapping the screen with three fingers will redo the action that you last undid. Tap and hold with three fingers to activate rapid redo:

Figure 6.4: Three-finger tap to redo
There are more three-finger actions, which are discussed in the next few sub-sections.
Three-finger scrub
This gesture is performed by using three fingers to quickly rub the screen from left to right, called a scrub:

Figure 6.5: Three-finger scrub to clear layer
By default, this clears all the contents of the current layer.
Three-finger swipe down
Swiping down with three fingers is used to bring up a floating menu called Copy & Paste:

Figure 6.6: Three-finger swipe down
This menu has clipboard tools (Cut, Copy, Paste, and so on), as shown in the following screenshot:

Figure 6.7: Copy & Paste menu
This menu can be used on the current layer or selection. The following options are available here:
- Cut: This is used to clear the contents of the layer or selection, while still having it available on your clipboard to be pasted later.
- Copy: This is used to copy the contents of the layer or selection into your clipboard without clearing the original.
- Copy All: This is used to copy the whole canvas as a single image, which you can then paste.
- Duplicate: This is used to perform the Copy and Paste functions in one go. The selection or layer will be duplicated onto a new layer titled From Selection or Inserted Image (when the whole layer is duplicated).
- Cut & Paste: This is used to perform the Cut and Paste functions together. The selection or layer will be cleared and transferred to a new layer titled From Selection or Inserted Image (when the whole layer is cut and pasted).
- Paste: This is used to re-insert your cut or copied selection as a new layer titled From Selection or Inserted Image (when the whole layer is pasted).
Four-finger tap
When the screen is tapped with four fingers, as shown in the following screenshot, it hides the interface and gives you a fullscreen view of your canvas:
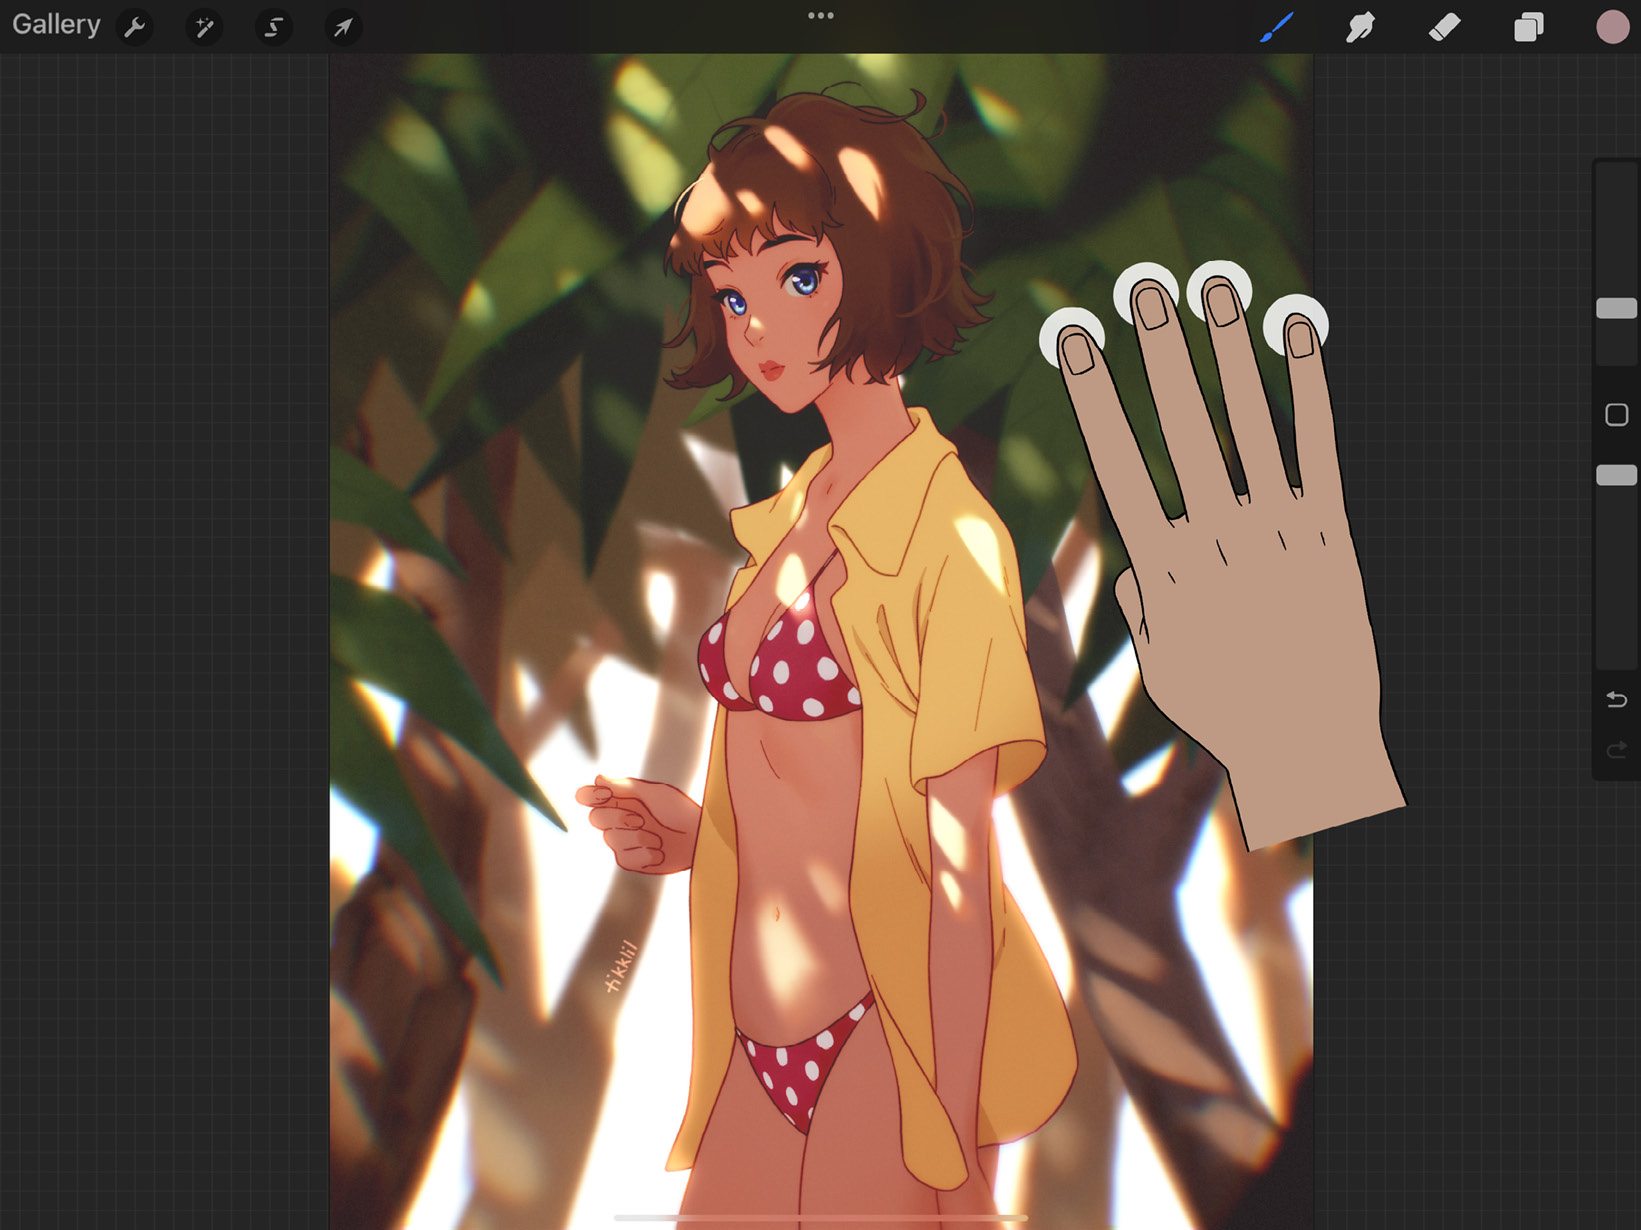
Figure 6.8: Four-finger tap to enter fullscreen mode
Tap with four fingers once again to restore the interface. In the next section, we will discuss QuickShape, a great tool for accuracy.
QuickShape
This feature allows you to quickly create regular shapes from freely drawn strokes. Draw a freehand shape and hold your Apple Pencil down on your screen without lifting it. Your drawing will turn into the closest regular shape, such as a straight line, arc, circle, rectangle, and many more.
To use the QuickShape feature, follow these steps:
- Draw a freehand shape. For this exercise, let’s go with a wonky circle, as shown here:

Figure 6.9: Hand-drawn circle
- Without lifting your pencil, press and hold until the shape turns into a regular ellipse. At the top of the screen, you will see a notification pop up, which says Ellipse created. You can stretch, rotate, and resize the shape by dragging your pencil without lifting it, as shown here:
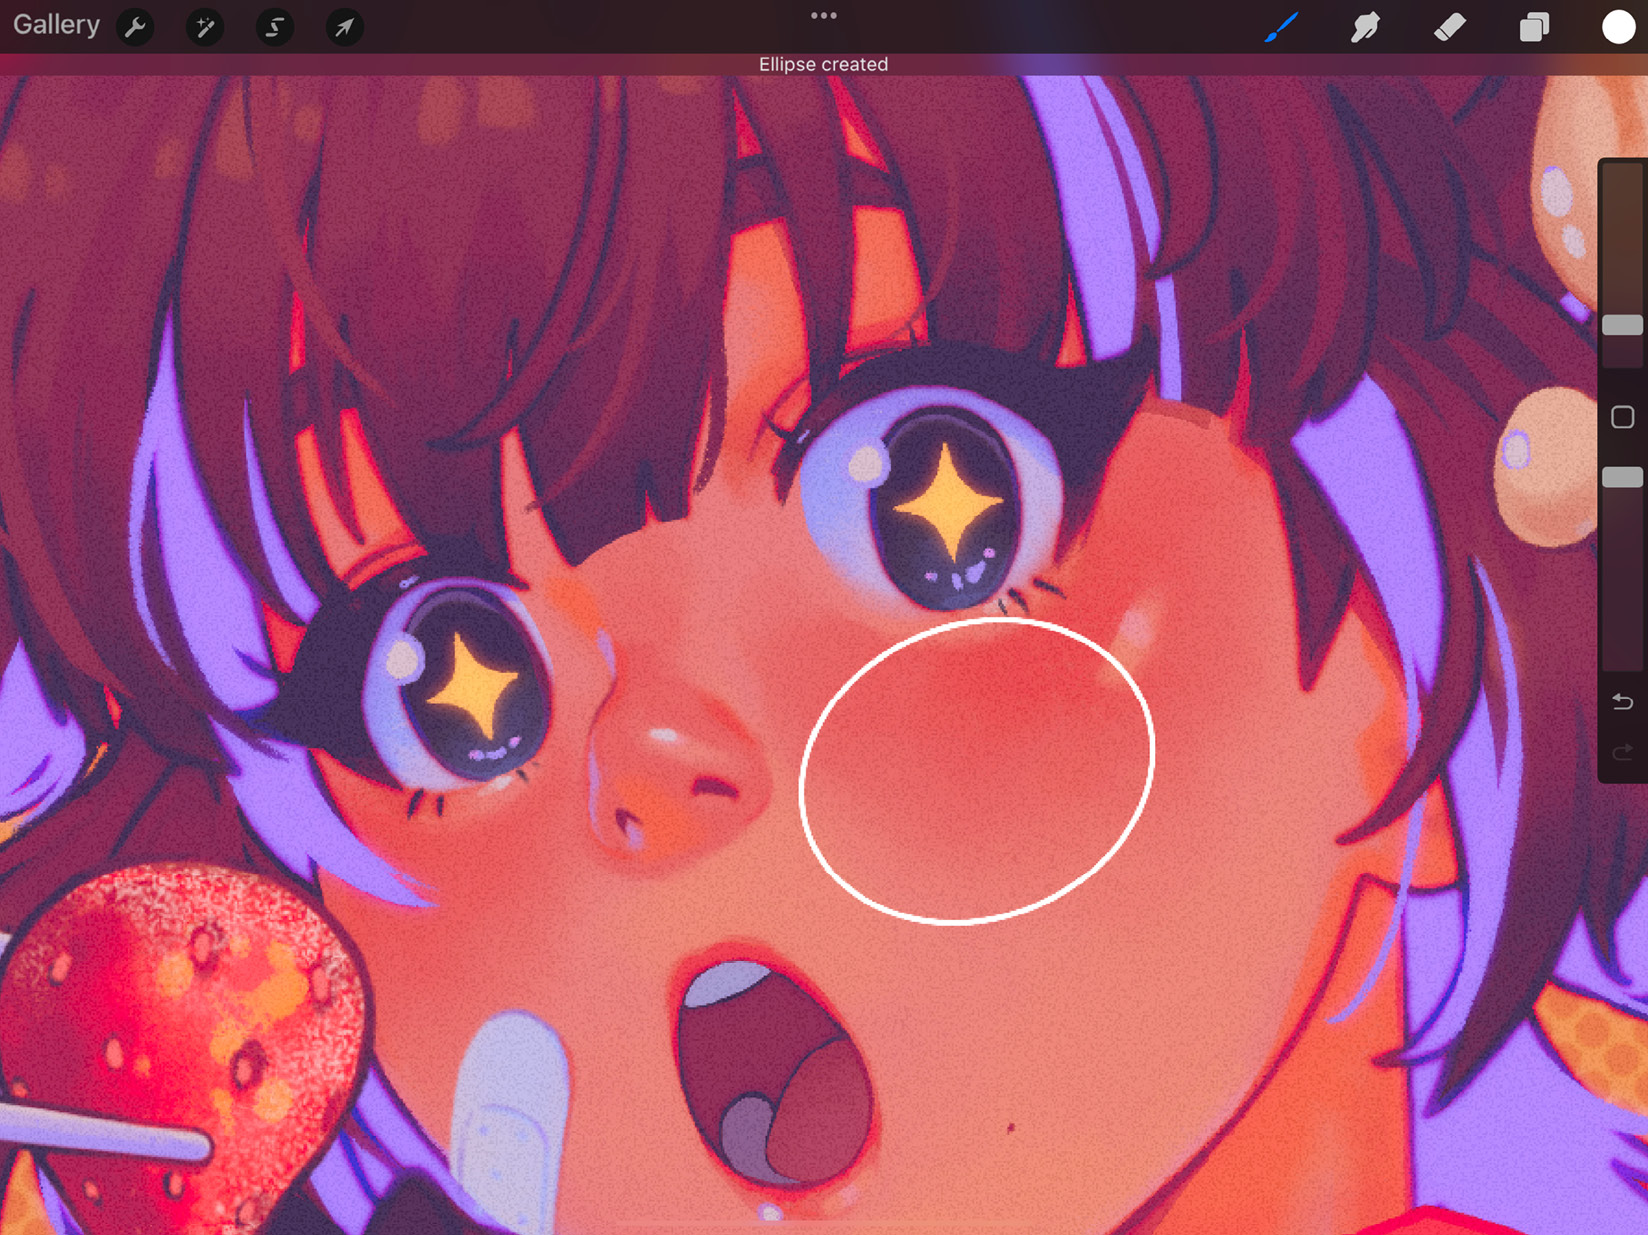
Figure 6.10: Ellipse created
- As soon as you lift your pencil, you will see another notification at the top of the screen: a button that says Edit Shape. Once you tap on it, you will be given options to either make your shape an ellipse or a circle. At this point, four blue dots will also appear on your shape, as shown in the following screenshot:

Figure 6.11: Edit shape and handles
These are called handles, which you can manually use to stretch and squash it.
- For this exercise, we shall choose to tap on Circle. The shape will immediately become a regular circle, like this:

Figure 6.12: Circle created
- You will notice that the blue handles are still present. You can use them to stretch the shape back into an ellipse.
- To make the shape uniformly bigger or smaller, place your pencil anywhere between two handles on the outline of the shape, and drag.
- To reposition the shape, place your pencil anywhere on the screen and drag it in any direction.
- Once you are happy with the changes, tap on any tool, such as Paint or Erase, to commit and exit QuickShape.
In your own time, try drawing other kinds of shapes such as straight lines, arcs, rectangles/squares, polygons, and so on. It will help you become familiar with how each of their controls works.
Precise slider control
In Chapter 3, Understanding Your Workspace, we learned about the sidebar, which has the size and opacity sliders. These sliders help you change the size and opacity of your brush. It’s possible to make finer adjustments than normal using sliders, with a simple gesture.
Place your finger on the slider button, swipe to the side, and move your finger up and down without lifting it. You will notice that the slider is now moving more slowly than usual. This gesture helps you fine-tune the brush size or opacity.
This section dived into all the major types of gestures that you will frequently use while drawing in Procreate. In the next section, we’ll learn about the accessibility tools that the app has to offer.
Using accessibility gestures
There is a set of gestures that make Procreate more convenient to use with a single hand. It is one of the many ways the software takes accessibility into account, by accommodating users according to their needs.
This is done using what is called single touch gestures, which can be activated when required. It is a floating menu with the Undo, Redo, Zoom, Move, and Fit Canvas buttons. We will see this in the next section.
Activating single touch gestures
The single touch gesture menu can be activated by following these steps:
- Go to your iPadOS Settings.
- Select Procreate.
- Find the option called Single Touch Gestures Companion and toggle it on:
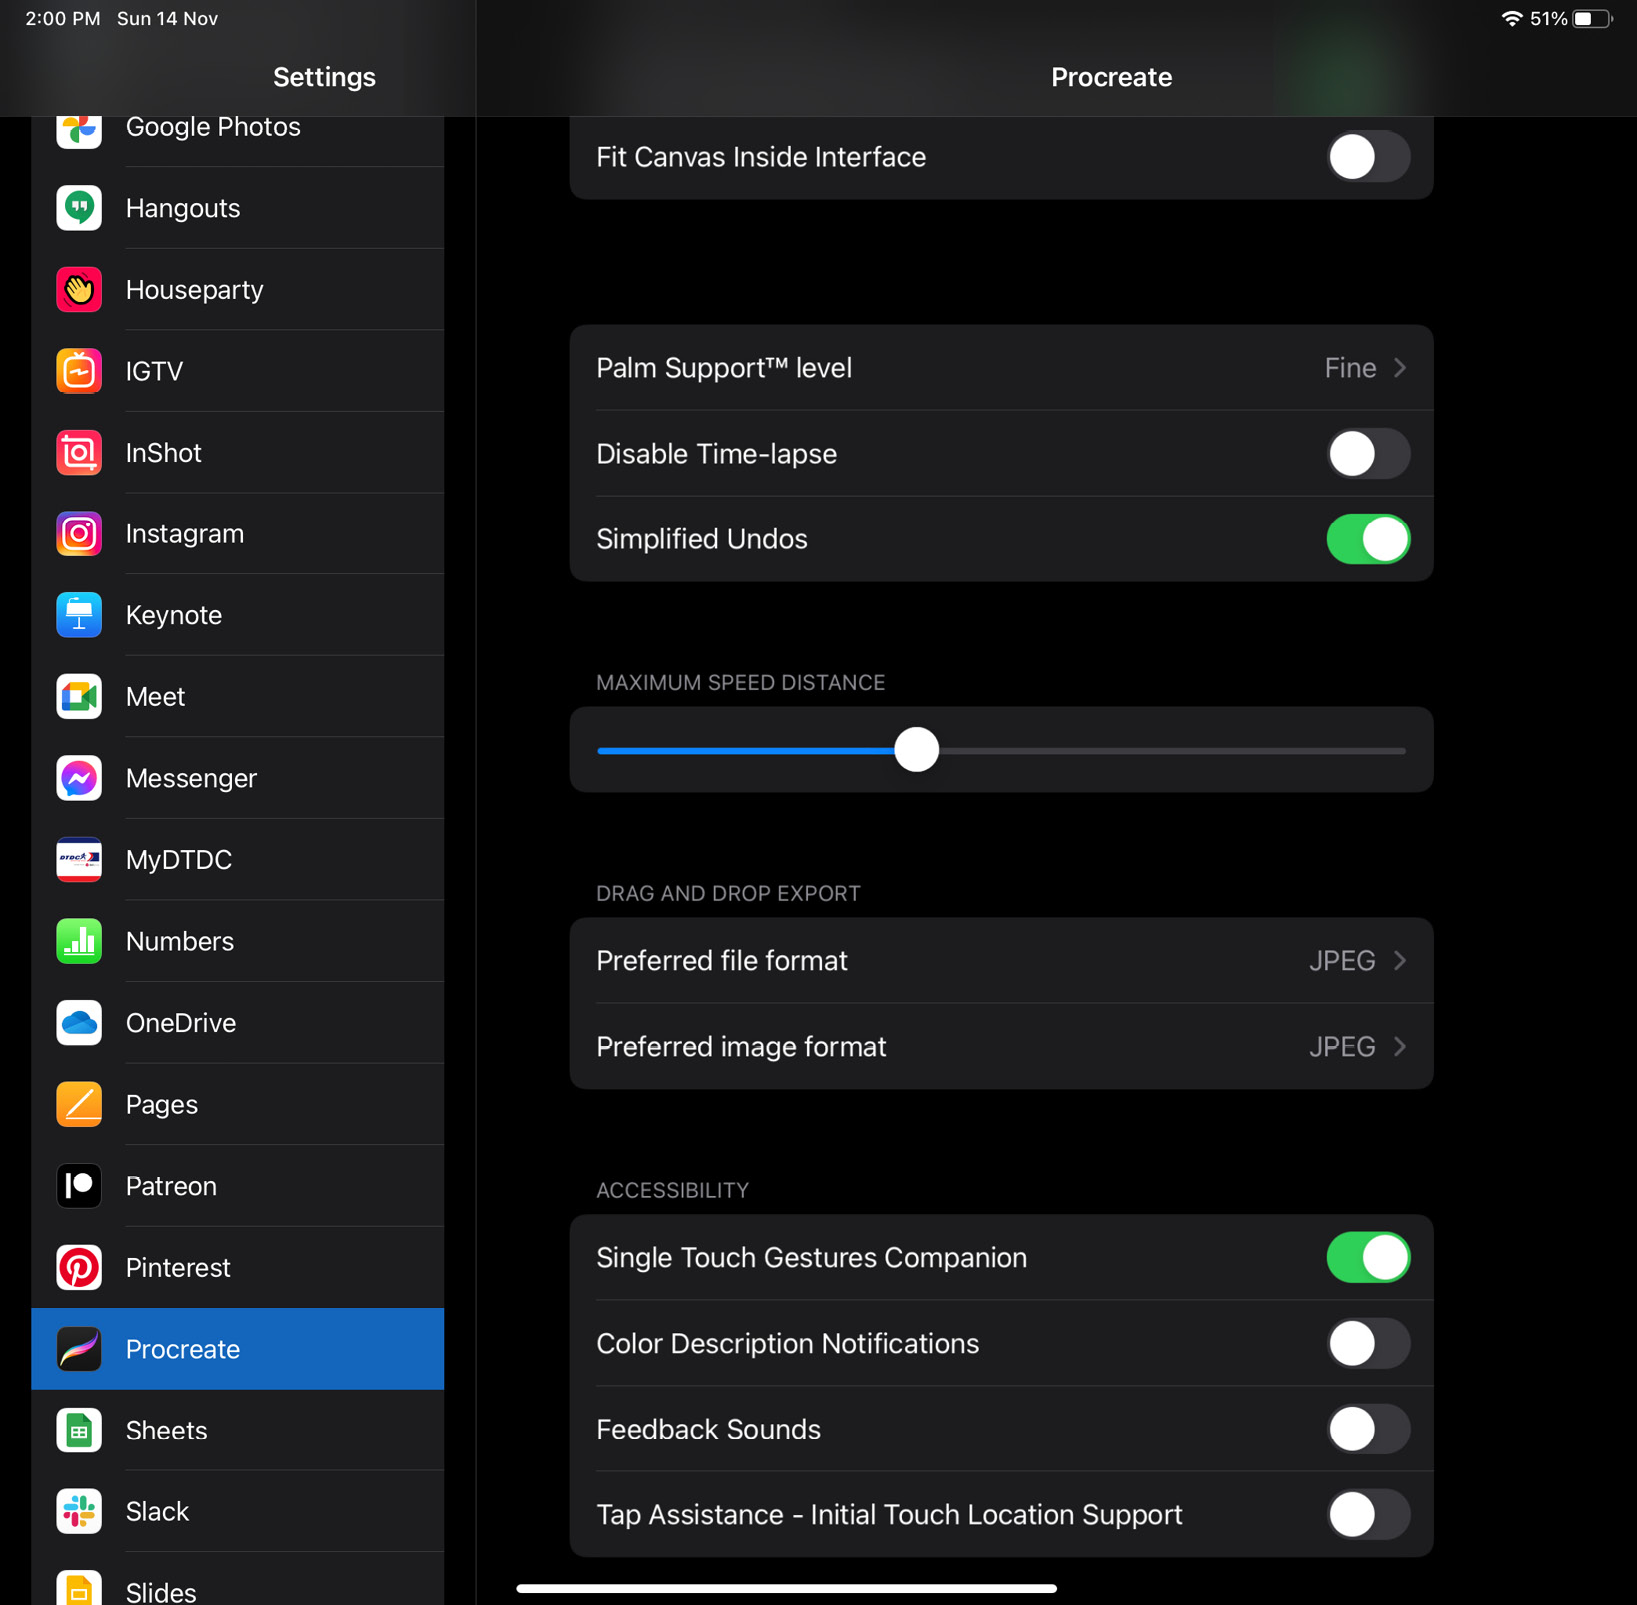
Figure 6.13: Single Touch Gestures Companion toggled on
The menu will now be available whenever you use the app until it is toggled off, as seen in the following screenshot:

Figure 6.14: Single touch gestures menu
Let’s now look at how each of these buttons works in the following sections.
Undo and Redo
The first two buttons on the menu are Undo and Redo. By default, undo is performed with a two-finger tap, and redo with a three-finger tap. In the single touch menu, these are simplified to a single tap of the Undo and Redo buttons respectively.
Zoom
Zoom is the next button, which allows you to zoom in and out of your artwork and rotate it, without using the default pinch-and-twist gesture.
Follow these steps to use this feature:
- Select Zoom. On doing so, the icon will turn blue, indicating that it has been selected.
- Place your pencil anywhere on the canvas. You will see that a blue line is now joining that point with the center of the canvas.
- Drag your pencil across the screen to see how the canvas zooms and rotates with the blue line:

Figure 6.15: Single touch zoom
- To exit Zoom mode, tap on the Zoom button again to deselect it.
Important Note
Initially, when you tap on the screen to set a point of control, it’s always a good idea to choose a point that is neither too close nor too far away from the center of the canvas. This ensures that you get a decent amount of control while both zooming and rotating it.
Tapping close to the center gives you more scope for scaling but makes rotation difficult to moderate. Inversely, when your point of control is far away from the center, it is easier to rotate, but limits scaling. It’s important to strike a balance that works best for you.
Move
Move is the fourth option on the menu. It is used to reposition the canvas on the screen. By default, this action is performed using the two-finger drag gesture.
Follow these steps to use this feature:
- Select Move. On doing so, the icon will turn blue, indicating that it has been selected.
- Place your pencil anywhere on the screen and drag it in any direction to move the canvas around.
- To exit Move mode, tap on the Move button again to deselect it.
Fit Canvas
The last option on the menu is Fit Canvas. It is used to fit your canvas inside the interface for a full view. By default, this action is performed using the quick pinch gesture.
In this section, we covered how Procreate can be made easier to use with single touch gestures. The next section will introduce you to specific gestures that are used to work with layers.
Exploring layer gestures
Procreate uses layers to facilitate making art. Layer gestures are a set of handy shortcuts to make using layers more convenient. These gestures simplify commonly used layer tasks into easy-to-perform actions.
To use layer gestures, you must tap on the Layers icon in the top right-hand corner of the interface, so that the Layers popover is open. Let’s look at the different gestures available in the following sections.
Selecting layers
Tap on a layer to select it as the primary layer, on which you will be able to draw and make edits.
To select more than one layer, select any one of them as the primary layer, then swipe right on all the other layers you wish to select, as shown in the following screenshot:

Figure 6.16: Swipe right to select secondary layers
The primary layer is indicated in light blue and the secondary layers in dark blue. After this, you can group, delete, or transform them together.
While multiple layers are selected, you will only be able to draw and perform adjustments on the primary layer. However, selections and transformations will apply to all selected layers as a whole. To learn more about layers, refer to Chapter 7, Organizing Your Layers.
Pinch to merge layers
Place two fingers on two layers and pinch to merge them and all layers in between into a single layer:

Figure 6.17: Pinch to merge layers
Two-finger tap for layer opacity
On the Layers panel, tap on a layer with two fingers to select it and activate opacity controls. The current opacity of the layer will appear as a blue slider at the top of the screen, as shown here:

Figure 6.18: Layer Opacity slider
Once the controls have been activated, scrub the screen with your finger to the left to decrease the opacity of the layer, and to the right to increase it.
Two-finger swipe right for alpha lock
On the Layers panel, swipe right on a layer with two fingers to alpha lock it:

Figure 6.19: Two-finger swipe right to toggle alpha lock
This means that you can no longer paint on the transparent pixels of the layer. Swipe right once again to turn off the alpha lock.
Two-finger hold to select layer contents
On the Layers panel, use two fingers to touch and hold a layer. This will activate Selections and select the contents of that layer. Transparent pixels will not be selected.
You can modify the selection in various ways, such as by painting, adjusting, or transforming it. To learn more about the Selections tool, refer to Chapter 5, Selecting and Transforming.
This section discussed layer gestures in detail. In the next and final section, you will learn how to take gestures into your own hands and customize the experience you have with them.
Customizing gestures
There are many ways to customize your experience with gestures. This can be done using the Gesture Controls menu. You can use this menu to assign shortcuts of your choice to certain actions, and even enable certain features that are not toggled on by default.
Follow these steps to access the Gesture Controls menu:
- Tap on Actions, which is the wrench-shaped icon in the top left-hand corner of the interface.
- Go to the sub-menu titled Prefs.
- Tap on Gesture Controls.
This will bring you to the Gesture controls panel, shown here:
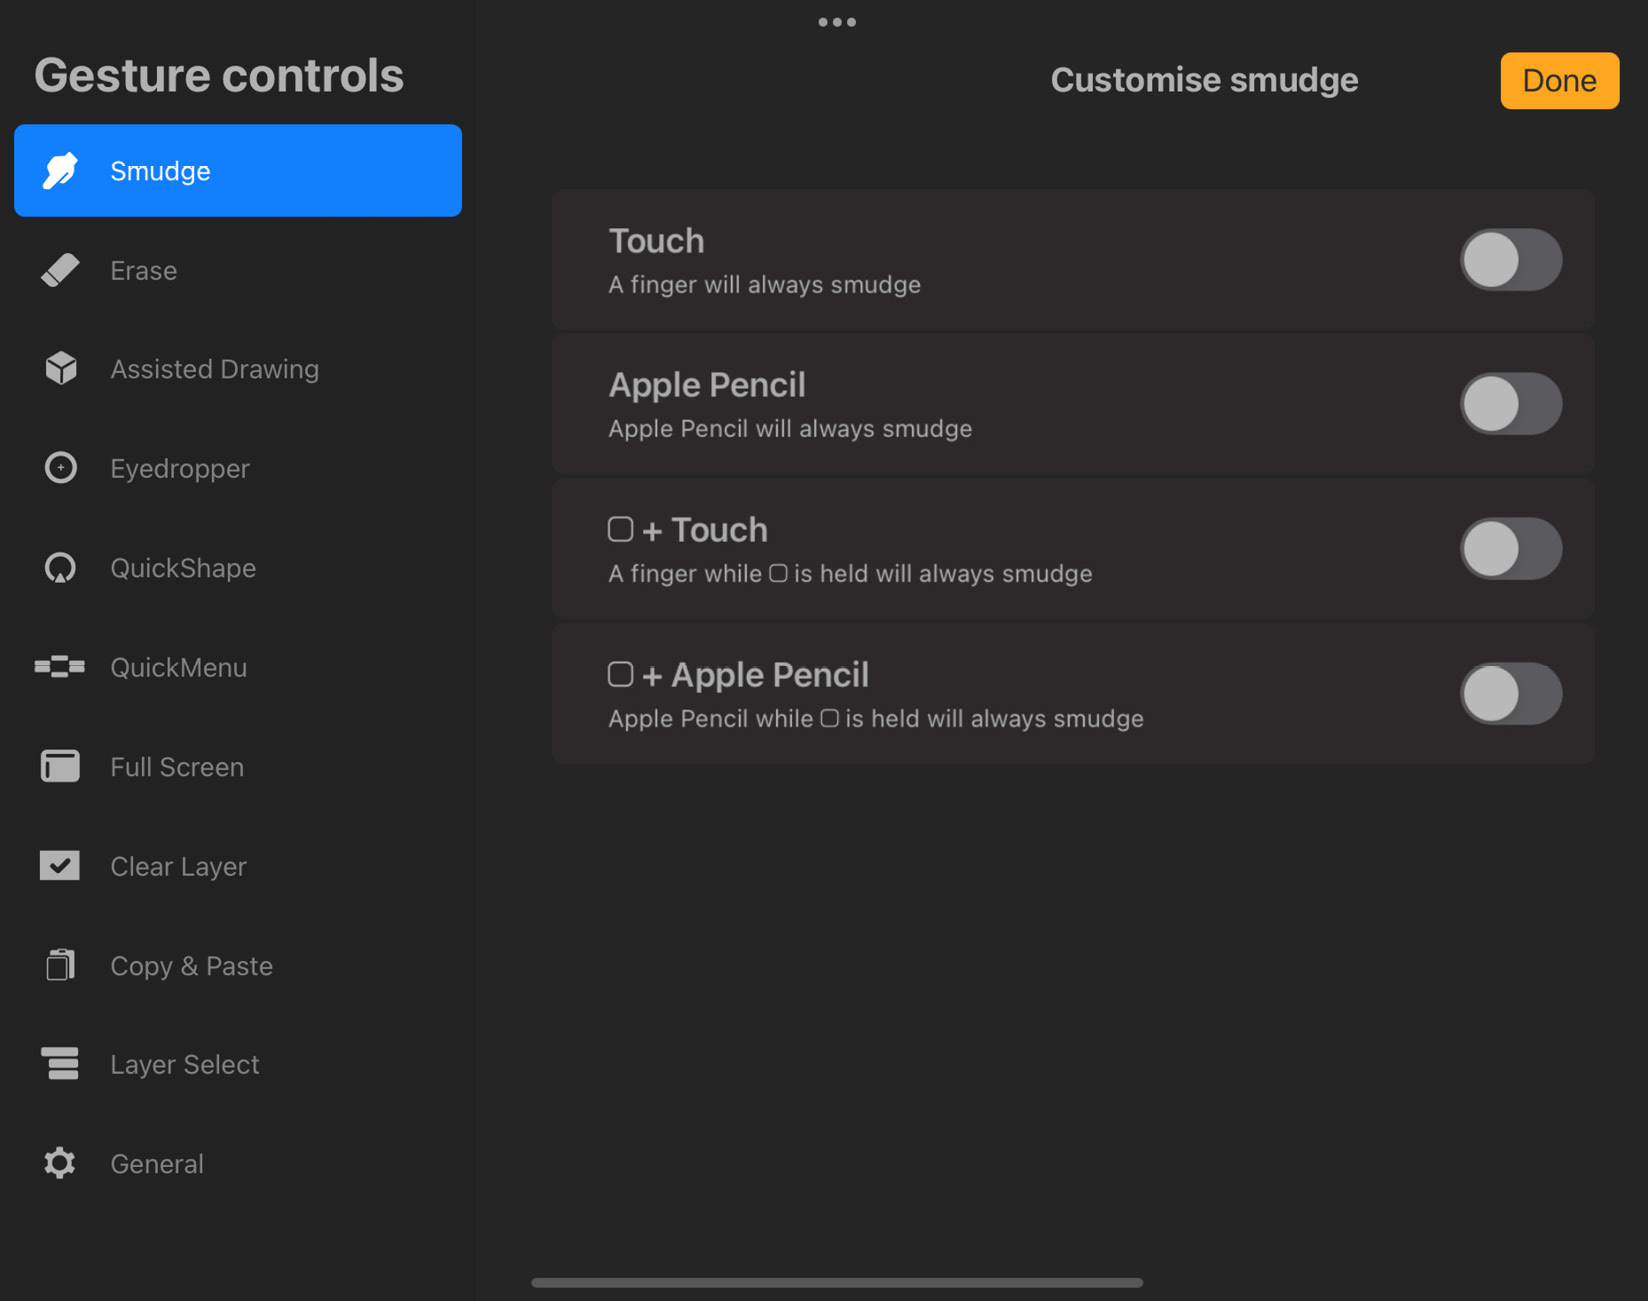
Figure 6.20: Gesture controls
In the left column, you will see a list of actions for which you can customize gestures. On the right are the possible gestures you can designate each. You may assign different shortcuts to the same action, but the same shortcut can’t be used for different actions. If this situation arises, you will see a yellow warning flash up next to the feature in question.
Let’s dive into each of these features and how to customize gestures for each.
Painting gestures
The first three features on the list are Smudge, Erase, and Assisted Drawing. Let’s discuss them one by one:

Figure 6.21: Smudge gestures
Doing so will ensure that input through that particular method will always smudge, no matter which tool is selected. For example, if Touch is toggled on, touching the screen with your finger will always perform the smudge action, even if the Erase tool is selected.

Figure 6.22: Erase gestures
Doing so will ensure that input through that particular method will always erase, no matter which tool is selected. For example, if Apple Pencil is toggled on, drawing with your Apple Pencil will always perform the erase action, even if the Smudge tool is selected.
- Assisted Drawing: You can choose the gesture that will turn on Drawing Assist on the current layer – either by tapping the Modify button or by double-tapping on your gen 2 Apple Pencil:
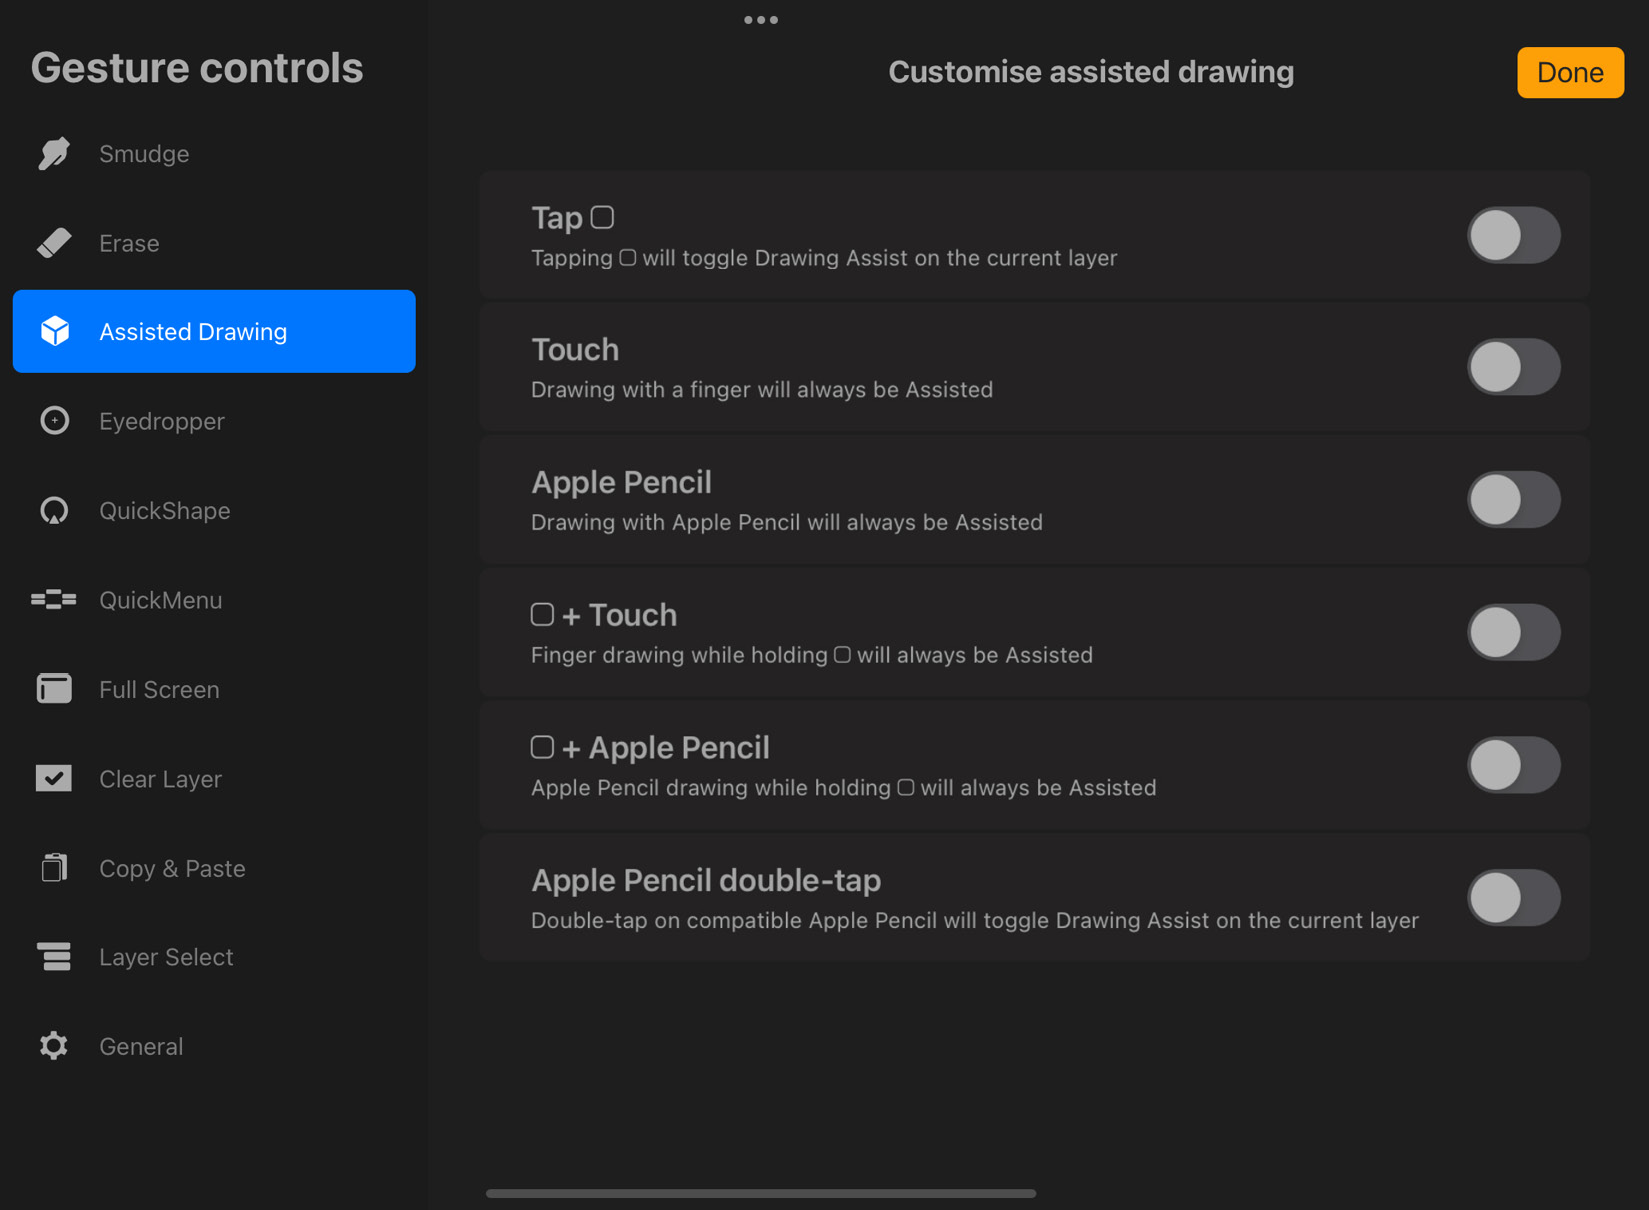
Figure 6.23: Assisted Drawing gestures
Similar to the two previous options, you have six gesture options to choose from, which will ensure that drawing using that particular method will always be assisted.
To learn more about Drawing Assist, refer to Chapter 12, Using Assisted Drawing Tools.
Advanced feature gestures
Eyedropper, QuickShape, and QuickMenu fall under advanced feature gestures. Let’s explore the gestures available for each:
- Eyedropper: The following screenshot shows the gestures available for invoking the Eyedropper tool. You can toggle on as many as you like, as long as the same gestures are not assigned to any other feature.

Figure 6.24: Eyedropper gestures
For Touch and hold, the slider labeled Delay lets you configure how long you must hold before the eyedropper is invoked.
- QuickShape: The following screenshot shows the gestures that are available for invoking the QuickShape tool:

Figure 6.25: QuickShape gestures
Similar to the last option, you can toggle on as many as you like, as long as the same gestures are not assigned to any other feature. For Draw and hold, the slider labeled Delay lets you configure how long you must hold before QuickShape is invoked.
- QuickMenu: QuickMenu is an extremely convenient feature that lets you access commonly used actions in the form of a floating menu, as shown here:
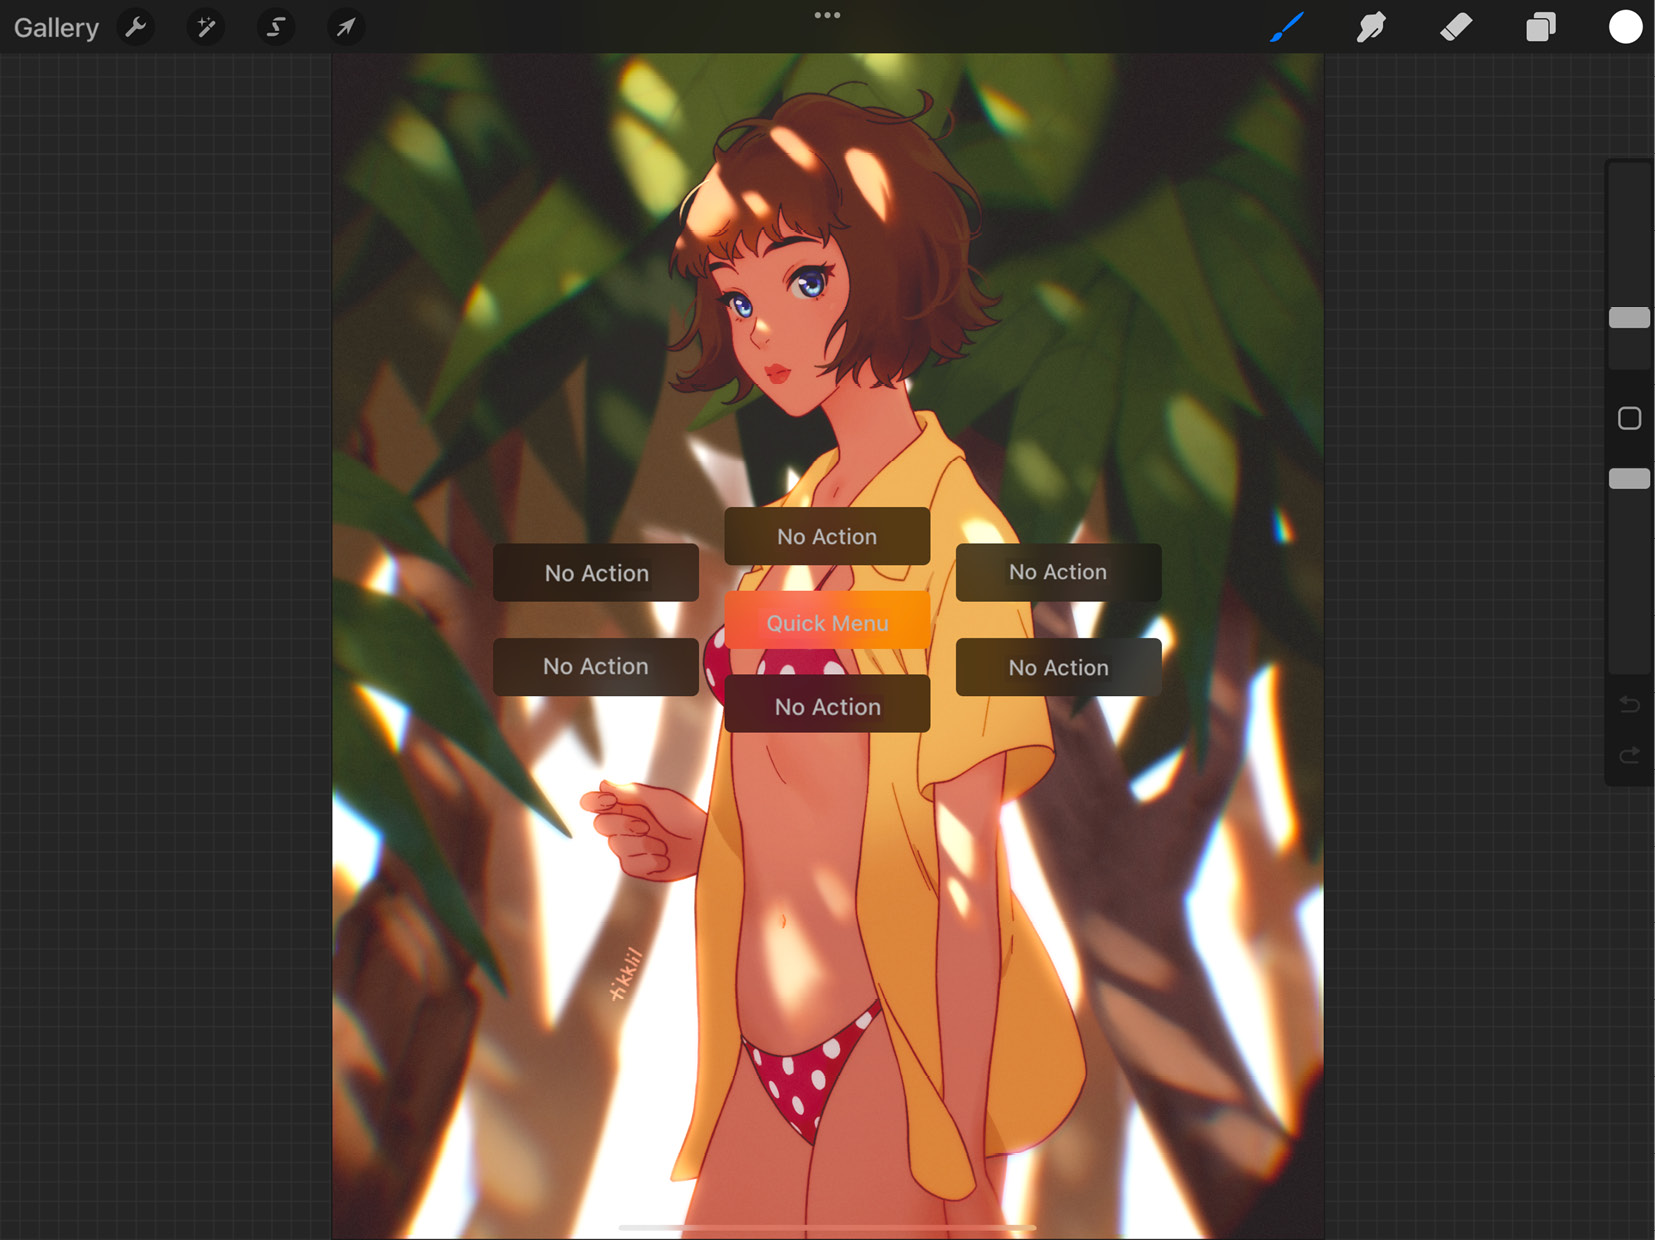
Figure 6.26: QuickMenu
It doesn’t have a gesture allotted to it by default, so you have to turn it on yourself. The following gesture options are available for you to choose from, which can invoke QuickMenu:

Figure 6.27: QuickMenu gestures
For Touch and hold, the slider labeled Delay lets you configure how long you must hold before QuickMenu appears.
Once you have activated it, you will need to personalize the options available on the menu to suit your needs. Here’s how to do so:
- Invoke QuickMenu.
- Press and hold on the option you want to edit until a popup appears with a list of possible alternatives, as shown:
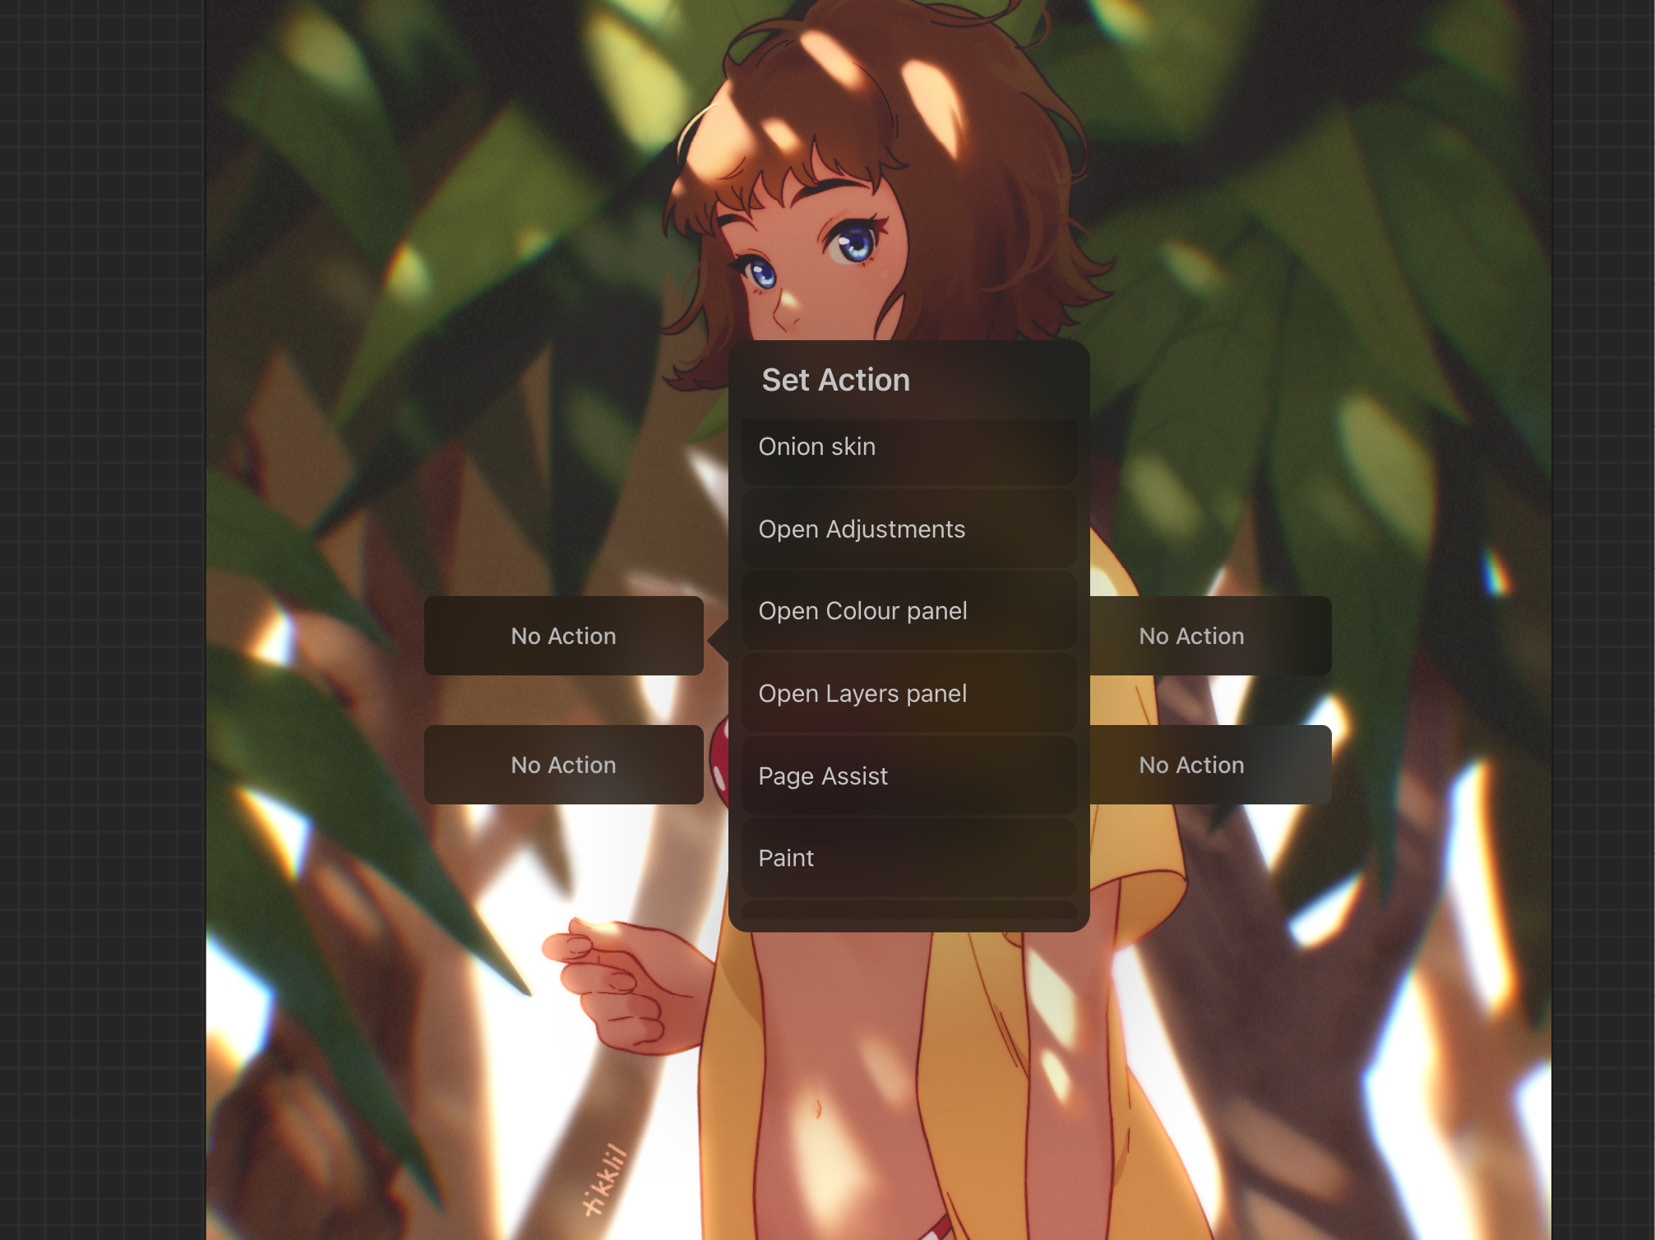
Figure 6.28: Edit QuickMenu
Full Screen gestures
Full Screen is a feature that makes the interface of the software disappear to put complete focus on the canvas. By default, it is done by the four-finger tap gesture. The following gestures are also available to perform this action:

Figure 6.29: Full Screen gestures
If Automatic Full Screen is toggled on, then the interface automatically disappears once you start drawing. The slider labeled Delay lets you configure how long the interface takes to re-appear after you stop drawing.
Layer content gestures
The next set of features pertains to actions using the contents of layers. These are Clear Layer, Copy & Paste, and Layer Select:
- Clear Layer: The following screenshot shows the gestures available for deleting all the contents of the layer:
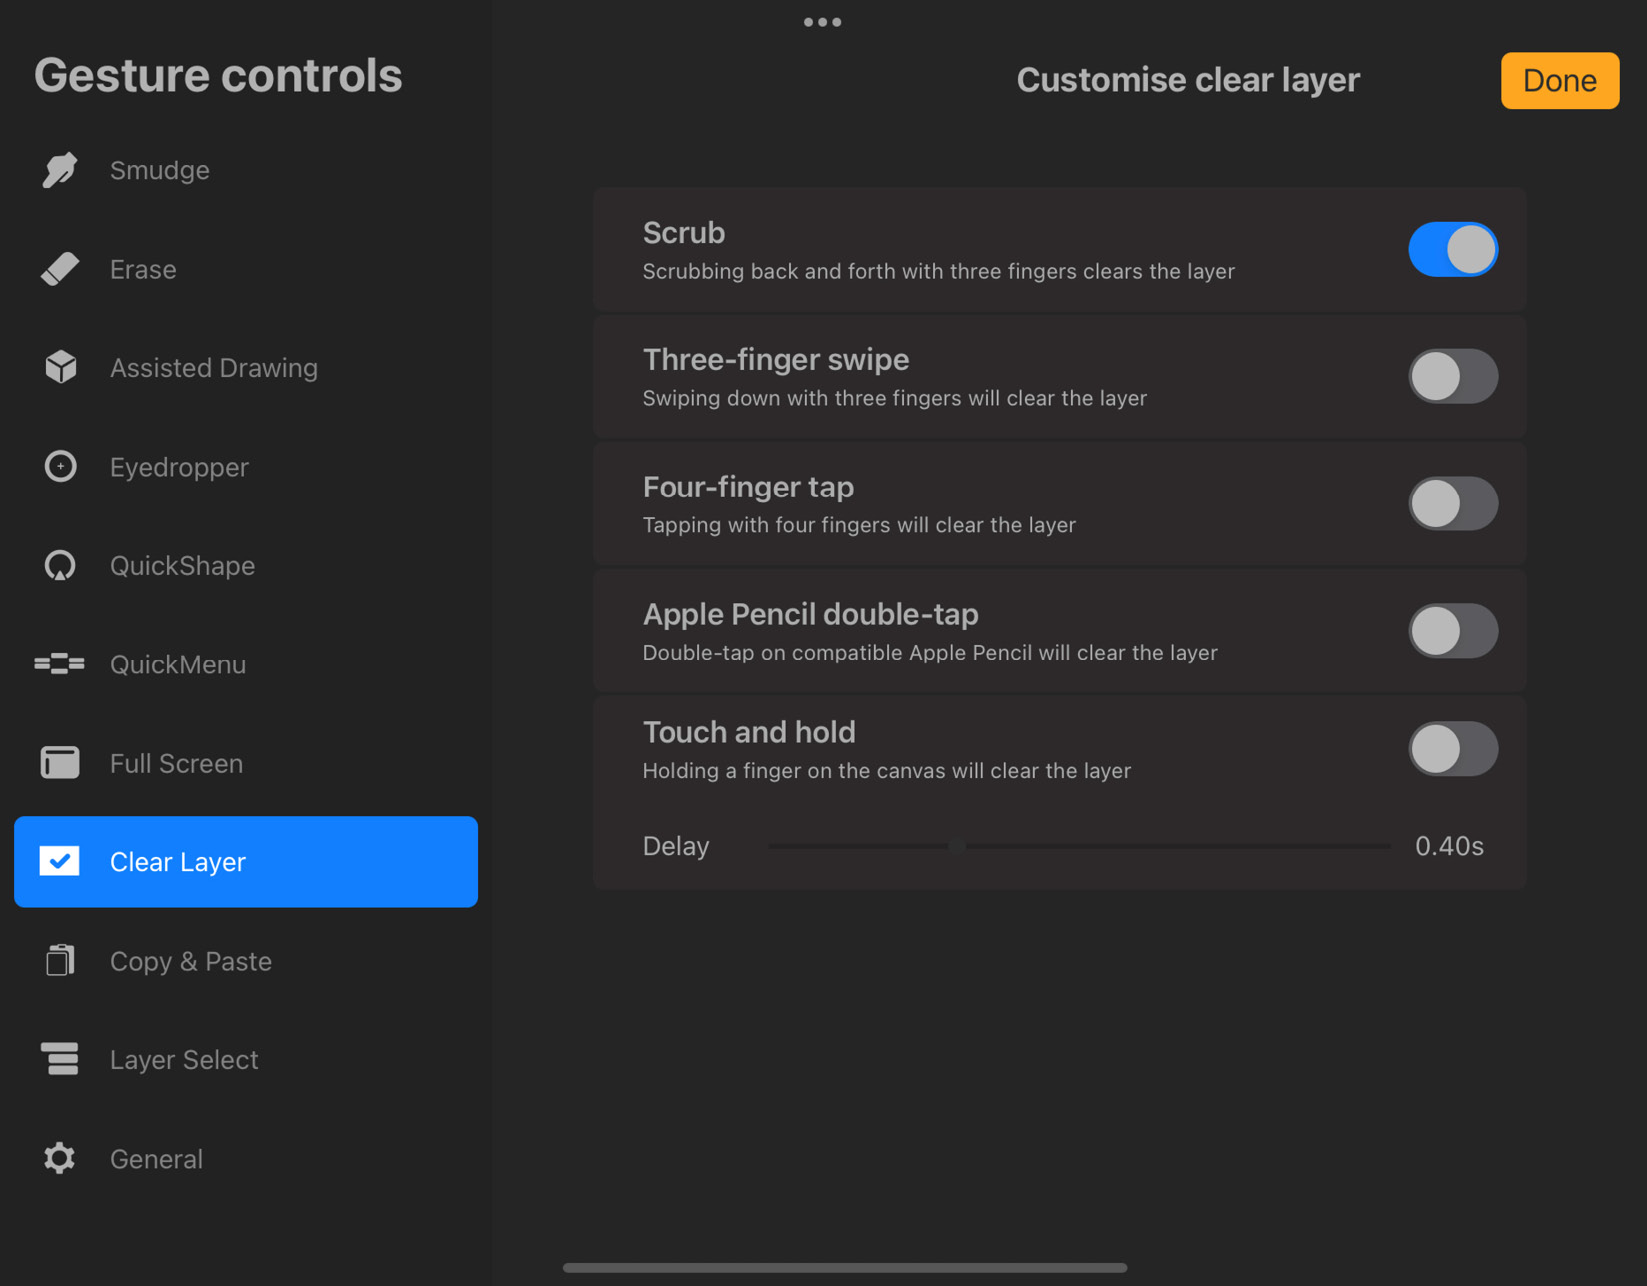
Figure 6.30: Clear Layer gestures
By default, it is done by the three-finger scrub gesture.
- Copy & Paste: The following screenshot shows the gestures that are available for invoking the menu with Copy, Paste, and other clipboard tools:

Figure 6.31: Copy & Paste gestures
Refer to Chapter 5, Selecting and Transforming, to learn more about this menu.
- Layer Select: This is different from Select Layer Contents. Layer Select lets you switch between layers without opening the Layers panel, just by touching their contents. It doesn’t have a gesture allotted to it by default, so you have to turn it on yourself. The following gesture options are available for you to choose from, which can invoke Layer Select:

Figure 6.32: Layer Select gestures
Once you have activated this feature, follow these steps to use it:
- Invoke Layer Select.
- Hold and drag on the canvas, until you’re touching the element you want to focus on.
- Wait for a moment until a layer menu pops up, as shown in the following screenshot, containing the possible layers the element could be on:

Figure 6.33: Layer Select
General gesture options
The last item in the left column is labeled General. It has options to configure the overall way your gestures function, as shown here:

Figure 6.34: General gesture options
The following general options are available:
- Disable Touch actions: Enabling this will ensure that touches can only perform gestures. Drawing and using other painting tools such as Smudge and Erase will no longer work with finger touches.
- Disable Undo and Redo: This option disables two-finger tap Undo and three-finger tap Redo.
- Rotate with pinch zoom: This option lets you choose whether pinching can also rotate the canvas, along with zooming.
- Enable 3D painting with finger: By default, the Apple Pencil is used to paint on 3D models, while the finger touch is used to rotate the models. This option allows you to use your finger to paint 3D models. Rotating would then require you to hold the Modify button while rotating with your finger.
- Reset to defaults: Tap this button to revert all gestures to the default.
Once you are happy with the edits, tap on Done to finalize the changes. We have now covered the entirety of gestures in Procreate, so let’s summarize.
Summary
Procreate has a robust and intricate system of gestures to enhance its functionality and accessibility. In this chapter, we covered the most commonly used default gestures, single touch gestures for accessibility, and basic gestures associated with layers. Finally, we discussed how you can customize these gestures for yourself, using Gesture Controls.
By now, you should have a general understanding of what gestures are, the different combinations of gestures available on the app, and how they can be used to complement your workflow. Gestures take a bit of practice to get used to, so it would help to tinker around with the software at your own pace.
In the next chapter, we will delve into the framework holding all artwork together—layers.