
15
Painting on 3D Models
Through the course of this book, we have explored Procreate as a robust tool for 2D painting. This chapter will cover the final function of the app, which goes beyond a two-dimensional canvas and allows you to paint on 3D objects. In the latest version – Procreate 5.2 – developers introduced a feature that lets you import 3D models into the gallery and paint on top of them.
In this chapter, we will look in depth at what makes 3D painting unique and how the familiar interface of Procreate is modified for a task beyond 2D illustration.
We’re going to cover the following broad topics in this chapter:
- Opening a 3D model
- Understanding 3D models
- Using the 3D interface
- Working with layers in 3D
- Transforming graphics on a 3D model
- Modifying the environment using Lighting Studio
- Exporting from a 3D canvas
Opening a 3D model
3D painting canvases work differently from their 2D counterparts. When a 3D model is imported into Procreate, it opens in a 3D canvas, specially designed for this purpose. There are two ways to import 3D models – using the Import button in the Gallery and by downloading Procreate’s own model pack. We will discuss both options in this section.
Importing a 3D model
The Import button sits in the top-right corner of the Procreate Gallery, as shown in the following screenshot:

Figure 15.1 : The Import button
Tapping this button will open the Files app on your iPad. From here, you can import an external 3D object. Procreate supports .OBJ and .USDZ, two of the most common file types for 3D objects.
You can also drag and drop 3D files directly into Procreate. These files will automatically open in a 3D canvas.
Importing Procreate’s Model pack
Procreate offers its own pack of 3D models, consisting of a variety of objects. When you freshly install or update to Procreate 5.2, you will see a welcome screen with a video, as shown in the following screenshot:

Figure 15.2 : The Procreate 5.2 welcome screen
Here, you will find a button that says Model pack. Tap on this button to download the pack. These 3D models will directly open in Procreate and don’t need to be imported separately. To access this welcome screen anytime, go to Actions | Help | What’s New. The following screenshot shows this Model pack in Procreate:

Figure 15.3 : The Procreate Model pack
Important Note
Make sure the .OBJ or .USDZ file you are trying to import comes with a UV map. The file will be unsupported otherwise. UV maps will be explained in the next section.
In the next section, we will get a basic understanding of how 3D models are composed, especially how painting on them works.
Understanding 3D models
Before getting into the 3D painting features of Procreate, this section will help you form an understanding of how painting on 3D models is made possible. For that, we need to look at painted 3D models as a composite of two parts: the model and the UV map. The presence of a UV map allows you to paint on a 3D model, which would otherwise not be possible. In the following subsection, we will discuss UV maps.
UV maps
3D painting in Procreate requires your 3D model to have an associated UV map. Think of a UV map as a two-dimensional skin that covers all the surfaces of your model like wrapping paper. The following diagram explains how a 2D UV map sits on a 3D model:

Figure 15.4 : A 3D model versus an unwrapped UV map
UV maps provide a 2D surface to let you paint. This is because 3D models, by themselves, exist in 3D space and can’t be painted on. When importing a 3D model into Procreate, consider the following things:
- The model must have an associated UV map. A good way to find out whether a .OBJ or .USDZ file has one is to check whether they have any textures on the model surface. Note that some UV maps may be blank.
- UV maps that contain overlap or leave blank spaces on the model are not suitable for 3D painting, even if they import into Procreate. If possible, try to find models that are specifically created to be painted on.
Once you’re familiar with the basics of how 3D painting works, you can start learning about the 3D interface of Procreate.
Using the 3D interface
A 3D canvas is mostly similar to its 2D counterpart. In this section, we will go over the basic interface and gestures that are unique to 3D painting in Procreate.
The workspace
Starting off, we will be looking at the workspace for 3D painting. The following screenshot shows the interface:

Figure 15.5 : The 3D painting interface
The following are the elements in your workspace:
- The 3D model: Painting on a 3D model works much the same way as 2D painting, except this time, the painted strokes lay on top of a 3D surface (the canvas). This model can be moved and rotated to access different parts of the canvas. For 3D models comprising multiple parts, you can tap on each part to select and draw on.
Unlike a 2D background, a 3D model exists in an infinite, neutral space. The attributes of a 3D background can be changed using Lighting Studio. We’ll learn more about it later in the chapter, in the Modifying the environment using Lighting Studio section.
- The Layers panel: Layers have slightly different features in a 3D canvas. Layers show all the texture sets that make up the separate components of your 3D model. Simple models may have just one or a few texture sets, while complex ones have several. Refer to the Working with layers in 3D section to understand more information about layers.
In the next two subsections, we’ll discuss the Actions menu. In a 3D canvas, the Actions menu sports additional features. There is a new option available in the Reference companion. You may also notice that the Video tab is replaced by a brand new 3D tab. Let’s discuss the first of these additions.
The Reference companion
You may remember learning about the Reference companion in Chapter 4, Using the Actions Menu. Tap the wrench-shaped icon in the top-left corner of the screen to open the Actions menu, select the Canvas tab, and toggle on Reference. Doing so will open a floating window with a smaller preview of your canvas. This is the Reference companion. It allows you to use references while you work, as shown in the following screenshot:

Figure 15.6 : The Reference companion
At the bottom of the Reference companion window, there are three options: 2D, 3D, and Image. They serve the following functions:
- 2D: When this option is selected, the reference window shows the unwrapped view of the texture map of the currently selected mesh (the 3D component), as shown in the following screenshot:

Figure 15.7 : The 2D reference showing a UV unwrap of the Board mesh
Select other layers to observe how the reference changes. Any strokes you make on the model will appear on the 2D reference, corresponding to their location on the UV map.
- 3D: When this option is selected, the reference window shows a separate view of the 3D model, as shown in the following screenshot:

Figure 15.8 : The 3D reference
This view can be moved and rotated independently, while also reflecting any strokes made on the actual model.
- Image: With this option, you can import an image from your gallery to use as a reference. Tap on Import Image to select a reference picture from Photos, as shown in the following screenshot:

Figure 15.9: Reference image
Tap on Clear to remove the current reference image. You can also use the eyedropper to pick colors directly from the reference image.
In the next subsection, you will be introduced to the 3D menu, which is unique to the 3D painting interface.
The 3D menu
The 3D tab can be found in the Actions menu in place of the Video tab. It is indicated by a little hexagonal icon, as shown in the following screenshot:

Figure 15.10 : The 3D tab
This menu has utility tools specific to 3D painting, which we’ll discuss here:
- Show 2D texture: This is a toggle that displays the unwrapped 2D texture on the canvas instead of the 3D model. The canvas will show the UV unwrap of the selected mesh, as shown in the following screenshot:

Figure 15.11 : 2D texture
- Paint through mesh: This option is helpful when you have overlapping 3D components. Toggling it on lets you paint a continuous image on a mesh even if it has another texture set blocking it. When toggled off, the area blocked off by the overlapping meshes will be left blank. The following screenshots demonstrate the difference between the two:
.jpg)
Figure 15.12 : (a) Paint through mesh active, and (b) Paint through mesh inactive
- Edit lighting & environment: This option will take you to Lighting Studio, which is used for setting up the ambient lighting and environment for your model. You will learn more about it in the Modifying the environment using Lighting Studio section of this chapter.
- View in AR: Use this feature to activate the camera and view your 3D model in the real world using augmented reality (AR).
With this, we have covered the additional features of the Actions menu. The next section is all about the gestures used in 3D painting.
3D gestures
3D painting borrows some regular 2D gestures, even though their effects may look different on a 3D canvas. It also has 3D-exclusive gestures, which we will learn about here.
First, let’s look at the basic gestures, as follows:
- Paint: By default, you need the Apple Pencil to be able to draw, smudge, and erase on the model. These actions work the same way as 2D. Finger gestures are used for rotating and moving the model.
However, you can change your painting input to your finger by going to Actions | Prefs | Gesture Controls | General | Enable 3D painting with finger.
Once finger painting has been activated, you will need to hold down the Modify button to move and rotate your model:
- Move the model: Use a two-finger dragging gesture to move your 3D model around in space.
- Rotate the model: Use a one-finger dragging gesture to rotate your 3D model in any direction. A quick one-finger swipe in any direction will make the model spin about its center of focus.
- Pinch to zoom: Pinch to zoom in and out of your 3D model.
- Resize with Quick Pinch: Make a quick pinching gesture on the screen to fit the 3D model within the screen area. This gesture also works inside the Reference companion.
Note that while Quick Pinch will return the model to its original size, it won’t reset any changes in rotation/orientation.
Next, let’s look at the more advanced gestures for 3D models:
- Select mesh: When you tap on any component of the 3D model, it will flash blue, indicating that the layer corresponding to that mesh has been selected. Your painting will now affect only that component.
- Select all meshes: Hold down the Modify button and tap on any mesh to instantly select all meshes within that texture set. This is indicated by the texture set flashing blue. Your strokes will now affect all the meshes in the current texture set.
- Move center of focus: The center of focus is the point about which a 3D model rotates. By default, it is at its center, but it changes position every time you rotate it. Give your model a quick spin to find out its current center of focus.
This section introduced to you the interface and gestures of 3D painting in Procreate. In the next section, we will discuss the features of 3D layers.
Working with layers in 3D
Layers are an interesting subject when it comes to 3D painting. Although they look similar to those in 2D, 3D layers function differently. In this section, we will familiarize ourselves with the various layer functions in a 3D canvas.
Texture sets
When you open the Layers panel in a 3D canvas, you will see layer “groups,” corresponding to each separate component of a 3D model. These groups are called texture sets. Each texture set is indicated with a label. The following screenshot shows a model with two texture sets, Trucks and Board:

Figure 15.13 : Texture sets
If the model is a simple one, you will find fewer texture sets and vice versa. Components that share the same UV map come under the same set and share a common base layer.
Meshes
Each texture set has associated meshes. You can think of these as “subcomponents.” For example, the Trucks texture set in the following screenshot has the Trucks and Wheels meshes under it:

Figure 15.14 : Meshes
Meshes under a single texture set share the same base layer. When a mesh is selected, painting will only affect the part of the base layer being used by that mesh. New layers created on top of the base layer are also shared by all the meshes in the texture set.
Base Layer
When it comes to the Procreate Model pack, you will find that each texture set of each model comes with a Base Layer. This layer contains all the original color and texture information of the 3D model. A Base Layer is shared by all the meshes in the set. The base layer of the Trucks set is shown in the following screenshot:

Figure 15.15 : Base Layer
In the Layers panel, the base layer appears under whichever mesh is selected, like a floating layer. While it’s possible to paint on the base layer, doing so is an invasive process, since you will essentially paint over and lose the original color and texture. To avoid this, it’s always a good idea to either duplicate it or create an Additional Layer on top of it. A base layer can be set to any blend mode, just like a 2D layer.
Important Note
Some 3D models may not come with a base layer at all. You can still create new layers for its meshes.
Additional Layers
An Additional Layer is any new layer created within a texture set and shared with all the meshes in it, as shown in the following screenshot:

Figure 15.16 : Additional Layer
You can use these layers to paint not only graphics but also materials onto your 3D model. We will discuss materials in the next subsection. All other layer options for additional layers work just like 2D layers. Refer to Chapter 7, Organizing Your Layers, for more information on layer options.
Materials
When you paint on a layer, you will see that your stroke covers the surface of the model as an opaque area, erasing all its material and texture information, as shown in the following screenshot:

Figure 15.17 : Regular painting
However, each 3D layer has special features that make it possible to paint material properties onto a 3D model. When you alter these properties, the same 3D model can appear to be made of different materials. These properties are called Colour, Roughness, and Metallic. Tap on the little hexagon icon on the layer, called the Materials icon, to reveal these layer properties, as shown in the following screenshot:

Figure 15.18 : Materials
Each of these can be painted on separately and have different effects on the 3D model. Let’s discuss them:
- Colour: Tap on the panel labeled Colour and start painting. Your strokes will affect only the color of the mesh without changing its texture or material, as shown in the following screenshot:

Figure 15.19 : Colour
- Roughness: This decides how glossy or matte the surface will look. You can only paint in grayscale on it, much like a layer mask. Different values of gray impart different levels of roughness. Black represents the glossiest finish, and white makes it look matte, as shown in the following screenshots:
.jpg)
Figure 15.20 : (a) Roughness painted with white, and (b) Roughness painted with black
- Metallic: This decides whether the surface will look metallic. Here too you can only paint in grayscale. Different values of gray impart different levels of metallic texture. White represents a completely metallic finish, and black makes it look non-metallic, as shown in the following screenshots:
.jpg)
Figure 15.21 : (a) Metallic painted with white, and (b) Metallic painted with black
Important Note
Some brushes have 3D attributes that allow them to paint Roughness and Metallic information along with color. To learn more about brush attributes, refer to Chapter 9, Brush Studio Settings – Editing and Combining Brushes.
Material options
The three material panels behave like miniature layers and have their very own version of Layer Options called Material Options, as shown in the following screenshot:
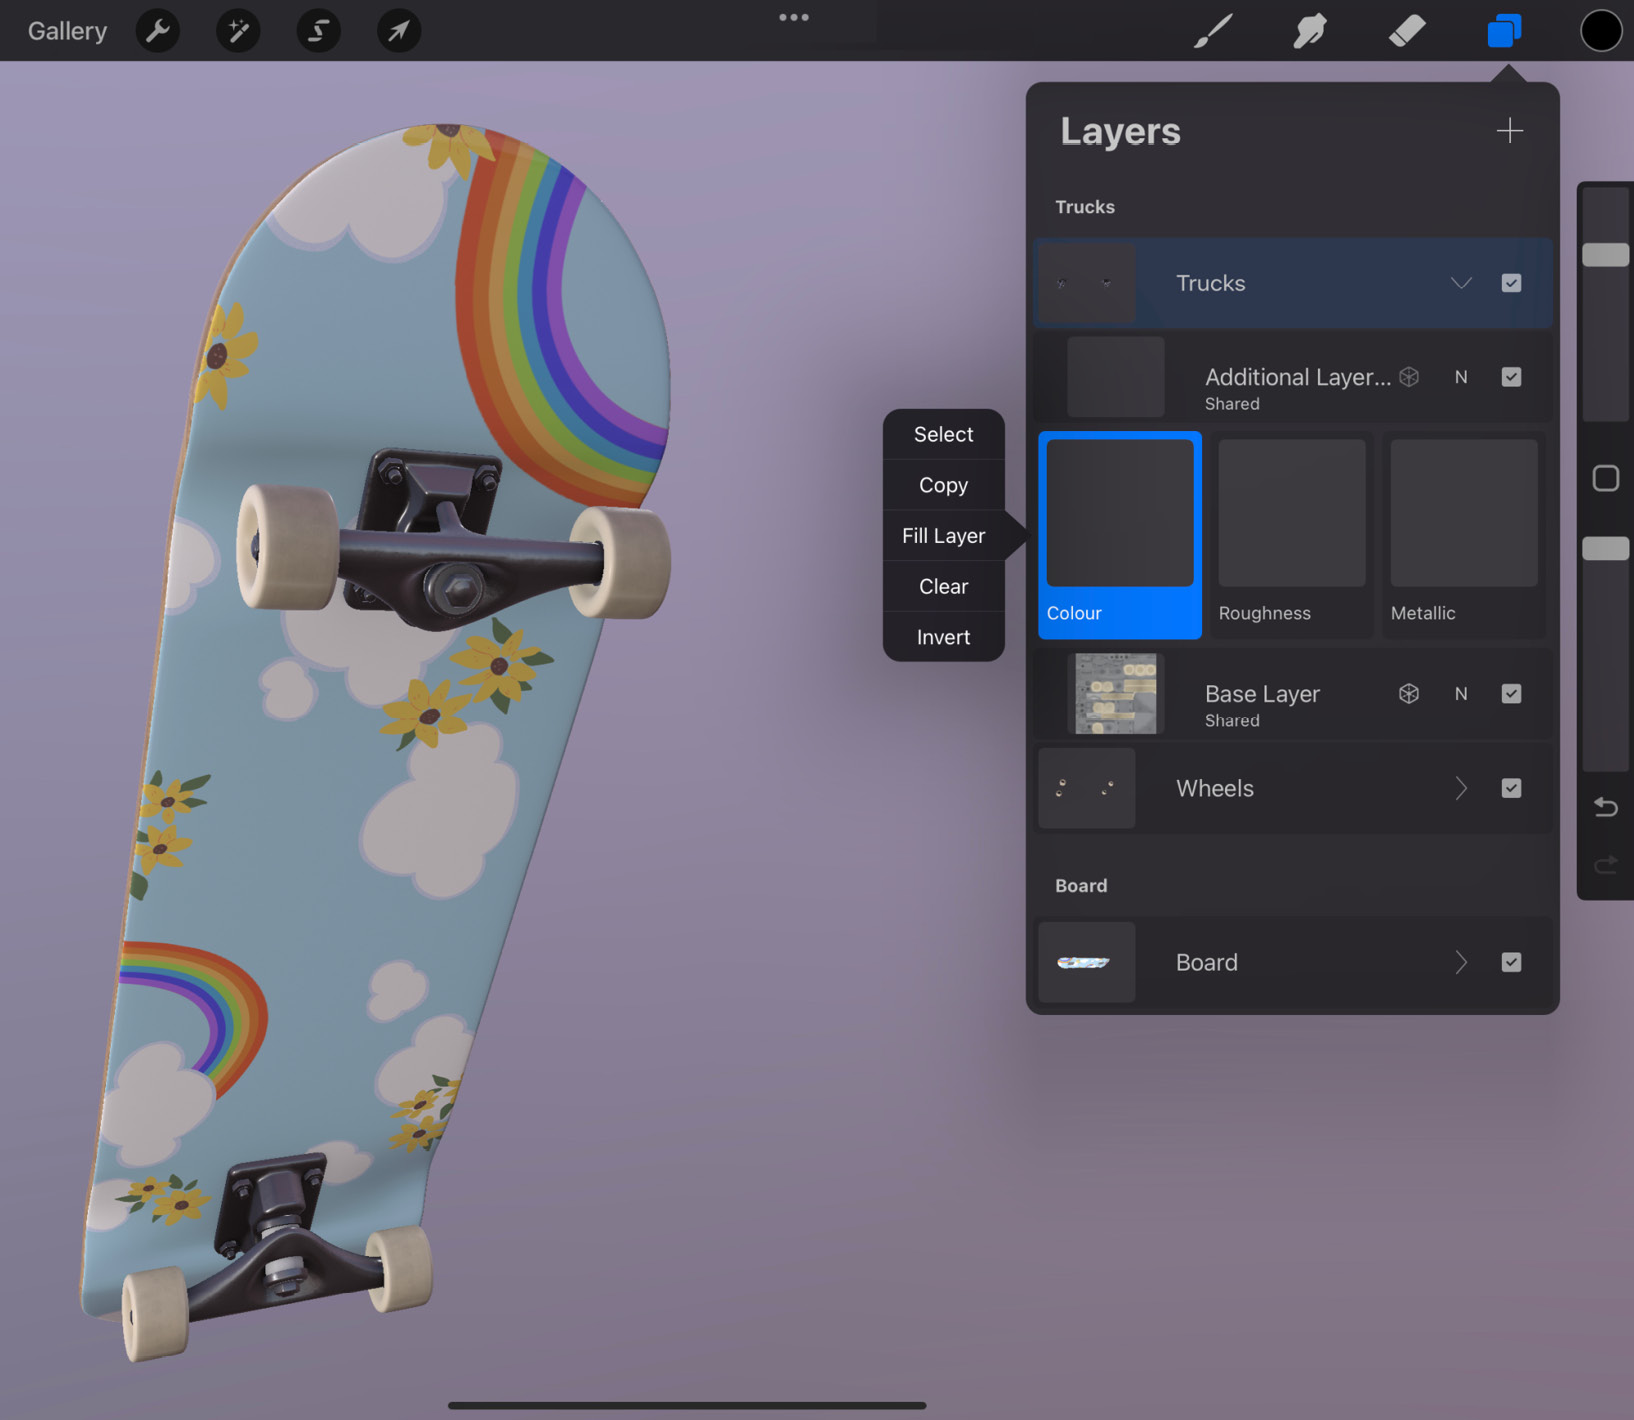
Figure 15.22 : Material Options
Each material has its own menu, so they can be altered separately. In this subsection, we’ll discuss all the options in this menu:
- Select: This option creates a selection mask with the layer contents, activating the Selections tool in the process. This selection can now be drawn in, copied, or transformed.
- Copy: This option copies the layer contents and makes them available on the clipboard. These contents can now be pasted in another layer, canvas, or even textboxes that support images, such as those on Twitter.
- Fill Layer: This option fills the layer with the currently selected color. For grayscale layers, the layer is filled with a gray of the same value as the active color.
- Clear: This option erases the layer contents. This effect can also be achieved by scrubbing the screen with three fingers.
- Invert: This option inverts the colors currently painted. This means that every color becomes another color that is diametrically opposite to it on the color wheel. In grayscale images, blacks and whites get interchanged.
With this, we have covered all the layer properties for a 3D layer. In the next section, let’s take a look at another common 2D tool that works very differently in a 3D canvas – Transform.
Transforming graphics on a 3D model
The Transform tool is used to move, rotate, or otherwise modify graphics both in the 2D and 3D contexts. We discussed the 2D transform tool in Chapter 5, Selecting and Transforming. In a 3D canvas, the Transform tool shares some features with its 2D counterpart. However, it has some unique features.
To activate this tool, tap the arrow icon at the top left of the screen. When working in 2D, the transformation affects all the contents of the layer. However, in a 3D canvas, only the layer contents visible on the screen can be transformed. This means that if you have graphics on the back of the 3D model that were not visible on screen at the time of activating the tool, those graphics won’t be included in the transformation. Just like a 2D canvas, you may also use the Selections tool to isolate and transform only a specific portion of the graphics.
In the following subsections, we’ll delve into the Transform tool.
Interface
A toolbar appears at the bottom of the screen when you use Transform, as shown in the following screenshot:

Figure 15.23 : The Transform toolbar
The interface has the following elements:
- Bounding halo: When Transform is activated, a solid white glowing line surrounds the selection. This is called the bounding halo, as shown in the following screenshot:

Figure 15.24 : The bounding halo
The halo works much like the bounding box in 2D transform. You can tap and drag it to move the selection, as well as pinch to zoom and rotate it.
- Automatic mode: At the top of the toolbox, you will notice two options – Automatic and Advanced. Automatic lets you perform the normal move, scale, rotate, and flip functions, similar to 2D transformations.
- Advanced mode: This mode helps you perform more 3D-specific transformations. Advanced mode allows non-uniform transformation along separate axes and even makes it possible to detach the image from the 3D surface. We will discuss this mode more in the next subsection.
- Flip: These buttons flip your drawing vertically or horizontally.
- Rotate 45°: Tap on this button to rotate your drawing by 45° clockwise.
- Projection: This feature lets you control the direction and depth with which Transform can act on a 3D surface. There are two controls under this feature, Bidirectional and Projection depth, as shown in the following screenshot:

Figure 15.25: Projection
- Bidirectional is a toggle. When on, it projects an image identical to the one you are transforming, on a surface that’s 180° opposite. Visualize it like two projectors projecting the same image on both sides of a wall.
- Projection depth is a slider that lets you control the depth to which your drawing will be transformed. It stretches a 2D image along a third axis. This tool is helpful when transforming across an uneven surface. When you change the slider position, a 3D wireframe box will appear around the image, as shown in the following screenshot:

Figure 15.26: A Projection box
This box will increase or decrease in depth depending on the slider value.
- Interpolation: This feature decides how Procreate manages pixels while transforming a drawing. To learn more about Interpolation, refer to Chapter 5, Selecting and Transforming.
- Reset: This option undoes all the transformations you have made so far and resets the selection to its original state.
To apply the changes and exit Transform, simply click on any button, such as Paint or Erase.
In the next subsection, we’ll learn about the Advanced mode of transformation in more detail.
Advanced transformation
Choosing Advanced transformation gives you more options to modify a drawing in a 3D context. In this mode, the drawing is surrounded by a new type of controls, as shown in the following screenshot:

Figure 15.27: Advanced transform
Let’s look at these one by one:
- Uniform scale and rotate: The ring surrounding the selection can be used to uniformly scale and rotate it. Tap anywhere on the ring and drag inward toward the center to scale down the drawing, and outward to scale it up. Similarly, touching and rotating the ring will let you rotate the selection.
- Move and detach: The disc in the middle lets you drag the selection to move it around on the 3D surface. It also allows you to detach the drawing from the 3D canvas and transform it in space.
To detach the drawing, tap on the disc to bring up the Detach option, as shown in the following screenshot:

Figure 15.28: Detach
The disc will change to a dual cone, as shown in the following screenshot:

Figure 15.29 : Dual cone
This means that the selection is now detached from the surface. You may now drag the drawing into 3D space, without it being tethered to the model surface.
Tap on the dual cone again to bring up the Attach option, as shown in the following screenshot:

Figure 15.30 : Attach
This will reattach your drawing to the mesh surface.
- 3D rotate: Hovering over the disc is a blue sphere. It is used to rotate the selection’s angle of projection. Tap and drag this sphere to observe how it affects the drawing. This feature is especially useful when the model has sharp edges on its surface.
- Non-uniform scaling: Inside the ring, there are two blue cubes. These are used for non-uniformly scaling the selection (stretching and squashing). The cube at the top stretches it in a vertical direction, while the one on the right stretches it in a horizontal direction.
The scale of the transformation increases the farther you move a cube from the center. As you move it closer to the center, the scale decreases, until the cube crosses the center of the selection. Then, the scale of transformation increases again, as the cube moves away from the center in the opposite direction.
In this section, we covered everything you need to know to use the 3D Transform tool. The next section will introduce Lighting Studio, which is a simple way to change the environment and lighting conditions for your 3D model.
Modifying the environment using Lighting Studio
Lighting Studio lets you effortlessly adjust the environment and lighting conditions for your model. Lighting can affect the mood and feel of a 3D artwork. To access Lighting Studio, go to Actions | 3D | Edit lighting & environment, as shown in the following screenshot:

Figure 15.31 : Edit lighting & environment
This will take you to the Lighting Studio interface, as shown in the following screenshot:

Figure 15.32 : Lighting Studio
Let’s look at the interface of Lighting Studio.
Overview
The Lighting Studio interface has the following elements:
- Cancel: Along the buttons in the top-right corner of the screen, the first is Cancel. Tap this to exit Lighting Studio without saving any changes.
- Add Light: This adds a light source to the environment. You can add a maximum of four lights.
- Environment: Adjust and fine-tune the environment and ambient lighting conditions of your 3D model using this option.
- Done: Tap this to save the changes you made and exit Lighting Studio.
- Reference: A floating Reference companion offers a real-time view of how the edits to lighting and environment affect the look of your 3D model.
In the following subsections, we will cover these features in more detail.
Lighting
Light sources in Lighting Studio are represented by cubes. You can add, remove, and edit the properties of these light sources, as well as reposition them to affect your model differently. Lighting Studio allows you to add up to four separate light sources. Tap on a light source to bring up Light Settings, as shown in the following screenshot:

Figure 15.33 : Light Settings
This window has the following settings:
- Hue: The Hue slider sets the color of light provided by the source.
- Saturation: This slider affects how vibrant the chosen hue of light appears. At 0%, the light is white, while at 100%, it produces vibrant colored light.
- Intensity: This slider controls the brightness of the source. At 0%, the light is dim, while at 100%, it has the highest brightness.
- Delete: This removes the light source.
- Duplicate: This option creates an exact copy of the light source.
Light sources can also be moved around in space. Tap and hold a light source, and then drag to reposition it. You will see a live preview of the 3D model in the Reference companion to make sure the lighting is exactly how you want it.
The next subsection will introduce the Environment option.
Environment
Aside from direct light sources, Environment also provides an ambient lighting condition, which adds a sense of space to your model. Tap on Environment to bring up the menu shown in the following screenshot:

Figure 15.34 : Environment
Let’s take look at the Environment options:
- Show Environment: The first option is a toggle. When turned on, the 3D space around the model shows a blurred representation of an environment. When toggled off, the environment is neutral.
- Exposure: This slider mimics the shutter speed and aperture of a camera, which can expand and constrict to let in more or less light. Reducing exposure creates a dark environment and vice versa.
- Environments: Procreate offers 11 in-built real-world environments that you can choose from. Although these environments won’t be visible in the space around your 3D model, you can see them in the reflections on its surface. A very reflective 3D object can give you a clear view of the current environment. Every environment has a different feel to it and offers unique ambient conditions.
You have now learned how to use Lighting Studio to adjust direct as well as ambient lighting for your 3D model. In the next section, we will discuss how you can export files from a 3D canvas.
Exporting from a 3D canvas
There are several ways to export a 3D model in Procreate. To export, go to Actions | Share, as shown in the following screenshot:

Figure 15.35 : The Share menu
There are three ways by which you can share your model:
- Share Model: This option allow you to export the 3D model itself, which can then be opened using 3D software.
- Share Image: The options under this heading help you export your 3D model in image or video formats.
- Share Textures: The options under this heading help you export your 3D artwork as a flattened image.
In the following subsections, we’ll be going over all the formats you can export to from a 3D canvas.
Share Model
The first three options on the list are Procreate, USDZ, and OBJ. These are all formats that allow you to share the 3D model as a whole, which can be transferred to a different location or opened in different 3D modeling software. Let’s look at each of these in more detail:
- Procreate: Export your 3D model as a .Procreate file, which can be opened on the Procreate app.
- USDZ: This file type uses the .USDZ extension, which can be opened on 3D-modeling software on Apple devices.
- OBJ: This is perhaps the most common file type that can be opened by most 3D software.
Share Image
These options export your canvas as a JPEG, PNG, or TIFF image. Animated views of your 3D model also fall under this category, and we will discuss animations later on in this subsection. The following formats are available for image exports:
- JPEG: This is the most common format, which compresses the image slightly, resulting in a much smaller file size while still preserving image quality. JPEG is a versatile file type that is supported almost everywhere.
- PNG: This format is lossless, which means it preserves the full quality of the resulting image, coupled with a higher file size. A prime advantage of using this format is that it supports transparent pixels. If you wish to export a 3D model in a transparent background, simply open Lighting Studio and toggle off Show Environment.
- TIFF: This image format also preserves the full quality of the image, with a significantly larger file size. TIFF is a great choice for printing.
Under the Share Image umbrella, you will also find several options to export the 3D model as an animation, complete with the lighting and environment. The following formats are available for animated results:
- Animated GIF: GIF is one of the most widely used formats for web animations. When trying to export an animated GIF, you will see the following interface:

Figure 15.36 : Animated GIF
You will find the following options under Animated GIF:
- At the top, you can choose between Max Resolution for high-quality output and Web Ready for a compressed, smaller file. Compression may cause color banding in your GIF. To reduce this, toggle on Dithering.
- Per frame colour palette applies a fresh limited color palette to each frame of animation, instead of the whole video, thus increasing file size.
- While exporting an animation, you have the choice to export using either Animated rotate, which will make your model rotate in one direction, or Animated swing, which will make it ‘ping-pong’ from side to side.
- Animation duration is a slider that determines the duration of one full cycle of an animation.
- Zoom distance affects the distance that the model will zoom out to at the farthest point in the animation. At 0%, the model stays close to the camera throughout. At 100%, the model moves far away from the camera. Adjust the Zoom distance slider to decide which distance suits your needs.
- Ease applies a feeling of momentum and naturalness to the motion, by making the animation slow down and speed up at certain points. At 0%, there is uniform, mechanical motion. At 100%, the motion appears smoother and more realistic.
- In case you want to export an animation with a transparent background, toggle off Show environment. Doing so will reveal another toggle called Transparent background. Once it’s toggled on, a slider labeled Alpha threshold will appear, as shown in the following screenshot:

Figure 15.37 : Alpha threshold
This slider helps you reduce any unwanted noise that may appear on the edges of your model. Turn the slider up to 100% to reduce excess noise.
- Animated PNG: PNG is a desirable format when you want to export animations with transparent elements. When trying to export an animated PNG, you will see the following interface:

Figure 15.38 : Animated PNG
Since PNG preserves full image quality, you won’t find options such as Dithering or Per frame colour palette. However, all other settings here are identical to Animated GIF.
- Animated MP4: MP4 offers reasonable video quality at a much smaller file size. It is an extremely versatile format that is supported almost everywhere. When trying to export an animated MP4, you will see the following interface:

Figure 15.39 : Animated MP4
At the top, you will see four options: 720p, 1080p, 4K, and Square. These are the different resolutions you can choose to export with. The rest of the settings are the same as we have previously learned. MP4 lacks the Alpha threshold slider, since MP4s can’t have transparent backgrounds.
- Animated HEVC: HEVC is similar to MP4, but it can also have a transparent background. The file size also tends to be smaller than animated GIFs or PNGs. When trying to export an animated HEVC, you will see the following interface:

Figure 15.40 : Animated HEVC
This interface is almost identical to that of MP4, with the added Alpha threshold feature.
This covers all the animated export formats available in a 3D canvas. In the next subsection, we will cover how to export flattened textures.
Share textures
This kind of export flattens each individual texture into an image and exports them all together. To share textures, go to Actions | Share | Share Textures | PNG.
Every texture set is exported as five separate PNG images, each corresponding to the following properties:
- Ambient Occlusion
- Color
- Metallic
- Normal
- Roughness
Even though properties such as Ambient Occlusion and Normal can’t be edited on Procreate itself, these images can be imported into other 3D software for further editing.
We have now covered all the features of 3D painting in Procreate, so let’s summarize.
Summary
This chapter covered the details of 3D painting on Procreate. We learned how to import 3D models into the app from external sources as well as Procreate’s own Model pack. The chapter introduced the concepts behind 3D painting and how UV maps facilitate it. Then, we discussed the interface of a 3D canvas in depth, talking about how it is different from its 2D counterpart, as well as introducing the common gestures used.
Next, we took a closer look at layers in a 3D context, specifically how each texture set works as a separate layer and how a layer has its own material properties. We also talked about the versatile Transform tool, which helps us adjust the way a drawing is moved, scaled, and projected on a 3D surface.
The chapter then explored Lighting Studio, which lets you adjust the lighting and environment that affect the overall look and feel of your 3D model. Finally, you learned about the various ways a 3D model can be exported – as a model, image, video, or textures.
3D painting is a relatively new addition to Procreate, opening users up to an entirely new way to explore their creativity. The app’s versatile 3D tools, as well as easy integration with existing 3D software and conventions, make 3D painting a fascinating experience.
In the next and final chapter, we will look at a simple drawing tutorial that will help you apply your knowledge to your art.