
2
Getting Started – Setting Up a Canvas
While making a new canvas, Procreate offers you a default set of canvas presets to choose from. Your canvas specifics will largely depend on the artwork you want to make. For instance, a thumbnail you want to post to Instagram and a poster you want to print out for your bedroom wall need separate settings to work in the way they are intended. The size they will be viewed in, where, and in what format they will be displayed are among the factors you need to consider while choosing your canvas settings.
If you find that the default options don’t cover your precise needs, you can easily create a fresh canvas manually. This allows you to have a lot more control over parameters such as size and resolution. Since Procreate automatically records a time-lapse video, the canvas settings also include time-lapse settings.
Open Procreate and tap on the + icon in the upper-right corner of the screen. This will open up the New canvas menu, which we will focus on for this chapter.
In this chapter, we’re going to cover the following main topics:
- Working from presets
- Creating a custom canvas
- Dimensions, resolutions, and layer limits
- Choosing a color profile
- Time-lapse and canvas properties
Working from presets
The first thing you will notice once you open the New canvas menu is a list of canvas presets. They are included in Procreate by default and can be quite convenient when used properly. In this section, we will look at each preset, what they’re most suited for, and how to edit/delete them. Note that the exact presets you have available might differ based on your device.
Preset – Screen_Size
The very first option available is Screen_Size. Depending on the model of your iPad, it will create a canvas that has the same size and resolution as your screen. This preset is not editable.
The specifics of this preset are as follows (3rd generation 12.9-inch iPad Pro):
- Dimensions: The same as the screen (2732 x 2048 px)
- Dots per Inch (DPI): 132
- Color profile: Display P3
- Layers available: 91
- Video settings: 1080p (H.264):

Figure 2.1: The Screen_Size preset
This preset is great if you’re designing an image that will only be viewed on screens. For example, images such as website headers and social media layouts are good places to use the Screen_Size canvas.
Important Note
You can edit a preset by swiping left on it and tapping on Edit. This is also a handy way to check the properties of a canvas before using it since there are some things you can’t edit once a canvas has been created (such as the color profile and time-lapse settings).
Please note that Screen_Size is the only preset that cannot be edited.
Once you edit a preset, it will have the settings you assign it every time it’s used, until you edit it again.
Preset – Square
Square is the first item on the list. As per its name, it creates a square canvas with the following specifics:
- Dimensions: 2048 x 2048 px
- DPI: 132
- Color profile: sRGB IEC6 1966-2.1
- Layers available: 124
- Video settings: 1080p (H.264):

Figure 2.2: The Square preset
Square is a great preset to use when you want to make images for Instagram slides, social media marketing, or generally anywhere on the internet.
Preset – 4K
Next on the list is 4K, which is a canvas for a high-resolution film:
- Dimensions: 4096 x 1714 px
- DPI: 132
- Color profile: sRGB IEC6 1966-2.1
- Layers available: 72
- Video settings: 1080p (H.264):

Figure 2.3: The 4K preset
This is an especially useful preset for making an animation film, specifically when you are planning to zoom into a single frame. The large dimensions of the 4K preset allow you to work both in a wide angle setting and close up (or even for extreme close-ups), without the loss of quality.
Preset – A4
A4 is a universally useful format. On Procreate, it comes with the following settings:
- Dimensions: 210 x 297 mm
- DPI: 300
- Color profile: sRGB IEC6 1966-2.1
- Layers available: 57
- Video settings: 1080p (H.264):

Figure 2.4: The A4 preset
This preset is useful for making print-ready documents, brochures, flyers, and more. Combined with Procreate’s text editing tools, it also offers you a convenient way to design and format your own documents within the app. The DPI value of 300 means your file will be ready for print right off the bat.
Preset – 4 x 6 Photo
4 x 6 Photo is another preset that is optimized for printing, with the following settings:
- Dimensions: 6” x 4”
- DPI: 300
- Color profile: sRGB IEC6 1966-2.1
- Layers available: 244
- Video settings: 1080p (H.264):

Figure 2.5: The 4 x 6 Photo preset
This preset’s 3:2 aspect ratio is made to mimic traditional film photographs. It’s great for making small-sized prints.
Preset – Paper
Paper is commonly called US Letter. On Procreate, it comes with the following settings:
- Dimensions: 11” x 8.5”
- DPI: 300
- Color profile: sRGB IEC6 1966-2.1
- Layers available: 59
- Video settings: 1080p (H.264):

Figure 2.6: The Paper preset
This preset is optimized for printing in standard North and South American paper sizes.
Preset – Comic
As the name suggests, the Comic preset is designed for making graphic novels. The preset settings are as follows:
- Dimensions: 6” x 9.5”
- DPI: 400
- Color profile: Generic CMYK profile
- Layers available: 54
- Video settings: 1080p (H.264):
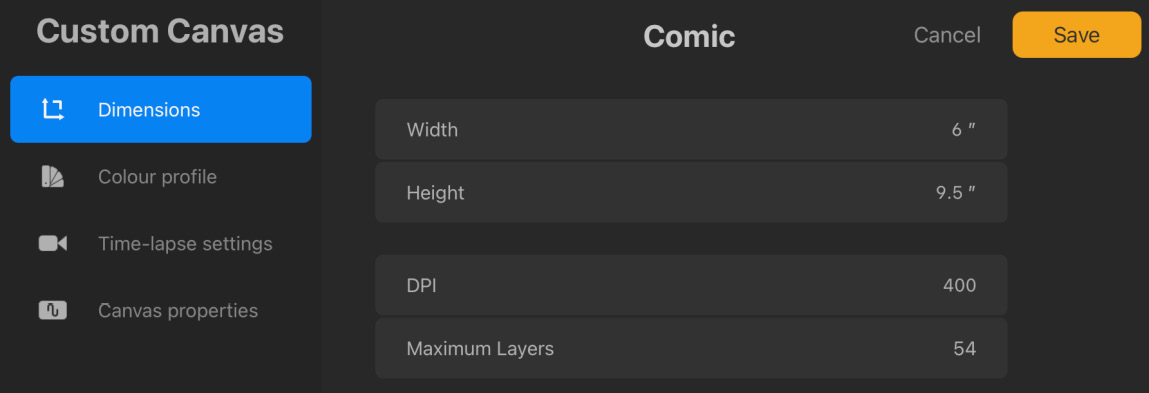
Figure 2.7: The Comic preset
You will notice that this is the only preset that uses a CMYK (Cyan, Magenta, Yellow, and Key) profile. Color profiles and their uses will be described in more detail later. For now, it’s enough to know that CMYK means the canvas is optimized for color accuracy during printing.
Creating a custom canvas
Now that you are familiar with the available presets, you are ready to learn how to create a canvas from scratch:
- Tap the + button in the upper-right corner of the gallery.
- Once the New canvas menu opens up, tap the box with a + icon to enter the Custom Canvas screen. It looks like this:

Figure 2.8: The Custom Canvas screen
- Tap on the canvas name to edit it.
This will serve as the preset title (as explained next), not the name of the individual file! By default, the canvas created will still be named Untitled Artwork. What you are naming here is your own fresh preset, in case you want to open a similar file again later:

Figure 2.9: Every new canvas is saved as a preset
Important Note
Every time you create a new canvas, it automatically gets saved in the list of presets with the name Untitled Canvas. Even if you create the same canvas twice, it will be saved as two identical presets.
So, it is a good practice to notice and rename custom canvases that you frequently use, and open them directly from the presets. Otherwise, your list can become repetitive and confusing in no time.
With that, you’re all set to create your own custom canvas.
As an artist, I have my own favorite canvases that I have customized for my work. Here is one I use most frequently:
Custom preset – Usual Landscape
Usual Landscape is a generally versatile preset that I use to make most of my landscape orientation artworks. The preset settings are listed as follows:
- Dimensions: 7.5” x 6”
- DPI: 300
- Color profile: Display P3
- Layers available: 128
- Video settings: 1080p (H.264):

Figure 2.10: The Usual Landscape preset
Dimensions, resolutions, and layer limits
To set up a custom canvas, the first items of information you need to enter are the dimensions and resolution (DPI). Procreate sets a limit of maximum layers depending on those values. Let’s look at each of those terms and what they mean.
Dimensions
Dimensions refers to the physical size of your canvas. It can be entered in inches (“), centimeters (cm), millimeters (mm), or pixels (px). On Procreate, it’s written in the width x height format.
As you can see in the following screenshot, the first value you enter will be for the width (horizontal) of the canvas, and the second one will be for the height (vertical):

Figure 2.11: Canvas Dimensions
Resolution
The term “resolution” refers to how densely the pixels are arranged on a canvas. It is measured in DPI, as shown in the following screenshot:

Figure 2.12: The canvas resolution in DPI
This tells us how many digital pixels or ink dots (for printing) fit into one physical inch of the canvas. Naturally, the value of the pixel dimensions of the canvas will depend on the DPI you choose.
As a rule of thumb, it’s safe to use 300 DPI or higher when working for print. Usually, screens work on 72 or 96 PPI (Pixels per Inch, as used in the digital context), so higher resolution images get compressed to match that value.
Layer limits in Procreate
For every canvas that you create, Procreate sets a limit on the maximum number of layers you can use. The limit depends on a set of factors, including the dimensions and resolution of your canvas along with the RAM of your device. Adjust the canvas properties to see how it changes the layer limit:

Figure 2.13: The layer limit
For a smooth illustrating experience, adjust your canvas to have at least 100 layers available to you.
Next, we will look at color profiles and how to use them.
Choosing a color profile
The color profile of a canvas dictates how it manages color. Select the Color profile tab in the Custom Canvas screen, as shown in the following screenshot:

Figure 2.14: Canvas Color profile
Procreate allows you to work with RGB or CMYK. They are the most widely used profiles and have their separate uses. Let’s look at them in more detail.
RGB
RGB stands for Red, Green, and Blue; the three colors of light that most screens display. These colors are emitted in varying combinations to make different colors in a way that the maximum values of all three together produce white light:
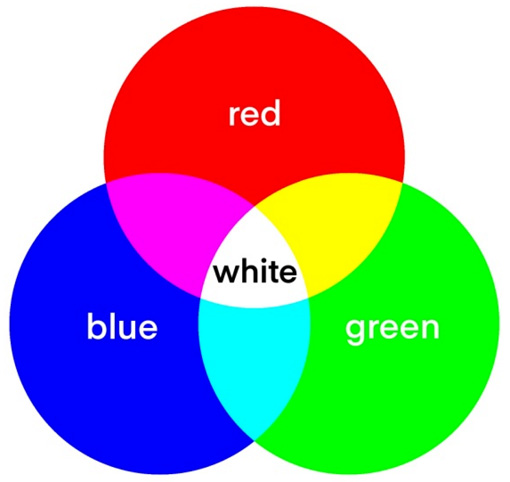
Figure 2.15: RGB combines light
RBG color profiles allow you to use a large range of colors, including brighter, highly saturated versions. They are best used when you are designing for screens, such as publishing on the internet or for a film.
CMYK
CMYK stands for Cyan, Magenta, Yellow, and Key (Black). These are the four colors of ink that most printers combine to print different colors. In theory, cyan, magenta, and yellow combined in the same quantities produce black ink, as shown in the following diagram. In reality, black ink is used separately while printing and is referred to as key:

Figure 2.16: CMYK combines ink
The range of colors you can use here is narrower, limited to what can realistically be printed. That’s why it is always a good idea to use CMYK profiles when your work is intended for print. Trying to print an image with an RGB profile can result in unpredictable color inaccuracies.
Here is a comparison of the colors available for each context:

Figure 2.17 (a): The color range in RGB; (b): The color range in CMYK
You will notice that highly saturated colors toward the right edge are eliminated from the CMYK color square since they are impossible to print.
Important Note
Once you have created a canvas, you cannot switch between the RGB and CMYK profiles. However, you can choose from different versions of the same profile available.
To view the same image under another color profile, create a separate canvas that has the color profile you want, and import the image into it.
It’s a good practice to open your RGB artworks in a CMYK canvas to get a quick idea of how they will look when printed. This is so that you can tweak the colors for accuracy if necessary. For example, take a look at the following:
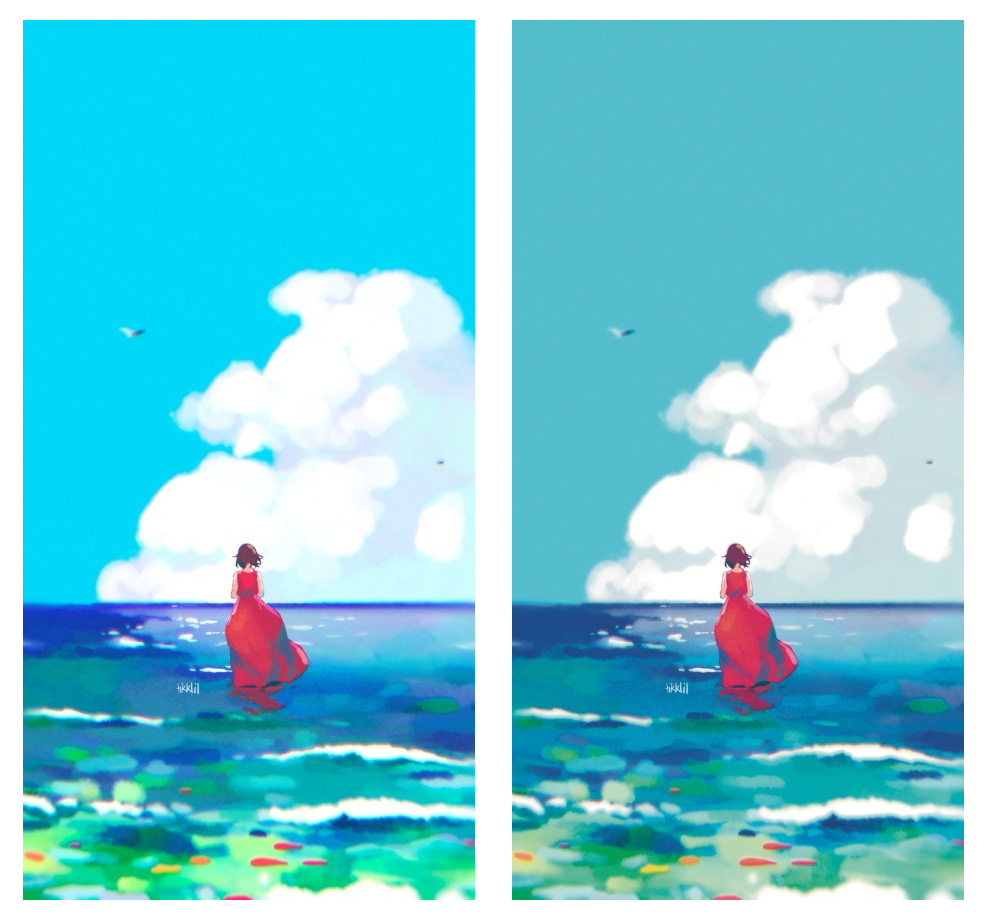
Figure 2.18 (a): The image viewed in RGB; (b): Identical image viewed in CMYK
After making some edits, the following is closer to the intended colors:

Figure 2.19: The CMYK image adjusted for color accuracy
Importing your own color profile
There are subtle differences between the options available under both RGB and CMYK. Not all RGB profiles are identical, and neither are all CMYK profiles.
If you are looking for a specific profile that isn’t available on Procreate by default, you can import your own using the Import button in the upper-right corner of the Color profile tab:

Figure 2.20: Importing a color profile
The slight differences between all the different versions of color profiles are best explored at your own pace. Now, we will move on to our last two settings, that is, Time-lapse settings and Canvas properties.
Time-lapse and canvas properties
The final settings we will look at when creating our custom canvas are related to the time-lapse video and the canvas background.
Time-lapse video
One of the most interesting features of Procreate is that a full-length time-lapse video is recorded for every canvas by default. The Time-lapse settings tab allows you to specify the quality in which you want your time-lapse video to be recorded. These are the resolution choices you have:

Figure 2.21: The time-lapse properties
HEVC is a relatively newer format suitable for transparent videos. If it’s toggled on, your file size will increase.
Important Note
Once a canvas has been created, you can’t change the time-lapse quality. However, you can still edit the preset, which will apply to any later canvases you create with it.
Changing the color profile midway while working on a canvas can also affect time-lapse quality.
Canvas properties
The Canvas properties tab lets you decide the kind of background you want your canvas to have. This is how the editor looks:

Figure 2.22: Canvas properties
The Background color option lets you specify the color of the background layer. Additionally, you can toggle Background hidden on if you’d like to create a canvas with a transparent background. You don’t have to worry too much about these two settings because they are not permanent and can easily be changed at any point.
Once you are happy with your preferences, tap on Create to instantly make and load a new canvas (as well as a preset). Inversely, tap on Cancel if you want to discard your changes and return to the New canvas menu.
Summary
By the time you reach this point, you should have the skills necessary to create a new canvas from presets or from scratch. You will have understood the uses and advantages of each preset. You should also be familiar with the terms Dimensions, Resolution, Layer Limit, Color Profile, and Time-lapse.
Moving forward, we’ll cover the last bit of information that will bring you up to speed with the interface of Procreate. In the following chapter, you will learn how to navigate the tools available when a canvas is opened on the app.