
Chapter 10: Workbooks
In this chapter, you will learn how to create and manage workbooks in Microsoft Defender for Cloud. You can create workbooks in several ways and, once created, you can change and modify them as you need, as well as share and redeploy them as needed in other tenants.
Workbooks provide a way to analyze data, gain insight into Azure data and trends, discover baselines, create powerful visual reports, and much more.
We will not explain how to create a workbook in detail—such as adding parameters, links, queries, and other workbook elements—as this is out of the scope of this book. We will show you how to get started with creating workbooks, and then you can take it from there and modify workbooks further to suit your needs.
We will cover the following recipes in this chapter:
- Creating a workbook from an existing template
- Creating a workbook from an empty workbook
- Managing workbooks and workbook templates
Technical requirements
To successfully complete the recipes in this chapter, the following is required:
- An Azure subscription
- A web browser, preferably Microsoft Edge
- Microsoft Defender for Cloud plans
- Resources in an Azure subscription, such as virtual machines (VMs), storage, a Structured Query Language (SQL) server, and Logic Apps. Microsoft Defender for Cloud will create resource recommendations based on available resources.
The code samples can be found at https://github.com/PacktPublishing/Microsoft-Defender-for-Cloud-Cookbook.
Creating a workbook from an existing template
You can create Microsoft Defender for Cloud workbooks in several ways, and using a pre-created or existing workbook template is one way to create an additional workbook.
In this recipe, you will learn how to create a workbook from an existing template.
Getting ready
Open a web browser and navigate to https://portal.azure.com.
How to do it…
To create a workbook from an existing template, complete the following steps:
- In the Azure portal, open Microsoft Defender for Cloud.
- On the left menu, click Workbooks.
- Click on a template you want to edit. You will create a new workbook based on the selected template. In the following example, we will select the Compliance Over Time workbook:

Figure 10.1 – Workbooks gallery
- From the drop-down menus, select values for Workspace and Subscription, and for Standard name, select one or more regulatory compliance standards. In this example, select the Azure Security Benchmark standard:

Figure 10.2 – Compliance Over Time (Preview) workbook blade
- The top menu on the Workbooks page contains a command for managing workbooks. To make changes to a workbook and to save it under a different name, click Edit.
- When you selected Edit, you changed from reading mode to editing mode, and the menu button changes accordingly to Done Editing. You can distinguish between the two modes by looking at the right side of a blade and identifying the ↑ Edit button.
- Click on the ↑ Edit button next to a workbook title:

Figure 10.3 – Editing text item: main header
- Change the workbook title to Azure Security Benchmark Compliance Over Time.
- Click Done Editing.
- On the lower-right part of the Standard name page, click on the ↑ Edit button:

Figure 10.4 – Standard view item
- Inside ❹ Editing group item: Standard view, next to the Standard name dropdown, click on the ↑ Edit button:

Figure 10.5 – Workbook editor: Standard view
- Inside the ❶ Editing parameters item: parameters – 0 field, change the text in the Display name field from Standard name to Regulatory Compliance Standard Name:

Figure 10.6 – Workbook editor: editing parameters
- Click Done Editing in the ❶ Editing parameters item: parameters – 0 field.
- Click Done Editing in the ❹ Editing group item: Standard view field.
- On the top workbook menu, click on the Save as icon (two floppy disks, next to a cog icon):

Figure 10.7 – Workbook save dialog box
- In the Title field, type a new workbook name. Choose a subscription, resource group, and location to save the workbook. Click Save.
- Return to the Workbooks blade. Select the All tab to display all workbooks:

Figure 10.8 – Microsoft Defender for Cloud: Workbooks
- Under Recently modified workbooks, identify the recently modified Azure Security Benchmark Compliance Over Time workbook and select Azure Security Benchmark Compliance Over Time workbook.
- Observe a workbook you have created from an existing workbook template.
How it works…
Microsoft Defender for Cloud at this time includes out-of-the-box workbooks, such as Secure Score Over Time, Compliance Over Time, Vulnerability Assessment Findings, Active Alerts, and System Updates. On certain occasions, editing and modifying an existing template can save time. Many workbook templates can be found at https://github.com/Azure/Microsoft-Defender-for-Cloud/tree/main/Workbooks.
Creating a workbook from an empty workbook
Microsoft Azure supports creating workbooks from scratch or from a blank workbook. This gives you the possibility to take advantage of the powerful workbook editor and its capability to define the look and feel of a new workbook in detail.
In this recipe, you will learn how to create a workbook from an empty workbook.
Getting ready
Open a web browser and navigate to https://portal.azure.com.
How to do it…
To create a workbook from an empty workbook, complete the following steps:
- In the Azure portal, open Microsoft Defender for Cloud.
- On the left menu, click Workbooks:

Figure 10.9 – Workbooks blade
- On the top menu is the + New button, and the Quick start section contains an Empty button. Click on either button to start creating a workbook from scratch—that is, an empty workbook.
- An empty workbook editor opens. If you were to develop and create a workbook from scratch, you would have to add text, parameters, links, queries, and metrics, possibly in groups:

Figure 10.10 – Empty workbook editor
In this exercise, you will use a saved template and create your version of a workbook. On the toolbar, click the </> button to access Advanced Editor.
- Open a new browser tab and navigate to https://github.com/Azure/Microsoft-Defender-for-Cloud/blob/main/Workbooks/Regulatory%20Compliance/regulatorycompliance.workbook.
- Copy the workbook content to the clipboard.
- Select Gallery Template for the Template Type field. You would use Gallery Template to create a template for the workbook gallery, and ARM Template to create a template usable with Azure Resource Manager (ARM).
- Paste and replace the gallery template content with the workbook content copied in Step 6:
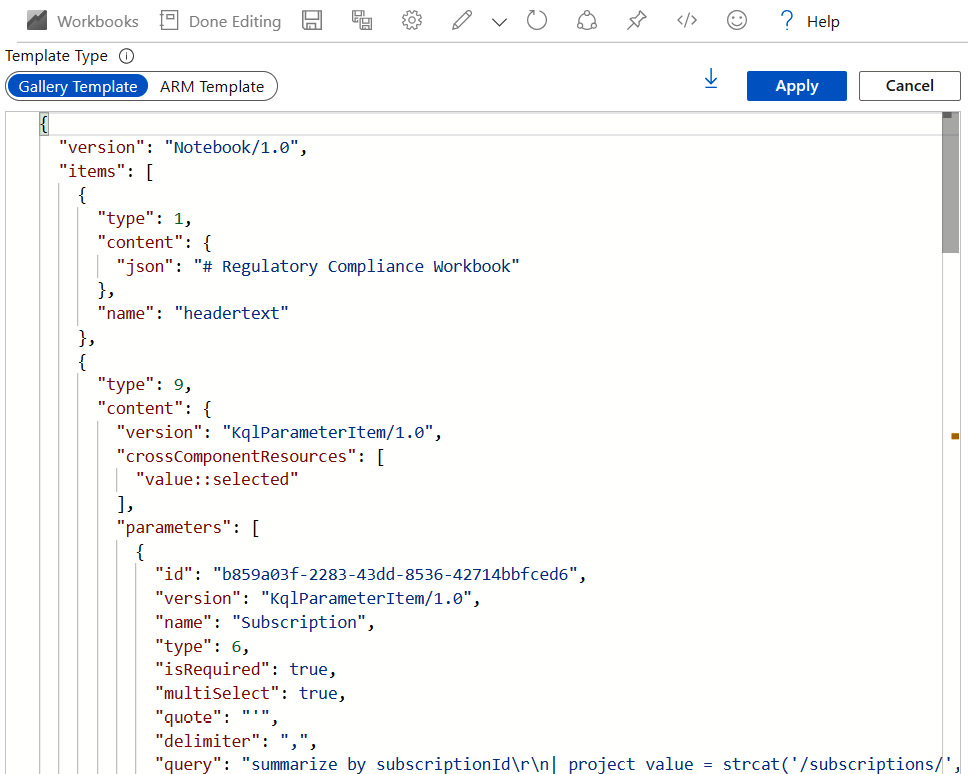
Figure 10.11 – Workbook gallery template code
- Click Apply. As you do so, Advanced Editor closes, and you will see the result of a workbook template in the editor:

Figure 10.12 – Editing workbook fields
- In the editor, click on the ↑ Edit button to edit and modify desired workbook fields. Click Done Editing when you are done with editing the workbook to exit the workbook editor.
- Click the Save button:
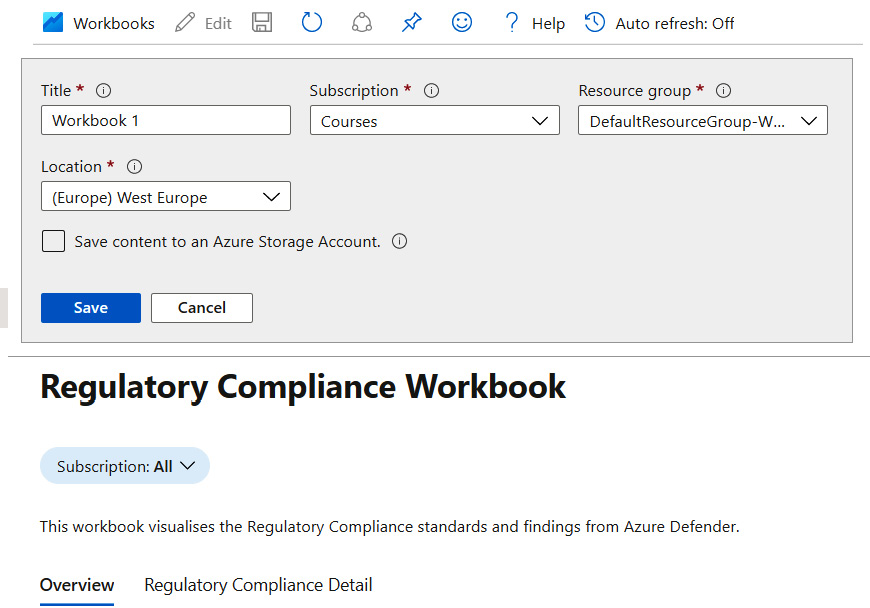
Figure 10.13 – Save workbook dialog
- Enter the workbook title, subscription, resource group, and location to save the workbook, and click Save.
How it works…
Regardless of the many workbook templates available at https://github.com/Azure/Microsoft-Defender-for-Cloud/tree/main/Workbooks, you might want to start with a blank workbook to be able to design it fully to your specifications, designs, and desires, without unnecessary editing and changing existing code.
There's more…
To write your own workbooks, you should be familiar with Kusto Query Language or KQL, the query language required not only to build custom workbooks but also for data analysis, viewing monitor data from multiple resources, creating textual and visual reports, hunting for threats, and much more.
Here are some references to online resources that might help you to learn about workbooks and KQL:
- Azure Monitor Workbooks
https://docs.microsoft.com/en-us/azure/azure-monitor/visualize/workbooks-overview
- Kusto Query Language (KQL) overview
https://docs.microsoft.com/en-us/azure/data-explorer/kusto/query/
- Write your first query with Kusto Query Language
https://docs.microsoft.com/en-us/learn/modules/write-first-query-kusto-query-language/
- SC-200: Create queries for Microsoft Sentinel using Kusto Query Language (KQL)
https://docs.microsoft.com/en-us/learn/paths/sc-200-utilize-kql-for-azure-sentinel/
- Must Learn KQL
- Kusto Query Language (KQL) from Scratch
https://www.pluralsight.com/courses/kusto-query-language-kql-from-scratch
Managing workbooks and workbook templates
Once you create a workbook, you can modify its parameters, rename, delete, and lock a workbook, and perform well-known Azure tasks. Additionally, you can deploy a workbook from a GitHub repository too.
In this recipe, you will learn how to manage workbooks and workbook templates and to deploy a workbook from a GitHub repository.
Getting ready
Open a web browser and navigate to https://portal.azure.com.
How to do it…
To manage workbooks and workbook templates in Microsoft Defender for Cloud and to deploy a workbook from a GitHub repository, complete the following steps:
- In the Azure portal, open Microsoft Defender for Cloud.
- On the left menu, click Workbooks:

Figure 10.14 – Microsoft Defender for Cloud workbooks gallery
- On the Workbooks gallery blade, under the Recently modified workbooks section, either click on an ellipsis on a workbook tile or right-click on a workbook tile to open a menu. The menu allows you to perform several actions on a workbook: View resource, Delete, Rename, or Pin to dashboard.
- Click View resource. A workbook blade opens:

Figure 10.15 – Workbook blade
- A workbook blade contains a standard set of menus and groups of menus characteristic for every other Azure resource: Activity log, Access control (IAM), Tags, and Locks, as well as a Workbook workbook-specific menu that contains workbook data. From the top menu, you can rename, delete, or share a workbook.
In the top-right corner, click on X to close the workbook blade.
- On the Workbook Gallery blade, on the top menu, click on the Community Git Repo menu and select Microsoft Defender for Cloud. A new browser tab will open.
Note: A new browser tab should open the https://github.com/Azure/Microsoft-Defender-for-Cloud/tree/main/Workbooks page. If not, open the page manually. This Uniform Resource Locator (URL) points to the Microsoft Defender for Cloud workbook gallery on GitHub.
- On the GitHub workbook gallery page, click on a workbook link that you want to deploy in Azure, in the Microsoft Defender for Cloud workbook gallery. In this example, we will install the Defender for Cloud Coverage workbook.
Click on the Defender for Cloud Coverage link:

Figure 10.16 – Workbook GitHub details
- Click on Deploy to Azure to deploy the workbook. Every workbook requires specific deployment parameters. Follow the onscreen instructions for the workbook instance to deploy the workbook. For example, specify Subscription, Resource group, and Region values, a workbook name, and other details. Click Review + Create, and then click Create to finish deploying the workbook:

Figure 10.17 – Workbook deployment parameters
- Return to the Microsoft Defender for Cloud workbooks gallery, and from the top menu, click Refresh to reload new content.
- Click on the Defender for Cloud Coverage workbook.
- Select one or more subscriptions to display the results.
How it works…
Business and technical requirements change over time and, accordingly, you need to edit, modify, change, and delete existing workbooks, as well as create new workbooks from newly created templates. Workbook editing in Microsoft Defender for Cloud provides convenient commands for all these actions.